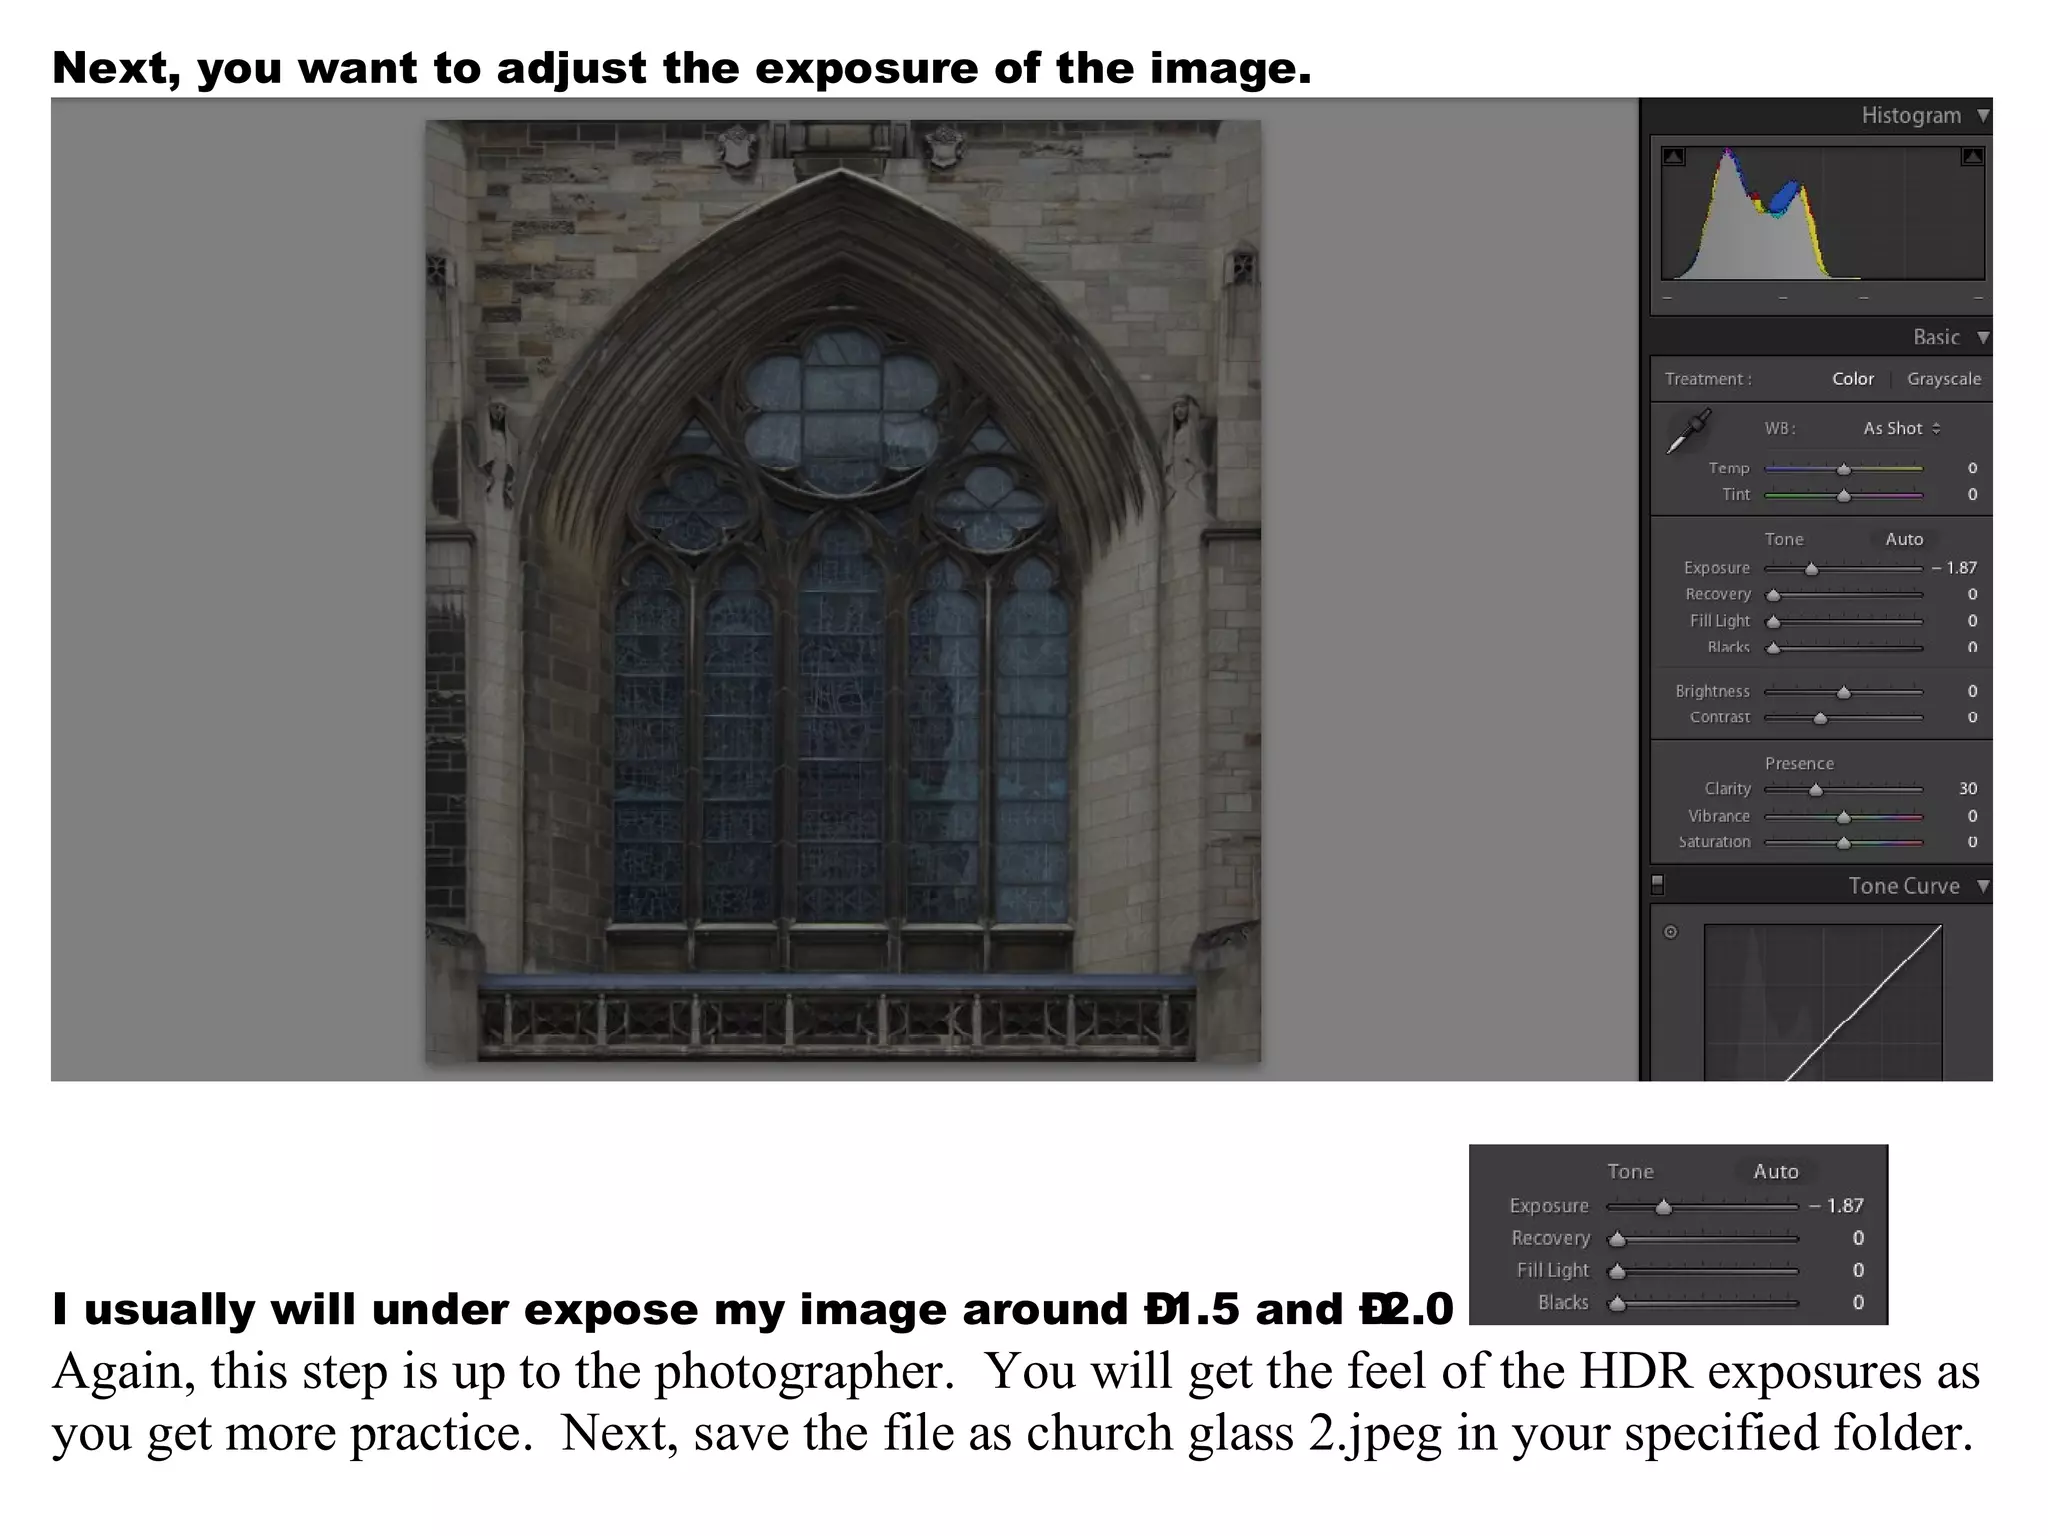
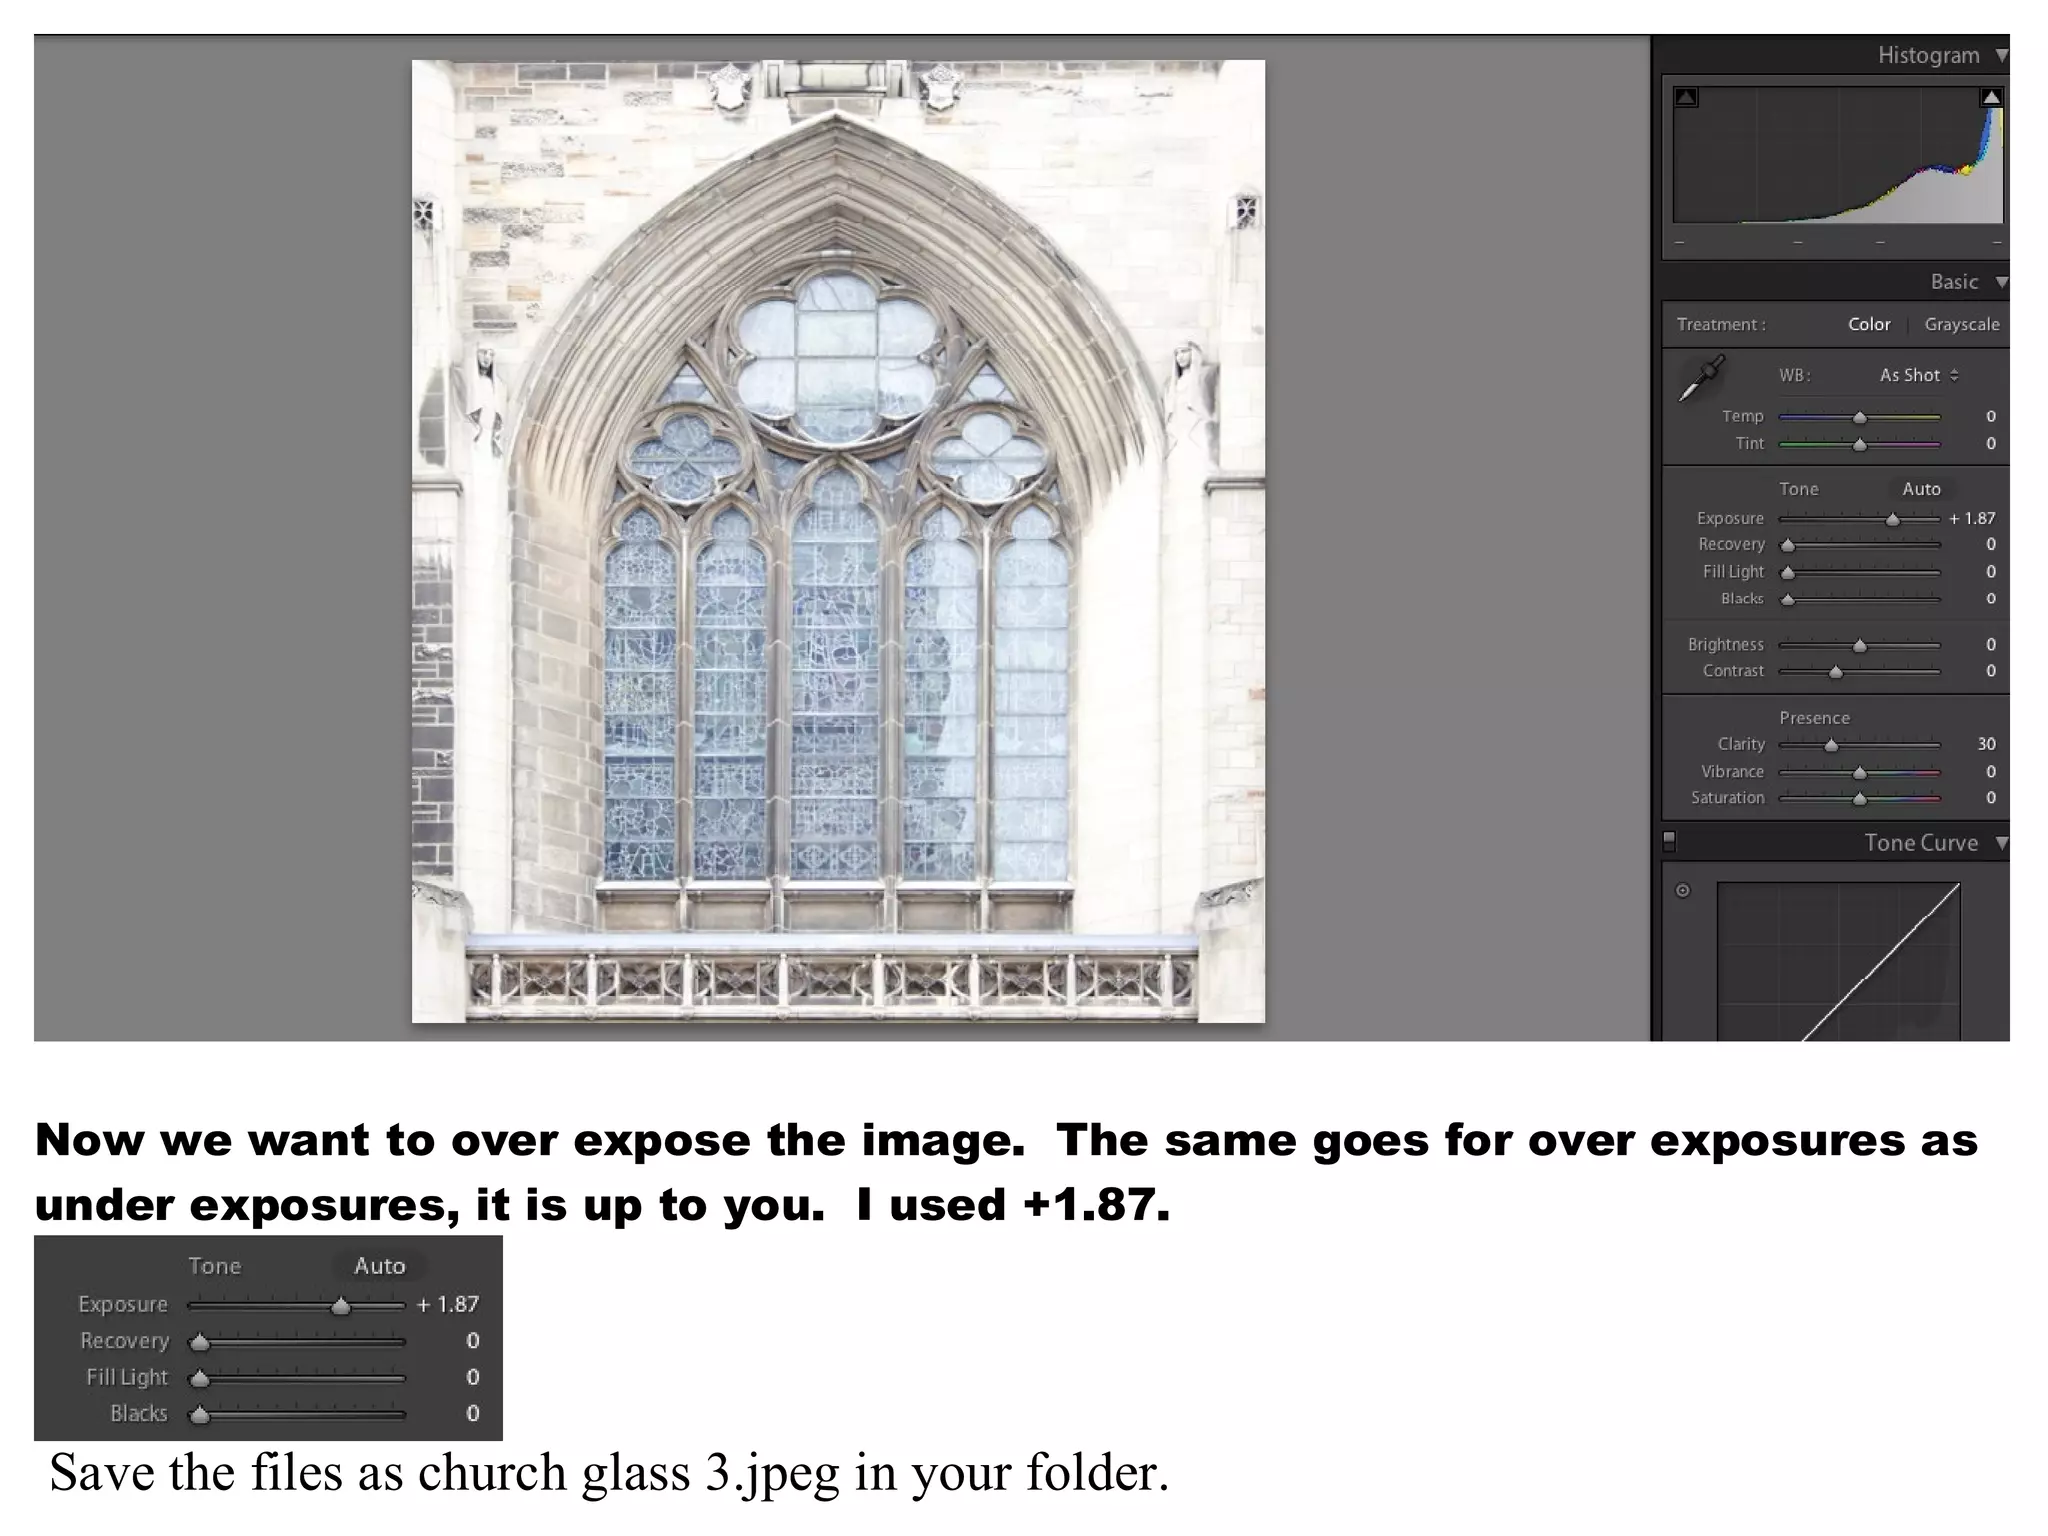
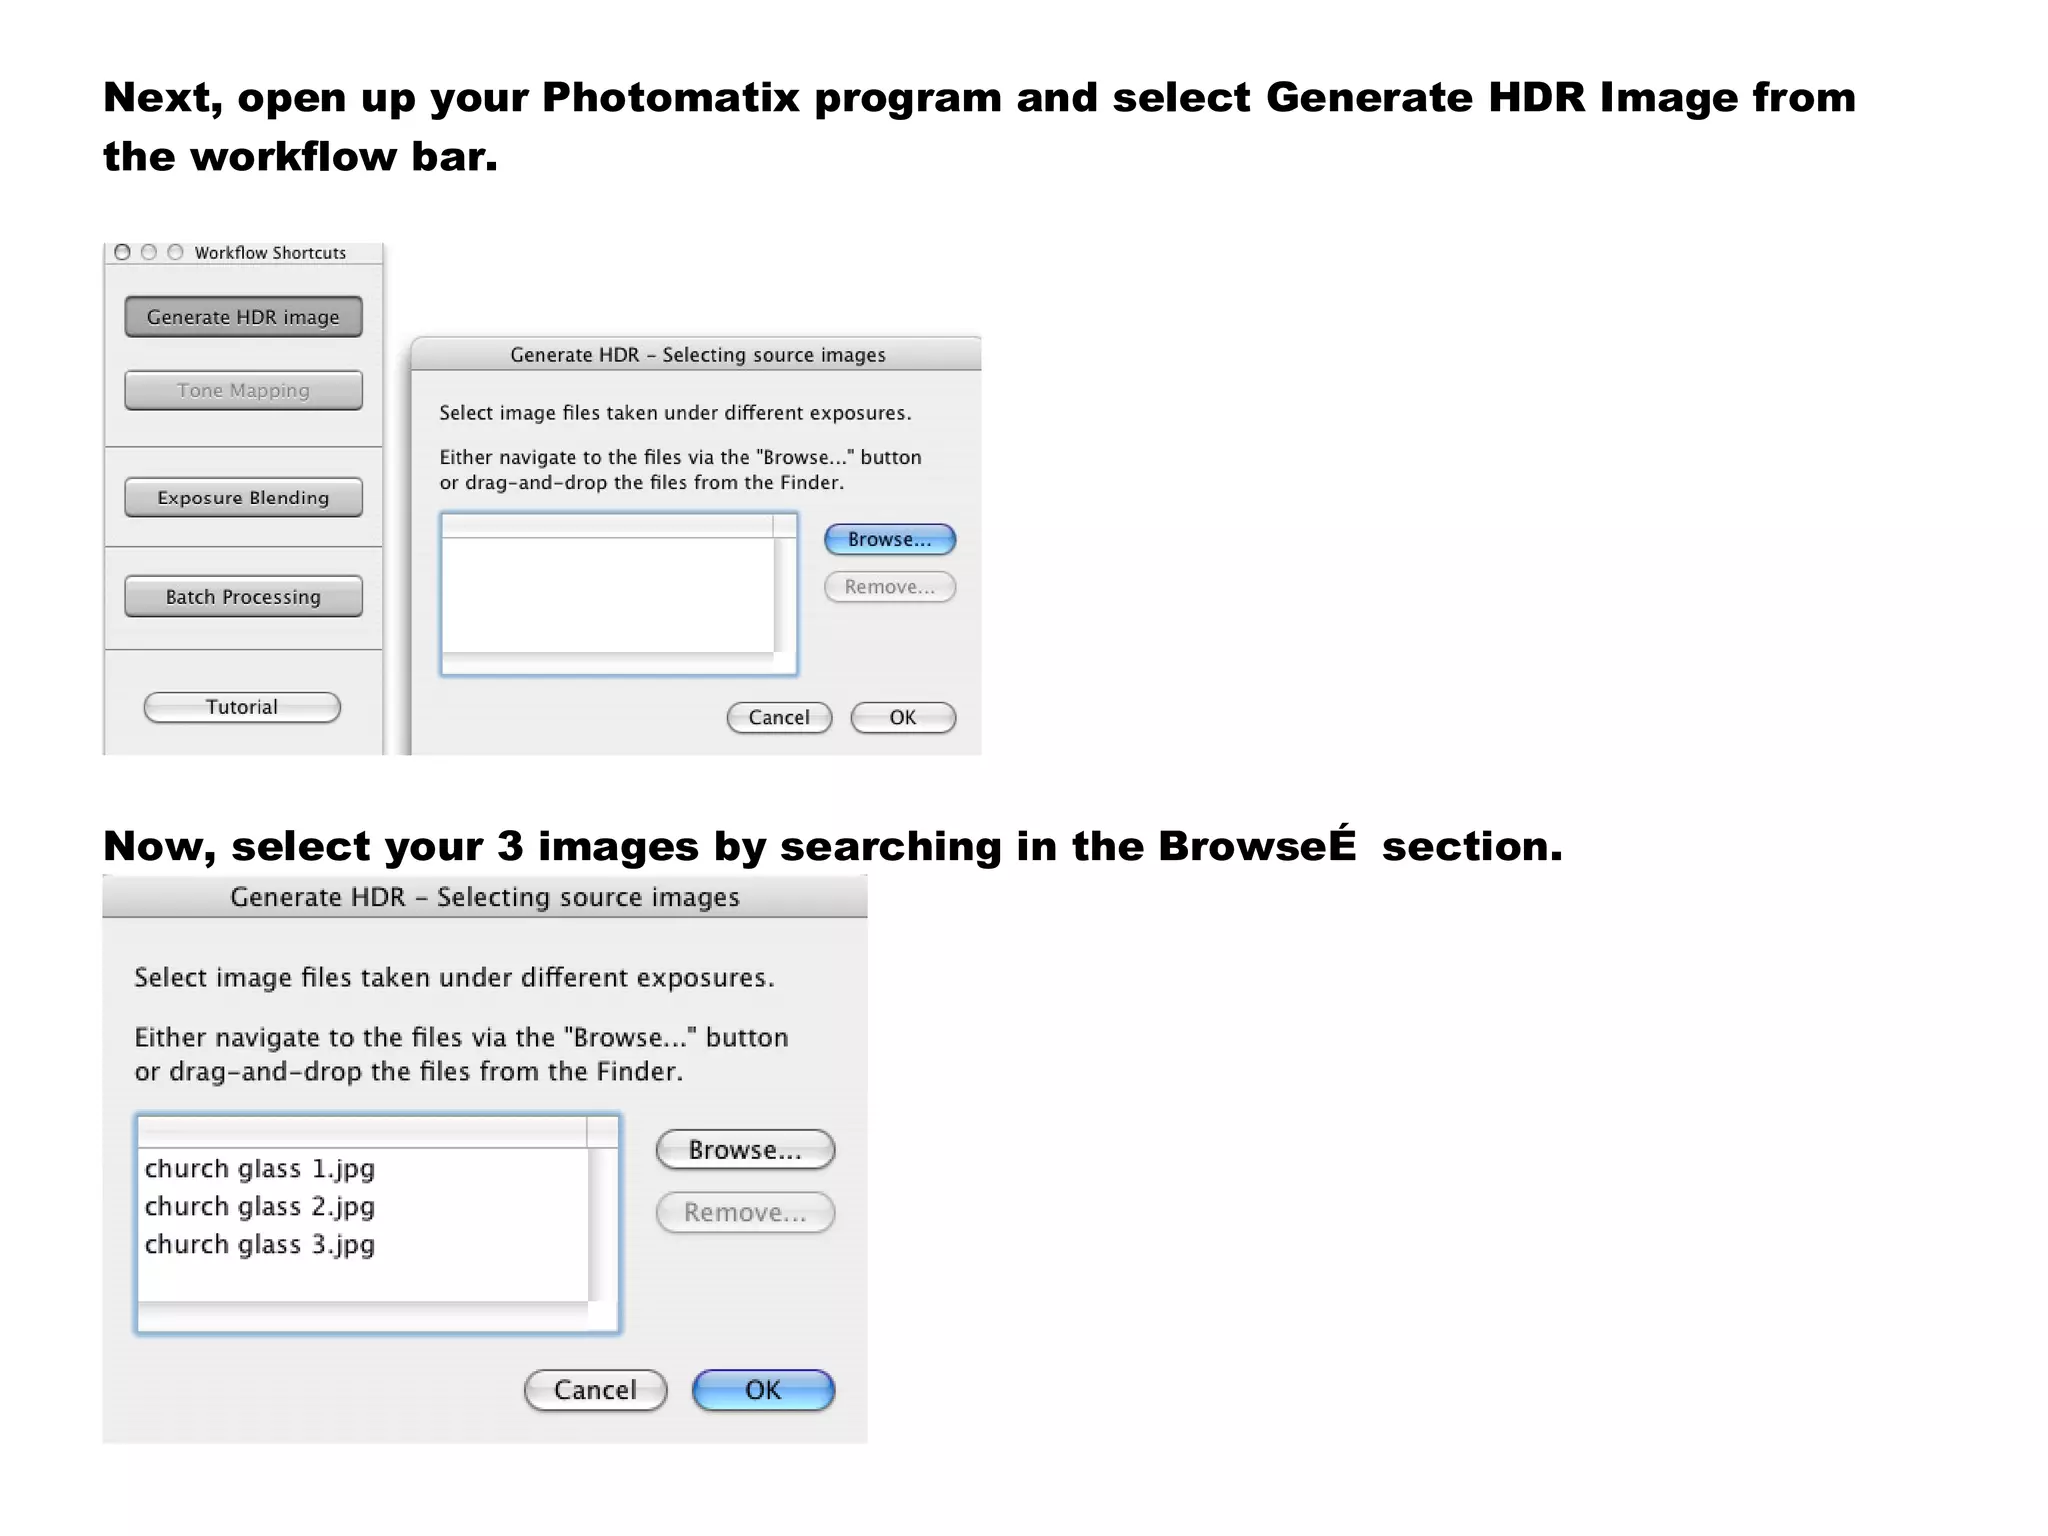
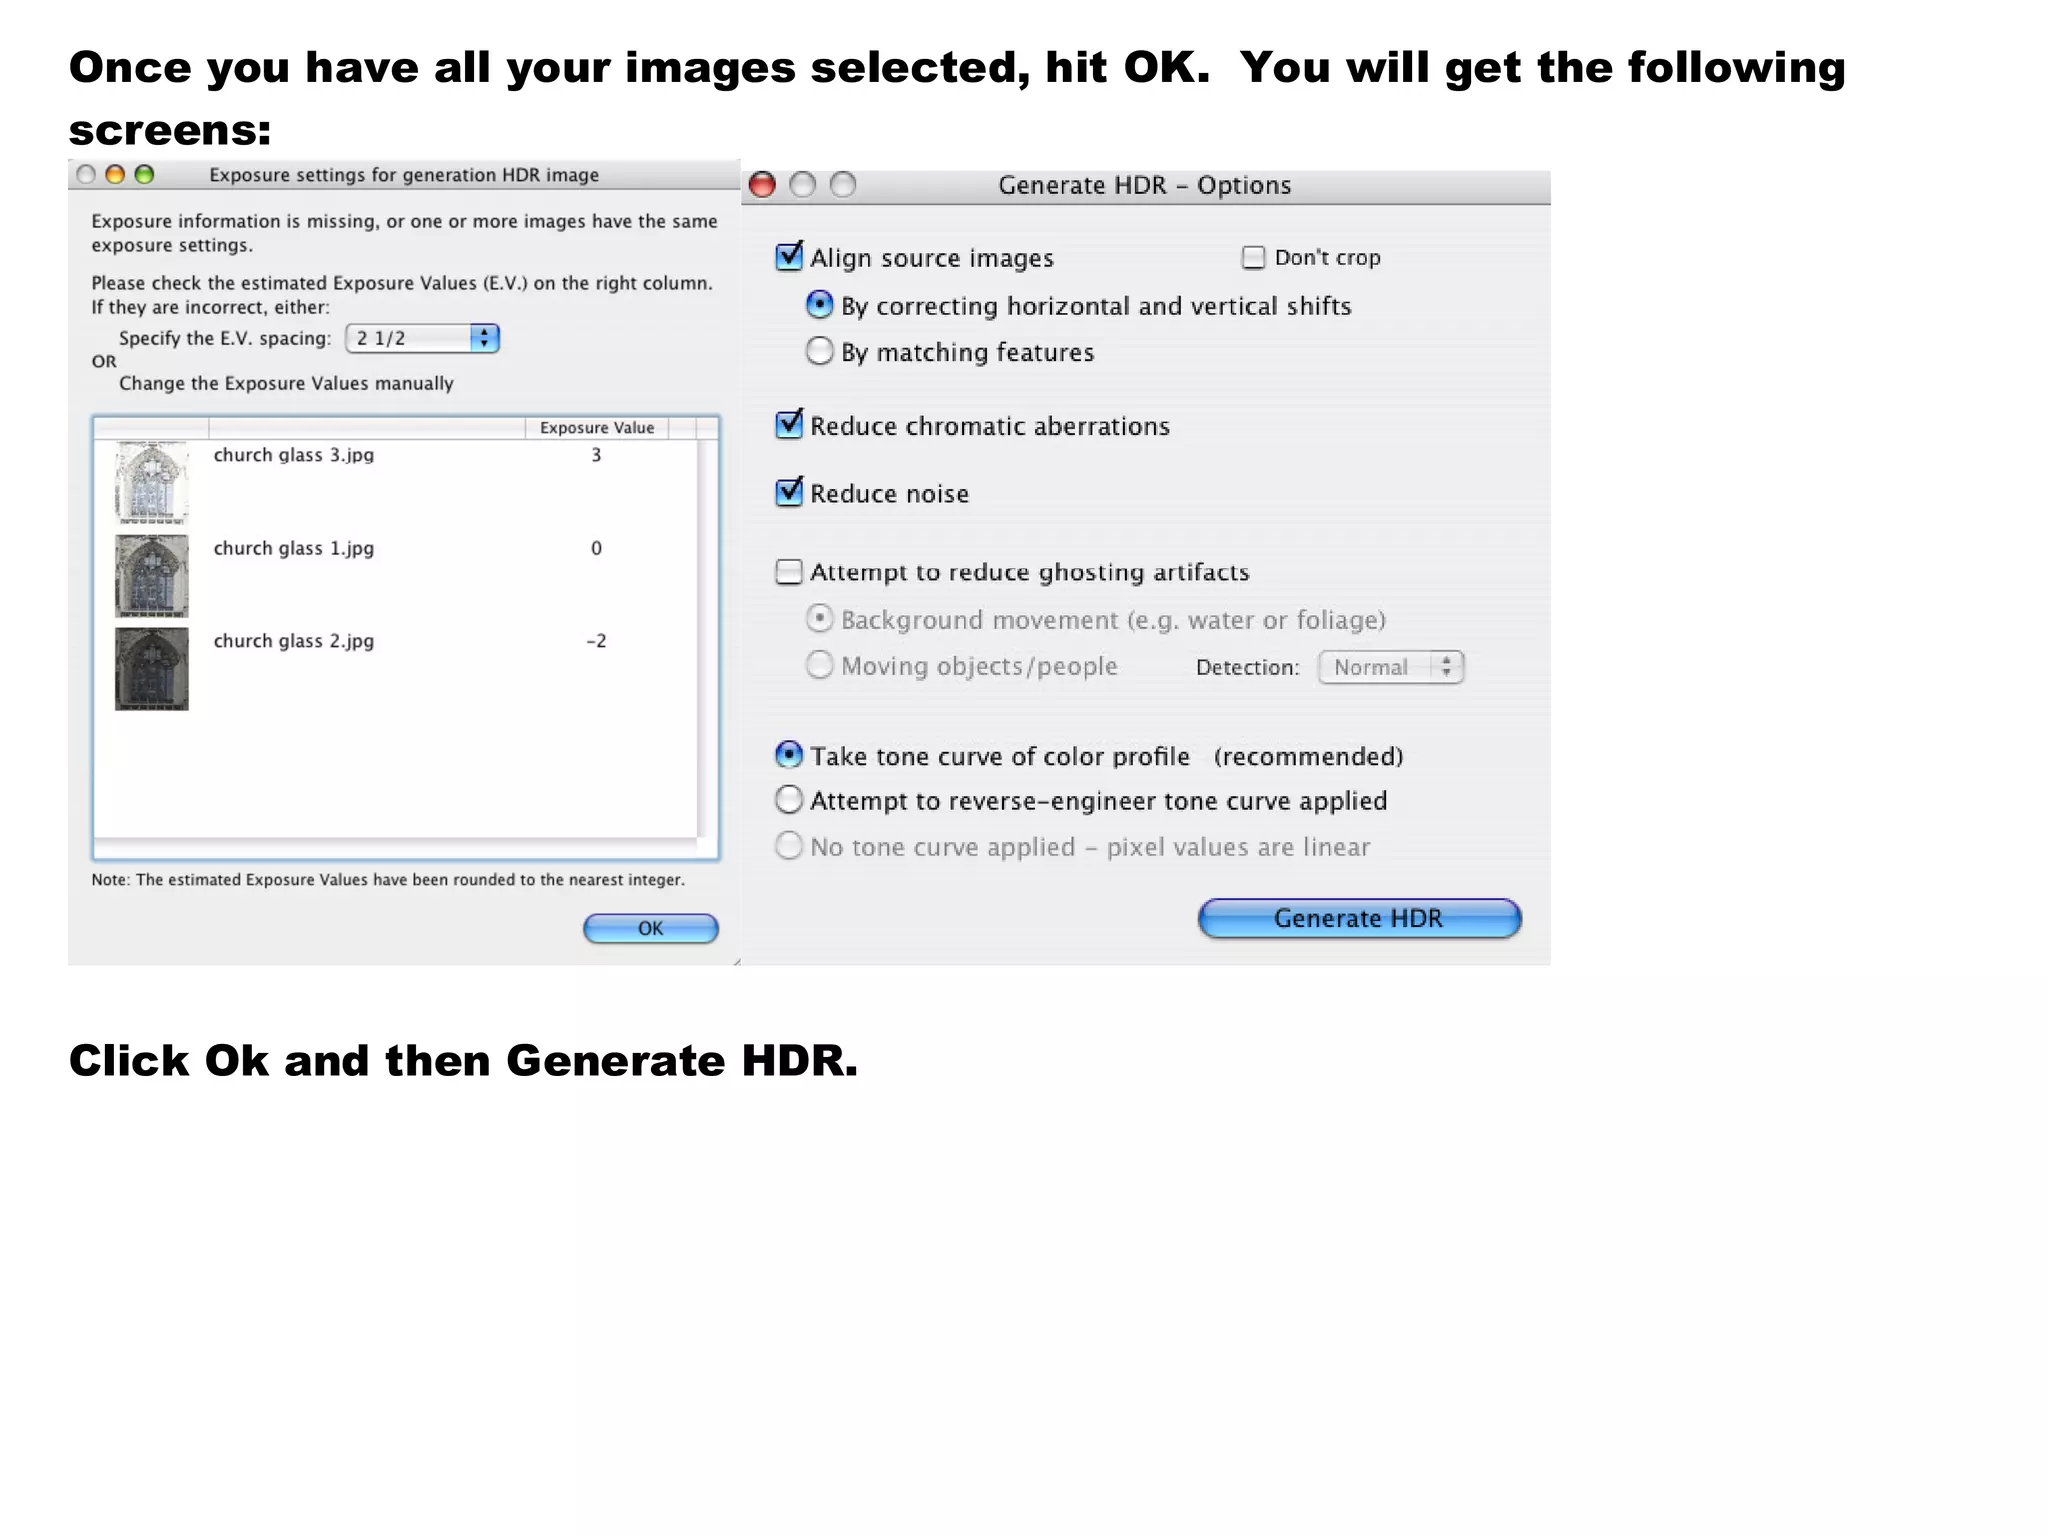
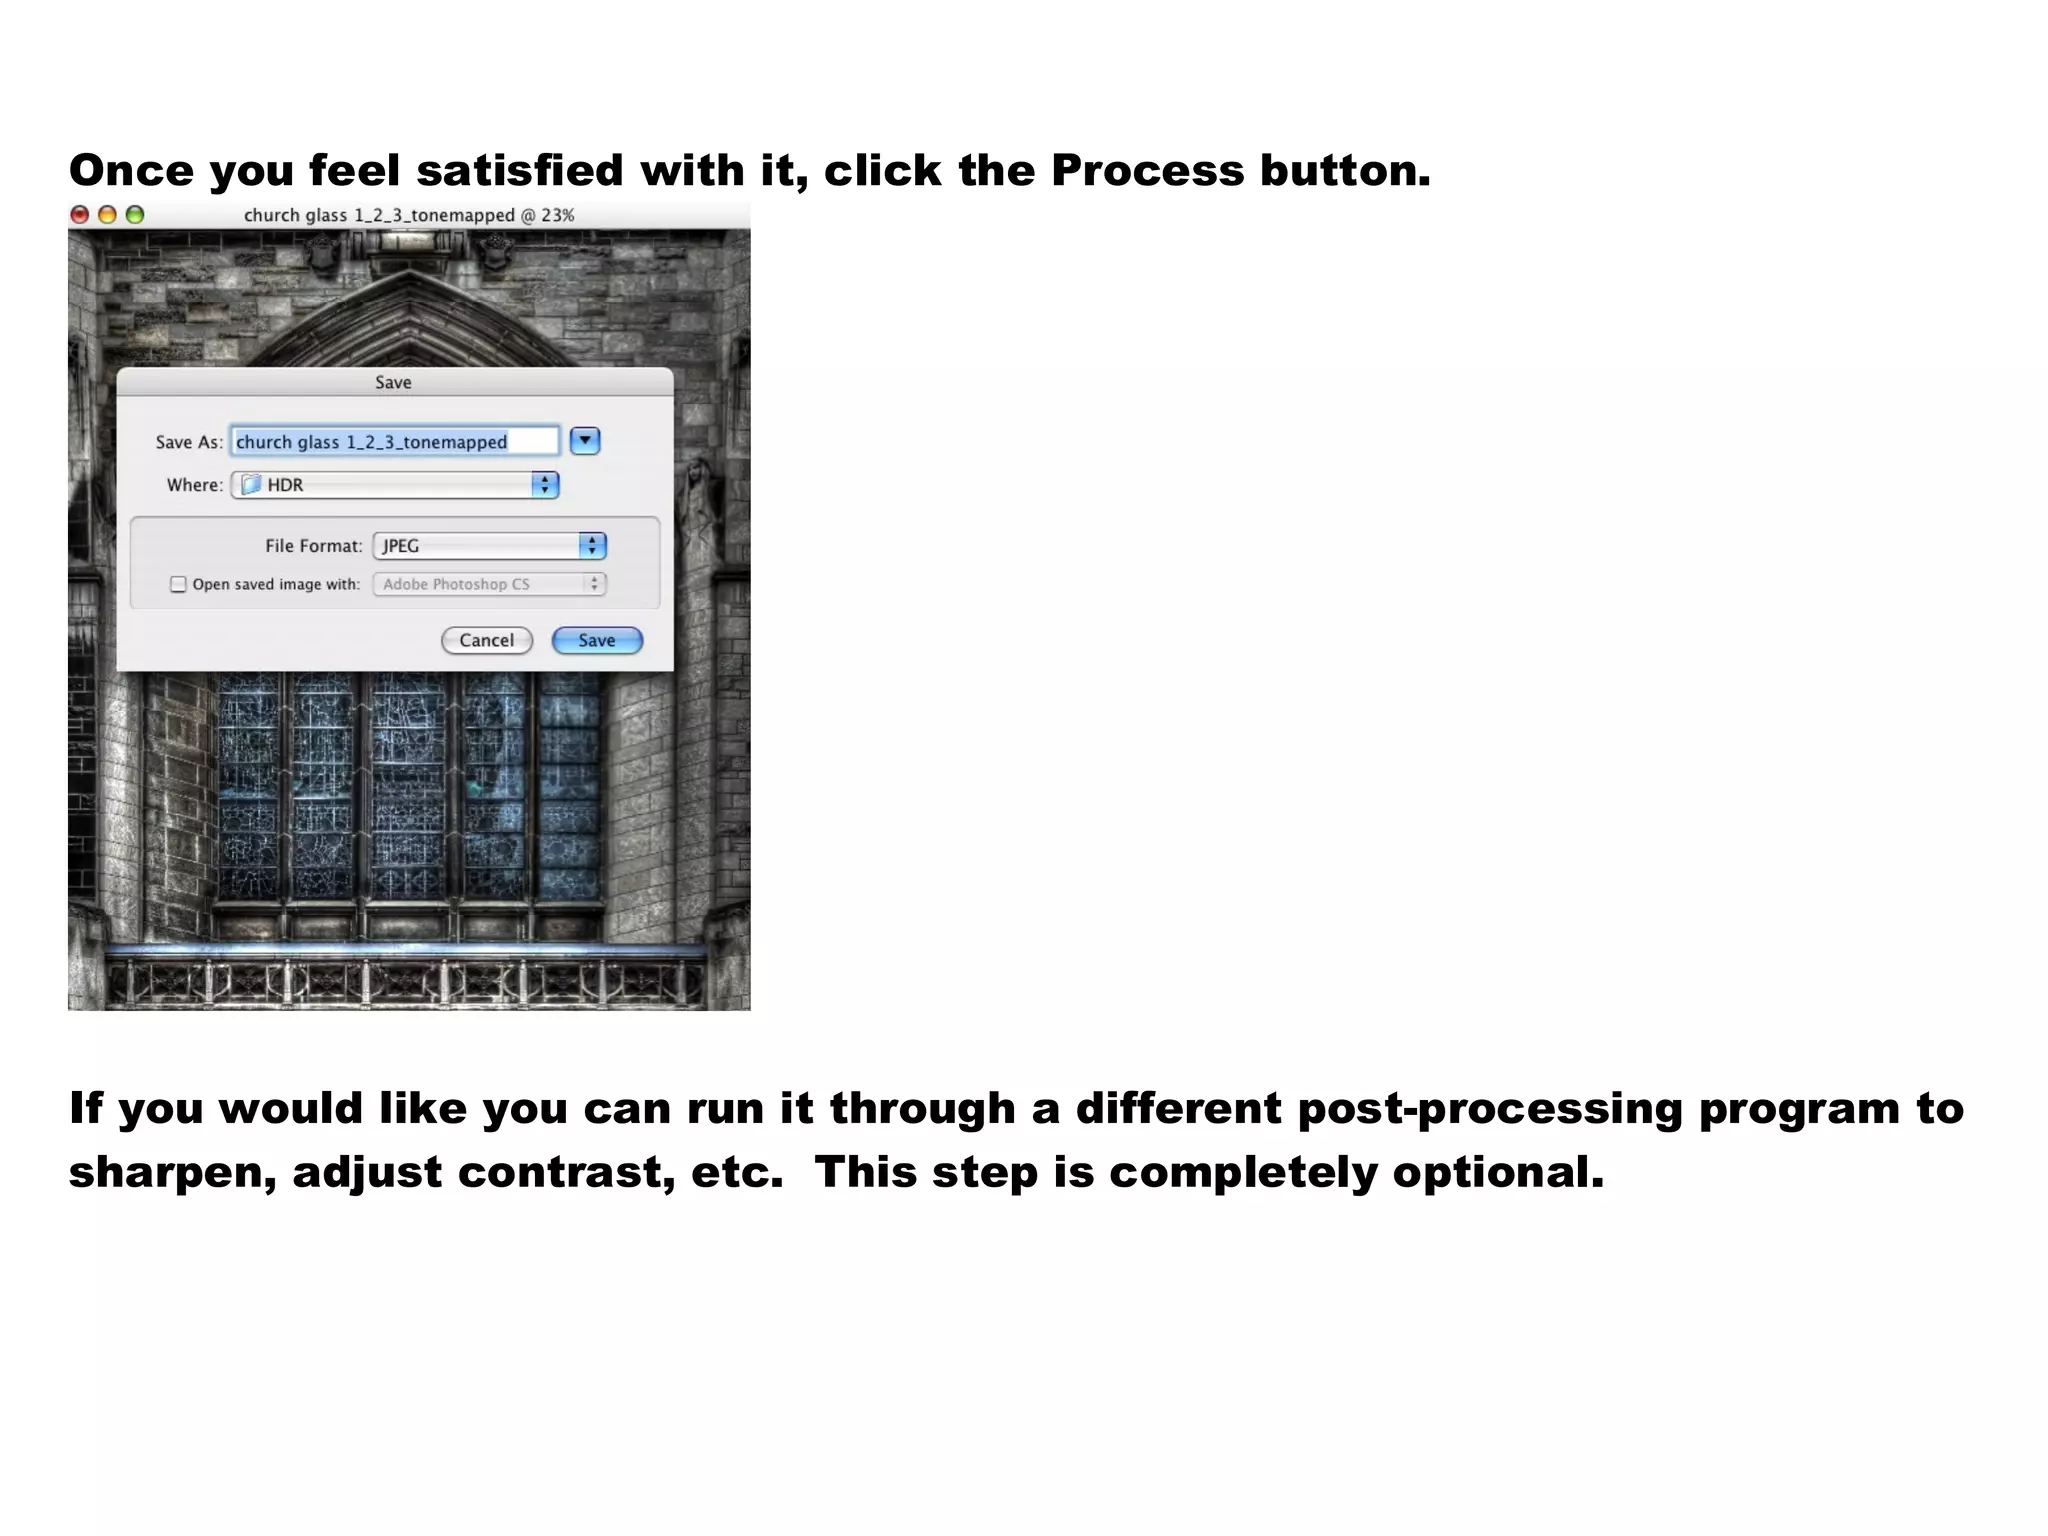
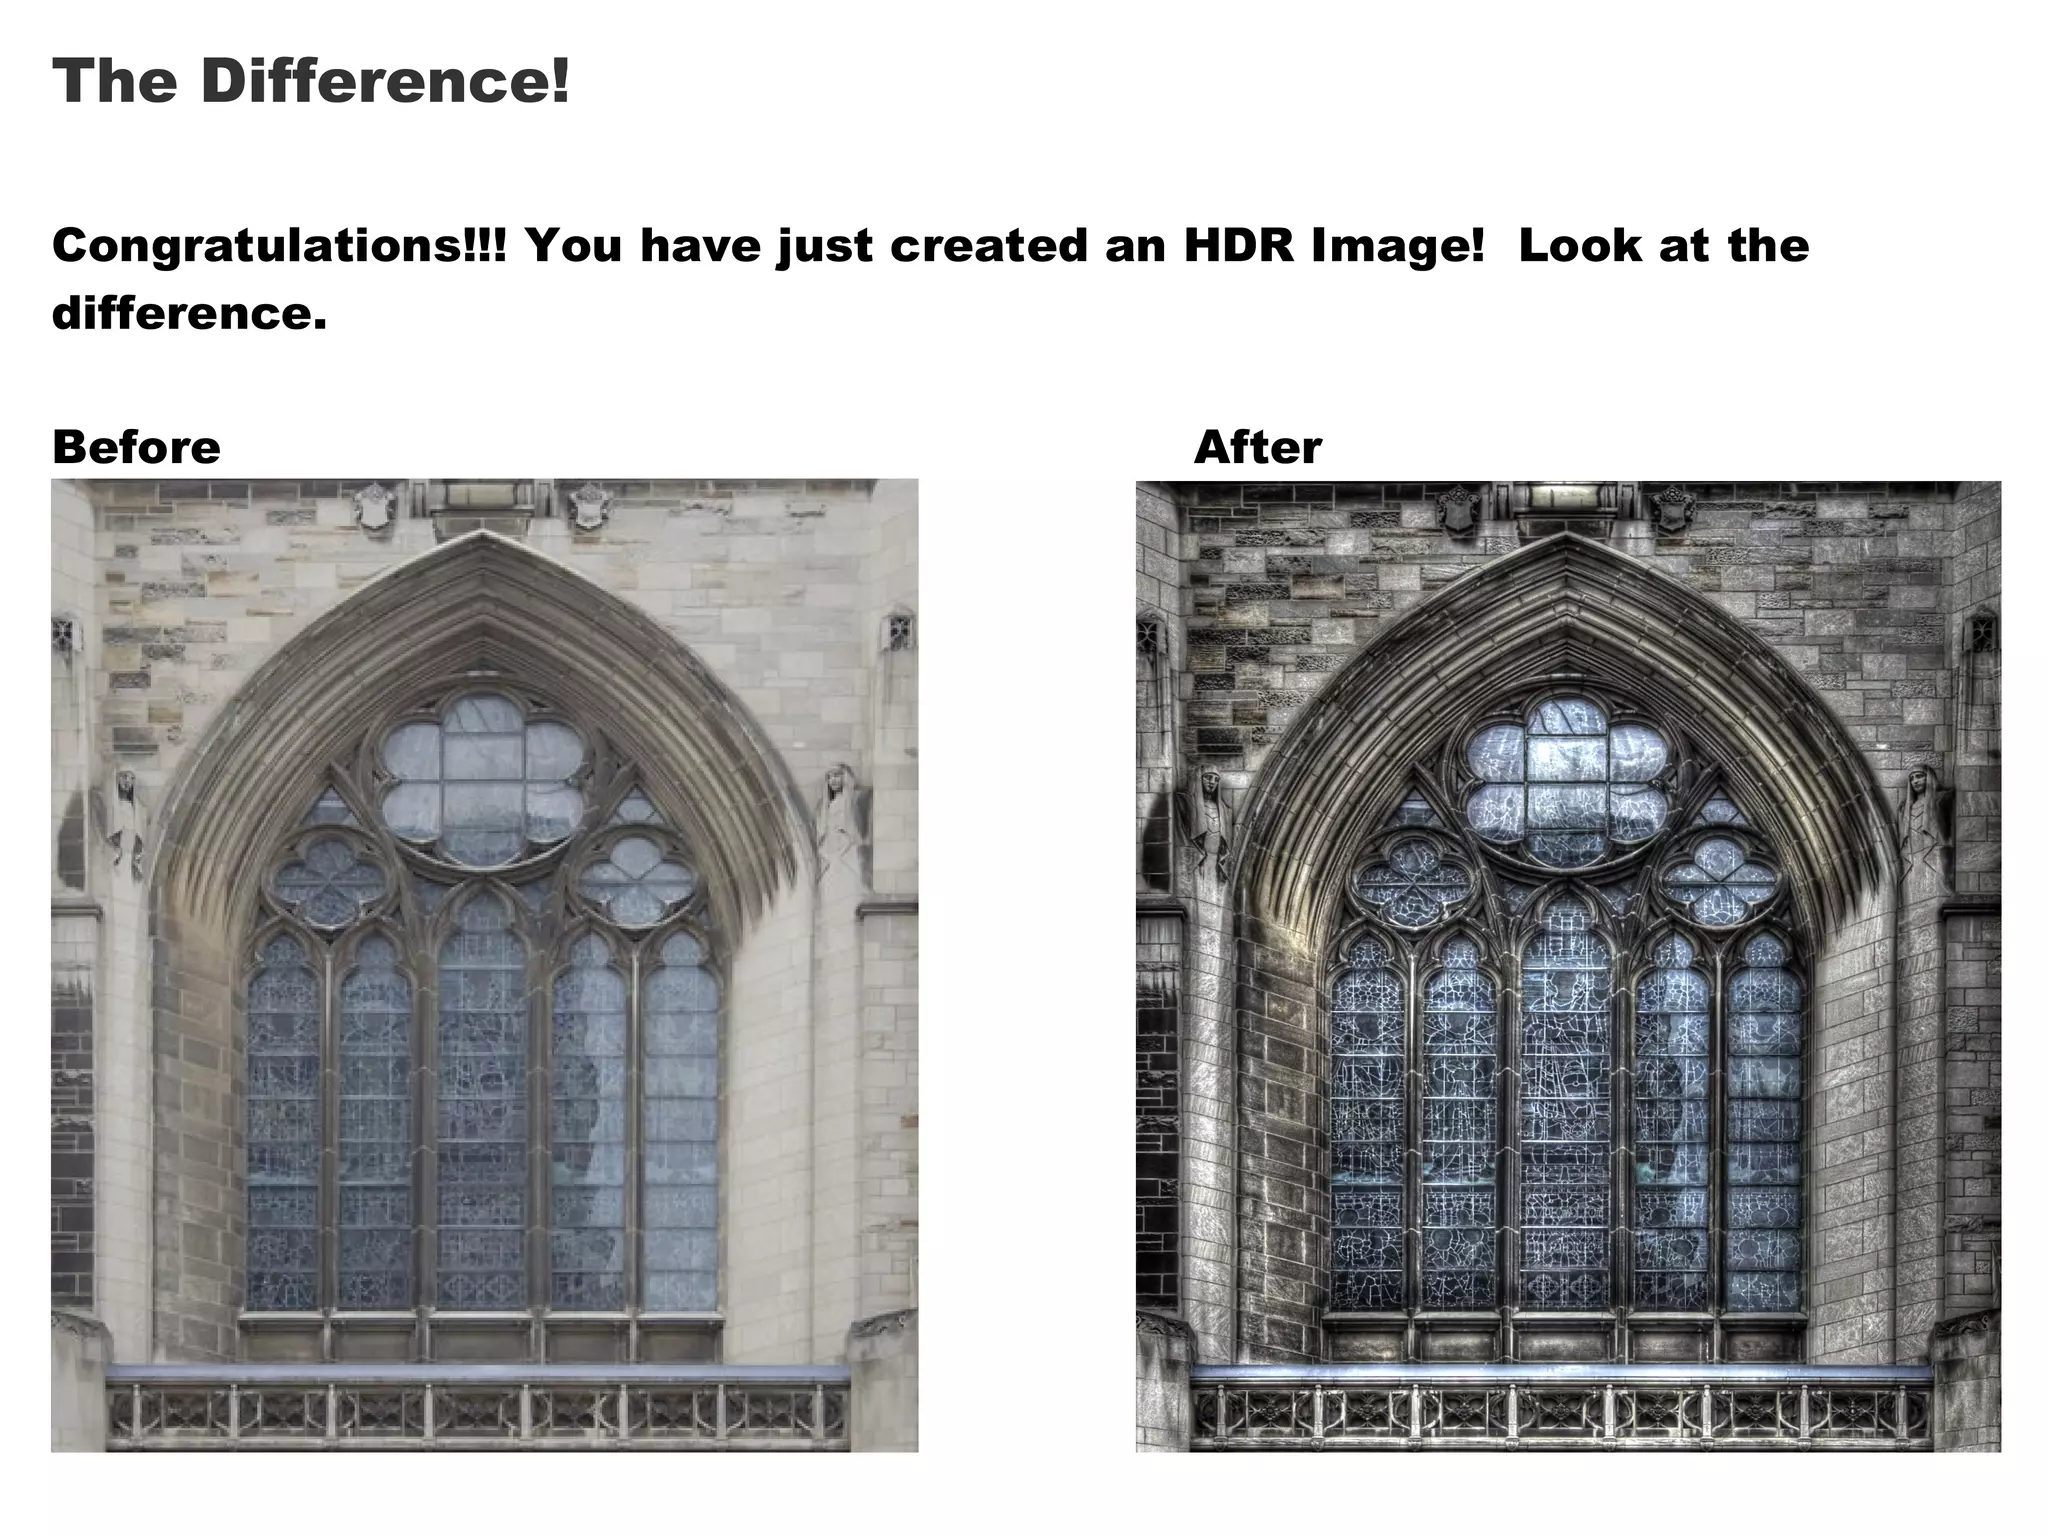
HDR Tutorial for Beginners
By: Joshua Northrup
Part 1: What is HDR?

HDR is short for High Dynamic Range. In short, it is the ability to bring light
and color to dark or under exposed areas of a picture (its more complicated
than that, but also more boring). The camera is not capable of taking the
whole dynamic range. It leaves parts of the picture under exposed or over
exposed while the rest of the picture is correctly exposed. A true HDR shot is
taken with a number of shots at different exposures. I usually use three, but it
is up the photographer. There has been much debate over the use of three
individual files as opposed to changing the exposure on a single image. They
both have their positives and negatives. For this lesson I will be using one
single image for two reasons. First, if an object is moving in your picture,
taking three different shots will leave you with a blur where the object is
moving. Second, you can make HDR shots out of pictures that you previously
shot.
Step One: Preparing the image

I use Adobe Lightroom to adjust the exposures of my images. You can use
any program you like that has this function.


Above is the layout in Lightroom. Use the                 section towards the
right to adjust the exposure.
At this point I will save my first picture using the exposure it was shot (0.00)
and save as a .jpeg church glass 1 in a folder of your choice (note: since there
are going to be numerous shots I would create a specific folder for your HDR
stuff).
Next, you want to adjust the exposure of the image.


I usually will under expose my image around Ð1.5 and Ð2.0
Again, this step is up to the photographer. You will get the feel of the HDR exposures as
you get more practice. Next, save the file as church glass 2.jpeg in your specified folder.
Now we want to over expose the image. The same goes for over exposures as
under exposures, it is up to you. I used +1.87.


Save the files as church glass 3.jpeg in your folder.
Step Three: Turning your images into an HDR Image

Now comes the fun part. We will be merging the three shots into one HDR
image. The beautiful and exciting thing about HDR is that you never know
how itÕs g ing to turn out. I use Photomatix Pro to produce my HDR images.
            o
Adobe Photoshop has a plug in, but I donÕ find it to be as dynamic as
                                         t
Photomatix. If you have the newest version of Photoshop I do encourage you
to try it, you may like it better.

I recommend downloading the free trial version of Photomatix at
http://www.hdrsoft.com/ to see if its something you like. Please note, it will
have an annoying watermark on the picture until you decide if you are going to
buy the program.
Next, open up your Photomatix program and select Generate HDR Image from
the workflow bar.


Now, select your 3 images by searching in the BrowseÉ section.
Once you have all your images selected, hit OK. You will get the following
screens:


Click Ok and then Generate HDR.
DONÕ FREAK OUT YET! This is just the raw unprocessed image. Click the
    T
Tone Mapping button to process your image.
Step Four: Processing your Image.

TADAAAA!! Now you can see what the image will look like as an HDR.
In the processing phase I donÕ try to explain how the image should look
                                            t
because I want you to play with all the different settings. Have fun with it and
process it the way you want it. I will give a few tips:
    1. A dj ust t h e str e ngt h t o mak e i t mor e o r l e ss Ò a rto o ney Ó.
                                                                           c
    2. T ry a l l f iv e l i g h t sm o ot h in g bu t ton s . Y o u w il l n o t i ce d r amat i c
       d iff er e nc e s i n a ll f iv e .
    3. Wh i t e p o i nt an d Bl a c k po i n t a dj ustm e nts w ill m a ke th e p ic tu r e dar k er o r
       b r ig hte r É i t Õ a ll up t o y o u !
                             s
Once you feel satisfied with it, click the Process button.


If you would like you can run it through a different post-processing program to
sharpen, adjust contrast, etc. This step is completely optional.
The Difference!

Congratulations!!! You have just created an HDR Image! Look at the
difference.

Before                                    After
Lets give you r s elf a r oun d of ap pl aus e YOU DID IT !!!!!!!!!!!!

If at any time you get stuck or have a questionÉ please donÕ hesitate to
                                                           t
contact me through RedGage.com and I would be more than happy to help in
any way I canÉ no w, open up some old pictures and have some fun!

HDR Tutorial

  • 1.
    HDR Tutorial forBeginners By: Joshua Northrup
  • 2.
    Part 1: Whatis HDR? HDR is short for High Dynamic Range. In short, it is the ability to bring light and color to dark or under exposed areas of a picture (its more complicated than that, but also more boring). The camera is not capable of taking the whole dynamic range. It leaves parts of the picture under exposed or over exposed while the rest of the picture is correctly exposed. A true HDR shot is taken with a number of shots at different exposures. I usually use three, but it is up the photographer. There has been much debate over the use of three individual files as opposed to changing the exposure on a single image. They both have their positives and negatives. For this lesson I will be using one single image for two reasons. First, if an object is moving in your picture, taking three different shots will leave you with a blur where the object is moving. Second, you can make HDR shots out of pictures that you previously shot.
  • 3.
    Step One: Preparingthe image I use Adobe Lightroom to adjust the exposures of my images. You can use any program you like that has this function. Above is the layout in Lightroom. Use the section towards the right to adjust the exposure.
  • 4.
    At this pointI will save my first picture using the exposure it was shot (0.00) and save as a .jpeg church glass 1 in a folder of your choice (note: since there are going to be numerous shots I would create a specific folder for your HDR stuff).
  • 5.
    Next, you wantto adjust the exposure of the image. I usually will under expose my image around Ð1.5 and Ð2.0 Again, this step is up to the photographer. You will get the feel of the HDR exposures as you get more practice. Next, save the file as church glass 2.jpeg in your specified folder.
  • 6.
    Now we wantto over expose the image. The same goes for over exposures as under exposures, it is up to you. I used +1.87. Save the files as church glass 3.jpeg in your folder.
  • 7.
    Step Three: Turningyour images into an HDR Image Now comes the fun part. We will be merging the three shots into one HDR image. The beautiful and exciting thing about HDR is that you never know how itÕs g ing to turn out. I use Photomatix Pro to produce my HDR images. o Adobe Photoshop has a plug in, but I donÕ find it to be as dynamic as t Photomatix. If you have the newest version of Photoshop I do encourage you to try it, you may like it better. I recommend downloading the free trial version of Photomatix at http://www.hdrsoft.com/ to see if its something you like. Please note, it will have an annoying watermark on the picture until you decide if you are going to buy the program.
  • 8.
    Next, open upyour Photomatix program and select Generate HDR Image from the workflow bar. Now, select your 3 images by searching in the BrowseÉ section.
  • 9.
    Once you haveall your images selected, hit OK. You will get the following screens: Click Ok and then Generate HDR.
  • 10.
    DONÕ FREAK OUTYET! This is just the raw unprocessed image. Click the T Tone Mapping button to process your image.
  • 11.
    Step Four: Processingyour Image. TADAAAA!! Now you can see what the image will look like as an HDR.
  • 12.
    In the processingphase I donÕ try to explain how the image should look t because I want you to play with all the different settings. Have fun with it and process it the way you want it. I will give a few tips: 1. A dj ust t h e str e ngt h t o mak e i t mor e o r l e ss Ò a rto o ney Ó. c 2. T ry a l l f iv e l i g h t sm o ot h in g bu t ton s . Y o u w il l n o t i ce d r amat i c d iff er e nc e s i n a ll f iv e . 3. Wh i t e p o i nt an d Bl a c k po i n t a dj ustm e nts w ill m a ke th e p ic tu r e dar k er o r b r ig hte r É i t Õ a ll up t o y o u ! s
  • 13.
    Once you feelsatisfied with it, click the Process button. If you would like you can run it through a different post-processing program to sharpen, adjust contrast, etc. This step is completely optional.
  • 14.
    The Difference! Congratulations!!! Youhave just created an HDR Image! Look at the difference. Before After
  • 15.
    Lets give your s elf a r oun d of ap pl aus e YOU DID IT !!!!!!!!!!!! If at any time you get stuck or have a questionÉ please donÕ hesitate to t contact me through RedGage.com and I would be more than happy to help in any way I canÉ no w, open up some old pictures and have some fun!