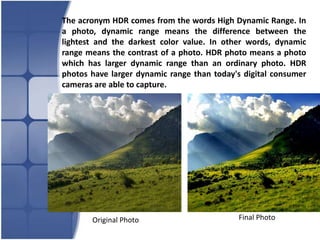
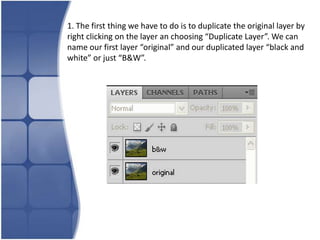
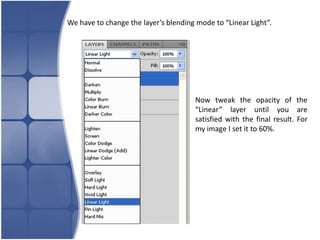
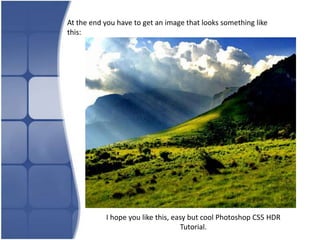
Adobe Photoshop


         Prepared by: Lyndon Jeorge A. Mendoza
Photoshop: Tutorial

   Adobe Photoshop CS5 HDR Tutorial
The acronym HDR comes from the words High Dynamic Range. In
a photo, dynamic range means the difference between the
lightest and the darkest color value. In other words, dynamic
range means the contrast of a photo. HDR photo means a photo
which has larger dynamic range than an ordinary photo. HDR
photos have larger dynamic range than today's digital consumer
cameras are able to capture.


       Original Photo                       Final Photo
1. The first thing we have to do is to duplicate the original layer by
right clicking on the layer an choosing “Duplicate Layer”. We can
name our first layer “original” and our duplicated layer “black and
white” or just “B&W”.
2. Now we have to adjust our “B&W” layer. First we will change
the layer’s blending mode to “Overlay”.
Next we have to desaturate the layer. We can do this by going to
Image > Adjustments > Desaturate.

                                           •Or we can use the keyboard
                                           shortcut combination
                                           Shift+Ctrl+U.

                                           •Now we’re going to invert the
                                           “B&W” layer: Image >
                                           Adjustments > Invert

                                           •Or we can use the keyboard
                                           shortcut combination Ctrl+I.
3. It’s time to add some Gaussian Blur to our “B&W” Layer. We’ll do
this by going to Filter > Blur > Gaussian Blur.

Tweak the blur radius around 30 pixels. You can adjust this to fit
your own taste. Anywhere between 20 and 50 pixels will create the
“glow” around the edges.

Now if you have followed right our CS5 HDR tutorial, you will have
an image similar to this:
4. The next thing to do is to duplicate again the original layer and to
drag it on top of all layers. We can name this layer “Linear”.
We have to change the layer’s blending mode to “Linear Light”.


                                      Now tweak the opacity of the
                                      “Linear” layer until you are
                                      satisfied with the final result. For
                                      my image I set it to 60%.
At the end you have to get an image that looks something like
this:


           I hope you like this, easy but cool Photoshop CS5 HDR
                                   Tutorial.
Thank you!

Adobe photoshop hdr tutorial

  • 2.
    Adobe Photoshop Prepared by: Lyndon Jeorge A. Mendoza
  • 3.
    Photoshop: Tutorial Adobe Photoshop CS5 HDR Tutorial
  • 4.
    The acronym HDRcomes from the words High Dynamic Range. In a photo, dynamic range means the difference between the lightest and the darkest color value. In other words, dynamic range means the contrast of a photo. HDR photo means a photo which has larger dynamic range than an ordinary photo. HDR photos have larger dynamic range than today's digital consumer cameras are able to capture. Original Photo Final Photo
  • 5.
    1. The firstthing we have to do is to duplicate the original layer by right clicking on the layer an choosing “Duplicate Layer”. We can name our first layer “original” and our duplicated layer “black and white” or just “B&W”.
  • 6.
    2. Now wehave to adjust our “B&W” layer. First we will change the layer’s blending mode to “Overlay”. Next we have to desaturate the layer. We can do this by going to Image > Adjustments > Desaturate. •Or we can use the keyboard shortcut combination Shift+Ctrl+U. •Now we’re going to invert the “B&W” layer: Image > Adjustments > Invert •Or we can use the keyboard shortcut combination Ctrl+I.
  • 7.
    3. It’s timeto add some Gaussian Blur to our “B&W” Layer. We’ll do this by going to Filter > Blur > Gaussian Blur. Tweak the blur radius around 30 pixels. You can adjust this to fit your own taste. Anywhere between 20 and 50 pixels will create the “glow” around the edges. Now if you have followed right our CS5 HDR tutorial, you will have an image similar to this:
  • 9.
    4. The nextthing to do is to duplicate again the original layer and to drag it on top of all layers. We can name this layer “Linear”.
  • 10.
    We have tochange the layer’s blending mode to “Linear Light”. Now tweak the opacity of the “Linear” layer until you are satisfied with the final result. For my image I set it to 60%.
  • 11.
    At the endyou have to get an image that looks something like this: I hope you like this, easy but cool Photoshop CS5 HDR Tutorial.
  • 12.