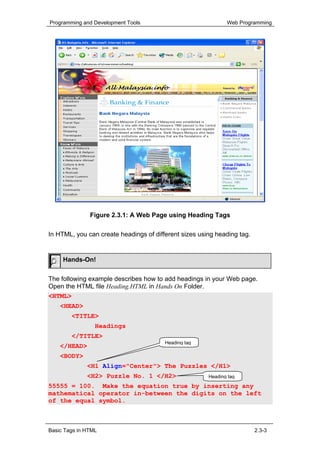
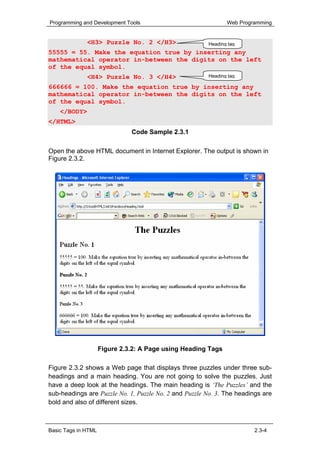
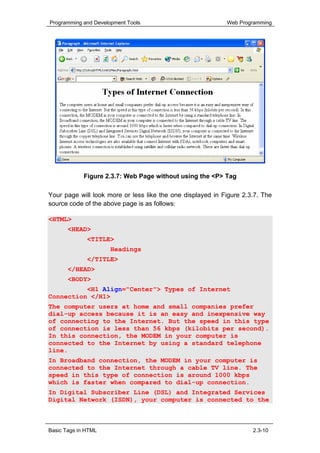
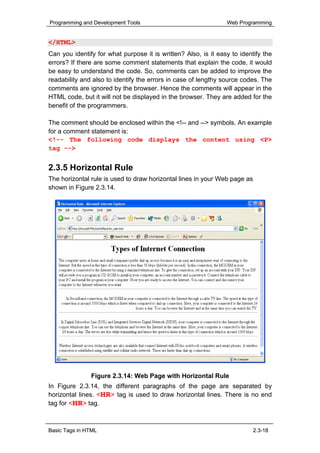
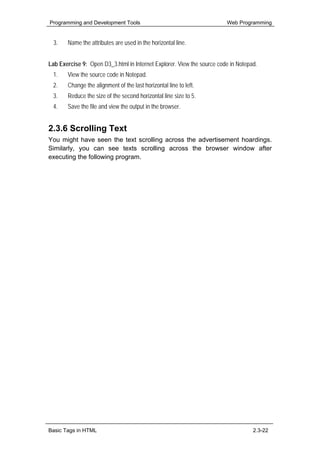
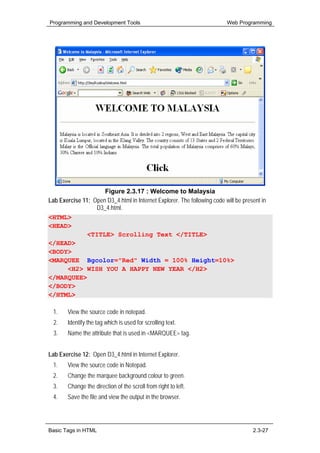
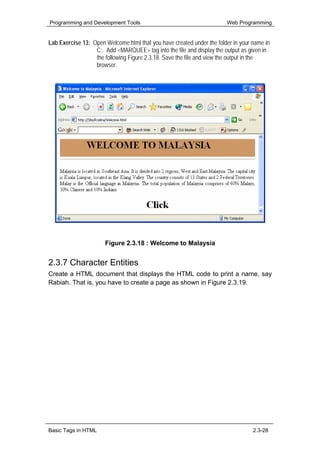
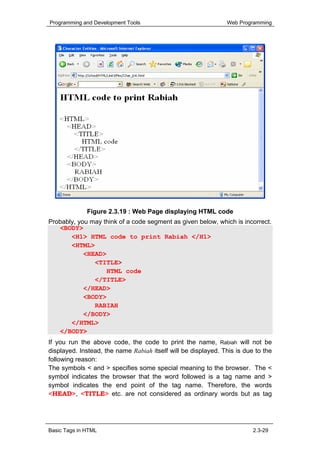
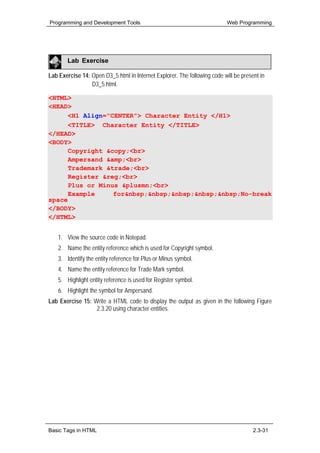
This document discusses various HTML tags for formatting web pages, including headings, paragraphs, and comments. It provides examples of how to use the <H1>-<H6> heading tags, the <P> paragraph tag, and the <BR> line break tag. It also demonstrates how to add comments to HTML code using the <!-- --> comment tags to make the code more readable.
The workshop facilitator will introduce participants to the basic building blocks of HTML. Elements such as page framework and individual items will be introduced. The goal is to have participants identify the parts of an HTML document. Understanding basic HTML elements will allow instructors troubleshooting ability with their Desire2Learn. pages.
There are four tasks to complete in this workshop. They are listed below and can be accessed from the JohnAllanSandbox course on Desire2Learn, in the Table of Content. Please complete these in this order.
1. HTML Review Activity
2. Creating an image link
3. Attributes
4. Lists
Here's my FIT Board Practical File. I hope you find it as useful as it was to me. I constantly got complimented for my file from internal as well as external teachers so I thought of sharing my work with all of you.
After this presentation students will be able to:
1. Define the term hypertext and state the purpose of HTML.
2. Identify the main parts of an HTML document.
3. Identify and state the purpose of different HTML elements.
4. Differentiate between HTML elements, tags, and attributes.
Create web pages using different basic and formatting tags.
HTML4 is the latest standard released by the World Wide Web consortium (www.w3.org) for web pages.
Making sure that your pages comply with standards like HTML4 will allow your site to be viewed by the maximum number of visitors.
Since HTML4 was published, browsers have moved on and support for HTML4 is becoming much more consistent between updated browsers.
En el momento de embotellar un vino es necesario prestar atención a la calidad del tapón, calidad que vendrá muy determinada por los procesos de manipulación, conservación y estabilización entre otros.
Así el tapón de corcho, se convierte en pieza fundamental y parte esencial de toda botella de vino.
The Diy Marketers Guide To A Magnetic MarketingDIYMarketers
There's a reason we don't do marketing plans well - if at all. It's that we focus on the plan and not the purpose. These 6 secrets will help you get out of your circle and into a world of marketing opportunities
Epistemic Interaction - tuning interfaces to provide information for AI supportAlan Dix
Paper presented at SYNERGY workshop at AVI 2024, Genoa, Italy. 3rd June 2024
https://alandix.com/academic/papers/synergy2024-epistemic/
As machine learning integrates deeper into human-computer interactions, the concept of epistemic interaction emerges, aiming to refine these interactions to enhance system adaptability. This approach encourages minor, intentional adjustments in user behaviour to enrich the data available for system learning. This paper introduces epistemic interaction within the context of human-system communication, illustrating how deliberate interaction design can improve system understanding and adaptation. Through concrete examples, we demonstrate the potential of epistemic interaction to significantly advance human-computer interaction by leveraging intuitive human communication strategies to inform system design and functionality, offering a novel pathway for enriching user-system engagements.
Neuro-symbolic is not enough, we need neuro-*semantic*Frank van Harmelen
Neuro-symbolic (NeSy) AI is on the rise. However, simply machine learning on just any symbolic structure is not sufficient to really harvest the gains of NeSy. These will only be gained when the symbolic structures have an actual semantics. I give an operational definition of semantics as “predictable inference”.
All of this illustrated with link prediction over knowledge graphs, but the argument is general.
Builder.ai Founder Sachin Dev Duggal's Strategic Approach to Create an Innova...Ramesh Iyer
In today's fast-changing business world, Companies that adapt and embrace new ideas often need help to keep up with the competition. However, fostering a culture of innovation takes much work. It takes vision, leadership and willingness to take risks in the right proportion. Sachin Dev Duggal, co-founder of Builder.ai, has perfected the art of this balance, creating a company culture where creativity and growth are nurtured at each stage.
UiPath Test Automation using UiPath Test Suite series, part 4DianaGray10
Welcome to UiPath Test Automation using UiPath Test Suite series part 4. In this session, we will cover Test Manager overview along with SAP heatmap.
The UiPath Test Manager overview with SAP heatmap webinar offers a concise yet comprehensive exploration of the role of a Test Manager within SAP environments, coupled with the utilization of heatmaps for effective testing strategies.
Participants will gain insights into the responsibilities, challenges, and best practices associated with test management in SAP projects. Additionally, the webinar delves into the significance of heatmaps as a visual aid for identifying testing priorities, areas of risk, and resource allocation within SAP landscapes. Through this session, attendees can expect to enhance their understanding of test management principles while learning practical approaches to optimize testing processes in SAP environments using heatmap visualization techniques
What will you get from this session?
1. Insights into SAP testing best practices
2. Heatmap utilization for testing
3. Optimization of testing processes
4. Demo
Topics covered:
Execution from the test manager
Orchestrator execution result
Defect reporting
SAP heatmap example with demo
Speaker:
Deepak Rai, Automation Practice Lead, Boundaryless Group and UiPath MVP
GDG Cloud Southlake #33: Boule & Rebala: Effective AppSec in SDLC using Deplo...James Anderson
Effective Application Security in Software Delivery lifecycle using Deployment Firewall and DBOM
The modern software delivery process (or the CI/CD process) includes many tools, distributed teams, open-source code, and cloud platforms. Constant focus on speed to release software to market, along with the traditional slow and manual security checks has caused gaps in continuous security as an important piece in the software supply chain. Today organizations feel more susceptible to external and internal cyber threats due to the vast attack surface in their applications supply chain and the lack of end-to-end governance and risk management.
The software team must secure its software delivery process to avoid vulnerability and security breaches. This needs to be achieved with existing tool chains and without extensive rework of the delivery processes. This talk will present strategies and techniques for providing visibility into the true risk of the existing vulnerabilities, preventing the introduction of security issues in the software, resolving vulnerabilities in production environments quickly, and capturing the deployment bill of materials (DBOM).
Speakers:
Bob Boule
Robert Boule is a technology enthusiast with PASSION for technology and making things work along with a knack for helping others understand how things work. He comes with around 20 years of solution engineering experience in application security, software continuous delivery, and SaaS platforms. He is known for his dynamic presentations in CI/CD and application security integrated in software delivery lifecycle.
Gopinath Rebala
Gopinath Rebala is the CTO of OpsMx, where he has overall responsibility for the machine learning and data processing architectures for Secure Software Delivery. Gopi also has a strong connection with our customers, leading design and architecture for strategic implementations. Gopi is a frequent speaker and well-known leader in continuous delivery and integrating security into software delivery.
The Art of the Pitch: WordPress Relationships and SalesLaura Byrne
Clients don’t know what they don’t know. What web solutions are right for them? How does WordPress come into the picture? How do you make sure you understand scope and timeline? What do you do if sometime changes?
All these questions and more will be explored as we talk about matching clients’ needs with what your agency offers without pulling teeth or pulling your hair out. Practical tips, and strategies for successful relationship building that leads to closing the deal.
Slack (or Teams) Automation for Bonterra Impact Management (fka Social Soluti...Jeffrey Haguewood
Sidekick Solutions uses Bonterra Impact Management (fka Social Solutions Apricot) and automation solutions to integrate data for business workflows.
We believe integration and automation are essential to user experience and the promise of efficient work through technology. Automation is the critical ingredient to realizing that full vision. We develop integration products and services for Bonterra Case Management software to support the deployment of automations for a variety of use cases.
This video focuses on the notifications, alerts, and approval requests using Slack for Bonterra Impact Management. The solutions covered in this webinar can also be deployed for Microsoft Teams.
Interested in deploying notification automations for Bonterra Impact Management? Contact us at sales@sidekicksolutionsllc.com to discuss next steps.
DevOps and Testing slides at DASA ConnectKari Kakkonen
My and Rik Marselis slides at 30.5.2024 DASA Connect conference. We discuss about what is testing, then what is agile testing and finally what is Testing in DevOps. Finally we had lovely workshop with the participants trying to find out different ways to think about quality and testing in different parts of the DevOps infinity loop.
JMeter webinar - integration with InfluxDB and GrafanaRTTS
Watch this recorded webinar about real-time monitoring of application performance. See how to integrate Apache JMeter, the open-source leader in performance testing, with InfluxDB, the open-source time-series database, and Grafana, the open-source analytics and visualization application.
In this webinar, we will review the benefits of leveraging InfluxDB and Grafana when executing load tests and demonstrate how these tools are used to visualize performance metrics.
Length: 30 minutes
Session Overview
-------------------------------------------
During this webinar, we will cover the following topics while demonstrating the integrations of JMeter, InfluxDB and Grafana:
- What out-of-the-box solutions are available for real-time monitoring JMeter tests?
- What are the benefits of integrating InfluxDB and Grafana into the load testing stack?
- Which features are provided by Grafana?
- Demonstration of InfluxDB and Grafana using a practice web application
To view the webinar recording, go to:
https://www.rttsweb.com/jmeter-integration-webinar
State of ICS and IoT Cyber Threat Landscape Report 2024 previewPrayukth K V
The IoT and OT threat landscape report has been prepared by the Threat Research Team at Sectrio using data from Sectrio, cyber threat intelligence farming facilities spread across over 85 cities around the world. In addition, Sectrio also runs AI-based advanced threat and payload engagement facilities that serve as sinks to attract and engage sophisticated threat actors, and newer malware including new variants and latent threats that are at an earlier stage of development.
The latest edition of the OT/ICS and IoT security Threat Landscape Report 2024 also covers:
State of global ICS asset and network exposure
Sectoral targets and attacks as well as the cost of ransom
Global APT activity, AI usage, actor and tactic profiles, and implications
Rise in volumes of AI-powered cyberattacks
Major cyber events in 2024
Malware and malicious payload trends
Cyberattack types and targets
Vulnerability exploit attempts on CVEs
Attacks on counties – USA
Expansion of bot farms – how, where, and why
In-depth analysis of the cyber threat landscape across North America, South America, Europe, APAC, and the Middle East
Why are attacks on smart factories rising?
Cyber risk predictions
Axis of attacks – Europe
Systemic attacks in the Middle East
Download the full report from here:
https://sectrio.com/resources/ot-threat-landscape-reports/sectrio-releases-ot-ics-and-iot-security-threat-landscape-report-2024/
PHP Frameworks: I want to break free (IPC Berlin 2024)Ralf Eggert
In this presentation, we examine the challenges and limitations of relying too heavily on PHP frameworks in web development. We discuss the history of PHP and its frameworks to understand how this dependence has evolved. The focus will be on providing concrete tips and strategies to reduce reliance on these frameworks, based on real-world examples and practical considerations. The goal is to equip developers with the skills and knowledge to create more flexible and future-proof web applications. We'll explore the importance of maintaining autonomy in a rapidly changing tech landscape and how to make informed decisions in PHP development.
This talk is aimed at encouraging a more independent approach to using PHP frameworks, moving towards a more flexible and future-proof approach to PHP development.
PHP Frameworks: I want to break free (IPC Berlin 2024)
Unit 2.3
1. Programming and Development Tools Web Programming
UNIT
2.3
Web Programming
Basic Tags in HTML
OBJECTIVES
This unit helps you to experiment the various tags and attributes to create
attractive Web pages.
At the end of this unit, you will be able to
Add headings to your Web page.
Align text as paragraphs in Web pages.
Add blank lines to your Web page.
Make your HTML code readable by adding comments.
Decorate your page by inserting horizontal lines.
Scroll text across the Web page.
Add special characters to your Web page.
Add colours and background pictures to enrich your Web page.
Benchmark Standard
Use the basic tags and their attributes to create professional-
looking Web pages.
Basic Tags in HTML 2.3-1
2. Programming and Development Tools Web Programming
Let us Revise!
1. Give the expansion of HTML.
2. List the steps to create and execute a HTML document.
3. Write the structure of HTML document.
4. Define the term Tag.
Introduction
You know that the source of a Web page is a HTML document. Reading this
unit, you will realize that the code behind an attractive Web page is a simple
HTML code. HTML uses tags, which are nothing but codes that specifies how
a Web page should appear. There are various tags that are used to display
the text, images, lists, buttons and links on the Web pages. In this unit, you
will learn some of the basic tags of HTML.
2.3.1 Headings
You might have seen different headings in online newspapers and
magazines. Almost all topics in a newspaper begin with a heading. Figure
2.3.1 shows a Web page with different headings.
Basic Tags in HTML 2.3-2
3. Programming and Development Tools Web Programming
Figure 2.3.1: A Web Page using Heading Tags
In HTML, you can create headings of different sizes using heading tag.
Hands-On!
The following example describes how to add headings in your Web page.
Open the HTML file Heading.HTML in Hands On Folder.
<HTML>
<HEAD>
<TITLE>
Headings
</TITLE>
Heading tag
</HEAD>
<BODY>
<H1 Align="Center"> The Puzzles </H1>
<H2> Puzzle No. 1 </H2> Heading tag
55555 = 100. Make the equation true by inserting any
mathematical operator in-between the digits on the left
of the equal symbol.
Basic Tags in HTML 2.3-3
4. Programming and Development Tools Web Programming
<H3> Puzzle No. 2 </H3> Heading tag
55555 = 55. Make the equation true by inserting any
mathematical operator in-between the digits on the left
of the equal symbol.
<H4> Puzzle No. 3 </H4> Heading tag
666666 = 100. Make the equation true by inserting any
mathematical operator in-between the digits on the left
of the equal symbol.
</BODY>
</HTML>
Code Sample 2.3.1
Open the above HTML document in Internet Explorer. The output is shown in
Figure 2.3.2.
Figure 2.3.2: A Page using Heading Tags
Figure 2.3.2 shows a Web page that displays three puzzles under three sub-
headings and a main heading. You are not going to solve the puzzles. Just
have a deep look at the headings. The main heading is ‘The Puzzles’ and the
sub-headings are Puzzle No. 1, Puzzle No. 2 and Puzzle No. 3. The headings are
bold and also of different sizes.
Basic Tags in HTML 2.3-4
5. Programming and Development Tools Web Programming
When you view the code, you can identify that the heading The Puzzles,
enclosed between <H1> and </H1> tags. The text enclosed within H1
displays a heading of maximum size. The size of the headings produced by
<H2>, <H3> and so on decreases respectively. The tags <H1>, <H2>,
<H3>, <H4>, <H5> and <H6> are the heading tags. The text that has to be
given as the heading is enclosed within the opening and closing heading tags.
<H1> tag produces a heading of largest size. <H6> produces a heading of
smallest size.
In Figure 2.3.2, you can see that all the sub-headings are aligned to the left.
You can change the alignment of the heading using ALIGN attribute of
heading tag.
Note
An attribute is a property that enhances the effect of a tag.
The Align attribute enhances the appearance of the headings in the Web
page by aligning the heading.
Values for the Align attribute:
• Left
• Right
• Center
For example, Align=”Left” will align the text to the left in the browser window.
Note
The default alignment for heading tag is left. So, the heading will be aligned to the left, if the
ALIGN attribute is omitted in the heading tag.
In Figure 2.3.2, the heading The Puzzle can be aligned to the left by using the
attribute Align as follows.
<H1 Align=”Left”> The Puzzle </H1>.
Here, H1 is the heading tag and Align is the attribute of the heading tag. The
Align attribute takes the value Left to position the text in the left of the browser
window.
Basic Tags in HTML 2.3-5
6. Programming and Development Tools Web Programming
Note
HTML is not a case-sensitive language. Hence the tags and attributes that you specify in HTML
file can be of any case (lowercase or uppercase).
Self-Check Exercise 2.3.1
Identify the tags and attribute values used in each line of the following Web page.
Figure 2.3.3: Six Levels of Heading Tag
Activity 2.3.1
1. Create a Web page that explains the heading tags as shown in Figure
2.3.4.
2. Save the HTML file as Activity1.HTML in Activity folder.
Basic Tags in HTML 2.3-6
7. Programming and Development Tools Web Programming
Figure 2.3.4 : A Web Page that explains the Heading Tag
Lab Exercise
Lab Exercise 1: Open D3_1.html in Internet Explorer. The following code will be present in
D3_1.html.
<HTML>
<HEAD>
<H1 ALIGN = CENTER> HEADING TAG </H1>
<TITLE>Six Headings</TITLE>
</HEAD>
<BODY>
<H1>Heading 1</H1>
<H2>Heading 2</H2>
<H3>Heading 3</H3>
<H4>Heading 4</H4>
<H5>Heading 5</H5>
<H6>Heading 6</H6>
</BODY>
</HTML>
Basic Tags in HTML 2.3-7
8. Programming and Development Tools Web Programming
1. View the source code in Notepad.
2. Identify the tag, which is used to display Heading 1 in the source code of D3_1.html
3. Name the attribute used to display the Heading Tag with centre alignment.
4. Underline the tag, which is used to display Heading 4 in the source code of D3_1.html.
Lab Exercise 2: Open D3_1.html in Internet Explorer. View the source code in Notepad.
1. View the source code in Notepad.
2. Edit the style of Heading 1 from <H1> to <H3>.
3. Change the alignment of Heading 2 to centre align.
4. Change the alignment of Heading 3 to right align.
5. Save the source code file and refresh the Web page.
Lab Exercise 3: Write HTML code to display the output as given in the following Figure 2.3.5
using the <HEAD> tag.
Figure 2.3.5: Headings
Lab Exercise 4: Open Welcome.html that you have created under the folder in your name in
C:. Add <HEAD> tag into the file and display the output as given in the
following Figure 2.3.6. Save the file and view the output in the browser.
Basic Tags in HTML 2.3-8
9. Programming and Development Tools Web Programming
Figure 2.3.6: Welcome to Malaysia
2.3.2 Paragraph
You have learned about the different types of Internet connections in the first
unit. Create a HTML document with the heading Types of Internet Connection
and the types of Internet connections elaborated in different paragraphs below
the heading.
Basic Tags in HTML 2.3-9
10. Programming and Development Tools Web Programming
Figure 2.3.7: Web Page without using the <P> Tag
Your page will look more or less like the one displayed in Figure 2.3.7. The
source code of the above page is as follows:
<HTML>
<HEAD>
<TITLE>
Headings
</TITLE>
</HEAD>
<BODY>
<H1 Align="Center"> Types of Internet
Connection </H1>
The computer users at home and small companies prefer
dial-up access because it is an easy and inexpensive way
of connecting to the Internet. But the speed in this type
of connection is less than 56 kbps (kilobits per second).
In this connection, the MODEM in your computer is
connected to the Internet by using a standard telephone
line.
In Broadband connection, the MODEM in your computer is
connected to the Internet through a cable TV line. The
speed in this type of connection is around 1000 kbps
which is faster when compared to dial-up connection.
In Digital Subscriber Line (DSL) and Integrated Services
Digital Network (ISDN), your computer is connected to the
Basic Tags in HTML 2.3-10
11. Programming and Development Tools Web Programming
Internet through the copper telephone line. Here, your
computer is connected to the Internet 24 hours a day.
Wireless Internet access technologies are also available
that connect Internet with PDAs, notebook computers and
smart phones. A wireless connection is established using
satellite and cellular radio network.
</BODY>
</HTML>
Code Sample 2.3.2
Though you have written the content in different paragraphs, it appears as
continuous text in the browser window. This is because the browser does not
consider the line breaks you have given by pressing the Enter key, while
typing the content.
<P> tag is used for creating paragraphs. Whenever the browser encounters a
<P> tag a new paragraph is created from that point. The end of the paragraph
is marked by </P>, which is optional.
Best Programming Practise
Even though the closing tag is optional, it is better to add the closing tag to improve the
readability.
The Align attribute can be used along with the <P> tag to align the paragraph
to the left, right, center or justify. For example, the following segment of HTML
document displays the Web page with the paragraph aligned to the right.
<P Align=”Right”> Paragraph tag
In Broadband connection, the MODEM in your computer is
connected to the Internet through a cable TV line. The
speed in this type of connection is around 1000 kbps
which is faster when compared to dial-up connection.
</P>
Basic Tags in HTML 2.3-11
12. Programming and Development Tools Web Programming
Figure 2.3.8: Web Page created using <P> tag
Self-Check Exercise 2.3.2
Write the tag with its attribute that you will insert to align the four paragraphs as given in Figure
2.3.8.
First paragraph should be left aligned.
Second paragraph should be right aligned.
Third paragraph should be centred.
Fourth paragraph should be justified.
Lab Exercise
Lab Exercise 5: Open D3_2.html in Internet Explorer. The following code will be present in
D3_2.html. View the source code in Notepad.
<HTML>
<HEAD>
<TITLE>
Paragraph and Blank Return Tags
</TITLE>
</HEAD>
<BODY>
<H1 Align="CENTER"> Paragraph Tag </H1> <BR>
Basic Tags in HTML 2.3-12
13. Programming and Development Tools Web Programming
<P>This is paragraph aligned with the default value.
<P Align="right">This is a paragraph aligned to the right
<P Align="left">This is paragraph aligned to the left.
<P Align="center">This is paragraph centered. </P>
Learning HTML gives tremendous joy. <BR>
Because it is easy, gentle and also much helpful.
</BODY>
</HTML>
1. View the source code in Notepad.
2. Identify the tag which is used to create paragraph?
3. Identify and list the different values given for the align attribute in the HTML document.
Lab Exercise 6: Write a HTML code to display the output as given in the following Figure
2.3.9 using <P> tag.
Figure 2.3.9: Paragraph Alignment
Lab Exercise 7: Open Welcome.html that you have created under the folder in your name in
C:. Add <P> tag into the file and display the output as given in the following
Figure 2.3.10. Save the file and view the output in the browser.
Basic Tags in HTML 2.3-13
14. Programming and Development Tools Web Programming
Figure 2.3.10: Welcome to Malaysia
2.3.3 Line Breaks
You know that paragraph tag is used to break content into different
paragraphs. But line breaks are used to start a new line within the current
paragraph. It can also be used to create blank lines.
Hands-On!
The following example describes the use of line breaks in HTML document.
Open the HTML file Break1.HTML.
<HTML>
<HEAD>
<TITLE> Line Breaks
Code without line
</TITLE> break
<BODY>
<H1> Conduct </H1>
Who loses conduct loses love
Who loses love loses self-confidence
Who loses self-confidence loses his life.
</BODY>
</HTML>
Code Sample 2.3.3
Basic Tags in HTML 2.3-14
15. Programming and Development Tools Web Programming
The output of the above code is shown in Figure 2.3.11.
Figure 2.3.11 : Web Page using <BR> tag
In this source code, the content of the <BODY> tag is written in three different
lines. However, it is displayed continuously in the browser window. This is
because more than one space given in the source code is treated as one
space by the browser.
<BR> tag is used to insert the line breaks. If you want a sentence to be
printed in the next line, then it should be preceded by <BR> tag. <BR> tag
does not have any end tag. The same Web page using <BR> tag is shown in
Figure 2.3.12.
Figure 2.3.12 : Web Page using <BR> tag
Basic Tags in HTML 2.3-15
16. Programming and Development Tools Web Programming
Self-Check Exercise 2.3.3
Identify the lines where you will insert the <BR> tag in the code to display the Web page shown
in Figure 2.3.12.
Activity 2.3.2
1. Create a Web page that explains the use of <BR> tag and <P> tag as
shown in Figure 2.3.13.
2. Save the HTML file as Activity2.HTML in Activity folder.
Figure 2.3.13 : A Web page that explains the <BR> and <P> tags
2.3.4 Comments
Read the following program and identify the objective of the program. Correct
the mistakes, if any.
<HTML>
<HEAD><TITLE> Scrolling Text </TITLE></HEAD>
<BODY>
<H1 Align="Center"> Terms related to IT </H1>
<H2> Algorithm </H2>
Basic Tags in HTML 2.3-16
17. Programming and Development Tools Web Programming
<MARQUEE Behavior="Alternate" Height="120"
Width=”820” Bgcolor=”Green”>
The step-by-step instruction involved in solving a
problem is called Algorithm.
</MARQUEE>
<H2> Biometrics </H2>
<MARQUEE Scrolldelay=”1000”>
Biometrics is a technology of identifying the
finger prints, voice and facial patterns for
authentication purpose.
</MARQUEE> Code without
comments
<H2> C# </H2>
<MARQUEE Scrollamount="100" Behavior=”Slide”>
C# is an object-oriented programming language that
has the features of C++, Java and Visual Basic.
</MARQUEE>
<H2> Database </H2>
<MARQUEE Bgcolor="Yellow" Hspace="35" Vspace=”15”>
A database is a collection of information that is
organized so that it can easily be accessed,
managed, and updated.
</MARQUEE>
<H2> Encryption </H2>
<MARQUEE Loop="2">
Encryption is the process of converting data into
a form that cannot be understood by unauthorized
persons. The reverse process of converting
encrypted data back into its original form is
called Decryption.
</MARQUEE>
<H2> File Server </H2>
<MARQUEE Direction="Right">
It is a server computer where the data files are
stored so that the other computers can access
these data in the network.
</MARQUEE>
</BODY>
Basic Tags in HTML 2.3-17
18. Programming and Development Tools Web Programming
</HTML>
Can you identify for what purpose it is written? Also, is it easy to identify the
errors? If there are some comment statements that explain the code, it would
be easy to understand the code. So, comments can be added to improve the
readability and also to identify the errors in case of lengthy source codes. The
comments are ignored by the browser. Hence the comments will appear in the
HTML code, but it will not be displayed in the browser. They are added for the
benefit of the programmers.
The comment should be enclosed within the <!-- and --> symbols. An example
for a comment statement is:
<!-- The following code displays the content using <P>
tag -->
2.3.5 Horizontal Rule
The horizontal rule is used to draw horizontal lines in your Web page as
shown in Figure 2.3.14.
Figure 2.3.14: Web Page with Horizontal Rule
In Figure 2.3.14, the different paragraphs of the page are separated by
horizontal lines. <HR> tag is used to draw horizontal lines. There is no end
tag for <HR> tag.
Basic Tags in HTML 2.3-18
19. Programming and Development Tools Web Programming
Attributes of <HR> tag:
Size - Specifies the thickness of the line.
Width - Specifies the width of the line.
Align - Specifies the alignment of the line.
Noshade - Removes the shade from the line.
For example, a horizontal rule of size 5, width 40% of the browser window,
with no shade and with left alignment can be printed using the following code
snippet:
<HR Size=”5” Width=”40%” Noshade Align=”Left”>.
Hands-On!
The following example describes the use of different attributes of <HR> tag:
Open the HTML file Hor_Rule.HTML in Hands On Folder.
Figure 2.3.15: Web Page using attributes of <HR> tag
The HTML source code for the above page is as follows:
<HTML>
<HEAD>
<TITLE> Horizontal rule
</TITLE>
</HEAD>
Basic Tags in HTML 2.3-19
20. Programming and Development Tools Web Programming
<BODY>
<H1 Align="Center"> Horizontal Rule with Different
Attributes </H1>
<FONT Size="5">
Horizontal rule of size 5
<HR Size="5"> Draws a horizontal line
Horizontal rule of size 10 and width 50% of the browser
window
<HR Size="10" Width="50%">
Horizontal rule of size 15, width 75%, noshade and
aligned left
<HR Size="10" Width="75%" Noshade Align="Left">
Horizontal rule with default values<HR>
</FONT>
</BODY>
</HTML>
Code Sample 2.3.4
Activity 2.3.3
1. Create a Web page that explains the use of <HR> tag as shown in Figure
2.3.16. Add comments in your HTML file.
2. Save the HTML file as Activity3.HTML in Activity folder.
Basic Tags in HTML 2.3-20
21. Programming and Development Tools Web Programming
Figure 2.3.16: A Web page that explains the <HR> tag
Lab Exercise
Lab Exercise 8: Open D3_3.html in Internet Explorer. The following code will be present in
D3_3.html. View the source code in Notepad.
<HTML>
<HEAD>
<H1 Align="CENTER"> Horizontal Rule</H1>
<TITLE> Horizontal Rule </TITLE>
<BODY>
HR tag is used to draw horizontal lines. Default
horizontal line.
<HR>
Horizontal line size and noshade attribute.
<HR Size=10 Noshade>
Horizontal line width and align attribute.
<HR Width =50% Align="CENTER">
</BODY>
</HTML>
1. View the source code in Notepad.
2. Identify the tag which is used for draw a horizontal line in the Web page.
Basic Tags in HTML 2.3-21
22. Programming and Development Tools Web Programming
3. Name the attributes are used in the horizontal line.
Lab Exercise 9: Open D3_3.html in Internet Explorer. View the source code in Notepad.
1. View the source code in Notepad.
2. Change the alignment of the last horizontal line to left.
3. Reduce the size of the second horizontal line size to 5.
4. Save the file and view the output in the browser.
2.3.6 Scrolling Text
You might have seen the text scrolling across the advertisement hoardings.
Similarly, you can see texts scrolling across the browser window after
executing the following program.
Basic Tags in HTML 2.3-22
23. Programming and Development Tools Web Programming
Hands-On!
The following example explains how to scroll a text across a Web page. Open
the HTML file Scroll.HTML in Hands On Folder.
<HTML>
<HEAD>
<TITLE>
Scrolling Text
</TITLE>
</HEAD>
<BODY>
<H1 Align="Center"> Terms related to IT </H1>
<H2> Algorithm </H2> Scrolls in both the directions
<MARQUEE Behavior="Alternate" Height="120"
Width=”820” Bgcolor=”Green”>
The step-by-step instruction involved in solving a
problem is called Algorithm.
</MARQUEE> Sets the scrolling speed
<H2> Biometrics </H2>
<MARQUEE Scrolldelay=”1000”>
Biometrics is a technology of identifying the finger
prints, voice and facial patterns for authentication
purpose.
</MARQUEE> Scrolls in both the directions in the scrolling area
<H2> C# </H2>
<MARQUEE Scrollamount="100" Behavior=”Slide”>
C# is an object-oriented programming language that
has the features of C++, Java and Visual Basic.
</MARQUEE> Sets the size and background colour of the
scrolling area
<H2> Database </H2>
<MARQUEE Bgcolor="Yellow" Hspace="35" Vspace=”15”>
A database is a collection of information that is
organized so that it can easily be accessed, managed,
and updated.
</MARQUEE>
<H2> Encryption </H2>
Scrolls two times
<MARQUEE Loop="2">
Encryption is the process of converting data into a
form that cannot be understood by unauthorized
persons.
Basic Tags in HTML 2.3-23
24. Programming and Development Tools Web Programming
</MARQUEE>
<H2> File Server </H2>
Scrolls from left to right
<MARQUEE Direction="Right">
It is a server computer where the data files are
stored so that the other computers can access these
data in the network.
</MARQUEE>
</BODY>
</HTML>
Code Sample 2.3.5
This effect of scrolling can be set to the text in your Web page using the
<MARQUEE> tag.
The Marquee tag makes the text move across the browser window. The text
that has to be scrolled should be placed between <MARQUEE> and
</MARQUEE> tags. There are different attributes that enhance the effect of
<MARQUEE> tag. The attributes of the <MARQUEE> tag are given in the
Table 2.3.1:
Attribute Function Example
HEIGHT Specifies the height of <MARQUEE
the scrolling area Height="120">
WIDTH Specifies the width of the <MARQUEE
scrolling area Width="120">
BEHAVIOR Specifies the style of <MARQUEE
scrolling. The values that Behavior=”Scroll”>
can be assigned to this
attribute are Alternate,
Scroll and Slide.
BGCOLOR Sets the background <MARQUEE
colour of the scrolling Bgcolor="Yellow">
area
SCROLLDELAY Sets the time for the text <MARQUEE
to scroll from one Scrolldelay=”1000”>
position to the next
immediate position
Basic Tags in HTML 2.3-24
25. Programming and Development Tools Web Programming
SCROLLAMOUNT Specifies the distance <MARQUEE
between two consecutive Scrollamount="100">
points of text while
scrolling. The greater the
SCROLLAMOUNT the
faster will be the speed of
scrolling
LOOP Specifies the number of <MARQUEE Loop="2">
times the text scrolls from
one end to the other end
in the text area
DIRECTION Specifies the direction of <MARQUEE
scrolling. By default, the Direction="Right">
text scrolls from right to
left in the scrolling area.
VSPACE Specifies the space <MARQUEE
between the scrolling text Vspace=”15”>
and the texts that scrolls
above and below the
scrolling text
HSPACE Specifies the distance <MARQUEE
between the scrolling Hspace="35">
area and the two ends of
the browser window
Table 2.3.1: Attributes of <MARQUEE> tag
Activity 2.3.4
1. Create a Web page with the content given below. The conditions you have
to follow while creating the Web page is given within brackets.
2. Save the HTML file as Activity4.HTML in Activity folder.
Scrolling Text
The Tag
The tag used to scroll text across the browser window is <MARQUEE> tag.
Attributes
HEIGHT
This attribute specifies the height of the scrolling area.
WIDTH
This attribute specifies the width of the scrolling area.
BEHAVIOR
This attribute specifies the style of scrolling. The values that can be assigned
to this attribute are Alternate, Slide and Scroll.
Basic Tags in HTML 2.3-25
26. Programming and Development Tools Web Programming
If BEHAVIOR = Alternate, the text scrolls from right to left and left to right
alternatively within the scrolling area. (Make this text scroll to and fro within
the scrolling area).
If BEHAVIOR = Slide, the text scrolls from right to left and stops or slides in the
left-most portion of the scrolling area. (Make this text slide from right to left).
The default value of Behavior attribute is Scroll. If this attribute is omitted or
set to Scroll the text keeps scrolling from right to left indefinitely in the scrolling
area. (Make this text scroll from right to left indefinitely).
BGCOLOR
This attribute sets the background colour of the scrolling area. (Set the
background colour of this scrolling area to Yellow).
SCROLLDELAY
This attribute sets the time for the text to scroll from one position to the next
immediate position. (Slow down the scrolling of this text).
SCROLLAMOUNT
This attribute specifies the distance between two consecutive points of text
while scrolling. The greater the SCROLLAMOUNT the faster will be the speed
of scrolling. (Make this text scroll faster).
LOOP
This attribute specifies the number of times the text scrolls from one end to
the other end in the text area. By default, the text scrolls indefinitely. (Make
this text scroll 5 times).
DIRECTION
As the name suggest, this attribute specifies the direction of scrolling. By
default, the text scrolls from right to left in the scrolling area. (Make this text
scroll from left to right).
Example
In this page, the text below the heading Behavior scrolls to and fro within the
text area because of the tag <MARQUEE Behavior=”Alternate”> ………
</MARQUEE>.
Lab Exercise
Lab Exercise 10: Open Welcome.html that you have created under the folder in your name in
C:. Add <HR> tag into the file and display the output as given in the
following Figure 2.3.17. Save the file and view the output in the browser.
Basic Tags in HTML 2.3-26
27. Programming and Development Tools Web Programming
Figure 2.3.17 : Welcome to Malaysia
Lab Exercise 11: Open D3_4.html in Internet Explorer. The following code will be present in
D3_4.html.
<HTML>
<HEAD>
<TITLE> Scrolling Text </TITLE>
</HEAD>
<BODY>
<MARQUEE Bgcolor="Red" Width = 100% Height=10%>
<H2> WISH YOU A HAPPY NEW YEAR </H2>
</MARQUEE>
</BODY>
</HTML>
1. View the source code in notepad.
2. Identify the tag which is used for scrolling text.
3. Name the attribute that is used in <MARQUEE> tag.
Lab Exercise 12: Open D3_4.html in Internet Explorer.
1. View the source code in Notepad.
2. Change the marquee background colour to green.
3. Change the direction of the scroll from right to left.
4. Save the file and view the output in the browser.
Basic Tags in HTML 2.3-27
28. Programming and Development Tools Web Programming
Lab Exercise 13: Open Welcome.html that you have created under the folder in your name in
C:. Add <MARQUEE> tag into the file and display the output as given in
the following Figure 2.3.18. Save the file and view the output in the
browser.
Figure 2.3.18 : Welcome to Malaysia
2.3.7 Character Entities
Create a HTML document that displays the HTML code to print a name, say
Rabiah. That is, you have to create a page as shown in Figure 2.3.19.
Basic Tags in HTML 2.3-28
29. Programming and Development Tools Web Programming
Figure 2.3.19 : Web Page displaying HTML code
Probably, you may think of a code segment as given below, which is incorrect.
<BODY>
<H1> HTML code to print Rabiah </H1>
<HTML>
<HEAD>
<TITLE>
HTML code
</TITLE>
</HEAD>
<BODY>
RABIAH
</BODY>
</HTML>
</BODY>
If you run the above code, the code to print the name, Rabiah will not be
displayed. Instead, the name Rabiah itself will be displayed. This is due to the
following reason:
The symbols < and > specifies some special meaning to the browser. The <
symbol indicates the browser that the word followed is a tag name and >
symbol indicates the end point of the tag name. Therefore, the words
<HEAD>, <TITLE> etc. are not considered as ordinary words but as tag
Basic Tags in HTML 2.3-29
32. Programming and Development Tools Web Programming
Figure 2.3.20 : Character Entities
Self-Check Exercise 2.3.4
Write HTML code segment to display the text given below:
1. <HTML>
2. 500¥
3. Area of triangle = ½ bh
2.3.8 Colour, Colour Values and Colour Names
Knowledge about adding colours is of great importance in HTML to create
colourful and eye-catching Web pages.
The following example describes how to add colours to the background of a
Web page
Create a HTML document with the text given in the Web page in Figure
2.3.15. To specify a background colour, modify the <BODY> tag as <BODY
Bgcolor="Green" Text="Yellow">.
The output when you run the file is shown in Figure 2.3.21.
Basic Tags in HTML 2.3-32
33. Programming and Development Tools Web Programming
Figure 2.3.21 : Web Page with coloured background
From Figure 2.3.21, it is clear that the attributes Bgcolor and Text are the
attributes of the <BODY> tag.
Bgcolor attribute specifies the background colour of the page. The
background colour of the above page is set to Green, which is the
hexadecimal code for a shade of green.
The text colour of the above page is set to Yellow.
The colours can also be specified in the form of colour values instead of
colour names. The hexadecimal colour value for Green is 336600 where 33
represent the Red component, 66 represent Green and 00 represent Blue.
For example, the colour value for White is FFFFFF and for Black is 000000.
Some of the colours and their values are given in Figure 2.3.22.
RED GREEN BLUE
FF0000 00FF00 0000FF
YELLOW CYAN MAGENTA
FFFF00 00FFFF FF00FF
BLACK WHITE GRAY
000000 FFFFFF 808080
Figure 2.3.22 : Colour Names and Values
Pictures can also be added as background of a page. Figure 2.3.23 shows the
same page with picture as a background.
Basic Tags in HTML 2.3-33
34. Programming and Development Tools Web Programming
Figure 2.3.23: Web Page with a picture as background
To add a picture as a background instead of colour, replace BGCOLOR with
BACKGROUND attribute as follows:
<BODY Background=”c:Internet.jpg”>
The value for the Background attribute is a picture file along with its location.
In the above example, the picture file, Internet.jpg is located in the c: drive.
The background of the page will be blank, if the picture file is not in the
specified location.
Lab Exercise
Lab Exercise 16: Open D3_6.html in Internet Explorer. The following code will be present in
D3_6.html.
1. View the source code in Notepad.
2. Identify the tag which is used to change the background and text colour of the above
Web page.
3. Change the background colour to pink and text colour to black.
4. Save the file and view the output in the browser.
Basic Tags in HTML 2.3-34
35. Programming and Development Tools Web Programming
Lab Exercise 17: Open Welcome.html that you have created under the folder in your name in
C:. Add background attribute into the <BODY> tag and display the output
as given in the following Figure 2.3.24. Save the file and view the output in
the browser.
Figure 2.3.24 : Welcome to Malaysia
Lab Exercise 18: Write a HTML code to display the output as given in the following Figure
2.3.25 using <H1>,<BODY> <HR> and <MARQUEE>. Save the file as
Malaysia.html under the folder in your name in C:.
Basic Tags in HTML 2.3-35
36. Programming and Development Tools Web Programming
Figure 2.3.25 : Information about Malaysia
Activity 2.3.5
1. Create a Web page that explains the structure of HTML document as
shown in Figure 2.3.26. The continuation of the page is shown in Figure
2.3.27.
2. Save the HTML file as Activity5.html in Activity folder.
Basic Tags in HTML 2.3-36
37. Programming and Development Tools Web Programming
Figure 2.3.26 : A Web page that explains the structure of HTML
document
Figure 2.3.27: Continuation of the Web page (Figure 2.3.26 contd..)
Basic Tags in HTML 2.3-37
38. Programming and Development Tools Web Programming
Technical Terminologies
Attribute - Property that enhances the effect of a tag.
Entity reference - Symbolic representation of the characters.
Comments - Added to improve the readability and also to identify
the errors in case of lengthy source codes.
Colour values - Hexadecimal values for the colour names.
Summary
In this unit, you learnt that
The tags <H1>, <H2>, <H3>,<H4>, <H5> and <H6> are the
heading tags.
<P> tag is used for creating paragraphs.
<BR> tag can be used to insert the line breaks.
The comment should be enclosed within the <!-- and --> symbols.
<HR> tag is used to draw horizontal lines.
<MARQUEE> tag makes the text move across the browser window.
Entity references are the symbolic representation of the characters.
Bgcolor attribute of <BODY> tag specifies the background color of the
page.
Text attribute of <BODY> tag specifies the text color.
Background attribute of <BODY> tag specifies the background picture
of the page.
Basic Tags in HTML 2.3-38
39. Programming and Development Tools Web Programming
Assignment
I. Solve the following crossword:
1
2 3 4 5
6
7
8
9
10
Across
6. Attribute of <MARQUEE> tag to scroll the text to and fro in the
scrolling area.
8. To draw a horizontal line.
9. Attribute to specify the number of times to scroll.
10. Character entity name to display the ¥ symbol.
Down
1. To scroll across the browser window.
2. Name of character entity to leave space.
3. Use of <P> tag.
4. Attribute of <MARQUEE> tag to specify the direction of scrolling.
5. Character entity reference ends with this.
7. To print in the next line.
II Answer the following questions:
1. Name the attribute used to change the alignment of a paragraph.
2. Write about the use of <BR> tag.
3. Give the purpose of adding comments.
4. Name the tag which is used to scroll a text.
5. Write the use of character entities.
6. Give the tag and attribute used to add a picture to the background of
the browser window.
Basic Tags in HTML 2.3-39
40. Programming and Development Tools Web Programming
Criterion Referenced Test
Instruction: Students must evaluate themselves to attain the list of
competencies to be achieved.
Name:
Subject: Programming and Development tools
Unit: Basic tags in HTML
Please tick [ √ ] the appropriate box when you have achieved the respective
competency.
Date Basic tags in HTML
C1 C2 C3 C4 C5 C6 C7 C8
Comment
Competency codes
C1 = Write the purpose of heading tags.
C2 = Insert paragraphs and align them.
C3 = Insert Line Breaks in your Web pages.
C4 = Insert comment statement in your Web pages.
C5 = Insert horizontal lines in your Web page.
C6 = Use <MARQUEE> and its attributes.
C7 = Identify the character entities for different symbols
C8 = Add colours and pictures to your Web page.
Basic Tags in HTML 2.3-40