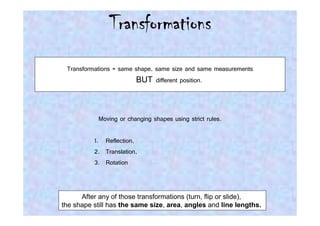
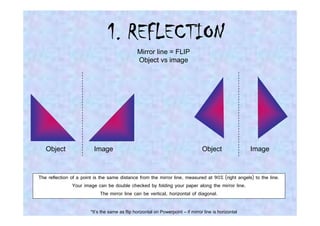
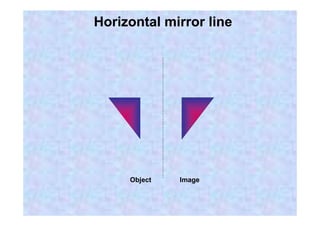
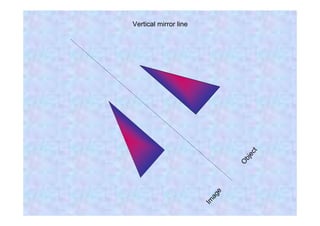
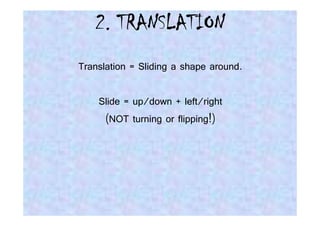
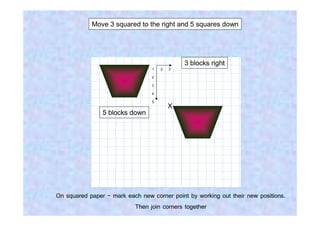
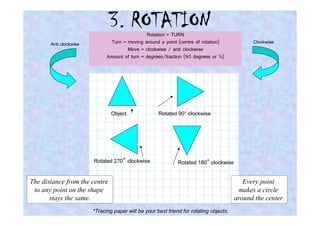
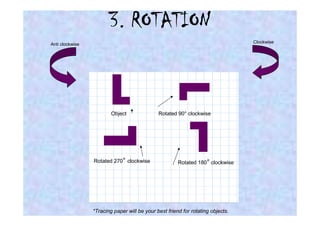
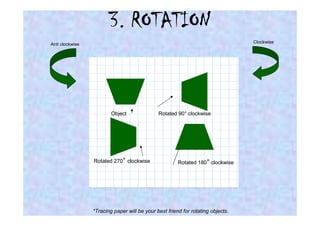
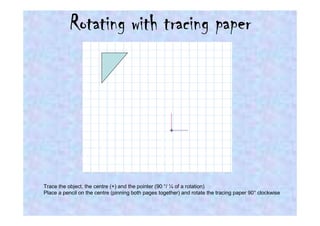
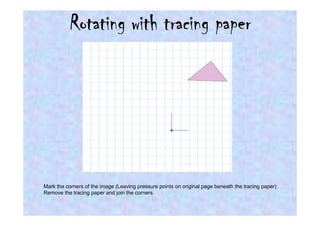
MATHS
        geometry


Transformations

    By Ginny Ruadh (P7)
Transformations
 Transformations = same shape, same size and same measurements
                        BUT    different position.


           Moving or changing shapes using strict rules.

          1. Reflection,
          2. Translation,
          3. Rotation


      After any of those transformations (turn, flip or slide),
the shape still has the same size, area, angles and line lengths.
1. REFLECTION
                                                Mirror line = FLIP
                                                Object vs image


   Object                Image                                                     Object                Image


The reflection of a point is the same distance from the mirror line, measured at 90% (right angels) to the line.
                Your image can be double checked by folding your paper along the mirror line.
                              The mirror line can be vertical, horizontal of diagonal.

                        *It’s the same as flip horizontal on Powerpoint – if mirror line is horizontal
Vertical mirror line


                       Object
                       Image
Horizontal mirror line


     Object   Image
Vertical mirror line


                                     t
                                   ec
                                 bj
                                O
                            e
                         ag
                       Im
2. TRANSLATION
Translation = Sliding a shape around.

    Slide = up/down + left/right
     (NOT turning or flipping!)
Move 3 squared to the right and 5 squares down


                                             3 blocks right
                                 1   2   3

                                 2

                                 3

                                 4

                                 5
                                         X
                5 blocks down


On squared paper - mark each new corner point by working out their new positions.
                          Then join corners together
3. ROTATION     Rotation = TURN
       Anti clockwise          Turn = moving around a point (centre of rotation)              Clockwise
                                      Move = clcokwise / anti clockwise
                              Amount of turn = degrees/fraction (90 degrees or ¼)


                                Object               Rotated 90° clockwise


                        Rotated 270° clockwise                Rotated 180° clockwise


The distance from the centre                                                               Every point
 to any point on the shape                                                               makes a circle
       stays the same.                                                                  around the center.
                        *Tracing paper will be your best friend for rotating objects.
3. ROTATION
Anti clockwise                                                                   Clockwise


                         Object               Rotated 90° clockwise


                 Rotated 270° clockwise                Rotated 180° clockwise


                 *Tracing paper will be your best friend for rotating objects.
Rotating with tracing paper


                                                     +


Trace the object, the centre (+) and the pointer (90 °/ ¼ of a rotation)
Place a pencil on the centre (pinning both pages together) and rotate the tracing paper 90° clockwise
Rotating with tracing paper


                                                     +


Mark the corners of the image (Leaving pressure points on original page beneath the tracing paper)
Remove the tracing paper and join the corners.
References
1.   http://www.mathsisfun.com
2.   Key Stage 2 – The Essentials of Maths (SRG)

Transformations

  • 1.
    MATHS geometry Transformations By Ginny Ruadh (P7)
  • 2.
    Transformations Transformations =same shape, same size and same measurements BUT different position. Moving or changing shapes using strict rules. 1. Reflection, 2. Translation, 3. Rotation After any of those transformations (turn, flip or slide), the shape still has the same size, area, angles and line lengths.
  • 3.
    1. REFLECTION Mirror line = FLIP Object vs image Object Image Object Image The reflection of a point is the same distance from the mirror line, measured at 90% (right angels) to the line. Your image can be double checked by folding your paper along the mirror line. The mirror line can be vertical, horizontal of diagonal. *It’s the same as flip horizontal on Powerpoint – if mirror line is horizontal
  • 4.
  • 5.
  • 6.
    Vertical mirror line t ec bj O e ag Im
  • 7.
    2. TRANSLATION Translation =Sliding a shape around. Slide = up/down + left/right (NOT turning or flipping!)
  • 8.
    Move 3 squaredto the right and 5 squares down 3 blocks right 1 2 3 2 3 4 5 X 5 blocks down On squared paper - mark each new corner point by working out their new positions. Then join corners together
  • 9.
    3. ROTATION Rotation = TURN Anti clockwise Turn = moving around a point (centre of rotation) Clockwise Move = clcokwise / anti clockwise Amount of turn = degrees/fraction (90 degrees or ¼) Object Rotated 90° clockwise Rotated 270° clockwise Rotated 180° clockwise The distance from the centre Every point to any point on the shape makes a circle stays the same. around the center. *Tracing paper will be your best friend for rotating objects.
  • 10.
    3. ROTATION Anti clockwise Clockwise Object Rotated 90° clockwise Rotated 270° clockwise Rotated 180° clockwise *Tracing paper will be your best friend for rotating objects.
  • 11.
    3. ROTATION Anti clockwise Clockwise Object Rotated 90° clockwise Rotated 270° clockwise Rotated 180° clockwise *Tracing paper will be your best friend for rotating objects.
  • 12.
    Rotating with tracingpaper + Trace the object, the centre (+) and the pointer (90 °/ ¼ of a rotation) Place a pencil on the centre (pinning both pages together) and rotate the tracing paper 90° clockwise
  • 13.
    Rotating with tracingpaper + Mark the corners of the image (Leaving pressure points on original page beneath the tracing paper) Remove the tracing paper and join the corners.
  • 14.
    References 1. http://www.mathsisfun.com 2. Key Stage 2 – The Essentials of Maths (SRG)