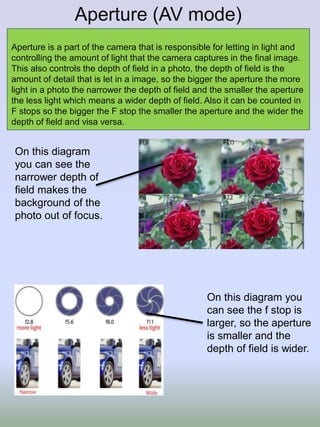
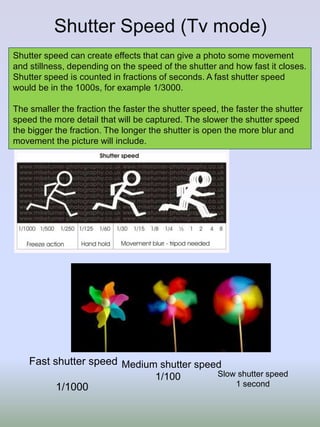
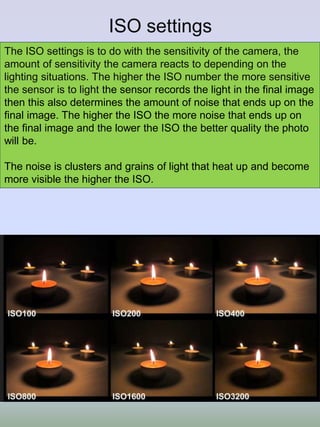
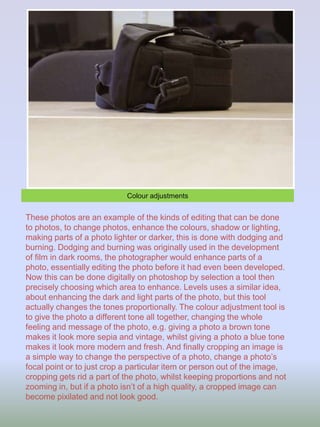
1
Aperture (AV mode)
Aperture is a part of the camera that is responsible for letting in light and
controlling the amount of light that the camera captures in the final image.
This also controls the depth of field in a photo, the depth of field is the
amount of detail that is let in a image, so the bigger the aperture the more
light in a photo the narrower the depth of field and the smaller the aperture
the less light which means a wider depth of field. Also it can be counted in
F stops so the bigger the F stop the smaller the aperture and the wider the
depth of field and visa versa.
On this diagram
you can see the
narrower depth of
field makes the
background of the
photo out of focus.
On this diagram you
can see the f stop is
larger, so the aperture
is smaller and the
depth of field is wider.
On this photo the camera setting had a
small aperture so this meant it had a
large depth of field so most of the photo
would be in focus. You can see this by
most of the photo being in focus like the
books being in sharp focus and also you
can see by the shelves being in focus
and being able to see more detail.
This time the aperture is midway, so the
depth of field will also be midway, but
now you can see on the photo that the
books have come out of the field of focus
and are slightly out of focus. Also the
shelves in the background have become
more unclear and blurry, because they
are not in focus.
This time the aperture is at its largest, so
now all the background and foreground
is out of focus and just the camera case
is in focus. The camera case is the only
thing in sharp focus because it is in the
line of focus that has been created by
the larger Fstop
F stop 8
F stop 4
F stop 2
Shutter Speed (Tv mode)
Shutter speed can create effects that can give a photo some movement
and stillness, depending on the speed of the shutter and how fast it closes.
Shutter speed is counted in fractions of seconds. A fast shutter speed
would be in the 1000s, for example 1/3000.
The smaller the fraction the faster the shutter speed, the faster the shutter
speed the more detail that will be captured. The slower the shutter speed
the bigger the fraction. The longer the shutter is open the more blur and
movement the picture will include.
Fast shutter speed
1/1000
Medium shutter speed
1/100 Slow shutter speed
1 second
This photo has been taken with a fast
shutter speed, so the movement is
captured so all the detail is kept and
there is no blurring.
This time the shutter speed was at a
medium speed, this did capture some
movement and blurring but not enough
to create a movement in the photo.
On this photo the shutter speed is slow
and it captures the movement in the
photo. Because the shutter was open for
longer this meant more light got into the
picture making it a bit over exposed.
1/500 shutter speed
1/100 shutter speed
¼ shutter speed
ISO settings
The ISO settings is to do with the sensitivity of the camera, the
amount of sensitivity the camera reacts to depending on the
lighting situations. The higher the ISO number the more sensitive
the sensor is to light the sensor records the light in the final image
then this also determines the amount of noise that ends up on the
final image. The higher the ISO the more noise that ends up on
the final image and the lower the ISO the better quality the photo
will be.
The noise is clusters and grains of light that heat up and become
more visible the higher the ISO.
On this photo I put the ISO settings on to
the highest setting, this has made the
camera sensitive to the light, if you
cropped into this or zoomed the noise in
this photo would be visible.
In this photo the ISO it about medium
sensitivity. The noise would be a lot less
visible if you zoomed into the photo.
In this photo the ISO is at its least so the
light sensitivity is not high. The noise on
this is the least and may not be very
visible when you crop or zoom into the
photo.
3200 ISO
600 ISO
200 ISO
White Balance
This is changing the white colour in the photo. The white
balance menu lets you choose to take an image for each
setting. Some settings will give more dramatic or subtle
results, the balance will make the photo more yellow or blue .
In this
selection of
photos it
shows how
different the
different white
balances can
make the same
photo look.
Using different white balances on the same photos each
give the same photos a very different feel. The top 2 photos
look a lot warmer and yellower, where as the bottom two
look colder and bluer. The white balance can change the
whole story of the photo and make them look like a very
different place.
White balance: warm
White balance: sunlight
White balance: Shade
White balance: tungsten
Original image
cropped image
Levels
Dodging and burning
Colour adjustments
These photos are an example of the kinds of editing that can be done
to photos, to change photos, enhance the colours, shadow or lighting,
making parts of a photo lighter or darker, this is done with dodging and
burning. Dodging and burning was originally used in the development
of film in dark rooms, the photographer would enhance parts of a
photo, essentially editing the photo before it had even been developed.
Now this can be done digitally on photoshop by selection a tool then
precisely choosing which area to enhance. Levels uses a similar idea,
about enhancing the dark and light parts of the photo, but this tool
actually changes the tones proportionally. The colour adjustment tool is
to give the photo a different tone all together, changing the whole
feeling and message of the photo, e.g. giving a photo a brown tone
makes it look more sepia and vintage, whilst giving a photo a blue tone
makes it look more modern and fresh. And finally cropping an image is
a simple way to change the perspective of a photo, change a photo’s
focal point or to just crop a particular item or person out of the image,
cropping gets rid a part of the photo, whilst keeping proportions and not
zooming in, but if a photo isn’t of a high quality, a cropped image can
become pixilated and not look good.

Canon getting started guideupdated

  • 1.
  • 2.
    Aperture (AV mode) Apertureis a part of the camera that is responsible for letting in light and controlling the amount of light that the camera captures in the final image. This also controls the depth of field in a photo, the depth of field is the amount of detail that is let in a image, so the bigger the aperture the more light in a photo the narrower the depth of field and the smaller the aperture the less light which means a wider depth of field. Also it can be counted in F stops so the bigger the F stop the smaller the aperture and the wider the depth of field and visa versa. On this diagram you can see the narrower depth of field makes the background of the photo out of focus. On this diagram you can see the f stop is larger, so the aperture is smaller and the depth of field is wider.
  • 3.
    On this photothe camera setting had a small aperture so this meant it had a large depth of field so most of the photo would be in focus. You can see this by most of the photo being in focus like the books being in sharp focus and also you can see by the shelves being in focus and being able to see more detail. This time the aperture is midway, so the depth of field will also be midway, but now you can see on the photo that the books have come out of the field of focus and are slightly out of focus. Also the shelves in the background have become more unclear and blurry, because they are not in focus. This time the aperture is at its largest, so now all the background and foreground is out of focus and just the camera case is in focus. The camera case is the only thing in sharp focus because it is in the line of focus that has been created by the larger Fstop F stop 8 F stop 4 F stop 2
  • 4.
    Shutter Speed (Tvmode) Shutter speed can create effects that can give a photo some movement and stillness, depending on the speed of the shutter and how fast it closes. Shutter speed is counted in fractions of seconds. A fast shutter speed would be in the 1000s, for example 1/3000. The smaller the fraction the faster the shutter speed, the faster the shutter speed the more detail that will be captured. The slower the shutter speed the bigger the fraction. The longer the shutter is open the more blur and movement the picture will include. Fast shutter speed 1/1000 Medium shutter speed 1/100 Slow shutter speed 1 second
  • 5.
    This photo hasbeen taken with a fast shutter speed, so the movement is captured so all the detail is kept and there is no blurring. This time the shutter speed was at a medium speed, this did capture some movement and blurring but not enough to create a movement in the photo. On this photo the shutter speed is slow and it captures the movement in the photo. Because the shutter was open for longer this meant more light got into the picture making it a bit over exposed. 1/500 shutter speed 1/100 shutter speed ¼ shutter speed
  • 6.
    ISO settings The ISOsettings is to do with the sensitivity of the camera, the amount of sensitivity the camera reacts to depending on the lighting situations. The higher the ISO number the more sensitive the sensor is to light the sensor records the light in the final image then this also determines the amount of noise that ends up on the final image. The higher the ISO the more noise that ends up on the final image and the lower the ISO the better quality the photo will be. The noise is clusters and grains of light that heat up and become more visible the higher the ISO.
  • 7.
    On this photoI put the ISO settings on to the highest setting, this has made the camera sensitive to the light, if you cropped into this or zoomed the noise in this photo would be visible. In this photo the ISO it about medium sensitivity. The noise would be a lot less visible if you zoomed into the photo. In this photo the ISO is at its least so the light sensitivity is not high. The noise on this is the least and may not be very visible when you crop or zoom into the photo. 3200 ISO 600 ISO 200 ISO
  • 8.
    White Balance This ischanging the white colour in the photo. The white balance menu lets you choose to take an image for each setting. Some settings will give more dramatic or subtle results, the balance will make the photo more yellow or blue . In this selection of photos it shows how different the different white balances can make the same photo look.
  • 9.
    Using different whitebalances on the same photos each give the same photos a very different feel. The top 2 photos look a lot warmer and yellower, where as the bottom two look colder and bluer. The white balance can change the whole story of the photo and make them look like a very different place. White balance: warm White balance: sunlight White balance: Shade White balance: tungsten
  • 10.
  • 11.
  • 12.
    Colour adjustments These photosare an example of the kinds of editing that can be done to photos, to change photos, enhance the colours, shadow or lighting, making parts of a photo lighter or darker, this is done with dodging and burning. Dodging and burning was originally used in the development of film in dark rooms, the photographer would enhance parts of a photo, essentially editing the photo before it had even been developed. Now this can be done digitally on photoshop by selection a tool then precisely choosing which area to enhance. Levels uses a similar idea, about enhancing the dark and light parts of the photo, but this tool actually changes the tones proportionally. The colour adjustment tool is to give the photo a different tone all together, changing the whole feeling and message of the photo, e.g. giving a photo a brown tone makes it look more sepia and vintage, whilst giving a photo a blue tone makes it look more modern and fresh. And finally cropping an image is a simple way to change the perspective of a photo, change a photo’s focal point or to just crop a particular item or person out of the image, cropping gets rid a part of the photo, whilst keeping proportions and not zooming in, but if a photo isn’t of a high quality, a cropped image can become pixilated and not look good.