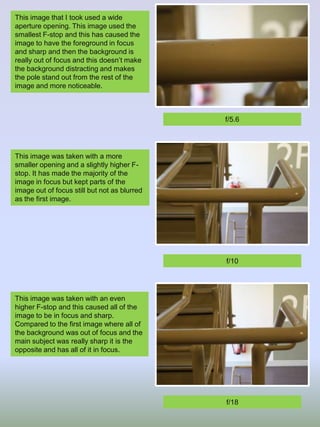
SlideShare a Scribd company logo
1
Aperture (AV Mode)
The aperture controls the depth of field in the images. When you have the AV mode set on
your camera, you can then manually control the aperture to what you want and the camera
automatically changes the shutter speed so it matches the aperture that has been set.
Aperture is measured with F-stops and when you have a lower F-stop then the wider the
opening of the aperture is. When the F-stop is higher, this makes the opening smaller for the
aperture. For example, when the F-stop is set at f/2.8, this would make the opening wide for
the aperture. This would cause the background in the image to be completely out of focus
and then the subject that is being focused on will be crisp sharp. If the F-stop was changed to
f/20, this would make a smaller opening for the aperture. This would make the whole image in
focus and crisp sharp.
When the aperture is set so the opening is wider, it allows more light to be allowed into the
camera lens. This then takes less time for the camera to set the exposure and this makes the
shutter speed faster. A wide aperture causes a shallow depth of field and this is what causes
the background to be out of focus. When the aperture has a smaller opening, less light is
allowed into the cameras lens and this takes more time for the exposure to be set and this
causes the shutter speed to be slow. Smaller apertures will cause a deep depth of field and
makes everything in the image really sharp.
Wide apertures are used mostly in low light conditions because more light is let into the
cameras lens and because the shutter speed is so fast, moving objects are caught and are
frozen how they are. Wide apertures are used for mainly portrait photography or macro
images as the photographer will want the background to be out of focus so that the subject or
model has the full attention and has the main focus when being looked at and it also makes
the background less distracting.
Smaller apertures are useful for taking images in good lighting conditions because there will
be enough light being used and let into the camera lens. The shutter speed isn’t as fast so it
is good if the photographer wanted motion to be noticed in the images. So if the photographer
was taking an image of the waterfall, the slower shutter speed allows the photographer to get
the motion effect of the water gushing. Smaller apertures are used mainly for taking
landscape images or for group images so that everything that is in the image is considerably
sharp.
This image that I took used a wide
aperture opening. This image used the
smallest F-stop and this has caused the
image to have the foreground in focus
and sharp and then the background is
really out of focus and this doesn’t make
the background distracting and makes
the pole stand out from the rest of the
image and more noticeable.

f/5.6

This image was taken with a more
smaller opening and a slightly higher Fstop. It has made the majority of the
image in focus but kept parts of the
image out of focus still but not as blurred
as the first image.

f/10

This image was taken with an even
higher F-stop and this caused all of the
image to be in focus and sharp.
Compared to the first image where all of
the background was out of focus and the
main subject was really sharp it is the
opposite and has all of it in focus.

f/18
Shutter Speed (TV Mode)
Shutter speed allows you to control how long the shutter is open on your camera. When you
have the setting TV set on your camera, it allows you to change the length of the shutter and
how long it’s left open. Shutter speed works in fractions of time. So they can go from fractions
of a second to several seconds.
For example, they are seen on the camera like this 1/1000 or 1/10. When it reads 1/1000 this
means the picture is took really fast and can capture things that our eyes even can’t see
because it is that quick at taking the image and this freezes everything in that fraction of a
second. But when you see it say 1/10, this means that the image was took with a longer
shutter speed and this captures the movement seen before taking the image. To get an image
which avoids seeing the camera shakes is using the fraction 1/60 or more. Anything used
below this fraction will start to show camera shakes and that’s when a tripod is ideal to take
the image.
When taking images on a really bright day where there is a lot of light, the shutter speed has
to be set so it’s faster rather than a slower shutter speed because if the shutter speed is slow
it allows more light to be let into the lens and this causes the images to become overexposed
and this can make the images nearly white. If it’s a bright day and by using a faster shutter
speed, the right amount of light is let into the lens and has the right amount of light for the
image and no overexposed parts to the image. When taking night time images or images in
low lighting places, the shutter speed needs to be slower rather than faster. This is because
when the shutter speed is too fast, it doesn’t get the right amount of light or gets enough light
for the image and this causes the images to be dark and underexposed. But by using a
slower shutter speed, it has enough time to then let the right amount of light in that is needed
to brighten up the image.
But when you keep the shutter open for longer, you are more likely to get out of focus images
due to camera shake because the slightest movement and the camera detects this and then
it comes out as a blurred image. Fine art photographers sometimes like this effect that the
image has but for people who want a sharp and in focus image then either using a tripod or
leaning the camera on the wall or on a table, this keeps the camera still and captures sharp
images.
Having a slow shutter speed is good for taking images of trains coming past or capturing the
water falling down the waterfalls. For taking images with a fast shutter speed, this is good for
water sport images or acrobatic images.
This image was took with a fast shutter
speed. It freezes the people who were
moving and this makes the images really
sharp as no movement is detected. As
the shutter isn’t open for very long, there
is no risk of camera shakes being
detected and because it was sunny the
image isn’t too underexposed.

1/500 sec

This image was taken with a slightly
slower shutter speed. This makes a lot of
difference from the first image because
you can see a bit of movement from the
people walking and to stop the camera
shakes coming though, I leant on the
hand rails and this made the image really
sharp and then the movement had been
detected slightly.

1/25 sec

This image was taken with a really slow
shutter speed and this means the shutter
was open a lot longer than the first
image. Movement has been detected a
lot in this image and the people don’t
show any sharp detail on them and it is
seen a lot more in this image than the
middle image. I still leant on the hand rail
so that no camera shakes were detected
and this made my image really sharp.

1/10 sec
ISO Settings
ISO is all about how sensitive to light the camera is. The normal range of ISO is between 200
and it goes up to 1600, depending on what the camera is, the range of ISO varies. When
choosing the number it has two important meanings with it.
The first one is it sets the right amount of exposure that is needed with the amount of light
being taken in. If you go out and take an image on a bright, sunny day, a lower ISO needs to
be used, for example, 100 or 200 ISO.. This is because the lower the number is, the more
light is required and the more light that is required, the more likely a shutter speed needs to
be used. Then if you don’t have a lot of light or if you aren’t using a fast shutter speed, the
ISO number would need to be raised. Each time the ISO number is doubled (so from 100 to
200) it means that the camera only needs half the light to get the same exposure. For
example, if the shutter speed was at 1/250 and the ISO was set at 200, if you changed the
ISO to 400 the shutter speed would need to be changed to 1/500 because this then gives you
the same exposure because the numbers have been changed but they have only been
doubled.
Higher ISOs are usually used for indoor photography and for activities like sporting events
because the shutter speed would need to be fast so that it freezes the action and the
photographers would normally use an ISO around 1600.
The second important meaning is that it also detects the noise in the image. So when you use
a higher ISO, the quality of the image decreases and the visibility of ‘noise’ increases. Noise
is the grainy effect which is seen on images sometimes and is more noticeable on pictures
which have been taken on a mobile phone and tend not to be as bad when using a digital
camera and can be good quality with ISOs that are 1600 or above.
There are quite a few factors which can affect how noticeable the noise is. The first factor is
the size of the pixels used on the sensor. If there is larger pixels, the amount of noise on the
image is reduced and this is why digital cameras can produce high quality images because
they have larger sensors which produce larger pixels.
Another factor is the amount and the type of noise reduction that is being applied in the
camera. All the pixels collect noise, so every camera runs processing on the image taken and
this is to minimize the noise. Newer models of cameras have the newer technology that
reduce the noise.
This image was taken with the lowest
ISO setting. It is quite dark and I don’t
know if that was due to the lighting but it
shouldn’t have gone dark like that and
should have had a balanced amount of
light on the image like the bottom two
images.

ISO 100

This image was taken with a slightly
higher ISO setting and it hasn’t gone
dark or light and has the right amount of
light on the image and is similar to the
bottom image because we were in
daylight.

ISO 800

This image was taken with an even
higher ISO setting and looks exactly the
same as the middle image. All the detail
is maintained and it is at a high quality
just like the middle image.

ISO 3200
White Balance
The white balance is all about getting the colours in the images as accurate as they look to
the naked eye. Having the right white balance set in different lightings helps the camera
identify what the colours are.
When taking images sometimes they might come out with a bluish tint too them or a
yellow/orange tint. This is because different lightings have different temperatures or colours to
them and without changing the settings to what lightings your under, this can cause the
camera to get confused as to what the lighting is and this causes the different tints over the
images.
Fluorescent light adds a blue tint to the images whereas tungsten lights have a yellow tint to
the images. The temperatures can range from a light blue like the sky, to a warm light from a
candle.
We don’t see the different temperatures because our eyes adjust to it automatically but to a
camera, it isn’t smart enough to make the adjustments like we can automatically and that’s
why the settings need to be manually changed by us and so it needs to be told if there is
warm light, to cool it down and when there is cool light, to warm it up.
These are some of the basic White Balance settings on the camera:
Auto – is when the camera tries to make a guess of the colours in basic and easy lighting.
But in trickier lighting situations it isn’t as good to use Auto.
Tungsten – Is the mode which is mainly used for indoor shoots, especially under
incandescent lighting (such as bulb lighting) and it usually cools down the colours in the
images.
Fluorescent – is the setting which will warm up the colours in the images and it also
compensates for the ‘cool’ light of the florescent light.
Daylight/Sunny – is the mode which isn’t displayed on most cameras because it sets things
to a fairly normal and isn’t a big change to the images.
Cloudy – is the mode that warms up the images a little bit more than the daylight mode does.
Flash – When using flash on a camera it can make the images quite cool and so having this
mode on helps warm up some of the images.
Shade – The light in the shade is normally quite cool and blue so using this mode warms
things up a little.
Tungsten Light

Cloudy

White Fluorescent Light

Flash

All these images were took when it was really bright and sunny. In the first image I used
the Tungsten mode and it has a really heavy blue tint to the image as it is used for mainly
bulb lighting and is the mode which cools down the colours. The second image was taken
using the Cloudy mode. This has made the image just slightly warmer than it already was
but not massively as this mode generally warms up the image slightly. The third image
was taken with the Fluorescent mode. This has made the image have a blue frost over the
image but not as deep as the Tungsten mode did. This is because this mode compensates
for the cool light of a fluorescent light. The final image was taken using the Flash mode.
This has warmed the image up again. This is because the flash leaves quite a cool effect
on an image and having that mode on it warms up the colours in the image.
Original image

Cropped
Levels

Dodging and burning
Colour adjustments

More Related Content

What's hot

Canon getting started guide
Canon getting started guideCanon getting started guide
Canon getting started guidePJG123
 
Canon getting started guide
Canon getting started guideCanon getting started guide
Canon getting started guidePJG123
 
Canon getting started guide
Canon getting started guideCanon getting started guide
Canon getting started guidePJG123
 
Camera - Getting Started Guide
Camera - Getting Started GuideCamera - Getting Started Guide
Camera - Getting Started Guide
tayniegage
 
Photography lo2!!
Photography lo2!!Photography lo2!!
Photography lo2!!AlanSmith96
 
Canon getting started guide --
Canon getting started guide --Canon getting started guide --
Canon getting started guide --
Jonah Adshead
 
Photography LO2!
Photography LO2!Photography LO2!
Photography LO2!AlanSmith96
 
Photography lo2!
Photography lo2!Photography lo2!
Photography lo2!AlanSmith96
 
Task 2 v2
Task 2 v2Task 2 v2
Task 2 v2
Mel Storey
 
Task 2 reuploaded
Task 2 reuploadedTask 2 reuploaded
Task 2 reuploadedMel Storey
 
Canon getting started guide
Canon getting started guideCanon getting started guide
Canon getting started guideCraig Cassidy
 
PhotographyTerminologyComplete
PhotographyTerminologyCompletePhotographyTerminologyComplete
PhotographyTerminologyCompleteChloeKyri
 
Canon getting started guideeter
Canon getting started guideeterCanon getting started guideeter
Canon getting started guideeter
JakeSellers
 
Photography kits
Photography kitsPhotography kits
Photography kits
subith joseph
 
Canon getting started guide
Canon getting started guideCanon getting started guide
Canon getting started guideJonah Adshead
 
Task 2 photography terminology work sheet
Task 2 photography terminology work sheetTask 2 photography terminology work sheet
Task 2 photography terminology work sheet
LewisDunn
 
Task 2 canon getting started guide
 Task 2 canon getting started guide Task 2 canon getting started guide
Task 2 canon getting started guide
HannahMizen
 
Canon getting started guide2
Canon getting started guide2Canon getting started guide2
Canon getting started guide2HannahMizen
 
Fine Tuning Sharpness Pres
Fine Tuning Sharpness PresFine Tuning Sharpness Pres
Fine Tuning Sharpness PresSarah Fernetich
 
Camera Components
Camera ComponentsCamera Components
Camera Components
Matheus Verstoep
 

What's hot (20)

Canon getting started guide
Canon getting started guideCanon getting started guide
Canon getting started guide
 
Canon getting started guide
Canon getting started guideCanon getting started guide
Canon getting started guide
 
Canon getting started guide
Canon getting started guideCanon getting started guide
Canon getting started guide
 
Camera - Getting Started Guide
Camera - Getting Started GuideCamera - Getting Started Guide
Camera - Getting Started Guide
 
Photography lo2!!
Photography lo2!!Photography lo2!!
Photography lo2!!
 
Canon getting started guide --
Canon getting started guide --Canon getting started guide --
Canon getting started guide --
 
Photography LO2!
Photography LO2!Photography LO2!
Photography LO2!
 
Photography lo2!
Photography lo2!Photography lo2!
Photography lo2!
 
Task 2 v2
Task 2 v2Task 2 v2
Task 2 v2
 
Task 2 reuploaded
Task 2 reuploadedTask 2 reuploaded
Task 2 reuploaded
 
Canon getting started guide
Canon getting started guideCanon getting started guide
Canon getting started guide
 
PhotographyTerminologyComplete
PhotographyTerminologyCompletePhotographyTerminologyComplete
PhotographyTerminologyComplete
 
Canon getting started guideeter
Canon getting started guideeterCanon getting started guideeter
Canon getting started guideeter
 
Photography kits
Photography kitsPhotography kits
Photography kits
 
Canon getting started guide
Canon getting started guideCanon getting started guide
Canon getting started guide
 
Task 2 photography terminology work sheet
Task 2 photography terminology work sheetTask 2 photography terminology work sheet
Task 2 photography terminology work sheet
 
Task 2 canon getting started guide
 Task 2 canon getting started guide Task 2 canon getting started guide
Task 2 canon getting started guide
 
Canon getting started guide2
Canon getting started guide2Canon getting started guide2
Canon getting started guide2
 
Fine Tuning Sharpness Pres
Fine Tuning Sharpness PresFine Tuning Sharpness Pres
Fine Tuning Sharpness Pres
 
Camera Components
Camera ComponentsCamera Components
Camera Components
 

Similar to Canon Getting Started Guide

Camera Settings Guide
Camera Settings GuideCamera Settings Guide
Camera Settings Guide
Chris Bailey
 
What is ios, shutter speed and aperture photography
What is ios, shutter speed and aperture  photographyWhat is ios, shutter speed and aperture  photography
What is ios, shutter speed and aperture photography
jackoregan1996
 
3 Canon getting started guide 2
3 Canon getting started guide 23 Canon getting started guide 2
3 Canon getting started guide 2RichardBurnn
 
Canon getting started guide
Canon getting started guide Canon getting started guide
Canon getting started guide TheJellehKed
 
Task 2 photography terminology
Task 2 photography terminology Task 2 photography terminology
Task 2 photography terminology
LouiseMaher18
 
Canon getting started guide 3
Canon getting started guide 3Canon getting started guide 3
Canon getting started guide 3RichardBurnn
 
Canon getting started guide
Canon getting started guideCanon getting started guide
Canon getting started guideRichardBurnn
 
Canongettingstartedguide 140225031859-phpapp02
Canongettingstartedguide 140225031859-phpapp02Canongettingstartedguide 140225031859-phpapp02
Canongettingstartedguide 140225031859-phpapp02Jonah Adshead
 
Canon getting started guide
Canon getting started guide Canon getting started guide
Canon getting started guide DaJellehked
 
Unit 57 photography evidence template
Unit 57 photography evidence templateUnit 57 photography evidence template
Unit 57 photography evidence template
Callumknight
 
Photography terminology work
Photography terminology workPhotography terminology work
Photography terminology workSarahMurrayy
 
Photography terminology work
Photography terminology workPhotography terminology work
Photography terminology workSarahMurrayy
 
Photography LO2 - canon guide
Photography LO2 - canon guidePhotography LO2 - canon guide
Photography LO2 - canon guide
TheJellehKed
 
Canon getting started guide pro forma
Canon getting started guide pro formaCanon getting started guide pro forma
Canon getting started guide pro forma
Dan Bell
 
Canon getting started guideupdated
Canon getting started guideupdatedCanon getting started guideupdated
Canon getting started guideupdated
HannahMizen
 

Similar to Canon Getting Started Guide (16)

Camera Settings Guide
Camera Settings GuideCamera Settings Guide
Camera Settings Guide
 
What is ios, shutter speed and aperture photography
What is ios, shutter speed and aperture  photographyWhat is ios, shutter speed and aperture  photography
What is ios, shutter speed and aperture photography
 
3 Canon getting started guide 2
3 Canon getting started guide 23 Canon getting started guide 2
3 Canon getting started guide 2
 
Canon getting started guide
Canon getting started guide Canon getting started guide
Canon getting started guide
 
Task 2 photography terminology
Task 2 photography terminology Task 2 photography terminology
Task 2 photography terminology
 
Canon getting started guide 3
Canon getting started guide 3Canon getting started guide 3
Canon getting started guide 3
 
Canon getting started guide
Canon getting started guideCanon getting started guide
Canon getting started guide
 
Canongettingstartedguide 140225031859-phpapp02
Canongettingstartedguide 140225031859-phpapp02Canongettingstartedguide 140225031859-phpapp02
Canongettingstartedguide 140225031859-phpapp02
 
Canon getting started guide
Canon getting started guide Canon getting started guide
Canon getting started guide
 
Unit 57 photography evidence template
Unit 57 photography evidence templateUnit 57 photography evidence template
Unit 57 photography evidence template
 
Photography terminology work
Photography terminology workPhotography terminology work
Photography terminology work
 
Photography terminology work
Photography terminology workPhotography terminology work
Photography terminology work
 
Photography LO2 - canon guide
Photography LO2 - canon guidePhotography LO2 - canon guide
Photography LO2 - canon guide
 
Canon getting started guide pro forma
Canon getting started guide pro formaCanon getting started guide pro forma
Canon getting started guide pro forma
 
Canon guide
Canon guideCanon guide
Canon guide
 
Canon getting started guideupdated
Canon getting started guideupdatedCanon getting started guideupdated
Canon getting started guideupdated
 

More from hayleylou11

Initial Research
Initial ResearchInitial Research
Initial Research
hayleylou11
 
Production Powerpoint 2
Production Powerpoint 2Production Powerpoint 2
Production Powerpoint 2
hayleylou11
 
Band Description
Band DescriptionBand Description
Band Description
hayleylou11
 
Production Powerpoint 2
Production Powerpoint 2Production Powerpoint 2
Production Powerpoint 2
hayleylou11
 
Production Research
Production ResearchProduction Research
Production Research
hayleylou11
 
Production Powerpoint
Production PowerpointProduction Powerpoint
Production Powerpoint
hayleylou11
 
Production Powerpoint
Production PowerpointProduction Powerpoint
Production Powerpoint
hayleylou11
 
Mood Board
Mood BoardMood Board
Mood Board
hayleylou11
 
SAS Factfile
SAS FactfileSAS Factfile
SAS Factfile
hayleylou11
 
Research Template
Research TemplateResearch Template
Research Template
hayleylou11
 
Band Description
Band DescriptionBand Description
Band Description
hayleylou11
 
Task 4
Task 4Task 4
Task 4
hayleylou11
 
Evaluation
EvaluationEvaluation
Evaluation
hayleylou11
 
Arctic Monkeys
Arctic Monkeys Arctic Monkeys
Arctic Monkeys
hayleylou11
 
Artist Research
Artist ResearchArtist Research
Artist Research
hayleylou11
 

More from hayleylou11 (20)

Initial Research
Initial ResearchInitial Research
Initial Research
 
Production Powerpoint 2
Production Powerpoint 2Production Powerpoint 2
Production Powerpoint 2
 
Band Description
Band DescriptionBand Description
Band Description
 
Production Powerpoint 2
Production Powerpoint 2Production Powerpoint 2
Production Powerpoint 2
 
Production Research
Production ResearchProduction Research
Production Research
 
Production Powerpoint
Production PowerpointProduction Powerpoint
Production Powerpoint
 
Production Powerpoint
Production PowerpointProduction Powerpoint
Production Powerpoint
 
Task 3
Task 3Task 3
Task 3
 
Mood Board
Mood BoardMood Board
Mood Board
 
SAS Factfile
SAS FactfileSAS Factfile
SAS Factfile
 
Research Template
Research TemplateResearch Template
Research Template
 
Band Description
Band DescriptionBand Description
Band Description
 
Task 4
Task 4Task 4
Task 4
 
Task 2
Task 2Task 2
Task 2
 
Task 10
Task 10Task 10
Task 10
 
Evaluation
EvaluationEvaluation
Evaluation
 
Task 10
Task 10Task 10
Task 10
 
Arctic Monkeys
Arctic Monkeys Arctic Monkeys
Arctic Monkeys
 
Task 10
Task 10Task 10
Task 10
 
Artist Research
Artist ResearchArtist Research
Artist Research
 

Recently uploaded

The Challenger.pdf DNHS Official Publication
The Challenger.pdf DNHS Official PublicationThe Challenger.pdf DNHS Official Publication
The Challenger.pdf DNHS Official Publication
Delapenabediema
 
TESDA TM1 REVIEWER FOR NATIONAL ASSESSMENT WRITTEN AND ORAL QUESTIONS WITH A...
TESDA TM1 REVIEWER  FOR NATIONAL ASSESSMENT WRITTEN AND ORAL QUESTIONS WITH A...TESDA TM1 REVIEWER  FOR NATIONAL ASSESSMENT WRITTEN AND ORAL QUESTIONS WITH A...
TESDA TM1 REVIEWER FOR NATIONAL ASSESSMENT WRITTEN AND ORAL QUESTIONS WITH A...
EugeneSaldivar
 
Home assignment II on Spectroscopy 2024 Answers.pdf
Home assignment II on Spectroscopy 2024 Answers.pdfHome assignment II on Spectroscopy 2024 Answers.pdf
Home assignment II on Spectroscopy 2024 Answers.pdf
Tamralipta Mahavidyalaya
 
Introduction to Quality Improvement Essentials
Introduction to Quality Improvement EssentialsIntroduction to Quality Improvement Essentials
Introduction to Quality Improvement Essentials
Excellence Foundation for South Sudan
 
How to Make a Field invisible in Odoo 17
How to Make a Field invisible in Odoo 17How to Make a Field invisible in Odoo 17
How to Make a Field invisible in Odoo 17
Celine George
 
Additional Benefits for Employee Website.pdf
Additional Benefits for Employee Website.pdfAdditional Benefits for Employee Website.pdf
Additional Benefits for Employee Website.pdf
joachimlavalley1
 
Model Attribute Check Company Auto Property
Model Attribute  Check Company Auto PropertyModel Attribute  Check Company Auto Property
Model Attribute Check Company Auto Property
Celine George
 
aaaaaaaaaaaaaaaaaaaaaaaaaaaaaaaaaaaaaaaaaaaaaaaaaaaaaaa
aaaaaaaaaaaaaaaaaaaaaaaaaaaaaaaaaaaaaaaaaaaaaaaaaaaaaaaaaaaaaaaaaaaaaaaaaaaaaaaaaaaaaaaaaaaaaaaaaaaaaaaaaaaaaa
aaaaaaaaaaaaaaaaaaaaaaaaaaaaaaaaaaaaaaaaaaaaaaaaaaaaaaa
siemaillard
 
ESC Beyond Borders _From EU to You_ InfoPack general.pdf
ESC Beyond Borders _From EU to You_ InfoPack general.pdfESC Beyond Borders _From EU to You_ InfoPack general.pdf
ESC Beyond Borders _From EU to You_ InfoPack general.pdf
Fundacja Rozwoju Społeczeństwa Przedsiębiorczego
 
Ethnobotany and Ethnopharmacology ......
Ethnobotany and Ethnopharmacology ......Ethnobotany and Ethnopharmacology ......
Ethnobotany and Ethnopharmacology ......
Ashokrao Mane college of Pharmacy Peth-Vadgaon
 
Palestine last event orientationfvgnh .pptx
Palestine last event orientationfvgnh .pptxPalestine last event orientationfvgnh .pptx
Palestine last event orientationfvgnh .pptx
RaedMohamed3
 
Overview on Edible Vaccine: Pros & Cons with Mechanism
Overview on Edible Vaccine: Pros & Cons with MechanismOverview on Edible Vaccine: Pros & Cons with Mechanism
Overview on Edible Vaccine: Pros & Cons with Mechanism
DeeptiGupta154
 
The French Revolution Class 9 Study Material pdf free download
The French Revolution Class 9 Study Material pdf free downloadThe French Revolution Class 9 Study Material pdf free download
The French Revolution Class 9 Study Material pdf free download
Vivekanand Anglo Vedic Academy
 
Synthetic Fiber Construction in lab .pptx
Synthetic Fiber Construction in lab .pptxSynthetic Fiber Construction in lab .pptx
Synthetic Fiber Construction in lab .pptx
Pavel ( NSTU)
 
Welcome to TechSoup New Member Orientation and Q&A (May 2024).pdf
Welcome to TechSoup   New Member Orientation and Q&A (May 2024).pdfWelcome to TechSoup   New Member Orientation and Q&A (May 2024).pdf
Welcome to TechSoup New Member Orientation and Q&A (May 2024).pdf
TechSoup
 
CLASS 11 CBSE B.St Project AIDS TO TRADE - INSURANCE
CLASS 11 CBSE B.St Project AIDS TO TRADE - INSURANCECLASS 11 CBSE B.St Project AIDS TO TRADE - INSURANCE
CLASS 11 CBSE B.St Project AIDS TO TRADE - INSURANCE
BhavyaRajput3
 
The approach at University of Liverpool.pptx
The approach at University of Liverpool.pptxThe approach at University of Liverpool.pptx
The approach at University of Liverpool.pptx
Jisc
 
How to Split Bills in the Odoo 17 POS Module
How to Split Bills in the Odoo 17 POS ModuleHow to Split Bills in the Odoo 17 POS Module
How to Split Bills in the Odoo 17 POS Module
Celine George
 
1.4 modern child centered education - mahatma gandhi-2.pptx
1.4 modern child centered education - mahatma gandhi-2.pptx1.4 modern child centered education - mahatma gandhi-2.pptx
1.4 modern child centered education - mahatma gandhi-2.pptx
JosvitaDsouza2
 
The Art Pastor's Guide to Sabbath | Steve Thomason
The Art Pastor's Guide to Sabbath | Steve ThomasonThe Art Pastor's Guide to Sabbath | Steve Thomason
The Art Pastor's Guide to Sabbath | Steve Thomason
Steve Thomason
 

Recently uploaded (20)

The Challenger.pdf DNHS Official Publication
The Challenger.pdf DNHS Official PublicationThe Challenger.pdf DNHS Official Publication
The Challenger.pdf DNHS Official Publication
 
TESDA TM1 REVIEWER FOR NATIONAL ASSESSMENT WRITTEN AND ORAL QUESTIONS WITH A...
TESDA TM1 REVIEWER  FOR NATIONAL ASSESSMENT WRITTEN AND ORAL QUESTIONS WITH A...TESDA TM1 REVIEWER  FOR NATIONAL ASSESSMENT WRITTEN AND ORAL QUESTIONS WITH A...
TESDA TM1 REVIEWER FOR NATIONAL ASSESSMENT WRITTEN AND ORAL QUESTIONS WITH A...
 
Home assignment II on Spectroscopy 2024 Answers.pdf
Home assignment II on Spectroscopy 2024 Answers.pdfHome assignment II on Spectroscopy 2024 Answers.pdf
Home assignment II on Spectroscopy 2024 Answers.pdf
 
Introduction to Quality Improvement Essentials
Introduction to Quality Improvement EssentialsIntroduction to Quality Improvement Essentials
Introduction to Quality Improvement Essentials
 
How to Make a Field invisible in Odoo 17
How to Make a Field invisible in Odoo 17How to Make a Field invisible in Odoo 17
How to Make a Field invisible in Odoo 17
 
Additional Benefits for Employee Website.pdf
Additional Benefits for Employee Website.pdfAdditional Benefits for Employee Website.pdf
Additional Benefits for Employee Website.pdf
 
Model Attribute Check Company Auto Property
Model Attribute  Check Company Auto PropertyModel Attribute  Check Company Auto Property
Model Attribute Check Company Auto Property
 
aaaaaaaaaaaaaaaaaaaaaaaaaaaaaaaaaaaaaaaaaaaaaaaaaaaaaaa
aaaaaaaaaaaaaaaaaaaaaaaaaaaaaaaaaaaaaaaaaaaaaaaaaaaaaaaaaaaaaaaaaaaaaaaaaaaaaaaaaaaaaaaaaaaaaaaaaaaaaaaaaaaaaa
aaaaaaaaaaaaaaaaaaaaaaaaaaaaaaaaaaaaaaaaaaaaaaaaaaaaaaa
 
ESC Beyond Borders _From EU to You_ InfoPack general.pdf
ESC Beyond Borders _From EU to You_ InfoPack general.pdfESC Beyond Borders _From EU to You_ InfoPack general.pdf
ESC Beyond Borders _From EU to You_ InfoPack general.pdf
 
Ethnobotany and Ethnopharmacology ......
Ethnobotany and Ethnopharmacology ......Ethnobotany and Ethnopharmacology ......
Ethnobotany and Ethnopharmacology ......
 
Palestine last event orientationfvgnh .pptx
Palestine last event orientationfvgnh .pptxPalestine last event orientationfvgnh .pptx
Palestine last event orientationfvgnh .pptx
 
Overview on Edible Vaccine: Pros & Cons with Mechanism
Overview on Edible Vaccine: Pros & Cons with MechanismOverview on Edible Vaccine: Pros & Cons with Mechanism
Overview on Edible Vaccine: Pros & Cons with Mechanism
 
The French Revolution Class 9 Study Material pdf free download
The French Revolution Class 9 Study Material pdf free downloadThe French Revolution Class 9 Study Material pdf free download
The French Revolution Class 9 Study Material pdf free download
 
Synthetic Fiber Construction in lab .pptx
Synthetic Fiber Construction in lab .pptxSynthetic Fiber Construction in lab .pptx
Synthetic Fiber Construction in lab .pptx
 
Welcome to TechSoup New Member Orientation and Q&A (May 2024).pdf
Welcome to TechSoup   New Member Orientation and Q&A (May 2024).pdfWelcome to TechSoup   New Member Orientation and Q&A (May 2024).pdf
Welcome to TechSoup New Member Orientation and Q&A (May 2024).pdf
 
CLASS 11 CBSE B.St Project AIDS TO TRADE - INSURANCE
CLASS 11 CBSE B.St Project AIDS TO TRADE - INSURANCECLASS 11 CBSE B.St Project AIDS TO TRADE - INSURANCE
CLASS 11 CBSE B.St Project AIDS TO TRADE - INSURANCE
 
The approach at University of Liverpool.pptx
The approach at University of Liverpool.pptxThe approach at University of Liverpool.pptx
The approach at University of Liverpool.pptx
 
How to Split Bills in the Odoo 17 POS Module
How to Split Bills in the Odoo 17 POS ModuleHow to Split Bills in the Odoo 17 POS Module
How to Split Bills in the Odoo 17 POS Module
 
1.4 modern child centered education - mahatma gandhi-2.pptx
1.4 modern child centered education - mahatma gandhi-2.pptx1.4 modern child centered education - mahatma gandhi-2.pptx
1.4 modern child centered education - mahatma gandhi-2.pptx
 
The Art Pastor's Guide to Sabbath | Steve Thomason
The Art Pastor's Guide to Sabbath | Steve ThomasonThe Art Pastor's Guide to Sabbath | Steve Thomason
The Art Pastor's Guide to Sabbath | Steve Thomason
 

Canon Getting Started Guide

  • 1. 1
  • 2. Aperture (AV Mode) The aperture controls the depth of field in the images. When you have the AV mode set on your camera, you can then manually control the aperture to what you want and the camera automatically changes the shutter speed so it matches the aperture that has been set. Aperture is measured with F-stops and when you have a lower F-stop then the wider the opening of the aperture is. When the F-stop is higher, this makes the opening smaller for the aperture. For example, when the F-stop is set at f/2.8, this would make the opening wide for the aperture. This would cause the background in the image to be completely out of focus and then the subject that is being focused on will be crisp sharp. If the F-stop was changed to f/20, this would make a smaller opening for the aperture. This would make the whole image in focus and crisp sharp. When the aperture is set so the opening is wider, it allows more light to be allowed into the camera lens. This then takes less time for the camera to set the exposure and this makes the shutter speed faster. A wide aperture causes a shallow depth of field and this is what causes the background to be out of focus. When the aperture has a smaller opening, less light is allowed into the cameras lens and this takes more time for the exposure to be set and this causes the shutter speed to be slow. Smaller apertures will cause a deep depth of field and makes everything in the image really sharp. Wide apertures are used mostly in low light conditions because more light is let into the cameras lens and because the shutter speed is so fast, moving objects are caught and are frozen how they are. Wide apertures are used for mainly portrait photography or macro images as the photographer will want the background to be out of focus so that the subject or model has the full attention and has the main focus when being looked at and it also makes the background less distracting. Smaller apertures are useful for taking images in good lighting conditions because there will be enough light being used and let into the camera lens. The shutter speed isn’t as fast so it is good if the photographer wanted motion to be noticed in the images. So if the photographer was taking an image of the waterfall, the slower shutter speed allows the photographer to get the motion effect of the water gushing. Smaller apertures are used mainly for taking landscape images or for group images so that everything that is in the image is considerably sharp.
  • 3. This image that I took used a wide aperture opening. This image used the smallest F-stop and this has caused the image to have the foreground in focus and sharp and then the background is really out of focus and this doesn’t make the background distracting and makes the pole stand out from the rest of the image and more noticeable. f/5.6 This image was taken with a more smaller opening and a slightly higher Fstop. It has made the majority of the image in focus but kept parts of the image out of focus still but not as blurred as the first image. f/10 This image was taken with an even higher F-stop and this caused all of the image to be in focus and sharp. Compared to the first image where all of the background was out of focus and the main subject was really sharp it is the opposite and has all of it in focus. f/18
  • 4. Shutter Speed (TV Mode) Shutter speed allows you to control how long the shutter is open on your camera. When you have the setting TV set on your camera, it allows you to change the length of the shutter and how long it’s left open. Shutter speed works in fractions of time. So they can go from fractions of a second to several seconds. For example, they are seen on the camera like this 1/1000 or 1/10. When it reads 1/1000 this means the picture is took really fast and can capture things that our eyes even can’t see because it is that quick at taking the image and this freezes everything in that fraction of a second. But when you see it say 1/10, this means that the image was took with a longer shutter speed and this captures the movement seen before taking the image. To get an image which avoids seeing the camera shakes is using the fraction 1/60 or more. Anything used below this fraction will start to show camera shakes and that’s when a tripod is ideal to take the image. When taking images on a really bright day where there is a lot of light, the shutter speed has to be set so it’s faster rather than a slower shutter speed because if the shutter speed is slow it allows more light to be let into the lens and this causes the images to become overexposed and this can make the images nearly white. If it’s a bright day and by using a faster shutter speed, the right amount of light is let into the lens and has the right amount of light for the image and no overexposed parts to the image. When taking night time images or images in low lighting places, the shutter speed needs to be slower rather than faster. This is because when the shutter speed is too fast, it doesn’t get the right amount of light or gets enough light for the image and this causes the images to be dark and underexposed. But by using a slower shutter speed, it has enough time to then let the right amount of light in that is needed to brighten up the image. But when you keep the shutter open for longer, you are more likely to get out of focus images due to camera shake because the slightest movement and the camera detects this and then it comes out as a blurred image. Fine art photographers sometimes like this effect that the image has but for people who want a sharp and in focus image then either using a tripod or leaning the camera on the wall or on a table, this keeps the camera still and captures sharp images. Having a slow shutter speed is good for taking images of trains coming past or capturing the water falling down the waterfalls. For taking images with a fast shutter speed, this is good for water sport images or acrobatic images.
  • 5. This image was took with a fast shutter speed. It freezes the people who were moving and this makes the images really sharp as no movement is detected. As the shutter isn’t open for very long, there is no risk of camera shakes being detected and because it was sunny the image isn’t too underexposed. 1/500 sec This image was taken with a slightly slower shutter speed. This makes a lot of difference from the first image because you can see a bit of movement from the people walking and to stop the camera shakes coming though, I leant on the hand rails and this made the image really sharp and then the movement had been detected slightly. 1/25 sec This image was taken with a really slow shutter speed and this means the shutter was open a lot longer than the first image. Movement has been detected a lot in this image and the people don’t show any sharp detail on them and it is seen a lot more in this image than the middle image. I still leant on the hand rail so that no camera shakes were detected and this made my image really sharp. 1/10 sec
  • 6. ISO Settings ISO is all about how sensitive to light the camera is. The normal range of ISO is between 200 and it goes up to 1600, depending on what the camera is, the range of ISO varies. When choosing the number it has two important meanings with it. The first one is it sets the right amount of exposure that is needed with the amount of light being taken in. If you go out and take an image on a bright, sunny day, a lower ISO needs to be used, for example, 100 or 200 ISO.. This is because the lower the number is, the more light is required and the more light that is required, the more likely a shutter speed needs to be used. Then if you don’t have a lot of light or if you aren’t using a fast shutter speed, the ISO number would need to be raised. Each time the ISO number is doubled (so from 100 to 200) it means that the camera only needs half the light to get the same exposure. For example, if the shutter speed was at 1/250 and the ISO was set at 200, if you changed the ISO to 400 the shutter speed would need to be changed to 1/500 because this then gives you the same exposure because the numbers have been changed but they have only been doubled. Higher ISOs are usually used for indoor photography and for activities like sporting events because the shutter speed would need to be fast so that it freezes the action and the photographers would normally use an ISO around 1600. The second important meaning is that it also detects the noise in the image. So when you use a higher ISO, the quality of the image decreases and the visibility of ‘noise’ increases. Noise is the grainy effect which is seen on images sometimes and is more noticeable on pictures which have been taken on a mobile phone and tend not to be as bad when using a digital camera and can be good quality with ISOs that are 1600 or above. There are quite a few factors which can affect how noticeable the noise is. The first factor is the size of the pixels used on the sensor. If there is larger pixels, the amount of noise on the image is reduced and this is why digital cameras can produce high quality images because they have larger sensors which produce larger pixels. Another factor is the amount and the type of noise reduction that is being applied in the camera. All the pixels collect noise, so every camera runs processing on the image taken and this is to minimize the noise. Newer models of cameras have the newer technology that reduce the noise.
  • 7. This image was taken with the lowest ISO setting. It is quite dark and I don’t know if that was due to the lighting but it shouldn’t have gone dark like that and should have had a balanced amount of light on the image like the bottom two images. ISO 100 This image was taken with a slightly higher ISO setting and it hasn’t gone dark or light and has the right amount of light on the image and is similar to the bottom image because we were in daylight. ISO 800 This image was taken with an even higher ISO setting and looks exactly the same as the middle image. All the detail is maintained and it is at a high quality just like the middle image. ISO 3200
  • 8. White Balance The white balance is all about getting the colours in the images as accurate as they look to the naked eye. Having the right white balance set in different lightings helps the camera identify what the colours are. When taking images sometimes they might come out with a bluish tint too them or a yellow/orange tint. This is because different lightings have different temperatures or colours to them and without changing the settings to what lightings your under, this can cause the camera to get confused as to what the lighting is and this causes the different tints over the images. Fluorescent light adds a blue tint to the images whereas tungsten lights have a yellow tint to the images. The temperatures can range from a light blue like the sky, to a warm light from a candle. We don’t see the different temperatures because our eyes adjust to it automatically but to a camera, it isn’t smart enough to make the adjustments like we can automatically and that’s why the settings need to be manually changed by us and so it needs to be told if there is warm light, to cool it down and when there is cool light, to warm it up. These are some of the basic White Balance settings on the camera: Auto – is when the camera tries to make a guess of the colours in basic and easy lighting. But in trickier lighting situations it isn’t as good to use Auto. Tungsten – Is the mode which is mainly used for indoor shoots, especially under incandescent lighting (such as bulb lighting) and it usually cools down the colours in the images. Fluorescent – is the setting which will warm up the colours in the images and it also compensates for the ‘cool’ light of the florescent light. Daylight/Sunny – is the mode which isn’t displayed on most cameras because it sets things to a fairly normal and isn’t a big change to the images. Cloudy – is the mode that warms up the images a little bit more than the daylight mode does. Flash – When using flash on a camera it can make the images quite cool and so having this mode on helps warm up some of the images. Shade – The light in the shade is normally quite cool and blue so using this mode warms things up a little.
  • 9. Tungsten Light Cloudy White Fluorescent Light Flash All these images were took when it was really bright and sunny. In the first image I used the Tungsten mode and it has a really heavy blue tint to the image as it is used for mainly bulb lighting and is the mode which cools down the colours. The second image was taken using the Cloudy mode. This has made the image just slightly warmer than it already was but not massively as this mode generally warms up the image slightly. The third image was taken with the Fluorescent mode. This has made the image have a blue frost over the image but not as deep as the Tungsten mode did. This is because this mode compensates for the cool light of a fluorescent light. The final image was taken using the Flash mode. This has warmed the image up again. This is because the flash leaves quite a cool effect on an image and having that mode on it warms up the colours in the image.