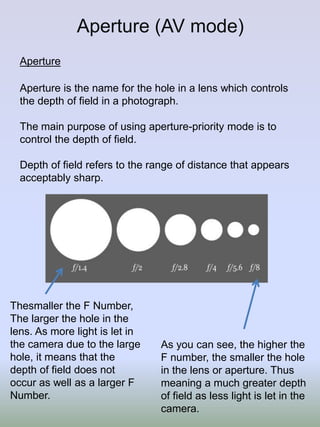
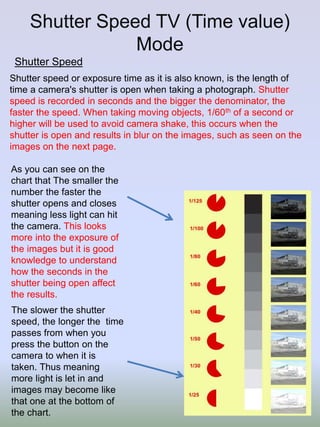
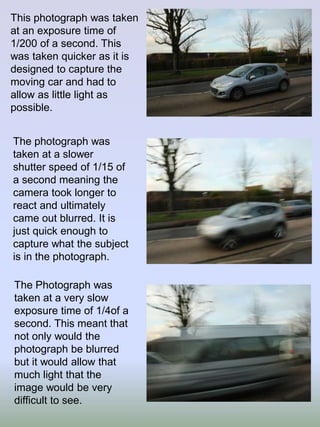
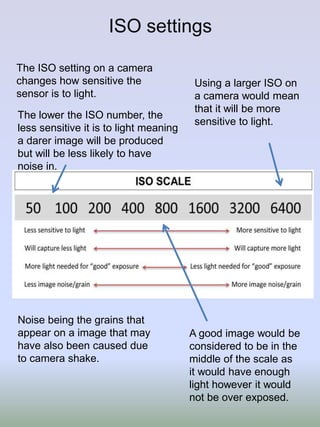
Aperture (AV mode)
Aperture
Aperture is the name for the hole in a lens which controls
the depth of field in a photograph.
The main purpose of using aperture-priority mode is to
control the depth of field.
Depth of field refers to the range of distance that appears
acceptably sharp.

Thesmaller the F Number,
The larger the hole in the
lens. As more light is let in
the camera due to the large
hole, it means that the
depth of field does not
occur as well as a larger F
Number.

As you can see, the higher the
F number, the smaller the hole
in the lens or aperture. Thus
meaning a much greater depth
of field as less light is let in the
camera.
Here the photograph has
been taken using a
Smaller F Number of
F/4.5. This has a wide
aperture due to one
image being the central
focus. The image was
taken close to the
camera to enhance the
effect of what large
aperture can create.
Here the F Number on
this photograph was
F/11. This starts to
become more clear as
depth of field is starting
to be seen across the
image. Here the full
image starts to become
clear however the
background is still not in
focus.
Here the Photograph
was taken at F/29. This
is clear as the small
aperture creates a much
larger depth of field due
to full image being clear
and you can see objects
such as the Rubbish Bin
without Noise. It is clear
throughout the image.
Shutter Speed TV (Time value)
Mode
Shutter Speed
Shutter speed or exposure time as it is also known, is the length of
time a camera's shutter is open when taking a photograph. Shutter
speed is recorded in seconds and the bigger the denominator, the
faster the speed. When taking moving objects, 1/60th of a second or
higher will be used to avoid camera shake, this occurs when the
shutter is open and results in blur on the images, such as seen on the
images on the next page.
As you can see on the
chart that The smaller the
number the faster the
shutter opens and closes
meaning less light can hit
the camera. This looks
more into the exposure of
the images but it is good
knowledge to understand
how the seconds in the
shutter being open affect
the results.
The slower the shutter
speed, the longer the time
passes from when you
press the button on the
camera to when it is
taken. Thus meaning
more light is let in and
images may become like
that one at the bottom of
the chart.
This photograph was taken
at an exposure time of
1/200 of a second. This
was taken quicker as it is
designed to capture the
moving car and had to
allow as little light as
possible.
The photograph was
taken at a slower
shutter speed of 1/15 of
a second meaning the
camera took longer to
react and ultimately
came out blurred. It is
just quick enough to
capture what the subject
is in the photograph.
The Photograph was
taken at a very slow
exposure time of 1/4of a
second. This meant that
not only would the
photograph be blurred
but it would allow that
much light that the
image would be very
difficult to see.
ISO settings
The ISO setting on a camera
changes how sensitive the
sensor is to light.
The lower the ISO number, the
less sensitive it is to light meaning
a darer image will be produced
but will be less likely to have
noise in.

Noise being the grains that
appear on a image that may
have also been caused due
to camera shake.

Using a larger ISO on
a camera would mean
that it will be more
sensitive to light.

A good image would be
considered to be in the
middle of the scale as
it would have enough
light however it would
not be over exposed.
This photograph was taken at
a much lower ISO of 100. This
has allowed less light in the
camera due to having such a
fast speed. The shutter speed
setting on this ISO was ½ of a
second. From these images it
is clear that the speed of the
camera and light determine
how well the image is.
This Photograph was taken at
an ISO of 800. This is seen as
a good image because it
captures the natural daylight by
having just the right amount of
light in the lens. This
photograph had a shutter
speed of 1/15th of a second,
this is seen by capturing all the
necessary detail in the image.

This photograph was taken at
an ISO of 3200. This shows
an over exposure to light
meaning the image is a lot
lighter than the other lower
ISO images. You start you
lose detail such as in the
centre of the stairwell and
lose colour on the walls and
ceiling.
Here is an example of
Camera Shake. This
produces grain in the image
meaning it becomes harder
to see.

When zooming close into
the image it becomes more
clear that it has been over
exposed and does not have
any detail in the object.

However in
contrast to this
image of the same
object, it has been
taken with steady
hand and with a
lower ISO to avoid
any Noise or
Camera shake.
This is an example of Noise in an image. A Large ISO of
6400 has been used to fully show the grain in the image
when zoomed in.

8
White Balance
White Balance is altering the way the camera sees White.
White Balance is used to change the way the
/
photographs are taken, and sometimes is vital to create a
photograph suitable to that climate around you.
Using the cloudy setting in bright daylight will give your
image a warmer, yellow tint to it or the Tungsten setting to
make the image blue and more abstract.

There are many
temperatures when
looking at white
balance and you can
alter an image to
whatever colour you
wish by taking in
certain ways.
Daylight

Shade

Cloudy

Tungsten

The photographs taken with Tungsten and Daylight are very
different, However the cloudy setting does very little to change
the appearance of the photograph. The shade setting brings
out the colour that the natural daylight did not bring, this was
found absurd as the shade itself became the brightest setting
that was tried. The Tungsten gives a more peculiar impression
to the photograph and this may be used when capturing
something more exciting such as an moving object.
Original image

Cropped image- This technique takes away parts of the photograph you do not
want to be visible, such as here the top of the building has been cut off from the
original as that was adding more of a darker tone to the image.
Levels
This tool on the left is
found in Photoshop
and used to tilt the
levels to whatever
colour or brightness
you choose. The
brightness can also be
controlled in certain
parts of the image and
not the full
photograph. For
example here the
original image has had
a sharper
improvement towards
the top in the centre.
Curves- Similar to Levels, this controls where the light is
shared on the photograph. You can also change the
colour of the light.

Burning- Unlike Dodging, Burning takes all the light
away from the parts you do not want.
Dodging – Dodging has been used to bring out the colour in
the parts where the natural daylight has not brought out.

Colour Adjustments such as Hue and saturation have been used to tilt
the colour balance to more of a green image.

Photography lo2!!

  • 1.
    Aperture (AV mode) Aperture Apertureis the name for the hole in a lens which controls the depth of field in a photograph. The main purpose of using aperture-priority mode is to control the depth of field. Depth of field refers to the range of distance that appears acceptably sharp. Thesmaller the F Number, The larger the hole in the lens. As more light is let in the camera due to the large hole, it means that the depth of field does not occur as well as a larger F Number. As you can see, the higher the F number, the smaller the hole in the lens or aperture. Thus meaning a much greater depth of field as less light is let in the camera.
  • 2.
    Here the photographhas been taken using a Smaller F Number of F/4.5. This has a wide aperture due to one image being the central focus. The image was taken close to the camera to enhance the effect of what large aperture can create. Here the F Number on this photograph was F/11. This starts to become more clear as depth of field is starting to be seen across the image. Here the full image starts to become clear however the background is still not in focus. Here the Photograph was taken at F/29. This is clear as the small aperture creates a much larger depth of field due to full image being clear and you can see objects such as the Rubbish Bin without Noise. It is clear throughout the image.
  • 3.
    Shutter Speed TV(Time value) Mode Shutter Speed Shutter speed or exposure time as it is also known, is the length of time a camera's shutter is open when taking a photograph. Shutter speed is recorded in seconds and the bigger the denominator, the faster the speed. When taking moving objects, 1/60th of a second or higher will be used to avoid camera shake, this occurs when the shutter is open and results in blur on the images, such as seen on the images on the next page. As you can see on the chart that The smaller the number the faster the shutter opens and closes meaning less light can hit the camera. This looks more into the exposure of the images but it is good knowledge to understand how the seconds in the shutter being open affect the results. The slower the shutter speed, the longer the time passes from when you press the button on the camera to when it is taken. Thus meaning more light is let in and images may become like that one at the bottom of the chart.
  • 4.
    This photograph wastaken at an exposure time of 1/200 of a second. This was taken quicker as it is designed to capture the moving car and had to allow as little light as possible. The photograph was taken at a slower shutter speed of 1/15 of a second meaning the camera took longer to react and ultimately came out blurred. It is just quick enough to capture what the subject is in the photograph. The Photograph was taken at a very slow exposure time of 1/4of a second. This meant that not only would the photograph be blurred but it would allow that much light that the image would be very difficult to see.
  • 5.
    ISO settings The ISOsetting on a camera changes how sensitive the sensor is to light. The lower the ISO number, the less sensitive it is to light meaning a darer image will be produced but will be less likely to have noise in. Noise being the grains that appear on a image that may have also been caused due to camera shake. Using a larger ISO on a camera would mean that it will be more sensitive to light. A good image would be considered to be in the middle of the scale as it would have enough light however it would not be over exposed.
  • 6.
    This photograph wastaken at a much lower ISO of 100. This has allowed less light in the camera due to having such a fast speed. The shutter speed setting on this ISO was ½ of a second. From these images it is clear that the speed of the camera and light determine how well the image is. This Photograph was taken at an ISO of 800. This is seen as a good image because it captures the natural daylight by having just the right amount of light in the lens. This photograph had a shutter speed of 1/15th of a second, this is seen by capturing all the necessary detail in the image. This photograph was taken at an ISO of 3200. This shows an over exposure to light meaning the image is a lot lighter than the other lower ISO images. You start you lose detail such as in the centre of the stairwell and lose colour on the walls and ceiling.
  • 7.
    Here is anexample of Camera Shake. This produces grain in the image meaning it becomes harder to see. When zooming close into the image it becomes more clear that it has been over exposed and does not have any detail in the object. However in contrast to this image of the same object, it has been taken with steady hand and with a lower ISO to avoid any Noise or Camera shake.
  • 8.
    This is anexample of Noise in an image. A Large ISO of 6400 has been used to fully show the grain in the image when zoomed in. 8
  • 9.
    White Balance White Balanceis altering the way the camera sees White. White Balance is used to change the way the / photographs are taken, and sometimes is vital to create a photograph suitable to that climate around you. Using the cloudy setting in bright daylight will give your image a warmer, yellow tint to it or the Tungsten setting to make the image blue and more abstract. There are many temperatures when looking at white balance and you can alter an image to whatever colour you wish by taking in certain ways.
  • 10.
    Daylight Shade Cloudy Tungsten The photographs takenwith Tungsten and Daylight are very different, However the cloudy setting does very little to change the appearance of the photograph. The shade setting brings out the colour that the natural daylight did not bring, this was found absurd as the shade itself became the brightest setting that was tried. The Tungsten gives a more peculiar impression to the photograph and this may be used when capturing something more exciting such as an moving object.
  • 11.
    Original image Cropped image-This technique takes away parts of the photograph you do not want to be visible, such as here the top of the building has been cut off from the original as that was adding more of a darker tone to the image.
  • 12.
    Levels This tool onthe left is found in Photoshop and used to tilt the levels to whatever colour or brightness you choose. The brightness can also be controlled in certain parts of the image and not the full photograph. For example here the original image has had a sharper improvement towards the top in the centre.
  • 13.
    Curves- Similar toLevels, this controls where the light is shared on the photograph. You can also change the colour of the light. Burning- Unlike Dodging, Burning takes all the light away from the parts you do not want.
  • 14.
    Dodging – Dodginghas been used to bring out the colour in the parts where the natural daylight has not brought out. Colour Adjustments such as Hue and saturation have been used to tilt the colour balance to more of a green image.