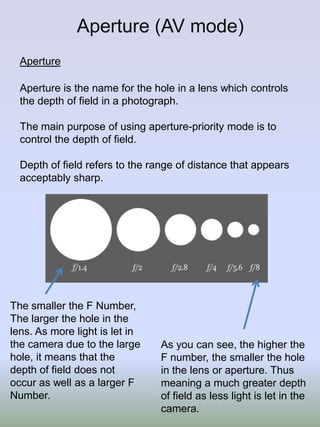
Aperture (AV mode)
Aperture
Aperture is the name for the hole in a lens which controls
the depth of field in a photograph.
The main purpose of using aperture-priority mode is to
control the depth of field.
Depth of field refers to the range of distance that appears
acceptably sharp.

The smaller the F Number,
The larger the hole in the
lens. As more light is let in
the camera due to the large
hole, it means that the
depth of field does not
occur as well as a larger F
Number.

As you can see, the higher the
F number, the smaller the hole
in the lens or aperture. Thus
meaning a much greater depth
of field as less light is let in the
camera.
Here the photograph
has been taken using
a Smaller F Number
of F/4.5. This has a
wide aperture due to
one image being the
central focus. The
image was taken
close to the camera to
enhance the effect of
what large aperture
can create.
Here the F Number on
this photograph was
F/11. This starts to
become more clear as
depth of field is starting
to be seen across the
image.
Here the Photograph
was taken at F/29. This
is clear as the small
aperture creates a
much larger depth of
field due to full image
being clear and you
can see objects such
as the Rubbish Bin
without Noise.
Shutter Speed TV (Time value)
Mode
Shutter Speed
Shutter speed or exposure time as it is also
known, is the length of time a camera's shutter
is open when taking a photograph
As you can see on the
chart that The smaller
the number the faster
the shutter opens and
closes meaning less
light can hit the camera.
The slower the shutter
speed, the longer the
time passes from when
you press the button on
the camera to when it
is taken. Thus meaning
more light is let in and
images may become
like that one at the
bottom of the chart.
This photograph was taken
at an exposure time of
1/200 of a second. This
was taken quicker as it is
designed to capture the
moving car and had to
allow as little light as
possible.
The photograph was
taken at a slower
shutter speed of 1/15 of
a second meaning the
camera took longer to
react and ultimately
came out blurred. It is
just quick enough to
capture what the subject
is in the photograph.
The Photograph was
taken at a very slow
exposure time of 1/4of a
second. This meant that
not only would the
photograph be blurred
but it would allow that
much light that the
image would be very
difficult to see.
ISO settings
The ISO setting on a camera
changes how sensitive the
sensor is to light.
The lower the ISO, the less
sensitive it is to light
meaning that it will capture a
better quality Photograph.

Noise being the grains that
appear on a image that may
have also been caused due
to camera shake.

Using a larger ISO on a
camera would mean
that it will be more
sensitive to light,
producing a bad image
as it would have more
Noise.

When image quality
needs to be very high, a
low ISO speed is
required to avoid noise!
This photograph was taken at
an ISO of 1600. This is clear
because the photograph has a
lot of Noise and grain in it. This
has become blurry due to
having much more light than
needed in the image. As it is
taken so quickly there is not
enough time to capture
everything meaning it will not
receive enough light.
This Photograph was taken at
an ISO of 800 as it has a lot of
light such as the one taken with
1600 ISO, however this starts to
show less grain and more
sharpness on the object. This is
less sensitive to light however
still lacks the detail of a lower
ISO.
This photograph was taken at
a much lower ISO of 400. It is
taken at a slower speed to
receive more light on the
sensor. A lot more quality and
sharpness is seen across the
whole photograph because it
has time to steady itself and
capture the full image at a
natural pace.
White Balance
White Balance is altering the way the camera sees White.
White Balance is used to change the way the
/
photographs are taken, and sometimes is vital to create a
photograph suitable to that climate around you.
Using the cloudy setting in bright daylight will give your
image a warmer, yellow tint to it or the Tungsten setting to
make the image blue and more abstract.

There are many
temperatures when
looking at white
balance and you can
alter an image to
whatever colour you
wish by taking in
certain ways.
Daylight

Shade

Cloudy

Tungsten

The photographs taken with Tungsten and Daylight are very
different, However the cloudy setting does very little to change
the appearance of the photograph. The shade setting brings
out the colour that the natural daylight did not bring, this was
found absurd as the shade itself became the brightest setting
that was tried. The Tungsten gives a more peculiar impression
to the photograph and this may be used when capturing
something more exciting such as an moving object.
Original image

Cropped image- This technique takes away parts of the photograph you do not
want to be visible, such as here the top of the building has been cut off from the
original as that was adding more of a darker tone to the image.
Levels
This tool on the left is
found in Photoshop
and used to tilt the
levels to whatever
colour or brightness
you choose. The
brightness can also be
controlled in certain
parts of the image and
not the full
photograph. For
example here the
original image has had
a sharper
improvement towards
the top in the centre.
Dodging and Burning- Dodging has predominantly been used to bring
out the colour in the parts where the natural daylight has not brought
out. Burning has been used to darken the middle stairway to add to the
detail that was already there.

Colour Adjustments such as Hue and saturation have been used to tilt
the colour balance to more of a green image.

Photography LO2!

  • 1.
    Aperture (AV mode) Aperture Apertureis the name for the hole in a lens which controls the depth of field in a photograph. The main purpose of using aperture-priority mode is to control the depth of field. Depth of field refers to the range of distance that appears acceptably sharp. The smaller the F Number, The larger the hole in the lens. As more light is let in the camera due to the large hole, it means that the depth of field does not occur as well as a larger F Number. As you can see, the higher the F number, the smaller the hole in the lens or aperture. Thus meaning a much greater depth of field as less light is let in the camera.
  • 2.
    Here the photograph hasbeen taken using a Smaller F Number of F/4.5. This has a wide aperture due to one image being the central focus. The image was taken close to the camera to enhance the effect of what large aperture can create. Here the F Number on this photograph was F/11. This starts to become more clear as depth of field is starting to be seen across the image. Here the Photograph was taken at F/29. This is clear as the small aperture creates a much larger depth of field due to full image being clear and you can see objects such as the Rubbish Bin without Noise.
  • 3.
    Shutter Speed TV(Time value) Mode Shutter Speed Shutter speed or exposure time as it is also known, is the length of time a camera's shutter is open when taking a photograph As you can see on the chart that The smaller the number the faster the shutter opens and closes meaning less light can hit the camera. The slower the shutter speed, the longer the time passes from when you press the button on the camera to when it is taken. Thus meaning more light is let in and images may become like that one at the bottom of the chart.
  • 4.
    This photograph wastaken at an exposure time of 1/200 of a second. This was taken quicker as it is designed to capture the moving car and had to allow as little light as possible. The photograph was taken at a slower shutter speed of 1/15 of a second meaning the camera took longer to react and ultimately came out blurred. It is just quick enough to capture what the subject is in the photograph. The Photograph was taken at a very slow exposure time of 1/4of a second. This meant that not only would the photograph be blurred but it would allow that much light that the image would be very difficult to see.
  • 5.
    ISO settings The ISOsetting on a camera changes how sensitive the sensor is to light. The lower the ISO, the less sensitive it is to light meaning that it will capture a better quality Photograph. Noise being the grains that appear on a image that may have also been caused due to camera shake. Using a larger ISO on a camera would mean that it will be more sensitive to light, producing a bad image as it would have more Noise. When image quality needs to be very high, a low ISO speed is required to avoid noise!
  • 6.
    This photograph wastaken at an ISO of 1600. This is clear because the photograph has a lot of Noise and grain in it. This has become blurry due to having much more light than needed in the image. As it is taken so quickly there is not enough time to capture everything meaning it will not receive enough light. This Photograph was taken at an ISO of 800 as it has a lot of light such as the one taken with 1600 ISO, however this starts to show less grain and more sharpness on the object. This is less sensitive to light however still lacks the detail of a lower ISO. This photograph was taken at a much lower ISO of 400. It is taken at a slower speed to receive more light on the sensor. A lot more quality and sharpness is seen across the whole photograph because it has time to steady itself and capture the full image at a natural pace.
  • 7.
    White Balance White Balanceis altering the way the camera sees White. White Balance is used to change the way the / photographs are taken, and sometimes is vital to create a photograph suitable to that climate around you. Using the cloudy setting in bright daylight will give your image a warmer, yellow tint to it or the Tungsten setting to make the image blue and more abstract. There are many temperatures when looking at white balance and you can alter an image to whatever colour you wish by taking in certain ways.
  • 8.
    Daylight Shade Cloudy Tungsten The photographs takenwith Tungsten and Daylight are very different, However the cloudy setting does very little to change the appearance of the photograph. The shade setting brings out the colour that the natural daylight did not bring, this was found absurd as the shade itself became the brightest setting that was tried. The Tungsten gives a more peculiar impression to the photograph and this may be used when capturing something more exciting such as an moving object.
  • 9.
    Original image Cropped image-This technique takes away parts of the photograph you do not want to be visible, such as here the top of the building has been cut off from the original as that was adding more of a darker tone to the image.
  • 10.
    Levels This tool onthe left is found in Photoshop and used to tilt the levels to whatever colour or brightness you choose. The brightness can also be controlled in certain parts of the image and not the full photograph. For example here the original image has had a sharper improvement towards the top in the centre.
  • 11.
    Dodging and Burning-Dodging has predominantly been used to bring out the colour in the parts where the natural daylight has not brought out. Burning has been used to darken the middle stairway to add to the detail that was already there. Colour Adjustments such as Hue and saturation have been used to tilt the colour balance to more of a green image.