Download to read offline
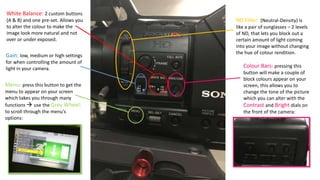


The document provides instructions for various functions and controls on a camera, including: Gain, white balance, menu, ND filter, color bars, audio controls, memory card slot, focus, zoom, iris, manual/auto settings, lens info, brightness display, histogram, peaking, contrast and brightness dials, zebra, mirror image, and shutter. It describes what each control does and how to use it to capture well-exposed video and audio with the desired color, focus, and lighting.


![2. [pro forma] camera getting started guide(4)](https://cdn.slidesharecdn.com/ss_thumbnails/2-170705214618-thumbnail.jpg?width=640&height=640&fit=bounds)


