1. LECTURE 2
THE VIDEO CAMERA
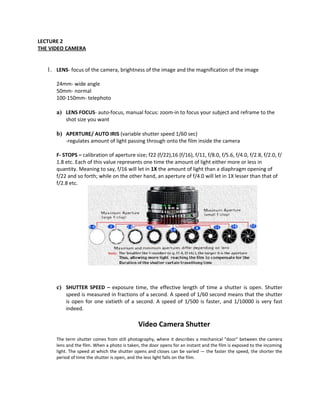
1. LENS- focus of the camera, brightness of the image and the magnification of the image
24mm- wide angle
50mm- normal
100-150mm- telephoto
a) LENS FOCUS- auto-focus, manual focus: zoom-in to focus your subject and reframe to the
shot size you want
b) APERTURE/ AUTO IRIS (variable shutter speed 1/60 sec)
-regulates amount of light passing through onto the film inside the camera
F- STOPS – calibration of aperture size; f22 (f/22),16 (f/16), f/11, f/8.0, f/5.6, f/4.0, f/2.8, f/2.0, f/
1.8 etc. Each of this value represents one time the amount of light either more or less in
quantity. Meaning to say, f/16 will let in 1X the amount of light than a diaphragm opening of
f/22 and so forth; while on the other hand, an aperture of f/4.0 will let in 1X lesser than that of
f/2.8 etc.
c) SHUTTER SPEED – exposure time, the effective length of time a shutter is open. Shutter
speed is measured in fractions of a second. A speed of 1/60 second means that the shutter
is open for one sixtieth of a second. A speed of 1/500 is faster, and 1/10000 is very fast
indeed.
Video Camera Shutter
The term shutter comes from still photography, where it describes a mechanical "door" between the camera
lens and the film. When a photo is taken, the door opens for an instant and the film is exposed to the incoming
light. The speed at which the shutter opens and closes can be varied — the faster the speed, the shorter the
period of time the shutter is open, and the less light falls on the film.
2. Shutter speed is measured in fractions of a second. A speed of 1/60 second means that the shutter is open for
one sixtieth of a second. A speed of 1/500 is faster, and 1/10000 is very fast indeed.
Video camera shutters work quite differently from still camera shutters, but the result is basically the same.
(The technical difference is that, rather than using a mechanical device, the shutter speed is adjusted by
electronically varying the amount of time the CCD is allowed to build a charge. If this means nothing to you,
don't worry. It really doesn't matter how the shutter works, it's the effect it has that counts.)
The shutter "opens" and "closes" once for each frame of video; that is, 25 times per second for PAL and 30
times per second for NTSC. Thus, if a camera has it's shutter set to 1/60, each frame will be exposed for 1/60
second. If the speed is increased to 1/120, each frame will be exposed for 1/120 of a second.
The main effect of higher shutter speeds is that individual frames appear sharper, due to the minimisation of
motion blur. Motion blur occurs when the subject moves within the frame while the shutter is open. The less
time the shutter is open (ie. the faster the shutter speed), the less movement will take place.
One side-effect of higher shutter speeds is that movement appears more jerky. This is because motion blur
tends to smooth consecutive frames together.
The three shots below were each taken as the car travelled past a stationary camera at 100 km/hr. With the
shutter off, motion blur is most pronounced. As the shutter speed is increased, the image becomes sharper.
Shutter Off 1/120 second 1/500 second
Higher shutter speeds are common in sports coverage. Watch any fast-action sport to see the "flickering" shutter effect.
Notice how the slow-motion replays look, especially when they freeze the last frame.
the key to an theoretical good EXPOSURE = Aperture + Shutter speed
d) DEPTH OF FIELD (zone of sharp focus)
DOF is shallow at big aperture, also at telephoto lens
Moderate at f5.6
Extensive at small apertures, also at wide angle setting
There are a few elements that will affects Depth of Field in a picture
(Note:- Factors on lens ONLY, shutter speed never affects depth of field):
1 the lens opening the bigger the apertures used, the zone of sharpness is shallower or vice versa i.e.
(diaphragm inside the lens) smaller aperture used will has extended depth of field
2 the focal length of the lens wide angle lenses have extended field of sharpness than a longer focal length
(50mm as standard, 80mm telephoto lenses and/or longest reach focal length on your zoom lens), and
above as telephoto; 35mm
3. or shorter as wideangle)
3 the distance from the lens the nearer the subject is, the shallower the zone of sharpness and vice versa.
to the subject
2. CAMERA/REC- on/off/standby mode
3. VIEWFINDER- allows you to see the video signal, serves as the monitor
4. TIMECODE
5. VTR (video tape recorder)
6. Audio recording- microphone built in
7. POWER SUPPLY
SUPPLEMENTARY CAMERA CONTROLS:
1. WHITE BALANCE- every light source has a color cast to it, hence, the camera need to adjust the
white balance to correspond to the color temperature illuminating the scene.
White balance basically means colour balance. It is a function which gives the camera a
reference to "true white" — it tells the camera what the colour white looks like, so the camera
will record it correctly. Since white light is the sum of all other colours, the camera will then
display all colours correctly.
Incorrect white balance shows up as pictures with orange or blue tints.
DAYLIGHT- (blue cast)
TUNGSTEN (reddish cast)
MANUAL used in mixed lighting (choose dominant light in the scene)
AUTO WHITE BALANCE- camera automatically adjust white balance
How to Perform a Manual White Balance
You should perform this procedure at the beginning of every shoot, and every time the lighting
conditions change. It is especially important to re-white balance when moving between indoors and
outdoors, and between rooms lit by different kinds of lights. During early morning and late evening, the
daylight colour changes quickly and significantly (although your eyes don't notice, your camera will). Do
regular white balances during these periods.
You will need:
• A camera with a manual white-balance function. There should be a "white balance" button or switch
on your camera.
1. If your camera has a filter wheel (or if you use add-on filters), make
sure you are using the correct filter for the lighting conditions.
2. Point your camera to a pure white subject, so that most of what
you're seeing in the viewfinder is white. Opinions vary on just how
much white needs to be in the frame - but we've found that about
4. 50-80% of the frame should be fine (Sony recommends 80% of frame width). The subject should be
fairly matte, that is, non-reflective.
3. Set your exposure and focus.
4. Activate the white balance by pressing the button or throwing the switch. The camera may take a few
seconds to complete the operation, after which you should get a message (or icon) in the viewfinder.
Hopefully this will be telling you that the white balance has succeeded - in this case, the camera will
retain it's current colour balance until another white balance is performed.
If the viewfinder message is that the white balance has failed, then you need to find out why. A good
camera will give you a clue such as "colour temperature too high" (in which case change filters). Also
try opening or closing the iris a little.
2. BACK LIGHT- opens the lens to 1 or 2 stops to let in more light
3. VIDEO GAIN- amplifies the video signal in low light situation but distorts video signal by
becoming grainy; colors are murky
THE LANGUAGE OF FILM: SHOTS, CAMERA MOVES, AND TRANSITIONS
SHOTS: (often called a set-up)
1. ESTABLISHING SHOT (ES)
- often used at the beginning of a scene, over-all lay-out of where the scene is taking
place.
2. MASTER SHOT
- as opposed to the establishing shot, master shot shows the room where the scene is
actually taking place
3. WIDE SHOT
- refers to any shot that isn’t a close-up. Often interchangeable with master shot but this
can lead to confusion because master shot is detailed wide shot just means that it isn’t a
narrow one.
4. TWO-SHOT, THREE SHOT, FOUR SHOT, ETC
- two people in it
5. OVER-THE SHOULDER (OTS) –clean / dirty
6. EXTREME CLOSE-UP (ECU), CLOSE-UP (CU), MEDIUM SHOT (MS), FULL SHOT/LONG SHOT, TOP
SHOT
7. AERIAL SHOTS
8. OTHER WAYS: POV, MOS, PICK-UPS, MARTINI
POV: A. BIRD’S EYEVIW, WORM’S EYEVIEW
5. 9. HANDHELD/BACK-PACK
CAMERA MOVEMENTS:
1. TRACKING SHOT (DOLLY SHOT)
2. PANNING (LEFT TO RIGHT)
3. TILTING (UP DOWN)
4. ZOOMING SHOTS (CRASH ZOOM)
5. CRANE SHOTS
6. STEADICAM SHOTS
7. DUTCH TILT (CRAZY SHOT)
Camera Angles
Camera angles and movements combine to create a sequence of images, just as words, word
order and punctuation combine to make the meaning of a sentence. You need a straightforward
set of key terms to describe them.
Describing Shots
When describing camera angles, or creating them yourself, you have to think about three
important factors
— The FRAMING or the LENGTH of shot
— The ANGLE of the shot
— If there is any MOVEMENT involved
When describing different cinematic shots, different terms are used to indicate the amount of
subject matter contained within a frame, how far away the camera is from the subject, and the
perspective of the viewer. Each different shot has a different purpose and effect. A change
between two different shots is called a CUT.
Framing or Shot Length
6. 1 . Extreme long shot
This can be taken from as much as a quarter of a mile away, and is generally used as a scene-
setting, establishing shot. It normally shows an EXTERIOR, eg the outside of a building, or a
landscape, and is often used to show scenes of thrilling action eg in a war film or disaster movie.
There will be very little detail visible in the shot, it's meant to give a general impression rather
than specific information.
The extreme long shot on the left is taken from a distance, but denotes a precise location - it
might even connote all of the entertainment industry if used as the opening shot in a news story.
2. Long Shot
This is the most difficult to categorise precisely, but is generally one which shows the image as
approximately "life" size ie corresponding to the real distance between the audience and the
screen in a cinema (the figure of a man would appear as six feet tall). This category includes the
FULL SHOT showing the entire human body, with the head near the top of the frame and the
feet near the bottom. While the focus is on characters, plenty of background detail still emerges:
we can tell the coffins on the right are in a Western-style setting, for instance.
7. 3. Medium Shot
Contains a figure from the knees/waist up and is normally used for dialogue scenes, or to show
some detail of action. Variations on this include the TWO SHOT (containing two figures from
the waist up) and the THREE SHOT (contains 3 figures...). NB. Any more than three figures and
the shot tends to become a long shot. Background detail is minimal, probably because location
has been established earlier in the scene - the audience already know where they are and now
want to focus on dialogue and character interation. Another variation in this category is the
OVER-THE-SHOULDER-SHOT, which positions the camera behind one figure, revealing the
other figure, and part of the first figure's back, head and shoulder.
4. Close-Up
This shows very little background, and concentrates on either a face, or a specific detail of mise
en scène. Everything else is just a blur in the background. This shot magnifies the object (think
of how big it looks on a cinema screen) and shows the importance of things, be it words written
on paper, or the expression on someone's face. The close-up takes us into the mind of a character.
In reality, we only let people that we really trust get THAT close to our face - mothers, children
and lovers, usually - so a close up of a face is a very intimate shot. A film-maker may use this to
make us feel extra comfortable or extremely uncomfortable about a character, and usually uses a
zoom lens in order to get the required framing.
8. 5. Extreme Close-Up
As its name suggests, an extreme version of the close up, generally magnifying beyond what the
human eye would experience in reality. An extreme close-up of a face, for instance, would show
only the mouth or eyes, with no background detail whatsoever. This is a very artificial shot, and
can be used for dramatic effect. The tight focus required means that extra care must be taken
when setting up and lighting the shot - the slightest camera shake or error in focal length is very
noticeable.
Camera Angles
The relationship between the camera and the object being photographed (ie the ANGLE) gives
emotional information to an audience, and guides their judgment about the character or object in
shot. The more extreme the angle (ie the further away it is from eye left), the more symbolic and
heavily-loaded the shot.
1. The Bird's-Eye view
This shows a scene from directly overhead, a very unnatural and strange angle. Familiar objects
viewed from this angle might seem totally unrecognisable at first (umbrellas in a crowd, dancers'
legs). This shot does, however, put the audience in a godlike position, looking down on the
action. People can be made to look insignificant, ant-like, part of a wider scheme of things.
Hitchcock (and his admirers, like Brian de Palma) is fond of this style of shot.
9. A cameraman, raised above the action, gets a high angle shot
2. High Angle
Not so extreme as a bird's eye view. The camera is elevated above the action using a crane to
give a general overview. High angles make the object photographed seem smaller, and less
significant (or scary). The object or character often gets swallowed up by their setting - they
become part of a wider picture.
3. Eye Level
A fairly neutral shot; the camera is positioned as though it is a human actually observing a scene,
so that eg actors' heads are on a level with the focus. The camera will be placed approximately
five to six feet from the ground.
4. Low Angle
These increase height (useful for short actors like Tom Cruise or James McAvoy) and give a
sense of speeded motion. Low angles help give a sense of confusion to a viewer, of
powerlessness within the action of a scene. The background of a low angle shot will tend to be
just sky or ceiling, the lack of detail about the setting adding to the disorientation of the viewer.
The added height of the object may make it inspire fear and insecurity in the viewer, who is
psychologically dominated by the figure on the screen.
5. Oblique/Canted Angle
Sometimes the camera is tilted (ie is not placed horizontal to floor level), to suggest imbalance,
transition and instability (very popular in horror movies). This technique is used to suggest
POINT-OF-View shots (ie when the camera becomes the 'eyes' of one particular character,seeing
what they see — a hand held camera is often used for this.
10. Camera Movement
A director may choose to move action along by telling the story as a series of cuts, going from
one shot to another, or they may decide to move the camera with the action. Moving the camera
often takes a great deal of time, and makes the action seem slower, as it takes several second for
a moving camera shot to be effective, when the same information may be placed on screen in a
series of fast cuts. Not only must the style of movement be chosen, but the method of actually
moving the camera must be selected too. There are seven basic methods:
1. Pans
A movement which scans a scene horizontally. The camera is placed on a tripod, which operates
as a stationary axis point as the camera is turned, often to follow a moving object which is kept
in the middle of the frame.
2. Tilts
A movement which scans a scene vertically, otherwise similar to a pan.
3. Dolly Shots
Sometimes called TRUCKING or TRACKING shots. The camera is placed on a moving vehicle
and moves alongside the action, generally following a moving figure or object. Complicated
dolly shots will involve a track being laid on set for the camera to follow, hence the name. The
camera might be mounted on a car, a plane, or even a shopping trolley (good method for
independent film-makers looking to save a few dollars). A dolly shot may be a good way of
portraying movement, the journey of a character for instance, or for moving from a long shot to a
close-up, gradually focusing the audience on a particular object or character.
4. Hand-held shots
The hand-held movie camera first saw widespread use during World War II, when news
reporters took their windup Arriflexes and Eyemos into the heat of battle, producing some of the
most arresting footage of the twentieth century. After the war, it took a while for commercially
produced movies to catch up, and documentary makers led the way, demanding the production of
smaller, lighter cameras that could be moved in and out of a scene with speed, producing a "fly-
on-the-wall" effect.This aesthetic took a while to catch on with mainstream Hollywood, as it
gives a jerky, ragged effect, totally at odds with the organised smoothness of a dolly shot. The
Steadicam (a heavy contraption which is attached a camera to an operator by a harness. The
camera is stabilized so it moves independently) was debuted in Marathon Man (1976), bringing a
new smoothness to hand held camera movement and has been used to great effect in movies and
TV shows ever since. No "walk and talk" sequence would be complete without one. Hand held
cameras denote a certain kind of gritty realism, and they can make the audience feel as though
they are part of a scene, rather than viewing it from a detached, frozen position.
11. A crane in use, following the path of a balloon floating into the sky
5. Crane Shots
Basically, dolly-shots-in-the-air. A crane (or jib), is a large, heavy piece of equipment, but is a
useful way of moving a camera - it can move up, down, left, right, swooping in on action or
moving diagonally out of it. The camera operator and camera are counter-balanced by a heavy
weight, and trust their safety to a skilled crane/jib operator.
6. Zoom Lenses
A zoom lens contains a mechanism that changes the magnification of an image. On a still
camera, this means that the photographer can get a 'close up' shot while still being some distance
from the subject. A video zoom lens can change the position of the audience, either very quickly
(a smash zoom) or slowly, without moving the camera an inch, thus saving a lot of time and
trouble. The drawbacks to zoom use include the fact that while a dolly shot involves a steady
movement similar to the focusing change in the human eye, the zoom lens tends to be jerky
(unless used very slowly) and to distort an image, making objects appear closer together than
they really are. Zoom lenses are also drastically over-used by many directors (including those
holding palmcorders), who try to give the impression of movement and excitement in a scene
where it does not exist. Use with caution - and a tripod!
7. The Aerial Shot
An exciting variation of a crane shot, usually taken from a helicopter. This is often used at the
beginning of a film, in order to establish setting and movement. A helicopter is like a particularly
flexible sort of crane - it can go anywhere, keep up with anything, move in and out of a scene,
and convey real drama and exhilaration — so long as you don't need to get too close to your
actors or use location sound with the shots.