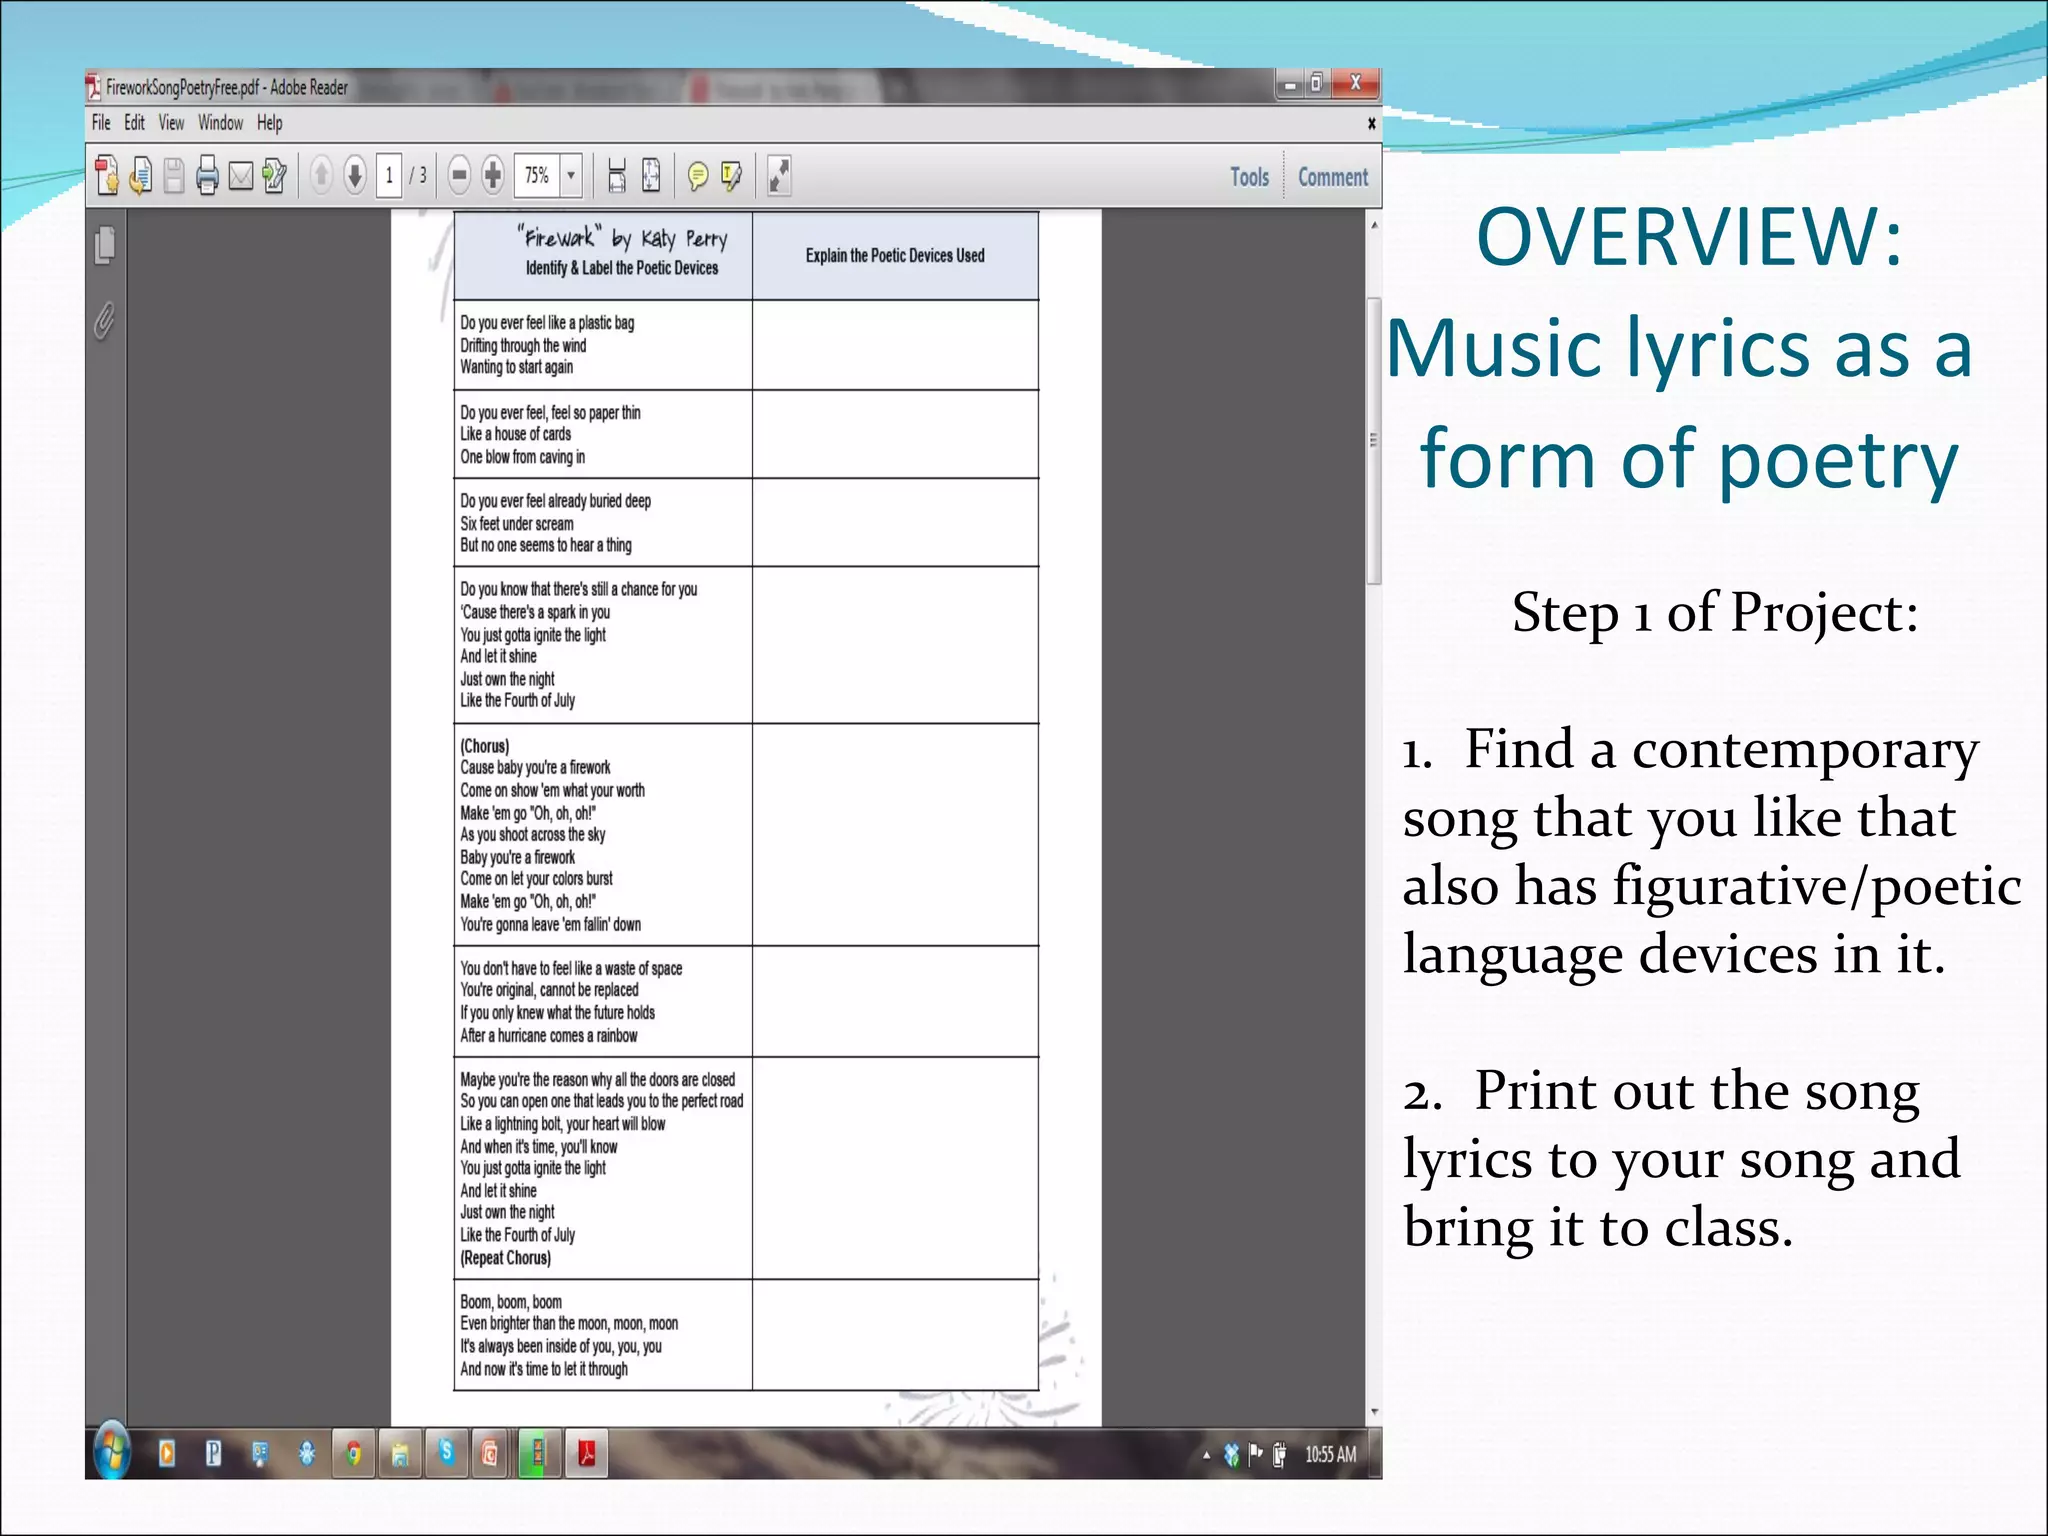
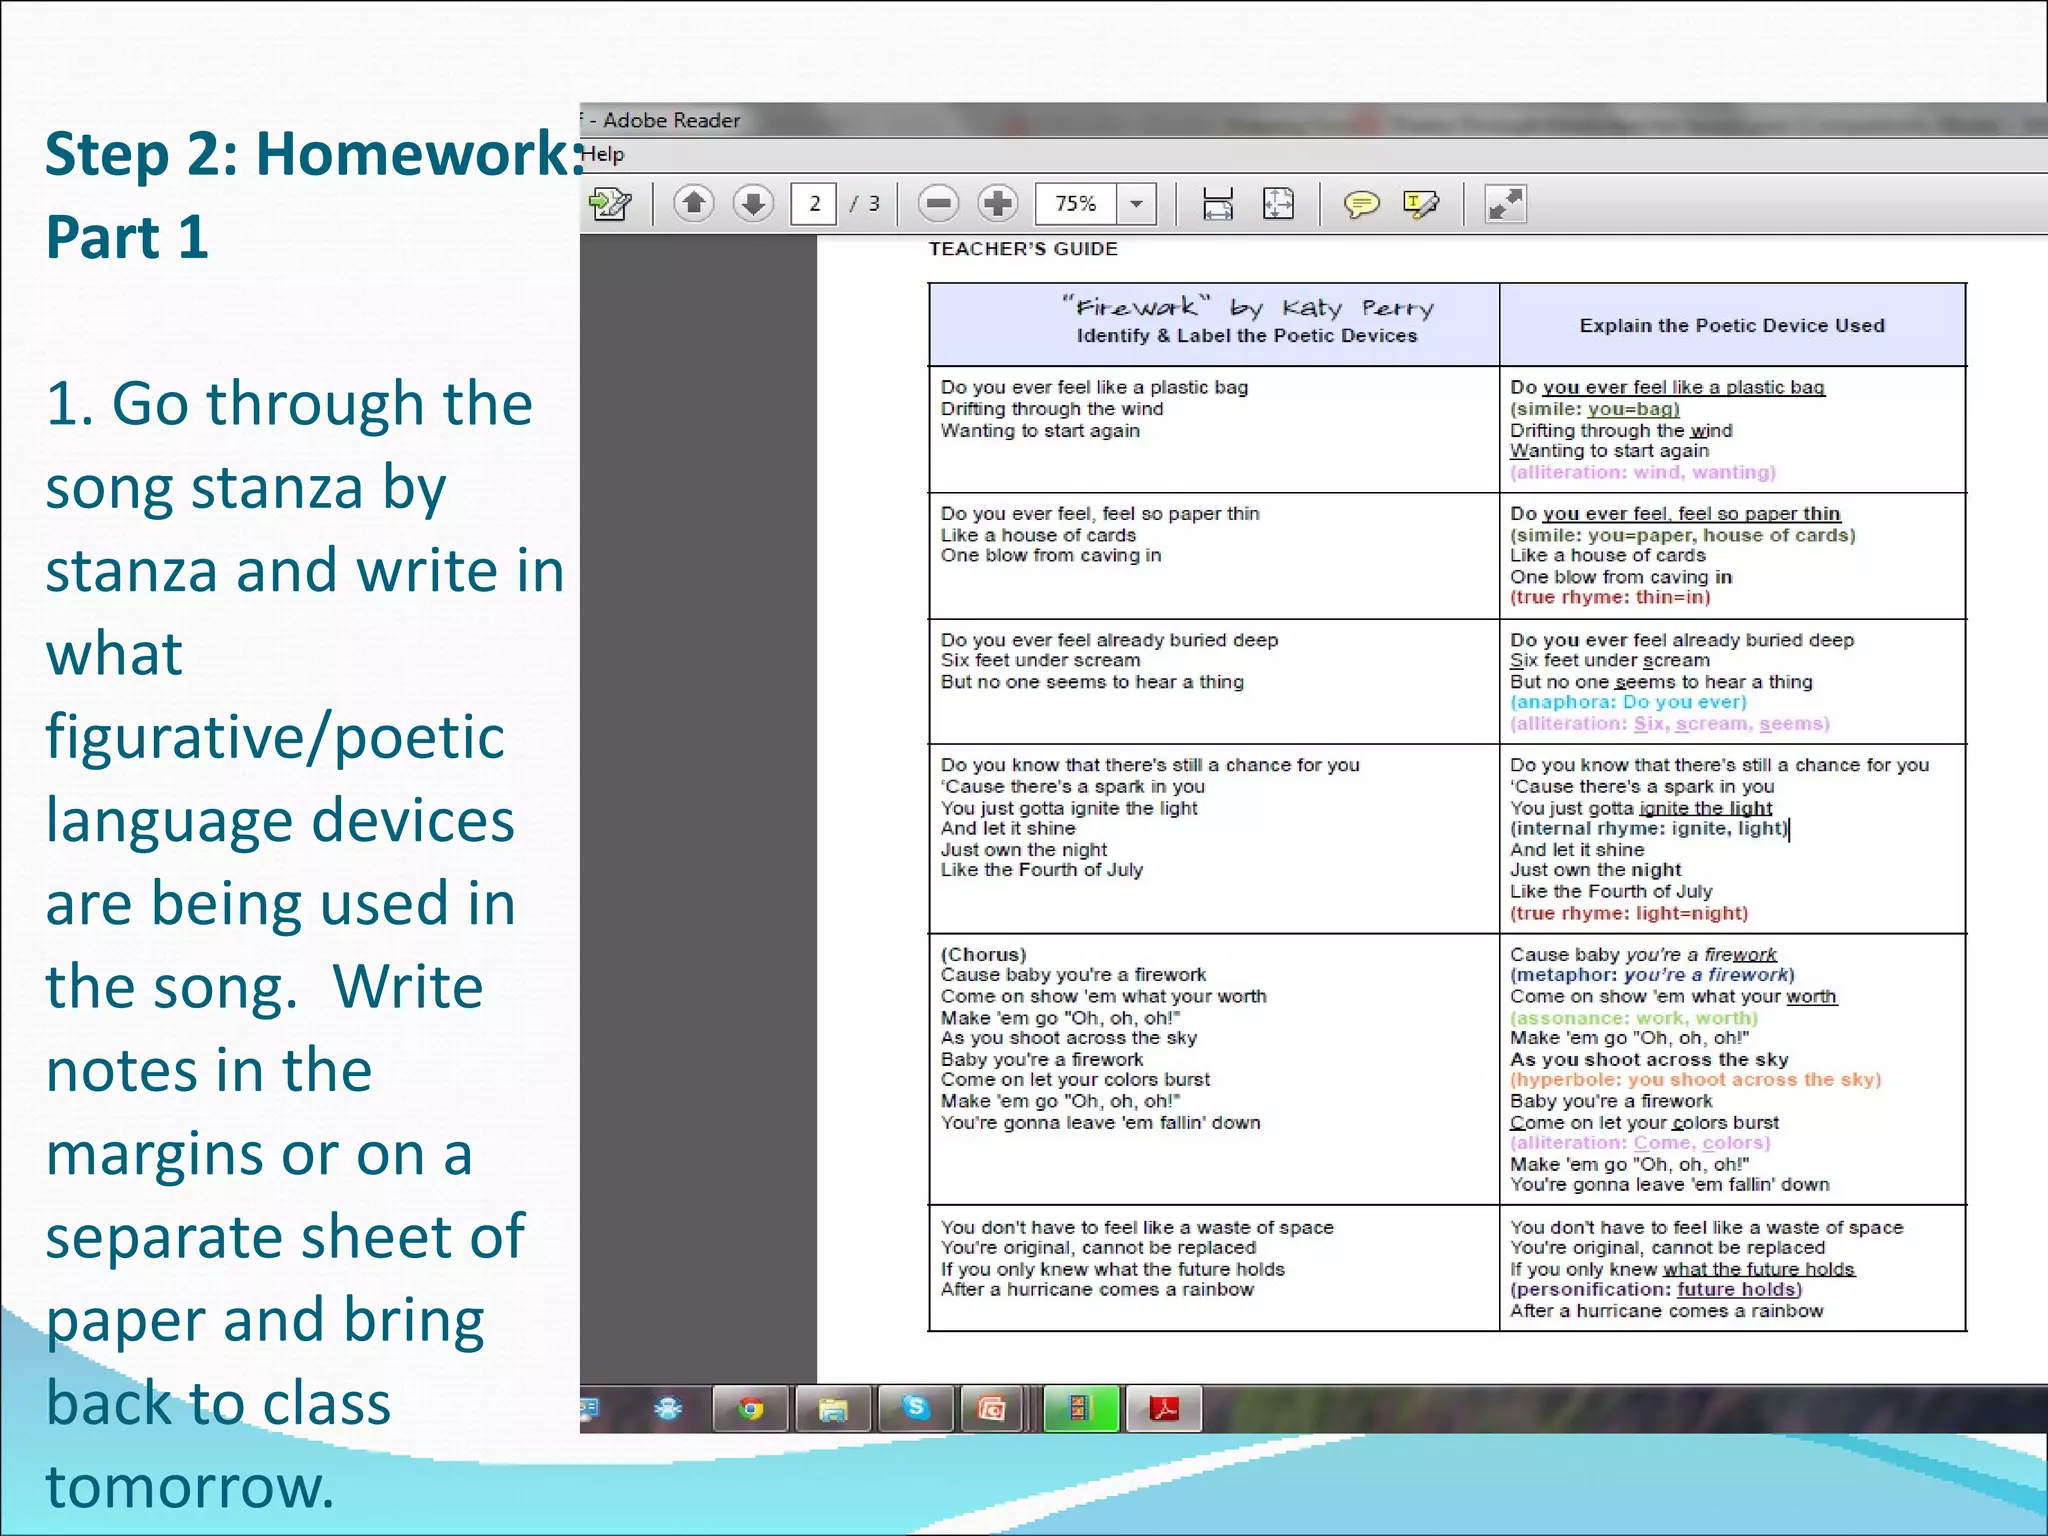
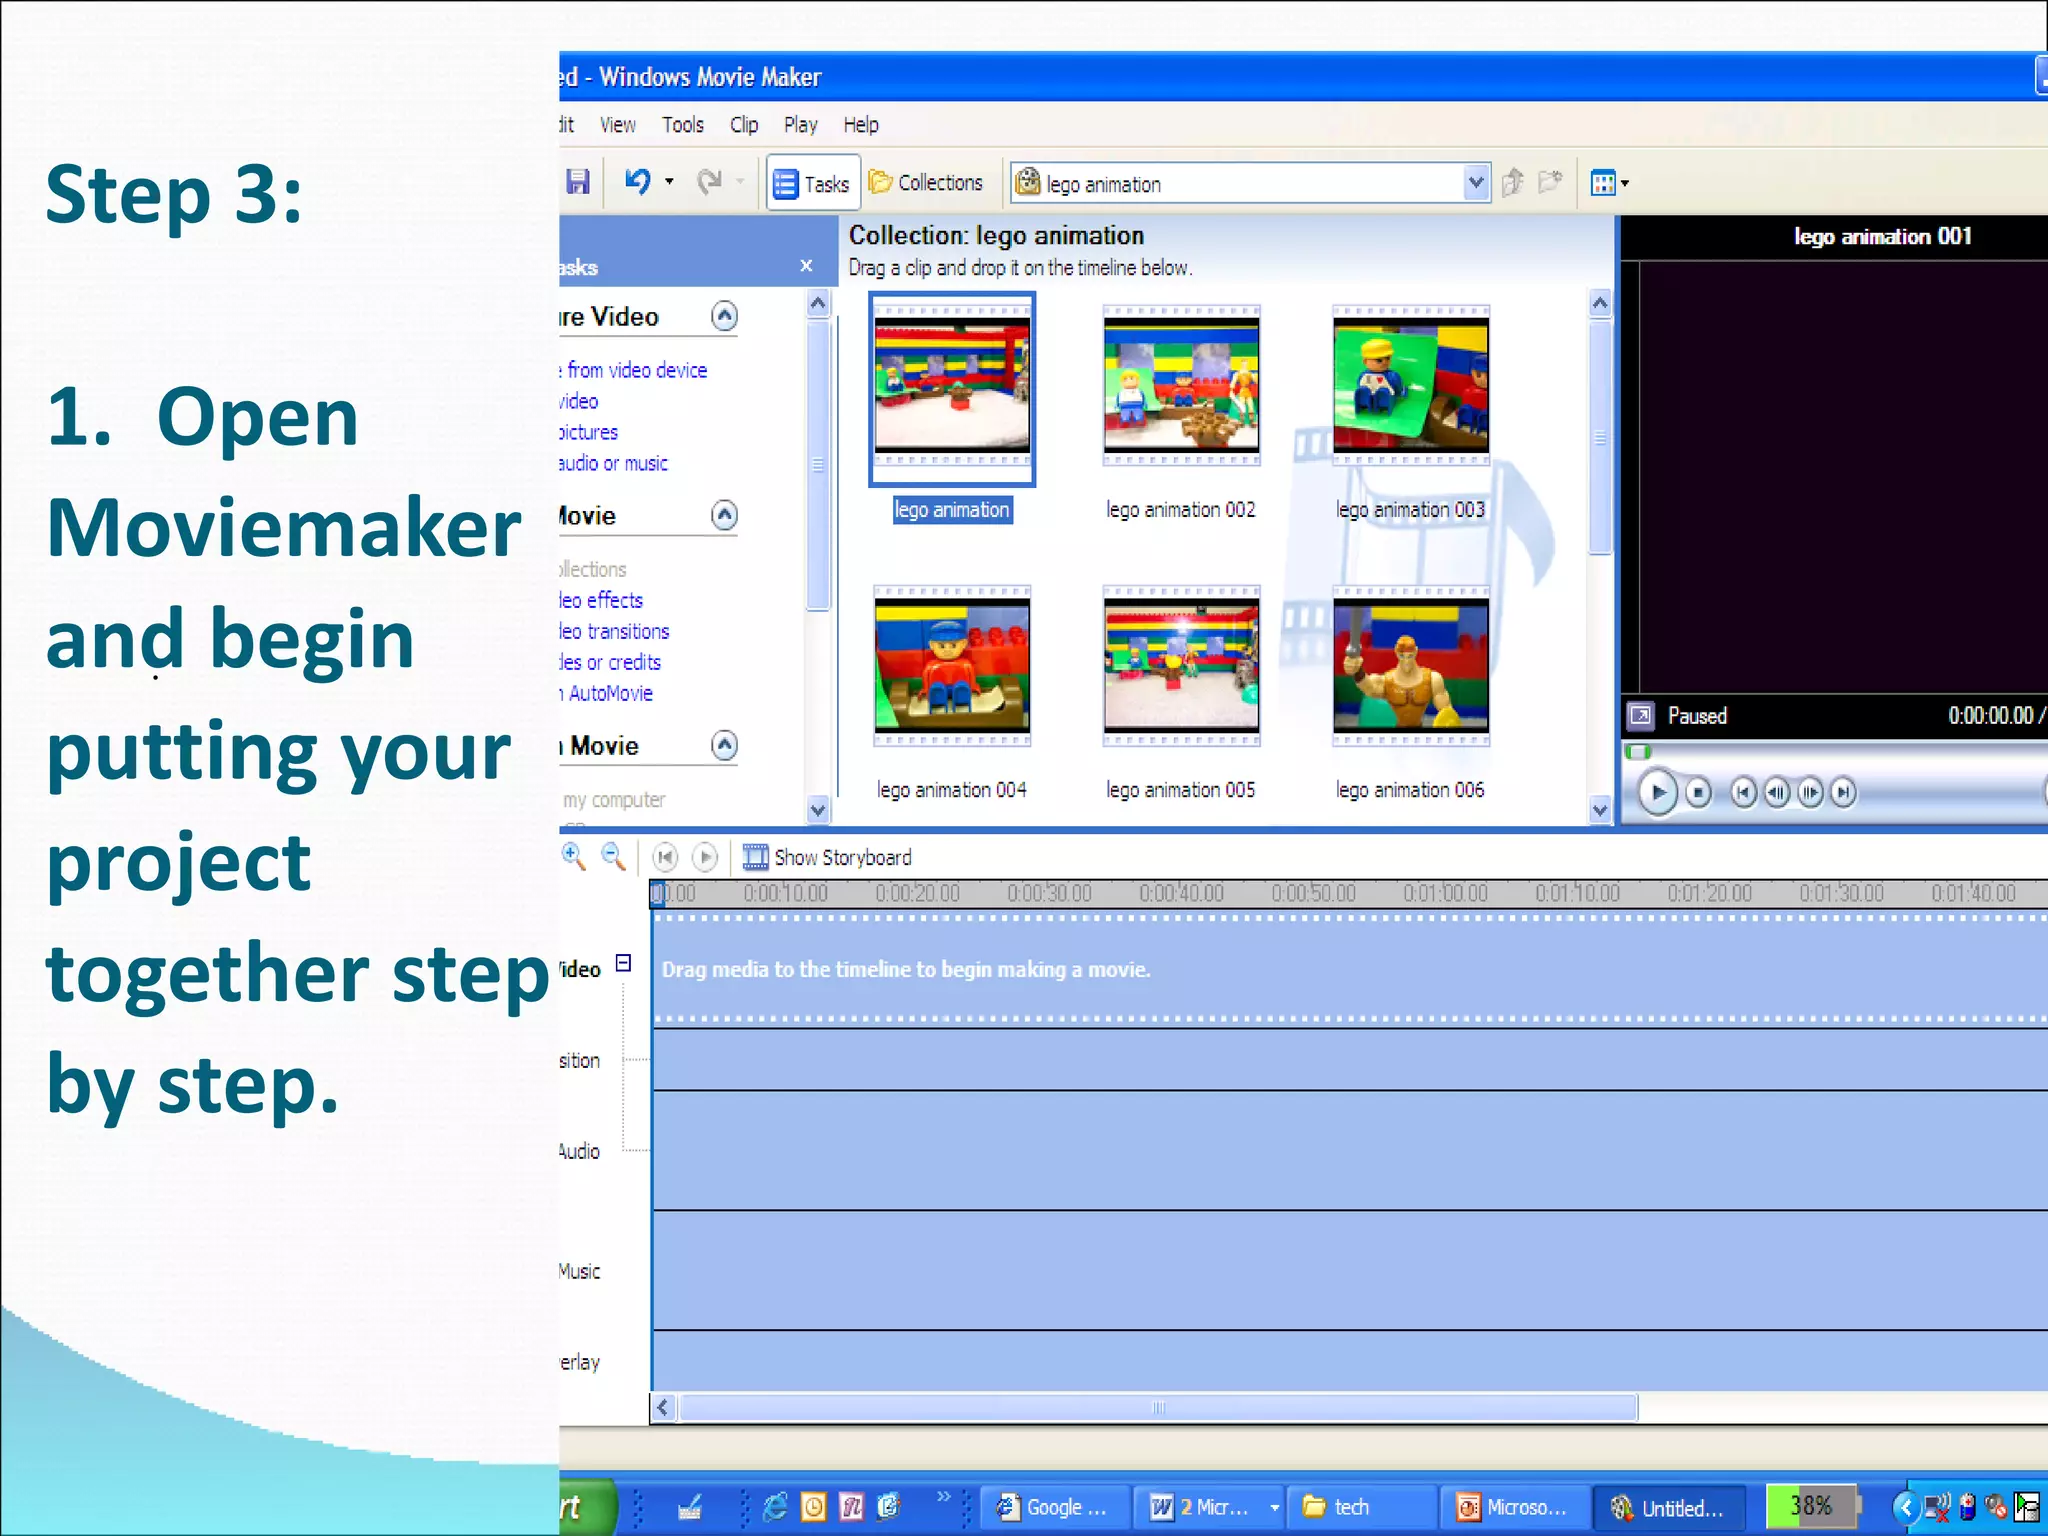
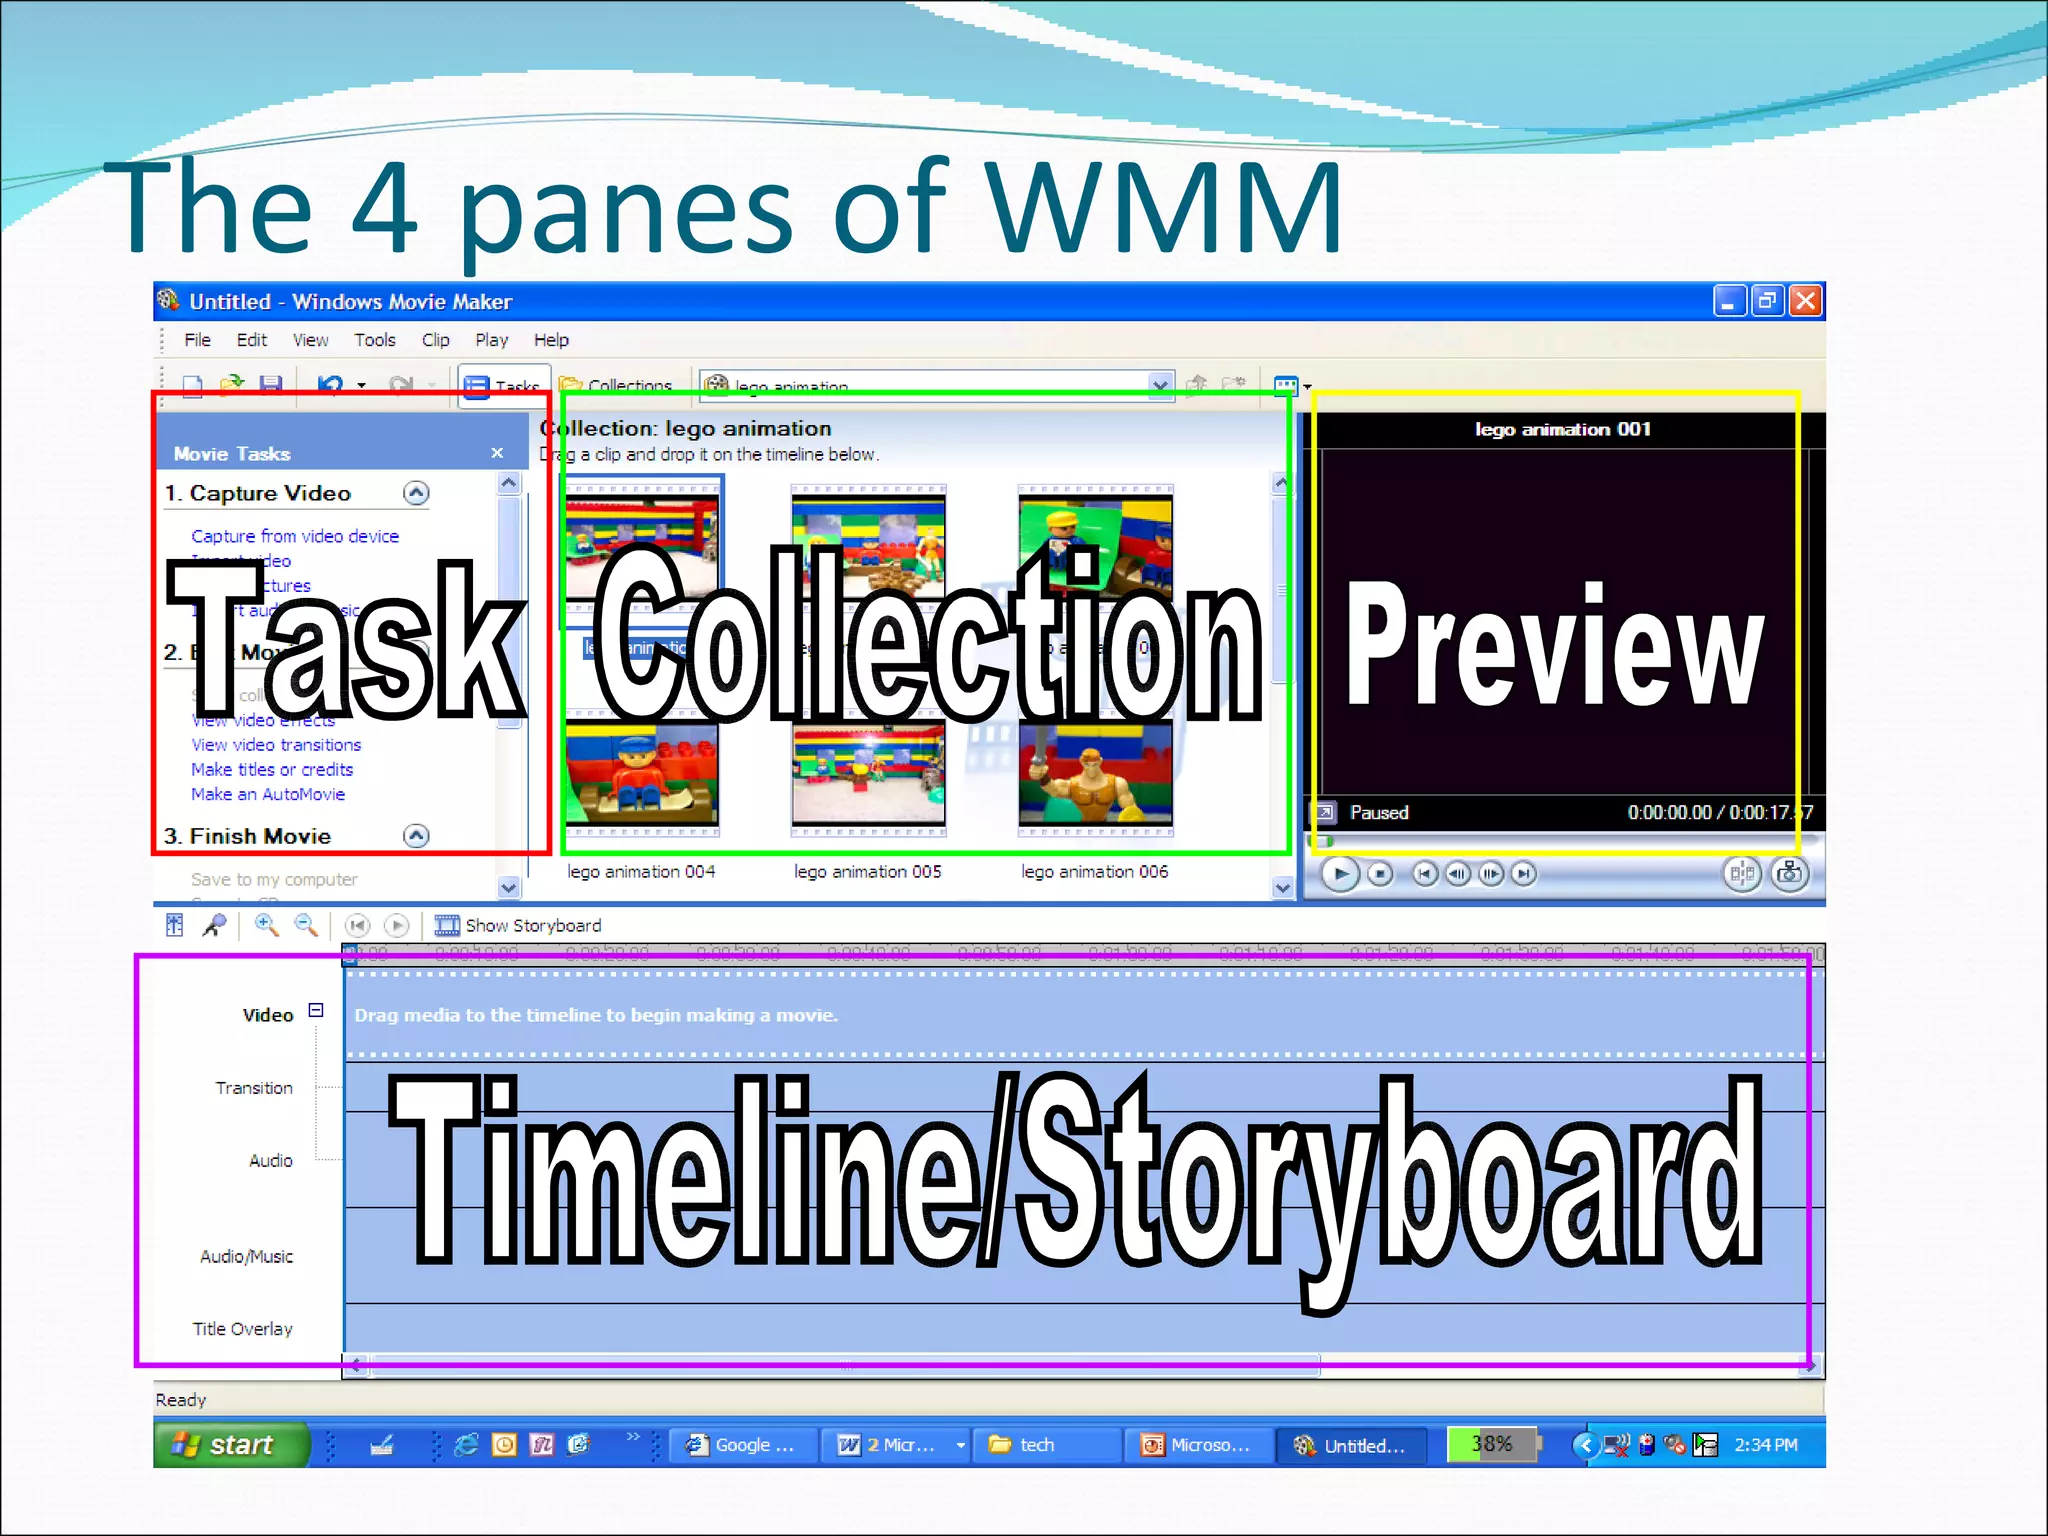
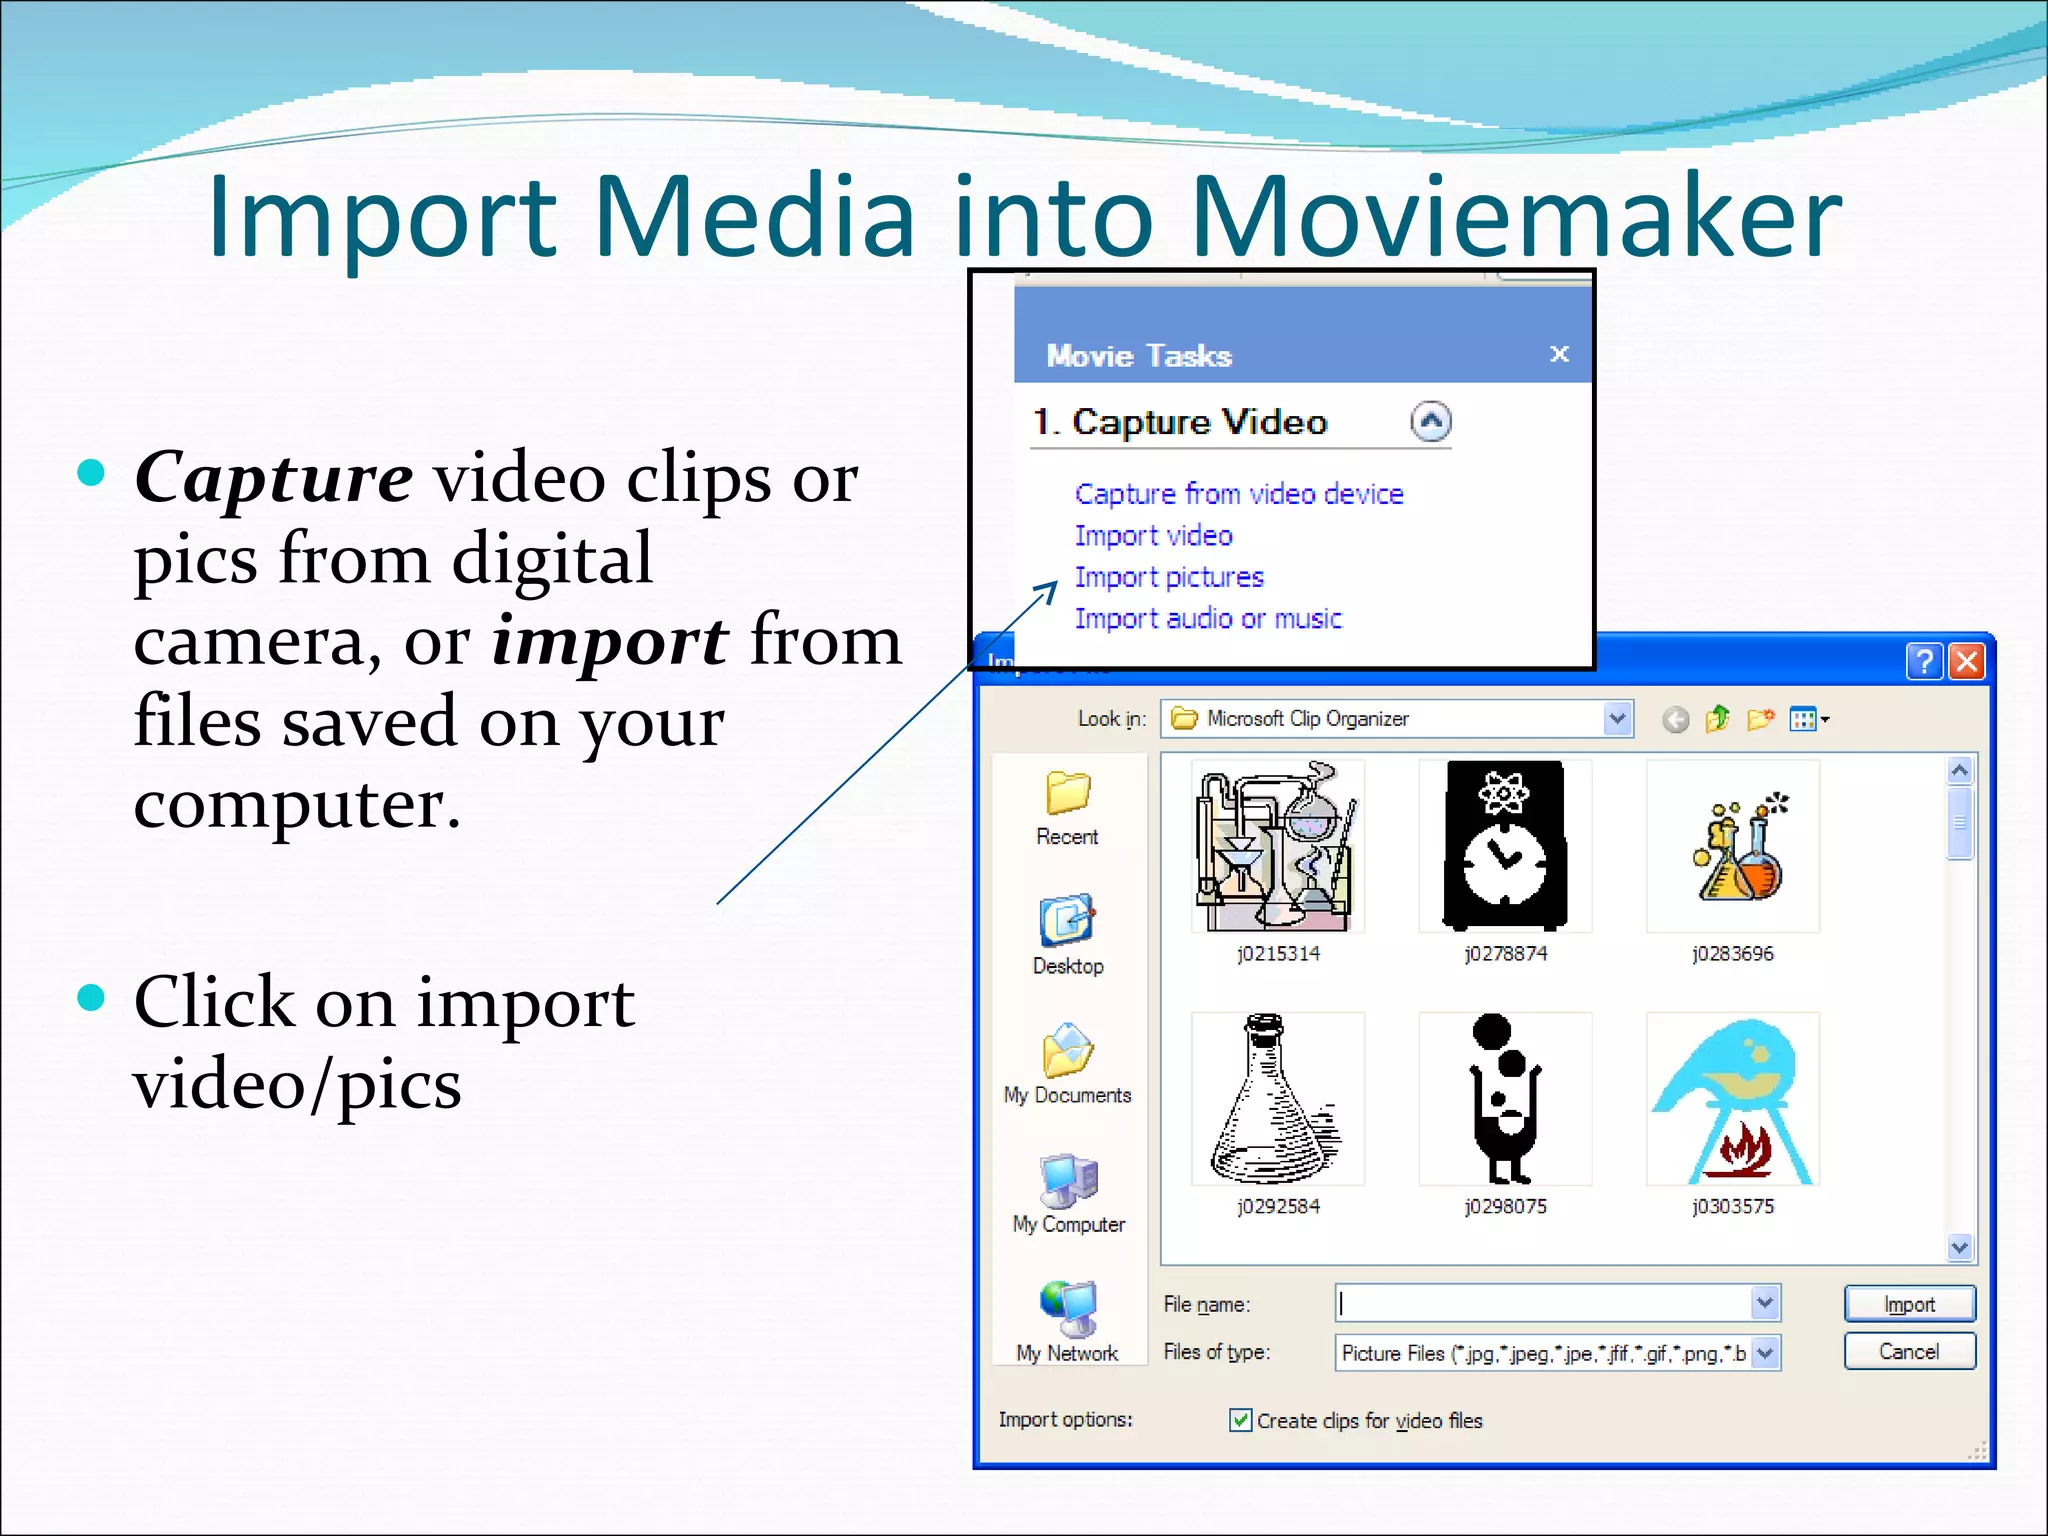
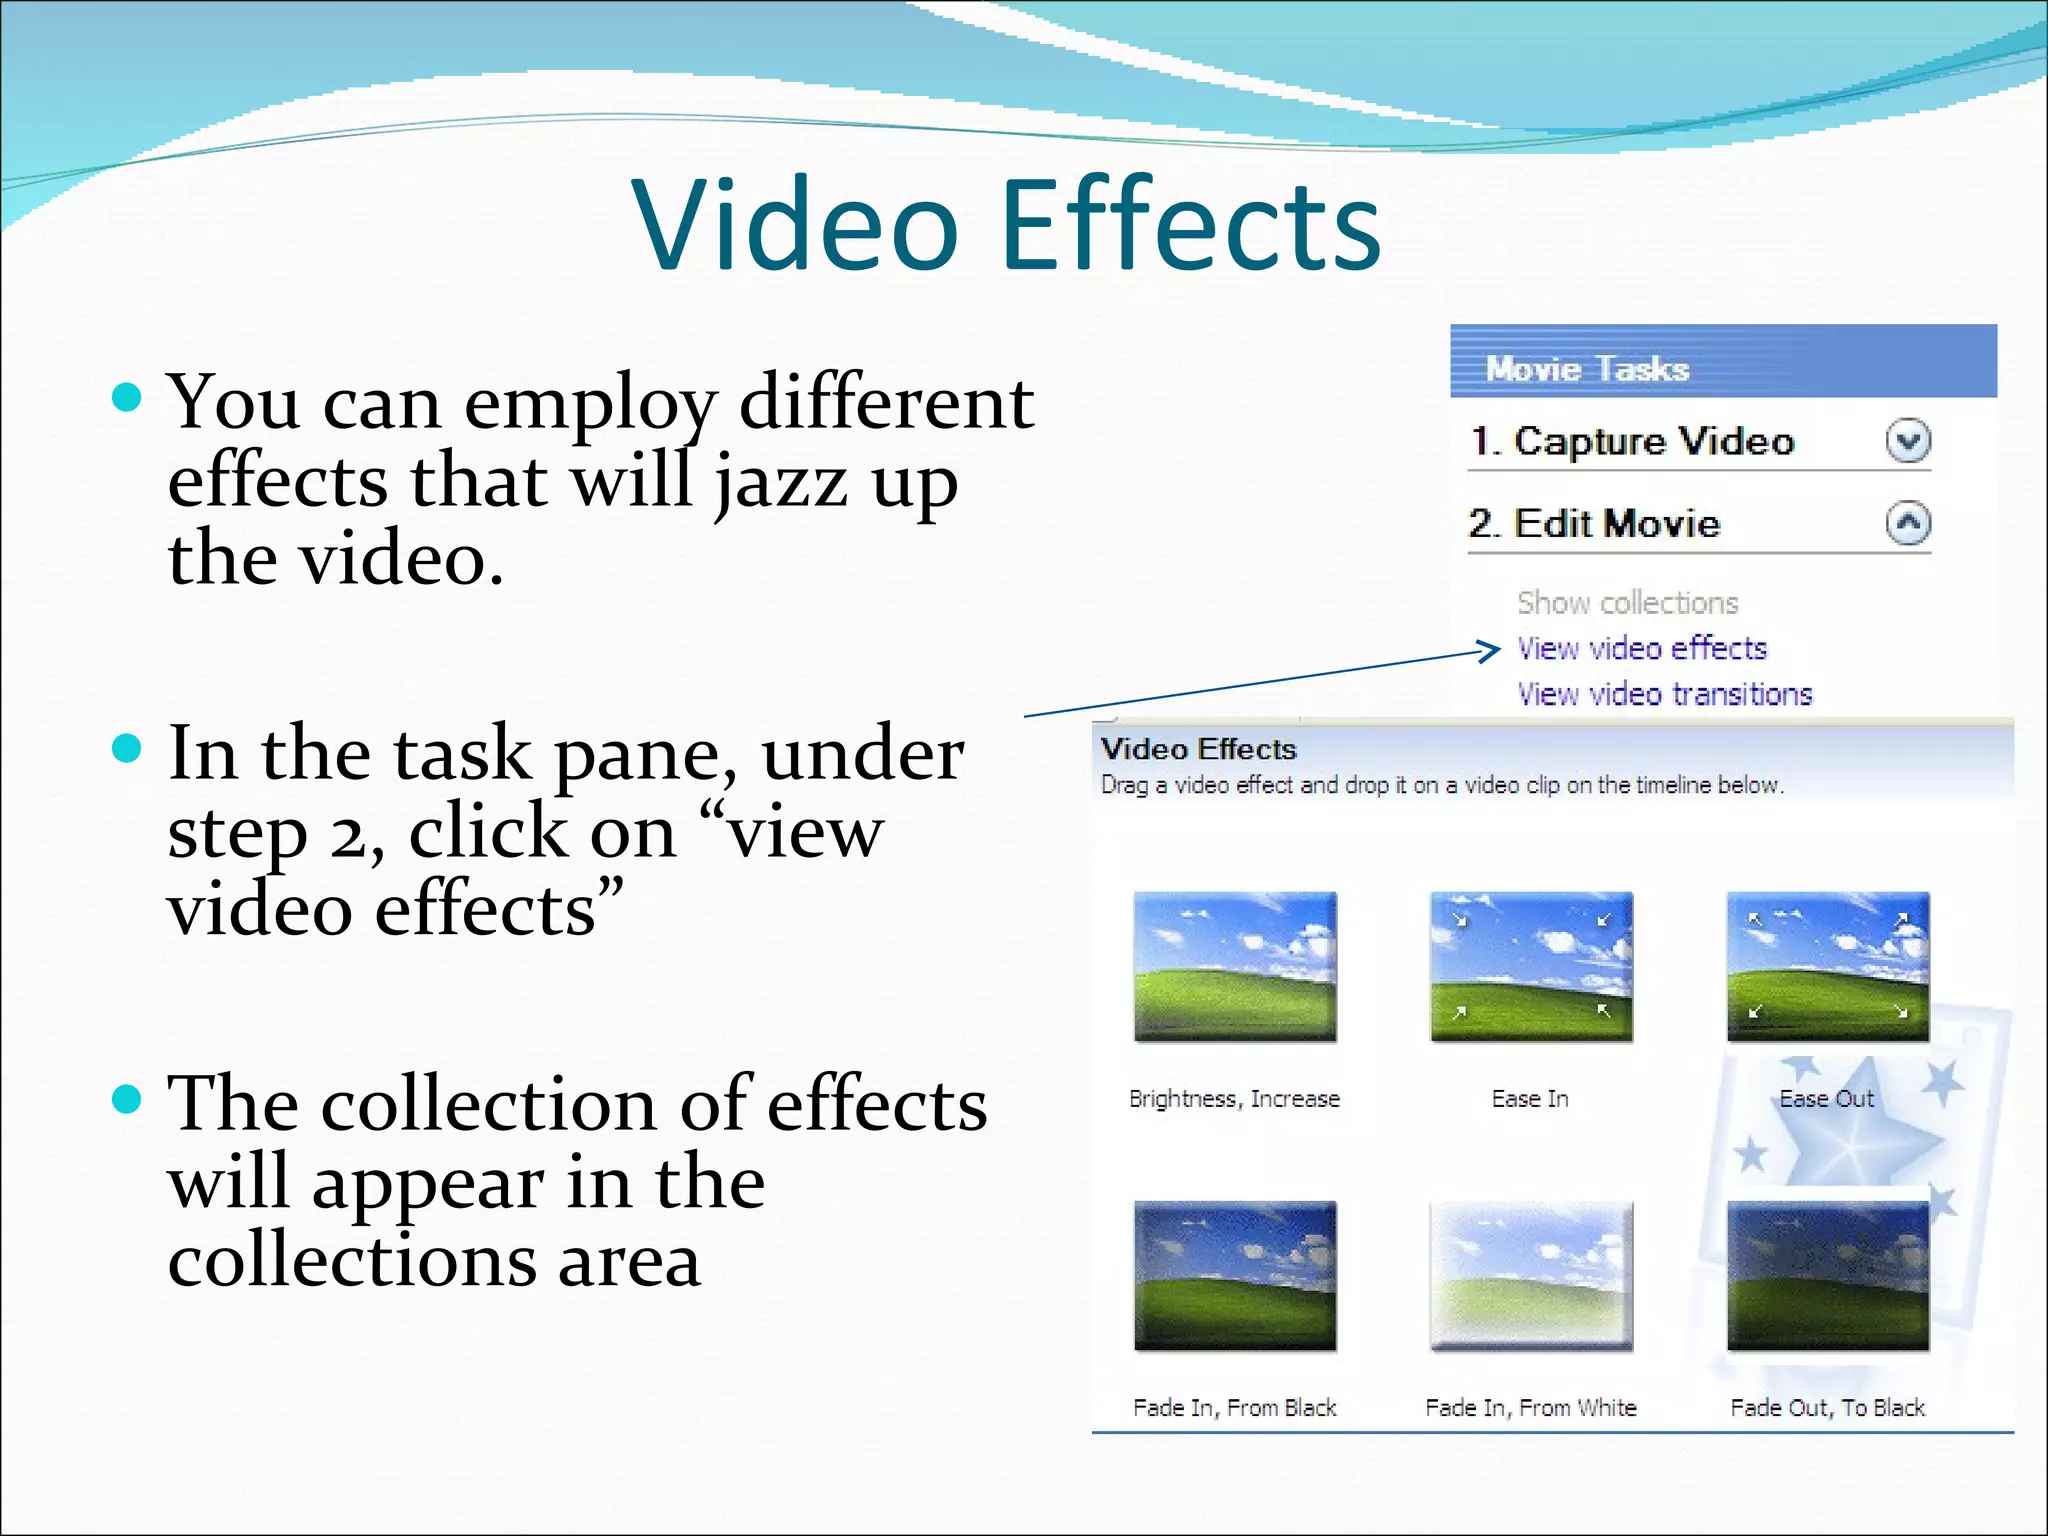
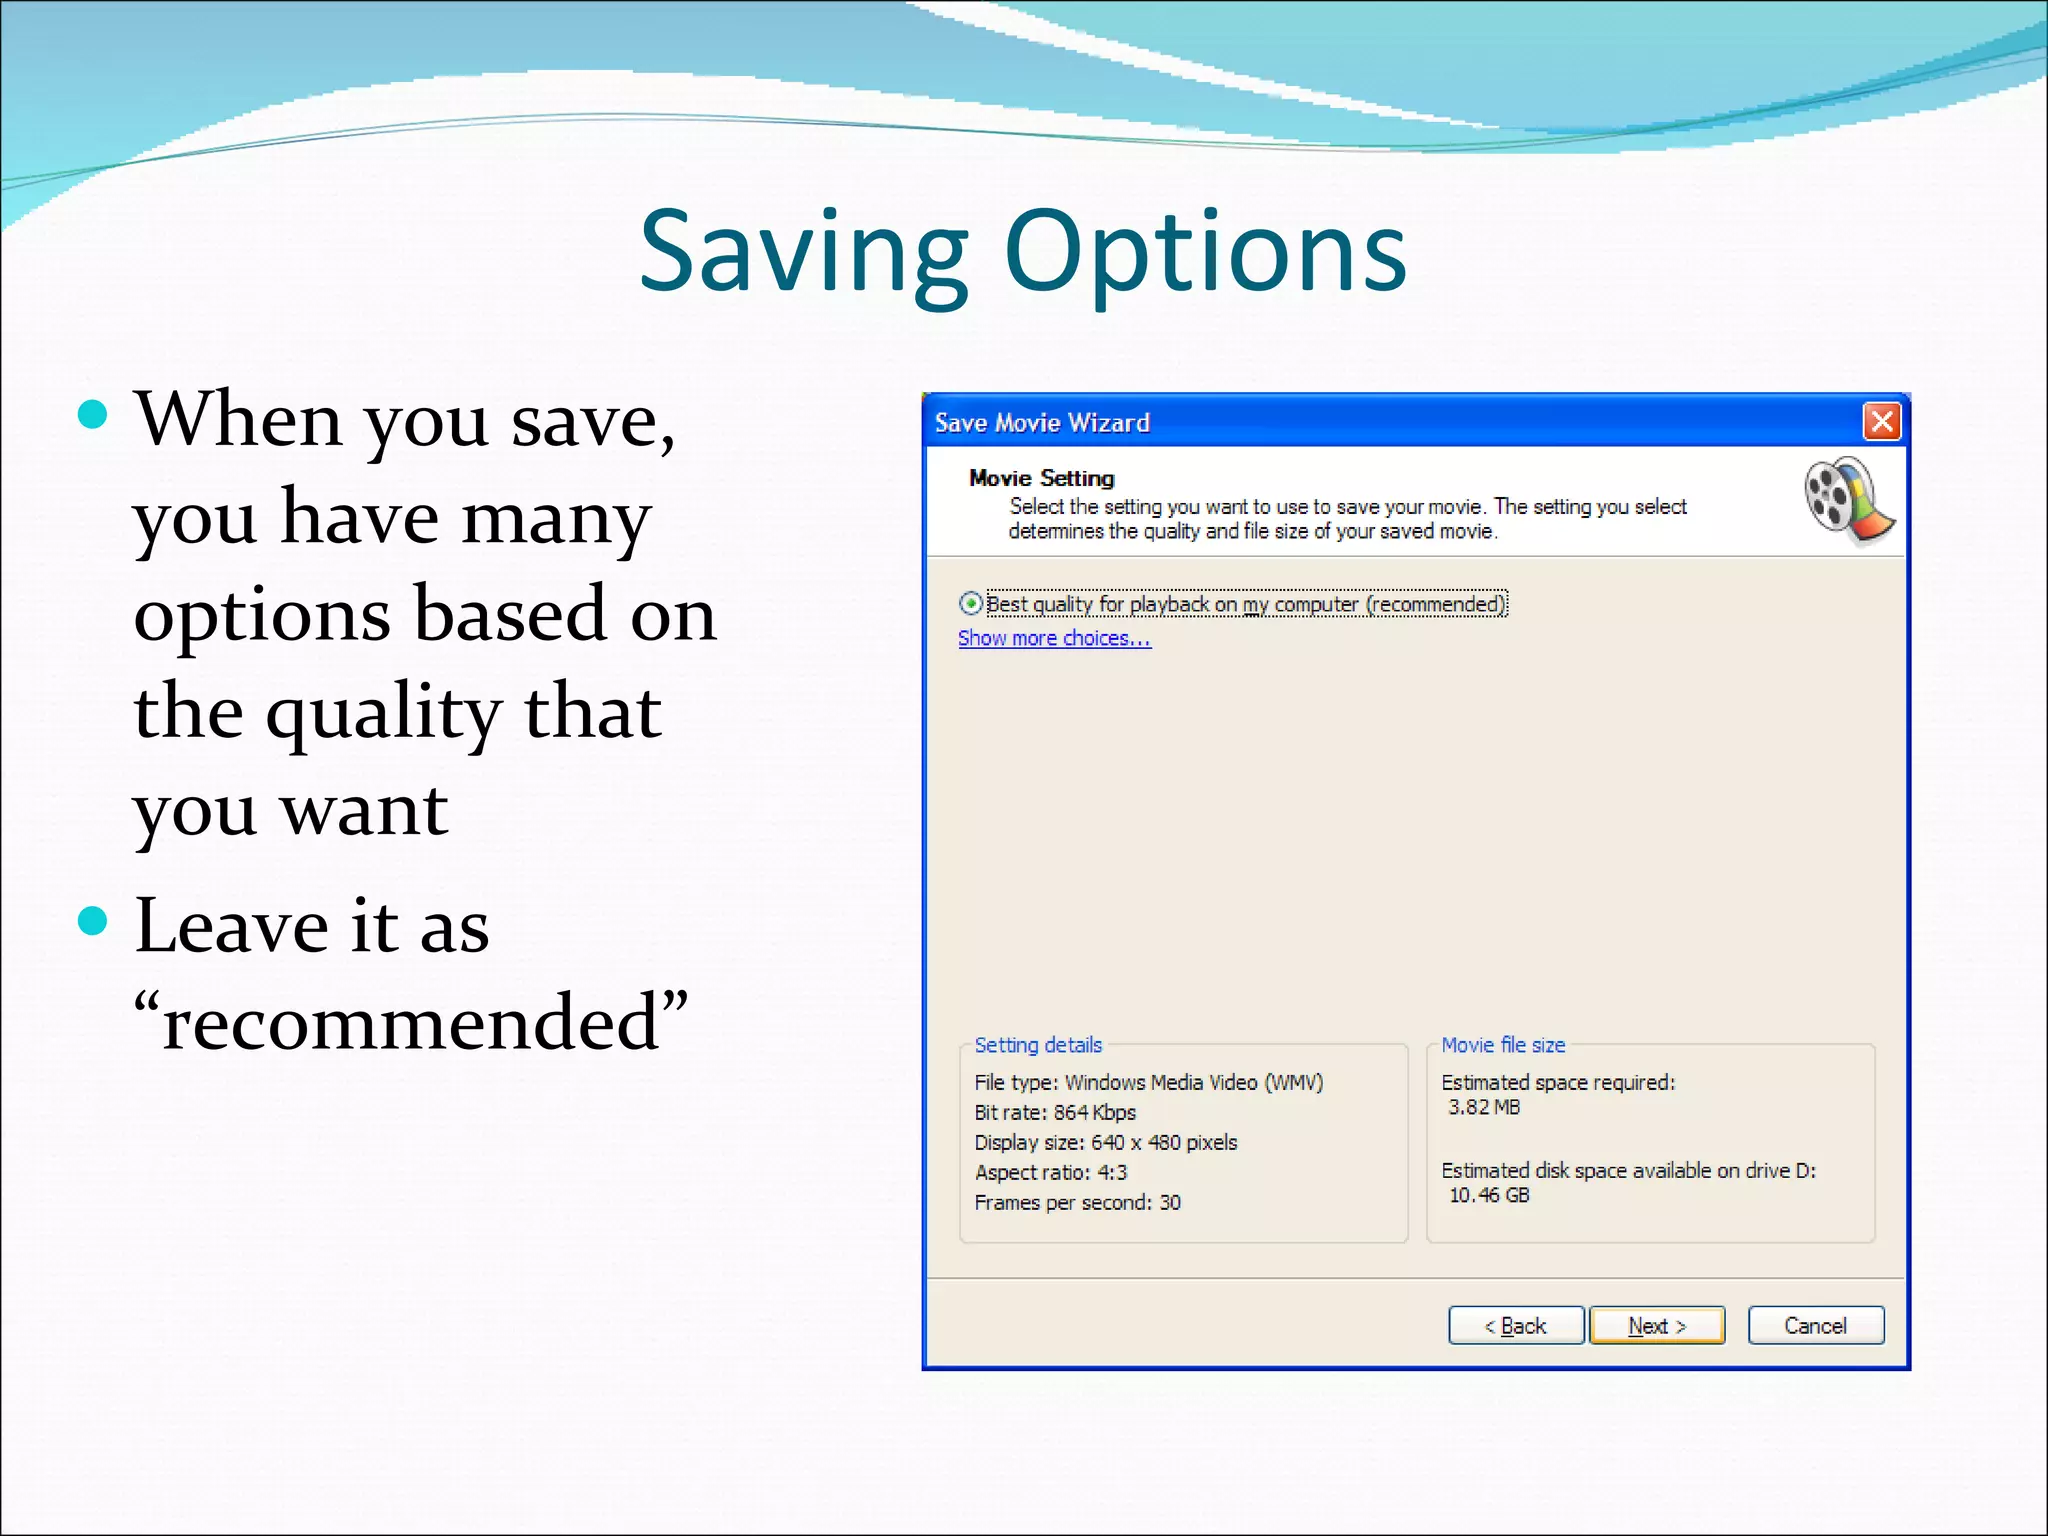
Lesson Plan By: Jocelyn Werner
OVERVIEW: Music lyrics as a  form of poetry Step 1 of Project: 1.  Find a contemporary song that you like that also has figurative/poetic language devices in it. 2.  Print out the song lyrics to your song and bring it to class.
Step 2: Homework: Part 1 1. Go through the song stanza by stanza and write in what figurative/poetic language devices are being used in the song.  Write notes in the margins or on a separate sheet of paper and bring back to class tomorrow.
Step 2: Homework: Part 2 Bring in a copy of the music selection you want to use for your poetry project on a flash drive.  It must be in MP3 format.
Step 3: 1.  Open Moviemaker and begin putting your project together step by step. .
The 4 panes of WMM Task Collection Preview Timeline/Storyboard
Using the task pane 3 Tasks: 1.Capture/Import  2.Edit 3.Finish
The Timeline/Storyboard 5 Tracks  Video Transition Audio Audio/music Title When we edit our movie, different parts will go in these tracks
Import Media into Moviemaker Capture  video clips or pics from digital camera, or  import  from files saved on your computer. Click on import video/pics
Move video/pics to the timeline Each item will appear in the collections pane  Drag each item to the story board and drop them in the order you wish them to appear.
Picture time You can also change the length of time that the picture is shown in the movie By default each picture will be shown for 5 seconds If you want to change that amount of time drag the “end trim handle” (shown below).  Notice when you click and drag the amount of time will show in the window. If you are using video you can crop the length of the video using the same process.
Preview your movie You can preview the video at any time by simply clicking the play button at the bottom of the preview screen (or at the top left of the storyboard) The preview will start where the timeline marker is set… you can drag the marker anywhere you choose by grabbing it at the top You can also click on the full screen button to see it big Note: when you preview a movie it may be choppy. Timeline marker Full screen
Video Effects You can employ different effects that will jazz up the video.  In the task pane, under step 2, click on “view video effects” The collection of effects will appear in the collections area
Drag the effects down Once you have found the effect that is perfect… click and drag it down to the clip in the storyboard You can use multiple effects on an item
Video Effects Part 2 You will notice on the picture that a star will appear to represent an effect is on the picture You will notice that there are 2 overlapping stars on a picture with 2 effects You can preview the effect on your pictures/video Full screen
Transitions You can employ different transitions to jazz up the video In the task pane, under step 2, click on “view video transitions” The collection of transitions will appear in the collections area
Drag the transitions down Once you have found the transition that is perfect… click and drag it between the clips in the storyboard.  A blue line will appear to show where the trans will go
Transitions Part 2 You will notice that the 2 clips will slightly overlap, and in the track beneath the clips, the name of the transition will appear. Unlike effects, only one transition can be used at a time You can also speed up or slow down a transition by clicking on the picture and sliding it forward or back to increase or decrease the transition’s speed
Titles / Credits Again, in the task pane, under step 2 click on “Make titles…” This will appear and you can choose where you want to put the title/credits
Titles Type whatever you want in the text box Below, you can change the animation or the font and color Once complete, click on Done.
Audio Add music (mp3) to your movie In the task pane, click on “import audio…” Choose the file(s) you want to use and click “import” (you must first save your music to a file folder using your flash drive)
Drag audio down… In the collections pane, click on the audio file and drag it into the Audio/Music track.
Adjust the audio To adjust the volume, push the Control key and U Or you can right-click on the track and get this menu which shows volume, fade in and out. For video clips, you can mute the recorded sound in the same way
Trim the audio Be sure to make the music the same length as the video.  Click on the end of the track and drag it left or right to trim the length. You can add more audio tracks before or after this track
Finish the movie First go to File-Save to save your project as a Movie Maker File. This will enable you to go back and make changes, if necessary. Go to Step 3: Finish Movie. In the Save Movie Wizard box, enter and name and choose where to save.
Saving Options When you save, you have many options based on the quality that you want Leave it as “recommended”
Saving The amount of time that it takes to save depends upon how long it is and the quality options you chose.  The next screen will tell you it is finished and will ask if you want to see your work.
Watching the video The video is now set to play back in Window media player If you go to the folder you saved it in and double click it will open and play for you Then you can burn the file to cd or flash drive to take with you
Step 8: Present to the class Once your slideshow is created, you will need to present it to 2 other of your classmates. Your classmates will score you based on the requirements for this project. If you would like to present your project to the whole class, you will need to sign up for a day and time to do so.
Grading You will be graded on the following components of your project worth a total of 100 points: 1.  Complete Moviemaker project with the following parts: Title page with song title and your name/date/class etc. Music lyrics playing to your video  Images that go along with music lyrics (at least 10) figurative/poetic language devices from song (at least 8) written out on slides in video
References Joanne Steckling [email_address] Powerpoint courtesy of Scott Bell, Chaminade College Prep, St. Louis, Mo.

Poetry through music teacher lesson plan

  • 1.
    Lesson Plan By:Jocelyn Werner
  • 2.
    OVERVIEW: Music lyricsas a form of poetry Step 1 of Project: 1. Find a contemporary song that you like that also has figurative/poetic language devices in it. 2. Print out the song lyrics to your song and bring it to class.
  • 3.
    Step 2: Homework:Part 1 1. Go through the song stanza by stanza and write in what figurative/poetic language devices are being used in the song. Write notes in the margins or on a separate sheet of paper and bring back to class tomorrow.
  • 4.
    Step 2: Homework:Part 2 Bring in a copy of the music selection you want to use for your poetry project on a flash drive. It must be in MP3 format.
  • 5.
    Step 3: 1. Open Moviemaker and begin putting your project together step by step. .
  • 6.
    The 4 panesof WMM Task Collection Preview Timeline/Storyboard
  • 7.
    Using the taskpane 3 Tasks: 1.Capture/Import 2.Edit 3.Finish
  • 8.
    The Timeline/Storyboard 5Tracks Video Transition Audio Audio/music Title When we edit our movie, different parts will go in these tracks
  • 9.
    Import Media intoMoviemaker Capture video clips or pics from digital camera, or import from files saved on your computer. Click on import video/pics
  • 10.
    Move video/pics tothe timeline Each item will appear in the collections pane Drag each item to the story board and drop them in the order you wish them to appear.
  • 11.
    Picture time Youcan also change the length of time that the picture is shown in the movie By default each picture will be shown for 5 seconds If you want to change that amount of time drag the “end trim handle” (shown below). Notice when you click and drag the amount of time will show in the window. If you are using video you can crop the length of the video using the same process.
  • 12.
    Preview your movieYou can preview the video at any time by simply clicking the play button at the bottom of the preview screen (or at the top left of the storyboard) The preview will start where the timeline marker is set… you can drag the marker anywhere you choose by grabbing it at the top You can also click on the full screen button to see it big Note: when you preview a movie it may be choppy. Timeline marker Full screen
  • 13.
    Video Effects Youcan employ different effects that will jazz up the video. In the task pane, under step 2, click on “view video effects” The collection of effects will appear in the collections area
  • 14.
    Drag the effectsdown Once you have found the effect that is perfect… click and drag it down to the clip in the storyboard You can use multiple effects on an item
  • 15.
    Video Effects Part2 You will notice on the picture that a star will appear to represent an effect is on the picture You will notice that there are 2 overlapping stars on a picture with 2 effects You can preview the effect on your pictures/video Full screen
  • 16.
    Transitions You canemploy different transitions to jazz up the video In the task pane, under step 2, click on “view video transitions” The collection of transitions will appear in the collections area
  • 17.
    Drag the transitionsdown Once you have found the transition that is perfect… click and drag it between the clips in the storyboard. A blue line will appear to show where the trans will go
  • 18.
    Transitions Part 2You will notice that the 2 clips will slightly overlap, and in the track beneath the clips, the name of the transition will appear. Unlike effects, only one transition can be used at a time You can also speed up or slow down a transition by clicking on the picture and sliding it forward or back to increase or decrease the transition’s speed
  • 19.
    Titles / CreditsAgain, in the task pane, under step 2 click on “Make titles…” This will appear and you can choose where you want to put the title/credits
  • 20.
    Titles Type whateveryou want in the text box Below, you can change the animation or the font and color Once complete, click on Done.
  • 21.
    Audio Add music(mp3) to your movie In the task pane, click on “import audio…” Choose the file(s) you want to use and click “import” (you must first save your music to a file folder using your flash drive)
  • 22.
    Drag audio down…In the collections pane, click on the audio file and drag it into the Audio/Music track.
  • 23.
    Adjust the audioTo adjust the volume, push the Control key and U Or you can right-click on the track and get this menu which shows volume, fade in and out. For video clips, you can mute the recorded sound in the same way
  • 24.
    Trim the audioBe sure to make the music the same length as the video. Click on the end of the track and drag it left or right to trim the length. You can add more audio tracks before or after this track
  • 25.
    Finish the movieFirst go to File-Save to save your project as a Movie Maker File. This will enable you to go back and make changes, if necessary. Go to Step 3: Finish Movie. In the Save Movie Wizard box, enter and name and choose where to save.
  • 26.
    Saving Options Whenyou save, you have many options based on the quality that you want Leave it as “recommended”
  • 27.
    Saving The amountof time that it takes to save depends upon how long it is and the quality options you chose. The next screen will tell you it is finished and will ask if you want to see your work.
  • 28.
    Watching the videoThe video is now set to play back in Window media player If you go to the folder you saved it in and double click it will open and play for you Then you can burn the file to cd or flash drive to take with you
  • 29.
    Step 8: Presentto the class Once your slideshow is created, you will need to present it to 2 other of your classmates. Your classmates will score you based on the requirements for this project. If you would like to present your project to the whole class, you will need to sign up for a day and time to do so.
  • 30.
    Grading You willbe graded on the following components of your project worth a total of 100 points: 1. Complete Moviemaker project with the following parts: Title page with song title and your name/date/class etc. Music lyrics playing to your video Images that go along with music lyrics (at least 10) figurative/poetic language devices from song (at least 8) written out on slides in video
  • 31.
    References Joanne Steckling[email_address] Powerpoint courtesy of Scott Bell, Chaminade College Prep, St. Louis, Mo.