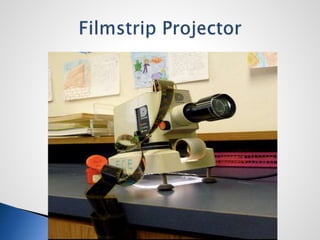
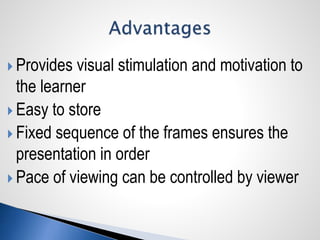
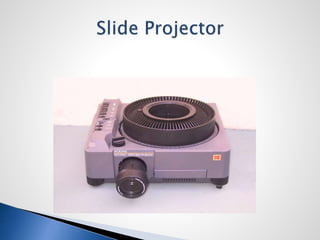
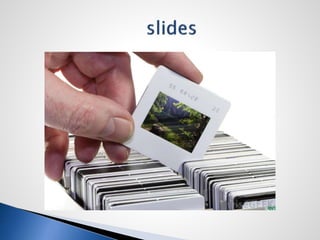
1.Identify the different projection systems
2. Analyze the characteristics of the different
projection systems
3. Demonstrate proper use of the different
projectors
4. Prepare transparencies.
1. Filmstrip Projector
2. Slide Projector
3. Overhead Projector
4. Opaque Projector
5. LCD (Liquid Crystal Display) Projector
 It is a device used to view a filmstrip- refers to
a roll of 35mm transparent film containing
series of related pictures shown one at a time.
 Provides visual stimulation and motivation to
the learner
 Easy to store
 Fixed sequence of the frames ensures the
presentation in order
 Pace of viewing can be controlled by viewer
 Impossible to alter due to permanent
sequence of images
 Sprocket holes get damaged if constantly
used.
 A device used to view photographic slides-
refers to a small format photographic
transparency individually mounted for one-at-
a-time projection.
 Amateurs are now able to produce their own
slides because of photographic equipment has
become simplified.
 Slides can be rearranged into different
sequences
 Automatic projectors can hold sets of slides in
trays.
 There are even remote control and timer.
 Can be integrated into individualized
instruction program
 Audio may accompany the slide show.
 Easily disorganized
 Jamming of slides in the slide-changing
mechanism
 Dust or fingerprints may accumulate on the
slide if not stored well
 Not effective in a fully lighted room.
 No face to face contact with the learner
 A device that has the capacity to display opaque
materials on screen.
 Possible to have colors projected
 Small objects magnified so they can be
viewed by a group and valuable prints and
pictures with minimum damaged
 Heavy and bulky
 Room needs to be very dark
 Heat from the projector can damage the
materials being projected
 expensive
 A type of projector that can display video,
images, or computer data on screen or any
flat surface
 Slides are easy to prepare because of the
presentation tools that are readily available
 Storage is not a problem
 Possible to show motion or have
accompanying sounds
 Needs electricity and computer
 Other projectors need to be dimmed so
that the projection can be seen
 Colors are distorted
 It is a box with a large “stage” on the top
surface. A lamp from inside the box is
condensed by a special type of lens and
passes through the transparency that is
placed on the “stage”
 Position the projector at least 2-3 meters from
the screen.
 Avoid projecting on a glossy surface.
 Check if the lenses and glass plate are clean.
 Place the transparency on the stage as you
would normally view it.
 Do necessary adjustments with the head assembly
and focusing knob in order to ensure that the
projection can be read by your learners who are
seated at the farthest part of the room.
 Make sure that your learners can see what you are
projecting.
 Speak with more volume than you normally
use.
 Look at either your class or your transparency
and not on the projector.
 Place the transparency on the glass plate
before turning on the projector. Turn it off
before removing the transparency.
 Use dim lights.
 When using an OHP pointer, point it to the transparency
and not on the screen.
 Gradually expose the contents of your transparencies
through masking.
 Use the OHP like a chalkboard if some materials have to
be drawn or written.
 Turn off the OHP when you are not using it during
discussions.
 Make sure that the lamp is cooled before
moving the projector.
 Carry the OHP by its body and not by its post
and heard assembly.
Preparing Transparencies
Transparency- composed of photographic
film, clear acetate, or any transparent
material capable of being imprinted with
an image
1. Print horizontally on the transparency.
2. Use a large text size.
3. Use standard fonts.
4. Color of the text should be black. Use red sparingly.
5. Do not load your transparency. Use 66 rule-6 lines
per page and 6 words per line.
6. Use topical outline not sentences.
7. Do not reproduce a typewritten page or page from
the book.
8. Write notes of the frame of your transparency.
9. Vary your presentation with the use of overlays,
masking, silhouettes and cut- outs.
1. Direct Draw Method
2. Thermal Film Process
3. Electrostatic Film Process
( Xerography)
4. Computer Generated.
 Content is drawn or written directly on the
transparency using a marking pen
 A master is prepared on an ordinary paper using
heat-absorbing materials such as India ink, ordinary
lead pencil, or any substances containing carbon.
This image is then burned into (with infrared light) a
specially treated acetate film.
 Transparencies are prepared using plain
paper coping machines. A master is
prepared on plain paper and then
photocopied.
 Transparencies are prepared with the
use of computers and then printed on an
inkjet or laser printer.
1. Prepare a sketch of the content.
2. Decide which part of the sketch will be the base and
which will be the overlays.
3. For each separate part make a master drawing.
4. To make sure that the base and the overlays align
properly, mark two corners of each master.
5. Prepare transparency from each master.
6. Prepare the frame. It can be made out of folder or an
illustration board.
7. Mount the transparencies on the prepared frame. The
base will be placed under the frame while the overlays
are placed on top of the frame.
 It is simple to operate.
 Rate of presentation can be controlled by the Teacher.
 It is usually placed in front of the classroom, therefore the
teacher can still face his/her students.
 Transparencies can be prepared through a variety of simple,
inexpensive methods.
 It can be used in large groups.
 Effective in a well- lighted room
 It requires electricity and special equipment.
 OHPs are heavy and bulky to transport.
 Framed transparencies are bulky and difficult to store.
 It is instructor dependent
 It requires preparation since nontransparent materials
cannot be projected.
---------------------
Reporters:
---------------------
Arvin Donguines
Hernanie Gumahad
Carmelyn Mary Sarra

Projection Systems

  • 2.
    1.Identify the differentprojection systems 2. Analyze the characteristics of the different projection systems 3. Demonstrate proper use of the different projectors 4. Prepare transparencies.
  • 3.
    1. Filmstrip Projector 2.Slide Projector 3. Overhead Projector 4. Opaque Projector 5. LCD (Liquid Crystal Display) Projector
  • 4.
     It isa device used to view a filmstrip- refers to a roll of 35mm transparent film containing series of related pictures shown one at a time.
  • 6.
     Provides visualstimulation and motivation to the learner  Easy to store  Fixed sequence of the frames ensures the presentation in order  Pace of viewing can be controlled by viewer
  • 7.
     Impossible toalter due to permanent sequence of images  Sprocket holes get damaged if constantly used.
  • 8.
     A deviceused to view photographic slides- refers to a small format photographic transparency individually mounted for one-at- a-time projection.
  • 11.
     Amateurs arenow able to produce their own slides because of photographic equipment has become simplified.  Slides can be rearranged into different sequences  Automatic projectors can hold sets of slides in trays.  There are even remote control and timer.
  • 12.
     Can beintegrated into individualized instruction program  Audio may accompany the slide show.
  • 13.
     Easily disorganized Jamming of slides in the slide-changing mechanism  Dust or fingerprints may accumulate on the slide if not stored well  Not effective in a fully lighted room.  No face to face contact with the learner
  • 15.
     A devicethat has the capacity to display opaque materials on screen.
  • 16.
     Possible tohave colors projected  Small objects magnified so they can be viewed by a group and valuable prints and pictures with minimum damaged
  • 17.
     Heavy andbulky  Room needs to be very dark  Heat from the projector can damage the materials being projected  expensive
  • 18.
     A typeof projector that can display video, images, or computer data on screen or any flat surface
  • 20.
     Slides areeasy to prepare because of the presentation tools that are readily available  Storage is not a problem  Possible to show motion or have accompanying sounds
  • 21.
     Needs electricityand computer  Other projectors need to be dimmed so that the projection can be seen  Colors are distorted
  • 22.
     It isa box with a large “stage” on the top surface. A lamp from inside the box is condensed by a special type of lens and passes through the transparency that is placed on the “stage”
  • 25.
     Position theprojector at least 2-3 meters from the screen.  Avoid projecting on a glossy surface.  Check if the lenses and glass plate are clean.  Place the transparency on the stage as you would normally view it.
  • 26.
     Do necessaryadjustments with the head assembly and focusing knob in order to ensure that the projection can be read by your learners who are seated at the farthest part of the room.  Make sure that your learners can see what you are projecting.
  • 27.
     Speak withmore volume than you normally use.  Look at either your class or your transparency and not on the projector.  Place the transparency on the glass plate before turning on the projector. Turn it off before removing the transparency.
  • 28.
     Use dimlights.  When using an OHP pointer, point it to the transparency and not on the screen.  Gradually expose the contents of your transparencies through masking.  Use the OHP like a chalkboard if some materials have to be drawn or written.  Turn off the OHP when you are not using it during discussions.
  • 29.
     Make surethat the lamp is cooled before moving the projector.  Carry the OHP by its body and not by its post and heard assembly.
  • 30.
  • 31.
    Transparency- composed ofphotographic film, clear acetate, or any transparent material capable of being imprinted with an image
  • 32.
    1. Print horizontallyon the transparency. 2. Use a large text size. 3. Use standard fonts. 4. Color of the text should be black. Use red sparingly. 5. Do not load your transparency. Use 66 rule-6 lines per page and 6 words per line. 6. Use topical outline not sentences.
  • 33.
    7. Do notreproduce a typewritten page or page from the book. 8. Write notes of the frame of your transparency. 9. Vary your presentation with the use of overlays, masking, silhouettes and cut- outs.
  • 34.
    1. Direct DrawMethod 2. Thermal Film Process 3. Electrostatic Film Process ( Xerography) 4. Computer Generated.
  • 35.
     Content isdrawn or written directly on the transparency using a marking pen
  • 36.
     A masteris prepared on an ordinary paper using heat-absorbing materials such as India ink, ordinary lead pencil, or any substances containing carbon. This image is then burned into (with infrared light) a specially treated acetate film.
  • 37.
     Transparencies areprepared using plain paper coping machines. A master is prepared on plain paper and then photocopied.
  • 38.
     Transparencies areprepared with the use of computers and then printed on an inkjet or laser printer.
  • 39.
    1. Prepare asketch of the content. 2. Decide which part of the sketch will be the base and which will be the overlays. 3. For each separate part make a master drawing. 4. To make sure that the base and the overlays align properly, mark two corners of each master.
  • 40.
    5. Prepare transparencyfrom each master. 6. Prepare the frame. It can be made out of folder or an illustration board. 7. Mount the transparencies on the prepared frame. The base will be placed under the frame while the overlays are placed on top of the frame.
  • 41.
     It issimple to operate.  Rate of presentation can be controlled by the Teacher.  It is usually placed in front of the classroom, therefore the teacher can still face his/her students.  Transparencies can be prepared through a variety of simple, inexpensive methods.  It can be used in large groups.  Effective in a well- lighted room
  • 42.
     It requireselectricity and special equipment.  OHPs are heavy and bulky to transport.  Framed transparencies are bulky and difficult to store.  It is instructor dependent  It requires preparation since nontransparent materials cannot be projected.
  • 43.