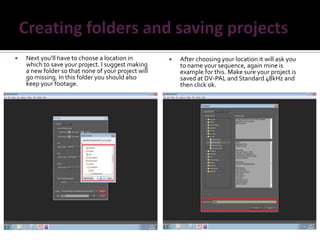
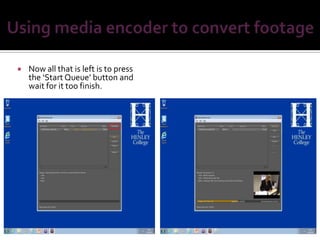
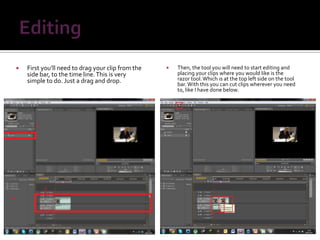
By Elliot jones
   1st off you will need to open premiere pro      You’ll then want to start by giving your
    and create a new project. You do this by         project a name. I’ve set mine as
    clicking on the ‘new project’ button             ‘example’ for this.
    outlined below.
   Next you’ll have to choose a location in            After choosing your location it will ask you
    which to save your project. I suggest making         to name your sequence, again mine is
    a new folder so that none of your project will       example for this. Make sure your project is
    go missing. In this folder you should also           saved at DV-PAL and Standard 48kHz and
    keep your footage.                                   then click ok.
   In order to get your clips to work in Premiere
    pro you will need to convert your footage to        Then find and select the clips that you want to
    Windows media (WMV) or QuickTime. For this           convert. To select more then one clip hold
    I’m going to us WMV. To start with open up           down shift and click to the bottom of the list.
    Media Encoder, and select the add button.
   The output file will be set to the original
    destination of the piece of footage you’re       You now want to change the format of
    converting. If you wanted to change the           the file/s you’re encoding. For this I am
    you can click just under the ‘output file’        converting to Windows Media (WMV).
    and change it. Then click save.
   Now all that is left is to press
    the ‘Start Queue’ button and
    wait for it too finish.
   First you’ll need to drag your clip from the      Then, the tool you will need to start editing and
    side bar, to the time line. This is very           placing your clips where you would like is the
    simple to do. Just a drag and drop.                razor tool. Which is at the top left side on the tool
                                                       bar. With this you can cut clips wherever you need
                                                       to, like I have done below.
   Now you know how to cut clips, you may                I open the video transition folder, and then
    want to add effects to the clip or to the              go onto the dissolve tab. There obviously a
    transitions, to do this at the bottom left is an       lot more choice then this. I choose the ‘cross
    ‘effects’ tab, you click here and then scroll          dissolve’ option so that the clips will fade in
    down to either ‘video effects’ or ‘video               to one another. All I have to do is drag and
    transitions’. I am going to use a video                drop the effect between the two clips that I
    transition                                             want to fade.
   Before exporting, press the enter to        This screen will then pop up. Choose your
    render your video, this smooth's             format of your exported video (I have selected
                                                 Windows Media) you can also name the video
    everything out and makes sure the            and select where you want to export it to by
    effects will work. Then you’ll want to       clicking next to ‘output name’ the yellow link.
    go to ‘file’, ‘export’, ‘media’.             Once ready click export.

Premiere pro guide

  • 1.
  • 2.
    1st off you will need to open premiere pro  You’ll then want to start by giving your and create a new project. You do this by project a name. I’ve set mine as clicking on the ‘new project’ button ‘example’ for this. outlined below.
  • 3.
    Next you’ll have to choose a location in  After choosing your location it will ask you which to save your project. I suggest making to name your sequence, again mine is a new folder so that none of your project will example for this. Make sure your project is go missing. In this folder you should also saved at DV-PAL and Standard 48kHz and keep your footage. then click ok.
  • 4.
    In order to get your clips to work in Premiere pro you will need to convert your footage to  Then find and select the clips that you want to Windows media (WMV) or QuickTime. For this convert. To select more then one clip hold I’m going to us WMV. To start with open up down shift and click to the bottom of the list. Media Encoder, and select the add button.
  • 5.
    The output file will be set to the original destination of the piece of footage you’re  You now want to change the format of converting. If you wanted to change the the file/s you’re encoding. For this I am you can click just under the ‘output file’ converting to Windows Media (WMV). and change it. Then click save.
  • 6.
    Now all that is left is to press the ‘Start Queue’ button and wait for it too finish.
  • 7.
    First you’ll need to drag your clip from the  Then, the tool you will need to start editing and side bar, to the time line. This is very placing your clips where you would like is the simple to do. Just a drag and drop. razor tool. Which is at the top left side on the tool bar. With this you can cut clips wherever you need to, like I have done below.
  • 8.
    Now you know how to cut clips, you may  I open the video transition folder, and then want to add effects to the clip or to the go onto the dissolve tab. There obviously a transitions, to do this at the bottom left is an lot more choice then this. I choose the ‘cross ‘effects’ tab, you click here and then scroll dissolve’ option so that the clips will fade in down to either ‘video effects’ or ‘video to one another. All I have to do is drag and transitions’. I am going to use a video drop the effect between the two clips that I transition want to fade.
  • 9.
    Before exporting, press the enter to  This screen will then pop up. Choose your render your video, this smooth's format of your exported video (I have selected Windows Media) you can also name the video everything out and makes sure the and select where you want to export it to by effects will work. Then you’ll want to clicking next to ‘output name’ the yellow link. go to ‘file’, ‘export’, ‘media’. Once ready click export.