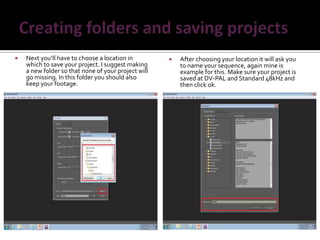
By Elliot jones
   1st off you will need to open premiere pro      You’ll then want to start by giving your
    and create a new project. You do this by         project a name. I’ve set mine as
    clicking on the ‘new project’ button             ‘example’ for this.
    outlined below.
   Next you’ll have to choose a location in            After choosing your location it will ask you
    which to save your project. I suggest making         to name your sequence, again mine is
    a new folder so that none of your project will       example for this. Make sure your project is
    go missing. In this folder you should also           saved at DV-PAL and Standard 48kHz and
    keep your footage.                                   then click ok.
   In order to get your clips to work in Premiere
    pro you will need to convert your footage to        Then find and select the clips that you want to
    Windows media (WMV) or QuickTime. For this           convert. To select more then one clip hold
    I’m going to us WMV. To start with open up           down shift and click to the bottom of the list.
    Media Encoder, and select the add button.
   The output file will be set to the original
    destination of the piece of footage you’re       You now want to change the format of
    converting. If you wanted to change the           the file/s you’re encoding. For this I am
    you can click just under the ‘output file’        converting to Windows Media (WMV).
    and change it. Then click save.
   Now all that is left is to press
    the ‘Start Queue’ button and
    wait for it too finish.
Premiere pro guide

Premiere pro guide

  • 1.
  • 2.
    1st off you will need to open premiere pro  You’ll then want to start by giving your and create a new project. You do this by project a name. I’ve set mine as clicking on the ‘new project’ button ‘example’ for this. outlined below.
  • 3.
    Next you’ll have to choose a location in  After choosing your location it will ask you which to save your project. I suggest making to name your sequence, again mine is a new folder so that none of your project will example for this. Make sure your project is go missing. In this folder you should also saved at DV-PAL and Standard 48kHz and keep your footage. then click ok.
  • 4.
    In order to get your clips to work in Premiere pro you will need to convert your footage to  Then find and select the clips that you want to Windows media (WMV) or QuickTime. For this convert. To select more then one clip hold I’m going to us WMV. To start with open up down shift and click to the bottom of the list. Media Encoder, and select the add button.
  • 5.
    The output file will be set to the original destination of the piece of footage you’re  You now want to change the format of converting. If you wanted to change the the file/s you’re encoding. For this I am you can click just under the ‘output file’ converting to Windows Media (WMV). and change it. Then click save.
  • 6.
    Now all that is left is to press the ‘Start Queue’ button and wait for it too finish.