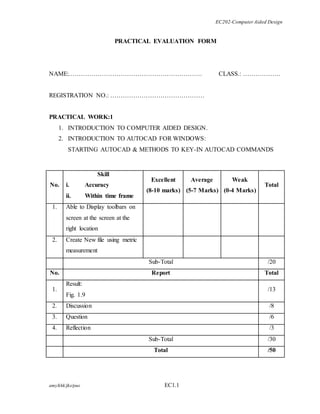
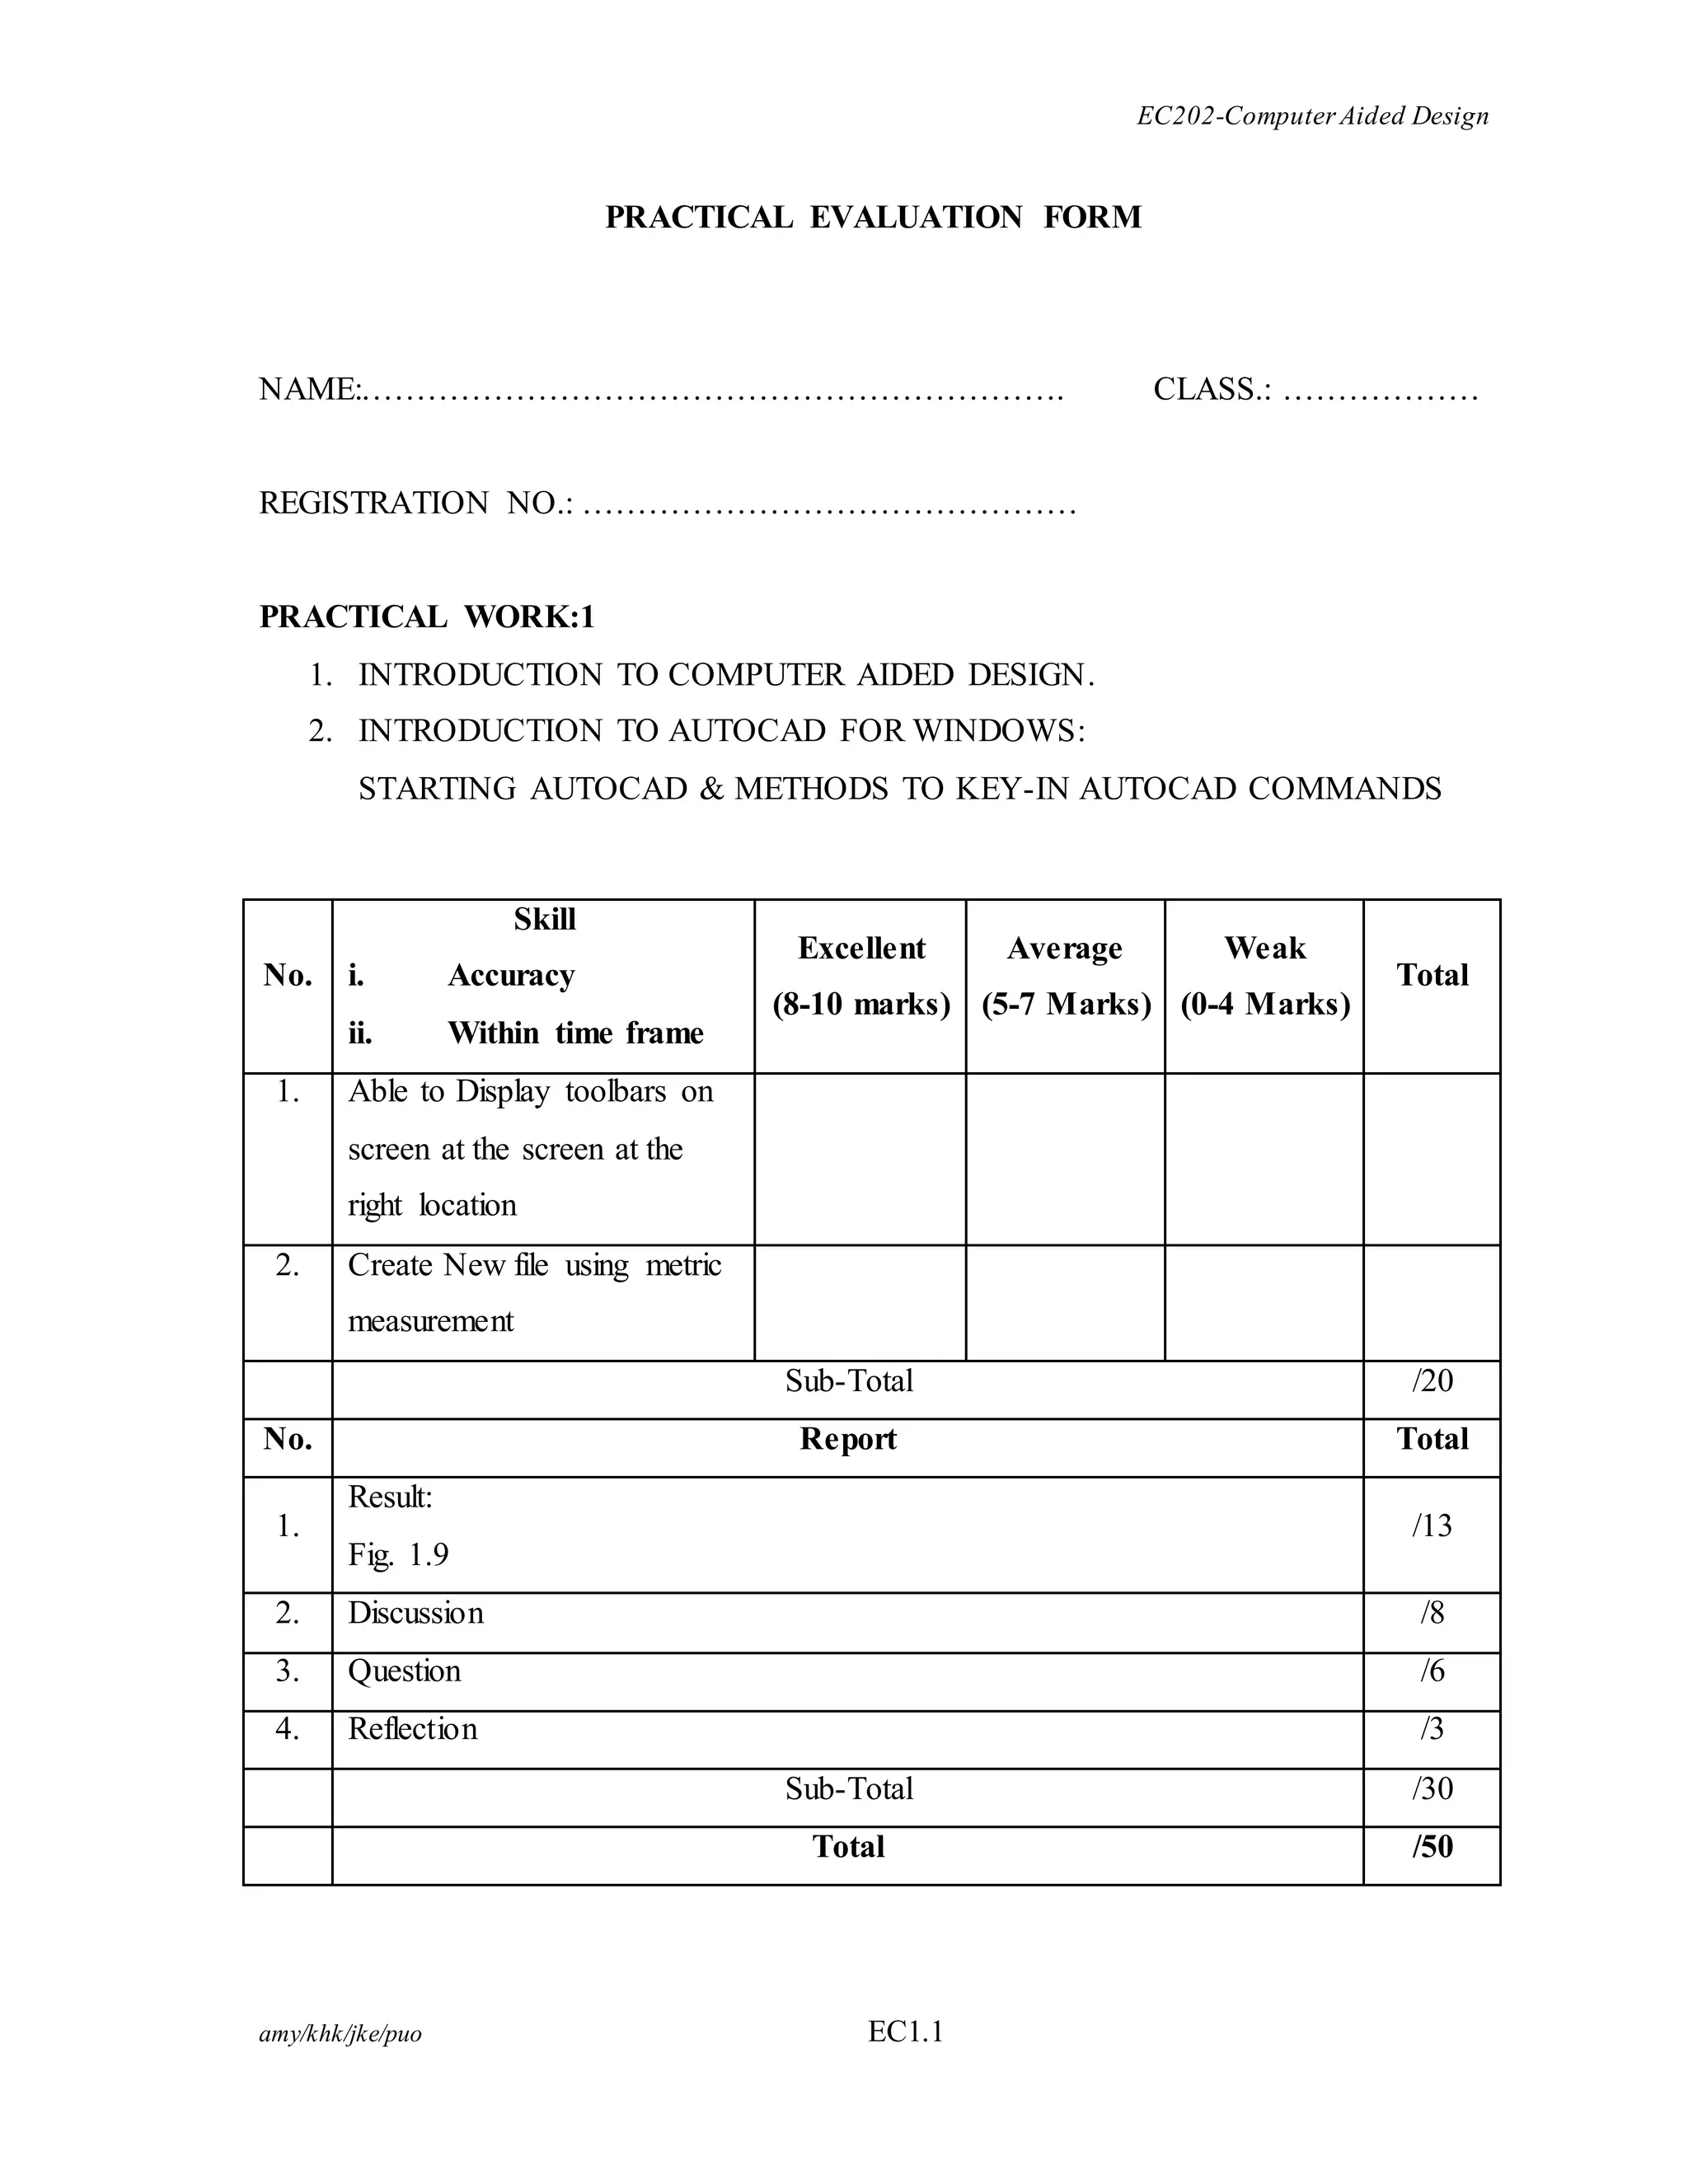
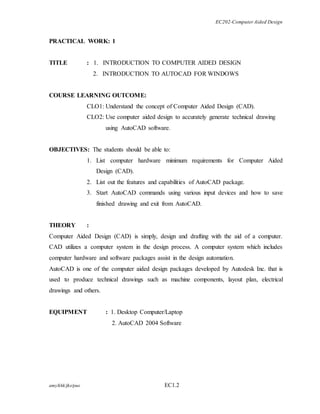
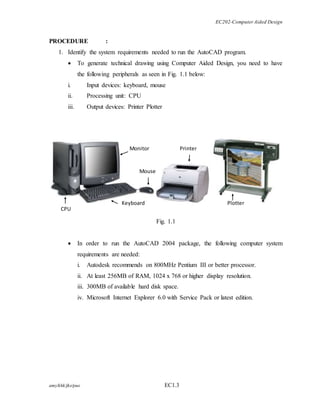
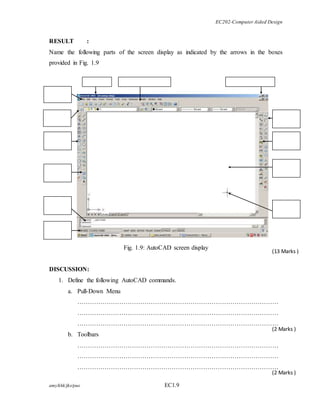
EC202-Computer Aided Design 
PRACTICAL EVALUATION FORM 
NAME:………………………………………………………. CLASS.: ……………… 
REGISTRATION NO.: ……………………………………… 
PRACTICAL WORK:1 
1. INTRODUCTION TO COMPUTER AIDED DESIGN. 
2. INTRODUCTION TO AUTOCAD FOR WINDOWS: 
STARTING AUTOCAD & METHODS TO KEY-IN AUTOCAD COMMANDS 
No. 
Skill 
i. Accuracy 
ii. Within time frame 
Excellent 
(8-10 marks) 
amy/khk/jke/puo EC1.1 
Average 
(5-7 Marks) 
Weak 
(0-4 Marks) 
Total 
1. Able to Display toolbars on 
screen at the screen at the 
right location 
2. Create New file using metric 
measurement 
Sub-Total /20 
No. Report Total 
1. 
Result: 
Fig. 1.9 
/13 
2. Discussion /8 
3. Question /6 
4. Reflection /3 
Sub-Total /30 
Total /50
EC202-Computer Aided Design 
PRACTICAL WORK: 1 
TITLE : 1. INTRODUCTION TO COMPUTER AIDED DESIGN 
2. INTRODUCTION TO AUTOCAD FOR WINDOWS 
COURSE LEARNING OUTCOME: 
CLO1: Understand the concept of Computer Aided Design (CAD). 
CLO2: Use computer aided design to accurately generate technical drawing 
using AutoCAD software. 
OBJECTIVES: The students should be able to: 
1. List computer hardware minimum requirements for Computer Aided 
Design (CAD). 
2. List out the features and capabilities of AutoCAD package. 
3. Start AutoCAD commands using various input devices and how to save 
finished drawing and exit from AutoCAD. 
THEORY : 
Computer Aided Design (CAD) is simply, design and drafting with the aid of a computer. 
CAD utilizes a computer system in the design process. A computer system which includes 
computer hardware and software packages assist in the design automation. 
AutoCAD is one of the computer aided design packages developed by Autodesk Inc. that is 
used to produce technical drawings such as machine components, layout plan, electrical 
drawings and others. 
EQUIPMENT : 1. Desktop Computer/Laptop 
2. AutoCAD 2004 Software 
amy/khk/jke/puo EC1.2
EC202-Computer Aided Design 
PROCEDURE : 
1. Identify the system requirements needed to run the AutoCAD program. 
 To generate technical drawing using Computer Aided Design, you need to have 
the following peripherals as seen in Fig. 1.1 below: 
i. Input devices: keyboard, mouse 
ii. Processing unit: CPU 
iii. Output devices: Printer Plotter 
Fig. 1.1 
CPU 
Mouse 
Keyboard 
 In order to run the AutoCAD 2004 package, the following computer system 
requirements are needed: 
i. Autodesk recommends on 800MHz Pentium III or better processor. 
ii. At least 256MB of RAM, 1024 x 768 or higher display resolution. 
iii. 300MB of available hard disk space. 
iv. Microsoft Internet Explorer 6.0 with Service Pack or latest edition. 
amy/khk/jke/puo EC1.3 
Printer 
Plotter 
Monitor
EC202-Computer Aided Design 
2. Starting the AutoCAD program 
 Select the AutoCAD 2004 option from the Program menu or double click 
AutoCAD 2004 icon on the desktop as shown in Fig. 1.2. 
Fig. 1.2.Starting up AutoCAD 2004 
 Once the program is loaded into memory, the AutoCAD 2004 display screen will 
appear as at Fig. 1.3. 
3. Getting to know the AutoCAD 2004 screen display. 
a. Observe and identify every part of the graphic display. 
i. Title Bar 
ii. Toolbars -Standard, Draw, Modify, Dimension, Osnap, Object Properties 
iii. Status Bar 
iv. Command Prompt Area 
v. Menu Pull-Down Bar 
vi. Drawing Area 
amy/khk/jke/puo EC1.4
EC202-Computer Aided Design 
Fig.1.3 AutoCAD screen display 
4. Getting to know the AutoCAD instructions: 
a. Identify the following methods to enter commands. 
i. Keyboard 
ii. Pull-Down Menu 
iii. Toolbar icon 
b. Identify the method to cancel command. 
5. Displaying Toolbars 
The use of toolbars in AutoCAD is almost always quicker than any other methods. 
But the toolbars you see in the screen are usually displayed by default but if they are 
not already displayed, you can display them by using the TOOLBAR command. 
amy/khk/jke/puo EC1.5
EC202-Computer Aided Design 
 Select toolbars from the Pull-Down Menu <VIEW> . 
Fig. 1.4: Selection <VIEW> toolbars 
 A dialogue box as shown below in Fig. 1.5 appears. 
Fig. 1.5: Customize Toolbars 
 Simply click the small box next to the required toolbars in the toolbar list and 
you will notice that the toolbars selected will appear on the screen, only waiting 
to be drag/move to the appropriate location of the screen. 
 Once you have completed your selection/selections, click the button Close. 
amy/khk/jke/puo EC1.6
EC202-Computer Aided Design 
6. Creating New File 
 Select New from the Pull-down menu <FILE> . 
Fig. 1.6: Selection <FILE> New 
 A dialogue box will appear as in Fig. 1.7 
Fig. 1.7: Selection of <templates> for New Files 
 From the Template selection, choose: 
(i) ACADiso (if your drawing measurement is in metric) 
(ii) ACAD (if your drawing measurement is in imperial/inches) 
 Double click your selection or click the selection and click the button Open and a 
new Drawing Screen will be displayed. 
(For your practical works in this course, you will be using the Metric 
measurement. Thus remember that your selection will always be the ACADiso 
template.) 
amy/khk/jke/puo EC1.7
EC202-Computer Aided Design 
7. Save and exit from AutoCAD Drawing. 
 Select SAVE or SAVE AS from the pull-down menu <FILE>. 
Fig. 1.8: Selection <FILE> Save or Save AS 
 Choose your directory and type your desired filename. 
 Choose your ‘file of type’ e.g AutoCAD 2004 Drawing (*.dwg) or any other type 
of files. 
 Click the button Save and you can continue drawing or EXIT the AutoCAD 
application. 
amy/khk/jke/puo EC1.8
EC202-Computer Aided Design 
RESULT : 
Name the following parts of the screen display as indicated by the arrows in the boxes 
provided in Fig. 1.9 
amy/khk/jke/puo EC1.9 
(13 Marks ) 
(2 Marks ) 
(2 Marks ) 
Fig. 1.9: AutoCAD screen display 
DISCUSSION: 
1. Define the following AutoCAD commands. 
a. Pull-Down Menu 
…………………………………………………………………………………… 
…………………………………………………………………………………… 
…………………………………………………………………………………… 
b. Toolbars 
…………………………………………………………………………………… 
…………………………………………………………………………………… 
……………………………………………………………………………………
EC202-Computer Aided Design 
amy/khk/jke/puo EC1.10 
(2 Marks ) 
(2 Marks ) 
(2 Marks ) 
(4 Marks ) 
(3 Marks ) 
c. Keyboard 
…………………………………………………………………………………… 
…………………………………………………………………………………… 
…………………………………………………………………………………… 
2. What is the difference between the commands SAVE and SAVE AS? 
………………………………………………………………………………………… 
………………………………………………………………………………………… 
………………………………………………………………………………………… 
………………………………………………………………………………………… 
QUESTION : 
1. Define Computer Aided Design. 
………………………………………………………………………………………… 
………………………………………………………………………………………… 
………………………………………………………………………………………… 
………………………………………………………………………………………… 
2. State 4 (four) advantages of CAD drawing to manual/conventional drawing? 
………………………………………………………………………………………… 
………………………………………………………………………………………… 
………………………………………………………………………………………… 
………………………………………………………………………………………… 
REFLECTION: 
At the end of this practical work, I have learnt that: 
………………………………………………………………………………………………… 
………………………………………………………………………………………………… 
………………………………………………………………………………………………… 
…………………………………………………………………………………………………

Practical work 1

  • 1.
    EC202-Computer Aided Design PRACTICAL EVALUATION FORM NAME:………………………………………………………. CLASS.: ……………… REGISTRATION NO.: ……………………………………… PRACTICAL WORK:1 1. INTRODUCTION TO COMPUTER AIDED DESIGN. 2. INTRODUCTION TO AUTOCAD FOR WINDOWS: STARTING AUTOCAD & METHODS TO KEY-IN AUTOCAD COMMANDS No. Skill i. Accuracy ii. Within time frame Excellent (8-10 marks) amy/khk/jke/puo EC1.1 Average (5-7 Marks) Weak (0-4 Marks) Total 1. Able to Display toolbars on screen at the screen at the right location 2. Create New file using metric measurement Sub-Total /20 No. Report Total 1. Result: Fig. 1.9 /13 2. Discussion /8 3. Question /6 4. Reflection /3 Sub-Total /30 Total /50
  • 2.
    EC202-Computer Aided Design PRACTICAL WORK: 1 TITLE : 1. INTRODUCTION TO COMPUTER AIDED DESIGN 2. INTRODUCTION TO AUTOCAD FOR WINDOWS COURSE LEARNING OUTCOME: CLO1: Understand the concept of Computer Aided Design (CAD). CLO2: Use computer aided design to accurately generate technical drawing using AutoCAD software. OBJECTIVES: The students should be able to: 1. List computer hardware minimum requirements for Computer Aided Design (CAD). 2. List out the features and capabilities of AutoCAD package. 3. Start AutoCAD commands using various input devices and how to save finished drawing and exit from AutoCAD. THEORY : Computer Aided Design (CAD) is simply, design and drafting with the aid of a computer. CAD utilizes a computer system in the design process. A computer system which includes computer hardware and software packages assist in the design automation. AutoCAD is one of the computer aided design packages developed by Autodesk Inc. that is used to produce technical drawings such as machine components, layout plan, electrical drawings and others. EQUIPMENT : 1. Desktop Computer/Laptop 2. AutoCAD 2004 Software amy/khk/jke/puo EC1.2
  • 3.
    EC202-Computer Aided Design PROCEDURE : 1. Identify the system requirements needed to run the AutoCAD program.  To generate technical drawing using Computer Aided Design, you need to have the following peripherals as seen in Fig. 1.1 below: i. Input devices: keyboard, mouse ii. Processing unit: CPU iii. Output devices: Printer Plotter Fig. 1.1 CPU Mouse Keyboard  In order to run the AutoCAD 2004 package, the following computer system requirements are needed: i. Autodesk recommends on 800MHz Pentium III or better processor. ii. At least 256MB of RAM, 1024 x 768 or higher display resolution. iii. 300MB of available hard disk space. iv. Microsoft Internet Explorer 6.0 with Service Pack or latest edition. amy/khk/jke/puo EC1.3 Printer Plotter Monitor
  • 4.
    EC202-Computer Aided Design 2. Starting the AutoCAD program  Select the AutoCAD 2004 option from the Program menu or double click AutoCAD 2004 icon on the desktop as shown in Fig. 1.2. Fig. 1.2.Starting up AutoCAD 2004  Once the program is loaded into memory, the AutoCAD 2004 display screen will appear as at Fig. 1.3. 3. Getting to know the AutoCAD 2004 screen display. a. Observe and identify every part of the graphic display. i. Title Bar ii. Toolbars -Standard, Draw, Modify, Dimension, Osnap, Object Properties iii. Status Bar iv. Command Prompt Area v. Menu Pull-Down Bar vi. Drawing Area amy/khk/jke/puo EC1.4
  • 5.
    EC202-Computer Aided Design Fig.1.3 AutoCAD screen display 4. Getting to know the AutoCAD instructions: a. Identify the following methods to enter commands. i. Keyboard ii. Pull-Down Menu iii. Toolbar icon b. Identify the method to cancel command. 5. Displaying Toolbars The use of toolbars in AutoCAD is almost always quicker than any other methods. But the toolbars you see in the screen are usually displayed by default but if they are not already displayed, you can display them by using the TOOLBAR command. amy/khk/jke/puo EC1.5
  • 6.
    EC202-Computer Aided Design  Select toolbars from the Pull-Down Menu <VIEW> . Fig. 1.4: Selection <VIEW> toolbars  A dialogue box as shown below in Fig. 1.5 appears. Fig. 1.5: Customize Toolbars  Simply click the small box next to the required toolbars in the toolbar list and you will notice that the toolbars selected will appear on the screen, only waiting to be drag/move to the appropriate location of the screen.  Once you have completed your selection/selections, click the button Close. amy/khk/jke/puo EC1.6
  • 7.
    EC202-Computer Aided Design 6. Creating New File  Select New from the Pull-down menu <FILE> . Fig. 1.6: Selection <FILE> New  A dialogue box will appear as in Fig. 1.7 Fig. 1.7: Selection of <templates> for New Files  From the Template selection, choose: (i) ACADiso (if your drawing measurement is in metric) (ii) ACAD (if your drawing measurement is in imperial/inches)  Double click your selection or click the selection and click the button Open and a new Drawing Screen will be displayed. (For your practical works in this course, you will be using the Metric measurement. Thus remember that your selection will always be the ACADiso template.) amy/khk/jke/puo EC1.7
  • 8.
    EC202-Computer Aided Design 7. Save and exit from AutoCAD Drawing.  Select SAVE or SAVE AS from the pull-down menu <FILE>. Fig. 1.8: Selection <FILE> Save or Save AS  Choose your directory and type your desired filename.  Choose your ‘file of type’ e.g AutoCAD 2004 Drawing (*.dwg) or any other type of files.  Click the button Save and you can continue drawing or EXIT the AutoCAD application. amy/khk/jke/puo EC1.8
  • 9.
    EC202-Computer Aided Design RESULT : Name the following parts of the screen display as indicated by the arrows in the boxes provided in Fig. 1.9 amy/khk/jke/puo EC1.9 (13 Marks ) (2 Marks ) (2 Marks ) Fig. 1.9: AutoCAD screen display DISCUSSION: 1. Define the following AutoCAD commands. a. Pull-Down Menu …………………………………………………………………………………… …………………………………………………………………………………… …………………………………………………………………………………… b. Toolbars …………………………………………………………………………………… …………………………………………………………………………………… ……………………………………………………………………………………
  • 10.
    EC202-Computer Aided Design amy/khk/jke/puo EC1.10 (2 Marks ) (2 Marks ) (2 Marks ) (4 Marks ) (3 Marks ) c. Keyboard …………………………………………………………………………………… …………………………………………………………………………………… …………………………………………………………………………………… 2. What is the difference between the commands SAVE and SAVE AS? ………………………………………………………………………………………… ………………………………………………………………………………………… ………………………………………………………………………………………… ………………………………………………………………………………………… QUESTION : 1. Define Computer Aided Design. ………………………………………………………………………………………… ………………………………………………………………………………………… ………………………………………………………………………………………… ………………………………………………………………………………………… 2. State 4 (four) advantages of CAD drawing to manual/conventional drawing? ………………………………………………………………………………………… ………………………………………………………………………………………… ………………………………………………………………………………………… ………………………………………………………………………………………… REFLECTION: At the end of this practical work, I have learnt that: ………………………………………………………………………………………………… ………………………………………………………………………………………………… ………………………………………………………………………………………………… …………………………………………………………………………………………………