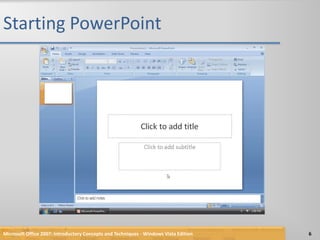
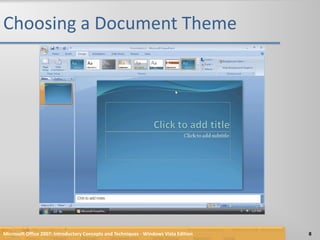
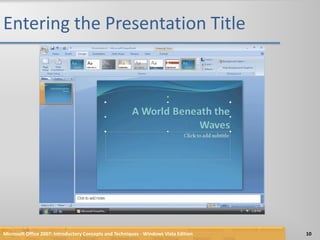
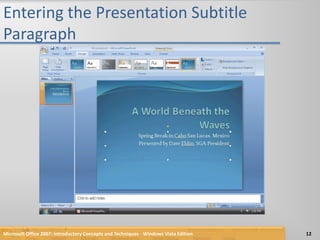
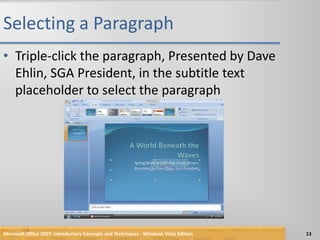
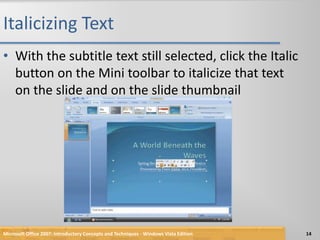
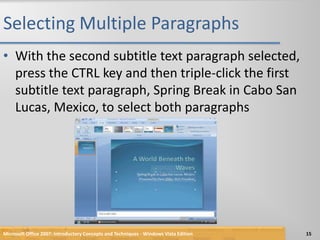
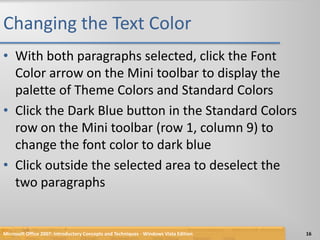
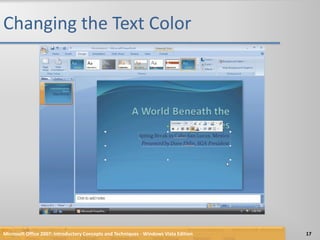
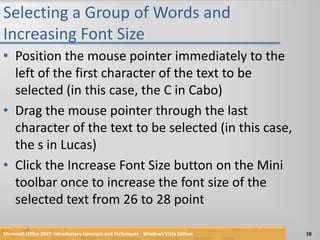
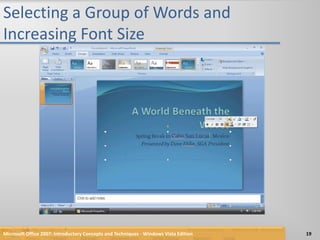
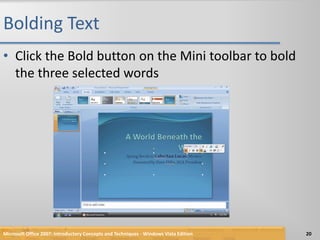
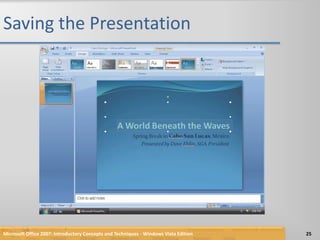
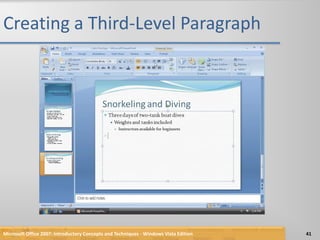
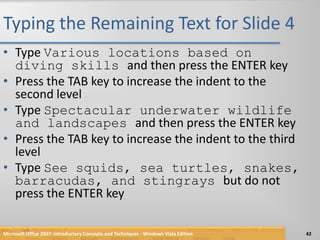
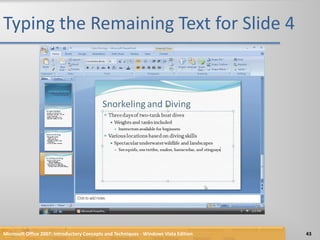
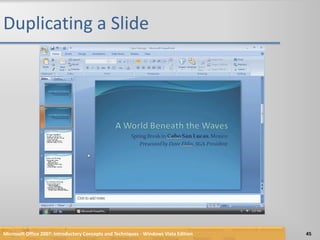
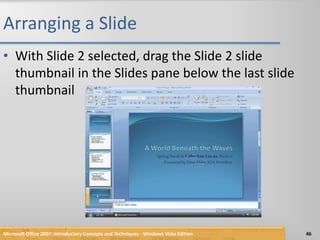
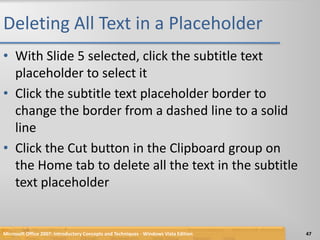
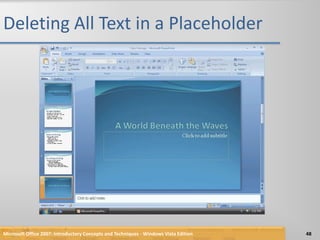
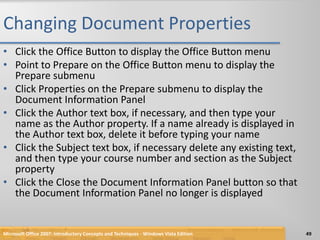
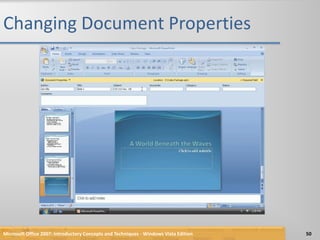
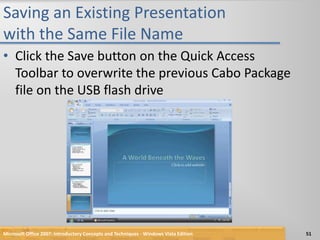
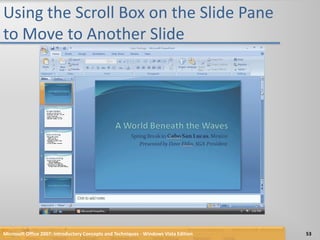
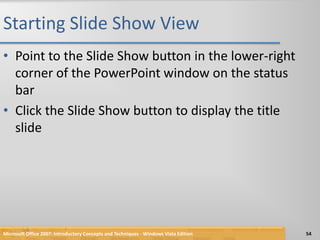
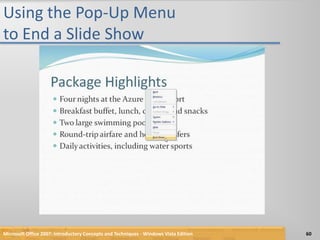
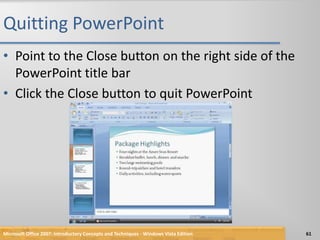
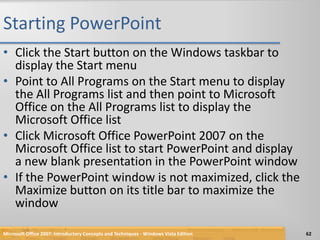
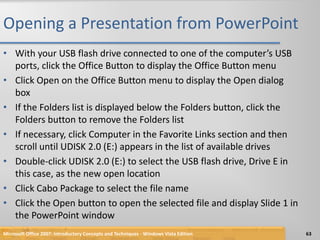
PowerPoint Chapter 1Creating and Editing aPresentation
ObjectivesStart and quit PowerPointDescribe the PowerPoint windowSelect a document themeCreate a title slide and text slides with single- and multi-level bulleted listsSave a presentationCopy elements from one slide to another2Microsoft Office 2007: Introductory Concepts and Techniques - Windows Vista Edition
ObjectivesView a presentation in Slide Show viewOpen a presentationDisplay and print a presentation in grayscaleCheck spellingUse PowerPoint Help3Microsoft Office 2007: Introductory Concepts and Techniques - Windows Vista Edition
Plan AheadFind the appropriate themeChoose words for each slideFormat specific elements of the textDetermine where to save the presentationMicrosoft Office 2007: Introductory Concepts and Techniques - Windows Vista Edition4
Starting PowerPointClick the Start button on the Windows Vista taskbar to display the Start menuClick All Programs at the bottom of the left pane on the Start menu to display the All Programs listClick Microsoft Office in the All Programs list to display Click Microsoft Office PowerPoint 2007 to start PowerPoint and display a new blank document in the PowerPoint windowIf the PowerPoint window is not maximized, click the Maximize button next to the Close button on its title bar to maximize the windowMicrosoft Office 2007: Introductory Concepts and Techniques - Windows Vista Edition5
Starting PowerPointMicrosoft Office 2007: Introductory Concepts and Techniques - Windows Vista Edition6
Choosing a Document ThemeClick Design on the Ribbon to display the Design tabClick the More button in the Themes gallery to expand the gallery, which shows more Built-In theme gallery optionsClick the Flow theme to apply this theme to Slide 1Microsoft Office 2007: Introductory Concepts and Techniques - Windows Vista Edition7
Choosing a Document ThemeMicrosoft Office 2007: Introductory Concepts and Techniques - Windows Vista Edition8
Entering the Presentation TitleClick the label, Click to add title, located inside the title text placeholder to select the placeholderType A World Beneath the Waves in the title text placeholder. Do not press the ENTER keyMicrosoft Office 2007: Introductory Concepts and Techniques - Windows Vista Edition9
Entering the Presentation TitleMicrosoft Office 2007: Introductory Concepts and Techniques - Windows Vista Edition10
Entering the Presentation Subtitle ParagraphClick the label, Click to add subtitle, located inside the subtitle text placeholder to select the placeholderType Spring Break in Cabo San Lucas, Mexico and then press the ENTER keyType Presented by Dave Ehlin, SGA President but do not press the ENTER keyMicrosoft Office 2007: Introductory Concepts and Techniques - Windows Vista Edition11
Entering the Presentation Subtitle ParagraphMicrosoft Office 2007: Introductory Concepts and Techniques - Windows Vista Edition12
Selecting a ParagraphTriple-click the paragraph, Presented by Dave Ehlin, SGA President, in the subtitle text placeholder to select the paragraphMicrosoft Office 2007: Introductory Concepts and Techniques - Windows Vista Edition13
Italicizing TextWith the subtitle text still selected, click the Italic button on the Mini toolbar to italicize that text on the slide and on the slide thumbnailMicrosoft Office 2007: Introductory Concepts and Techniques - Windows Vista Edition14
Selecting Multiple ParagraphsWith the second subtitle text paragraph selected, press the CTRL key and then triple-click the first subtitle text paragraph, Spring Break in Cabo San Lucas, Mexico, to select both paragraphsMicrosoft Office 2007: Introductory Concepts and Techniques - Windows Vista Edition15
Changing the Text ColorWith both paragraphs selected, click the Font Color arrow on the Mini toolbar to display the palette of Theme Colors and Standard ColorsClick the Dark Blue button in the Standard Colors row on the Mini toolbar (row 1, column 9) to change the font color to dark blueClick outside the selected area to deselect the two paragraphsMicrosoft Office 2007: Introductory Concepts and Techniques - Windows Vista Edition16
Changing the Text ColorMicrosoft Office 2007: Introductory Concepts and Techniques - Windows Vista Edition17
Selecting a Group of Words and Increasing Font SizePosition the mouse pointer immediately to the left of the first character of the text to be selected (in this case, the C in Cabo)Drag the mouse pointer through the last character of the text to be selected (in this case, the s in Lucas)Click the Increase Font Size button on the Mini toolbar once to increase the font size of the selected text from 26 to 28 pointMicrosoft Office 2007: Introductory Concepts and Techniques - Windows Vista Edition18
Selecting a Group of Words and Increasing Font SizeMicrosoft Office 2007: Introductory Concepts and Techniques - Windows Vista Edition19
Bolding TextClick the Bold button on the Mini toolbar to bold the three selected wordsMicrosoft Office 2007: Introductory Concepts and Techniques - Windows Vista Edition20
Decreasing the Title Slide Title Text Font SizeSelect the title slide title text, A World Beneath the WavesClick the Decrease Font Size button on the Mini toolbar twice to decrease the font size from 56 to 48 pointMicrosoft Office 2007: Introductory Concepts and Techniques - Windows Vista Edition21
Decreasing the Title Slide Title Text Font SizeMicrosoft Office 2007: Introductory Concepts and Techniques - Windows Vista Edition22
Saving the PresentationWith a USB flash drive connected to one of the computer’s USB ports, click the Save button on the Quick Access Toolbar to display the Save As dialog boxIf the Navigation pane is not displayed in the Save As dialog box, click the Browse Folders button to expand the dialog boxIf a Folders list is displayed below the Folders button, click the Folders button to remove the Folders listType Cabo Package in the File name box to change the file name. Do not press the ENTER key after typing the file nameIf Computer is not displayed in the Favorite Links section, drag the top or bottom edge of the Save As dialog box until Computer is displayedMicrosoft Office 2007: Introductory Concepts and Techniques - Windows Vista Edition23
Saving the PresentationClick Computer in the Favorite Links section to display a list of available drivesIf necessary, scroll until UDISK 2.0 (E:) appears in the list of available drivesDouble-click UDISK 2.0 (E:) in the Computer list to select the USB flash drive, Drive E in this case, as the new save locationClick the Save button in the Save As dialog box to save the presentation on the USB flash drive with the file name, Cabo PackageMicrosoft Office 2007: Introductory Concepts and Techniques - Windows Vista Edition24
Saving the PresentationMicrosoft Office 2007: Introductory Concepts and Techniques - Windows Vista Edition25
Adding a New Text Slide with a Bulleted ListClick Home on the Ribbon to display the Home tabClick the New Slide button in the Slides group to insert a new slide with the Title and Content layoutMicrosoft Office 2007: Introductory Concepts and Techniques - Windows Vista Edition26
Adding a New Text Slide with a Bulleted ListMicrosoft Office 2007: Introductory Concepts and Techniques - Windows Vista Edition27
Entering a Slide TitleClick the label, Click to add title, to select it and then type Package Highlights in the placeholder. Do not press the ENTER keyMicrosoft Office 2007: Introductory Concepts and Techniques - Windows Vista Edition28
Selecting a Text PlaceholderClick the label, Click to add text, to select the text placeholderMicrosoft Office 2007: Introductory Concepts and Techniques - Windows Vista Edition29
Typing a Single-Level Bulleted ListType Four nights at the Azure Seas Resort and then press the ENTER key to begin a new bulleted first-level paragraphType Breakfast buffet, lunch, dinner, and snacks and then press the ENTER keyType Two large swimming pools and then press the ENTER keyType Round-trip airfare and hotel transfers and then press the ENTER keyType Daily activities, including water sports but do not press the ENTER keyMicrosoft Office 2007: Introductory Concepts and Techniques - Windows Vista Edition30
Typing a Single-Level Bulleted ListMicrosoft Office 2007: Introductory Concepts and Techniques - Windows Vista Edition31
Adding a New Slide and Entering a Slide TitleClick the New Slide button in the Slides group on the Home tab to insert a new slide with the Title and Content layoutClick the title text placeholder and then type Rates and Booking in this placeholder. Do not press the ENTER keyMicrosoft Office 2007: Introductory Concepts and Techniques - Windows Vista Edition32
Adding a New Slide and Entering a Slide TitleMicrosoft Office 2007: Introductory Concepts and Techniques - Windows Vista Edition33
Typing a Multi-Level Bulleted ListClick the bulleted paragraph text placeholderType Only $495 double occupancy and then press the ENTER keyClick the Increase List Level button in the Paragraph group to indent the second paragraph below the first and create a second-level paragraphType Non-diver rate: $275 and then press the ENTER key to add a new paragraph at the same level as the previous paragraphType Single occupancy: add $150 and then press the ENTER keyClick the Decrease List Level button in the Paragraph group so that the second-level paragraph becomes a first-level paragraphMicrosoft Office 2007: Introductory Concepts and Techniques - Windows Vista Edition34
Typing a Multi-Level Bulleted ListMicrosoft Office 2007: Introductory Concepts and Techniques - Windows Vista Edition35
Typing the Remaining Text for Slide 3Type Nonrefundable $150 deposit required and then press the ENTER keyClick the Increase List Level button in the Paragraph group to demote the paragraphType Due by October 1 and then press the ENTER keyClick the Decrease List Level button in the Paragraph group to promote the paragraphType Travel insurance highly recommended but do not press the ENTER keyMicrosoft Office 2007: Introductory Concepts and Techniques - Windows Vista Edition36
Typing the Remaining Text for Slide 3Microsoft Office 2007: Introductory Concepts and Techniques - Windows Vista Edition37
Creating Slide 4Click the New Slide button in the Slides groupType Snorkeling and Diving in the title text placeholderPress CTRL+ENTER to move the insertion point to the text placeholderType Three days of two-tank boat dives and then press the ENTER keyClick the Increase List Level button. Type Weights and tanks included and then press the ENTER keyMicrosoft Office 2007: Introductory Concepts and Techniques - Windows Vista Edition38
Creating Slide 4Microsoft Office 2007: Introductory Concepts and Techniques - Windows Vista Edition39
Creating a Third-Level ParagraphClick the Increase List Level button so that the second-level paragraph becomes a third-level paragraphType Instructors available for beginners and then press the ENTER key to create a second third-level paragraphClick the Decrease List Level button two times so that the insertion point appears at the first levelMicrosoft Office 2007: Introductory Concepts and Techniques - Windows Vista Edition40
Creating a Third-Level ParagraphMicrosoft Office 2007: Introductory Concepts and Techniques - Windows Vista Edition41
Typing the Remaining Text for Slide 4Type Various locations based on diving skills and then press the ENTER keyPress the TAB key to increase the indent to the second levelType Spectacular underwater wildlife and landscapes and then press the ENTER keyPress the TAB key to increase the indent to the third levelType See squids, sea turtles, snakes, barracudas, and stingrays but do not press the ENTER keyMicrosoft Office 2007: Introductory Concepts and Techniques - Windows Vista Edition42
Typing the Remaining Text for Slide 4Microsoft Office 2007: Introductory Concepts and Techniques - Windows Vista Edition43
Duplicating a SlideClick the Slide 1 thumbnail in the Slides tab to display Slide 1Click the New Slide arrow in the Slides group on the Home tab to display the Flow layout galleryClick Duplicate Selected Slides in the Flow layout gallery to create a new Slide 2, which is a duplicate of Slide 1Microsoft Office 2007: Introductory Concepts and Techniques - Windows Vista Edition44
Duplicating a SlideMicrosoft Office 2007: Introductory Concepts and Techniques - Windows Vista Edition45
Arranging a SlideWith Slide 2 selected, drag the Slide 2 slide thumbnail in the Slides pane below the last slide thumbnailMicrosoft Office 2007: Introductory Concepts and Techniques - Windows Vista Edition46
Deleting All Text in a PlaceholderWith Slide 5 selected, click the subtitle text placeholder to select itClick the subtitle text placeholder border to change the border from a dashed line to a solid lineClick the Cut button in the Clipboard group on the Home tab to delete all the text in the subtitle text placeholderMicrosoft Office 2007: Introductory Concepts and Techniques - Windows Vista Edition47
Deleting All Text in a PlaceholderMicrosoft Office 2007: Introductory Concepts and Techniques - Windows Vista Edition48
Changing Document PropertiesClick the Office Button to display the Office Button menuPoint to Prepare on the Office Button menu to display the Prepare submenuClick Properties on the Prepare submenu to display the Document Information PanelClick the Author text box, if necessary, and then type your name as the Author property. If a name already is displayed in the Author text box, delete it before typing your nameClick the Subject text box, if necessary delete any existing text, and then type your course number and section as the Subject propertyClick the Close the Document Information Panel button so that the Document Information Panel no longer is displayedMicrosoft Office 2007: Introductory Concepts and Techniques - Windows Vista Edition49
Changing Document PropertiesMicrosoft Office 2007: Introductory Concepts and Techniques - Windows Vista Edition50
Saving an Existing Presentation with the Same File NameClick the Save button on the Quick Access Toolbar to overwrite the previous Cabo Package file on the USB flash driveMicrosoft Office 2007: Introductory Concepts and Techniques - Windows Vista Edition51
Using the Scroll Box on the Slide Pane to Move to Another SlidePosition the mouse pointer on the scroll boxPress and hold down the mouse button so that Slide: 5 of 5 A World Beneath the Waves appears in the slide indicatorDrag the scroll box up the vertical scroll bar until Slide: 1 of 5 A World Beneath the Waves appears in the slide indicatorRelease the mouse button so that Slide 1 appears in the Slide pane and the Slide 1 thumbnail has an orange border in the Slides tabMicrosoft Office 2007: Introductory Concepts and Techniques - Windows Vista Edition52
Using the Scroll Box on the Slide Pane to Move to Another SlideMicrosoft Office 2007: Introductory Concepts and Techniques - Windows Vista Edition53
Starting Slide Show ViewPoint to the Slide Show button in the lower-right corner of the PowerPoint window on the status barClick the Slide Show button to display the title slideMicrosoft Office 2007: Introductory Concepts and Techniques - Windows Vista Edition54
Starting Slide Show ViewMicrosoft Office 2007: Introductory Concepts and Techniques - Windows Vista Edition55
Moving Manually through Slides in a Slide ShowClick each slide until Slide 5 (A World Beneath the Waves) is displayedClick Slide 5 so that the black slide appears with a message announcing the end of the slide showMicrosoft Office 2007: Introductory Concepts and Techniques - Windows Vista Edition56
Displaying the Pop-Up Menu and Going to a Specific SlideWith the black slide displaying in Slide Show view, right-click the slide to display the pop-up menuPoint to Go to Slide on the pop-up menu, and then point to 2 Package Highlights in the Go to Slide submenuClick 2 Package Highlights to display Slide 2Microsoft Office 2007: Introductory Concepts and Techniques - Windows Vista Edition57
Displaying the Pop-Up Menu and Going to a Specific SlideMicrosoft Office 2007: Introductory Concepts and Techniques - Windows Vista Edition58
Using the Pop-Up Menu to End a Slide ShowRight-click Slide 2 and then point to End Show on the pop-up menuClick End Show to return to Slide 2 in the Slide pane in Normal viewIf the Microsoft Office PowerPoint dialog box appears, click the Yes buttonMicrosoft Office 2007: Introductory Concepts and Techniques - Windows Vista Edition59
Using the Pop-Up Menu to End a Slide ShowMicrosoft Office 2007: Introductory Concepts and Techniques - Windows Vista Edition60
Quitting PowerPointPoint to the Close button on the right side of the PowerPoint title barClick the Close button to quit PowerPointMicrosoft Office 2007: Introductory Concepts and Techniques - Windows Vista Edition61
Starting PowerPointClick the Start button on the Windows taskbar to display the Start menuPoint to All Programs on the Start menu to display the All Programs list and then point to Microsoft Office on the All Programs list to display the Microsoft Office listClick Microsoft Office PowerPoint 2007 on the Microsoft Office list to start PowerPoint and display a new blank presentation in the PowerPoint windowIf the PowerPoint window is not maximized, click the Maximize button on its title bar to maximize the windowMicrosoft Office 2007: Introductory Concepts and Techniques - Windows Vista Edition62
Opening a Presentation from PowerPointWith your USB flash drive connected to one of the computer’s USB ports, click the Office Button to display the Office Button menuClick Open on the Office Button menu to display the Open dialog boxIf the Folders list is displayed below the Folders button, click the Folders button to remove the Folders listIf necessary, click Computer in the Favorite Links section and then scroll until UDISK 2.0 (E:) appears in the list of available drivesDouble-click UDISK 2.0 (E:) to select the USB flash drive, Drive E in this case, as the new open locationClick Cabo Package to select the file nameClick the Open button to open the selected file and display Slide 1 in the PowerPoint windowMicrosoft Office 2007: Introductory Concepts and Techniques - Windows Vista Edition63
Opening a Presentation from PowerPointMicrosoft Office 2007: Introductory Concepts and Techniques - Windows Vista Edition64
Checking SpellingClick Review on the Ribbon to display the Review tabClick the Spelling button in the Proofing group to start the spelling checker and display the Spelling dialog boxClick the Ignore button to skip the word, CaboClick the Ignore button to skip the word, Ehlin.When the Microsoft Office PowerPoint dialog box appears, click the OK button to close the spelling checker and return to the current slide, Slide 1, or to the slide where a possible misspelled word appearedClick the slide to remove the box from the word, EhlinMicrosoft Office 2007: Introductory Concepts and Techniques - Windows Vista Edition65
Checking SpellingMicrosoft Office 2007: Introductory Concepts and Techniques - Windows Vista Edition66
Displaying a Presentation in GrayscaleClick View on the Ribbon to display the View tabClick Grayscale in the Color/Grayscale group to display Slide 1 in grayscale in the Slide paneClick the Next Slide button four times to view all slides in the presentation in grayscaleClick the Back To Color View button in the Close group to return to the previous tab and display Slide 5 with the default Flow color schemeMicrosoft Office 2007: Introductory Concepts and Techniques - Windows Vista Edition67
Displaying a Presentation in GrayscaleMicrosoft Office 2007: Introductory Concepts and Techniques - Windows Vista Edition68
Printing a PresentationClick the Office Button to display the Office Button menuPoint to Print on the Office Button menu to display the Print submenuClick Quick Print on the Print submenu to print the slidesWhen the printer stops, retrieve the hard copy of the five Cabo Package slidesMicrosoft Office 2007: Introductory Concepts and Techniques - Windows Vista Edition69
Printing a PresentationMicrosoft Office 2007: Introductory Concepts and Techniques - Windows Vista Edition70
Searching for PowerPoint HelpClick the Microsoft Office PowerPoint Help button near the upper right-corner of the PowerPoint window to open the PowerPoint Help windowType document theme in the Type words to search for text box at the top of the PowerPoint Help windowPress the ENTER key to display the search resultsClick the Maximize button on the PowerPoint Help window title bar to maximize the Help windowClick the ‘Apply or customize a document theme’ link to display information regarding applying or customizing themesClick the Close button on the PowerPoint Help window title bar to close the PowerPoint Help window and display Slide 5Microsoft Office 2007: Introductory Concepts and Techniques - Windows Vista Edition71
Searching for PowerPoint HelpMicrosoft Office 2007: Introductory Concepts and Techniques - Windows Vista Edition72
Quitting PowerPointClick the Close button on the right side of the title bar to quit PowerPointIf necessary, click the No button in the Microsoft Office PowerPoint dialog box so that any changes you have made are not savedMicrosoft Office 2007: Introductory Concepts and Techniques - Windows Vista Edition73
SummaryStart and quit PowerPointDescribe the PowerPoint windowSelect a document themeCreate a title slide and text slides with single- and multi-level bulleted listsSave a presentationCopy elements from one slide to another74Microsoft Office 2007: Introductory Concepts and Techniques - Windows Vista Edition
SummaryView a presentation in Slide Show viewOpen a presentationDisplay and print a presentation in grayscaleCheck spellingUse PowerPoint Help75Microsoft Office 2007: Introductory Concepts and Techniques - Windows Vista Edition
PowerPoint Chapter 1 Complete

Power point chapter 1

  • 1.
    PowerPoint Chapter 1Creatingand Editing aPresentation
  • 2.
    ObjectivesStart and quitPowerPointDescribe the PowerPoint windowSelect a document themeCreate a title slide and text slides with single- and multi-level bulleted listsSave a presentationCopy elements from one slide to another2Microsoft Office 2007: Introductory Concepts and Techniques - Windows Vista Edition
  • 3.
    ObjectivesView a presentationin Slide Show viewOpen a presentationDisplay and print a presentation in grayscaleCheck spellingUse PowerPoint Help3Microsoft Office 2007: Introductory Concepts and Techniques - Windows Vista Edition
  • 4.
    Plan AheadFind theappropriate themeChoose words for each slideFormat specific elements of the textDetermine where to save the presentationMicrosoft Office 2007: Introductory Concepts and Techniques - Windows Vista Edition4
  • 5.
    Starting PowerPointClick theStart button on the Windows Vista taskbar to display the Start menuClick All Programs at the bottom of the left pane on the Start menu to display the All Programs listClick Microsoft Office in the All Programs list to display Click Microsoft Office PowerPoint 2007 to start PowerPoint and display a new blank document in the PowerPoint windowIf the PowerPoint window is not maximized, click the Maximize button next to the Close button on its title bar to maximize the windowMicrosoft Office 2007: Introductory Concepts and Techniques - Windows Vista Edition5
  • 6.
    Starting PowerPointMicrosoft Office2007: Introductory Concepts and Techniques - Windows Vista Edition6
  • 7.
    Choosing a DocumentThemeClick Design on the Ribbon to display the Design tabClick the More button in the Themes gallery to expand the gallery, which shows more Built-In theme gallery optionsClick the Flow theme to apply this theme to Slide 1Microsoft Office 2007: Introductory Concepts and Techniques - Windows Vista Edition7
  • 8.
    Choosing a DocumentThemeMicrosoft Office 2007: Introductory Concepts and Techniques - Windows Vista Edition8
  • 9.
    Entering the PresentationTitleClick the label, Click to add title, located inside the title text placeholder to select the placeholderType A World Beneath the Waves in the title text placeholder. Do not press the ENTER keyMicrosoft Office 2007: Introductory Concepts and Techniques - Windows Vista Edition9
  • 10.
    Entering the PresentationTitleMicrosoft Office 2007: Introductory Concepts and Techniques - Windows Vista Edition10
  • 11.
    Entering the PresentationSubtitle ParagraphClick the label, Click to add subtitle, located inside the subtitle text placeholder to select the placeholderType Spring Break in Cabo San Lucas, Mexico and then press the ENTER keyType Presented by Dave Ehlin, SGA President but do not press the ENTER keyMicrosoft Office 2007: Introductory Concepts and Techniques - Windows Vista Edition11
  • 12.
    Entering the PresentationSubtitle ParagraphMicrosoft Office 2007: Introductory Concepts and Techniques - Windows Vista Edition12
  • 13.
    Selecting a ParagraphTriple-clickthe paragraph, Presented by Dave Ehlin, SGA President, in the subtitle text placeholder to select the paragraphMicrosoft Office 2007: Introductory Concepts and Techniques - Windows Vista Edition13
  • 14.
    Italicizing TextWith thesubtitle text still selected, click the Italic button on the Mini toolbar to italicize that text on the slide and on the slide thumbnailMicrosoft Office 2007: Introductory Concepts and Techniques - Windows Vista Edition14
  • 15.
    Selecting Multiple ParagraphsWiththe second subtitle text paragraph selected, press the CTRL key and then triple-click the first subtitle text paragraph, Spring Break in Cabo San Lucas, Mexico, to select both paragraphsMicrosoft Office 2007: Introductory Concepts and Techniques - Windows Vista Edition15
  • 16.
    Changing the TextColorWith both paragraphs selected, click the Font Color arrow on the Mini toolbar to display the palette of Theme Colors and Standard ColorsClick the Dark Blue button in the Standard Colors row on the Mini toolbar (row 1, column 9) to change the font color to dark blueClick outside the selected area to deselect the two paragraphsMicrosoft Office 2007: Introductory Concepts and Techniques - Windows Vista Edition16
  • 17.
    Changing the TextColorMicrosoft Office 2007: Introductory Concepts and Techniques - Windows Vista Edition17
  • 18.
    Selecting a Groupof Words and Increasing Font SizePosition the mouse pointer immediately to the left of the first character of the text to be selected (in this case, the C in Cabo)Drag the mouse pointer through the last character of the text to be selected (in this case, the s in Lucas)Click the Increase Font Size button on the Mini toolbar once to increase the font size of the selected text from 26 to 28 pointMicrosoft Office 2007: Introductory Concepts and Techniques - Windows Vista Edition18
  • 19.
    Selecting a Groupof Words and Increasing Font SizeMicrosoft Office 2007: Introductory Concepts and Techniques - Windows Vista Edition19
  • 20.
    Bolding TextClick theBold button on the Mini toolbar to bold the three selected wordsMicrosoft Office 2007: Introductory Concepts and Techniques - Windows Vista Edition20
  • 21.
    Decreasing the TitleSlide Title Text Font SizeSelect the title slide title text, A World Beneath the WavesClick the Decrease Font Size button on the Mini toolbar twice to decrease the font size from 56 to 48 pointMicrosoft Office 2007: Introductory Concepts and Techniques - Windows Vista Edition21
  • 22.
    Decreasing the TitleSlide Title Text Font SizeMicrosoft Office 2007: Introductory Concepts and Techniques - Windows Vista Edition22
  • 23.
    Saving the PresentationWitha USB flash drive connected to one of the computer’s USB ports, click the Save button on the Quick Access Toolbar to display the Save As dialog boxIf the Navigation pane is not displayed in the Save As dialog box, click the Browse Folders button to expand the dialog boxIf a Folders list is displayed below the Folders button, click the Folders button to remove the Folders listType Cabo Package in the File name box to change the file name. Do not press the ENTER key after typing the file nameIf Computer is not displayed in the Favorite Links section, drag the top or bottom edge of the Save As dialog box until Computer is displayedMicrosoft Office 2007: Introductory Concepts and Techniques - Windows Vista Edition23
  • 24.
    Saving the PresentationClickComputer in the Favorite Links section to display a list of available drivesIf necessary, scroll until UDISK 2.0 (E:) appears in the list of available drivesDouble-click UDISK 2.0 (E:) in the Computer list to select the USB flash drive, Drive E in this case, as the new save locationClick the Save button in the Save As dialog box to save the presentation on the USB flash drive with the file name, Cabo PackageMicrosoft Office 2007: Introductory Concepts and Techniques - Windows Vista Edition24
  • 25.
    Saving the PresentationMicrosoftOffice 2007: Introductory Concepts and Techniques - Windows Vista Edition25
  • 26.
    Adding a NewText Slide with a Bulleted ListClick Home on the Ribbon to display the Home tabClick the New Slide button in the Slides group to insert a new slide with the Title and Content layoutMicrosoft Office 2007: Introductory Concepts and Techniques - Windows Vista Edition26
  • 27.
    Adding a NewText Slide with a Bulleted ListMicrosoft Office 2007: Introductory Concepts and Techniques - Windows Vista Edition27
  • 28.
    Entering a SlideTitleClick the label, Click to add title, to select it and then type Package Highlights in the placeholder. Do not press the ENTER keyMicrosoft Office 2007: Introductory Concepts and Techniques - Windows Vista Edition28
  • 29.
    Selecting a TextPlaceholderClick the label, Click to add text, to select the text placeholderMicrosoft Office 2007: Introductory Concepts and Techniques - Windows Vista Edition29
  • 30.
    Typing a Single-LevelBulleted ListType Four nights at the Azure Seas Resort and then press the ENTER key to begin a new bulleted first-level paragraphType Breakfast buffet, lunch, dinner, and snacks and then press the ENTER keyType Two large swimming pools and then press the ENTER keyType Round-trip airfare and hotel transfers and then press the ENTER keyType Daily activities, including water sports but do not press the ENTER keyMicrosoft Office 2007: Introductory Concepts and Techniques - Windows Vista Edition30
  • 31.
    Typing a Single-LevelBulleted ListMicrosoft Office 2007: Introductory Concepts and Techniques - Windows Vista Edition31
  • 32.
    Adding a NewSlide and Entering a Slide TitleClick the New Slide button in the Slides group on the Home tab to insert a new slide with the Title and Content layoutClick the title text placeholder and then type Rates and Booking in this placeholder. Do not press the ENTER keyMicrosoft Office 2007: Introductory Concepts and Techniques - Windows Vista Edition32
  • 33.
    Adding a NewSlide and Entering a Slide TitleMicrosoft Office 2007: Introductory Concepts and Techniques - Windows Vista Edition33
  • 34.
    Typing a Multi-LevelBulleted ListClick the bulleted paragraph text placeholderType Only $495 double occupancy and then press the ENTER keyClick the Increase List Level button in the Paragraph group to indent the second paragraph below the first and create a second-level paragraphType Non-diver rate: $275 and then press the ENTER key to add a new paragraph at the same level as the previous paragraphType Single occupancy: add $150 and then press the ENTER keyClick the Decrease List Level button in the Paragraph group so that the second-level paragraph becomes a first-level paragraphMicrosoft Office 2007: Introductory Concepts and Techniques - Windows Vista Edition34
  • 35.
    Typing a Multi-LevelBulleted ListMicrosoft Office 2007: Introductory Concepts and Techniques - Windows Vista Edition35
  • 36.
    Typing the RemainingText for Slide 3Type Nonrefundable $150 deposit required and then press the ENTER keyClick the Increase List Level button in the Paragraph group to demote the paragraphType Due by October 1 and then press the ENTER keyClick the Decrease List Level button in the Paragraph group to promote the paragraphType Travel insurance highly recommended but do not press the ENTER keyMicrosoft Office 2007: Introductory Concepts and Techniques - Windows Vista Edition36
  • 37.
    Typing the RemainingText for Slide 3Microsoft Office 2007: Introductory Concepts and Techniques - Windows Vista Edition37
  • 38.
    Creating Slide 4Clickthe New Slide button in the Slides groupType Snorkeling and Diving in the title text placeholderPress CTRL+ENTER to move the insertion point to the text placeholderType Three days of two-tank boat dives and then press the ENTER keyClick the Increase List Level button. Type Weights and tanks included and then press the ENTER keyMicrosoft Office 2007: Introductory Concepts and Techniques - Windows Vista Edition38
  • 39.
    Creating Slide 4MicrosoftOffice 2007: Introductory Concepts and Techniques - Windows Vista Edition39
  • 40.
    Creating a Third-LevelParagraphClick the Increase List Level button so that the second-level paragraph becomes a third-level paragraphType Instructors available for beginners and then press the ENTER key to create a second third-level paragraphClick the Decrease List Level button two times so that the insertion point appears at the first levelMicrosoft Office 2007: Introductory Concepts and Techniques - Windows Vista Edition40
  • 41.
    Creating a Third-LevelParagraphMicrosoft Office 2007: Introductory Concepts and Techniques - Windows Vista Edition41
  • 42.
    Typing the RemainingText for Slide 4Type Various locations based on diving skills and then press the ENTER keyPress the TAB key to increase the indent to the second levelType Spectacular underwater wildlife and landscapes and then press the ENTER keyPress the TAB key to increase the indent to the third levelType See squids, sea turtles, snakes, barracudas, and stingrays but do not press the ENTER keyMicrosoft Office 2007: Introductory Concepts and Techniques - Windows Vista Edition42
  • 43.
    Typing the RemainingText for Slide 4Microsoft Office 2007: Introductory Concepts and Techniques - Windows Vista Edition43
  • 44.
    Duplicating a SlideClickthe Slide 1 thumbnail in the Slides tab to display Slide 1Click the New Slide arrow in the Slides group on the Home tab to display the Flow layout galleryClick Duplicate Selected Slides in the Flow layout gallery to create a new Slide 2, which is a duplicate of Slide 1Microsoft Office 2007: Introductory Concepts and Techniques - Windows Vista Edition44
  • 45.
    Duplicating a SlideMicrosoftOffice 2007: Introductory Concepts and Techniques - Windows Vista Edition45
  • 46.
    Arranging a SlideWithSlide 2 selected, drag the Slide 2 slide thumbnail in the Slides pane below the last slide thumbnailMicrosoft Office 2007: Introductory Concepts and Techniques - Windows Vista Edition46
  • 47.
    Deleting All Textin a PlaceholderWith Slide 5 selected, click the subtitle text placeholder to select itClick the subtitle text placeholder border to change the border from a dashed line to a solid lineClick the Cut button in the Clipboard group on the Home tab to delete all the text in the subtitle text placeholderMicrosoft Office 2007: Introductory Concepts and Techniques - Windows Vista Edition47
  • 48.
    Deleting All Textin a PlaceholderMicrosoft Office 2007: Introductory Concepts and Techniques - Windows Vista Edition48
  • 49.
    Changing Document PropertiesClickthe Office Button to display the Office Button menuPoint to Prepare on the Office Button menu to display the Prepare submenuClick Properties on the Prepare submenu to display the Document Information PanelClick the Author text box, if necessary, and then type your name as the Author property. If a name already is displayed in the Author text box, delete it before typing your nameClick the Subject text box, if necessary delete any existing text, and then type your course number and section as the Subject propertyClick the Close the Document Information Panel button so that the Document Information Panel no longer is displayedMicrosoft Office 2007: Introductory Concepts and Techniques - Windows Vista Edition49
  • 50.
    Changing Document PropertiesMicrosoftOffice 2007: Introductory Concepts and Techniques - Windows Vista Edition50
  • 51.
    Saving an ExistingPresentation with the Same File NameClick the Save button on the Quick Access Toolbar to overwrite the previous Cabo Package file on the USB flash driveMicrosoft Office 2007: Introductory Concepts and Techniques - Windows Vista Edition51
  • 52.
    Using the ScrollBox on the Slide Pane to Move to Another SlidePosition the mouse pointer on the scroll boxPress and hold down the mouse button so that Slide: 5 of 5 A World Beneath the Waves appears in the slide indicatorDrag the scroll box up the vertical scroll bar until Slide: 1 of 5 A World Beneath the Waves appears in the slide indicatorRelease the mouse button so that Slide 1 appears in the Slide pane and the Slide 1 thumbnail has an orange border in the Slides tabMicrosoft Office 2007: Introductory Concepts and Techniques - Windows Vista Edition52
  • 53.
    Using the ScrollBox on the Slide Pane to Move to Another SlideMicrosoft Office 2007: Introductory Concepts and Techniques - Windows Vista Edition53
  • 54.
    Starting Slide ShowViewPoint to the Slide Show button in the lower-right corner of the PowerPoint window on the status barClick the Slide Show button to display the title slideMicrosoft Office 2007: Introductory Concepts and Techniques - Windows Vista Edition54
  • 55.
    Starting Slide ShowViewMicrosoft Office 2007: Introductory Concepts and Techniques - Windows Vista Edition55
  • 56.
    Moving Manually throughSlides in a Slide ShowClick each slide until Slide 5 (A World Beneath the Waves) is displayedClick Slide 5 so that the black slide appears with a message announcing the end of the slide showMicrosoft Office 2007: Introductory Concepts and Techniques - Windows Vista Edition56
  • 57.
    Displaying the Pop-UpMenu and Going to a Specific SlideWith the black slide displaying in Slide Show view, right-click the slide to display the pop-up menuPoint to Go to Slide on the pop-up menu, and then point to 2 Package Highlights in the Go to Slide submenuClick 2 Package Highlights to display Slide 2Microsoft Office 2007: Introductory Concepts and Techniques - Windows Vista Edition57
  • 58.
    Displaying the Pop-UpMenu and Going to a Specific SlideMicrosoft Office 2007: Introductory Concepts and Techniques - Windows Vista Edition58
  • 59.
    Using the Pop-UpMenu to End a Slide ShowRight-click Slide 2 and then point to End Show on the pop-up menuClick End Show to return to Slide 2 in the Slide pane in Normal viewIf the Microsoft Office PowerPoint dialog box appears, click the Yes buttonMicrosoft Office 2007: Introductory Concepts and Techniques - Windows Vista Edition59
  • 60.
    Using the Pop-UpMenu to End a Slide ShowMicrosoft Office 2007: Introductory Concepts and Techniques - Windows Vista Edition60
  • 61.
    Quitting PowerPointPoint tothe Close button on the right side of the PowerPoint title barClick the Close button to quit PowerPointMicrosoft Office 2007: Introductory Concepts and Techniques - Windows Vista Edition61
  • 62.
    Starting PowerPointClick theStart button on the Windows taskbar to display the Start menuPoint to All Programs on the Start menu to display the All Programs list and then point to Microsoft Office on the All Programs list to display the Microsoft Office listClick Microsoft Office PowerPoint 2007 on the Microsoft Office list to start PowerPoint and display a new blank presentation in the PowerPoint windowIf the PowerPoint window is not maximized, click the Maximize button on its title bar to maximize the windowMicrosoft Office 2007: Introductory Concepts and Techniques - Windows Vista Edition62
  • 63.
    Opening a Presentationfrom PowerPointWith your USB flash drive connected to one of the computer’s USB ports, click the Office Button to display the Office Button menuClick Open on the Office Button menu to display the Open dialog boxIf the Folders list is displayed below the Folders button, click the Folders button to remove the Folders listIf necessary, click Computer in the Favorite Links section and then scroll until UDISK 2.0 (E:) appears in the list of available drivesDouble-click UDISK 2.0 (E:) to select the USB flash drive, Drive E in this case, as the new open locationClick Cabo Package to select the file nameClick the Open button to open the selected file and display Slide 1 in the PowerPoint windowMicrosoft Office 2007: Introductory Concepts and Techniques - Windows Vista Edition63
  • 64.
    Opening a Presentationfrom PowerPointMicrosoft Office 2007: Introductory Concepts and Techniques - Windows Vista Edition64
  • 65.
    Checking SpellingClick Reviewon the Ribbon to display the Review tabClick the Spelling button in the Proofing group to start the spelling checker and display the Spelling dialog boxClick the Ignore button to skip the word, CaboClick the Ignore button to skip the word, Ehlin.When the Microsoft Office PowerPoint dialog box appears, click the OK button to close the spelling checker and return to the current slide, Slide 1, or to the slide where a possible misspelled word appearedClick the slide to remove the box from the word, EhlinMicrosoft Office 2007: Introductory Concepts and Techniques - Windows Vista Edition65
  • 66.
    Checking SpellingMicrosoft Office2007: Introductory Concepts and Techniques - Windows Vista Edition66
  • 67.
    Displaying a Presentationin GrayscaleClick View on the Ribbon to display the View tabClick Grayscale in the Color/Grayscale group to display Slide 1 in grayscale in the Slide paneClick the Next Slide button four times to view all slides in the presentation in grayscaleClick the Back To Color View button in the Close group to return to the previous tab and display Slide 5 with the default Flow color schemeMicrosoft Office 2007: Introductory Concepts and Techniques - Windows Vista Edition67
  • 68.
    Displaying a Presentationin GrayscaleMicrosoft Office 2007: Introductory Concepts and Techniques - Windows Vista Edition68
  • 69.
    Printing a PresentationClickthe Office Button to display the Office Button menuPoint to Print on the Office Button menu to display the Print submenuClick Quick Print on the Print submenu to print the slidesWhen the printer stops, retrieve the hard copy of the five Cabo Package slidesMicrosoft Office 2007: Introductory Concepts and Techniques - Windows Vista Edition69
  • 70.
    Printing a PresentationMicrosoftOffice 2007: Introductory Concepts and Techniques - Windows Vista Edition70
  • 71.
    Searching for PowerPointHelpClick the Microsoft Office PowerPoint Help button near the upper right-corner of the PowerPoint window to open the PowerPoint Help windowType document theme in the Type words to search for text box at the top of the PowerPoint Help windowPress the ENTER key to display the search resultsClick the Maximize button on the PowerPoint Help window title bar to maximize the Help windowClick the ‘Apply or customize a document theme’ link to display information regarding applying or customizing themesClick the Close button on the PowerPoint Help window title bar to close the PowerPoint Help window and display Slide 5Microsoft Office 2007: Introductory Concepts and Techniques - Windows Vista Edition71
  • 72.
    Searching for PowerPointHelpMicrosoft Office 2007: Introductory Concepts and Techniques - Windows Vista Edition72
  • 73.
    Quitting PowerPointClick theClose button on the right side of the title bar to quit PowerPointIf necessary, click the No button in the Microsoft Office PowerPoint dialog box so that any changes you have made are not savedMicrosoft Office 2007: Introductory Concepts and Techniques - Windows Vista Edition73
  • 74.
    SummaryStart and quitPowerPointDescribe the PowerPoint windowSelect a document themeCreate a title slide and text slides with single- and multi-level bulleted listsSave a presentationCopy elements from one slide to another74Microsoft Office 2007: Introductory Concepts and Techniques - Windows Vista Edition
  • 75.
    SummaryView a presentationin Slide Show viewOpen a presentationDisplay and print a presentation in grayscaleCheck spellingUse PowerPoint Help75Microsoft Office 2007: Introductory Concepts and Techniques - Windows Vista Edition
  • 76.