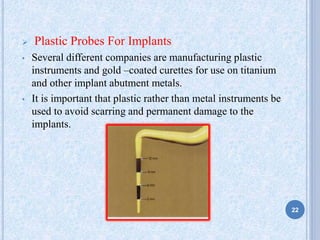
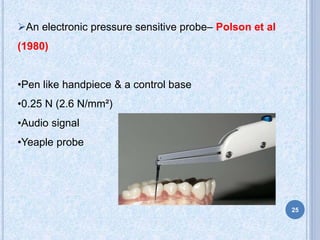
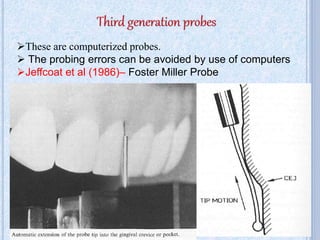
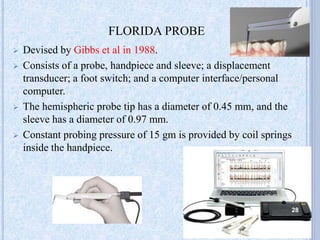
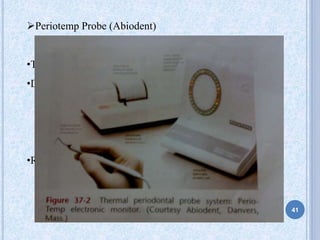
PERIODONTAL
PROBES
GUIDED BY:
DR. RUPINDER KAUR
PRESENTED BY:
DR. MALVIKA THAKUR
I YEAR
CONTENTS
1) Introduction
2) Uses of periodontal probes
3) History of periodontal probes
4) NIDCR Criteria
5) Classification of periodontal probes
6) Related Studies
7) Non periodontal probes
8) Basic concepts of probing technique
9) Conclusion
10) References
INTRODUCTION
 Probe – “to test”
 A calibrated probe used to measure the depth and determine
the configuration of a periodontal pocket. (Glossary of
Periodontal Terms 2001- 4th edition)
 1882 – John M Riggs – described probe.
 1915 -1958, several studies - supported use of the periodontal
probe - to determine the disease status of gingival tissues.
 Periodontal probe and its use was first described by F.V.
Simoton of the University Of California, San Francisco in
1925.
 Orban (1958) described the periodontal probe as “the eye of
the operator beneath the gingival margin.”
1/
 Goldman et al . stated that “Clinical probing with suitable
periodontal instruments such as the Williams calibrated
probe is a prime necessity in delineating the depth,
topography and character of the periodontal Pocket”
 Glickman stated that “The probe is an instrument with a
tapered rod-like blade which has a blunt and rounded tip”
 Rationale behind periodontal probing
Detect and measure loss or gain of attachment level
TO
Determine the extent of previous or ongoing disesase activity
AND
Assess the effect of ongoing treatment.
4
5
1. Assess the periodontal status for preparation of treatment plan.
2. Measure - pocket depths & clinical attachment level
3. Determine relationship of the gingival margin, attachment level,
and the mucogingival junction.
4. Locate calculus
5. Measure the width of attached gingiva.
6. Evaluate gingival bleeding on probing.
7. Locate and measure furcation involvements
8. Measure the extent of apparent, visible gingival recession.
9. Determine the consistency of the gingival tissue.
10.Evaluate tissue response to professional treatment post
operatively.
USES OF PERIODONTAL PROBES
HISTORY
 First described as a periodontal diagnostic instrument by John M
Riggs in 1882.
 The III edition of G.V. Black’s Special Dental Pathology
published in 1924 mentions “the use of very thin flat explorers
to determine the depth of pockets”.
 Periodontal probe and its use was first described by F.V. Simoton
of the University Of California, San Francisco in 1925.
 The first classification of periodontal probes was given by B. L
Philstrom in 1992 (I – III Generations of probes)
 In 2000 Watts added IV & V Generations.
6
 Simonton (1925) proposed flat probes 1mm wide, 10mm long and
notched every 2mm.
 Box (1928) used special gold or silver probes that had 5 different
angulations.
 Miller (1936) suggested probing of all pockets and recording their
depth and putting this information on the diagnostic chart. He used
a medium thickness silver abscess probe or scalers, with a blunt
blade.
 The probes most commonly used today were developed by
Ramfjord in 1959.
 In the late 1950’s, Goldman et al, Orban et al, and Glickman
published their texts on periodontal disease - agreed on the
importance of the periodontal probe in diagnosis, prognosis
and treatment, and supported use of the Williams probe.
7
2. Color Coding. Color-coded
probes are marked in bands
(often black in color) with each
band being several mm in width.
Characteristics of probe
8
1. Millimeter Markings
a. The working-end of the probe is marked at
mm intervals. grooves, colored indentations,
or colored bands may be used to indicate the
mm markings on the working-end.
b. Each mm may be indicated on the probe or
only certain mm increments may be marked
UNC 15 Probe
1,2,3,4,5,6,7,8,9,10,
11,12,13,14,15
Color coded at
5,10&15
Marquis color
coded probe
3,6,9,12
Color coded :
3 to 6 &
9 to 12 mm
1. Curved working end
- non-calibrated furcation probe
- narrow, smooth probe with round blunt end.
2. Straight working end
a. Shape – slender, rod like, with a smooth rounded end; may be
I .In design Tapered
Straight
Flat
ii.In cross section Round -> Michigan, Gillmore, Merritt, Williams &
Marquis
Rectangular -> Goldman Fox, Drellich & Nabers 9
PROBE DIAMETER
 There are numerous reports using various tip diameters (0.4, 0.5,
0.6, 0.8 and 1.0 mm).
 Van der Velden and Jansen (1981) suggested that with a probe
0.63mm in diameter, the optimal force to probe the most coronal
connective tissue attachment was 0.75 N.
 Keagle and Garnick (1989) - Probe diameter of 0.6 mm
discriminated best, the different levels of gingival inflammation
and health.
 It is recommended that, to measure the new sulcus depth, but not to
penetrate the long junctional epithelium, forces of 20 grams should
be used with a probe tip diameter 0.6 mm.
10
NATIONAL INSTITUTE OF DENTAL AND
CRANIOFACIAL RESEARCH (NIDCR) CRITERIA FOR
OVERCOMING CONVENTIONAL PROBING
11
Periodontal probes are classified as:
1 st generation probe
2nd generation probe Pihlstrom
3 rd generation probe
4 th generation probe Watts
5th generation probe
12
 Conventional or manual probes, made up of stainless steel or
plastic.
 No pressure or force measuring device attached.
 Working end – round , tapered, flat or rectangular with smooth
rounded end.
 Caliberations – mm
13
 John M Riggs (1882)
 G.V Black (1887) – Probe tips – flat blades : 1.5mm wide
& 8mm long – slightly bent R/L.
- Also used – endodontic files – difficult acess.
HK Box (1928) – WG Cross (1966)
- Set of 6 Periodontal probes – “Treatment of periodontal pocket”
- 3 probe types – soft sterling silver – diff in size &form of blades.
- Markings 1-16mm on one side , 2,4,6 mm – emphasized.
14
Sachs (1929)- introduced periodontal probes for the first time in
Europe
“Paradentometer”
- Thin , 1.3mm wide V2A steel blade ( bendable)
- 6 grooves at 2mm distance
Struckmann (1934)- a set of 6 probes ( stainless steel)
probe tips were 3 – 8 mm long 15
 CHM Williams (1936) – most popular probe
13 mm stainless steel tip
•Prototype for the development of Merritt
probes & University of Michigan O probe
EW Fish (1946)– probe tip – rounded & tapered
- 10mm long & perpendicular to handle
Muhlemann (1960) – ZIS probe
13mm & 115ᵒ angle
Williams probe
16
UNC 15- color coded probe
Marquis 1965- color coded probe.
• Calibrations are in 3mm sections.
• Markings are 3,6,9,12mm
17
WHO (1978)– CPITN probe
• Prof. George S Beagre and Jukka Ainamo
• Tip length- 16mm
• Angle -90ᵒ.
Schmid (1967)– Plast- O - Probe
• Flexible blade shaped tip
• 0.2 mm thick & 1.5 mm wide
18
CPITN-E Probe (Epidemological Probe)
Markings at 3.5 and 5.5mm.
CPITN-C Probe(Clinical Probe)
Markings at 3.5, 5.5, 8.5 and 11.5mm.
Ball Tip - 0.5 mm 19
MODIFICATIONS OF WILLIAM’S PROBE
 Goldman Fox Probe
• Calibrations same as Williams probe`s
• flattened not round
 University Of Michigan O Probe Without
Williams Marking
• Markings are at 3, 6, and 8mm
20
 GLICKMAN PERIODONTAL PROBE
• It has rounded tip with longer shank.
• 1-2-3-5-7-8-9-10 mm markings.
 Naber’s Probe
21
 Plastic Probes For Implants
• Several different companies are manufacturing plastic
instruments and gold –coated curettes for use on titanium
and other implant abutment metals.
• It is important that plastic rather than metal instruments be
used to avoid scarring and permanent damage to the
implants.
22
ADVANTAGES
• 1.Easily available and
inexpensive
• 2.Tactile sensation is
preserved
• 3.Colour coding
• 4.Can be used even in
presence of subgingival
calculus
DISADVANTAGES
• 1.Probing force cannot be
measured
• 2.Heavy in weight
• 3.Inter-examiner
variation
• 4.No computer capturing
data
• 5.Assistant is required to
record thereading
23
 Muhleman & Son (1971) – bleeding on gentle probing
 Waerhaug (1952) – light hand pressure – ≤ 0.2N/mm²
 Gabathuler & Hassel (1971)– 1st pressure sensitive probe.
- with the objective- quantitiating “gentle probing”
- constisted of standard ZIS probe & piezoelectric pressure
sensor
 Hunter (1990)– TPS probe
24
An electronic pressure sensitive probe– Polson et al
(1980)
•Pen like handpiece & a control base
•0.25 N (2.6 N/mm²)
•Audio signal
•Yeaple probe
25
ADVANTAGES
• Constant pressure
application
• Less inter examiner
variation
• Comfortable to the
patient
DISADVANTAGES
• Penetration into inflamed
connective tissue may
occur
• Assistant is required to
record the readings.
• Lacks tactile sensitivity.
26
These are computerized probes.
 The probing errors can be avoided by use of computers
Jeffcoat et al (1986)– Foster Miller Probe
27
 Devised by Gibbs et al in 1988.
 Consists of a probe, handpiece and sleeve; a displacement
transducer; a foot switch; and a computer interface/personal
computer.
 The hemispheric probe tip has a diameter of 0.45 mm, and the
sleeve has a diameter of 0.97 mm.
 Constant probing pressure of 15 gm is provided by coil springs
inside the handpiece.
FLORIDA PROBE
28
Florida probe with stent
Ledge on acrylic stent is
used as reference point
Florida probe without stent
Occlusal surface or incisal edge
is used as reference point
29
McCullock & Birek (1991) – Toronto Automated Probe
•Used occluso incisal surface
•Probing with 0.5 mm NiTi wire
•Advantage- incorporated electronic guidance
system
•Disadvantage- same head position required
Bose & Ott (1992) – Inter Probe (PerioProbe)
•Stainless steel probe- cause pain
•Tip – 0.5mm, probing force- 15 gm
30
ADVANTAGES
• Constant pressure
application.
• Errors during data
recording are minimal.
• Computerized storage of
data.
• Printouts can be attained.
DISADVANTAGES
• Penetration into inflamed
connective tissue may
occur.
• Less tactile sensitivity.
31
FOURTH GENERATION
 Watts (2000) - 3D probes
 These are three dimensional probes in which sequential probe
positions are measured.
ADVANTAGES
• Allows 3D
measurement of pocket.
• Sequential probe
positions can be
measured.
• Computerized storage
of data.
• Printouts can be
attained.
DISADVANTAGES
• Under development.
32
Eliminates the disadvantages of earlier generation probes
The only 5th generation probe- Ultra Sonographic (US) probe
Hinders & Companion (1999)
FIFTH GENERATION
33
 Component of the probe - contra-angled handpiece, computer,
electron box for water control, foot pedal, transducer emits and
receives sound waves.
34
ADVANTAGES
• Non –invasive
• Accurate measurement of
pocket depth
• Ultra sound waves
accurately detect various
periodontal structure like
upper boundary of PDL
and other soft tissue
structures.
• Provides information
regarding condition of the
gingival tissues.
• Printout can be obtained
DISADVANTAGES
• Technique sensitive
• Expensive
• Operator training
required for interpreting
the image obtained.
35
RELATED STUDIES
 Rams TE , Slots J (1993)
• 3 periodontal probes - manual probe and two computerized,
pressure-sensitive probes. robing depths were determined .
• Results - an electronic, pressure-sensitive probe yields more
reproducible probing depth measurements than a conventional
manual periodontal probe
36
L. Mayfield*, G. Bratthall, R. AttStröm(2005)
 Aim - To compare the relative intra- and inter-examiner
reproducibility of 4 different periodontal probes.
1. The Hu-Friedy LL 20 Probe, a manual probe.
2. The Vivacare TPS Probe, a plastic manual probe with a
standardised pressure of 0.20 N
3. The Vine Valley Probe, an electronic probe using a standardised
pressure of 0.25 N
4. The Peri Probe Comp, a computerised electronic probe with a
controlled pressure of 0.45 N
 Results show that the manual probe had the lowest degree of
variation, with a correlation coefficient of 0.83.
 The manual and Peri Probe Comp frequently recorded deeper
probing pocket depths compared to the TPS and Vine Valley
probes. 37
Garnick JJ ,Silverstein L J Periodontol.2000
 Aim -To determine the importance of the diameter of periodontal
probing tips in diagnosing and evaluating periodontal disease.
 RESULTS:
 The pressure used to place the probe tip at the base of the
periodontal sulcus/pocket was approximately 50 N/cm2 and at the
base of the junctional epithelium, 200 N/cm2.
 A tip diameter of 0.6 mm was needed to reach the base of the
pocket. Clinical inflammation did not necessarily reflect the
severity of histological inflammation.
 Probe tips need to have a diameter of 0.6 mm and a 0.20 gram
force (50 N/cm2) to obtain a pressure which demonstrates
approximate probing depth.
38
NON PERIODONTAL PROBES
 Calculus Detection Probes
1. Detect Tar Probe (Dentsply)
• Audio readings
• Disadvantages
2. Perioscope-
39
3. Keylaser -- InGaAs ; Er:YAG laser
 Periodontal Disease Evaluation System
•Detects periodontal disease at an early
stage
40
Periotemp Probe (Abiodent)
•Temperature sensitive probe
•Detects early inflammatory changes in gingival tissues
Two LEDs
•Red emitting diode Green emitting diode
41
BASIC CONCEPTS OF PROBING
ADAPTATION
 The side of the probe tip should be kept in contact with the tooth
surface.
 The probe tip is defined as 1 to 2 mm of the side of the probe.
Correct In correct
42
PARALLELISM
 The probe is positioned as parallel as possible to the tooth
surface.
 The probe must be parallel in the mesiodistal dimension and
faciolingual dimension.
Probe Parallel to Long Axis.
Probe is correctly positioned parallel to the long axis
of the tooth.
Probe Not Parallel to Long Axis.
Probe is incorrectly positioned in relation to the
long axis of the tooth.
43
INTERPROXIMAL TECHNIQUE
When two adjacent teeth are in contact, a special technique is used
to probe the area directly beneath the contact area
44
45
PROBING DEPTH MEASUREMENTS
Six sites per tooth
One reading per site
Full millimeter measurements
46
POSITIONING AND SEQUENCE FOR PROBING
47
 Probing is the act of walking the tip of a probe along the junctional
epithelium within the sulcus .
THE WALKING STROKE
48
MEASUREMENT OF CAL,RAL
49
TRANSGINGIVAL
PROBING
1.Gingival Recession
2.Histological
Probing
3.Clinical Probing
4.Bone sounding
50
PROBING HEALTHY VERSUS DISEASED TISSUE
.Position of Probe in a Healthy Sulcus.
In health,
the probe tip touches the junctional
epithelium located above the cemento-
enamel junction.
Position of Probe in a Periodontal
Pocket.
In a periodontal pocket, the probe tip
touches the(JE) located on the root
below the cemento-enamel junction..
51
PERI IMPLANT PROBING
 The results obtained with peri implant probing cannot be
interpreted same as the natural teeth because:
- Differences in the surrounding tissues that support implanted teeth.
- Probe inserts and penetrates differently.
The probing depth around implants presumed to be “healthy” has
been about 3mm around all surfaces.
52
CONCLUSION
 Newer developments in the field of periodontal probes provide
the potential for error-free determination of pocket depth.
 With more research and innovation, the advent of newer error-
free probes may resolve the remaining problems and those yet to
be realized.
53
 Hefti F. Clinical Reviews in Oral Biology & Medicine
1997;8(3):336-356.
 Ramachandra S. Periodontal Probing Systems: A Review of
Available Equipment. Compendium 2011;32(2):2-11.
 Newman, Takei, Klokkevold, Carranza. Clinical
Periodontology. Tenth Edition.
 Gehrig J. Fundamentals of Periodontal Instrumentation.
 Listgarten MA, Mao R, Robinson PJ. Periodontal probing and
the relationship of the probe tip to periodontal tissues. J
Periodontol. 1976;47(9):511-513
 Glossary Of Periodontal Terms. 2001 4 th Edition
References
54
 Box HK. Treatment of the Periodontal Pocket. Toronto: The
University of Toronto Press; 1928:83
 Simonton FV. Examination of the mouth-with special reference
to pyorrhea. J Am Dent Assoc 1925;72:287 -295.
 Miller SC. Oral Diagnosis and Treatment Planning.
PhiladelphiaP: . Blakiston'sS on t' Co.; 1936:239.
 Orban B, Wentz FM, Everett FG, Crant DA. Periodontics, A
Concept-Theorg and Practice. St. Louis: C.V. Mosby Co.;
1958:103.
 Goldman HM, Schluger S, Fox L. PeriodontalTherapg. St.
Louis: C.V. Mosby Co.; 1956:27.
 Glickman l. Clinical PeriodontologgP. hiladelphia:W B.
Saunders Co.; 1958:548.
55
THANK YOU
56

Periodontal probes

  • 1.
    PERIODONTAL PROBES GUIDED BY: DR. RUPINDERKAUR PRESENTED BY: DR. MALVIKA THAKUR I YEAR
  • 2.
    CONTENTS 1) Introduction 2) Usesof periodontal probes 3) History of periodontal probes 4) NIDCR Criteria 5) Classification of periodontal probes 6) Related Studies 7) Non periodontal probes 8) Basic concepts of probing technique 9) Conclusion 10) References
  • 3.
    INTRODUCTION  Probe –“to test”  A calibrated probe used to measure the depth and determine the configuration of a periodontal pocket. (Glossary of Periodontal Terms 2001- 4th edition)  1882 – John M Riggs – described probe.  1915 -1958, several studies - supported use of the periodontal probe - to determine the disease status of gingival tissues.  Periodontal probe and its use was first described by F.V. Simoton of the University Of California, San Francisco in 1925.  Orban (1958) described the periodontal probe as “the eye of the operator beneath the gingival margin.” 1/
  • 4.
     Goldman etal . stated that “Clinical probing with suitable periodontal instruments such as the Williams calibrated probe is a prime necessity in delineating the depth, topography and character of the periodontal Pocket”  Glickman stated that “The probe is an instrument with a tapered rod-like blade which has a blunt and rounded tip”  Rationale behind periodontal probing Detect and measure loss or gain of attachment level TO Determine the extent of previous or ongoing disesase activity AND Assess the effect of ongoing treatment. 4
  • 5.
    5 1. Assess theperiodontal status for preparation of treatment plan. 2. Measure - pocket depths & clinical attachment level 3. Determine relationship of the gingival margin, attachment level, and the mucogingival junction. 4. Locate calculus 5. Measure the width of attached gingiva. 6. Evaluate gingival bleeding on probing. 7. Locate and measure furcation involvements 8. Measure the extent of apparent, visible gingival recession. 9. Determine the consistency of the gingival tissue. 10.Evaluate tissue response to professional treatment post operatively. USES OF PERIODONTAL PROBES
  • 6.
    HISTORY  First describedas a periodontal diagnostic instrument by John M Riggs in 1882.  The III edition of G.V. Black’s Special Dental Pathology published in 1924 mentions “the use of very thin flat explorers to determine the depth of pockets”.  Periodontal probe and its use was first described by F.V. Simoton of the University Of California, San Francisco in 1925.  The first classification of periodontal probes was given by B. L Philstrom in 1992 (I – III Generations of probes)  In 2000 Watts added IV & V Generations. 6
  • 7.
     Simonton (1925)proposed flat probes 1mm wide, 10mm long and notched every 2mm.  Box (1928) used special gold or silver probes that had 5 different angulations.  Miller (1936) suggested probing of all pockets and recording their depth and putting this information on the diagnostic chart. He used a medium thickness silver abscess probe or scalers, with a blunt blade.  The probes most commonly used today were developed by Ramfjord in 1959.  In the late 1950’s, Goldman et al, Orban et al, and Glickman published their texts on periodontal disease - agreed on the importance of the periodontal probe in diagnosis, prognosis and treatment, and supported use of the Williams probe. 7
  • 8.
    2. Color Coding.Color-coded probes are marked in bands (often black in color) with each band being several mm in width. Characteristics of probe 8 1. Millimeter Markings a. The working-end of the probe is marked at mm intervals. grooves, colored indentations, or colored bands may be used to indicate the mm markings on the working-end. b. Each mm may be indicated on the probe or only certain mm increments may be marked UNC 15 Probe 1,2,3,4,5,6,7,8,9,10, 11,12,13,14,15 Color coded at 5,10&15 Marquis color coded probe 3,6,9,12 Color coded : 3 to 6 & 9 to 12 mm
  • 9.
    1. Curved workingend - non-calibrated furcation probe - narrow, smooth probe with round blunt end. 2. Straight working end a. Shape – slender, rod like, with a smooth rounded end; may be I .In design Tapered Straight Flat ii.In cross section Round -> Michigan, Gillmore, Merritt, Williams & Marquis Rectangular -> Goldman Fox, Drellich & Nabers 9
  • 10.
    PROBE DIAMETER  Thereare numerous reports using various tip diameters (0.4, 0.5, 0.6, 0.8 and 1.0 mm).  Van der Velden and Jansen (1981) suggested that with a probe 0.63mm in diameter, the optimal force to probe the most coronal connective tissue attachment was 0.75 N.  Keagle and Garnick (1989) - Probe diameter of 0.6 mm discriminated best, the different levels of gingival inflammation and health.  It is recommended that, to measure the new sulcus depth, but not to penetrate the long junctional epithelium, forces of 20 grams should be used with a probe tip diameter 0.6 mm. 10
  • 11.
    NATIONAL INSTITUTE OFDENTAL AND CRANIOFACIAL RESEARCH (NIDCR) CRITERIA FOR OVERCOMING CONVENTIONAL PROBING 11
  • 12.
    Periodontal probes areclassified as: 1 st generation probe 2nd generation probe Pihlstrom 3 rd generation probe 4 th generation probe Watts 5th generation probe 12
  • 13.
     Conventional ormanual probes, made up of stainless steel or plastic.  No pressure or force measuring device attached.  Working end – round , tapered, flat or rectangular with smooth rounded end.  Caliberations – mm 13
  • 14.
     John MRiggs (1882)  G.V Black (1887) – Probe tips – flat blades : 1.5mm wide & 8mm long – slightly bent R/L. - Also used – endodontic files – difficult acess. HK Box (1928) – WG Cross (1966) - Set of 6 Periodontal probes – “Treatment of periodontal pocket” - 3 probe types – soft sterling silver – diff in size &form of blades. - Markings 1-16mm on one side , 2,4,6 mm – emphasized. 14
  • 15.
    Sachs (1929)- introducedperiodontal probes for the first time in Europe “Paradentometer” - Thin , 1.3mm wide V2A steel blade ( bendable) - 6 grooves at 2mm distance Struckmann (1934)- a set of 6 probes ( stainless steel) probe tips were 3 – 8 mm long 15
  • 16.
     CHM Williams(1936) – most popular probe 13 mm stainless steel tip •Prototype for the development of Merritt probes & University of Michigan O probe EW Fish (1946)– probe tip – rounded & tapered - 10mm long & perpendicular to handle Muhlemann (1960) – ZIS probe 13mm & 115ᵒ angle Williams probe 16
  • 17.
    UNC 15- colorcoded probe Marquis 1965- color coded probe. • Calibrations are in 3mm sections. • Markings are 3,6,9,12mm 17
  • 18.
    WHO (1978)– CPITNprobe • Prof. George S Beagre and Jukka Ainamo • Tip length- 16mm • Angle -90ᵒ. Schmid (1967)– Plast- O - Probe • Flexible blade shaped tip • 0.2 mm thick & 1.5 mm wide 18
  • 19.
    CPITN-E Probe (EpidemologicalProbe) Markings at 3.5 and 5.5mm. CPITN-C Probe(Clinical Probe) Markings at 3.5, 5.5, 8.5 and 11.5mm. Ball Tip - 0.5 mm 19
  • 20.
    MODIFICATIONS OF WILLIAM’SPROBE  Goldman Fox Probe • Calibrations same as Williams probe`s • flattened not round  University Of Michigan O Probe Without Williams Marking • Markings are at 3, 6, and 8mm 20
  • 21.
     GLICKMAN PERIODONTALPROBE • It has rounded tip with longer shank. • 1-2-3-5-7-8-9-10 mm markings.  Naber’s Probe 21
  • 22.
     Plastic ProbesFor Implants • Several different companies are manufacturing plastic instruments and gold –coated curettes for use on titanium and other implant abutment metals. • It is important that plastic rather than metal instruments be used to avoid scarring and permanent damage to the implants. 22
  • 23.
    ADVANTAGES • 1.Easily availableand inexpensive • 2.Tactile sensation is preserved • 3.Colour coding • 4.Can be used even in presence of subgingival calculus DISADVANTAGES • 1.Probing force cannot be measured • 2.Heavy in weight • 3.Inter-examiner variation • 4.No computer capturing data • 5.Assistant is required to record thereading 23
  • 24.
     Muhleman &Son (1971) – bleeding on gentle probing  Waerhaug (1952) – light hand pressure – ≤ 0.2N/mm²  Gabathuler & Hassel (1971)– 1st pressure sensitive probe. - with the objective- quantitiating “gentle probing” - constisted of standard ZIS probe & piezoelectric pressure sensor  Hunter (1990)– TPS probe 24
  • 25.
    An electronic pressuresensitive probe– Polson et al (1980) •Pen like handpiece & a control base •0.25 N (2.6 N/mm²) •Audio signal •Yeaple probe 25
  • 26.
    ADVANTAGES • Constant pressure application •Less inter examiner variation • Comfortable to the patient DISADVANTAGES • Penetration into inflamed connective tissue may occur • Assistant is required to record the readings. • Lacks tactile sensitivity. 26
  • 27.
    These are computerizedprobes.  The probing errors can be avoided by use of computers Jeffcoat et al (1986)– Foster Miller Probe 27
  • 28.
     Devised byGibbs et al in 1988.  Consists of a probe, handpiece and sleeve; a displacement transducer; a foot switch; and a computer interface/personal computer.  The hemispheric probe tip has a diameter of 0.45 mm, and the sleeve has a diameter of 0.97 mm.  Constant probing pressure of 15 gm is provided by coil springs inside the handpiece. FLORIDA PROBE 28
  • 29.
    Florida probe withstent Ledge on acrylic stent is used as reference point Florida probe without stent Occlusal surface or incisal edge is used as reference point 29
  • 30.
    McCullock & Birek(1991) – Toronto Automated Probe •Used occluso incisal surface •Probing with 0.5 mm NiTi wire •Advantage- incorporated electronic guidance system •Disadvantage- same head position required Bose & Ott (1992) – Inter Probe (PerioProbe) •Stainless steel probe- cause pain •Tip – 0.5mm, probing force- 15 gm 30
  • 31.
    ADVANTAGES • Constant pressure application. •Errors during data recording are minimal. • Computerized storage of data. • Printouts can be attained. DISADVANTAGES • Penetration into inflamed connective tissue may occur. • Less tactile sensitivity. 31
  • 32.
    FOURTH GENERATION  Watts(2000) - 3D probes  These are three dimensional probes in which sequential probe positions are measured. ADVANTAGES • Allows 3D measurement of pocket. • Sequential probe positions can be measured. • Computerized storage of data. • Printouts can be attained. DISADVANTAGES • Under development. 32
  • 33.
    Eliminates the disadvantagesof earlier generation probes The only 5th generation probe- Ultra Sonographic (US) probe Hinders & Companion (1999) FIFTH GENERATION 33
  • 34.
     Component ofthe probe - contra-angled handpiece, computer, electron box for water control, foot pedal, transducer emits and receives sound waves. 34
  • 35.
    ADVANTAGES • Non –invasive •Accurate measurement of pocket depth • Ultra sound waves accurately detect various periodontal structure like upper boundary of PDL and other soft tissue structures. • Provides information regarding condition of the gingival tissues. • Printout can be obtained DISADVANTAGES • Technique sensitive • Expensive • Operator training required for interpreting the image obtained. 35
  • 36.
    RELATED STUDIES  RamsTE , Slots J (1993) • 3 periodontal probes - manual probe and two computerized, pressure-sensitive probes. robing depths were determined . • Results - an electronic, pressure-sensitive probe yields more reproducible probing depth measurements than a conventional manual periodontal probe 36
  • 37.
    L. Mayfield*, G.Bratthall, R. AttStröm(2005)  Aim - To compare the relative intra- and inter-examiner reproducibility of 4 different periodontal probes. 1. The Hu-Friedy LL 20 Probe, a manual probe. 2. The Vivacare TPS Probe, a plastic manual probe with a standardised pressure of 0.20 N 3. The Vine Valley Probe, an electronic probe using a standardised pressure of 0.25 N 4. The Peri Probe Comp, a computerised electronic probe with a controlled pressure of 0.45 N  Results show that the manual probe had the lowest degree of variation, with a correlation coefficient of 0.83.  The manual and Peri Probe Comp frequently recorded deeper probing pocket depths compared to the TPS and Vine Valley probes. 37
  • 38.
    Garnick JJ ,SilversteinL J Periodontol.2000  Aim -To determine the importance of the diameter of periodontal probing tips in diagnosing and evaluating periodontal disease.  RESULTS:  The pressure used to place the probe tip at the base of the periodontal sulcus/pocket was approximately 50 N/cm2 and at the base of the junctional epithelium, 200 N/cm2.  A tip diameter of 0.6 mm was needed to reach the base of the pocket. Clinical inflammation did not necessarily reflect the severity of histological inflammation.  Probe tips need to have a diameter of 0.6 mm and a 0.20 gram force (50 N/cm2) to obtain a pressure which demonstrates approximate probing depth. 38
  • 39.
    NON PERIODONTAL PROBES Calculus Detection Probes 1. Detect Tar Probe (Dentsply) • Audio readings • Disadvantages 2. Perioscope- 39
  • 40.
    3. Keylaser --InGaAs ; Er:YAG laser  Periodontal Disease Evaluation System •Detects periodontal disease at an early stage 40
  • 41.
    Periotemp Probe (Abiodent) •Temperaturesensitive probe •Detects early inflammatory changes in gingival tissues Two LEDs •Red emitting diode Green emitting diode 41
  • 42.
    BASIC CONCEPTS OFPROBING ADAPTATION  The side of the probe tip should be kept in contact with the tooth surface.  The probe tip is defined as 1 to 2 mm of the side of the probe. Correct In correct 42
  • 43.
    PARALLELISM  The probeis positioned as parallel as possible to the tooth surface.  The probe must be parallel in the mesiodistal dimension and faciolingual dimension. Probe Parallel to Long Axis. Probe is correctly positioned parallel to the long axis of the tooth. Probe Not Parallel to Long Axis. Probe is incorrectly positioned in relation to the long axis of the tooth. 43
  • 44.
    INTERPROXIMAL TECHNIQUE When twoadjacent teeth are in contact, a special technique is used to probe the area directly beneath the contact area 44
  • 45.
  • 46.
    PROBING DEPTH MEASUREMENTS Sixsites per tooth One reading per site Full millimeter measurements 46
  • 47.
  • 48.
     Probing isthe act of walking the tip of a probe along the junctional epithelium within the sulcus . THE WALKING STROKE 48
  • 49.
  • 50.
  • 51.
    PROBING HEALTHY VERSUSDISEASED TISSUE .Position of Probe in a Healthy Sulcus. In health, the probe tip touches the junctional epithelium located above the cemento- enamel junction. Position of Probe in a Periodontal Pocket. In a periodontal pocket, the probe tip touches the(JE) located on the root below the cemento-enamel junction.. 51
  • 52.
    PERI IMPLANT PROBING The results obtained with peri implant probing cannot be interpreted same as the natural teeth because: - Differences in the surrounding tissues that support implanted teeth. - Probe inserts and penetrates differently. The probing depth around implants presumed to be “healthy” has been about 3mm around all surfaces. 52
  • 53.
    CONCLUSION  Newer developmentsin the field of periodontal probes provide the potential for error-free determination of pocket depth.  With more research and innovation, the advent of newer error- free probes may resolve the remaining problems and those yet to be realized. 53
  • 54.
     Hefti F.Clinical Reviews in Oral Biology & Medicine 1997;8(3):336-356.  Ramachandra S. Periodontal Probing Systems: A Review of Available Equipment. Compendium 2011;32(2):2-11.  Newman, Takei, Klokkevold, Carranza. Clinical Periodontology. Tenth Edition.  Gehrig J. Fundamentals of Periodontal Instrumentation.  Listgarten MA, Mao R, Robinson PJ. Periodontal probing and the relationship of the probe tip to periodontal tissues. J Periodontol. 1976;47(9):511-513  Glossary Of Periodontal Terms. 2001 4 th Edition References 54
  • 55.
     Box HK.Treatment of the Periodontal Pocket. Toronto: The University of Toronto Press; 1928:83  Simonton FV. Examination of the mouth-with special reference to pyorrhea. J Am Dent Assoc 1925;72:287 -295.  Miller SC. Oral Diagnosis and Treatment Planning. PhiladelphiaP: . Blakiston'sS on t' Co.; 1936:239.  Orban B, Wentz FM, Everett FG, Crant DA. Periodontics, A Concept-Theorg and Practice. St. Louis: C.V. Mosby Co.; 1958:103.  Goldman HM, Schluger S, Fox L. PeriodontalTherapg. St. Louis: C.V. Mosby Co.; 1956:27.  Glickman l. Clinical PeriodontologgP. hiladelphia:W B. Saunders Co.; 1958:548. 55
  • 56.