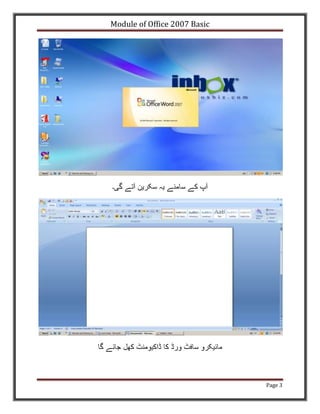
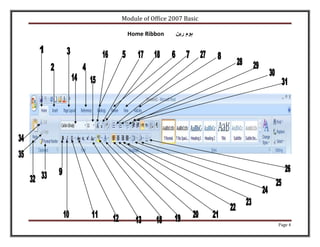
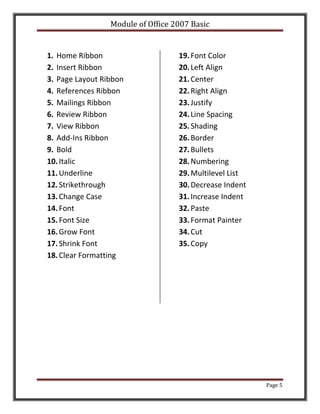
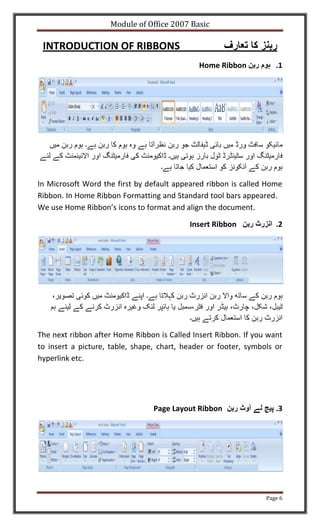
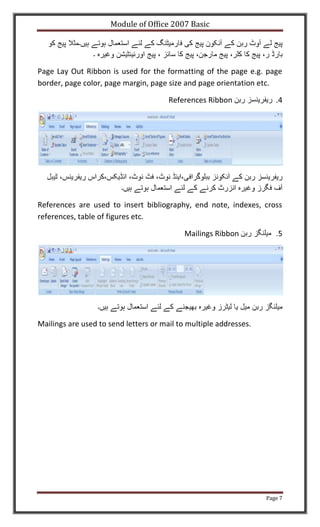
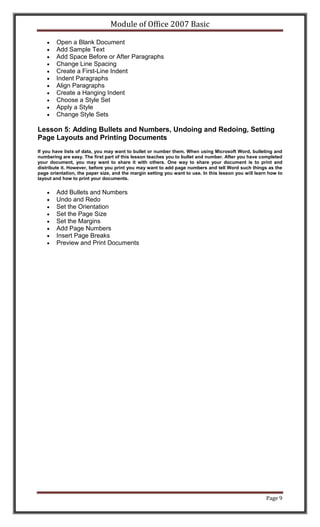
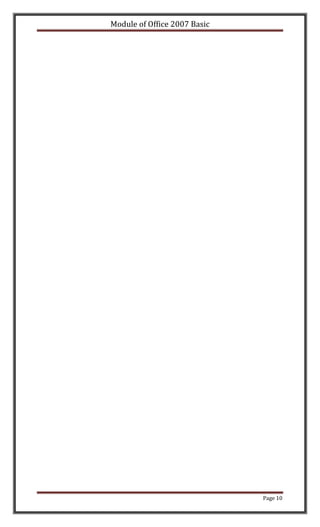
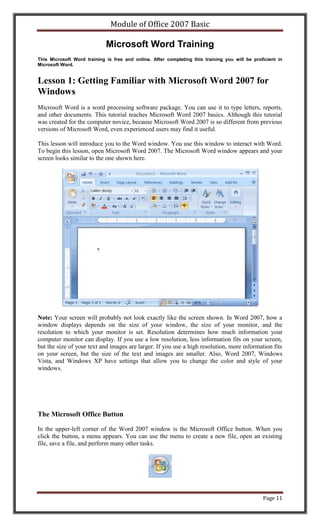
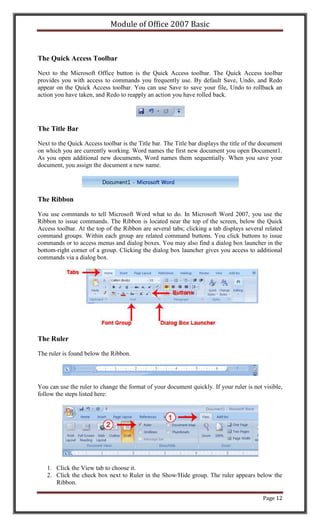
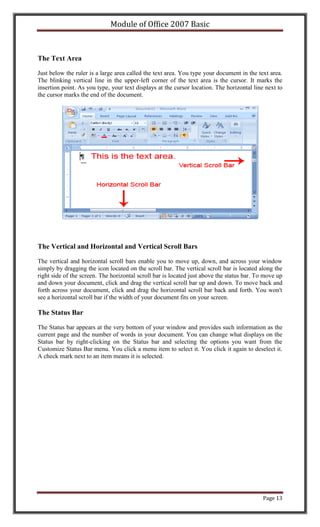
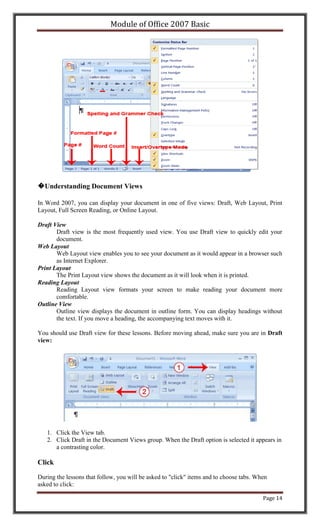
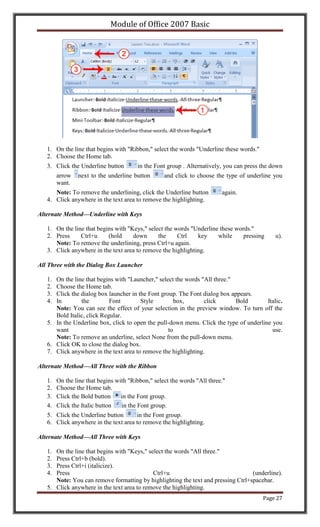
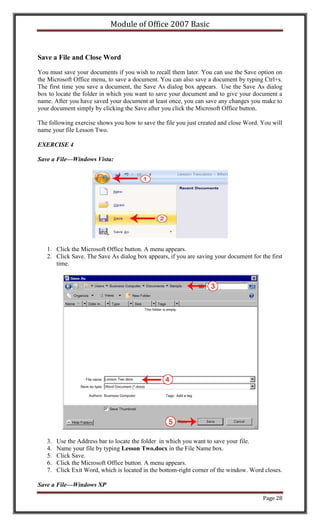
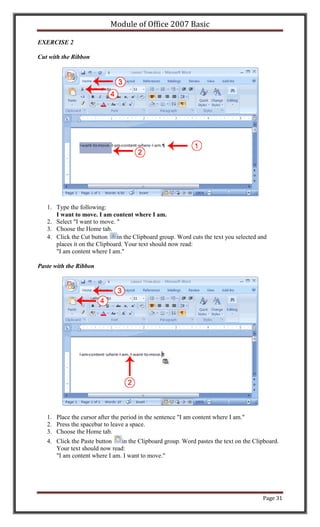
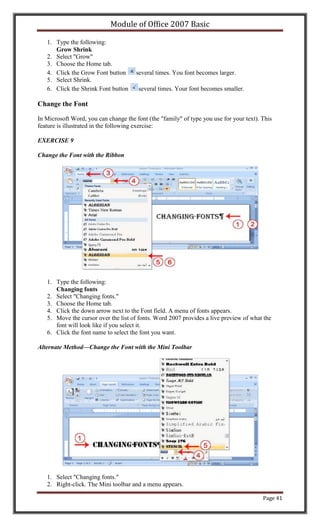
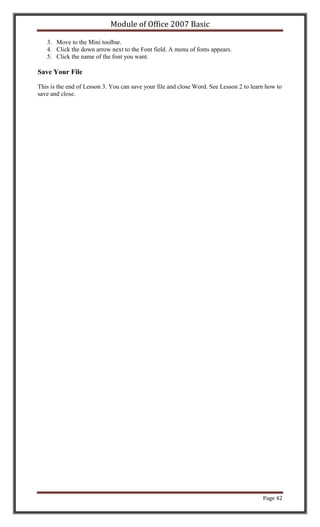
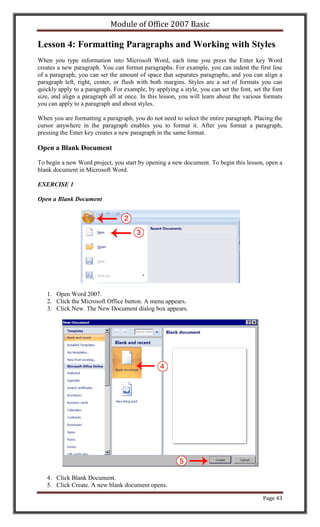
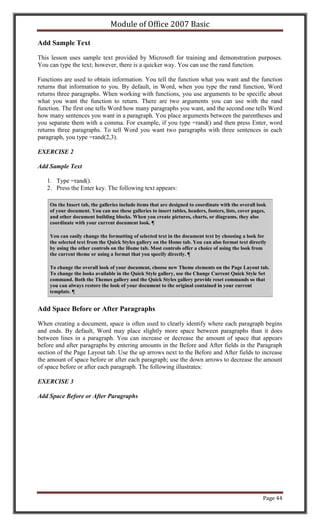
Module of Office 2007 Basic


                              Page 1
Module of Office 2007 Basic


                  Getting Started With Microsoft Word


 Steps


1. Click on Start button
2. Click on Microsoft Office Folder

3. Click on Microsoft Office Word 2007


                                                        Page 2
Module of Office 2007 Basic


                              Page 3
Module of Office 2007 Basic

  Home Ribbon


                              Page 4
Module of Office 2007 Basic


1. Home Ribbon                     19. Font Color
2. Insert Ribbon                   20. Left Align
3. Page Layout Ribbon              21. Center
4. References Ribbon               22. Right Align
5. Mailings Ribbon                 23. Justify
6. Review Ribbon                   24. Line Spacing
7. View Ribbon                     25. Shading
8. Add-Ins Ribbon                  26. Border
9. Bold                            27. Bullets
10. Italic                         28. Numbering
11. Underline                      29. Multilevel List
12. Strikethrough                  30. Decrease Indent
13. Change Case                    31. Increase Indent
14. Font                           32. Paste
15. Font Size                      33. Format Painter
16. Grow Font                      34. Cut
17. Shrink Font                    35. Copy
18. Clear Formatting


                                                         Page 5
Module of Office 2007 Basic

 INTRODUCTION OF RIBBONS
                                              Home Ribbon           .1


In Microsoft Word the first by default appeared ribbon is called Home
Ribbon. In Home Ribbon Formatting and Standard tool bars appeared.
We use Home Ribbon’s icons to format and align the document.

                                           Insert Ribbon            .2


The next ribbon after Home Ribbon is Called Insert Ribbon. If you want
to insert a picture, table, shape, chart, header or footer, symbols or
hyperlink etc.


                                 Page Layout Ribbon                 .3


                                                                 Page 6
Module of Office 2007 Basic


Page Lay Out Ribbon is used for the formatting of the page e.g. page
border, page color, page margin, page size and page orientation etc.

                                       References Ribbon              .4


References are used to insert bibliography, end note, indexes, cross
references, table of figures etc.

                                            Mailings Ribbon


Mailings are used to send letters or mail to multiple addresses.


                                                                   Page 7
Module of Office 2007 Basic

                                          Table of Contents

Lesson 1: Getting Familiar with Microsoft Word 2007 for Windows
Microsoft Word is a word processing software package. You can use it to type letters, reports, and other
documents. It gives you the ability to use your home computer as well as your business computer for
desktop publishing. This tutorial teaches Microsoft Word 2007 basics. Although this tutorial was created for
the computer novice, because Microsoft Word 2007 is so different from previous versions of Microsoft Word,
even experienced users may find it useful. This lesson will introduce you to the Word window. You use this
window to interact with Word.


        The Microsoft Office Button
        The Quick Access Toolbar
        The Title Bar
        The Ribbon
        The Ruler
        The Text Area
        The Vertical and Horizontal Scroll Bars
        The Status Bar
        Understanding Document Views
        Click
        Understanding Nonprinting Characters
        Create Sample Data and Select Text
        Place the Cursor
        Execute Commands with Keyboard Shortcuts
        Start a New Paragraph
        Exit Word

Lesson 2: Microsoft Word 2007 Basic Features
Lesson 1 familiarized you with the the Microsoft Word window. You are now ready to learn how to create a
Word document. This lesson covers typing, using the Backspace key, using the Delete key, inserting text,
bolding, underlining, and italicizing.


        Type, Backspace, and Delete
        Insert and Overtype
        Bold, Italicize, and Underline
        Save a File and Close Word

Lesson 3: More Basic Features
The features in Word 2007 can make your work easier, make your documents more attractive, and/or enable
you to work more efficiently. This Microsoft Word lesson teaches you how to open a file, cut, copy, paste,
use AutoText, use spell check, use Find and Replace, and change fonts. All of these features either make
your work easier or make your document more attractive.


        Open a File
        Cut and Paste
        Copy and Paste
        Use the Clipboard
        Create AutoText
        Use Spell Check
        Find and Replace
        Change the Font Size
        Change the Font
        Save Your File

Lesson 4: Formatting Paragraphs and Working with Styles
When you type information into Microsoft Word, each time you press the Enter key Word creates a new
paragraph. You can format paragraphs. For example, you can indent the first line of a paragraph, you can set
the amount of space that separates paragraphs, and you can align a paragraph left, right, center, or flush
with both margins. Styles are a set of formats you can quickly apply to a paragraph. For example, by
applying a style, you can set the font, set the font size, and align a paragraph all at once. In this lesson, you
will learn about the various formats you can apply to a paragraph and about styles.


                                                                                                         Page 8
Module of Office 2007 Basic

        Open a Blank Document
        Add Sample Text
        Add Space Before or After Paragraphs
        Change Line Spacing
        Create a First-Line Indent
        Indent Paragraphs
        Align Paragraphs
        Create a Hanging Indent
        Choose a Style Set
        Apply a Style
        Change Style Sets

Lesson 5: Adding Bullets and Numbers, Undoing and Redoing, Setting
Page Layouts and Printing Documents
If you have lists of data, you may want to bullet or number them. When using Microsoft Word, bulleting and
numbering are easy. The first part of this lesson teaches you to bullet and number. After you have completed
your document, you may want to share it with others. One way to share your document is to print and
distribute it. However, before you print you may want to add page numbers and tell Word such things as the
page orientation, the paper size, and the margin setting you want to use. In this lesson you will learn how to
layout and how to print your documents.


        Add Bullets and Numbers
        Undo and Redo
        Set the Orientation
        Set the Page Size
        Set the Margins
        Add Page Numbers
        Insert Page Breaks
        Preview and Print Documents


                                                                                                      Page 9
Module of Office 2007 Basic


                              Page 10
Module of Office 2007 Basic

                             Microsoft Word Training
This Microsoft Word training is free and online. After completing this training you will be proficient in
Microsoft Word.


Lesson 1: Getting Familiar with Microsoft Word 2007 for
Windows
Microsoft Word is a word processing software package. You can use it to type letters, reports,
and other documents. This tutorial teaches Microsoft Word 2007 basics. Although this tutorial
was created for the computer novice, because Microsoft Word 2007 is so different from previous
versions of Microsoft Word, even experienced users may find it useful.

This lesson will introduce you to the Word window. You use this window to interact with Word.
To begin this lesson, open Microsoft Word 2007. The Microsoft Word window appears and your
screen looks similar to the one shown here.


Note: Your screen will probably not look exactly like the screen shown. In Word 2007, how a
window displays depends on the size of your window, the size of your monitor, and the
resolution to which your monitor is set. Resolution determines how much information your
computer monitor can display. If you use a low resolution, less information fits on your screen,
but the size of your text and images are larger. If you use a high resolution, more information fits
on your screen, but the size of the text and images are smaller. Also, Word 2007, Windows
Vista, and Windows XP have settings that allow you to change the color and style of your
windows.


The Microsoft Office Button

In the upper-left corner of the Word 2007 window is the Microsoft Office button. When you
click the button, a menu appears. You can use the menu to create a new file, open an existing
file, save a file, and perform many other tasks.


                                                                                                Page 11
Module of Office 2007 Basic


The Quick Access Toolbar

Next to the Microsoft Office button is the Quick Access toolbar. The Quick Access toolbar
provides you with access to commands you frequently use. By default Save, Undo, and Redo
appear on the Quick Access toolbar. You can use Save to save your file, Undo to rollback an
action you have taken, and Redo to reapply an action you have rolled back.


The Title Bar

Next to the Quick Access toolbar is the Title bar. The Title bar displays the title of the document
on which you are currently working. Word names the first new document you open Document1.
As you open additional new documents, Word names them sequentially. When you save your
document, you assign the document a new name.


The Ribbon

You use commands to tell Microsoft Word what to do. In Microsoft Word 2007, you use the
Ribbon to issue commands. The Ribbon is located near the top of the screen, below the Quick
Access toolbar. At the top of the Ribbon are several tabs; clicking a tab displays several related
command groups. Within each group are related command buttons. You click buttons to issue
commands or to access menus and dialog boxes. You may also find a dialog box launcher in the
bottom-right corner of a group. Clicking the dialog box launcher gives you access to additional
commands via a dialog box.


The Ruler

The ruler is found below the Ribbon.


You can use the ruler to change the format of your document quickly. If your ruler is not visible,
follow the steps listed here:


   1. Click the View tab to choose it.
   2. Click the check box next to Ruler in the Show/Hide group. The ruler appears below the
      Ribbon.

                                                                                           Page 12
Module of Office 2007 Basic


The Text Area

Just below the ruler is a large area called the text area. You type your document in the text area.
The blinking vertical line in the upper-left corner of the text area is the cursor. It marks the
insertion point. As you type, your text displays at the cursor location. The horizontal line next to
the cursor marks the end of the document.


The Vertical and Horizontal and Vertical Scroll Bars

The vertical and horizontal scroll bars enable you to move up, down, and across your window
simply by dragging the icon located on the scroll bar. The vertical scroll bar is located along the
right side of the screen. The horizontal scroll bar is located just above the status bar. To move up
and down your document, click and drag the vertical scroll bar up and down. To move back and
forth across your document, click and drag the horizontal scroll bar back and forth. You won't
see a horizontal scroll bar if the width of your document fits on your screen.

The Status Bar

The Status bar appears at the very bottom of your window and provides such information as the
current page and the number of words in your document. You can change what displays on the
Status bar by right-clicking on the Status bar and selecting the options you want from the
Customize Status Bar menu. You click a menu item to select it. You click it again to deselect it.
A check mark next to an item means it is selected.


                                                                                            Page 13
Module of Office 2007 Basic


�Understanding Document Views

In Word 2007, you can display your document in one of five views: Draft, Web Layout, Print
Layout, Full Screen Reading, or Online Layout.

Draft View
       Draft view is the most frequently used view. You use Draft view to quickly edit your
       document.
Web Layout
       Web Layout view enables you to see your document as it would appear in a browser such
       as Internet Explorer.
Print Layout
       The Print Layout view shows the document as it will look when it is printed.
Reading Layout
       Reading Layout view formats your screen to make reading your document more
       comfortable.
Outline View
       Outline view displays the document in outline form. You can display headings without
       the text. If you move a heading, the accompanying text moves with it.

You should use Draft view for these lessons. Before moving ahead, make sure you are in Draft
view:


   1. Click the View tab.
   2. Click Draft in the Document Views group. When the Draft option is selected it appears in
      a contrasting color.

Click

During the lessons that follow, you will be asked to "click" items and to choose tabs. When
asked to click:

                                                                                         Page 14
Module of Office 2007 Basic

   1. Point to the item.
   2. Press your left mouse button once.

If you are asked to double-click an item:

   1. Point to the item.
   2. Quickly press your left mouse button twice.

If you are asked to right-click:

   1. Point to the item.
   2. Press your right mouse button.

If you are asked to choose a tab, click the tab.

Understanding Nonprinting Characters

Certain characters, called nonprinting caharacters, do not print and will not appear in your
printed document but do affect your document layout. You can elect to see these characters on
the screen as you type or you can elect to have them remain invisible. For these lessons, opt to
see them onscreen. This table describes most of them:

                  Character                    Denotes
                                               A tab

                    .                          A space
                    ¶                          The end of a paragraph
                                               Hidden text


To view nonprinting characters:


   1. Choose the Home tab.
   2. Click the Show/Hide button         in the Paragraph group . The Show/Hide button appears
      in a contrasting color, when it is selected.

Create Sample Data and Select Text

If you type =rand() in your Word document and then press Enter, Word creates three paragraphs.
You can use these paragraphs to practice what you learn. Throughout these lessons, you will be
asked to select text. The following exercise teaches you how to create data and how to select
data. You can select by using the arrow keys or by clicking and dragging. When using the arrow
keys, use the up arrow to move up, the down arrow to move down, the left arrow to move left,
and the right arrow to move right. When using the mouse, press the left mouse button and then
drag in the direction you want to move.

EXERCISE 1

Create Sample Data


                                                                                        Page 15
Module of Office 2007 Basic

   1. Type =rand().
   2. Press Enter. Three paragraphs appear in your document.

Select with the Shift and Arrow Keys

   1. Place your cursor before the word "On" in the first paragraph.
   2. Press and hold down the Shift key, which serves as an "anchor" showing where text you
      wish to select begins or ends.
   3. Press the right arrow key until the first line of text is highlighted.
   4. Press the down arrow key until the first paragraph is highlighted.
   5. Click anywhere outside the highlighted area to remove the highlighting.

Select with the Mouse

   1.    Place your cursor before the word "You" in the second paragraph.
   2.    Press and hold down the left mouse button.
   3.    Drag the mouse until you have highlighted the second paragraph.
   4.    Click anywhere outside the highlighted area to remove the highlighting.


Place the Cursor

During the lessons, you will often be asked to place the cursor at a specific location (the insertion
point) on the screen. You place the cursor by moving the cursor to the specified location and
pressing the left mouse button or by using the arrow keys to move to the specified location.

EXERCISE 2

The Arrow Keys

   1.    Use the down arrow key to move down your document.
   2.    Use the right arrow key to move to the right.
   3.    Use the up arrow key to move up.
   4.    Use the left arrow key to move to the left.

Cursor

   1. Move around you document by using you mouse and clicking in a variety of location.
   2. Click in a location and type. Note what happens.

Execute Commands with Keyboard Shortcuts

There are many methods you can use to accomplish tasks when using Word. Generally, you
choose an option by clicking the option on the Ribbon. However, you can also use shortcut keys.
A key name followed by a plus and a letter means to hold down the key while pressing the letter.
For example, Ctrl+b means you should hold down the Ctrl key while pressing "b." A shorthand
notation of the above would read as follows:

Press Ctrl+b

Typists who are slowed down by using a mouse usually prefer using keys.

Start a New Paragraph

When you type in Microsoft Word, you do not need to press a key to move to a new line. To start
a new paragraph, press the Enter key.

Exit Word

You have completed Lesson One. Typically, you save your work before exiting.

                                                                                             Page 16
Module of Office 2007 Basic

EXERCISE 3

Close and Save—Windows Vista


   1. Click the Microsoft Office button. A menu appears.
   2. Click Exit Word, which you can find in the bottom-right corner.


   3. You are prompted: "Do you want to save changes to Document1?" To save your changes,
      click Yes. Otherwise, click No. If you click Yes, the Save As dialog box appears.


   4. Move to the correct folder.
   5. Name your file by typing Lesson One.doc in the File Name field.
   6. Click Save. Word saves your file.

Close and Save—Windows XP

   1. Click the Microsoft Office button. A menu appears.
   2. Click Exit Word, which is in the bottom-right corner.
   3. You will be prompted: "Do you want to save changes to Document1?" To save your
      changes, click Yes. Otherwise, click No. If you click Yes, the Save As dialog box
      appears.
   4. Specify the correct folder in the Save In box.
   5. Name your file by typing Lesson One.doc in the File Name field.
   6. Click Save. Word saves your file.


                                                                                     Page 17
Module of Office 2007 Basic


                              Page 18
Module of Office 2007 Basic

Lesson 2: Microsoft Word 2007 Basic Features
Lesson 1 familiarized you with the the Microsoft Word window. You are now ready to learn how
to create a Word document. This lesson covers typing, using the Backspace key, using the Delete
key, inserting text, bolding, underlining, and italicizing. To begin, open Microsoft Word.

Type, Backspace, and Delete

In Microsoft Word, you create documents by typing them. For example, if you want to create a
report, you open Microsoft Word and then begin typing. You do not have to do anything when
your text reaches the end of a line and you want to move to a new line—Microsoft Word
automatically moves your text to a new line. If you want to start a new paragraph, press Enter.
Microsoft word creates a blank line to indicate the start of a new paragraph. To capitalize, hold
down the Shift key while typing the letter you want to capitalize. If you make a mistake, you can
delete what you typed and then type your correction.

You can use the Backspace key to delete. Each time you press the Backspace key, Microsoft
Word deletes the character that precedes the insertion point. The insertion point is the point at
which your mouse pointer is located. You can also delete text by using the Delete key. First, you
select the text you want to delete; then you press the Delete key.

EXERCISE 1

Type and Backspace

   1. Type                       the                   following                sentence:
      Joe has a very large house.
   2. Delete the word "house." Using either the arrow keys or the mouse, place the cursor
      between the period and the "e" in "house."
   3. Press the Backspace key until the word "house" is deleted.
   4. Type          boat.          The       sentence         should    now         read:
      "Joe has a very large boat."

Delete

Delete the word "very" from the sentence you just typed.

   1. Select the word "very." You can place the cursor before the "v" in the word "very," press
      and hold down the Shift key, and then press the right arrow key until the word "very" is
      highlighted.
   2. Press      the     Delete    key.      The      sentence      should      now       read:
      "Joe has a large boat."

Insert and Overtype

While creating your document, you may find you need to insert text—place new text between
existing text. Suppose, you type the sentence, "Joe has a large boat." After typing it, you decide
you want to change the sentence to "Joe has a large blue boat." With Microsoft Word, inserting
a word, phrase, or even several paragraphs is easy.

Alternatively, you may want to overtype text—replace old text with new text. For example,
suppose you type the sentence, "Joe has a large blue boat." After typing it, you decide you want
to change the sentence to "Joe has a large gray boat." With Microsoft Word, overtyping the
word blue with the word gray is also easy. Before you attempt to insert or overtype, you should
check the mode you are in—Insert or Overtype. You right-click the Status bar and then use the
Customize Status Bar menu to place the Insert/Overtype button on the Status bar. You can then
use the Insert/Overtype button to switch between Insert and Overtype mode. When you are in
Insert mode, you can insert text. When you are in Overtype mode, you can overtype text. By
default, Microsoft Word is in the Insert mode.

EXERCISE 2

                                                                                          Page 19
Module of Office 2007 Basic

Placing the Insert/Overtype button on the Status bar

   1.    Right-click the Status bar. The Customize Status Bar menu appears.
   2.    Click Overtype. The Insert/Overtype button appears on the Status bar.
   3.    If the word Insert appears on the Status bar, you are in Insert mode.
   4.    If the word Overtype appears on the Status bar, click the word Overtype and it will
         change to Insert, thereby changing Word to Insert mode.

Insert

Make sure you are in Insert mode before proceeding. You are going to insert the word "blue"
between the words "large" and "boat."

   1.    Place the cursor after the space between the words "large" and "boat."
   2.    Type the word blue.
   3.    Press the spacebar to add a space.
   4.    The                 sentence                should               now                read:
         "Joe has a large blue boat."

Overtype

You can type over the current text (replace the current text with new text) in the Overtype mode.
Do the following to change to the Overtype mode.

         Click "Insert" on the Status bar. The word Insert changes to Overtype.

Change the word "blue" to "gray."

   1. Place the cursor before the letter "b" in "blue."
   2. Type the word gray.
   3. The                 sentence                  should                now                read:
      "Joe has a large gray boat."

Note: You can overtype text without changing to Overtype mode by selecting the text you want
to overtype and then typing.

Bold, Italicize, and Underline

When creating a document, you may need to emphasize particular words or phrases by bolding,
underlining, or italicizing. Also, certain grammatical constructs require that you bold, underline,
or italicize. You can bold, underline, and italicize when using Word. You also can combine
these features—in other words, you can bold, underline, and italicize a single piece of text.

When you need to perform a task in Microsoft Word, you can usually choose from several
methods. The exercises that follow show you how to bold, underline, or italicize using four
different methods: using the launcher, the Ribbon, the Mini-toolbar/context menu, and the
keyboard.

EXERCISE 3

Type the following exactly as shown. Remember, pressing the Enter key starts a new paragraph.
Press the Enter key at the end of each of the following lines to start a new paragraph.

Launcher: Bold Italicize Underline these words. All three Regular

Ribbon: Bold Italicize Underline these words. All three Regular

Mini Toolbar: Bold Italicize Regular

Keys: Bold Italicize Underline these words. All three Regular


                                                                                           Page 20
Module of Office 2007 Basic


                    Your screen should look similar to the one shown here.

Bold with the Dialog Box Launcher


   1. On the line that begins with Launcher, select the word "Bold." You can place the cursor
      before the letter "B" in "Bold." Press the Shift key; then press the right arrow key until
      the entire word is highlighted.
   2. Choose the Home tab.
   3. Click the dialog box launcher in the Font group. The Font dialog box appears.


                                                                                        Page 21
Module of Office 2007 Basic


   4. Click          Bold           in          the          Font         Style         box.
      Note: You can see the effect of your action in the Preview window. To remove the bold,
      click Regular.
   5. Click OK to close the dialog box.
   6. Click anywhere in the text area to remove the highlighting. You have bolded the word
      bold.

Alternate Method—Bold with the Ribbon


   1. On the line that begins with "Ribbon," select the word "Bold." You can place the cursor
      before the letter "B" in "Bold." Press the Shift key; then press the right arrow key until
      the entire word is highlighted.
   2. Choose the Home tab.
   3. Click the Bold button          in the Font group. You have bolded the word bold.
      Note: To remove the bold, you can select the text and then click the Bold button
      again.
   4. Click anywhere in the text area to remove the highlighting.

Alternate Method - Bold with the Mini Toolbar


                                                                                        Page 22
Module of Office 2007 Basic


   1. On the line that begins with "Mini Toolbar," select the word "Bold." You can place the
      cursor before the letter "B" in "Bold."Press the Shift key; then press the right arrow key
      until the entire word is highlighted.
   2. Right-click. The Mini toolbar appears.
   3. Click the Bold button      . You have bolded the word bold.

Alternate Method—Bold with Keys

   1. On the line that begins with "Keys," select the word "Bold." You can place the cursor
      before the letter "B" in "Bold." Press the Shift key; then press the right arrow key until
      the entire word is highlighted.
   2. Press      Ctrl+b     (hold     down     the    Ctrl     key     while     pressing    b).
      Note: To remove the Bold, press Ctrl+b again. You can also remove formatting by
      pressing Ctrl+spacebar.
   3. Click anywhere in the text area to remove the highlighting.

Italicize with the Dialog Box Launcher


   1. On the line that begins with Launcher, select the word "Italicize." You can place the
      cursor before the letter "I" in "Italicize." Press the Shift key; then press the right arrow
      key until the entire word is highlighted.
   2. Choose the Home tab.
   3. Click the dialog box launcher in the Font group. The Font dialog box appears.


                                                                                          Page 23
Module of Office 2007 Basic


   4. Click            Italic         in           the       Font         Style           box.
      Note: You can see the effect of your selection in the Preview window. To remove the
      italics, click Regular in the Font Style box.
   5. Click OK to close the Font dialog box.
   6. Click anywhere in the text area to remove the highlighting. You have italicized the word
      Italicize.

Alternate Method—Italicize with the Ribbon


   1. On the line that begins with "Ribbon," select the word "Italicize." You can place the
      cursor before the letter "I" in "Italicize." Press the Shift key; then press the right arrow
      key until the entire word is highlighted.
   2. Choose the Home tab.
   3. Click the Italic button        on the Ribbon. You have italicized the word Italicize.
      Note: To remove the italics, select the text and click the Italicize button   again.
   4. Click anywhere in the text area to remove the highlighting.

Alternate Method—Italicize with the Mini Toolbar


                                                                                          Page 24
Module of Office 2007 Basic


   1. On the line that begins with "Mini Toolbar," select the word "Italicize." You can place
      the cursor before the letter "I" in "Italicize." Press the Shift key; then press the right arrow
      key until the entire word is highlighted.
   2. Right-click. The Mini toolbar appears.
   3. Click the Italic button    . You have italicized the word Italicize.

Alternate Method—Italicize with Keys

   1. On the line that begins with "Keys," select the word "Italicize." You can place the cursor
      before the letter "I" in "Italicize." Press the Shift key; then press the right arrow key until
      the entire word is highlighted.
   2. Press      Ctrl+i     (hold       down      the     Ctrl     key     while      pressing    i).
      Note: To remove italics, press Ctrl+i again. You can also remove formatting by pressing
      Ctrl+spacebar.
   3. Click anywhere in the text area to remove the highlighting.You have italicized the word
      Italicize.

Underline with the Dialog Box Launcher

You can underline when using Word. Word provides you with many types of underlines from
which to choose.The following are some of the underlines that are available if you use the dialog
box launcher:


The following illustrates underlining with the dialog box launcher:


                                                                                             Page 25
Module of Office 2007 Basic


   1. On the line that begins with "Launcher," select the words "Underline these words."
   2. Choose the Home tab.
   3. Click the dialog box launcher in the Font group. The Font dialog box appears.


   4. In the Underline Style box, click the down arrow to open the pull-down menu.
   5. Click      the       type       of       underline      you       wish      to      use.
      Note: To remove an underline, you select None from the pull-down menu.
   6. Click OK to close the dialog box. The underline you selected appears under the words.
   7. Click anywhere in the text area to remove the highlighting.

Alternate Method—Underline with the Ribbon


                                                                                       Page 26
Module of Office 2007 Basic


   1. On the line that begins with "Ribbon," select the words "Underline these words."
   2. Choose the Home tab.
   3. Click the Underline button        in the Font group . Alternatively, you can press the down
        arrow   next to the underline button       and click to choose the type of underline you
        want.
      Note: To remove the underlining, click the Underline button         again.
   4. Click anywhere in the text area to remove the highlighting.

Alternate Method—Underline with Keys

   1. On the line that begins with "Keys," select the words "Underline these words."
   2. Press     Ctrl+u     (hold     down      the     Ctrl   key     while     pressing      u).
      Note: To remove the underlining, press Ctrl+u again.
   3. Click anywhere in the text area to remove the highlighting.

All Three with the Dialog Box Launcher

   1. On the line that begins with "Launcher," select the words "All three."
   2. Choose the Home tab.
   3. Click the dialog box launcher in the Font group. The Font dialog box appears.
   4. In        the         Font        Style         box,       click       Bold       Italic.
      Note: You can see the effect of your selection in the preview window. To turn off the
      Bold Italic, click Regular.
   5. In the Underline box, click to open the pull-down menu. Click the type of underline you
      want                                         to                                     use.
      Note: To remove an underline, select None from the pull-down menu.
   6. Click OK to close the dialog box.
   7. Click anywhere in the text area to remove the highlighting.

Alternate Method—All Three with the Ribbon

   1.   On the line that begins with "Ribbon," select the words "All three."
   2.   Choose the Home tab.
   3.   Click the Bold button     in the Font group.
   4.   Click the Italic button   in the Font group.
   5. Click the Underline button      in the Font group.
   6. Click anywhere in the text area to remove the highlighting.

Alternate Method—All Three with Keys

   1. On the line that begins with "Keys," select the words "All three."
   2. Press Ctrl+b (bold).
   3. Press Ctrl+i (italicize).
   4. Press                                  Ctrl+u                               (underline).
      Note: You can remove formatting by highlighting the text and pressing Ctrl+spacebar.
   5. Click anywhere in the text area to remove the highlighting.
                                                                                         Page 27
Module of Office 2007 Basic


Save a File and Close Word

You must save your documents if you wish to recall them later. You can use the Save option on
the Microsoft Office menu, to save a document. You can also save a document by typing Ctrl+s.
The first time you save a document, the Save As dialog box appears. Use the Save As dialog
box to locate the folder in which you want to save your document and to give your document a
name. After you have saved your document at least once, you can save any changes you make to
your document simply by clicking the Save after you click the Microsoft Office button.

The following exercise shows you how to save the file you just created and close Word. You will
name your file Lesson Two.

EXERCISE 4

Save a File—Windows Vista:


   1. Click the Microsoft Office button. A menu appears.
   2. Click Save. The Save As dialog box appears, if you are saving your document for the first
      time.


   3.   Use the Address bar to locate the folder in which you want to save your file.
   4.   Name your file by typing Lesson Two.docx in the File Name box.
   5.   Click Save.
   6.   Click the Microsoft Office button. A menu appears.
   7.   Click Exit Word, which is located in the bottom-right corner of the window. Word closes.

Save a File—Windows XP

                                                                                        Page 28
Module of Office 2007 Basic

   1. Click the Microsoft Office button. A menu appears.
   2. Click Save. The Save As dialog box appears if you are saving your document for the first
      time.
   3. Specify the correct folder in the Save In box.
   4. Name your document by typing Lesson Two in the File Name box.
   5. Click Save.
   6. Click the Microsoft Office button. A menu appears.
   7. Click Exit Word, which is located in the bottom-right corner of the window. Word closes.

Every time you save your document, you overwrite the previous version of your document. For
example, you create a document and save it. Later you delete several passages from the
document and then save your changes. The passages from the first draft of the document no
longer exist. If you want to save both the original draft of your document and the revised
document, you must save the second draft of the document using a different name. To save the
document using a different name, click the Microsoft Office button. A menu appears. Click Save
As. The Save As dialog box appears. Use the File Name box to give your document a new name.


                                                                                      Page 29
Module of Office 2007 Basic

Lesson 3: More Basic Features
The features in Word 2007 can make your work easier, make your documents more attractive,
and/or enable you to work more efficiently. This Microsoft Word lesson teaches you how to
open a file, cut, copy, paste, use AutoText, use spell check, use Find and Replace, and change
fonts. All of these features either make your work easier or make your document more attractive.

Open a File

When you do not have time to complete your work or when you finish your work, you can save
and close your file. After saving a file, you can later open it to revise or finish it. You learned
how to save a file in Lesson 2. In the exercise that follows, you learn how to open the file you
saved.

EXERCISE 1

Open a File with Windows Vista

If you are using Windows Vista:

   1.   Open Word 2007.
   2.   Click the Microsoft Office button. A menu appears.
   3.   Click Open. The Open dialog box appears.
   4.   Locate the folder in which you saved the file. The file is named Lesson Two.docx.
   5.   Click Lesson Two.docx.
   6.   Click Open. The file you created during the previous lesson appears.

Open a File with Windows XP

If you are using Windows XP:

   1. Open Word 2007.
   2. Click the Microsoft Office button. A menu appears.
   3. Click Open. The Open dialog box appears.
   4. Use the Look In field to move to the folder in which you saved the file. The file is named
      Lesson Two.docx.
   5. Click Lesson Two.docx.
   6. Click Open. The file you created during the previous lesson appears.

Alternate Method—Opening a File with Keys

   1.   Open Word 2007.
   2.   Press Ctrl+o.
   3.   Locate the folder in which you saved your file. The file is named Lesson Two.docx
   4.   Click Lesson Two.docx.
   5.   Click Open. The file you created during the previous lesson appears.

Cut and Paste

You can use Word's Cut feature to remove information from a document. The you can use the
Paste feature to place the information you cut anywhere in the same or another document. In
other words, you can move information from one place in a document to another place in the
same or different document by using the Cut and Paste features. The Office Clipboard is a
storage area. When you cut, Word stores the data you cut on the Clipboard. You can paste the
information that is stored on the Clipboard as often as you like.


                                                                                           Page 30
Module of Office 2007 Basic

EXERCISE 2

Cut with the Ribbon


   1. Type the following:
      I want to move. I am content where I am.
   2. Select "I want to move. "
   3. Choose the Home tab.
   4. Click the Cut button in the Clipboard group. Word cuts the text you selected and
      places it on the Clipboard. Your text should now read:
      "I am content where I am."

Paste with the Ribbon


   1. Place the cursor after the period in the sentence "I am content where I am."
   2. Press the spacebar to leave a space.
   3. Choose the Home tab.
   4. Click the Paste button   in the Clipboard group. Word pastes the text on the Clipboard.
      Your text should now read:
      "I am content where I am. I want to move."


                                                                                      Page 31
Module of Office 2007 Basic

Alternate Method—Cut with a Context Menu


   1. Type the following:
      I want to move. I am content where I am.
   2. Select "I want to move. "
   3. Right-click. The Mini toolbar and a context menu appear.
   4. Click Cut on the menu. Your text should now read:
      "I am content where I am."

Alternate Method—Paste with a Context Menu


   1. Place the cursor after the period in the sentence
      "I am content where I am."
   2. Press the spacebar to leave a space.
   3. Right-click. A Mini toolbar and a context menu appear.
   4. Click Paste. Your text should now read:
      "I am content where I am. I want to move."

Alternate Method—Cut with Keys

   1. Type the following:
      I want to move. I am content where I am.
   2. Select "I want to move."
   3. Press Ctrl+x.
   4. Your text should now read:
      " I am content where I am."
                                                                 Page 32
Module of Office 2007 Basic

Alternate Method—Paste with Keys

   1.   Place the cursor after the period in the sentence: "I am content where I am."
   2.   Press the spacebar to leave a space.
   3.   Press Ctrl+v.
   4.   Your text should now read:
        "I am content where I am. I want to move."

Copy and Paste

In Microsoft Word, you can copy information from one area of a document and place the
information you copied anywhere in the same or another document. In other words, after you
type information into a document, if you want to place the same information somewhere else,
you do not have to retype the information. You simple copy it and then paste it in the new
location. As with cut data, Word stores copied data on the Clipboard.

EXERCISE 3

Copy with the Ribbon


   1. Type the following:
      You will want to copy me. One of me is all you need.
   2. Select "You will want to copy me."
   3. Choose the Home tab.
   4. Click the Copy button     in the Clipboard group. Word copies the data you selected to
      the Clipboard.

Paste with the Ribbon


   1. Place the cursor after the period in the sentence: "One of me is all you need."
   2. Press the spacebar to leave a space.
   3. Choose the Home tab.

                                                                                        Page 33
Module of Office 2007 Basic

   4. Click the Paste    button in the Clipboard group. Word places the data you copied at the
      insertion point. Your text should now read: "You will want to copy me. One of me is all
      you need. You will want to copy me."

Alternate Method—Copy with a Context Menu


   1. Type the following:
      You will want to copy me. One of me is all you need.
   2. Select "You will want to copy me."
   3. Right-click. A Mini toolbar and a context menu appear.
   4. Click Copy. Word places the data you copied at the insertion point. Your text should now
      read: "You will want to copy me. One of me is all you need. You will want to copy me."

Alternate Method—Paste with a Context Menu


   1.   Place the cursor after the period in the sentence: "One of me is all you need."
   2.   Press the spacebar to leave a space.
   3.   Right-click. A context menu appears.
   4.   Click Paste. Word pastes the information on the Clipboard into the document.

Alternate Method—Copy with Keys

   1. Type the following:
      You will want to copy me. One of me is all you need.
   2. Select "You will want to copy me. "
   3. Press Ctrl+c. Word copies the information you selected to the Clipboard.

Alternate Method—Paste with Keys

   1.   Place the cursor after the period in the sentence "One of me is all you need."
   2.   Press the spacebar to leave a space.
   3.   Press Ctrl+v.
   4.   Your text should now read:
        "You will want to copy me. One of me is all you need. You will want to copy me."

Use the Clipboard

As you cut or copy, Word can store the information you have cut or copied on the Clipboard in a
hierarchy. Then each time you cut or copy, the data you just cut or copied moves to the top of the
Clipboard hierarchy and the data previously at the top moves down one level. When you choose
Paste, the item at the top of the hierarchy is the item Word pastes into your document. The
Clipboard can store up to 24 items. You can paste any item on the Clipboard into your document
by placing your cursor at the insertion point, displaying the Clipboard pane, and then clicking the
item.


                                                                                           Page 34
Module of Office 2007 Basic

The Clipboard pane includes an Options button. You can click the Options button to set the
Clipboard options described in the following table.

    Option                                   Description
    Show Office Clipboard Automatically Shows the Clipboard automatically when you
                                        copy items.
    Show Office Clipboard When Ctrl+c        Shows the Clipboard when you press Ctrl+c
    Pressed Twice                            twice.
    Collect Without Showing Office           Copies to the Clipboard without displaying the
    Clipboard                                Clipboard pane.
    Show Office Clipboard Icon on            Displays the Clipboard icon on your system
    Taskbar                                  taskbar.
    Show Status Near Taskbar When            Displays the number of items copied on the
    Copying                                  taskbar when copying.

EXERCISE 4

Use the Clipboard


   1.   Place the cursor at the point at which you want to insert your text.
   2.   Choose the Home tab.
   3.   Click the Clipboard dialog box launcher to open the Clipboard.
   4.   Click the item on the clipboard you want to insert into your document. Word pastes the
        Clipboard item into your document at the insertion point.

Create AutoText

Cut and Copy both store information on the Clipboard. Information you store on the Clipboard is
eventually lost. If you want to store information permanently for reuse, use AutoText. AutoText
permanently stores information for future use.

EXERCISE 5

Create AutoText


                                                                                          Page 35
Module of Office 2007 Basic


   1. Type the following:
      AutoText information is stored permanently.
   2. Select "AutoText information is stored permanently."
   3. Choose the Insert tab.
   4. Click Quick Parts in the Text group. A menu appears.
   5. Click Save Selection to Quick Part Gallery. The Create New Building Block dialog box
      appears.


   6.  Microsoft Word suggests a name. Change the name by typing AT in the Name field.
   7.  Click OK. The dialog box closes.
   8.  Click anywhere in the text area to remove the highlighting.
   9.  Place the cursor between the period in the sentence you just typed and the paragraph
       marker (¶).
   10. Press the spacebar to leave a blank space.
   11. Type AT.
   12. Press F3. Your text should now read:
       "AutoText information is stored permanently. AutoText information is stored
       permanently."

Note: Whenever you need the text, simply type the name (AT) and then press F3.

Use Spell Check

Word checks your spelling and grammar as you type. Spelling errors display with a red wavy
line under the word. Grammar errors display with a green wavy line under the error. In Word
2007, you can use the Review tab's Spelling & Grammar button to initiate a spell and grammar
check of your document.


                                                                                        Page 36
Module of Office 2007 Basic


EXERCISE 6

Use Spell Check


   1. Type the following exactly as shown. Include all errors.
      Open thr door for Mayrala. She is a teacher from the town of Ridgemont.
   2. Select: "Open thr door for Mayrala. She is a teacher from the town of Ridgemont."
   3. Choose the Review tab.
   4. Click the Spelling & Grammar button. The Spelling and Grammar dialog box appears.


   6. "The" is misspelled, so it is highlighted on the screen and noted in the Not in Dictionary
       box. Word suggests correct spellings. These suggestions are found in the Suggestions
       box.
   7. Click "the" in the Suggestions box.
   8. Click Change.
       Note: If the word is misspelled in several places, click Change All to correct all
       misspellings.
   9. The name "Mayrala" is not in the dictionary, but it is correct. Click Ignore Once to leave
       "Mayrala" in the document with its current spelling.
       Note: If a word appears in several places in the document, click Ignore All so you are not
       prompted to correct the spelling for each occurrence.
   10. "Ridgemont" is not found in the dictionary. If you frequently use a word not found in the
       dictionary, you might want to add that word to the dictionary by clicking the Add to
       Dictionary button. Word will then recognize the word the next time it appears. Click Add
       to Dictionary.
   11. The following should appear on your screen: "Word finished checking the selection. Do
       you want to continue checking the remainder of the document?"
   12. Click No. If you wanted Word to spell-check the entire document, you would have
       clicked Yes.


                                                                                         Page 37
Module of Office 2007 Basic

Note: You can also press F7 to initiate a spelling and grammar check. If you don't have anything
selected, Word checks the entire document.

Find and Replace

If you need to find a particular word or phrase in your document, you can use the Find command.
This command is especially useful when you are working with large files. If you want to search
the entire document, simply execute the Find command. If you want to limit your search to a
selected area, select that area and then execute the Find command.

After you find the word or phrase you are searching for, you can replace it with new text by
executing the Replace command.

EXERCISE 7

Use Find with the Ribbon


   1. Type the following:
      Monica is from Easton. She lives on the east side of town. Her daughter attends
      Eastern High School.
   2. Select: "Monica is from Easton. She lives on the east side of town. Her daughter attends
      Eastern High School."
   3. Choose the Home tab.
   4. Click Find in the Editing group. A menu appears.

   5. Click the Find option on the menu. The Find and Replace dialog box appears.


   6. Type east in the Find What field.
   7. Click Find Next.
      Note that the "East" in Easton is highlighted.
   8. Click Find Next again.
      Note that "east" is highlighted.
   9. Click Find Next again.
      Note that the "East" in Eastern is highlighted.


                                                                                          Page 38
Module of Office 2007 Basic

   10. Click Find Next. The following message should appear: "Word has finished searching the
       selection. Do you want to search the remainder of the document?"
   11. Click No.
   12. Click Cancel.

Alternate Method—Find with Keys

   1. Select: "Monica is from Easton. She lives on the east side of town. Her daughter attends
      Eastern High School."
   2. Press Ctrl+f.
   3. Follow steps 6 through 12 in the preceding section.

Use Replace with the Ribbon


   1. Select "Monica is from Easton. She lives on the east side of town. Her daughter attends
      Eastern High School."
   2. Choose the Home tab.
   3. Click Replace in the Editing group. The Find and Replace dialog box appears.


   4.  Type east in the Find What box.
   5.  Type west in the Replace With box.
   6.  Click Find Next. The East in Easton is highlighted.
   7.  Click Replace. Word replaces the "East" in "Easton" with "West" and then highlights the
       word "east."
   8. Click Replace. Word replaces the word "east" with "west" and then highlights the word
       "Eastern."
   9. Click Close. Do not replace the "East" in "Eastern" with "West."
   10. Your text should now read,
       "Monica is from Weston. She lives on the west side of town. Her daughter attends
       Eastern High School."

Alternate Method—Replace with Keys

   1. Select "Monica is from Easton. She lives on the west side of town. Her daughter attends
      Western High School."
   2. Press Ctrl+h.
   3. Follow steps 4 through 11 in the preceding section.
                                                                                        Page 39
Module of Office 2007 Basic

Change the Font Size

A font is a set of characters (text) represented in a single typeface. Each character within a font is
created by using the same basic style. In Microsoft Word, you can change the size of your font.
The following exercise illustrates changing the font size.

EXERCISE 8

Change the Font Size


   1. Type the following:
      I can be any size you want me to be.
   2. Select "I can be any size you want me to be."
   3. Choose the Home tab.
   4. In the Font group, click the down arrow next to the Font Size box. A menu of font sizes
      appears.
   5. Move your cursor over the menu of font sizes. As you do, Word 2007 provides a live
      preview of the effect of applying each font size.
   6. Click 36 to select it as your font size.

Note: If you know the font size you want, you can type it in the Font Size field.

Alternate Method—Change the Font Size with Grow Font and Shrink Font

You can also change the size of your font by clicking the Grow Font and Shrink Font buttons.
Selecting text and then clicking the Grow Font button makes your font larger. Selecting text and
then clicking the Shrink Font button makes your font smaller.


                                                                                             Page 40
Module of Office 2007 Basic

   1. Type the following:
      Grow Shrink
   2. Select "Grow"
   3. Choose the Home tab.
   4. Click the Grow Font button       several times. You font becomes larger.
   5. Select Shrink.
   6. Click the Shrink Font button      several times. Your font becomes smaller.

Change the Font

In Microsoft Word, you can change the font (the "family" of type you use for your text). This
feature is illustrated in the following exercise:

EXERCISE 9

Change the Font with the Ribbon


   1. Type the following:
      Changing fonts
   2. Select "Changing fonts."
   3. Choose the Home tab.
   4. Click the down arrow next to the Font field. A menu of fonts appears.
   5. Move the cursor over the list of fonts. Word 2007 provides a live preview of what the
      font will look like if you select it.
   6. Click the font name to select the font you want.

Alternate Method—Change the Font with the Mini Toolbar


   1. Select "Changing fonts."
   2. Right-click. The Mini toolbar and a menu appears.

                                                                                         Page 41
Module of Office 2007 Basic

   3. Move to the Mini toolbar.
   4. Click the down arrow next to the Font field. A menu of fonts appears.
   5. Click the name of the font you want.

Save Your File

This is the end of Lesson 3. You can save your file and close Word. See Lesson 2 to learn how to
save and close.


                                                                                        Page 42
Module of Office 2007 Basic

Lesson 4: Formatting Paragraphs and Working with Styles
When you type information into Microsoft Word, each time you press the Enter key Word
creates a new paragraph. You can format paragraphs. For example, you can indent the first line
of a paragraph, you can set the amount of space that separates paragraphs, and you can align a
paragraph left, right, center, or flush with both margins. Styles are a set of formats you can
quickly apply to a paragraph. For example, by applying a style, you can set the font, set the font
size, and align a paragraph all at once. In this lesson, you will learn about the various formats
you can apply to a paragraph and about styles.

When you are formatting a paragraph, you do not need to select the entire paragraph. Placing the
cursor anywhere in the paragraph enables you to format it. After you format a paragraph,
pressing the Enter key creates a new paragraph in the same format.

Open a Blank Document

To begin a new Word project, you start by opening a new document. To begin this lesson, open a
blank document in Microsoft Word.

EXERCISE 1

Open a Blank Document


   1. Open Word 2007.
   2. Click the Microsoft Office button. A menu appears.
   3. Click New. The New Document dialog box appears.


   4. Click Blank Document.
   5. Click Create. A new blank document opens.

                                                                                          Page 43
Module of Office 2007 Basic

Add Sample Text

This lesson uses sample text provided by Microsoft for training and demonstration purposes.
You can type the text; however, there is a quicker way. You can use the rand function.

Functions are used to obtain information. You tell the function what you want and the function
returns that information to you. By default, in Word, when you type the rand function, Word
returns three paragraphs. When working with functions, you use arguments to be specific about
what you want the function to return. There are two arguments you can use with the rand
function. The first one tells Word how many paragraphs you want, and the second one tells Word
how many sentences you want in a paragraph. You place arguments between the parentheses and
you separate them with a comma. For example, if you type =rand() and then press Enter, word
returns three paragraphs. To tell Word you want two paragraphs with three sentences in each
paragraph, you type =rand(2,3).

EXERCISE 2

Add Sample Text

   1. Type =rand().
   2. Press the Enter key. The following text appears:

    On the Insert tab, the galleries include items that are designed to coordinate with the overall look
    of your document. You can use these galleries to insert tables, headers, footers, lists, cover pages,
    and other document building blocks. When you create pictures, charts, or diagrams, they also
    coordinate with your current document look. 

    You can easily change the formatting of selected text in the document text by choosing a look for
    the selected text from the Quick Styles gallery on the Home tab. You can also format text directly
    by using the other controls on the Home tab. Most controls offer a choice of using the look from
    the current theme or using a format that you specify directly. 

    To change the overall look of your document, choose new Theme elements on the Page Layout tab.
    To change the looks available in the Quick Style gallery, use the Change Current Quick Style Set
    command. Both the Themes gallery and the Quick Styles gallery provide reset commands so that
    you can always restore the look of your document to the original contained in your current
    template. 


Add Space Before or After Paragraphs

When creating a document, space is often used to clearly identify where each paragraph begins
and ends. By default, Word may place slightly more space between paragraphs than it does
between lines in a paragraph. You can increase or decrease the amount of space that appears
before and after paragraphs by entering amounts in the Before and After fields in the Paragraph
section of the Page Layout tab. Use the up arrows next to the Before and After fields to increase
the amount of space before or after each paragraph; use the down arrows to decrease the amount
of space before or after each paragraph. The following illustrates:

EXERCISE 3

Add Space Before or After Paragraphs


                                                                                                       Page 44
Module of Office 2007 Basic


   1. Place your cursor anywhere in the second paragraph of the sample text you created in
      Exercise 2.
   2. Choose the Page Layout tab. The default spacing appears in the Spacing Before field.
   3. Click the up arrow next to the Spacing Before field to increase the space before the
      paragraph.
   4. Click the up arrow next to the Spacing After field to increase the amount of space after
      the paragraph.

Note: You can click the down arrows next to the Spacing Before and the Spacing After fields to
decrease the amount of space before or after a paragraph. You can also type the amount of space
you want to use directly into the fields. Space is measured in points. There are 72 points to an
inch.

Change Line Spacing

Line spacing sets the amount of space between lines within a paragraph. The spacing for each
line is set to accommodate the largest font on that line. If the lines include smaller fonts, there
will appear to be extra space between lines where the smaller fonts are located. At 1.5, the line
spacing is set to one-and-a-half times the single-space amount. At 2.0, the line spacing is set to
two times the single-space amount (double space).

EXERCISE 4

Change Line Spacing


   1. Place your cursor anywhere in the first paragraph of the sample text you created in
      Exercise 2.
   2. Choose the Home tab.
   3. Click the Line Spacing button       in the Paragraph group. A menu of options appears.
   4. Click 2.0 to double-space the first paragraph.

Create a First-Line Indent


                                                                                           Page 45
Module of Office 2007 Basic

Some people and organizations delineate the start of a new paragraph by indenting the first line.
If you want to indent the first line of your paragraphs, you can use the Paragraph dialog box to
set the amount by which you want to indent. In the Special Field of the Paragraph dialog box,
you tell Word you want to indent the first line by choosing First Line from the menu options. In
the By field, you tell Word the amount, in inches by which you want to indent.

    EXAMPLE: First-line Indent

            On the Insert tab, the galleries include items that are designed to coordinate
    with the overall look of your document. You can use these galleries to insert tables,
    headers, footers, lists, cover pages, and other document building blocks. When you
    create pictures, charts, or diagrams, they also coordinate with your current document
    look.

EXERCISE 5

Create a First-line Indent


   1. Place your cursor anywhere within the first paragraph of the sample text you created in
      Exercise 2.
   2. Choose the Home tab.
   3. In the Paragraphs group, click the launcher. The Paragraph dialog box appears.


   4. Choose the Indents and Spacing tab.
   5. Click to open the drop-down menu on the Special field.
   6. Click First Line.

                                                                                             Page 46
Module of Office 2007 Basic

   7. Enter 0.5" in the By field.
   8. Click OK. The first line of your paragraph is now indented half an inch.

Special Note: To remove the first line indent:

   1.   Place the cursor anywhere in the paragraph.
   2.   Choose the Home tab.
   3.   In the Paragraphs group, click the launcher. The Paragraph dialog box opens.
   4.   Choose the Indents and Spacing tab.
   5.   Click the down arrow next to the Special field and then click None.
   6.   Click OK.


Indent Paragraphs

Indentation allows you to indent your paragraph from the left and/or right margin. You may find
this necessary when you are quoting a large block of text. The following exercise shows you how
to indent a paragraph 1 inch from each side.

    EXAMPLE: Indentation

    On the Insert tab, the galleries include items that are designed to coordinate with the
    overall look of your document. You can use these galleries to insert tables, headers,
    footers, lists, cover pages, and other document building blocks. When you create
    pictures, charts, or diagrams, they also coordinate with your current document look.

                   You can easily change the formatting of selected text in
                   the document text by choosing a look for the selected text
                   from the Quick Styles gallery on the Home tab. You can
                   also format text directly by using the other controls on the
                   Home tab. Most controls offer a choice of using the look
                   from the current theme or using a format that you specify
                   directly.


EXERCISE 6

Indent Paragraphs


                                                                                              Page 47
Module of Office 2007 Basic


   1. Place your cursor anywhere in the second paragraph of the sample text you created in
      Exercise 2.
   2. Choose the Page Layout tab.
   3. Type 1" in the Indent Left field or use the up or down arrows to set the field value to 1".
   4. Type 1" in the Indent Right field or use the up or down arrows to set the field value to 1".
      Your paragraph is now indented one inch from both the left and right margins, as in the
      example.

Align Paragraphs

Microsoft Word gives you a choice of several types of alignments. Left-aligned text is flush with
the left margin of your document and is the default setting. Right-aligned text is flush with the
right margin of your document, centered text is centered between the left and right margins, and
Justified text is flush with both the left and right margins.


     EXAMPLE: Left-Aligned

     Sample Paragraph

     On the Insert tab, the galleries include items that are designed to coordinate with the
     overall look of your document. You can use these galleries to insert tables, headers,
     footers, lists, cover pages, and other document building blocks. When you create
     pictures, charts, or diagrams, they also coordinate with your current document look.

     EXAMPLE: Right-aligned

                                                                           Sample Paragraph

       On the Insert tab, the galleries include items that are designed to coordinate with the
       overall look of your document. You can use these galleries to insert tables, headers,
          footers, lists, cover pages, and other document building blocks. When you create
       pictures, charts, or diagrams, they also coordinate with your current document look.

     EXAMPLE: Centered

                                        Sample Paragraph


                                                                                               Page 48
Module of Office 2007 Basic


        On the Insert tab, the galleries include items that are designed to coordinate with the
        overall look of your document. You can use these galleries to insert tables, headers,
         footers, lists, cover pages, and other document building blocks. When you create
        pictures, charts, or diagrams, they also coordinate with your current document look.

     EXAMPLE: Justified

     Sample Paragraph

     On the Insert tab, the galleries include items that are designed to coordinate with the
     overall look of your document. You can use these galleries to insert tables, headers,
     footers, lists, cover pages, and other document building blocks. When you create
     pictures, charts, or diagrams, they also coordinate with your current document look.


The following exercises demonstrate how to justify text.

EXERCISE 7

Create the Paragraphs

   1.     Type Sample Paragraph.
   2.     Press Enter.
   3.     Type =rand(1) to create a paragraph.
   4.     Press Enter.

Right-align


   1. Select the paragraphs you created.
   2. Choose the Home tab.
   3. Click the Align-right button    in the Paragraph group. Word right-aligns your
      paragraphs.

Left-align

   1. Select the paragraphs you created.
   2. Choose the Home tab.
   3. Click the Align-left button   in the Paragraph group. Word left-aligns your paragraph.

Center

   1. Selected the paragraphs you created.
   2. Choose the Home tab.
   3. Click the Center button   in the Paragraph group. Word centers your paragraph.

Justify

   1. Select the paragraphs you created.

                                                                                             Page 49
Module of Office 2007 Basic

   2. Choose the Home tab.
   3. Click the Justify button     in the Paragraph group. Word justifies your paragraph.

Alternate Method—Right-Justify with Keys

   1. Select the paragraphs you created.
   2. Press Ctrl+r. The paragraph is now right-aligned.

Alternate Method—Left-Justify with Keys

   1. Select the paragraphs you created.
   2. Press Ctrl+l. The paragraph is now left-aligned.

Alternate Method—Center with Keys

   1. Select the paragraphs you created.
   2. Press Ctrl+e. The paragraph is now centered.

Alternate Method—Justify with Keys

   1. Select the paragraphs you created.
   2. Press Ctrl+j. The paragraph is now justified.

Create a Hanging Indent

The hanging indent feature indents each line except the first line by the amount specified in the
By field, as shown in the example.

    EXAMPLE:Hanging Indent

    Hanging Indent:                      The hanging indent feature indents the first line of
                                         the paragraph from the margin by the amount
                                         specified in the Left field. The amount in the Left
                                         field plus the amount specified in the By field
                                         indent all subsequent lines.


EXERCISE 8

Create a Hanging Indent


                                                                                            Page 50
Module of Office 2007 Basic

   1. Type                                      the                                  following:
      Hanging Indent: The hanging indent feature indents the first line by the amount specified
      in the Left field. Subsequent lines are indented by the amount specified in the Left field
      plus the amount specified in the By field.
   2. Select the paragraph you just typed.
   3. Choose the Home tab.
   4. Click the launcher in the Paragraph group. The Paragraph dialog box appears.


   5. Choose the Indents and Spacing tab.
   6. In the Special field, click to open the pull-down menu.
   7. Click Hanging.
   8. In the By box, type 2".
   9. Click OK.
   10. Place the cursor after the colon following "Hanging Indent."
   11. Press the Tab key. Notice that the indentation changes.

Choose a Style Set

When working with Word, you can use styles to quickly format your documents. A style is a set
of formats consisting of such things as fonts, font colors, font sizes, and paragraph formats.
Word 2007 supplies you with predesigned style sets that contain styles for titles, subtitles,
quotes, headings, lists and more. The sections that follow all show you how to work with styles.
The exercises are based on a file you must download. Right click here to download the file. Click
Save Target As from the menu that appears, and save the linked file to a directory on your
computer. Then open the file.

EXERCISE 9

Choose a Style Set


                                                                                         Page 51
Module of Office 2007 Basic


   1. Choose the Home tab.
   2. Click Change Styles in the Styles group. A menu appears.
   3. Click Style Set. A menu appears. You can choose from any of the styles listed on the
      menu.
   4. Click Simple. Word 2007 reformats all of the paragraphs into the Simple style by
      applying the Normal format to each paragraph.

Apply a Style

You can see of all the styles available to you in the style set by clicking the launcher in the Styles
group and opening the Styles pane. You can leave the Styles pane open and available for use by
docking it. To dock the Styles pane, click the top of the pane and drag it to the left or right edge
of the Word window.

You do not need to select an entire paragraph to apply a style. If the cursor is anywhere in the
paragraph, when you click on the style, Word formats the entire paragraph.

EXERCISE 10

Apply the Title Style


   1. Choose the Home tab.
   2. Click the launcher in the Styles Group. The Styles pane appears. You can drag it to the
      side of the Word window to dock it. To close the Styles pane, click the Close button in
      the upper right corner of the pane .
   3. Click anywhere in the paragraph "Single-Parent Family—Career Help."
                                                                                             Page 52
Module of Office 2007 Basic

   4. Click Title in the Styles pane. Word 2007 applies the Title style to the paragraph.

Headings and subheadings mark major topics within your document. With Word 2007, you can
easily format the headings and subheadings in your document.

Apply Headings

   1. Click anywhere in the paragraph "The Nature of Single Parenthood."
   2. In the Style box, click Heading 1. Word reformats the paragraph.
   3. Repeat steps 1 and 2 in the following paragraphs:

       Types of Single Parents
       Career Development Needs of Single Parents
       Career Development Programs

Apply Subheadings

   1. Click anywhere in the paragraph "Displaced Homemakers"
   2. In the Style box, click Heading 2. Word reformats the paragraph.
   3. Repeat steps 1 and 2 for the following paragraphs:

       Displaced Homemakers
       Adolescent Mothers
       Single Fathers
       High School Dropout Prevention
       Established Education Sites

Alternate Method -- Apply Styles with the Ribbon

You can also choose styles by selecting the option you want from the Styles group on the
Ribbon. First you must place your cursor in the paragraph to which you want to apply the style.
Then you click the More button in the Styles group to see all of the styles in the currently
selected set. As you roll your cursor over each of the styles listed, Word 2007 provides you with
a live preview of how the style will appear when applied.

   1. Select the paragraphs "Emotional Support" through "Parenthood Education" (they are
      probably on page two).
   2. Click the More button in the Styles group.
   3. Locate and click the List Paragraph style. Word applies the List Paragraph style to the
      paragraphs you selected.

Change Style Sets

Once you have applied styles, changing to another style set is easy. You simply open the Style
Set gallery. As you move your cursor down the menu, Word 2007 provides you with a live
preview of the effect of applying the style set. To choose a style set, you click it.

EXERCISE 11

Change Style Sets

   1. Click Change Styles in the Styles group. A menu appears.
   2. Click Style Set. A menu appears. As you move your cursor down the menu Word 2007
      provides you with a live preview of the effect of applying the Style set to your document.
   3. Click Formal. Word 2007 reformats all of the paragraphs into the Formal style applying
      the appropriate format to each paragraph.


                                                                                            Page 53
Module of Office 2007 Basic

Lesson 5: Adding Bullets and Numbers, Undoing and
Redoing, Setting Page Layouts and Printing Documents
If you have lists of data, you may want to bullet or number them. When using Microsoft Word,
bulleting and numbering are easy. The first part of this lesson teaches you to bullet and number.

After you have completed your document, you may want to share it with others. One way to
share your document is to print and distribute it. However, before you print you may want to add
page numbers and tell Word such things as the page orientation, the paper size, and the margin
setting you want to use. In this lesson you will learn how to layout and how to print your
documents.

Add Bullets and Numbers

In Microsoft Word, you can easily create bulleted or numbered lists of items. Several bulleting
and numbering styles are available, as shown in the examples. You can select the one you wish
to use.

EXAMPLES: Numbering


EXAMPLES: Bulleting


EXERCISE 1

Bullets


                                                                                         Page 54
Module of Office 2007 Basic

   1. Type the following list as shown:
      Apple
      Orange
      Grape
      Mango
      Cherry
   2. Select the words you just typed.
   3. Choose the Home tab.
   4. In the Paragraph group, click the down arrow next to the Bullets button        . The Bullet
      Library appears.
   5. Click to select the type of bullet you want to use. Word adds bullets to your list.
      Note: As you move your cursor over the various bullet styles, Word displays the bullet
      style onscreen.

To remove the bulleting:

   1. Select the list again.
   2. Choose the Home tab.
   3. In the Paragraph group, click the down arrow next to the Bullets icon. The Bullet dialog
      box appears.
   4. Click None. Word removes the bullets from your list.

Numbers


   1. Type the following list as shown:
      Apple
      Orange
      Grape
      Mango
      Cherry
   2. Select the words you just typed.
   3. Choose the Home tab.
   4. In the Paragraph group, click the down arrow next to the Numbering button      . The
      Numbering Library appears.
   5. Click to select the type of numbering you want to use. Word numbers your list.
      Note: As you move your cursor over the various number styles, Word displays the
      number style onscreen.

                                                                                          Page 55
Module of Office 2007 Basic

To remove the numbering:

   1. Select the list again.
   2. Choose the Home tab.
   3. In the Paragraph group, click the down arrow next yo the Numbering icon. The Number
      dialog box appears.
   4. Click None. Word removes the numbering from your list.

Undo and Redo

You can quickly reverse most commands you execute by using Undo. If you then change your
mind again, and want to reapply a command, you can use Redo.

EXERCISE 2

Undo and Redo


   1. Type Undo example.
   2. Click the Undo button on the Quick Access menu. The typing disappears.
   3. Click the Redo button on the Quick Access menu. The typing reappears.
   4. Select "Undo example."
   5. Press Ctrl+b to bold. Word bolds the text.
   6. Press Ctrl+i. Word italicizes the text.
   7. Press Ctrl+u Word underlines the text.
   8. Click the down arrow next to the Undo icon. You will see the actions you performed
      listed. To undo the underline, click Underline; to undo the underline and italic, click
      Underline Italic; to undo the underline, italic, and bold click Bold etc.
   9. To redo, click the Redo icon several times.

Alternate Method -- Undo & Redo by Using Keys

   1.   Type Undo example.
   2.   Press Ctrl+z. The typing disappears.
   3.   Press Ctrl+y. The typing reappears.
   4.   Select "Undo example."
   5.   Press Ctrl+u to underline.
   6.   Press Ctrl+z. The underline is removed.
   7.   Press Ctrl+y. The underline reappears.

Set the Orientation

Before you print your document, you may want to change the orientation of your pages. There
are two orientations you can use: portrait and landscape. Paper, such as paper sized 8 1/2 by 11,
is longer on one edge than it is on the other. If you print in Portrait, the shortest edge of the paper
becomes the top of the page. Portrait is the default option. If you print Landscape, the longest
edge of the paper becomes the top of the page.

                                                                                              Page 56
Module of Office 2007 Basic

                                              Portrait


                                            Landscape


The exercises that follow use a file named SamplePrint.docx. Right click here to download the
file. Click Save Target As from the menu that appears, and save the linked file to a directory on
your computer. Then open the file.

EXERCISE 3

Set the Orientation


   1. Choose the Page Layout tab.
   2. Click Orientation in the Page Setup group. A menu appears.
   3. Click Portrait. Word sets your page orientation to Portrait.

Set the Page Size

Paper comes in a variety of sizes. Most business correspondence uses 8 1/2 by 11 paper which is
the default page size in Word. If you are not using 8 1/2 by 11 paper, you can use the Size option
in the Page Setup group of the Page Layout tab to change the Size setting.

EXERCISE 4

Set the Page Size


                                                                                           Page 57
Module of Office 2007 Basic


   1. Choose the Page Layout tab.
   2. Click Size in the Page Setup group. A menu appears.
   3. Click Letter 8.5 x 11in. Word sets your page size.

Set the Margins

Margins define the amount of white space that appears at the top, bottom, left, and right edges of
your document. The Margin option in the Page Setup group of the Page Layout tab provides
several standard margin sizes from which you can choose.

EXERCISE 5

Set the Margins


   1. Choose the Page Layout tab.
   2. Click Margins in the Page Setup group. A menu appears.
   3. Click Moderate. Word sets your margins to the Moderate settings.

Add Page Numbers


                                                                                          Page 58
Module of Office 2007 Basic

Page numbers help you keep your document organized and enable readers to find information
quickly. You can add page numbers to the top, bottom, or margins of your pages, and you can
choose where the numbers appear. For example, numbers can appear at the top of the page, on
the left, right, or center of the page. Word also offers several number styles from which you can
choose.

EXERCISE 6

Add Page Numbers


   1.   Choose the Insert tab.
   2.   Click the Page Number button in the Header & Footer group. A menu appears.
   3.   Click Bottom of Page.
   4.   Click the right-side option.

Insert Page Breaks

As you learned in Lesson 1, you can display your document in any of five views: Draft, Web
Layout, Print Layout, Full Screen Reading, or Online Layout. In Print Layout view you see your
document as it will appear when you print it. You can clearly see where each page ends and a
new page begins.

As you review your document, you may find that you want to change the point at which a new
page begins. You do this by inserting a page break. For example, if a page heading appears on
one page and the first paragraph under the heading appears on the next page, you may want to
inser a page break before the heading to keep the heading and the first paragraph together.

EXERCISE 7

Change to Print View


   1. Choose the View tab.
   2. Click Print Layout in the Document Views group. Your document changes to the Print
      Layout view.

Insert Page Breaks
                                                                                         Page 59
Module of Office 2007 Basic


   1. Place your cursor before the D in "Displaced Homemakers"
   2. Choose the Insert tab.
   3. Click Page Break. Word places a page break in your document.

To delete a page break, you select the page break and then press the Delete key.

Preview and Print Documents

When you have your margins, tabs, and so on the way you want them, you are ready to print. In
Word, You can preview your document before you print. In the Preview mode, you can review
each page, view multiple pages at the same time, zoom in on a page, and access the Size,
Orientation, and Margin options.

If you press the Zoom button while you are in Preview mode, the Zoom dialog box appears. In
the Zoom dialog box you can set the sizes of the pages that display as well as the number of
pages that display.

When you are ready to print, you use the Print dialog box. In the Print Range area, choose All to
print every page of your document, choose Current Page to print the page you are currently on,
or choose Pages to enter the specific pages you want to print. Type the pages you want to print in
the Pages field. Separate individual pages with commas (1,3, 13); specify a range by using a dash
(4-9).

EXERCISE 8

Print Preview

   1.   Click the Microsoft Office button. A menu appears.
   2.   Highlight the Print option. The Preview and Print the Document menu appears.
   3.   Click Print Preview. The Preview window appears, with your document in the window.
   4.   Click One Page to view one page at a time. Click Two Pages to view two pages at a time.
   5.   To view your document in normal size, click 100%.
   6.   Click the Zoom Button. The Zoom dialog box appears.
   7.   Select an option and then click OK. Perform this task for each option and note the results.

Note: As you review your document, if you see changes you would like to make to the layout,
use the Margin, Orientation, or Page Size options to make the changes. If you want to make other
types of changes to your document, click the Close Print Preview button, to return to your
document. Once you are satisfied with your document, you are ready to print.

Print

                                                                                           Page 60
Module of Office 2007 Basic

1. Click the Print button. The Print dialog box appears.
2. Click the down arrow next to the Name field and select the printer to which you want to
   print.
3. Choose All as the page range.
4. Click OK. Word prints your document.


                                                                                    Page 61
Module of Office 2007 Basic

Microsoft Excel 2007
                                 Table of Contents

Lesson 1: Entering Text and Numbers

Microsoft Excel is an electronic spreadsheet that runs on a personal computer. You can
use it to organize your data into rows and columns. You can also use it to perform
mathematical calculations quickly. This tutorial teaches Microsoft Excel basics. Although
knowledge of how to navigate in a Windows environment is helpful, this tutorial was
created for the computer novice. This lesson will introduce you to the Excel window. You
use the window to interact with Excel.

      The Microsoft Excel Window
      The Microsoft Office Button
      The Quick Access Toolbar
      The Title Bar
      The Ribbon
      Worksheets
      The Formula Bar
      The Status Bar
      Move Around a Worksheet
      Go To Cells Quickly
      Select Cells
      Enter Data
      Edit a Cell
      Wrap Text
      Delete a Cell Entry
      Save a File
      Close Excel

Lesson 2: Entering Excel Formulas and Formatting Data

Lesson 1 familiarized you with the Excel 2007 window, taught you how to move around
the window, and how to enter data. A major strength of Excel is that you can perform
mathematical calculations and format your data. In this lesson, you learn how to perform
basic mathematical calculations and how to format text and numerical data.

      Set the Enter Key Direction
      Perform Mathematical Calculations
      AutoSum
      Perform Automatic Calculations
      Align Cell Entries
      Perform Advanced Mathematical Calculations
      Copy, Cut, Paste, and Cell Addressing
      Insert and Delete Columns and Rows
      Create Borders
      Merge and Center
      Add Background Color
      Change the Font, Font Size, and Font Color
      Move to a New Worksheet
      Bold, Italicize, and Underline
      Work with Long Text
      Change a Column's Width
      Format Numbers

Lesson 3: Creating Excel Functions, Filling Cells, and Printing

By using functions, you can quickly and easily make many useful calculations, such as
finding an average, the highest number, the lowest number, and a count of the number of
items in a list. Microsoft Excel has many functions you can use. You can also use

                                                                                 Page 62
Module of Office 2007 Basic

Microsoft Excel to fill cells automatically with a series. For example, you can have Excel
automatically fill your worksheet with days of the week, months of the year, years, or
other types of series.

A header is text that appears at the top of every page of your printed worksheet. A footer
is text that appears at the bottom of every page of your printed worksheet. You can use a
header or footer to display among other things titles, page numbers, or logos. Once you
have completed your Excel worksheet, you may want to print it. This lesson teaches you
how to use functions, how to create a series, how to create headers and footers, and how
to print.

      Using Reference Operators
      Understanding Functions
      Fill Cells Automatically
      Create Headers and Footers
      Set Print Options
      Print

Lesson 4: Creating Charts

In Microsoft Excel, you can represent numbers in a chart. On the Insert tab, you can
choose from a variety of chart types, including column, line, pie, bar, area, and scatter.
The basic procedure for creating a chart is the same no matter what type of chart you
choose. As you change your data, your chart will automatically update. This lesson
teaches you how to create a chart in Excel.

      Create a Chart
      Apply A Chart Layout
      Add Labels
      Switch Data
      Change the Style of a Chart
      Change the Size and Position of a Chart
      Move A Chart to a Chart Sheet
      Change the Chart Type


                                                                                  Page 63
Module of Office 2007 Basic

                                     Excel Spreadsheet

Microsoft Excel is an electronic spreadsheet. As with a paper spreadsheet, you can use
Excel to organize your data into rows and columns and to perform mathematical
calculations. The tutorial teaches you how to create an Excel spreadsheet.


Lesson 1: Entering Text and Numbers
The Microsoft Excel Window

Microsoft Excel is an electronic spreadsheet. You can use it to organize your data into rows and
columns. You can also use it to perform mathematical calculations quickly. This tutorial teaches
Microsoft Excel basics. Although knowledge of how to navigate in a Windows environment is
helpful, this tutorial was created for the computer novice.

This lesson will introduce you to the Excel window. You use the window to interact with Excel.
To begin this lesson, start Microsoft Excel 2007. The Microsoft Excel window appears and your
screen looks similar to the one shown here.


Note: Your screen will probably not look exactly like the screen shown. In Excel 2007, how a
window displays depends on the size of your window, the size of your monitor, and the
resolution to which your monitor is set. Resolution determines how much information your
computer monitor can display. If you use a low resolution, less information fits on your screen,
but the size of your text and images are larger. If you use a high resolution, more information fits
on your screen, but the size of the text and images are smaller. Also, settings in Excel 2007,
Windows Vista, and Windows XP allow you to change the color and style of your windows.

The Microsoft Office Button


In the upper-left corner of the Excel 2007 window is the Microsoft Office button. When you
click the button, a menu appears. You can use the menu to create a new file, open an existing
file, save a file, and perform many other tasks.


                                                                                            Page 64
Module of Office 2007 Basic


The Quick Access Toolbar


Next to the Microsoft Office button is the Quick Access toolbar. The Quick Access toolbar gives
you with access to commands you frequently use. By default, Save, Undo, and Redo appear on
the Quick Access toolbar. You can use Save to save your file, Undo to roll back an action you
have taken, and Redo to reapply an action you have rolled back.

The Title Bar


Next to the Quick Access toolbar is the Title bar. On the Title bar, Microsoft Excel displays the
name of the workbook you are currently using. At the top of the Excel window, you should see
"Microsoft Excel - Book1" or a similar name.

The Ribbon


You use commands to tell Microsoft Excel what to do. In Microsoft Excel 2007, you use the
Ribbon to issue commands. The Ribbon is located near the top of the Excel window, below the
Quick Access toolbar. At the top of the Ribbon are several tabs; clicking a tab displays several
related command groups. Within each group are related command buttons. You click buttons to
issue commands or to access menus and dialog boxes. You may also find a dialog box launcher
in the bottom-right corner of a group. When you click the dialog box launcher, a dialog box
makes additional commands available.

Worksheets


                                                                                         Page 65
Module of Office 2007 Basic


Microsoft Excel consists of worksheets. Each worksheet contains columns and rows. The
columns are lettered A to Z and then continuing with AA, AB, AC and so on; the rows are
numbered 1 to 1,048,576. The number of columns and rows you can have in a worksheet is
limited by your computer memory and your system resources.

The combination of a column coordinate and a row coordinate make up a cell address. For
example, the cell located in the upper-left corner of the worksheet is cell A1, meaning column A,
row 1. Cell E10 is located under column E on row 10. You enter your data into the cells on the
worksheet.

The Formula Bar


                                           Formula Bar

If the Formula bar is turned on, the cell address of the cell you are in displays in the Name box
which is located on the left side of the Formula bar. Cell entries display on the right side of the
Formula bar. If you do not see the Formula bar in your window, perform the following steps:

   1. Choose the View tab.
   2. Click Formula Bar in the Show/Hide group. The Formula bar appears.

Note: The current cell address displays on the left side of the Formula bar.

The Status Bar


                                                                                           Page 66
Module of Office 2007 Basic


The Status bar appears at the very bottom of the Excel window and provides such information as
the sum, average, minimum, and maximum value of selected numbers. You can change what
displays on the Status bar by right-clicking on the Status bar and selecting the options you want
from the Customize Status Bar menu. You click a menu item to select it. You click it again to
deselect it. A check mark next to an item means the item is selected.

Move Around a Worksheet

By using the arrow keys, you can move around your worksheet. You can use the down arrow key
to move downward one cell at a time. You can use the up arrow key to move upward one cell at
a time. You can use the Tab key to move across the page to the right, one cell at a time. You can
hold down the Shift key and then press the Tab key to move to the left, one cell at a time. You
can use the right and left arrow keys to move right or left one cell at a time. The Page Up and
Page Down keys move up and down one page at a time. If you hold down the Ctrl key and then
press the Home key, you move to the beginning of the worksheet.

EXERCISE 1

Move Around the Worksheet

The Down Arrow Key

       Press the down arrow key several times. Note that the cursor moves downward one cell at
       a time.

The Up Arrow Key

       Press the up arrow key several times. Note that the cursor moves upward one cell at a
       time.

The Tab Key

   1. Move to cell A1.
   2. Press the Tab key several times. Note that the cursor moves to the right one cell at a time.

The Shift+Tab Keys


                                                                                          Page 67
Module of Office 2007 Basic

       Hold down the Shift key and then press Tab. Note that the cursor moves to the left one
       cell at a time.

The Right and Left Arrow Keys

   1. Press the right arrow key several times. Note that the cursor moves to the right.
   2. Press the left arrow key several times. Note that the cursor moves to the left.

Page Up and Page Down

   1. Press the Page Down key. Note that the cursor moves down one page.
   2. Press the Page Up key. Note that the cursor moves up one page.

The Ctrl-Home Key

   1. Move the cursor to column J.
   2. Stay in column J and move the cursor to row 20.
   3. Hold down the Ctrl key while you press the Home key. Excel moves to cell A1.

Go To Cells Quickly

The following are shortcuts for moving quickly from one cell in a worksheet to a cell in a
different part of the worksheet.

EXERCISE 2

Go to -- F5

The F5 function key is the "Go To" key. If you press the F5 key, you are prompted for the cell to
which you wish to go. Enter the cell address, and the cursor jumps to that cell.

   1. Press F5. The Go To dialog box opens.
   2. Type J3 in the Reference field.
   3. Press Enter. Excel moves to cell J3.

Go to -- Ctrl+G

You can also use Ctrl+G to go to a specific cell.

   1. Hold down the Ctrl key while you press "g" (Ctrl+g). The Go To dialog box opens.
   2. Type C4 in the Reference field.
   3. Press Enter. Excel moves to cell C4.

The Name Box

You can also use the Name box to go to a specific cell. Just type the cell you want to go to in the
Name box and then press Enter.


                                                                                            Page 68
Module of Office 2007 Basic


   1. Type B10 in the Name box.
   2. Press Enter. Excel moves to cell B10.

Select Cells


If you wish to perform a function on a group of cells, you must first select those cells by
highlighting them. The exercises that follow teach you how to select.


EXERCISE 3

Select Cells

To select cells A1 to E1:

   1. Go to cell A1.
   2. Press the F8 key. This anchors the cursor.

                                                                                   Page 69
Module of Office 2007 Basic

   3. Note that "Extend Selection" appears on the Status bar in the lower-left corner of the
      window. You are in the Extend mode.
   4. Click in cell E7. Excel highlights cells A1 to E7.
   5. Press Esc and click anywhere on the worksheet to clear the highlighting.

Alternative Method: Select Cells by Dragging

You can also select an area by holding down the left mouse button and dragging the mouse over
the area. In addition, you can select noncontiguous areas of the worksheet by doing the
following:


   1. Go to cell A1.
   2. Hold down the Ctrl key. You won't release it until step 9. Holding down the Ctrl key
       enables you to select noncontiguous areas of the worksheet.
   3. Press the left mouse button.
   4. While holding down the left mouse button, use the mouse to move from cell A1 to C5.
   5. Continue to hold down the Ctrl key, but release the left mouse button.
   6. Using the mouse, place the cursor in cell D7.
   7. Press the left mouse button.
   8. While holding down the left mouse button, move to cell F10. Release the left mouse
       button.
   9. Release the Ctrl key. Cells A1 to C5 and cells D7 to F10 are selected.
   10. Press Esc and click anywhere on the worksheet to remove the highlighting.

Enter Data

In this section, you will learn how to enter data into your worksheet. First, place the cursor in the
cell in which you want to start entering data. Type some data, and then press Enter. If you need
to delete, press the Backspace key to delete one character at a time.


EXERCISE 4

Enter Data


                                                                                             Page 70
Module of Office 2007 Basic


   1. Place the cursor in cell A1.
   2. Type John Jordan. Do not press Enter at this time.


Delete Data

The Backspace key erases one character at a time.

   1. Press the Backspace key until Jordan is erased.
   2. Press Enter. The name "John" appears in cell A1.

Edit a Cell

After you enter data into a cell, you can edit the data by pressing F2 while you are in the cell you
wish to edit.


EXERCISE 5


                                                                                            Page 71
Module of Office 2007 Basic

Edit a Cell

Change "John" to "Jones."

   1.   Move to cell A1.
   2.   Press F2.
   3.   Use the Backspace key to delete the "n" and the "h."
   4.   Type nes.
   5.   Press Enter.

Alternate Method: Editing a Cell by Using the Formula Bar

You can also edit the cell by using the Formula bar. You change "Jones" to "Joker" in the
following exercise.


   1. Move the cursor to cell A1.
   2. Click in the formula area of the Formula bar.


   3. Use the backspace key to erase the "s," "e," and "n."
   4. Type ker.
   5. Press Enter.

Alternate Method: Edit a Cell by Double-Clicking in the Cell

You can change "Joker" to "Johnson" as follows:


                                                                                            Page 72
Module of Office 2007 Basic

   1. Move to cell A1.
   2. Double-click in cell A1.
   3. Press the End key. Your cursor is now at the end of your text.


   3. Use the Backspace key to erase "r," "e," and "k."
   4. Type hnson.
   5. Press Enter.

Change a Cell Entry

Typing in a cell replaces the old cell entry with the new information you type.

   1. Move the cursor to cell A1.
   2. Type Cathy.
   3. Press Enter. The name "Cathy" replaces "Johnson."


Wrap Text

When you type text that is too long to fit in the cell, the text overlaps the next cell. If you do not
want it to overlap the next cell, you can wrap the text.

EXERCISE 6

Wrap Text


                                                                                              Page 73
Module of Office 2007 Basic

   1. Move to cell A2.
   2. Type Text too long to fit.
   3. Press Enter.


   4. Return to cell A2.
   5. Choose the Home tab.
   6. Click the Wrap Text button         . Excel wraps the text in the cell.

Delete a Cell Entry

To delete an entry in a cell or a group of cells, you place the cursor in the cell or select the group
of cells and press Delete.

EXERCISE 7

Delete a Cell Entry

   1. Select cells A1 to A2.
   2. Press the Delete key.

Save a File

This is the end of Lesson1. To save your file:

   1.   Click the Office button. A menu appears.
   2.   Click Save. The Save As dialog box appears.
   3.   Go to the directory in which you want to save your file.
   4.   Type Lesson1 in the File Name field.
   5.   Click Save. Excel saves your file.

Close Excel

Close Microsoft Excel.

   1. Click the Office button. A menu appears.
   2. Click Close. Excel closes.


                                                                                             Page 74
Module of Office 2007 Basic

                                       Excel Formulas

When you enter formulas into your Excel worksheet, the formulas can calculate
automatically. This lesson teaches you how to create an Excel formula.


Lesson 2: Entering Excel Formulas and Formatting Data
Lesson 1 familiarized you with the Excel 2007 window, taught you how to move around the
window, and how to enter data. A major strength of Excel is that you can perform mathematical
calculations and format your data. In this lesson, you learn how to perform basic mathematical
calculations and how to format text and numerical data. To start this lesson, open Excel.

Set the Enter Key Direction

In Microsoft Excel, you can specify the direction the cursor moves when you press the Enter key.
In the exercises that follow, the cursor must move down one cell when you press Enter. You can
use the Direction box in the Excel Options pane to set the cursor to move up, down, left, right, or
not at all. Perform the steps that follow to set the cursor to move down when you press the Enter
key.


   1. Click the Microsoft Office button. A menu appears.
   2. Click Excel Options in the lower-right corner. The Excel Options pane appears.


                                                                                           Page 75
Module of Office 2007 Basic


   3. Click Advanced.
   4. If the check box next to After Pressing Enter Move Selection is not checked, click the
      box to check it.
   5. If Down does not appear in the Direction box, click the down arrow next to the Direction
      box and then click Down.
   6. Click OK. Excel sets the Enter direction to down.

Perform Mathematical Calculations

In Microsoft Excel, you can enter numbers and mathematical formulas into cells. Whether you
enter a number or a formula, you can reference the cell when you perform mathematical
calculations such as addition, subtraction, multiplication, or division. When entering a
mathematical formula, precede the formula with an equal sign. Use the following to indicate the
type of calculation you wish to perform:

+ Addition

- Subtraction

* Multiplication

/ Division

^ Exponential

In the following exercises, you practice some of the methods you can use to move around a
worksheet and you learn how to perform mathematical calculations. Refer to Lesson 1 to learn
more about moving around a worksheet.

EXERCISE 1

Addition


                                                                                       Page 76
Module of Office 2007 Basic


   1.   Type Add in cell A1.
   2.   Press Enter. Excel moves down one cell.
   3.   Type 1 in cell A2.
   4.   Press Enter. Excel moves down one cell.
   5.   Type 1 in cell A3.
   6.   Press Enter. Excel moves down one cell.
   7.   Type =A2+A3 in cell A4.
   8.   Click the check mark on the Formula bar. Excel adds cell A1 to cell A2 and displays the
        result in cell A4. The formula displays on the Formula bar.

Note: Clicking the check mark on the Formula bar is similar to pressing Enter. Excel records
your entry but does not move to the next cell.

Subtraction


   1. Press F5. The Go To dialog box appears.
   2. Type B1 in the Reference field.
   3. Press Enter. Excel moves to cell B1.


                                                                                         Page 77
Module of Office 2007 Basic


   4. Type Subtract.
   5. Press Enter. Excel moves down one cell.
   6. Type 6 in cell B2.
   7. Press Enter. Excel moves down one cell.
   8. Type 3 in cell B3.
   9. Press Enter. Excel moves down one cell.
   10. Type =B2-B3 in cell B4.
   11. Click the check mark on the Formula bar. Excel subtracts cell B3 from cell B2 and the
       result displays in cell B4. The formula displays on the Formula bar.

Multiplication

   1. Hold down the Ctrl key while you press "g" (Ctrl+g). The Go To dialog box appears.
   2. Type C1 in the Reference field.
   3. Press Enter. Excel moves to cell C1
   4. Type Multiply.
   5. Press Enter. Excel moves down one cell.
   6. Type 2 in cell C2.
   7. Press Enter. Excel moves down one cell.
   8. Type 3 in cell C3.
   9. Press Enter. Excel moves down one cell.
   10. Type =C2*C3 in cell C4.
   11. Click the check mark on the Formula bar. Excel multiplies C1 by cell C2 and displays the
       result in cell C3. The formula displays on the Formula bar.

Division

   1. Press F5.
   2. Type D1 in the Reference field.
   3. Press Enter. Excel moves to cell D1.
   4. Type Divide.
   5. Press Enter. Excel moves down one cell.
   6. Type 6 in cell D2.
   7. Press Enter. Excel moves down one cell.
   8. Type 3 in cell D3.
   9. Press Enter. Excel moves down one cell.
   10. Type =D2/D3 in cell D4.
   11. Click the check mark on the Formula bar. Excel divides cell D2 by cell D3 and displays
       the result in cell D4. The formula displays on the Formula bar.

When creating formulas, you can reference cells and include numbers. All of the following
formulas are valid:

=A2/B2


                                                                                       Page 78
Module of Office 2007 Basic

=A1+12-B3

=A2*B2+12

=24+53

AutoSum

You can use the AutoSum button        on the Home tab to automatically add a column or row of
numbers. When you press the AutoSum button        , Excel selects the numbers it thinks you want
to add. If you then click the check mark on the Formula bar or press the Enter key, Excel adds
the numbers. If Excel's guess as to which numbers you want to add is wrong, you can select the
cells you want.

EXERCISE 2

AutoSum

The following illustrates AutoSum:


   1.   Go to cell F1.
   2.   Type 3.
   3.   Press Enter. Excel moves down one cell.
   4.   Type 3.
   5.   Press Enter. Excel moves down one cell.
   6.   Type 3.
   7.   Press Enter. Excel moves down one cell to cell F4.
   8.   Choose the Home tab.
   9.   Click the AutoSum button     in the Editing group. Excel selects cells F1 through F3 and
        enters a formula in cell F4.


   10. Press Enter. Excel adds cells F1 through F3 and displays the result in cell F4.

Perform Automatic Calculations

                                                                                         Page 79
Module of Office 2007 Basic

By default, Microsoft Excel recalculates the worksheet as you change cell entries. This makes it
easy for you to correct mistakes and analyze a variety of scenarios.

EXERCISE 3

Automatic Calculation

Make the changes described below and note how Microsoft Excel automatically recalculates.


   1. Move to cell A2.
   2. Type 2.
   3. Press the right arrow key. Excel changes the result in cell A4. Excel adds cell A2 to cell
       A3 and the new result appears in cell A4.
   4. Move to cell B2.
   5. Type 8.
   6. Press the right arrow key. Excel subtracts cell B3 from cell B3 and the new result
       appears in cell B4.
   7. Move to cell C2.
   8. Type 4.
   9. Press the right arrow key. Excel multiplies cell C2 by cell C3 and the new result appears
       in cell C4.
   10. Move to cell D2.
   11. Type 12.
   12. Press the Enter key. Excel divides cell D2 by cell D3 and the new result appears in cell
       D4.

Align Cell Entries

When you type text into a cell, by default your entry aligns with the left side of the cell. When
you type numbers into a cell, by default your entry aligns with the right side of the cell. You can
change the cell alignment. You can center, left-align, or right-align any cell entry. Look at cells
A1 to D1. Note that they are aligned with the left side of the cell.


EXERCISE 4

Center

To center cells A1 to D1:


                                                                                            Page 80
Module of Office 2007 Basic


   1. Select cells A1 to D1.
   2. Choose the Home tab.
   3. Click the Center button       in the Alignment group. Excel centers each cell's content.

Left-Align

To left-align cells A1 to D1:


   1. Select cells A1 to D1.
   2. Choose the Home tab.
   3. Click the Align Text Left       button in the Alignment group. Excel left-aligns each cell's
      content.

Right-Align

To right-align cells A1 to D1:


   1. Select cells A1 to D1. Click in cell A1.
   2. Choose the Home tab.
   3. Click the Align Text Right      button. Excel right-aligns the cell's content.

                                                                                           Page 81
Module of Office 2007 Basic

   4. Click anywhere on your worksheet to clear the highlighting.

Note: You can also change the alignment of cells with numbers in them by using the alignment
buttons.

Perform Advanced Mathematical Calculations

When you perform mathematical calculations in Excel, be careful of precedence. Calculations
are performed from left to right, with multiplication and division performed before addition and
subtraction.

EXERCISE 5

Advanced Calculations

   1. Move to cell A7.
   2. Type =3+3+12/2*4.
   3. Press Enter.

Note: Microsoft Excel divides 12 by 2, multiplies the answer by 4, adds 3, and then adds another
3. The answer, 30, displays in cell A7.


To change the order of calculation, use parentheses. Microsoft Excel calculates the information
in parentheses first.

   1. Double-click in cell A7.
   2. Edit the cell to read =(3+3+12)/2*4.
   3. Press Enter.

Note: Microsoft Excel adds 3 plus 3 plus 12, divides the answer by 2, and then multiplies the
result by 4. The answer, 36, displays in cell A7.


Copy, Cut, Paste, and Cell Addressing

In Excel, you can copy data from one area of a worksheet and place the data you copied
anywhere in the same or another worksheet. In other words, after you type information into a
worksheet, if you want to place the same information somewhere else, you do not have to retype
the information. You simple copy it and then paste it in the new location.

You can use Excel's Cut feature to remove information from a worksheet. Then you can use the
Paste feature to place the information you cut anywhere in the same or another worksheet. In
other words, you can move information from one place in a worksheet to another place in the
same or different worksheet by using the Cut and Paste features.

Microsoft Excel records cell addresses in formulas in three different ways, called absolute,
relative, and mixed. The way a formula is recorded is important when you copy it. With relative
cell addressing, when you copy a formula from one area of the worksheet to another, Excel
records the position of the cell relative to the cell that originally contained the formula. With

                                                                                         Page 82
Module of Office 2007 Basic

absolute cell addressing, when you copy a formula from one area of the worksheet to another,
Excel references the same cells, no matter where you copy the formula. You can use mixed cell
addressing to keep the row constant while the column changes, or vice versa. The following
exercises demonstrate.

EXERCISE 6

Copy, Cut, Paste, and Cell Addressing

   1.   Move to cell A9.
   2.   Type 1. Press Enter. Excel moves down one cell.
   3.   Type 1. Press Enter. Excel moves down one cell.
   4.   Type 1. Press Enter. Excel moves down one cell.
   5.   Move to cell B9.
   6.   Type 2. Press Enter. Excel moves down one cell.
   7.   Type 2. Press Enter. Excel moves down one cell.
   8.   Type 2. Press Enter. Excel moves down one cell.

In addition to typing a formula as you did in Lesson 1, you can also enter formulas by using
Point mode. When you are in Point mode, you can enter a formula either by clicking on a cell or
by using the arrow keys.

   1.   Move to cell A12.
   2.   Type =.
   3.   Use the up arrow key to move to cell A9.
   4.   Type +.
   5.   Use the up arrow key to move to cell A10.
   6.   Type +.
   7.   Use the up arrow key to move to cell A11.
   8.   Click the check mark on the Formula bar. Look at the Formula bar. Note that the formula
        you entered is displayed there.


Copy with the Ribbon

To copy the formula you just entered, follow these steps:


                                                                                        Page 83
Module of Office 2007 Basic


   1. You should be in cell A12.
   2. Choose the Home tab.
   3. Click the Copy     button in the Clipboard group. Excel copies the formula in cell A12.


   4. Press the right arrow key once to move to cell B12.
   5. Click the Paste      button in the Clipboard group. Excel pastes the formula in cell A12
      into cell B12.
   6. Press the Esc key to exit the Copy mode.

Compare the formula in cell A12 with the formula in cell B12 (while in the respective cell, look
at the Formula bar). The formulas are the same except that the formula in cell A12 sums the
entries in column A and the formula in cell B12 sums the entries in column B. The formula was
copied in a relative fashion.

Before proceeding with the next part of the exercise, you must copy the information in cells A7
to B9 to cells C7 to D9. This time you will copy by using the Mini toolbar.


Copy with the Mini Toolbar

                                                                                        Page 84
Module of Office 2007 Basic


   1. Select cells A9 to B11. Move to cell A9. Press the Shift key. While holding down the
      Shift key, press the down arrow key twice. Press the right arrow key once. Excel
      highlights A9 to B11.
   2. Right-click. A context menu and a Mini toolbar appear.
   3. Click Copy, which is located on the context menu. Excel copies the information in cells
      A9 to B11.


   4. Move to cell C9.
   5. Right-click. A context menu appears.
   6. Click Paste. Excel copies the contents of cells A9 to B11 to cells C9 to C11.


   7. Press Esc to exit Copy mode.

Absolute Cell Addressing

You make a cell address an absolute cell address by placing a dollar sign in front of the row and
column identifiers. You can do this automatically by using the F4 key. To illustrate:

   1.   Move to cell C12.
   2.   Type =.
   3.   Click cell C9.
   4.   Press F4. Dollar signs appear before the C and the 9.
   5.   Type +.
   6.   Click cell C10.
   7.   Press F4. Dollar signs appear before the C and the 10.
   8.   Type +.
   9.   Click cell C11.

                                                                                         Page 85
Module of Office 2007 Basic

   10. Press F4. Dollar signs appear before the C and the 11.
   11. Click the check mark on the formula bar. Excel records the formula in cell C12.


Copy and Paste with Keyboard Shortcuts

Keyboard shortcuts are key combinations that enable you to perform tasks by using the
keyboard. Generally, you press and hold down a key while pressing a letter. For example, Ctrl+c
means you should press and hold down the Ctrl key while pressing "c." This tutorial notates key
combinations as follows:

Press Ctrl+c.

Now copy the formula from C12 to D12. This time, copy by using keyboard shortcuts.

   1. Move to cell C12.
   2. Hold down the Ctrl key while you press "c" (Ctrl+c). Excel copies the contents of cell
      C12.
   3. Press the right arrow once. Excel moves to D12.
   4. Hold down the Ctrl key while you press "v" (Ctrl+v). Excel pastes the contents of cell
      C12 into cell D12.
   5. Press Esc to exit the Copy mode.


Compare the formula in cell C12 with the formula in cell D12 (while in the respective cell, look
at the Formula bar). The formulas are exactly the same. Excel copied the formula from cell C12
to cell D12. Excel copied the formula in an absolute fashion. Both formulas sum column C.

Mixed Cell Addressing

You use mixed cell addressing to reference a cell when you want to copy part of it absolute and
part relative. For example, the row can be absolute and the column relative. You can use the F4
key to create a mixed cell reference.

   1.   Move to cell E1.
   2.   Type =.
   3.   Press the up arrow key once.
   4.   Press F4.
   5.   Press F4 again. Note that the column is relative and the row is absolute.
   6.   Press F4 again. Note that the column is absolute and the row is relative.
   7.   Press Esc.


                                                                                         Page 86
Module of Office 2007 Basic


Cut and Paste

You can move data from one area of a worksheet to another.


   1. Select cells D9 to D12
   2. Choose the Home tab.
   3. Click the Cut    button.
   4. Move to cell G1.


   5. Click the Paste button      . Excel moves the contents of cells D9 to D12 to cells G1 to
      G4.

The keyboard shortcut for Cut is Ctrl+x. The steps for cutting and pasting with a keyboard
shortcut are:

   1. Select the cells you want to cut and paste.
   2. Press Ctrl+x.
   3. Move to the upper-left corner of the block of cells into which you want to paste.
                                                                                          Page 87
Module of Office 2007 Basic

   4. Press Ctrl+v. Excel cuts and pastes the cells you selected.


Insert and Delete Columns and Rows

You can insert and delete columns and rows. When you delete a column, you delete everything
in the column from the top of the worksheet to the bottom of the worksheet. When you delete a
row, you delete the entire row from left to right. Inserting a column or row inserts a completely
new column or row.

EXERCISE 7

Insert and Delete Columns and Rows

To delete columns F and G:


   1.   Click the column F indicator and drag to column G.
   2.   Click the down arrow next to Delete in the Cells group. A menu appears.
   3.   Click Delete Sheet Columns. Excel deletes the columns you selected.
   4.   Click anywhere on the worksheet to remove your selection.

To delete rows 7 through 12:


                                                                                           Page 88
Module of Office 2007 Basic


   1.   Click the row 7 indicator and drag to row 12.
   2.   Click the down arrow next to Delete in the Cells group. A menu appears.
   3.   Click Delete Sheet Rows. Excel deletes the rows you selected.
   4.   Click anywhere on the worksheet to remove your selection.

To insert a column:

   1.   Click on A to select column A.
   2.   Click the down arrow next to Insert in the Cells group. A menu appears.
   3.   Click Insert Sheet Columns. Excel inserts a new column.
   4.   Click anywhere on the worksheet to remove your selection.

To insert rows:

   1.   Click on 1 and then drag down to 2 to select rows 1 and 2.
   2.   Click the down arrow next to Insert in the Cells group. A menu appears.
   3.   Click Insert Sheet Rows. Excel inserts two new rows.
   4.   Click anywhere on the worksheet to remove your selection.

Your worksheet should look like the one shown here.


Create Borders

You can use borders to make entries in your Excel worksheet stand out. You can choose from
several types of borders. When you press the down arrow next to the Border button                   ,a
menu appears. By making the proper selection from the menu, you can place a border on the top,
bottom, left, or right side of the selected cells; on all sides; or around the outside border. You can
have a thick outside border or a border with a single-line top and a double-line bottom.


                                                                                             Page 89
Module of Office 2007 Basic

Accountants usually place a single underline above a final number and a double underline below.
The following illustrates:

EXERCISE 8

Create Borders


   1. Select cells B6 to E6.


   2. Choose the Home tab.

                                                                                       Page 90
Module of Office 2007 Basic

   3. Click the down arrow next to the Borders button    . A menu appears.
   4. Click Top and Double Bottom Border. Excel adds the border you chose to the selected
      cells.


Merge and Center

Sometimes, particularly when you give a title to a section of your worksheet, you will want to
center a piece of text over several columns or rows. The following example shows you how.


EXERCISE 9

Merge and Center


   1.   Go to cell B2.
   2.   Type Sample Worksheet.
   3.   Click the check mark on the Formula bar.
   4.   Select cells B2 to E2.
   5.   Choose the Home tab.
   6.   Click the Merge and Center button       in the Alignment group. Excel merges cells B2,
        C2, D2, and E2 and then centers the content.


                                                                                         Page 91
Module of Office 2007 Basic


Note: To unmerge cells:

   1.   Select the cell you want to unmerge.
   2.   Choose the Home tab.
   3.   Click the down arrow next to the Merge and Center button.      A menu appears.
   4.   Click Unmerge Cells. Excel unmerges the cells.

Add Background Color

To make a section of your worksheet stand out, you can add background color to a cell or group
of cells.

EXERCISE 10

Add Background Color


   1. Select cells B2 to E3.


                                                                                         Page 92
Module of Office 2007 Basic


   2. Choose the Home tab.
   3. Click the down arrow next to the Fill Color button      .
   4. Click the color dark blue. Excel places a dark blue background in the cells you selected.


Change the Font, Font Size, and Font Color

A font is a set of characters represented in a single typeface. Each character within a font is
created by using the same basic style. Excel provides many different fonts from which you can
choose. The size of a font is measured in points. There are 72 points to an inch. The number of
points assigned to a font is based on the distance from the top to the bottom of its longest
character. You can change the Font, Font Size, and Font Color of the data you enter into Excel.

EXERCISE 11

Change the Font

   1. Select cells B2 to E3.


                                                                                         Page 93
Module of Office 2007 Basic


   2. Choose the Home tab.
   3. Click the down arrow next to the Font box. A list of fonts appears. As you scroll down
      the list of fonts, Excel provides a preview of the font in the cell you selected.
   4. Find and click Times New Roman in the Font box. Note: If Times New Roman is your
      default font, click another font. Excel changes the font in the selected cells.

Change the Font Size


   1. Select cell B2.
   2. Choose the Home tab.


                                                                                       Page 94
Module of Office 2007 Basic

   3. Click the down arrow next to the Font Size box. A list of font sizes appears. As you scroll
      up or down the list of font sizes, Excel provides a preview of the font size in the cell you
      selected.
   4. Click 26. Excel changes the font size in cell B2 to 26.

Change the Font Color


   1.   Select cells B2 to E3.
   2.   Choose the Home tab.
   3.   Click the down arrow next to the Font Color button       .
   4.   Click on the color white. Your font color changes to white.

Your worksheet should look like the one shown here.


Move to a New Worksheet

In Microsoft Excel, each workbook is made up of several worksheets. Each worksheet has a tab.
By default, a workbook has three sheets and they are named sequentially, starting with Sheet1.
The name of the worksheet appears on the tab. Before moving to the next topic, move to a new
worksheet. The exercise that follows shows you how.


                                                                                          Page 95
Module of Office 2007 Basic

EXERCISE 12

Move to a New Worksheet

        Click Sheet2 in the lower-left corner of the screen. Excel moves to Sheet2.


Bold, Italicize, and Underline

When creating an Excel worksheet, you may want to emphasize the contents of cells by bolding,
italicizing, and/or underlining. You can easily bold, italicize, or underline text with Microsoft
Excel. You can also combine these features—in other words, you can bold, italicize, and
underline a single piece of text.

In the exercises that follow, you will learn different methods you can use to bold, italicize, and
underline.

EXERCISE 13

Bold with the Ribbon


   1.   Type Bold in cell A1.
   2.   Click the check mark located on the Formula bar.
   3.   Choose the Home tab.
   4.   Click the Bold button    . Excel bolds the contents of the cell.
   5.   Click the Bold button    again if you wish to remove the bold.

Italicize with the Ribbon


                                                                                          Page 96
Module of Office 2007 Basic

   1.   Type Italic in cell B1.
   2.   Click the check mark located on the Formula bar.
   3.   Choose the Home tab.
   4.   Click the Italic button  . Excel italicizes the contents of the cell.
   5.   Click the Italic button  again if you wish to remove the italic.

Underline with the Ribbon

Microsoft Excel provides two types of underlines. The exercises that follow illustrate them.

Single Underline:


   1.   Type Underline in cell C1.
   2.   Click the check mark located on the Formula bar.
   3.   Choose the Home tab.
   4.   Click the Underline button      . Excel underlines the contents of the cell.
   5.   Click the Underline button      again if you wish to remove the underline.

Double Underline


   1.   Type Underline in cell D1.
   2.   Click the check mark located on the Formula bar.
   3.   Choose the Home tab.
   4.   Click the down arrow next to the Underline button       and then click Double Underline.
        Excel double-underlines the contents of the cell. Note that the Underline button changes
        to the button shown here     , a D with a double underline under it. Then next time you
        click the Underline button, you will get a double underline. If you want a single
      underline, click the down arrow next to the Double Underline button             and then
      choose Underline.
   5. Click the double underline button again if you wish to remove the double underline.

                                                                                          Page 97
Module of Office 2007 Basic

Bold, Underline, and Italicize

   1.   Type All three in cell E1.
   2.   Click the check mark located on the Formula bar.
   3.   Choose the Home tab.
   4.   Click the Bold button     . Excel bolds the cell contents.
   5.   Click the Italic button   . Excel italicizes the cell contents.
   6.   Click the Underline button       . Excel underlines the cell contents.

Alternate Method: Bold with Shortcut Keys

   1.   Type Bold in cell A2.
   2.   Click the check mark located on the Formula bar.
   3.   Hold down the Ctrl key while pressing "b" (Ctrl+b). Excel bolds the contents of the cell.
   4.   Press Ctrl+b again if you wish to remove the bolding.

Alternate Method: Italicize with Shortcut Keys

   1. Type Italic in cell B2. Note: Because you previously entered the word Italic in column
      B, Excel may enter the word in the cell automatically after you type the letter I. Excel
      does this to speed up your data entry.
   2. Click the check mark located on the Formula bar.
   3. Hold down the Ctrl key while pressing "i" (Ctrl+i). Excel italicizes the contents of the
      cell.
   4. Press Ctrl+i again if you wish to remove the italic formatting.

Alternate Method: Underline with Shortcut Keys

   1. Type Underline in cell C2.
   2. Click the check mark located on the Formula bar.
   3. Hold down the Ctrl key while pressing "u" (Ctrl+u). Excel applies a single underline to
      the cell contents.
   4. Press Ctrl+u again if you wish to remove the underline.

Bold, Italicize, and Underline with Shortcut Keys

   1.   Type All three in cell D2.
   2.   Click the check mark located on the Formula bar.
   3.   Hold down the Ctrl key while pressing "b" (Ctrl+b). Excel bolds the cell contents.
   4.   Hold down the Ctrl key while pressing "i" (Ctrl+i). Excel italicizes the cell contents.
   5.   Hold down the Ctrl key while pressing "u" (Ctrl+u). Excel applies a single underline to
        the cell contents.

Work with Long Text

Whenever you type text that is too long to fit into a cell, Microsoft Excel attempts to display all
the text. It left-aligns the text regardless of the alignment you have assigned to it, and it borrows
space from the blank cells to the right. However, a long text entry will never write over cells that
already contain entries—instead, the cells that contain entries cut off the long text. The following
exercise illustrates this.

EXERCISE 14

Work with Long Text


                                                                                             Page 98
Module of Office 2007 Basic

   1. Move to cell A6.
   2. Type Now is the time for all good men to go to the aid of their army.
   3. Press Enter. Everything that does not fit into cell A6 spills over into the adjacent cell.


   4. Move to cell B6.
   5. Type Test.
   6. Press Enter. Excel cuts off the entry in cell A6.


   7. Move to cell A6.
   8. Look at the Formula bar. The text is still in the cell.

Change A Column's Width

You can increase column widths. Increasing the column width enables you to see the long text.

EXERCISE 15

Change Column Width


   1.   Make sure you are in any cell under column A.
   2.   Choose the Home tab.
   3.   Click the down arrow next to Format in the Cells group.
   4.   Click Column Width. The Column Width dialog box appears.
   5.   Type 55 in the Column Width field.
   6.   Click OK. Column A is set to a width of 55. You should now be able to see all of the text.


                                                                                            Page 99
Module of Office 2007 Basic


Change a Column Width by Dragging

You can also change the column width with the cursor.

   1. Place the mouse pointer on the line between the B and C column headings. The mouse
      pointer should look like the one displayed here      , with two arrows.
   2. Move your mouse to the right while holding down the left mouse button. The width
      indicator                       appears on the screen.
   3. Release the left mouse button when the width indicator shows approximately 20. Excel
      increases the column width to 20.

Format Numbers

You can format the numbers you enter into Microsoft Excel. For example, you can add commas
to separate thousands, specify the number of decimal places, place a dollar sign in front of a
number, or display a number as a percent.

EXERCISE 16

Format Numbers


   1. Move to cell B8.
   2. Type 1234567.
   3. Click the check mark on the Formula bar.


   4. Choose the Home tab.
   5. Click the down arrow next to the Number Format box. A menu appears.
   6. Click Number. Excel adds two decimal places to the number you typed.

                                                                                      Page 100
Module of Office 2007 Basic


   7. Click the Comma Style button   . Excel separates thousands with a comma.
   8. Click the Accounting Number Format button      . Excel adds a dollar sign to your
      number.
   9. Click twice on the Increase Decimal button    to change the number format to four
      decimal places.
   10. Click the Decrease Decimal button    if you wish to decrease the number of decimal
       places.

Change a decimal to a percent.


   1. Move to cell B9.
   2. Type .35 (note the decimal point).
   3. Click the check mark on the formula bar.


   4. Choose the Home tab.
   5. Click the Percent Style button   . Excel turns the decimal to a percent.


                                                                                    Page 101
Module of Office 2007 Basic

Lesson 3: Creating Excel Functions, Filling Cells, and
Printing
By using functions, you can quickly and easily make many useful calculations, such as finding
an average, the highest number, the lowest number, and a count of the number of items in a list.
Microsoft Excel has many functions that you can use.

Using Reference Operators

To use functions, you need to understand reference operators. Reference operators refer to a cell
or a group of cells. There are two types of reference operators: range and union.

A range reference refers to all the cells between and including the reference. A range reference
consists of two cell addresses separated by a colon. The reference A1:A3 includes cells A1, A2,
and A3. The reference A1:C3 includes cells A1, A2, A3, B1, B2, B3, C1, C2, and C3.

A union reference includes two or more references. A union reference consists of two or more
numbers, range referneces, or cell addresses separated by a comma. The reference
A7,B8:B10,C9,10 refers to cells A7, B8 to B10, C9 and the number 10.

Understanding Functions

Functions are prewritten formulas. Functions differ from regular formulas in that you supply the
value but not the operators, such as +, -, *, or /. For example, you can use the SUM function to
add. When using a function, remember the following:

Use an equal sign to begin a formula.

Specify the function name.

Enclose arguments within parentheses. Arguments are values on which you want to perform the
calculation. For example, arguments specify the numbers or cells you want to add.

Use a comma to separate arguments.

Here is an example of a function:

=SUM(2,13,A1,B2:C7)

In this function:

The equal sign begins the function.

SUM is the name of the function.

2, 13, A1, and B2:C7 are the arguments.

Parentheses enclose the arguments.

Commas separate the arguments.

After you type the first letter of a function name, the AutoComplete list appears. You can
double-click on an item in the AutoComplete list to complete your entry quickly. Excel will
complete the function name and enter the first parenthesis.


                                                                                        Page 102
Module of Office 2007 Basic

EXERCISE 1

Functions

The SUM function adds argument values.


   1.   Open Microsoft Excel.
   2.   Type 12 in cell B1.
   3.   Press Enter.
   4.   Type 27 in cell B2.
   5.   Press Enter.
   6.   Type 24 in cell B3.
   7.   Press Enter.
   8.   Type =SUM(B1:B3) in cell A4.
   9.   Press Enter. The sum of cells B1 to B3, which is 63, appears.

Alternate Method: Enter a Function with the Ribbon


   1. Type 150 in cell C1.
   2. Press Enter.
   3. Type 85 in cell C2.
   4. Press Enter.
   5. Type 65 in cell C3.
   6. Choose the Formulas tab.
   7. Click the Insert Function button. The Insert Function dialog box appears.
   8. Choose Math & Trig in the Or Select A Category box.
   9. Click Sum in the Select A Function box.
   10. Click OK. The Function Arguments dialog box appears.


                                                                                  Page 103
Module of Office 2007 Basic


   12. Type C1:C3 in the Number1 field, if it does not automatically appear.
   13. Click OK. The sum of cells C1 to C3, which is 300, appears.

Format worksheet


   1.   Move to cell A4.
   2.   Type the word Sum.
   3.   Select cells B4 to C4.
   4.   Choose the Home tab.
   5. Click the down arrow next to the Borders button          .
   6. Click Top and Double Bottom Border.

As you learned in Lesson 2, you can also calculate a sum by using the AutoSum button     .

Calculate an Average

You can use the AVERAGE function to calculate the average of a series of numbers.


   1.   Move to cell A6.
   2.   Type Average. Press the right arrow key to move to cell B6.
   3.   Type =AVERAGE(B1:B3).
   4.   Press Enter. The average of cells B1 to B3, which is 21, appears.

Calculate an Average with the AutoSum Button

In Microsoft Excel, you can use the AutoSum button       to calculate an average.


                                                                                       Page 104
Module of Office 2007 Basic


   1.   Move to cell C6.
   2.   Choose the Home tab.
   3.   Click the down arrow next to the AutoSum button         .
   4.   Click Average.


   5. Select cells C1 to C3.
   6. Press Enter. The average of cells C1 to C3, which is 100, appears.

Find the Lowest Number

You can use the MIN function to find the lowest number in a series of numbers.


   1.   Move to cell A7.
   2.   Type Min.
   3.   Press the right arrow key to move to cell B7.
   4.   Type = MIN(B1:B3).
   5.   Press Enter. The lowest number in the series, which is 12, appears.

Note: You can also use the drop-down button next to the AutoSum button        to calculate
minimums, maximums, and counts.

Find the Highest Number

                                                                                       Page 105
Module of Office 2007 Basic

You can use the MAX function to find the highest number in a series of numbers.


                                                                                  .

   1.   Move to cell A8.
   2.   Type Max.
   3.   Press the right arrow key to move to cell B8.
   4.   Type = MAX(B1:B3).
   5.   Press Enter. The highest number in the series, which is 27, appears.

Count the Numbers in a Series of Numbers

You can use the count function to count the number of numbers in a series.


   1.   Move to cell A9.
   2.   Type Count.
   3.   Press the right arrow key to move to cell B9.
   4.   Choose the Home tab.
   5.   Click the down arrow next to the AutoSum button         .
   6.   Click Count Numbers. Excel places the count function in cell C9 and takes a guess at
        which cells you want to count. The guess is incorrect, so you must select the proper cells.


   7. Select B1 to B3.
   8. Press Enter. The number of items in the series, which is 3, appears.
                                                                                          Page 106
Module of Office 2007 Basic


Fill Cells Automatically

You can use Microsoft Excel to fill cells automatically with a series. For example, you can have
Excel automatically fill your worksheet with days of the week, months of the year, years, or
other types of series.

EXERCISE 2

Fill Cells Automatically

The following demonstrates filling the days of the week:


   1.   Click the Sheet2 tab. Excel moves to Sheet2.
   2.   Move to cell A1.
   3.   Type Sun.
   4.   Move to cell B1.

                                                                                       Page 107
Module of Office 2007 Basic

   5.  Type Sunday.
   6.  Select cells A1 to B1.
   7.  Choose the Home tab.
   8.  Click the Bold button       . Excel bolds cells A1 to B1.
   9.  Find the small black square in the lower-right corner of the selected area. The small black
       square is called the fill handle.
   10. Grab the fill handle and drag with your mouse to fill cells A1 to B14. Note how the days
       of the week fill the cells in a series. Also, note that the Auto Fill Options button appears.


Copy Cells


   1. Click the Auto Fill Options button. The Auto Fill Options menu appears.
   2. Choose the Copy Cells radio button. The entry in cells A1 and B1 are copied to all the
      highlighted cells.
   3. Click the Auto Fill Options button again.
   4. Choose the Fill Series radio button. The cells fill as a series from Sunday to Saturday
      again.
   5. Click the Auto Fill Options button again.
   6. Choose the Fill Without Formatting radio button. The cells fill as a series from Sunday to
      Saturday, but the entries are not bolded.
   7. Click the Auto Fill Options button again.
                                                                                           Page 108
Module of Office 2007 Basic

   8. Choose the Fill Weekdays radio button. The cells fill as a series from Monday to Friday.

Adjust Column Width

Some of the entries in column B are too long to fit in the column. You can quickly adjust the
column width to fit the longest entry.

   1. Move your mouse pointer over the line that separates column B and C. The Width
      Indicator appears.


   2. Double-click. The Column adjusts to fit the longest entry.

After you complete the remainder of the exercise, your worksheet will look like the one shown
here.


Fill Times

The following demonstrates filling time:

   1. Type 1:00 into cell C1.
   2. Grab the fill handle and drag with your mouse to highlight cells C1 to C14. Note that
      each cell fills, using military time.
   3. Press Esc and then click anywhere on the worksheet to remove the highlighting.

To change the format of the time:

   1.   Select cells C1 to C14.
   2.   Choose the Home tab.
   3.   Click the down arrow next to the number format box             . A menu appears.
   4.   Click Time. Excel changes the format of the time.

Fill Numbers

You can also fill numbers.

Type a 1 in cell D1.

   1. Grab the fill handle and drag with your mouse to highlight cells D1 to D14. The number
      1 fills each cell.

                                                                                        Page 109
Module of Office 2007 Basic

    2. Click the Auto Fill Options button.
    3. Choose the Fill Series radio button. The cells fill as a series, starting with 1, 2, 3.

Here is another interesting fill feature.

    1. Go to cell E1.
    2. Type Lesson 1.
    3. Grab the fill handle and drag with your mouse to highlight cells E1 to E14. The cells fill
       in as a series: Lesson 1, Lesson 2, Lesson 3, and so on.

Create Headers and Footers

You can use the Header & Footer button on the Insert tab to create headers and footers. A header
is text that appears at the top of every page of your printed worksheet. A footer is text that
appears at the bottom of every page of your printed worksheet. When you click the Header &
Footer button, the Design context tab appears and Excel changes to Page Layout view. A context
tab is a tab that only appears when you need it. Page Layout view structures your worksheet so
that you can easily change the format of your document. You usually work in Normal view.

You can type in your header or footer or you can use predefined headers and footers. To find
predefined headers and footers, click the Header or Footer button or use the Header & Footer
Elements group's buttons. When you choose a header or footer by clicking the Header or Footer
button, Excel centers your choice. The table shown here describes each of the Header & Footer
Elements group button options.

                                    Header & Footer Elements
     Button                                 Purpose
     Page Number                            Inserts the page number.
     Number of Pages                        Inserts the number of pages in the document.
     Current Time                           Inserts the current time.
     File Path                              Inserts the path to the document.
     File Name                              Inserts the file name.
     Sheet Name                             Inserts the name of the worksheet.
     Picture                                Enables you to insert a picture.

Both the header and footer areas are divided into three sections: left, right, and center. When you
choose a Header or Footer from the Header & Footer Elements group, where you place your
information determines whether it appears on the left, right, or center of the printed page. You
use the Go To Header and Go To Footer buttons on the Design tab to move between the header
and footer areas of your worksheet.

EXERCISE 3

Insert Headers and Footers


    1. Choose the Insert tab.
    2. Click the Header & Footer button in the Text group. Your worksheet changes to Page
       Layout view and the Design context tab appears. Note that your cursor is located in the
       center section of the header area.


                                                                                                 Page 110
Module of Office 2007 Basic


   3. Click the right side of the header area.
   4. Click Page Number in the Header & Footer Elements group. When you print your
      document, Excel will place the page number in the upper-right corner.
   5. Click the left side of the Header area.
   6. Type your name. When you print your document, Excel will place your name in the
      upper-left corner.
   7. Click the Go To Footer button. Excel moves to the footer area.


   8. Click the Footer button. A menu appears.
   9. Click the path to your document. Excel will place the path to your document at the
      bottom of every printed page.

Return to Normal View

To return to Normal view:

   1. Choose the View tab.
   2. Click the Normal button in the Workbook Views group.

Set Print Options

There are many print options. You set print options on the Page Layout tab. Among other things,
you can set your margins, set your page orientation, and select your paper size.

Margins define the amount of white space that appears on the top, bottom, left, and right edges of
your document. The Margin option on the Page Layout tab provides several standard margin
sizes from which you can choose.

There are two page orientations: portrait and landscape. Paper, such as paper sized 8 1/2 by 11, is
longer on one edge than it is on the other. If you print in Portrait, the shortest edge of the paper


                                                                                          Page 111
Module of Office 2007 Basic

becomes the top of the page. Portrait is the default option. If you print in Landscape, the longest
edge of the paper becomes the top of the page.

                                              Portrait


                                            Landscape


Paper comes in a variety of sizes. Most business correspondence uses 8 1/2 by 11 paper, which is
the default page size in Excel. If you are not using 8 1/2 by 11 paper, you can use the Size option
on the Page Layout tab to change the Size setting.

EXERCISE 4

Set the Page Layout


   1. Choose the Page Layout tab.
   2. Click Margins in the Page Setup group. A menu appears.
   3. Click Wide. Word sets your margins to the Wide settings.

Set the Page Orientation


   1. Choose the Page Layout tab.
   2. Click Orientation in the Page Setup group. A menu appears.
   3. Click Landscape. Excel sets your page orientation to landscape.


                                                                                         Page 112
Module of Office 2007 Basic


Set the Paper Size


   1. Choose the Page Layout tab.
   2. Click Size in the Page Setup group. A menu appears.
   3. Click the paper size you are using. Excel sets your page size.

Print

The simplest way to print is to click the Office button, highlight Print on the menu that appears,
and then click Quick Print in the Preview and Print the Document pane. Dotted lines appear on
your screen, and your document prints. The dotted lines indicate the right, left, top, and bottom
edges of your printed pages.

You can also use the Print Preview option to print. When using Print Preview, you can see
onscreen how your printed document will look when you print it. If you click the Page Setup
button while in Print Preview mode, you can set page settings such as centering your data on the
page.

If your document is several pages long, you can use the Next Page and Previous Page buttons to
move forward and backward through your document. If you check the Show Margins check box,
you will see margin lines on your document. You can click and drag the margin markers to
increase or decrease the size of your margins. To return to Excel, click the Close Print Preview
button.

You click the Print button when you are ready to print. The Print dialog box appears. You can
choose to print the entire worksheet or specific pages. If you want to print specific pages, enter
the page numbers in the From and To fields. You can enter the number of copies you want to
print in the Number of Copies field.


                                                                                         Page 113
Module of Office 2007 Basic


EXERCISE 5

Open Print Preview


   1. Click the Office button. A menu appears.
   2. Highlight Print. The Preview and Print The Document pane appears.
   3. Click Print Preview. The Print Preview window appears, with your document in the
      center.

Center Your Document


   1. Click the Page Setup button in the Print group. The Page Setup dialog box appears.
   2. Choose the Margins tab.
                                                                                     Page 114
Module of Office 2007 Basic

   3. Click the Horizontally check box. Excel centers your data horizontally.
   4. Click the Vertically check box. Excel centers your data vertically.
   5. Click OK. The Page Setup dialog box closes.


Print


   1. Click the Print button. The Print dialog box appears.
   2. Click the down arrow next to the name field and select the printer to which you want to
      print.
   3. Click OK. Excel sends your worksheet to the printer.


                                                                                      Page 115
Module of Office 2007 Basic

                                        Excel Charts
In Excel, you can create charts. A chart is a graphical representation of numbers. This
tutorial teaches you how to create a chart in Excel.

Lesson 4: Creating Charts

In Microsoft Excel, you can represent numbers in a chart. On the Insert tab, you can choose from
a variety of chart types, including column, line, pie, bar, area, and scatter. The basic procedure
for creating a chart is the same no matter what type of chart you choose. As you change your
data, your chart will automatically update.

Create a Chart


You select a chart type by choosing an option from the Insert tab's Chart group. After you choose
a chart type, such as column, line, or bar, you choose a chart sub-type. For example, after you
choose Column Chart, you can choose to have your chart represented as a two-dimensional chart,
a three-dimensional chart, a cylinder chart, a cone chart, or a pyramid chart. There are further
sub-types within each of these categories. As you roll your mouse pointer over each option,
Excel supplies a brief description of each chart sub-type.

To create the column chart shown above, start by creating the worksheet below exactly as
shown.


After you have created the worksheet, you are ready to create your chart.


                                                                                         Page 116
Module of Office 2007 Basic


EXERCISE 1

Create a Column Chart


                 .

   1. Select cells A3 to D6. You must select all the cells containing the data you want in your
      chart. You should also include the data labels.
   2. Choose the Insert tab.
   3. Click the Column button in the Charts group. A list of column chart sub-types types
      appears.
   4. Click the Clustered Column chart sub-type. Excel creates a Clustered Column chart and
      the Chart Tools context tabs appear.

Apply a Chart Layout

Context tabs are tabs that only appear when you need them. Called Chart Tools, there are three
chart context tabs: Design, Layout, and Format. The tabs become available when you create a
new chart or when you click on a chart. You can use these tabs to customize your chart.

You can determine what your chart displays by choosing a layout. For example, the layout you
choose determines whether your chart displays a title, where the title displays, whether your
chart has a legend, where the legend displays, whether the chart has axis labels and so on. Excel
provides several layouts from which you can choose.

EXERCISE 2

Apply a Chart Layout


   1. Click your chart. The Chart Tools become available.
                                                                                        Page 117
Module of Office 2007 Basic

   2. Choose the Design tab.
   3. Click the Quick Layout button in the Chart Layout group. A list of chart layouts appears.
   4. Click Layout 5. Excel applies the layout to your chart.

Add Labels

When you apply a layout, Excel may create areas where you can insert labels. You use labels to
give your chart a title or to label your axes. When you applied layout 5, Excel created label areas
for a title and for the vertical axis.

EXERCISE 3

Add labels


                          Before                                   After


   1. Select Chart Title. Click on Chart Title and then place your cursor before the C in Chart
      and hold down the Shift key while you use the right arrow key to highlight the words
      Chart Title.
   2. Type Toy Sales. Excel adds your title.
   3. Select Axis Title. Click on Axis Title. Place your cursor before the A in Axis. Hold down
      the Shift key while you use the right arrow key to highlight the words Axis Title.
   4. Type Sales. Excel labels the axis.
   5. Click anywhere on the chart to end your entry.

Switch Data

If you want to change what displays in your chart, you can switch from row data to column data
and vice versa.

EXERCISE 4

Switch Data


                          Before                                   After


   1. Click your chart. The Chart Tools become available.
   2. Choose the Design tab.
   3. Click the Switch Row/Column button in the Data group. Excel changes the data in your
      chart.

Change the Style of a Chart


                                                                                         Page 118
Module of Office 2007 Basic

A style is a set of formatting options. You can use a style to change the color and format of your
chart. Excel 2007 has several predefined styles that you can use. They are numbered from left to
right, starting with 1, which is located in the upper-left corner.


EXERCISE 5

Change the Style of a Chart


   1. Click your chart. The Chart Tools become available.
   2. Choose the Design tab.
   3. Click the More button in the Chart Styles group. The chart styles appear.


   4. Click Style 42. Excel applies the style to your chart.

Change the Size and Position of a Chart

When you click a chart, handles appear on the right and left sides, the top and bottom, and the
corners of the chart. You can drag the handles on the top and bottom of the chart to increase or
decrease the height of the chart. You can drag the handles on the left and right sides to increase
or decrease the width of the chart. You can drag the handles on the corners to increase or
decrease the size of the chart proportionally. You can change the position of a chart by clicking
on an unused area of the chart and dragging.


                                                                                         Page 119
Module of Office 2007 Basic


EXERCISE 6

Change the Size and Position of a Chart


   1. Use the handles to adjust the size of your chart.
   2. Click an unused portion of the chart and drag to position the chart beside the data.

Move a Chart to a Chart Sheet

By default, when you create a chart, Excel embeds the chart in the active worksheet. However,
you can move a chart to another worksheet or to a chart sheet. A chart sheet is a sheet dedicated
to a particular chart. By default Excel names each chart sheet sequentially, starting with Chart1.
You can change the name.

EXERCISE 7

Move a Chart to a Chart Sheet


   1. Click your chart. The Chart Tools become available.
   2. Choose the Design tab.
   3. Click the Move Chart button in the Location group. The Move Chart dialog box appears.


                                                                                         Page 120
Module of Office 2007 Basic


   4. Click the New Sheet radio button.
   5. Type Toy Sales to name the chart sheet. Excel creates a chart sheet named Toy Sales and
      places your chart on it.

Change the Chart Type

Any change you can make to a chart that is embedded in a worksheet, you can also make to a
chart sheet. For example, you can change the chart type from a column chart to a bar chart.

EXERCISE 8

Change the Chart Type


   1.   Click your chart. The Chart Tools become available.
   2.   Choose the Design tab.
   3.   Click Change Chart Type in the Type group. The Chart Type dialog box appears.
   4.   Click Bar.
   5.   Click Clustered Horizontal Cylinder.
   6.   Click OK. Excel changes your chart type.


                                                                                     Page 121
Module of Office 2007 Basic


                              Page 122
Module of Office 2007 Basic

                      Microsoft PowerPoint 2007
                                 Table of Contents

Lesson 1: The PowerPoint Window

PowerPoint is a presentation software package. With PowerPoint, you can easily create
slide shows. Trainers and other presenters use slide shows to illustrate their
presentations. This tutorial teaches PowerPoint basics. This lesson introduces you to the
PowerPoint window. You use the window to interact with PowerPoint.

      The Microsoft Office Button
      The Quick Access Toolbar
      The Title Bar
      The Ribbon
      Rulers
      Slides, Placeholders, and Notes
      Status Bar, Tabs, View Buttons, and More

Lesson 2: Creating Your First PowerPoint Presentation

You create your PowerPoint presentation on slides. You use layouts to organize the
content on each slide. PowerPoint has several slide layouts from which to choose.
Themes are sets of colors, fonts, and special effects. Backgrounds add a colored
background to your slides. You can add themes and backgrounds to your slides. After
you complete your slides, you can run your presentation. In this lesson you learn how to
create slides, makes changes to slides, apply a theme and run a slide show.

      Create a Title Slide
      Create New Slides
      Make Changes to Your Slides
      Apply a Theme
      Run Your PowerPoint Slide Show

Lesson 3: Animations, Transitions, Spell Check, Outline Tab, Slides
Tabs, Sorter View, and Printing
Animations control how objects move onto, off of, and around your slides. Transitions
control how your presentation moves from one slide to the next. In this lesson you learn
how to create animations and transitions. You also learn how to spell-check your
document, how to use the Outline and Slides tabs, how to use Sorter view, and how to
print.

      Add Animations
      Add Transitions
      Spell Check
      Use the Outline and Slides Tabs
      Use Slide Sorter View
      Print


                                                                                Page 123
Module of Office 2007 Basic

                              PowerPoint Presentation
This tutorial takes you step-by-step through the process of developing an effective
PowerPoint presentation.


Lesson 1: The PowerPoint Window
PowerPoint is a presentation software package. With PowerPoint, you can easily create slide
shows. Trainers and other presenters use slide shows to illustrate their presentations.

This lesson introduces you to the PowerPoint window. You use the window to interact with the
software. To begin, open PowerPoint 2007. The window appears and your screen looks similar
to the one shown here.


Note: Your screen will probably not look exactly like the screen shown. In PowerPoint 2007,
how a window displays depends on the size of the window, the size of your monitor, and the
resolution to which your monitor is set. Resolution determines how much information your
computer monitor can display. If you use a low resolution, less information fits on your screen,
but the size of your text and images are larger. If you use a high resolution, more information fits
on your screen, but the size of the text and images are smaller. Also, settings in PowerPoint
2007, Windows Vista, and Windows XP allow you to change the color and style of your
windows.

The Microsoft Office Button


In the upper-left corner is the Microsoft Office button. When you click the button, a menu
appears. You can use the menu to create a new file, open an existing file, save a file, and perform
many other tasks.

The Quick Access Toolbar


Next to the Microsoft Office button is the Quick Access toolbar. The Quick Access toolbar
provides you with access to commands you frequently use. By default, Save, Undo, and Redo

                                                                                          Page 124
Module of Office 2007 Basic

appear on the Quick Access toolbar. You use Save to save your file, Undo to rollback an action
you have taken, and Redo to reapply an action you have rolled back.

The Title Bar


The Title bar is located at the top in the center of the PowerPoint window. The Title bar displays
the name of the presentation on which you are currently working. By default, PowerPoint names
presentations sequentially, starting with Presentation1. When you save your file, you can change
the name of your presentation.

The Ribbon


                                 1    Tabs
                                 2    Command Group
                                 3    Command Buttons
                                 4    Launcher


You use commands to tell PowerPoint what to do. In PowerPoint 2007, you use the Ribbon to
issue commands. The Ribbon is located near the top of the PowerPoint window, below the Quick
Access toolbar. At the top of the Ribbon are several tabs; clicking a tab displays several related
command groups. Within each group are related command buttons. You click buttons to issue
commands or to access menus and dialog boxes. You may also find a dialog box launcher in the
bottom-right corner of a group. When you click the dialog box launcher, a dialog box makes
additional commands available.

Rulers


Rulers are vertical and horizontal guides. You use them to determine where you want to place an
object. If the rulers do not display in your PowerPoint window:

   1. Click the View tab.
   2. Click Ruler in the Show/Hide group. The rulers appear.

Slides, Placeholders, and Notes


                                                                                        Page 125
Module of Office 2007 Basic

                                   1     Slide
                                   2     Placeholders
                                   3     Notes


Slides appear in the center of the window. You create your presentation on slides.

Placeholders hold the objects in your slide. You can use placeholders to hold text, clip art, charts,
and more.

You can use the notes area to creates notes to yourself. You can refer to these notes as you give
your presentation.

Status Bar, Tabs, View Buttons, and More


                            Status Bar          6   Vertical & Horizontal
                        1
                                                    Splitter Bars
                        2   Outline Tab         7   Minimize Button
                        3   Slides Tab          8   Maximize/Restore Button
                        4   View Buttons        9   Close Button
                        5   Zoom


The Status bar generally appears at the bottom of the window. The Status bar displays the
number of the slide that is currently displayed, the total number of slides, and the name of the
design template in use or the name of the background.

The Outline tab displays the text contained in your presentation. The Slides tab displays a
thumbnail of all your slides. You click the thumbnail to view the slide in the Slide pane.

The View buttons appear near the bottom of the screen. You use the View buttons to change
between Normal view, Slider Sorter view, and the Slide Show view.

Normal View
      Normal view splits your screen into three major sections: the Outline and Slides tabs, the
      Slide pane, and the Notes area. The Outline and Slides tabs are on the left side of your
      window. They enable you to shift between two different ways of viewing your slides. The
      Slides tab shows thumbnails of your slides. The Outline tab shows the text on your slides.
      The Slide pane is located in the center of your window. The Slide pane shows a large
      view of the slide on which you are currently working. The Notes area appears below the
      Slide pane. You can type notes to yourself on the Notes area.


                                                                                           Page 126
Module of Office 2007 Basic

Slide Sorter View
        Slide Sorter view shows thumbnails of all your slides. In Slide Sorter view, you can
        easily add, delete, or change their order of your slides.


Slide Show
        Use the Slide Show view when you want to view your slides, as they will look in your
        final presentation. When in Slide Show view:
              Esc            Returns you to the view you were using previously.

              Left-          Moves you to the next slide or animation effect.
              clicking       When you reach the last slide, you automatically
                             return to your previous view.

              Right-         Opens a pop-up menu. You can use this menu to
              clicking       navigate the slides, add speaker notes, select a
                             pointer, and mark your presentation.


Zoom                          allows you to zoom in and zoom out on the window. Zooming in
makes the window larger so you focus in on an object. Zooming out makes the window smaller
so you can see the entire window.

You can click and drag the vertical and horizontal splitter bars to change the size of your panes.

You use the Minimize button        to remove a window from view. While a window is minimized,
its title appears on the taskbar. You click the Maximize button      to cause a window to fill the
screen. After you maximize a window, clicking the Restore button         returns the window to its
former smaller size. You click the Close button     to exit the window and close the program.


                                                                                          Page 127
Module of Office 2007 Basic

Lesson 2: Creating Your First PowerPoint Presentation
You create your PowerPoint presentation on slides. You use layouts to organize the content on
each slide. PowerPoint has several slide layouts from which to choose.

Themes are sets of colors, fonts, and special effects. Backgrounds add a colored background to
your slides. You can add themes and backgrounds to your slides. After you complete your slides,
you can run your presentation.

Create a Title Slide

When you start PowerPoint, PowerPoint displays the title slide in the Slide pane. You can type
the title of your presentation and a subtitle on this slide. To enter text:

       Click and type the title of your presentation in the "Click to add title" area.
       Click and type a subtitle in the "Click to add subtitle" area.

If you do not wish to use the title slide, click the Delete Slide button      in the Slides group on
the Home tab.

EXERCISE 1

Create a Title Slide

   1. Open PowerPoint. You are presented with a title slide.


   2. Enter the information shown here. Type College Scholarships and Financial Aid in the
      Click to Add Title text box. Type Paying for College in the Click to Add Subtitle text
      box.


                                                                                           Page 128
Module of Office 2007 Basic


Create New Slides

After completing your title slide, you can create additional slides. To create a new slide:

   1. Choose the Home tab.

   2. Click the New Slide button         in the Slides group. The Office Theme dialog box
      appears and displays several layout templates.
   3. Click the layout you want. The layout appears in the Slide pane of the PowerPoint
      window.


   3. To add text, click inside the placeholder and type.
   4. To add an additional slide to your presentation, do one of the following:

               Right-click the slide layout. A menu appears. Click Layout and then click the
               layout you want.


               Choose the Home tab, click the New Slide button               , and then choose the
               slide layout you want.

EXERCISE 2

Create New Slides

   1. Choose the Home tab.

   2. Click the New Slide button           in the Slides group. The Office Theme dialog box
      appears.
   3. Click the Title and Content Layout. The slide appears on the Slides tab.


                                                                                              Page 129
Module of Office 2007 Basic


   4. Enter the information shown here. Type Here is what to do: (including the colon) in the
      Click to Add Title text box. Type the bulleted text in the Content text box.


Create an Outline

If you need to present the information in your slide in outline form, you can easily create an
outline by using the Increase List Level button   to create a hierarchy.

   1. Choose the Home tab.

   2. Click the New Slide button          in the Slides group. The Office Theme dialog box
      appears.
   3. Click the Title and Content layout.
   4. Enter the information shown here. Click the Increase List Level button        in the
      Paragraph group to indent the bullets for Stafford Loans and PLUS Loans. If you ever
       need to decrease an indent, use the Decrease List Level button       in the Praragraph
       group.


                                                                                     Page 130
Module of Office 2007 Basic

Use Two-Column Text

You can also place text in two separate columns.

   1. Choose the Home tab.

   2. Click the New Slide button              in the Slides group. The Office Theme dialog box
      appears.
   3. Click the Two Content layout.
   4. Enter the information shown here.


Make Changes to Your Slides

After creating a slide, if you want to add text:

   1. Place the mouse pointer at the point at which you would like to add text.
   2. Type the information you want to add.

If you would like to change text:

   1. Select the text you want to change.
   2. Type the new text.

You can use the Backspace key to delete text. You can also delete text by highlighting the text
and pressing the Delete key.

Apply a Theme

A theme is a set of colors, fonts, and special effects. Themes provide attractive backgrounds for
your PowerPoint slides.

To apply a theme to all of the slides in your presentation:

   1. Choose the Design tab.
   2. Click the More button in the Themes group.
   3. Click the design you want.

To apply a theme to selected slides:

   1. Click the Slides tab, located on the left side of the window.
   2. Hold down the Ctrl key and then click to select the slides to which you want to apply a
      theme.
   3. Choose the Design tab.
   4. Click the More button in the Themes group.
   5. Right-click the theme you want to apply. A menu appears.
   6. Click Apply to Selected Slides. Excel applies the theme to the slides you selected.

                                                                                        Page 131
Module of Office 2007 Basic

You can add a dramatic effect to your theme by applying a background.

   1. Choose the Design tab.
   2. Click the Background Styles button                       .
   3. Click the background you want.


EXERCISE 3

Apply a Theme


   1. Choose the Design tab.
   2. Click the More button in the Themes group.


   3. Click the theme you want. PowerPoint applies the theme to all of the slides in your
      presentation.

Add a Background


   1. Choose the Design tab.
   2. Click the Background Styles button                     .
   3. Click the background you want. PowerPoint applies the background to your slides.

Run Your PowerPoint Slide Show

After you create your slides, you can run your slide show:

   1. Do any one of the following:
                                                                                       Page 132
Module of Office 2007 Basic

          o   Press F5.
          o   Choose the Slide Show tab. Click the From Beginning button        in the Start
              Slide Show group.
          o   Click the Slide Show icon in the bottom-right corner of your screen.

Your slide show appears on your screen.


                                     Navigating the Slide Show
         Task                                       Procedure
         Go to the next slide.                      Do one of the following:

                                                           Press the Right Arrow key.
                                                           Press the Enter key.
                                                           Press the Page Down key.
                                                           Left-click the slide.


         Go to the previous slide.                  Do one of the following:

                                                           Press the Left Arrow key.
                                                           Press the Backspace key.
                                                           Press the Page Up key.


         End the slide show and return to           Press the Esc key.
         PowerPoint.


EXERCISE 4

Run Your Slide Show

   1. Press F5 to run the slide show.
   2. Use the arrow keys on your keyboard to move forward and backward through your slides.
   3. Use the Esc key to return to Normal view.


                                                                                        Page 133
Module of Office 2007 Basic

                  PowerPoint Animations and Transitions
This lesson teaches you how to animate the objects on your PowerPoint slides.


Lesson 3: Animations, Transitions, Spell Check, Outline
Tab, Slides Tab, Sorter View, and Printing
Animations control how objects move onto, off of, and around your slides. Transitions control
how your presentation moves from one slide to the next. This lesson teaches you how to create
animations and transitions. It also teaches how to spell-check your document, how to use the
Outline and Slides tabs, how to use Sorter view, and how to print.

Add Animations

You can animate the objects on your PowerPoint slides. PowerPoint provides four types of
animations: Entrance, Emphasis, Exit, and Motion Paths. An Entrance animation determines the
manner in which an object appears on a slide; for example, an object can move onto a slide. An
Emphasis animation does something to draw attention to an object; for example, the object can
become larger. An Exit animation determines the manner in which an object leaves a slide; for
example, an object can move off a slide. A Motion Paths animation determines how an object
moves around a slide; for example, an object can move from left to right.

After you add an animation, you can use the Custom Animation pane to modify it by choosing an
effect. Choosing an effect enables you to define what starts the animation, its properties (such the
direction from which an object moves onto the slide), and control the speed of the animation. In
addition, you can have an animation start when you click the mouse, start along with the
previous animation, or start at a specified time after the previous animation.

If the Auto Preview box is checked on the Custom Animation pane, PowerPoint provides you
with preview of your animation after you create it and each time you modify it. You can also use
the Play button        on the Custom Animation pane to preview an animation.

To choose an effect:

   1. Select the object you want to animate.
   2. Choose the Animations tab.
   3. Click the Custom Animation button                       . The Custom Animation pane
      appears.
   4. Click the Add Effect button               . A menu appears.
   5. Choose the type of effect you want. A submenu appears.
   6. Click the effect you want. PowerPoint applies the effect.

To modify an effect:

   1. Click the down arrow next to the Start field on the Custom Animations pane and then
      select the start method you want.
   2. Click the down arrow next to the Property field on the Custom Animations pane and the
      select the property you want. The Property field might be labeled Direction, Size, or
      some other property.
   3. Click the down arrow next to the Speed field on the Custom Animations pane and then
      select the speed you want to apply to your animation.

To preview the animation, click the Play button          on the Custom Animations pane.


                                                                                          Page 134
Module of Office 2007 Basic


EXERCISE 1

Add an Animation to a Slide


   1. Click Slide 2 on the Slides tab.
   2. Select "Start saving early."
   3. Choose the Animations tab.
   4. Click the Custom Animation button                        . The Custom Animation pane
      appears.
   5. Click the Add Effect button                 . A menu appears.
   6. Choose Entrance. A submenu appears.
   7. Click Fly In. PowerPoint applies the effect. If the Auto preview box is checked,
      PowerPoint automatically provides you with a preview of the animation.

Modify the Effect


   1. Click the down arrow next to the Start field and then select After Previous.
   2. Click the down arrow next to the Direction field and then select From Bottom.
   3. Click the down arrow next to the Speed field and then select Medium.

Add Another Animation


   1. Select "Apply for financial aid."
   2. Click the Add Effect button               . A menu appears.

                                                                                      Page 135
Module of Office 2007 Basic

   3. Choose Entrance. A submenu appears.
   4. Click Fly In. PowerPoint applies the effect. If the Auto preview box is checked,
      PowerPoint automatically provides you with a preview of the animation.

Modify the Animation


   1. Click the down arrow next to the Start field and then select After Previous. The Apply for
      Financial Aid field appears in the center of the Custom Animation pane.
   2. Click the down arrow next to the Apply for Financial Aid field and then click Timing.
      The Fly In dialog box appears.


   3. Type 0.05 in the Delay text box.
   4. Click OK.


   5. Click the down arrow next to the Direction field and then select From Bottom.
   6. Click the down arrow next to the Speed field and then select Medium. If the Auto
      preview box is checked, PowerPoint automatically provides you with a preview of the
      animation. You can click the Play button              on the Custom Animation pane at
      anytime to preview an animation.

                                                                                         Page 136
Module of Office 2007 Basic

Add Transitions

Transitions determine how your presentations move from one slide to the next. For example, a
slide can move up onto the screen and replace the previous slide. PowerPoint provides several
transition methods. You can add sound to a transition and you can control its speed. You can
apply a transition to selected slides or to all of the slides in your presentation.

A transition can occur when the presenter clicks the mouse or after the amount of time you
specify.

To apply a transition to selected slides:

    1. On the Slides tab, hold down the Ctrl key and then click the slides to which you want to
       apply the transition.
    2. Choose the Animations tab.
    3. Click the More button in the Transition to this Slide group. A menu of transitions
       appears.
    4. Click the transition you want to apply. PowerPoint applies the transition. As you roll your
       pointer over each transition, PowerPoint provides you with a live preview of the
       transition.

To apply a transition to all slides:

    1. Choose the Animations tab.
    2. Click the More button in the Transition to this Slide group. A menu of transitions
       appears.
    3. Click the transition you want to apply. As you roll your pointer over each transition,
       PowerPoint provides you with a live preview of the transition.
    4. Click the Apply to All button                 in the Transition to This Slide group.

To add a sound to a transition:

    1. Choose the Animations tab.
    2. Click the down arrow next to the Transition Sound field and then click the sound you
       want. As you roll your pointer over each sound, PowerPoint plays the sound.

To set the speed of a transition:

    1. Choose the Animations tab.
    2. Click the down arrow next to the Transition Speed field and then click the speed you
       want.

If you want the transition to occur after the presenter clicks the mouse, check the On Mouse
Click check box. If you want a transition to occur after a specified period of time, check the
Automatically After check box and then specify the amount of time you want to elapse before
the transition occurs. The On Mouse Click check box and the Automatically After check box are
both located on the Animations tab in the Transition to This Slide group.

EXERCISE 2

Add Transitions


                                                                                         Page 137
Module of Office 2007 Basic

   1. Choose the Animations tab.
   2. Click the More button in the Transition to this Slide group. A menu of transitions
      appears.


                                                                       s

   3. Click the Push Up transition. As you roll your pointer over each transition, PowerPoint
      provides you with a live preview of the transition.

Add Sound and Set the Speed


   1. Click the down arrow next to the Transition Sound field and then click Click.
   2. Click the down arrow next to the Transition Speed field and then click Slow.

Advance Slide


   1. Check the On Mouse Click check box.
   2. Click the Automatically After check box.
   3. Type 00:07 in the Automatically After text box.
   4. Click the Apply to All button               . PowerPoint applies all of your changes to
      all of the slides.
   5. Click Slide 1 on the Slides tab.
   6. Type 00:03 in the Automatically After text box. PowerPoint changes the timing for Slide
      1.

Spell Check

PowerPoint checks your spelling as you type and displays errors with a red wavy line under the
misspelled word. You can right-click and then select the correct spelling from the list of
offerings on the menu that appears or select Spelling to open the Spelling dialog box. If you need
to, you can initiate a spell check anytime you like. To start a spell check, do one of the following:

       Press F7.
       Choose the Review tab and then click the Spelling button        .

If the spell check finds a possible spelling error, the Spelling dialog box opens with the spelling
error highlighted. You can respond in several ways.


                                                                                           Page 138
Module of Office 2007 Basic


          Response                          Procedure
          Do not change spelling.           Click Ignore.
          Correct spelling.                     1. Click the correct spelling in the
                                                   Suggestions box.
                                                2. Click Change.


          Add to dictionary.                Click Add.
          Word is correct. Do not change    Click Ignore All.
          presentation.
          Word is incorrect. Change         Click Change All.
          entire presentation.

EXERCISE 3

Spell Check

   1. Press F7
   2. Correct any spelling errors PowerPoint finds. If PowerPoint does not find any errors, the
      Spelling Check is Complete message box appears. Click OK.

Use the Outline and Slides Tabs

By default, the Outline and Slides tabs are located on the left side of your PowerPoint window.
The Outline tab displays the text contained in your presentation. The Slides tab displays a
thumbnail of all your slides. You click the thumbnail to view the slide in the Slide pane.

EXERCISE 4

Use the Outline and Slides Tabs


                                                                                        Page 139
Module of Office 2007 Basic


   1. Choose the Slides tab to view thumbnails of your slides.


   2. Choose the Outline tab to view the text of your presentation as an outline.

Use Slide Sorter View

After you have created your PowerPoint slides, you can move, cut, copy, paste, duplicate,
navigate, and view them in Sorter view. To view the slides in Sorter view, do one of the
following:


       Choose the View tab and then click the Slide Sorter button      in the Presentation Views
       group.
       Click the Slide Sorter button   in the bottom-right corner of the PowerPoint window.

                                      Slide Sorter View
            Task                                 Procedure
            Move to first slide.                 Use Ctrl+Home.
            Move to last slide.                  Use Ctrl+End.
            Move to next slide.                  Use the right arrow.
            Move to previous slide.              Use the left arrow.
            Select a slide.                      Single-click the slide.
            Open a slide in Normal view.         Double-click the slide.
            Select slides.                       Select a single slide:

                                                     1. Click the slide you want to
                                                        select.


                                                                                       Page 140
Module of Office 2007 Basic

                         Slide Sorter View
Task                              Procedure
                                  Select multiple slides:

                                     1. Hold down the Ctrl key.
                                     2. Click the slides you want to
                                        select.


Delete a slide.                      1. Select the slide or slides
                                        you want to delete.
                                     2. Press the Delete key.


                                     1. Select the slide or slides
                                        you want to delete.
                                     2. Choose the Home tab and
                                        then click the Delete button
                                           .


Copy a slide.                        1. Select the slide.
                                     2. Choose the Home tab.
                                     3. Click the Copy button
                                        in the Clipboard group.


                                     1. Select the slide.
                                     2. Press Ctrl+C.


Paste a slide.                       1. Select the slide after which
                                        you want the new slide or
                                        slides to appear.
                                     2. Choose the Home tab.
                                     3. Click the Paste button
                                        in the Clipboard group.


                                     1. Select the slide after which
                                        you want the new slide or
                                        slides to appear.
                                     2. Press Ctrl+V.


Cut a slide.                         1. Select the slide or slides
                                        you want to cut.
                                     2. Choose the Home tab.
                                     3. Click the Cut button      in
                                        the Clipboard group.


                                     1. Select the slide or slides
                                        you want to cut.
                                     2. Press Ctrl+X.


Move a slide.                        1. Select the slide (or slides)
                                        you want to move.
                                     2. Drag it to the new location.


                                                                       Page 141
Module of Office 2007 Basic

                                        Slide Sorter View
            Task                                   Procedure
            Duplicate a slide.                         1. Select the slide (or slides)
                                                          you want to duplicate.
                                                       2. Press Ctrl+D.


EXERCISE 5

Use Slide Sorter View


   1. Choose the View tab.
   2. Click Slide Sorter in the Presentation Views group.
   3. Double-click a slide to view it in Normal view.

Print

PowerPoint provides you with many printing options. You can print a large view of your slides
or you can print your slides as handouts with 1, 2, 3, 4, 6, or 9 slides per page. You can also print
your Notes pages or the Outline view of your slides.

To print:

   1. Click the Microsoft Office button. A menu appears.
   2. Choose Print.
   3. Click Print Preview.
   4. Click the down arrow next to the Print What field in the Page Setup group and then select
      what you would like to print. A preview appears onscreen.
   5. Click the Print . The Print dialog box appears.
   6. Click the down arrow next to the Color/Grayscale field to select whether you want your
      slides to print in color, grayscale, or black and white. If you are using a black and white
      printer, choose black and white. You will use less ink or toner.
   7. Click OK.

EXERCISE 6

Print an Outline


                                                                                           Page 142
Module of Office 2007 Basic


1. Click the Microsoft Office button. A menu appears.
2. Choose Print.
3. Click Print Preview. The Print Preview tab appears.


4. Click the down arrow next to the Print What field in the Page Setup group and then select
   Outline View.
5. Click the Print button  . The Print dialog box appears.


                                                                                   Page 143
Module of Office 2007 Basic

   6. Click the down arrow next to the Color/Grayscale field to select whether you want your
      slides to print in color, grayscale, or black and white. If you are using a black and white
      printer, choose black and white. You will use less ink or toner.
   7. Set the other print settings.
   8. Click OK. Your outline prints.

Print Your Slides

   1.   Click the Microsoft Office button. A menu appears.
   2.   Choose Print.
   3.   Click Print Preview. The Print Preview tab appears.
   4.   Click the down arrow next to the Print What field in the Page Setup group and then select
        Slides.
   5.   Click the Print button      . The Print dialog box appears.
   6.   Click the down arrow next to the Color/Grayscale field to select whether you want your
        slides to print in color, grayscale, or black and white. If you are using a black and white
        printer, choose black and white. You will use less ink or toner.
   7.   Set the other print settings.
   8.   Click OK. Your slides print.

Print Your Slides as a Handout

   1.   Click the Microsoft Office button. A menu appears.
   2.   Choose Print.
   3.   Click Print Preview. The Print Preview tab appears.
   4.   Click the down arrow next to the Print What field in the Page Setup group and then select
        Handouts (4 slides per page).
   5.   Click the Print button       . The Print dialog box appears.
   6.   Click the down arrow next to the Color/Grayscale field to select whether you want your
        slides to print in color, grayscale, or black and white. If you are using a black and white
        printer, choose black and white. You will use less ink or toner.
   7.   Set the other print settings.
   8.   Click OK. Your handouts print.


                                                                                          Page 144
Module of Office 2007 Basic


                              Page 145
Module of Office 2007 Basic


                              Page 146
Module of Office 2007 Basic


                              Page 147

Ms office notes

  • 1.
    Module of Office2007 Basic Page 1
  • 2.
    Module of Office2007 Basic Getting Started With Microsoft Word Steps 1. Click on Start button 2. Click on Microsoft Office Folder 3. Click on Microsoft Office Word 2007 Page 2
  • 3.
    Module of Office2007 Basic Page 3
  • 4.
    Module of Office2007 Basic Home Ribbon Page 4
  • 5.
    Module of Office2007 Basic 1. Home Ribbon 19. Font Color 2. Insert Ribbon 20. Left Align 3. Page Layout Ribbon 21. Center 4. References Ribbon 22. Right Align 5. Mailings Ribbon 23. Justify 6. Review Ribbon 24. Line Spacing 7. View Ribbon 25. Shading 8. Add-Ins Ribbon 26. Border 9. Bold 27. Bullets 10. Italic 28. Numbering 11. Underline 29. Multilevel List 12. Strikethrough 30. Decrease Indent 13. Change Case 31. Increase Indent 14. Font 32. Paste 15. Font Size 33. Format Painter 16. Grow Font 34. Cut 17. Shrink Font 35. Copy 18. Clear Formatting Page 5
  • 6.
    Module of Office2007 Basic INTRODUCTION OF RIBBONS Home Ribbon .1 In Microsoft Word the first by default appeared ribbon is called Home Ribbon. In Home Ribbon Formatting and Standard tool bars appeared. We use Home Ribbon’s icons to format and align the document. Insert Ribbon .2 The next ribbon after Home Ribbon is Called Insert Ribbon. If you want to insert a picture, table, shape, chart, header or footer, symbols or hyperlink etc. Page Layout Ribbon .3 Page 6
  • 7.
    Module of Office2007 Basic Page Lay Out Ribbon is used for the formatting of the page e.g. page border, page color, page margin, page size and page orientation etc. References Ribbon .4 References are used to insert bibliography, end note, indexes, cross references, table of figures etc. Mailings Ribbon Mailings are used to send letters or mail to multiple addresses. Page 7
  • 8.
    Module of Office2007 Basic Table of Contents Lesson 1: Getting Familiar with Microsoft Word 2007 for Windows Microsoft Word is a word processing software package. You can use it to type letters, reports, and other documents. It gives you the ability to use your home computer as well as your business computer for desktop publishing. This tutorial teaches Microsoft Word 2007 basics. Although this tutorial was created for the computer novice, because Microsoft Word 2007 is so different from previous versions of Microsoft Word, even experienced users may find it useful. This lesson will introduce you to the Word window. You use this window to interact with Word. The Microsoft Office Button The Quick Access Toolbar The Title Bar The Ribbon The Ruler The Text Area The Vertical and Horizontal Scroll Bars The Status Bar Understanding Document Views Click Understanding Nonprinting Characters Create Sample Data and Select Text Place the Cursor Execute Commands with Keyboard Shortcuts Start a New Paragraph Exit Word Lesson 2: Microsoft Word 2007 Basic Features Lesson 1 familiarized you with the the Microsoft Word window. You are now ready to learn how to create a Word document. This lesson covers typing, using the Backspace key, using the Delete key, inserting text, bolding, underlining, and italicizing. Type, Backspace, and Delete Insert and Overtype Bold, Italicize, and Underline Save a File and Close Word Lesson 3: More Basic Features The features in Word 2007 can make your work easier, make your documents more attractive, and/or enable you to work more efficiently. This Microsoft Word lesson teaches you how to open a file, cut, copy, paste, use AutoText, use spell check, use Find and Replace, and change fonts. All of these features either make your work easier or make your document more attractive. Open a File Cut and Paste Copy and Paste Use the Clipboard Create AutoText Use Spell Check Find and Replace Change the Font Size Change the Font Save Your File Lesson 4: Formatting Paragraphs and Working with Styles When you type information into Microsoft Word, each time you press the Enter key Word creates a new paragraph. You can format paragraphs. For example, you can indent the first line of a paragraph, you can set the amount of space that separates paragraphs, and you can align a paragraph left, right, center, or flush with both margins. Styles are a set of formats you can quickly apply to a paragraph. For example, by applying a style, you can set the font, set the font size, and align a paragraph all at once. In this lesson, you will learn about the various formats you can apply to a paragraph and about styles. Page 8
  • 9.
    Module of Office2007 Basic Open a Blank Document Add Sample Text Add Space Before or After Paragraphs Change Line Spacing Create a First-Line Indent Indent Paragraphs Align Paragraphs Create a Hanging Indent Choose a Style Set Apply a Style Change Style Sets Lesson 5: Adding Bullets and Numbers, Undoing and Redoing, Setting Page Layouts and Printing Documents If you have lists of data, you may want to bullet or number them. When using Microsoft Word, bulleting and numbering are easy. The first part of this lesson teaches you to bullet and number. After you have completed your document, you may want to share it with others. One way to share your document is to print and distribute it. However, before you print you may want to add page numbers and tell Word such things as the page orientation, the paper size, and the margin setting you want to use. In this lesson you will learn how to layout and how to print your documents. Add Bullets and Numbers Undo and Redo Set the Orientation Set the Page Size Set the Margins Add Page Numbers Insert Page Breaks Preview and Print Documents Page 9
  • 10.
    Module of Office2007 Basic Page 10
  • 11.
    Module of Office2007 Basic Microsoft Word Training This Microsoft Word training is free and online. After completing this training you will be proficient in Microsoft Word. Lesson 1: Getting Familiar with Microsoft Word 2007 for Windows Microsoft Word is a word processing software package. You can use it to type letters, reports, and other documents. This tutorial teaches Microsoft Word 2007 basics. Although this tutorial was created for the computer novice, because Microsoft Word 2007 is so different from previous versions of Microsoft Word, even experienced users may find it useful. This lesson will introduce you to the Word window. You use this window to interact with Word. To begin this lesson, open Microsoft Word 2007. The Microsoft Word window appears and your screen looks similar to the one shown here. Note: Your screen will probably not look exactly like the screen shown. In Word 2007, how a window displays depends on the size of your window, the size of your monitor, and the resolution to which your monitor is set. Resolution determines how much information your computer monitor can display. If you use a low resolution, less information fits on your screen, but the size of your text and images are larger. If you use a high resolution, more information fits on your screen, but the size of the text and images are smaller. Also, Word 2007, Windows Vista, and Windows XP have settings that allow you to change the color and style of your windows. The Microsoft Office Button In the upper-left corner of the Word 2007 window is the Microsoft Office button. When you click the button, a menu appears. You can use the menu to create a new file, open an existing file, save a file, and perform many other tasks. Page 11
  • 12.
    Module of Office2007 Basic The Quick Access Toolbar Next to the Microsoft Office button is the Quick Access toolbar. The Quick Access toolbar provides you with access to commands you frequently use. By default Save, Undo, and Redo appear on the Quick Access toolbar. You can use Save to save your file, Undo to rollback an action you have taken, and Redo to reapply an action you have rolled back. The Title Bar Next to the Quick Access toolbar is the Title bar. The Title bar displays the title of the document on which you are currently working. Word names the first new document you open Document1. As you open additional new documents, Word names them sequentially. When you save your document, you assign the document a new name. The Ribbon You use commands to tell Microsoft Word what to do. In Microsoft Word 2007, you use the Ribbon to issue commands. The Ribbon is located near the top of the screen, below the Quick Access toolbar. At the top of the Ribbon are several tabs; clicking a tab displays several related command groups. Within each group are related command buttons. You click buttons to issue commands or to access menus and dialog boxes. You may also find a dialog box launcher in the bottom-right corner of a group. Clicking the dialog box launcher gives you access to additional commands via a dialog box. The Ruler The ruler is found below the Ribbon. You can use the ruler to change the format of your document quickly. If your ruler is not visible, follow the steps listed here: 1. Click the View tab to choose it. 2. Click the check box next to Ruler in the Show/Hide group. The ruler appears below the Ribbon. Page 12
  • 13.
    Module of Office2007 Basic The Text Area Just below the ruler is a large area called the text area. You type your document in the text area. The blinking vertical line in the upper-left corner of the text area is the cursor. It marks the insertion point. As you type, your text displays at the cursor location. The horizontal line next to the cursor marks the end of the document. The Vertical and Horizontal and Vertical Scroll Bars The vertical and horizontal scroll bars enable you to move up, down, and across your window simply by dragging the icon located on the scroll bar. The vertical scroll bar is located along the right side of the screen. The horizontal scroll bar is located just above the status bar. To move up and down your document, click and drag the vertical scroll bar up and down. To move back and forth across your document, click and drag the horizontal scroll bar back and forth. You won't see a horizontal scroll bar if the width of your document fits on your screen. The Status Bar The Status bar appears at the very bottom of your window and provides such information as the current page and the number of words in your document. You can change what displays on the Status bar by right-clicking on the Status bar and selecting the options you want from the Customize Status Bar menu. You click a menu item to select it. You click it again to deselect it. A check mark next to an item means it is selected. Page 13
  • 14.
    Module of Office2007 Basic �Understanding Document Views In Word 2007, you can display your document in one of five views: Draft, Web Layout, Print Layout, Full Screen Reading, or Online Layout. Draft View Draft view is the most frequently used view. You use Draft view to quickly edit your document. Web Layout Web Layout view enables you to see your document as it would appear in a browser such as Internet Explorer. Print Layout The Print Layout view shows the document as it will look when it is printed. Reading Layout Reading Layout view formats your screen to make reading your document more comfortable. Outline View Outline view displays the document in outline form. You can display headings without the text. If you move a heading, the accompanying text moves with it. You should use Draft view for these lessons. Before moving ahead, make sure you are in Draft view: 1. Click the View tab. 2. Click Draft in the Document Views group. When the Draft option is selected it appears in a contrasting color. Click During the lessons that follow, you will be asked to "click" items and to choose tabs. When asked to click: Page 14
  • 15.
    Module of Office2007 Basic 1. Point to the item. 2. Press your left mouse button once. If you are asked to double-click an item: 1. Point to the item. 2. Quickly press your left mouse button twice. If you are asked to right-click: 1. Point to the item. 2. Press your right mouse button. If you are asked to choose a tab, click the tab. Understanding Nonprinting Characters Certain characters, called nonprinting caharacters, do not print and will not appear in your printed document but do affect your document layout. You can elect to see these characters on the screen as you type or you can elect to have them remain invisible. For these lessons, opt to see them onscreen. This table describes most of them: Character Denotes A tab . A space ¶ The end of a paragraph Hidden text To view nonprinting characters: 1. Choose the Home tab. 2. Click the Show/Hide button in the Paragraph group . The Show/Hide button appears in a contrasting color, when it is selected. Create Sample Data and Select Text If you type =rand() in your Word document and then press Enter, Word creates three paragraphs. You can use these paragraphs to practice what you learn. Throughout these lessons, you will be asked to select text. The following exercise teaches you how to create data and how to select data. You can select by using the arrow keys or by clicking and dragging. When using the arrow keys, use the up arrow to move up, the down arrow to move down, the left arrow to move left, and the right arrow to move right. When using the mouse, press the left mouse button and then drag in the direction you want to move. EXERCISE 1 Create Sample Data Page 15
  • 16.
    Module of Office2007 Basic 1. Type =rand(). 2. Press Enter. Three paragraphs appear in your document. Select with the Shift and Arrow Keys 1. Place your cursor before the word "On" in the first paragraph. 2. Press and hold down the Shift key, which serves as an "anchor" showing where text you wish to select begins or ends. 3. Press the right arrow key until the first line of text is highlighted. 4. Press the down arrow key until the first paragraph is highlighted. 5. Click anywhere outside the highlighted area to remove the highlighting. Select with the Mouse 1. Place your cursor before the word "You" in the second paragraph. 2. Press and hold down the left mouse button. 3. Drag the mouse until you have highlighted the second paragraph. 4. Click anywhere outside the highlighted area to remove the highlighting. Place the Cursor During the lessons, you will often be asked to place the cursor at a specific location (the insertion point) on the screen. You place the cursor by moving the cursor to the specified location and pressing the left mouse button or by using the arrow keys to move to the specified location. EXERCISE 2 The Arrow Keys 1. Use the down arrow key to move down your document. 2. Use the right arrow key to move to the right. 3. Use the up arrow key to move up. 4. Use the left arrow key to move to the left. Cursor 1. Move around you document by using you mouse and clicking in a variety of location. 2. Click in a location and type. Note what happens. Execute Commands with Keyboard Shortcuts There are many methods you can use to accomplish tasks when using Word. Generally, you choose an option by clicking the option on the Ribbon. However, you can also use shortcut keys. A key name followed by a plus and a letter means to hold down the key while pressing the letter. For example, Ctrl+b means you should hold down the Ctrl key while pressing "b." A shorthand notation of the above would read as follows: Press Ctrl+b Typists who are slowed down by using a mouse usually prefer using keys. Start a New Paragraph When you type in Microsoft Word, you do not need to press a key to move to a new line. To start a new paragraph, press the Enter key. Exit Word You have completed Lesson One. Typically, you save your work before exiting. Page 16
  • 17.
    Module of Office2007 Basic EXERCISE 3 Close and Save—Windows Vista 1. Click the Microsoft Office button. A menu appears. 2. Click Exit Word, which you can find in the bottom-right corner. 3. You are prompted: "Do you want to save changes to Document1?" To save your changes, click Yes. Otherwise, click No. If you click Yes, the Save As dialog box appears. 4. Move to the correct folder. 5. Name your file by typing Lesson One.doc in the File Name field. 6. Click Save. Word saves your file. Close and Save—Windows XP 1. Click the Microsoft Office button. A menu appears. 2. Click Exit Word, which is in the bottom-right corner. 3. You will be prompted: "Do you want to save changes to Document1?" To save your changes, click Yes. Otherwise, click No. If you click Yes, the Save As dialog box appears. 4. Specify the correct folder in the Save In box. 5. Name your file by typing Lesson One.doc in the File Name field. 6. Click Save. Word saves your file. Page 17
  • 18.
    Module of Office2007 Basic Page 18
  • 19.
    Module of Office2007 Basic Lesson 2: Microsoft Word 2007 Basic Features Lesson 1 familiarized you with the the Microsoft Word window. You are now ready to learn how to create a Word document. This lesson covers typing, using the Backspace key, using the Delete key, inserting text, bolding, underlining, and italicizing. To begin, open Microsoft Word. Type, Backspace, and Delete In Microsoft Word, you create documents by typing them. For example, if you want to create a report, you open Microsoft Word and then begin typing. You do not have to do anything when your text reaches the end of a line and you want to move to a new line—Microsoft Word automatically moves your text to a new line. If you want to start a new paragraph, press Enter. Microsoft word creates a blank line to indicate the start of a new paragraph. To capitalize, hold down the Shift key while typing the letter you want to capitalize. If you make a mistake, you can delete what you typed and then type your correction. You can use the Backspace key to delete. Each time you press the Backspace key, Microsoft Word deletes the character that precedes the insertion point. The insertion point is the point at which your mouse pointer is located. You can also delete text by using the Delete key. First, you select the text you want to delete; then you press the Delete key. EXERCISE 1 Type and Backspace 1. Type the following sentence: Joe has a very large house. 2. Delete the word "house." Using either the arrow keys or the mouse, place the cursor between the period and the "e" in "house." 3. Press the Backspace key until the word "house" is deleted. 4. Type boat. The sentence should now read: "Joe has a very large boat." Delete Delete the word "very" from the sentence you just typed. 1. Select the word "very." You can place the cursor before the "v" in the word "very," press and hold down the Shift key, and then press the right arrow key until the word "very" is highlighted. 2. Press the Delete key. The sentence should now read: "Joe has a large boat." Insert and Overtype While creating your document, you may find you need to insert text—place new text between existing text. Suppose, you type the sentence, "Joe has a large boat." After typing it, you decide you want to change the sentence to "Joe has a large blue boat." With Microsoft Word, inserting a word, phrase, or even several paragraphs is easy. Alternatively, you may want to overtype text—replace old text with new text. For example, suppose you type the sentence, "Joe has a large blue boat." After typing it, you decide you want to change the sentence to "Joe has a large gray boat." With Microsoft Word, overtyping the word blue with the word gray is also easy. Before you attempt to insert or overtype, you should check the mode you are in—Insert or Overtype. You right-click the Status bar and then use the Customize Status Bar menu to place the Insert/Overtype button on the Status bar. You can then use the Insert/Overtype button to switch between Insert and Overtype mode. When you are in Insert mode, you can insert text. When you are in Overtype mode, you can overtype text. By default, Microsoft Word is in the Insert mode. EXERCISE 2 Page 19
  • 20.
    Module of Office2007 Basic Placing the Insert/Overtype button on the Status bar 1. Right-click the Status bar. The Customize Status Bar menu appears. 2. Click Overtype. The Insert/Overtype button appears on the Status bar. 3. If the word Insert appears on the Status bar, you are in Insert mode. 4. If the word Overtype appears on the Status bar, click the word Overtype and it will change to Insert, thereby changing Word to Insert mode. Insert Make sure you are in Insert mode before proceeding. You are going to insert the word "blue" between the words "large" and "boat." 1. Place the cursor after the space between the words "large" and "boat." 2. Type the word blue. 3. Press the spacebar to add a space. 4. The sentence should now read: "Joe has a large blue boat." Overtype You can type over the current text (replace the current text with new text) in the Overtype mode. Do the following to change to the Overtype mode. Click "Insert" on the Status bar. The word Insert changes to Overtype. Change the word "blue" to "gray." 1. Place the cursor before the letter "b" in "blue." 2. Type the word gray. 3. The sentence should now read: "Joe has a large gray boat." Note: You can overtype text without changing to Overtype mode by selecting the text you want to overtype and then typing. Bold, Italicize, and Underline When creating a document, you may need to emphasize particular words or phrases by bolding, underlining, or italicizing. Also, certain grammatical constructs require that you bold, underline, or italicize. You can bold, underline, and italicize when using Word. You also can combine these features—in other words, you can bold, underline, and italicize a single piece of text. When you need to perform a task in Microsoft Word, you can usually choose from several methods. The exercises that follow show you how to bold, underline, or italicize using four different methods: using the launcher, the Ribbon, the Mini-toolbar/context menu, and the keyboard. EXERCISE 3 Type the following exactly as shown. Remember, pressing the Enter key starts a new paragraph. Press the Enter key at the end of each of the following lines to start a new paragraph. Launcher: Bold Italicize Underline these words. All three Regular Ribbon: Bold Italicize Underline these words. All three Regular Mini Toolbar: Bold Italicize Regular Keys: Bold Italicize Underline these words. All three Regular Page 20
  • 21.
    Module of Office2007 Basic Your screen should look similar to the one shown here. Bold with the Dialog Box Launcher 1. On the line that begins with Launcher, select the word "Bold." You can place the cursor before the letter "B" in "Bold." Press the Shift key; then press the right arrow key until the entire word is highlighted. 2. Choose the Home tab. 3. Click the dialog box launcher in the Font group. The Font dialog box appears. Page 21
  • 22.
    Module of Office2007 Basic 4. Click Bold in the Font Style box. Note: You can see the effect of your action in the Preview window. To remove the bold, click Regular. 5. Click OK to close the dialog box. 6. Click anywhere in the text area to remove the highlighting. You have bolded the word bold. Alternate Method—Bold with the Ribbon 1. On the line that begins with "Ribbon," select the word "Bold." You can place the cursor before the letter "B" in "Bold." Press the Shift key; then press the right arrow key until the entire word is highlighted. 2. Choose the Home tab. 3. Click the Bold button in the Font group. You have bolded the word bold. Note: To remove the bold, you can select the text and then click the Bold button again. 4. Click anywhere in the text area to remove the highlighting. Alternate Method - Bold with the Mini Toolbar Page 22
  • 23.
    Module of Office2007 Basic 1. On the line that begins with "Mini Toolbar," select the word "Bold." You can place the cursor before the letter "B" in "Bold."Press the Shift key; then press the right arrow key until the entire word is highlighted. 2. Right-click. The Mini toolbar appears. 3. Click the Bold button . You have bolded the word bold. Alternate Method—Bold with Keys 1. On the line that begins with "Keys," select the word "Bold." You can place the cursor before the letter "B" in "Bold." Press the Shift key; then press the right arrow key until the entire word is highlighted. 2. Press Ctrl+b (hold down the Ctrl key while pressing b). Note: To remove the Bold, press Ctrl+b again. You can also remove formatting by pressing Ctrl+spacebar. 3. Click anywhere in the text area to remove the highlighting. Italicize with the Dialog Box Launcher 1. On the line that begins with Launcher, select the word "Italicize." You can place the cursor before the letter "I" in "Italicize." Press the Shift key; then press the right arrow key until the entire word is highlighted. 2. Choose the Home tab. 3. Click the dialog box launcher in the Font group. The Font dialog box appears. Page 23
  • 24.
    Module of Office2007 Basic 4. Click Italic in the Font Style box. Note: You can see the effect of your selection in the Preview window. To remove the italics, click Regular in the Font Style box. 5. Click OK to close the Font dialog box. 6. Click anywhere in the text area to remove the highlighting. You have italicized the word Italicize. Alternate Method—Italicize with the Ribbon 1. On the line that begins with "Ribbon," select the word "Italicize." You can place the cursor before the letter "I" in "Italicize." Press the Shift key; then press the right arrow key until the entire word is highlighted. 2. Choose the Home tab. 3. Click the Italic button on the Ribbon. You have italicized the word Italicize. Note: To remove the italics, select the text and click the Italicize button again. 4. Click anywhere in the text area to remove the highlighting. Alternate Method—Italicize with the Mini Toolbar Page 24
  • 25.
    Module of Office2007 Basic 1. On the line that begins with "Mini Toolbar," select the word "Italicize." You can place the cursor before the letter "I" in "Italicize." Press the Shift key; then press the right arrow key until the entire word is highlighted. 2. Right-click. The Mini toolbar appears. 3. Click the Italic button . You have italicized the word Italicize. Alternate Method—Italicize with Keys 1. On the line that begins with "Keys," select the word "Italicize." You can place the cursor before the letter "I" in "Italicize." Press the Shift key; then press the right arrow key until the entire word is highlighted. 2. Press Ctrl+i (hold down the Ctrl key while pressing i). Note: To remove italics, press Ctrl+i again. You can also remove formatting by pressing Ctrl+spacebar. 3. Click anywhere in the text area to remove the highlighting.You have italicized the word Italicize. Underline with the Dialog Box Launcher You can underline when using Word. Word provides you with many types of underlines from which to choose.The following are some of the underlines that are available if you use the dialog box launcher: The following illustrates underlining with the dialog box launcher: Page 25
  • 26.
    Module of Office2007 Basic 1. On the line that begins with "Launcher," select the words "Underline these words." 2. Choose the Home tab. 3. Click the dialog box launcher in the Font group. The Font dialog box appears. 4. In the Underline Style box, click the down arrow to open the pull-down menu. 5. Click the type of underline you wish to use. Note: To remove an underline, you select None from the pull-down menu. 6. Click OK to close the dialog box. The underline you selected appears under the words. 7. Click anywhere in the text area to remove the highlighting. Alternate Method—Underline with the Ribbon Page 26
  • 27.
    Module of Office2007 Basic 1. On the line that begins with "Ribbon," select the words "Underline these words." 2. Choose the Home tab. 3. Click the Underline button in the Font group . Alternatively, you can press the down arrow next to the underline button and click to choose the type of underline you want. Note: To remove the underlining, click the Underline button again. 4. Click anywhere in the text area to remove the highlighting. Alternate Method—Underline with Keys 1. On the line that begins with "Keys," select the words "Underline these words." 2. Press Ctrl+u (hold down the Ctrl key while pressing u). Note: To remove the underlining, press Ctrl+u again. 3. Click anywhere in the text area to remove the highlighting. All Three with the Dialog Box Launcher 1. On the line that begins with "Launcher," select the words "All three." 2. Choose the Home tab. 3. Click the dialog box launcher in the Font group. The Font dialog box appears. 4. In the Font Style box, click Bold Italic. Note: You can see the effect of your selection in the preview window. To turn off the Bold Italic, click Regular. 5. In the Underline box, click to open the pull-down menu. Click the type of underline you want to use. Note: To remove an underline, select None from the pull-down menu. 6. Click OK to close the dialog box. 7. Click anywhere in the text area to remove the highlighting. Alternate Method—All Three with the Ribbon 1. On the line that begins with "Ribbon," select the words "All three." 2. Choose the Home tab. 3. Click the Bold button in the Font group. 4. Click the Italic button in the Font group. 5. Click the Underline button in the Font group. 6. Click anywhere in the text area to remove the highlighting. Alternate Method—All Three with Keys 1. On the line that begins with "Keys," select the words "All three." 2. Press Ctrl+b (bold). 3. Press Ctrl+i (italicize). 4. Press Ctrl+u (underline). Note: You can remove formatting by highlighting the text and pressing Ctrl+spacebar. 5. Click anywhere in the text area to remove the highlighting. Page 27
  • 28.
    Module of Office2007 Basic Save a File and Close Word You must save your documents if you wish to recall them later. You can use the Save option on the Microsoft Office menu, to save a document. You can also save a document by typing Ctrl+s. The first time you save a document, the Save As dialog box appears. Use the Save As dialog box to locate the folder in which you want to save your document and to give your document a name. After you have saved your document at least once, you can save any changes you make to your document simply by clicking the Save after you click the Microsoft Office button. The following exercise shows you how to save the file you just created and close Word. You will name your file Lesson Two. EXERCISE 4 Save a File—Windows Vista: 1. Click the Microsoft Office button. A menu appears. 2. Click Save. The Save As dialog box appears, if you are saving your document for the first time. 3. Use the Address bar to locate the folder in which you want to save your file. 4. Name your file by typing Lesson Two.docx in the File Name box. 5. Click Save. 6. Click the Microsoft Office button. A menu appears. 7. Click Exit Word, which is located in the bottom-right corner of the window. Word closes. Save a File—Windows XP Page 28
  • 29.
    Module of Office2007 Basic 1. Click the Microsoft Office button. A menu appears. 2. Click Save. The Save As dialog box appears if you are saving your document for the first time. 3. Specify the correct folder in the Save In box. 4. Name your document by typing Lesson Two in the File Name box. 5. Click Save. 6. Click the Microsoft Office button. A menu appears. 7. Click Exit Word, which is located in the bottom-right corner of the window. Word closes. Every time you save your document, you overwrite the previous version of your document. For example, you create a document and save it. Later you delete several passages from the document and then save your changes. The passages from the first draft of the document no longer exist. If you want to save both the original draft of your document and the revised document, you must save the second draft of the document using a different name. To save the document using a different name, click the Microsoft Office button. A menu appears. Click Save As. The Save As dialog box appears. Use the File Name box to give your document a new name. Page 29
  • 30.
    Module of Office2007 Basic Lesson 3: More Basic Features The features in Word 2007 can make your work easier, make your documents more attractive, and/or enable you to work more efficiently. This Microsoft Word lesson teaches you how to open a file, cut, copy, paste, use AutoText, use spell check, use Find and Replace, and change fonts. All of these features either make your work easier or make your document more attractive. Open a File When you do not have time to complete your work or when you finish your work, you can save and close your file. After saving a file, you can later open it to revise or finish it. You learned how to save a file in Lesson 2. In the exercise that follows, you learn how to open the file you saved. EXERCISE 1 Open a File with Windows Vista If you are using Windows Vista: 1. Open Word 2007. 2. Click the Microsoft Office button. A menu appears. 3. Click Open. The Open dialog box appears. 4. Locate the folder in which you saved the file. The file is named Lesson Two.docx. 5. Click Lesson Two.docx. 6. Click Open. The file you created during the previous lesson appears. Open a File with Windows XP If you are using Windows XP: 1. Open Word 2007. 2. Click the Microsoft Office button. A menu appears. 3. Click Open. The Open dialog box appears. 4. Use the Look In field to move to the folder in which you saved the file. The file is named Lesson Two.docx. 5. Click Lesson Two.docx. 6. Click Open. The file you created during the previous lesson appears. Alternate Method—Opening a File with Keys 1. Open Word 2007. 2. Press Ctrl+o. 3. Locate the folder in which you saved your file. The file is named Lesson Two.docx 4. Click Lesson Two.docx. 5. Click Open. The file you created during the previous lesson appears. Cut and Paste You can use Word's Cut feature to remove information from a document. The you can use the Paste feature to place the information you cut anywhere in the same or another document. In other words, you can move information from one place in a document to another place in the same or different document by using the Cut and Paste features. The Office Clipboard is a storage area. When you cut, Word stores the data you cut on the Clipboard. You can paste the information that is stored on the Clipboard as often as you like. Page 30
  • 31.
    Module of Office2007 Basic EXERCISE 2 Cut with the Ribbon 1. Type the following: I want to move. I am content where I am. 2. Select "I want to move. " 3. Choose the Home tab. 4. Click the Cut button in the Clipboard group. Word cuts the text you selected and places it on the Clipboard. Your text should now read: "I am content where I am." Paste with the Ribbon 1. Place the cursor after the period in the sentence "I am content where I am." 2. Press the spacebar to leave a space. 3. Choose the Home tab. 4. Click the Paste button in the Clipboard group. Word pastes the text on the Clipboard. Your text should now read: "I am content where I am. I want to move." Page 31
  • 32.
    Module of Office2007 Basic Alternate Method—Cut with a Context Menu 1. Type the following: I want to move. I am content where I am. 2. Select "I want to move. " 3. Right-click. The Mini toolbar and a context menu appear. 4. Click Cut on the menu. Your text should now read: "I am content where I am." Alternate Method—Paste with a Context Menu 1. Place the cursor after the period in the sentence "I am content where I am." 2. Press the spacebar to leave a space. 3. Right-click. A Mini toolbar and a context menu appear. 4. Click Paste. Your text should now read: "I am content where I am. I want to move." Alternate Method—Cut with Keys 1. Type the following: I want to move. I am content where I am. 2. Select "I want to move." 3. Press Ctrl+x. 4. Your text should now read: " I am content where I am." Page 32
  • 33.
    Module of Office2007 Basic Alternate Method—Paste with Keys 1. Place the cursor after the period in the sentence: "I am content where I am." 2. Press the spacebar to leave a space. 3. Press Ctrl+v. 4. Your text should now read: "I am content where I am. I want to move." Copy and Paste In Microsoft Word, you can copy information from one area of a document and place the information you copied anywhere in the same or another document. In other words, after you type information into a document, if you want to place the same information somewhere else, you do not have to retype the information. You simple copy it and then paste it in the new location. As with cut data, Word stores copied data on the Clipboard. EXERCISE 3 Copy with the Ribbon 1. Type the following: You will want to copy me. One of me is all you need. 2. Select "You will want to copy me." 3. Choose the Home tab. 4. Click the Copy button in the Clipboard group. Word copies the data you selected to the Clipboard. Paste with the Ribbon 1. Place the cursor after the period in the sentence: "One of me is all you need." 2. Press the spacebar to leave a space. 3. Choose the Home tab. Page 33
  • 34.
    Module of Office2007 Basic 4. Click the Paste button in the Clipboard group. Word places the data you copied at the insertion point. Your text should now read: "You will want to copy me. One of me is all you need. You will want to copy me." Alternate Method—Copy with a Context Menu 1. Type the following: You will want to copy me. One of me is all you need. 2. Select "You will want to copy me." 3. Right-click. A Mini toolbar and a context menu appear. 4. Click Copy. Word places the data you copied at the insertion point. Your text should now read: "You will want to copy me. One of me is all you need. You will want to copy me." Alternate Method—Paste with a Context Menu 1. Place the cursor after the period in the sentence: "One of me is all you need." 2. Press the spacebar to leave a space. 3. Right-click. A context menu appears. 4. Click Paste. Word pastes the information on the Clipboard into the document. Alternate Method—Copy with Keys 1. Type the following: You will want to copy me. One of me is all you need. 2. Select "You will want to copy me. " 3. Press Ctrl+c. Word copies the information you selected to the Clipboard. Alternate Method—Paste with Keys 1. Place the cursor after the period in the sentence "One of me is all you need." 2. Press the spacebar to leave a space. 3. Press Ctrl+v. 4. Your text should now read: "You will want to copy me. One of me is all you need. You will want to copy me." Use the Clipboard As you cut or copy, Word can store the information you have cut or copied on the Clipboard in a hierarchy. Then each time you cut or copy, the data you just cut or copied moves to the top of the Clipboard hierarchy and the data previously at the top moves down one level. When you choose Paste, the item at the top of the hierarchy is the item Word pastes into your document. The Clipboard can store up to 24 items. You can paste any item on the Clipboard into your document by placing your cursor at the insertion point, displaying the Clipboard pane, and then clicking the item. Page 34
  • 35.
    Module of Office2007 Basic The Clipboard pane includes an Options button. You can click the Options button to set the Clipboard options described in the following table. Option Description Show Office Clipboard Automatically Shows the Clipboard automatically when you copy items. Show Office Clipboard When Ctrl+c Shows the Clipboard when you press Ctrl+c Pressed Twice twice. Collect Without Showing Office Copies to the Clipboard without displaying the Clipboard Clipboard pane. Show Office Clipboard Icon on Displays the Clipboard icon on your system Taskbar taskbar. Show Status Near Taskbar When Displays the number of items copied on the Copying taskbar when copying. EXERCISE 4 Use the Clipboard 1. Place the cursor at the point at which you want to insert your text. 2. Choose the Home tab. 3. Click the Clipboard dialog box launcher to open the Clipboard. 4. Click the item on the clipboard you want to insert into your document. Word pastes the Clipboard item into your document at the insertion point. Create AutoText Cut and Copy both store information on the Clipboard. Information you store on the Clipboard is eventually lost. If you want to store information permanently for reuse, use AutoText. AutoText permanently stores information for future use. EXERCISE 5 Create AutoText Page 35
  • 36.
    Module of Office2007 Basic 1. Type the following: AutoText information is stored permanently. 2. Select "AutoText information is stored permanently." 3. Choose the Insert tab. 4. Click Quick Parts in the Text group. A menu appears. 5. Click Save Selection to Quick Part Gallery. The Create New Building Block dialog box appears. 6. Microsoft Word suggests a name. Change the name by typing AT in the Name field. 7. Click OK. The dialog box closes. 8. Click anywhere in the text area to remove the highlighting. 9. Place the cursor between the period in the sentence you just typed and the paragraph marker (¶). 10. Press the spacebar to leave a blank space. 11. Type AT. 12. Press F3. Your text should now read: "AutoText information is stored permanently. AutoText information is stored permanently." Note: Whenever you need the text, simply type the name (AT) and then press F3. Use Spell Check Word checks your spelling and grammar as you type. Spelling errors display with a red wavy line under the word. Grammar errors display with a green wavy line under the error. In Word 2007, you can use the Review tab's Spelling & Grammar button to initiate a spell and grammar check of your document. Page 36
  • 37.
    Module of Office2007 Basic EXERCISE 6 Use Spell Check 1. Type the following exactly as shown. Include all errors. Open thr door for Mayrala. She is a teacher from the town of Ridgemont. 2. Select: "Open thr door for Mayrala. She is a teacher from the town of Ridgemont." 3. Choose the Review tab. 4. Click the Spelling & Grammar button. The Spelling and Grammar dialog box appears. 6. "The" is misspelled, so it is highlighted on the screen and noted in the Not in Dictionary box. Word suggests correct spellings. These suggestions are found in the Suggestions box. 7. Click "the" in the Suggestions box. 8. Click Change. Note: If the word is misspelled in several places, click Change All to correct all misspellings. 9. The name "Mayrala" is not in the dictionary, but it is correct. Click Ignore Once to leave "Mayrala" in the document with its current spelling. Note: If a word appears in several places in the document, click Ignore All so you are not prompted to correct the spelling for each occurrence. 10. "Ridgemont" is not found in the dictionary. If you frequently use a word not found in the dictionary, you might want to add that word to the dictionary by clicking the Add to Dictionary button. Word will then recognize the word the next time it appears. Click Add to Dictionary. 11. The following should appear on your screen: "Word finished checking the selection. Do you want to continue checking the remainder of the document?" 12. Click No. If you wanted Word to spell-check the entire document, you would have clicked Yes. Page 37
  • 38.
    Module of Office2007 Basic Note: You can also press F7 to initiate a spelling and grammar check. If you don't have anything selected, Word checks the entire document. Find and Replace If you need to find a particular word or phrase in your document, you can use the Find command. This command is especially useful when you are working with large files. If you want to search the entire document, simply execute the Find command. If you want to limit your search to a selected area, select that area and then execute the Find command. After you find the word or phrase you are searching for, you can replace it with new text by executing the Replace command. EXERCISE 7 Use Find with the Ribbon 1. Type the following: Monica is from Easton. She lives on the east side of town. Her daughter attends Eastern High School. 2. Select: "Monica is from Easton. She lives on the east side of town. Her daughter attends Eastern High School." 3. Choose the Home tab. 4. Click Find in the Editing group. A menu appears. 5. Click the Find option on the menu. The Find and Replace dialog box appears. 6. Type east in the Find What field. 7. Click Find Next. Note that the "East" in Easton is highlighted. 8. Click Find Next again. Note that "east" is highlighted. 9. Click Find Next again. Note that the "East" in Eastern is highlighted. Page 38
  • 39.
    Module of Office2007 Basic 10. Click Find Next. The following message should appear: "Word has finished searching the selection. Do you want to search the remainder of the document?" 11. Click No. 12. Click Cancel. Alternate Method—Find with Keys 1. Select: "Monica is from Easton. She lives on the east side of town. Her daughter attends Eastern High School." 2. Press Ctrl+f. 3. Follow steps 6 through 12 in the preceding section. Use Replace with the Ribbon 1. Select "Monica is from Easton. She lives on the east side of town. Her daughter attends Eastern High School." 2. Choose the Home tab. 3. Click Replace in the Editing group. The Find and Replace dialog box appears. 4. Type east in the Find What box. 5. Type west in the Replace With box. 6. Click Find Next. The East in Easton is highlighted. 7. Click Replace. Word replaces the "East" in "Easton" with "West" and then highlights the word "east." 8. Click Replace. Word replaces the word "east" with "west" and then highlights the word "Eastern." 9. Click Close. Do not replace the "East" in "Eastern" with "West." 10. Your text should now read, "Monica is from Weston. She lives on the west side of town. Her daughter attends Eastern High School." Alternate Method—Replace with Keys 1. Select "Monica is from Easton. She lives on the west side of town. Her daughter attends Western High School." 2. Press Ctrl+h. 3. Follow steps 4 through 11 in the preceding section. Page 39
  • 40.
    Module of Office2007 Basic Change the Font Size A font is a set of characters (text) represented in a single typeface. Each character within a font is created by using the same basic style. In Microsoft Word, you can change the size of your font. The following exercise illustrates changing the font size. EXERCISE 8 Change the Font Size 1. Type the following: I can be any size you want me to be. 2. Select "I can be any size you want me to be." 3. Choose the Home tab. 4. In the Font group, click the down arrow next to the Font Size box. A menu of font sizes appears. 5. Move your cursor over the menu of font sizes. As you do, Word 2007 provides a live preview of the effect of applying each font size. 6. Click 36 to select it as your font size. Note: If you know the font size you want, you can type it in the Font Size field. Alternate Method—Change the Font Size with Grow Font and Shrink Font You can also change the size of your font by clicking the Grow Font and Shrink Font buttons. Selecting text and then clicking the Grow Font button makes your font larger. Selecting text and then clicking the Shrink Font button makes your font smaller. Page 40
  • 41.
    Module of Office2007 Basic 1. Type the following: Grow Shrink 2. Select "Grow" 3. Choose the Home tab. 4. Click the Grow Font button several times. You font becomes larger. 5. Select Shrink. 6. Click the Shrink Font button several times. Your font becomes smaller. Change the Font In Microsoft Word, you can change the font (the "family" of type you use for your text). This feature is illustrated in the following exercise: EXERCISE 9 Change the Font with the Ribbon 1. Type the following: Changing fonts 2. Select "Changing fonts." 3. Choose the Home tab. 4. Click the down arrow next to the Font field. A menu of fonts appears. 5. Move the cursor over the list of fonts. Word 2007 provides a live preview of what the font will look like if you select it. 6. Click the font name to select the font you want. Alternate Method—Change the Font with the Mini Toolbar 1. Select "Changing fonts." 2. Right-click. The Mini toolbar and a menu appears. Page 41
  • 42.
    Module of Office2007 Basic 3. Move to the Mini toolbar. 4. Click the down arrow next to the Font field. A menu of fonts appears. 5. Click the name of the font you want. Save Your File This is the end of Lesson 3. You can save your file and close Word. See Lesson 2 to learn how to save and close. Page 42
  • 43.
    Module of Office2007 Basic Lesson 4: Formatting Paragraphs and Working with Styles When you type information into Microsoft Word, each time you press the Enter key Word creates a new paragraph. You can format paragraphs. For example, you can indent the first line of a paragraph, you can set the amount of space that separates paragraphs, and you can align a paragraph left, right, center, or flush with both margins. Styles are a set of formats you can quickly apply to a paragraph. For example, by applying a style, you can set the font, set the font size, and align a paragraph all at once. In this lesson, you will learn about the various formats you can apply to a paragraph and about styles. When you are formatting a paragraph, you do not need to select the entire paragraph. Placing the cursor anywhere in the paragraph enables you to format it. After you format a paragraph, pressing the Enter key creates a new paragraph in the same format. Open a Blank Document To begin a new Word project, you start by opening a new document. To begin this lesson, open a blank document in Microsoft Word. EXERCISE 1 Open a Blank Document 1. Open Word 2007. 2. Click the Microsoft Office button. A menu appears. 3. Click New. The New Document dialog box appears. 4. Click Blank Document. 5. Click Create. A new blank document opens. Page 43
  • 44.
    Module of Office2007 Basic Add Sample Text This lesson uses sample text provided by Microsoft for training and demonstration purposes. You can type the text; however, there is a quicker way. You can use the rand function. Functions are used to obtain information. You tell the function what you want and the function returns that information to you. By default, in Word, when you type the rand function, Word returns three paragraphs. When working with functions, you use arguments to be specific about what you want the function to return. There are two arguments you can use with the rand function. The first one tells Word how many paragraphs you want, and the second one tells Word how many sentences you want in a paragraph. You place arguments between the parentheses and you separate them with a comma. For example, if you type =rand() and then press Enter, word returns three paragraphs. To tell Word you want two paragraphs with three sentences in each paragraph, you type =rand(2,3). EXERCISE 2 Add Sample Text 1. Type =rand(). 2. Press the Enter key. The following text appears: On the Insert tab, the galleries include items that are designed to coordinate with the overall look of your document. You can use these galleries to insert tables, headers, footers, lists, cover pages, and other document building blocks. When you create pictures, charts, or diagrams, they also coordinate with your current document look. ¶ You can easily change the formatting of selected text in the document text by choosing a look for the selected text from the Quick Styles gallery on the Home tab. You can also format text directly by using the other controls on the Home tab. Most controls offer a choice of using the look from the current theme or using a format that you specify directly. ¶ To change the overall look of your document, choose new Theme elements on the Page Layout tab. To change the looks available in the Quick Style gallery, use the Change Current Quick Style Set command. Both the Themes gallery and the Quick Styles gallery provide reset commands so that you can always restore the look of your document to the original contained in your current template. ¶ Add Space Before or After Paragraphs When creating a document, space is often used to clearly identify where each paragraph begins and ends. By default, Word may place slightly more space between paragraphs than it does between lines in a paragraph. You can increase or decrease the amount of space that appears before and after paragraphs by entering amounts in the Before and After fields in the Paragraph section of the Page Layout tab. Use the up arrows next to the Before and After fields to increase the amount of space before or after each paragraph; use the down arrows to decrease the amount of space before or after each paragraph. The following illustrates: EXERCISE 3 Add Space Before or After Paragraphs Page 44
  • 45.
    Module of Office2007 Basic 1. Place your cursor anywhere in the second paragraph of the sample text you created in Exercise 2. 2. Choose the Page Layout tab. The default spacing appears in the Spacing Before field. 3. Click the up arrow next to the Spacing Before field to increase the space before the paragraph. 4. Click the up arrow next to the Spacing After field to increase the amount of space after the paragraph. Note: You can click the down arrows next to the Spacing Before and the Spacing After fields to decrease the amount of space before or after a paragraph. You can also type the amount of space you want to use directly into the fields. Space is measured in points. There are 72 points to an inch. Change Line Spacing Line spacing sets the amount of space between lines within a paragraph. The spacing for each line is set to accommodate the largest font on that line. If the lines include smaller fonts, there will appear to be extra space between lines where the smaller fonts are located. At 1.5, the line spacing is set to one-and-a-half times the single-space amount. At 2.0, the line spacing is set to two times the single-space amount (double space). EXERCISE 4 Change Line Spacing 1. Place your cursor anywhere in the first paragraph of the sample text you created in Exercise 2. 2. Choose the Home tab. 3. Click the Line Spacing button in the Paragraph group. A menu of options appears. 4. Click 2.0 to double-space the first paragraph. Create a First-Line Indent Page 45
  • 46.
    Module of Office2007 Basic Some people and organizations delineate the start of a new paragraph by indenting the first line. If you want to indent the first line of your paragraphs, you can use the Paragraph dialog box to set the amount by which you want to indent. In the Special Field of the Paragraph dialog box, you tell Word you want to indent the first line by choosing First Line from the menu options. In the By field, you tell Word the amount, in inches by which you want to indent. EXAMPLE: First-line Indent On the Insert tab, the galleries include items that are designed to coordinate with the overall look of your document. You can use these galleries to insert tables, headers, footers, lists, cover pages, and other document building blocks. When you create pictures, charts, or diagrams, they also coordinate with your current document look. EXERCISE 5 Create a First-line Indent 1. Place your cursor anywhere within the first paragraph of the sample text you created in Exercise 2. 2. Choose the Home tab. 3. In the Paragraphs group, click the launcher. The Paragraph dialog box appears. 4. Choose the Indents and Spacing tab. 5. Click to open the drop-down menu on the Special field. 6. Click First Line. Page 46
  • 47.
    Module of Office2007 Basic 7. Enter 0.5" in the By field. 8. Click OK. The first line of your paragraph is now indented half an inch. Special Note: To remove the first line indent: 1. Place the cursor anywhere in the paragraph. 2. Choose the Home tab. 3. In the Paragraphs group, click the launcher. The Paragraph dialog box opens. 4. Choose the Indents and Spacing tab. 5. Click the down arrow next to the Special field and then click None. 6. Click OK. Indent Paragraphs Indentation allows you to indent your paragraph from the left and/or right margin. You may find this necessary when you are quoting a large block of text. The following exercise shows you how to indent a paragraph 1 inch from each side. EXAMPLE: Indentation On the Insert tab, the galleries include items that are designed to coordinate with the overall look of your document. You can use these galleries to insert tables, headers, footers, lists, cover pages, and other document building blocks. When you create pictures, charts, or diagrams, they also coordinate with your current document look. You can easily change the formatting of selected text in the document text by choosing a look for the selected text from the Quick Styles gallery on the Home tab. You can also format text directly by using the other controls on the Home tab. Most controls offer a choice of using the look from the current theme or using a format that you specify directly. EXERCISE 6 Indent Paragraphs Page 47
  • 48.
    Module of Office2007 Basic 1. Place your cursor anywhere in the second paragraph of the sample text you created in Exercise 2. 2. Choose the Page Layout tab. 3. Type 1" in the Indent Left field or use the up or down arrows to set the field value to 1". 4. Type 1" in the Indent Right field or use the up or down arrows to set the field value to 1". Your paragraph is now indented one inch from both the left and right margins, as in the example. Align Paragraphs Microsoft Word gives you a choice of several types of alignments. Left-aligned text is flush with the left margin of your document and is the default setting. Right-aligned text is flush with the right margin of your document, centered text is centered between the left and right margins, and Justified text is flush with both the left and right margins. EXAMPLE: Left-Aligned Sample Paragraph On the Insert tab, the galleries include items that are designed to coordinate with the overall look of your document. You can use these galleries to insert tables, headers, footers, lists, cover pages, and other document building blocks. When you create pictures, charts, or diagrams, they also coordinate with your current document look. EXAMPLE: Right-aligned Sample Paragraph On the Insert tab, the galleries include items that are designed to coordinate with the overall look of your document. You can use these galleries to insert tables, headers, footers, lists, cover pages, and other document building blocks. When you create pictures, charts, or diagrams, they also coordinate with your current document look. EXAMPLE: Centered Sample Paragraph Page 48
  • 49.
    Module of Office2007 Basic On the Insert tab, the galleries include items that are designed to coordinate with the overall look of your document. You can use these galleries to insert tables, headers, footers, lists, cover pages, and other document building blocks. When you create pictures, charts, or diagrams, they also coordinate with your current document look. EXAMPLE: Justified Sample Paragraph On the Insert tab, the galleries include items that are designed to coordinate with the overall look of your document. You can use these galleries to insert tables, headers, footers, lists, cover pages, and other document building blocks. When you create pictures, charts, or diagrams, they also coordinate with your current document look. The following exercises demonstrate how to justify text. EXERCISE 7 Create the Paragraphs 1. Type Sample Paragraph. 2. Press Enter. 3. Type =rand(1) to create a paragraph. 4. Press Enter. Right-align 1. Select the paragraphs you created. 2. Choose the Home tab. 3. Click the Align-right button in the Paragraph group. Word right-aligns your paragraphs. Left-align 1. Select the paragraphs you created. 2. Choose the Home tab. 3. Click the Align-left button in the Paragraph group. Word left-aligns your paragraph. Center 1. Selected the paragraphs you created. 2. Choose the Home tab. 3. Click the Center button in the Paragraph group. Word centers your paragraph. Justify 1. Select the paragraphs you created. Page 49
  • 50.
    Module of Office2007 Basic 2. Choose the Home tab. 3. Click the Justify button in the Paragraph group. Word justifies your paragraph. Alternate Method—Right-Justify with Keys 1. Select the paragraphs you created. 2. Press Ctrl+r. The paragraph is now right-aligned. Alternate Method—Left-Justify with Keys 1. Select the paragraphs you created. 2. Press Ctrl+l. The paragraph is now left-aligned. Alternate Method—Center with Keys 1. Select the paragraphs you created. 2. Press Ctrl+e. The paragraph is now centered. Alternate Method—Justify with Keys 1. Select the paragraphs you created. 2. Press Ctrl+j. The paragraph is now justified. Create a Hanging Indent The hanging indent feature indents each line except the first line by the amount specified in the By field, as shown in the example. EXAMPLE:Hanging Indent Hanging Indent: The hanging indent feature indents the first line of the paragraph from the margin by the amount specified in the Left field. The amount in the Left field plus the amount specified in the By field indent all subsequent lines. EXERCISE 8 Create a Hanging Indent Page 50
  • 51.
    Module of Office2007 Basic 1. Type the following: Hanging Indent: The hanging indent feature indents the first line by the amount specified in the Left field. Subsequent lines are indented by the amount specified in the Left field plus the amount specified in the By field. 2. Select the paragraph you just typed. 3. Choose the Home tab. 4. Click the launcher in the Paragraph group. The Paragraph dialog box appears. 5. Choose the Indents and Spacing tab. 6. In the Special field, click to open the pull-down menu. 7. Click Hanging. 8. In the By box, type 2". 9. Click OK. 10. Place the cursor after the colon following "Hanging Indent." 11. Press the Tab key. Notice that the indentation changes. Choose a Style Set When working with Word, you can use styles to quickly format your documents. A style is a set of formats consisting of such things as fonts, font colors, font sizes, and paragraph formats. Word 2007 supplies you with predesigned style sets that contain styles for titles, subtitles, quotes, headings, lists and more. The sections that follow all show you how to work with styles. The exercises are based on a file you must download. Right click here to download the file. Click Save Target As from the menu that appears, and save the linked file to a directory on your computer. Then open the file. EXERCISE 9 Choose a Style Set Page 51
  • 52.
    Module of Office2007 Basic 1. Choose the Home tab. 2. Click Change Styles in the Styles group. A menu appears. 3. Click Style Set. A menu appears. You can choose from any of the styles listed on the menu. 4. Click Simple. Word 2007 reformats all of the paragraphs into the Simple style by applying the Normal format to each paragraph. Apply a Style You can see of all the styles available to you in the style set by clicking the launcher in the Styles group and opening the Styles pane. You can leave the Styles pane open and available for use by docking it. To dock the Styles pane, click the top of the pane and drag it to the left or right edge of the Word window. You do not need to select an entire paragraph to apply a style. If the cursor is anywhere in the paragraph, when you click on the style, Word formats the entire paragraph. EXERCISE 10 Apply the Title Style 1. Choose the Home tab. 2. Click the launcher in the Styles Group. The Styles pane appears. You can drag it to the side of the Word window to dock it. To close the Styles pane, click the Close button in the upper right corner of the pane . 3. Click anywhere in the paragraph "Single-Parent Family—Career Help." Page 52
  • 53.
    Module of Office2007 Basic 4. Click Title in the Styles pane. Word 2007 applies the Title style to the paragraph. Headings and subheadings mark major topics within your document. With Word 2007, you can easily format the headings and subheadings in your document. Apply Headings 1. Click anywhere in the paragraph "The Nature of Single Parenthood." 2. In the Style box, click Heading 1. Word reformats the paragraph. 3. Repeat steps 1 and 2 in the following paragraphs: Types of Single Parents Career Development Needs of Single Parents Career Development Programs Apply Subheadings 1. Click anywhere in the paragraph "Displaced Homemakers" 2. In the Style box, click Heading 2. Word reformats the paragraph. 3. Repeat steps 1 and 2 for the following paragraphs: Displaced Homemakers Adolescent Mothers Single Fathers High School Dropout Prevention Established Education Sites Alternate Method -- Apply Styles with the Ribbon You can also choose styles by selecting the option you want from the Styles group on the Ribbon. First you must place your cursor in the paragraph to which you want to apply the style. Then you click the More button in the Styles group to see all of the styles in the currently selected set. As you roll your cursor over each of the styles listed, Word 2007 provides you with a live preview of how the style will appear when applied. 1. Select the paragraphs "Emotional Support" through "Parenthood Education" (they are probably on page two). 2. Click the More button in the Styles group. 3. Locate and click the List Paragraph style. Word applies the List Paragraph style to the paragraphs you selected. Change Style Sets Once you have applied styles, changing to another style set is easy. You simply open the Style Set gallery. As you move your cursor down the menu, Word 2007 provides you with a live preview of the effect of applying the style set. To choose a style set, you click it. EXERCISE 11 Change Style Sets 1. Click Change Styles in the Styles group. A menu appears. 2. Click Style Set. A menu appears. As you move your cursor down the menu Word 2007 provides you with a live preview of the effect of applying the Style set to your document. 3. Click Formal. Word 2007 reformats all of the paragraphs into the Formal style applying the appropriate format to each paragraph. Page 53
  • 54.
    Module of Office2007 Basic Lesson 5: Adding Bullets and Numbers, Undoing and Redoing, Setting Page Layouts and Printing Documents If you have lists of data, you may want to bullet or number them. When using Microsoft Word, bulleting and numbering are easy. The first part of this lesson teaches you to bullet and number. After you have completed your document, you may want to share it with others. One way to share your document is to print and distribute it. However, before you print you may want to add page numbers and tell Word such things as the page orientation, the paper size, and the margin setting you want to use. In this lesson you will learn how to layout and how to print your documents. Add Bullets and Numbers In Microsoft Word, you can easily create bulleted or numbered lists of items. Several bulleting and numbering styles are available, as shown in the examples. You can select the one you wish to use. EXAMPLES: Numbering EXAMPLES: Bulleting EXERCISE 1 Bullets Page 54
  • 55.
    Module of Office2007 Basic 1. Type the following list as shown: Apple Orange Grape Mango Cherry 2. Select the words you just typed. 3. Choose the Home tab. 4. In the Paragraph group, click the down arrow next to the Bullets button . The Bullet Library appears. 5. Click to select the type of bullet you want to use. Word adds bullets to your list. Note: As you move your cursor over the various bullet styles, Word displays the bullet style onscreen. To remove the bulleting: 1. Select the list again. 2. Choose the Home tab. 3. In the Paragraph group, click the down arrow next to the Bullets icon. The Bullet dialog box appears. 4. Click None. Word removes the bullets from your list. Numbers 1. Type the following list as shown: Apple Orange Grape Mango Cherry 2. Select the words you just typed. 3. Choose the Home tab. 4. In the Paragraph group, click the down arrow next to the Numbering button . The Numbering Library appears. 5. Click to select the type of numbering you want to use. Word numbers your list. Note: As you move your cursor over the various number styles, Word displays the number style onscreen. Page 55
  • 56.
    Module of Office2007 Basic To remove the numbering: 1. Select the list again. 2. Choose the Home tab. 3. In the Paragraph group, click the down arrow next yo the Numbering icon. The Number dialog box appears. 4. Click None. Word removes the numbering from your list. Undo and Redo You can quickly reverse most commands you execute by using Undo. If you then change your mind again, and want to reapply a command, you can use Redo. EXERCISE 2 Undo and Redo 1. Type Undo example. 2. Click the Undo button on the Quick Access menu. The typing disappears. 3. Click the Redo button on the Quick Access menu. The typing reappears. 4. Select "Undo example." 5. Press Ctrl+b to bold. Word bolds the text. 6. Press Ctrl+i. Word italicizes the text. 7. Press Ctrl+u Word underlines the text. 8. Click the down arrow next to the Undo icon. You will see the actions you performed listed. To undo the underline, click Underline; to undo the underline and italic, click Underline Italic; to undo the underline, italic, and bold click Bold etc. 9. To redo, click the Redo icon several times. Alternate Method -- Undo & Redo by Using Keys 1. Type Undo example. 2. Press Ctrl+z. The typing disappears. 3. Press Ctrl+y. The typing reappears. 4. Select "Undo example." 5. Press Ctrl+u to underline. 6. Press Ctrl+z. The underline is removed. 7. Press Ctrl+y. The underline reappears. Set the Orientation Before you print your document, you may want to change the orientation of your pages. There are two orientations you can use: portrait and landscape. Paper, such as paper sized 8 1/2 by 11, is longer on one edge than it is on the other. If you print in Portrait, the shortest edge of the paper becomes the top of the page. Portrait is the default option. If you print Landscape, the longest edge of the paper becomes the top of the page. Page 56
  • 57.
    Module of Office2007 Basic Portrait Landscape The exercises that follow use a file named SamplePrint.docx. Right click here to download the file. Click Save Target As from the menu that appears, and save the linked file to a directory on your computer. Then open the file. EXERCISE 3 Set the Orientation 1. Choose the Page Layout tab. 2. Click Orientation in the Page Setup group. A menu appears. 3. Click Portrait. Word sets your page orientation to Portrait. Set the Page Size Paper comes in a variety of sizes. Most business correspondence uses 8 1/2 by 11 paper which is the default page size in Word. If you are not using 8 1/2 by 11 paper, you can use the Size option in the Page Setup group of the Page Layout tab to change the Size setting. EXERCISE 4 Set the Page Size Page 57
  • 58.
    Module of Office2007 Basic 1. Choose the Page Layout tab. 2. Click Size in the Page Setup group. A menu appears. 3. Click Letter 8.5 x 11in. Word sets your page size. Set the Margins Margins define the amount of white space that appears at the top, bottom, left, and right edges of your document. The Margin option in the Page Setup group of the Page Layout tab provides several standard margin sizes from which you can choose. EXERCISE 5 Set the Margins 1. Choose the Page Layout tab. 2. Click Margins in the Page Setup group. A menu appears. 3. Click Moderate. Word sets your margins to the Moderate settings. Add Page Numbers Page 58
  • 59.
    Module of Office2007 Basic Page numbers help you keep your document organized and enable readers to find information quickly. You can add page numbers to the top, bottom, or margins of your pages, and you can choose where the numbers appear. For example, numbers can appear at the top of the page, on the left, right, or center of the page. Word also offers several number styles from which you can choose. EXERCISE 6 Add Page Numbers 1. Choose the Insert tab. 2. Click the Page Number button in the Header & Footer group. A menu appears. 3. Click Bottom of Page. 4. Click the right-side option. Insert Page Breaks As you learned in Lesson 1, you can display your document in any of five views: Draft, Web Layout, Print Layout, Full Screen Reading, or Online Layout. In Print Layout view you see your document as it will appear when you print it. You can clearly see where each page ends and a new page begins. As you review your document, you may find that you want to change the point at which a new page begins. You do this by inserting a page break. For example, if a page heading appears on one page and the first paragraph under the heading appears on the next page, you may want to inser a page break before the heading to keep the heading and the first paragraph together. EXERCISE 7 Change to Print View 1. Choose the View tab. 2. Click Print Layout in the Document Views group. Your document changes to the Print Layout view. Insert Page Breaks Page 59
  • 60.
    Module of Office2007 Basic 1. Place your cursor before the D in "Displaced Homemakers" 2. Choose the Insert tab. 3. Click Page Break. Word places a page break in your document. To delete a page break, you select the page break and then press the Delete key. Preview and Print Documents When you have your margins, tabs, and so on the way you want them, you are ready to print. In Word, You can preview your document before you print. In the Preview mode, you can review each page, view multiple pages at the same time, zoom in on a page, and access the Size, Orientation, and Margin options. If you press the Zoom button while you are in Preview mode, the Zoom dialog box appears. In the Zoom dialog box you can set the sizes of the pages that display as well as the number of pages that display. When you are ready to print, you use the Print dialog box. In the Print Range area, choose All to print every page of your document, choose Current Page to print the page you are currently on, or choose Pages to enter the specific pages you want to print. Type the pages you want to print in the Pages field. Separate individual pages with commas (1,3, 13); specify a range by using a dash (4-9). EXERCISE 8 Print Preview 1. Click the Microsoft Office button. A menu appears. 2. Highlight the Print option. The Preview and Print the Document menu appears. 3. Click Print Preview. The Preview window appears, with your document in the window. 4. Click One Page to view one page at a time. Click Two Pages to view two pages at a time. 5. To view your document in normal size, click 100%. 6. Click the Zoom Button. The Zoom dialog box appears. 7. Select an option and then click OK. Perform this task for each option and note the results. Note: As you review your document, if you see changes you would like to make to the layout, use the Margin, Orientation, or Page Size options to make the changes. If you want to make other types of changes to your document, click the Close Print Preview button, to return to your document. Once you are satisfied with your document, you are ready to print. Print Page 60
  • 61.
    Module of Office2007 Basic 1. Click the Print button. The Print dialog box appears. 2. Click the down arrow next to the Name field and select the printer to which you want to print. 3. Choose All as the page range. 4. Click OK. Word prints your document. Page 61
  • 62.
    Module of Office2007 Basic Microsoft Excel 2007 Table of Contents Lesson 1: Entering Text and Numbers Microsoft Excel is an electronic spreadsheet that runs on a personal computer. You can use it to organize your data into rows and columns. You can also use it to perform mathematical calculations quickly. This tutorial teaches Microsoft Excel basics. Although knowledge of how to navigate in a Windows environment is helpful, this tutorial was created for the computer novice. This lesson will introduce you to the Excel window. You use the window to interact with Excel. The Microsoft Excel Window The Microsoft Office Button The Quick Access Toolbar The Title Bar The Ribbon Worksheets The Formula Bar The Status Bar Move Around a Worksheet Go To Cells Quickly Select Cells Enter Data Edit a Cell Wrap Text Delete a Cell Entry Save a File Close Excel Lesson 2: Entering Excel Formulas and Formatting Data Lesson 1 familiarized you with the Excel 2007 window, taught you how to move around the window, and how to enter data. A major strength of Excel is that you can perform mathematical calculations and format your data. In this lesson, you learn how to perform basic mathematical calculations and how to format text and numerical data. Set the Enter Key Direction Perform Mathematical Calculations AutoSum Perform Automatic Calculations Align Cell Entries Perform Advanced Mathematical Calculations Copy, Cut, Paste, and Cell Addressing Insert and Delete Columns and Rows Create Borders Merge and Center Add Background Color Change the Font, Font Size, and Font Color Move to a New Worksheet Bold, Italicize, and Underline Work with Long Text Change a Column's Width Format Numbers Lesson 3: Creating Excel Functions, Filling Cells, and Printing By using functions, you can quickly and easily make many useful calculations, such as finding an average, the highest number, the lowest number, and a count of the number of items in a list. Microsoft Excel has many functions you can use. You can also use Page 62
  • 63.
    Module of Office2007 Basic Microsoft Excel to fill cells automatically with a series. For example, you can have Excel automatically fill your worksheet with days of the week, months of the year, years, or other types of series. A header is text that appears at the top of every page of your printed worksheet. A footer is text that appears at the bottom of every page of your printed worksheet. You can use a header or footer to display among other things titles, page numbers, or logos. Once you have completed your Excel worksheet, you may want to print it. This lesson teaches you how to use functions, how to create a series, how to create headers and footers, and how to print. Using Reference Operators Understanding Functions Fill Cells Automatically Create Headers and Footers Set Print Options Print Lesson 4: Creating Charts In Microsoft Excel, you can represent numbers in a chart. On the Insert tab, you can choose from a variety of chart types, including column, line, pie, bar, area, and scatter. The basic procedure for creating a chart is the same no matter what type of chart you choose. As you change your data, your chart will automatically update. This lesson teaches you how to create a chart in Excel. Create a Chart Apply A Chart Layout Add Labels Switch Data Change the Style of a Chart Change the Size and Position of a Chart Move A Chart to a Chart Sheet Change the Chart Type Page 63
  • 64.
    Module of Office2007 Basic Excel Spreadsheet Microsoft Excel is an electronic spreadsheet. As with a paper spreadsheet, you can use Excel to organize your data into rows and columns and to perform mathematical calculations. The tutorial teaches you how to create an Excel spreadsheet. Lesson 1: Entering Text and Numbers The Microsoft Excel Window Microsoft Excel is an electronic spreadsheet. You can use it to organize your data into rows and columns. You can also use it to perform mathematical calculations quickly. This tutorial teaches Microsoft Excel basics. Although knowledge of how to navigate in a Windows environment is helpful, this tutorial was created for the computer novice. This lesson will introduce you to the Excel window. You use the window to interact with Excel. To begin this lesson, start Microsoft Excel 2007. The Microsoft Excel window appears and your screen looks similar to the one shown here. Note: Your screen will probably not look exactly like the screen shown. In Excel 2007, how a window displays depends on the size of your window, the size of your monitor, and the resolution to which your monitor is set. Resolution determines how much information your computer monitor can display. If you use a low resolution, less information fits on your screen, but the size of your text and images are larger. If you use a high resolution, more information fits on your screen, but the size of the text and images are smaller. Also, settings in Excel 2007, Windows Vista, and Windows XP allow you to change the color and style of your windows. The Microsoft Office Button In the upper-left corner of the Excel 2007 window is the Microsoft Office button. When you click the button, a menu appears. You can use the menu to create a new file, open an existing file, save a file, and perform many other tasks. Page 64
  • 65.
    Module of Office2007 Basic The Quick Access Toolbar Next to the Microsoft Office button is the Quick Access toolbar. The Quick Access toolbar gives you with access to commands you frequently use. By default, Save, Undo, and Redo appear on the Quick Access toolbar. You can use Save to save your file, Undo to roll back an action you have taken, and Redo to reapply an action you have rolled back. The Title Bar Next to the Quick Access toolbar is the Title bar. On the Title bar, Microsoft Excel displays the name of the workbook you are currently using. At the top of the Excel window, you should see "Microsoft Excel - Book1" or a similar name. The Ribbon You use commands to tell Microsoft Excel what to do. In Microsoft Excel 2007, you use the Ribbon to issue commands. The Ribbon is located near the top of the Excel window, below the Quick Access toolbar. At the top of the Ribbon are several tabs; clicking a tab displays several related command groups. Within each group are related command buttons. You click buttons to issue commands or to access menus and dialog boxes. You may also find a dialog box launcher in the bottom-right corner of a group. When you click the dialog box launcher, a dialog box makes additional commands available. Worksheets Page 65
  • 66.
    Module of Office2007 Basic Microsoft Excel consists of worksheets. Each worksheet contains columns and rows. The columns are lettered A to Z and then continuing with AA, AB, AC and so on; the rows are numbered 1 to 1,048,576. The number of columns and rows you can have in a worksheet is limited by your computer memory and your system resources. The combination of a column coordinate and a row coordinate make up a cell address. For example, the cell located in the upper-left corner of the worksheet is cell A1, meaning column A, row 1. Cell E10 is located under column E on row 10. You enter your data into the cells on the worksheet. The Formula Bar Formula Bar If the Formula bar is turned on, the cell address of the cell you are in displays in the Name box which is located on the left side of the Formula bar. Cell entries display on the right side of the Formula bar. If you do not see the Formula bar in your window, perform the following steps: 1. Choose the View tab. 2. Click Formula Bar in the Show/Hide group. The Formula bar appears. Note: The current cell address displays on the left side of the Formula bar. The Status Bar Page 66
  • 67.
    Module of Office2007 Basic The Status bar appears at the very bottom of the Excel window and provides such information as the sum, average, minimum, and maximum value of selected numbers. You can change what displays on the Status bar by right-clicking on the Status bar and selecting the options you want from the Customize Status Bar menu. You click a menu item to select it. You click it again to deselect it. A check mark next to an item means the item is selected. Move Around a Worksheet By using the arrow keys, you can move around your worksheet. You can use the down arrow key to move downward one cell at a time. You can use the up arrow key to move upward one cell at a time. You can use the Tab key to move across the page to the right, one cell at a time. You can hold down the Shift key and then press the Tab key to move to the left, one cell at a time. You can use the right and left arrow keys to move right or left one cell at a time. The Page Up and Page Down keys move up and down one page at a time. If you hold down the Ctrl key and then press the Home key, you move to the beginning of the worksheet. EXERCISE 1 Move Around the Worksheet The Down Arrow Key Press the down arrow key several times. Note that the cursor moves downward one cell at a time. The Up Arrow Key Press the up arrow key several times. Note that the cursor moves upward one cell at a time. The Tab Key 1. Move to cell A1. 2. Press the Tab key several times. Note that the cursor moves to the right one cell at a time. The Shift+Tab Keys Page 67
  • 68.
    Module of Office2007 Basic Hold down the Shift key and then press Tab. Note that the cursor moves to the left one cell at a time. The Right and Left Arrow Keys 1. Press the right arrow key several times. Note that the cursor moves to the right. 2. Press the left arrow key several times. Note that the cursor moves to the left. Page Up and Page Down 1. Press the Page Down key. Note that the cursor moves down one page. 2. Press the Page Up key. Note that the cursor moves up one page. The Ctrl-Home Key 1. Move the cursor to column J. 2. Stay in column J and move the cursor to row 20. 3. Hold down the Ctrl key while you press the Home key. Excel moves to cell A1. Go To Cells Quickly The following are shortcuts for moving quickly from one cell in a worksheet to a cell in a different part of the worksheet. EXERCISE 2 Go to -- F5 The F5 function key is the "Go To" key. If you press the F5 key, you are prompted for the cell to which you wish to go. Enter the cell address, and the cursor jumps to that cell. 1. Press F5. The Go To dialog box opens. 2. Type J3 in the Reference field. 3. Press Enter. Excel moves to cell J3. Go to -- Ctrl+G You can also use Ctrl+G to go to a specific cell. 1. Hold down the Ctrl key while you press "g" (Ctrl+g). The Go To dialog box opens. 2. Type C4 in the Reference field. 3. Press Enter. Excel moves to cell C4. The Name Box You can also use the Name box to go to a specific cell. Just type the cell you want to go to in the Name box and then press Enter. Page 68
  • 69.
    Module of Office2007 Basic 1. Type B10 in the Name box. 2. Press Enter. Excel moves to cell B10. Select Cells If you wish to perform a function on a group of cells, you must first select those cells by highlighting them. The exercises that follow teach you how to select. EXERCISE 3 Select Cells To select cells A1 to E1: 1. Go to cell A1. 2. Press the F8 key. This anchors the cursor. Page 69
  • 70.
    Module of Office2007 Basic 3. Note that "Extend Selection" appears on the Status bar in the lower-left corner of the window. You are in the Extend mode. 4. Click in cell E7. Excel highlights cells A1 to E7. 5. Press Esc and click anywhere on the worksheet to clear the highlighting. Alternative Method: Select Cells by Dragging You can also select an area by holding down the left mouse button and dragging the mouse over the area. In addition, you can select noncontiguous areas of the worksheet by doing the following: 1. Go to cell A1. 2. Hold down the Ctrl key. You won't release it until step 9. Holding down the Ctrl key enables you to select noncontiguous areas of the worksheet. 3. Press the left mouse button. 4. While holding down the left mouse button, use the mouse to move from cell A1 to C5. 5. Continue to hold down the Ctrl key, but release the left mouse button. 6. Using the mouse, place the cursor in cell D7. 7. Press the left mouse button. 8. While holding down the left mouse button, move to cell F10. Release the left mouse button. 9. Release the Ctrl key. Cells A1 to C5 and cells D7 to F10 are selected. 10. Press Esc and click anywhere on the worksheet to remove the highlighting. Enter Data In this section, you will learn how to enter data into your worksheet. First, place the cursor in the cell in which you want to start entering data. Type some data, and then press Enter. If you need to delete, press the Backspace key to delete one character at a time. EXERCISE 4 Enter Data Page 70
  • 71.
    Module of Office2007 Basic 1. Place the cursor in cell A1. 2. Type John Jordan. Do not press Enter at this time. Delete Data The Backspace key erases one character at a time. 1. Press the Backspace key until Jordan is erased. 2. Press Enter. The name "John" appears in cell A1. Edit a Cell After you enter data into a cell, you can edit the data by pressing F2 while you are in the cell you wish to edit. EXERCISE 5 Page 71
  • 72.
    Module of Office2007 Basic Edit a Cell Change "John" to "Jones." 1. Move to cell A1. 2. Press F2. 3. Use the Backspace key to delete the "n" and the "h." 4. Type nes. 5. Press Enter. Alternate Method: Editing a Cell by Using the Formula Bar You can also edit the cell by using the Formula bar. You change "Jones" to "Joker" in the following exercise. 1. Move the cursor to cell A1. 2. Click in the formula area of the Formula bar. 3. Use the backspace key to erase the "s," "e," and "n." 4. Type ker. 5. Press Enter. Alternate Method: Edit a Cell by Double-Clicking in the Cell You can change "Joker" to "Johnson" as follows: Page 72
  • 73.
    Module of Office2007 Basic 1. Move to cell A1. 2. Double-click in cell A1. 3. Press the End key. Your cursor is now at the end of your text. 3. Use the Backspace key to erase "r," "e," and "k." 4. Type hnson. 5. Press Enter. Change a Cell Entry Typing in a cell replaces the old cell entry with the new information you type. 1. Move the cursor to cell A1. 2. Type Cathy. 3. Press Enter. The name "Cathy" replaces "Johnson." Wrap Text When you type text that is too long to fit in the cell, the text overlaps the next cell. If you do not want it to overlap the next cell, you can wrap the text. EXERCISE 6 Wrap Text Page 73
  • 74.
    Module of Office2007 Basic 1. Move to cell A2. 2. Type Text too long to fit. 3. Press Enter. 4. Return to cell A2. 5. Choose the Home tab. 6. Click the Wrap Text button . Excel wraps the text in the cell. Delete a Cell Entry To delete an entry in a cell or a group of cells, you place the cursor in the cell or select the group of cells and press Delete. EXERCISE 7 Delete a Cell Entry 1. Select cells A1 to A2. 2. Press the Delete key. Save a File This is the end of Lesson1. To save your file: 1. Click the Office button. A menu appears. 2. Click Save. The Save As dialog box appears. 3. Go to the directory in which you want to save your file. 4. Type Lesson1 in the File Name field. 5. Click Save. Excel saves your file. Close Excel Close Microsoft Excel. 1. Click the Office button. A menu appears. 2. Click Close. Excel closes. Page 74
  • 75.
    Module of Office2007 Basic Excel Formulas When you enter formulas into your Excel worksheet, the formulas can calculate automatically. This lesson teaches you how to create an Excel formula. Lesson 2: Entering Excel Formulas and Formatting Data Lesson 1 familiarized you with the Excel 2007 window, taught you how to move around the window, and how to enter data. A major strength of Excel is that you can perform mathematical calculations and format your data. In this lesson, you learn how to perform basic mathematical calculations and how to format text and numerical data. To start this lesson, open Excel. Set the Enter Key Direction In Microsoft Excel, you can specify the direction the cursor moves when you press the Enter key. In the exercises that follow, the cursor must move down one cell when you press Enter. You can use the Direction box in the Excel Options pane to set the cursor to move up, down, left, right, or not at all. Perform the steps that follow to set the cursor to move down when you press the Enter key. 1. Click the Microsoft Office button. A menu appears. 2. Click Excel Options in the lower-right corner. The Excel Options pane appears. Page 75
  • 76.
    Module of Office2007 Basic 3. Click Advanced. 4. If the check box next to After Pressing Enter Move Selection is not checked, click the box to check it. 5. If Down does not appear in the Direction box, click the down arrow next to the Direction box and then click Down. 6. Click OK. Excel sets the Enter direction to down. Perform Mathematical Calculations In Microsoft Excel, you can enter numbers and mathematical formulas into cells. Whether you enter a number or a formula, you can reference the cell when you perform mathematical calculations such as addition, subtraction, multiplication, or division. When entering a mathematical formula, precede the formula with an equal sign. Use the following to indicate the type of calculation you wish to perform: + Addition - Subtraction * Multiplication / Division ^ Exponential In the following exercises, you practice some of the methods you can use to move around a worksheet and you learn how to perform mathematical calculations. Refer to Lesson 1 to learn more about moving around a worksheet. EXERCISE 1 Addition Page 76
  • 77.
    Module of Office2007 Basic 1. Type Add in cell A1. 2. Press Enter. Excel moves down one cell. 3. Type 1 in cell A2. 4. Press Enter. Excel moves down one cell. 5. Type 1 in cell A3. 6. Press Enter. Excel moves down one cell. 7. Type =A2+A3 in cell A4. 8. Click the check mark on the Formula bar. Excel adds cell A1 to cell A2 and displays the result in cell A4. The formula displays on the Formula bar. Note: Clicking the check mark on the Formula bar is similar to pressing Enter. Excel records your entry but does not move to the next cell. Subtraction 1. Press F5. The Go To dialog box appears. 2. Type B1 in the Reference field. 3. Press Enter. Excel moves to cell B1. Page 77
  • 78.
    Module of Office2007 Basic 4. Type Subtract. 5. Press Enter. Excel moves down one cell. 6. Type 6 in cell B2. 7. Press Enter. Excel moves down one cell. 8. Type 3 in cell B3. 9. Press Enter. Excel moves down one cell. 10. Type =B2-B3 in cell B4. 11. Click the check mark on the Formula bar. Excel subtracts cell B3 from cell B2 and the result displays in cell B4. The formula displays on the Formula bar. Multiplication 1. Hold down the Ctrl key while you press "g" (Ctrl+g). The Go To dialog box appears. 2. Type C1 in the Reference field. 3. Press Enter. Excel moves to cell C1 4. Type Multiply. 5. Press Enter. Excel moves down one cell. 6. Type 2 in cell C2. 7. Press Enter. Excel moves down one cell. 8. Type 3 in cell C3. 9. Press Enter. Excel moves down one cell. 10. Type =C2*C3 in cell C4. 11. Click the check mark on the Formula bar. Excel multiplies C1 by cell C2 and displays the result in cell C3. The formula displays on the Formula bar. Division 1. Press F5. 2. Type D1 in the Reference field. 3. Press Enter. Excel moves to cell D1. 4. Type Divide. 5. Press Enter. Excel moves down one cell. 6. Type 6 in cell D2. 7. Press Enter. Excel moves down one cell. 8. Type 3 in cell D3. 9. Press Enter. Excel moves down one cell. 10. Type =D2/D3 in cell D4. 11. Click the check mark on the Formula bar. Excel divides cell D2 by cell D3 and displays the result in cell D4. The formula displays on the Formula bar. When creating formulas, you can reference cells and include numbers. All of the following formulas are valid: =A2/B2 Page 78
  • 79.
    Module of Office2007 Basic =A1+12-B3 =A2*B2+12 =24+53 AutoSum You can use the AutoSum button on the Home tab to automatically add a column or row of numbers. When you press the AutoSum button , Excel selects the numbers it thinks you want to add. If you then click the check mark on the Formula bar or press the Enter key, Excel adds the numbers. If Excel's guess as to which numbers you want to add is wrong, you can select the cells you want. EXERCISE 2 AutoSum The following illustrates AutoSum: 1. Go to cell F1. 2. Type 3. 3. Press Enter. Excel moves down one cell. 4. Type 3. 5. Press Enter. Excel moves down one cell. 6. Type 3. 7. Press Enter. Excel moves down one cell to cell F4. 8. Choose the Home tab. 9. Click the AutoSum button in the Editing group. Excel selects cells F1 through F3 and enters a formula in cell F4. 10. Press Enter. Excel adds cells F1 through F3 and displays the result in cell F4. Perform Automatic Calculations Page 79
  • 80.
    Module of Office2007 Basic By default, Microsoft Excel recalculates the worksheet as you change cell entries. This makes it easy for you to correct mistakes and analyze a variety of scenarios. EXERCISE 3 Automatic Calculation Make the changes described below and note how Microsoft Excel automatically recalculates. 1. Move to cell A2. 2. Type 2. 3. Press the right arrow key. Excel changes the result in cell A4. Excel adds cell A2 to cell A3 and the new result appears in cell A4. 4. Move to cell B2. 5. Type 8. 6. Press the right arrow key. Excel subtracts cell B3 from cell B3 and the new result appears in cell B4. 7. Move to cell C2. 8. Type 4. 9. Press the right arrow key. Excel multiplies cell C2 by cell C3 and the new result appears in cell C4. 10. Move to cell D2. 11. Type 12. 12. Press the Enter key. Excel divides cell D2 by cell D3 and the new result appears in cell D4. Align Cell Entries When you type text into a cell, by default your entry aligns with the left side of the cell. When you type numbers into a cell, by default your entry aligns with the right side of the cell. You can change the cell alignment. You can center, left-align, or right-align any cell entry. Look at cells A1 to D1. Note that they are aligned with the left side of the cell. EXERCISE 4 Center To center cells A1 to D1: Page 80
  • 81.
    Module of Office2007 Basic 1. Select cells A1 to D1. 2. Choose the Home tab. 3. Click the Center button in the Alignment group. Excel centers each cell's content. Left-Align To left-align cells A1 to D1: 1. Select cells A1 to D1. 2. Choose the Home tab. 3. Click the Align Text Left button in the Alignment group. Excel left-aligns each cell's content. Right-Align To right-align cells A1 to D1: 1. Select cells A1 to D1. Click in cell A1. 2. Choose the Home tab. 3. Click the Align Text Right button. Excel right-aligns the cell's content. Page 81
  • 82.
    Module of Office2007 Basic 4. Click anywhere on your worksheet to clear the highlighting. Note: You can also change the alignment of cells with numbers in them by using the alignment buttons. Perform Advanced Mathematical Calculations When you perform mathematical calculations in Excel, be careful of precedence. Calculations are performed from left to right, with multiplication and division performed before addition and subtraction. EXERCISE 5 Advanced Calculations 1. Move to cell A7. 2. Type =3+3+12/2*4. 3. Press Enter. Note: Microsoft Excel divides 12 by 2, multiplies the answer by 4, adds 3, and then adds another 3. The answer, 30, displays in cell A7. To change the order of calculation, use parentheses. Microsoft Excel calculates the information in parentheses first. 1. Double-click in cell A7. 2. Edit the cell to read =(3+3+12)/2*4. 3. Press Enter. Note: Microsoft Excel adds 3 plus 3 plus 12, divides the answer by 2, and then multiplies the result by 4. The answer, 36, displays in cell A7. Copy, Cut, Paste, and Cell Addressing In Excel, you can copy data from one area of a worksheet and place the data you copied anywhere in the same or another worksheet. In other words, after you type information into a worksheet, if you want to place the same information somewhere else, you do not have to retype the information. You simple copy it and then paste it in the new location. You can use Excel's Cut feature to remove information from a worksheet. Then you can use the Paste feature to place the information you cut anywhere in the same or another worksheet. In other words, you can move information from one place in a worksheet to another place in the same or different worksheet by using the Cut and Paste features. Microsoft Excel records cell addresses in formulas in three different ways, called absolute, relative, and mixed. The way a formula is recorded is important when you copy it. With relative cell addressing, when you copy a formula from one area of the worksheet to another, Excel records the position of the cell relative to the cell that originally contained the formula. With Page 82
  • 83.
    Module of Office2007 Basic absolute cell addressing, when you copy a formula from one area of the worksheet to another, Excel references the same cells, no matter where you copy the formula. You can use mixed cell addressing to keep the row constant while the column changes, or vice versa. The following exercises demonstrate. EXERCISE 6 Copy, Cut, Paste, and Cell Addressing 1. Move to cell A9. 2. Type 1. Press Enter. Excel moves down one cell. 3. Type 1. Press Enter. Excel moves down one cell. 4. Type 1. Press Enter. Excel moves down one cell. 5. Move to cell B9. 6. Type 2. Press Enter. Excel moves down one cell. 7. Type 2. Press Enter. Excel moves down one cell. 8. Type 2. Press Enter. Excel moves down one cell. In addition to typing a formula as you did in Lesson 1, you can also enter formulas by using Point mode. When you are in Point mode, you can enter a formula either by clicking on a cell or by using the arrow keys. 1. Move to cell A12. 2. Type =. 3. Use the up arrow key to move to cell A9. 4. Type +. 5. Use the up arrow key to move to cell A10. 6. Type +. 7. Use the up arrow key to move to cell A11. 8. Click the check mark on the Formula bar. Look at the Formula bar. Note that the formula you entered is displayed there. Copy with the Ribbon To copy the formula you just entered, follow these steps: Page 83
  • 84.
    Module of Office2007 Basic 1. You should be in cell A12. 2. Choose the Home tab. 3. Click the Copy button in the Clipboard group. Excel copies the formula in cell A12. 4. Press the right arrow key once to move to cell B12. 5. Click the Paste button in the Clipboard group. Excel pastes the formula in cell A12 into cell B12. 6. Press the Esc key to exit the Copy mode. Compare the formula in cell A12 with the formula in cell B12 (while in the respective cell, look at the Formula bar). The formulas are the same except that the formula in cell A12 sums the entries in column A and the formula in cell B12 sums the entries in column B. The formula was copied in a relative fashion. Before proceeding with the next part of the exercise, you must copy the information in cells A7 to B9 to cells C7 to D9. This time you will copy by using the Mini toolbar. Copy with the Mini Toolbar Page 84
  • 85.
    Module of Office2007 Basic 1. Select cells A9 to B11. Move to cell A9. Press the Shift key. While holding down the Shift key, press the down arrow key twice. Press the right arrow key once. Excel highlights A9 to B11. 2. Right-click. A context menu and a Mini toolbar appear. 3. Click Copy, which is located on the context menu. Excel copies the information in cells A9 to B11. 4. Move to cell C9. 5. Right-click. A context menu appears. 6. Click Paste. Excel copies the contents of cells A9 to B11 to cells C9 to C11. 7. Press Esc to exit Copy mode. Absolute Cell Addressing You make a cell address an absolute cell address by placing a dollar sign in front of the row and column identifiers. You can do this automatically by using the F4 key. To illustrate: 1. Move to cell C12. 2. Type =. 3. Click cell C9. 4. Press F4. Dollar signs appear before the C and the 9. 5. Type +. 6. Click cell C10. 7. Press F4. Dollar signs appear before the C and the 10. 8. Type +. 9. Click cell C11. Page 85
  • 86.
    Module of Office2007 Basic 10. Press F4. Dollar signs appear before the C and the 11. 11. Click the check mark on the formula bar. Excel records the formula in cell C12. Copy and Paste with Keyboard Shortcuts Keyboard shortcuts are key combinations that enable you to perform tasks by using the keyboard. Generally, you press and hold down a key while pressing a letter. For example, Ctrl+c means you should press and hold down the Ctrl key while pressing "c." This tutorial notates key combinations as follows: Press Ctrl+c. Now copy the formula from C12 to D12. This time, copy by using keyboard shortcuts. 1. Move to cell C12. 2. Hold down the Ctrl key while you press "c" (Ctrl+c). Excel copies the contents of cell C12. 3. Press the right arrow once. Excel moves to D12. 4. Hold down the Ctrl key while you press "v" (Ctrl+v). Excel pastes the contents of cell C12 into cell D12. 5. Press Esc to exit the Copy mode. Compare the formula in cell C12 with the formula in cell D12 (while in the respective cell, look at the Formula bar). The formulas are exactly the same. Excel copied the formula from cell C12 to cell D12. Excel copied the formula in an absolute fashion. Both formulas sum column C. Mixed Cell Addressing You use mixed cell addressing to reference a cell when you want to copy part of it absolute and part relative. For example, the row can be absolute and the column relative. You can use the F4 key to create a mixed cell reference. 1. Move to cell E1. 2. Type =. 3. Press the up arrow key once. 4. Press F4. 5. Press F4 again. Note that the column is relative and the row is absolute. 6. Press F4 again. Note that the column is absolute and the row is relative. 7. Press Esc. Page 86
  • 87.
    Module of Office2007 Basic Cut and Paste You can move data from one area of a worksheet to another. 1. Select cells D9 to D12 2. Choose the Home tab. 3. Click the Cut button. 4. Move to cell G1. 5. Click the Paste button . Excel moves the contents of cells D9 to D12 to cells G1 to G4. The keyboard shortcut for Cut is Ctrl+x. The steps for cutting and pasting with a keyboard shortcut are: 1. Select the cells you want to cut and paste. 2. Press Ctrl+x. 3. Move to the upper-left corner of the block of cells into which you want to paste. Page 87
  • 88.
    Module of Office2007 Basic 4. Press Ctrl+v. Excel cuts and pastes the cells you selected. Insert and Delete Columns and Rows You can insert and delete columns and rows. When you delete a column, you delete everything in the column from the top of the worksheet to the bottom of the worksheet. When you delete a row, you delete the entire row from left to right. Inserting a column or row inserts a completely new column or row. EXERCISE 7 Insert and Delete Columns and Rows To delete columns F and G: 1. Click the column F indicator and drag to column G. 2. Click the down arrow next to Delete in the Cells group. A menu appears. 3. Click Delete Sheet Columns. Excel deletes the columns you selected. 4. Click anywhere on the worksheet to remove your selection. To delete rows 7 through 12: Page 88
  • 89.
    Module of Office2007 Basic 1. Click the row 7 indicator and drag to row 12. 2. Click the down arrow next to Delete in the Cells group. A menu appears. 3. Click Delete Sheet Rows. Excel deletes the rows you selected. 4. Click anywhere on the worksheet to remove your selection. To insert a column: 1. Click on A to select column A. 2. Click the down arrow next to Insert in the Cells group. A menu appears. 3. Click Insert Sheet Columns. Excel inserts a new column. 4. Click anywhere on the worksheet to remove your selection. To insert rows: 1. Click on 1 and then drag down to 2 to select rows 1 and 2. 2. Click the down arrow next to Insert in the Cells group. A menu appears. 3. Click Insert Sheet Rows. Excel inserts two new rows. 4. Click anywhere on the worksheet to remove your selection. Your worksheet should look like the one shown here. Create Borders You can use borders to make entries in your Excel worksheet stand out. You can choose from several types of borders. When you press the down arrow next to the Border button ,a menu appears. By making the proper selection from the menu, you can place a border on the top, bottom, left, or right side of the selected cells; on all sides; or around the outside border. You can have a thick outside border or a border with a single-line top and a double-line bottom. Page 89
  • 90.
    Module of Office2007 Basic Accountants usually place a single underline above a final number and a double underline below. The following illustrates: EXERCISE 8 Create Borders 1. Select cells B6 to E6. 2. Choose the Home tab. Page 90
  • 91.
    Module of Office2007 Basic 3. Click the down arrow next to the Borders button . A menu appears. 4. Click Top and Double Bottom Border. Excel adds the border you chose to the selected cells. Merge and Center Sometimes, particularly when you give a title to a section of your worksheet, you will want to center a piece of text over several columns or rows. The following example shows you how. EXERCISE 9 Merge and Center 1. Go to cell B2. 2. Type Sample Worksheet. 3. Click the check mark on the Formula bar. 4. Select cells B2 to E2. 5. Choose the Home tab. 6. Click the Merge and Center button in the Alignment group. Excel merges cells B2, C2, D2, and E2 and then centers the content. Page 91
  • 92.
    Module of Office2007 Basic Note: To unmerge cells: 1. Select the cell you want to unmerge. 2. Choose the Home tab. 3. Click the down arrow next to the Merge and Center button. A menu appears. 4. Click Unmerge Cells. Excel unmerges the cells. Add Background Color To make a section of your worksheet stand out, you can add background color to a cell or group of cells. EXERCISE 10 Add Background Color 1. Select cells B2 to E3. Page 92
  • 93.
    Module of Office2007 Basic 2. Choose the Home tab. 3. Click the down arrow next to the Fill Color button . 4. Click the color dark blue. Excel places a dark blue background in the cells you selected. Change the Font, Font Size, and Font Color A font is a set of characters represented in a single typeface. Each character within a font is created by using the same basic style. Excel provides many different fonts from which you can choose. The size of a font is measured in points. There are 72 points to an inch. The number of points assigned to a font is based on the distance from the top to the bottom of its longest character. You can change the Font, Font Size, and Font Color of the data you enter into Excel. EXERCISE 11 Change the Font 1. Select cells B2 to E3. Page 93
  • 94.
    Module of Office2007 Basic 2. Choose the Home tab. 3. Click the down arrow next to the Font box. A list of fonts appears. As you scroll down the list of fonts, Excel provides a preview of the font in the cell you selected. 4. Find and click Times New Roman in the Font box. Note: If Times New Roman is your default font, click another font. Excel changes the font in the selected cells. Change the Font Size 1. Select cell B2. 2. Choose the Home tab. Page 94
  • 95.
    Module of Office2007 Basic 3. Click the down arrow next to the Font Size box. A list of font sizes appears. As you scroll up or down the list of font sizes, Excel provides a preview of the font size in the cell you selected. 4. Click 26. Excel changes the font size in cell B2 to 26. Change the Font Color 1. Select cells B2 to E3. 2. Choose the Home tab. 3. Click the down arrow next to the Font Color button . 4. Click on the color white. Your font color changes to white. Your worksheet should look like the one shown here. Move to a New Worksheet In Microsoft Excel, each workbook is made up of several worksheets. Each worksheet has a tab. By default, a workbook has three sheets and they are named sequentially, starting with Sheet1. The name of the worksheet appears on the tab. Before moving to the next topic, move to a new worksheet. The exercise that follows shows you how. Page 95
  • 96.
    Module of Office2007 Basic EXERCISE 12 Move to a New Worksheet Click Sheet2 in the lower-left corner of the screen. Excel moves to Sheet2. Bold, Italicize, and Underline When creating an Excel worksheet, you may want to emphasize the contents of cells by bolding, italicizing, and/or underlining. You can easily bold, italicize, or underline text with Microsoft Excel. You can also combine these features—in other words, you can bold, italicize, and underline a single piece of text. In the exercises that follow, you will learn different methods you can use to bold, italicize, and underline. EXERCISE 13 Bold with the Ribbon 1. Type Bold in cell A1. 2. Click the check mark located on the Formula bar. 3. Choose the Home tab. 4. Click the Bold button . Excel bolds the contents of the cell. 5. Click the Bold button again if you wish to remove the bold. Italicize with the Ribbon Page 96
  • 97.
    Module of Office2007 Basic 1. Type Italic in cell B1. 2. Click the check mark located on the Formula bar. 3. Choose the Home tab. 4. Click the Italic button . Excel italicizes the contents of the cell. 5. Click the Italic button again if you wish to remove the italic. Underline with the Ribbon Microsoft Excel provides two types of underlines. The exercises that follow illustrate them. Single Underline: 1. Type Underline in cell C1. 2. Click the check mark located on the Formula bar. 3. Choose the Home tab. 4. Click the Underline button . Excel underlines the contents of the cell. 5. Click the Underline button again if you wish to remove the underline. Double Underline 1. Type Underline in cell D1. 2. Click the check mark located on the Formula bar. 3. Choose the Home tab. 4. Click the down arrow next to the Underline button and then click Double Underline. Excel double-underlines the contents of the cell. Note that the Underline button changes to the button shown here , a D with a double underline under it. Then next time you click the Underline button, you will get a double underline. If you want a single underline, click the down arrow next to the Double Underline button and then choose Underline. 5. Click the double underline button again if you wish to remove the double underline. Page 97
  • 98.
    Module of Office2007 Basic Bold, Underline, and Italicize 1. Type All three in cell E1. 2. Click the check mark located on the Formula bar. 3. Choose the Home tab. 4. Click the Bold button . Excel bolds the cell contents. 5. Click the Italic button . Excel italicizes the cell contents. 6. Click the Underline button . Excel underlines the cell contents. Alternate Method: Bold with Shortcut Keys 1. Type Bold in cell A2. 2. Click the check mark located on the Formula bar. 3. Hold down the Ctrl key while pressing "b" (Ctrl+b). Excel bolds the contents of the cell. 4. Press Ctrl+b again if you wish to remove the bolding. Alternate Method: Italicize with Shortcut Keys 1. Type Italic in cell B2. Note: Because you previously entered the word Italic in column B, Excel may enter the word in the cell automatically after you type the letter I. Excel does this to speed up your data entry. 2. Click the check mark located on the Formula bar. 3. Hold down the Ctrl key while pressing "i" (Ctrl+i). Excel italicizes the contents of the cell. 4. Press Ctrl+i again if you wish to remove the italic formatting. Alternate Method: Underline with Shortcut Keys 1. Type Underline in cell C2. 2. Click the check mark located on the Formula bar. 3. Hold down the Ctrl key while pressing "u" (Ctrl+u). Excel applies a single underline to the cell contents. 4. Press Ctrl+u again if you wish to remove the underline. Bold, Italicize, and Underline with Shortcut Keys 1. Type All three in cell D2. 2. Click the check mark located on the Formula bar. 3. Hold down the Ctrl key while pressing "b" (Ctrl+b). Excel bolds the cell contents. 4. Hold down the Ctrl key while pressing "i" (Ctrl+i). Excel italicizes the cell contents. 5. Hold down the Ctrl key while pressing "u" (Ctrl+u). Excel applies a single underline to the cell contents. Work with Long Text Whenever you type text that is too long to fit into a cell, Microsoft Excel attempts to display all the text. It left-aligns the text regardless of the alignment you have assigned to it, and it borrows space from the blank cells to the right. However, a long text entry will never write over cells that already contain entries—instead, the cells that contain entries cut off the long text. The following exercise illustrates this. EXERCISE 14 Work with Long Text Page 98
  • 99.
    Module of Office2007 Basic 1. Move to cell A6. 2. Type Now is the time for all good men to go to the aid of their army. 3. Press Enter. Everything that does not fit into cell A6 spills over into the adjacent cell. 4. Move to cell B6. 5. Type Test. 6. Press Enter. Excel cuts off the entry in cell A6. 7. Move to cell A6. 8. Look at the Formula bar. The text is still in the cell. Change A Column's Width You can increase column widths. Increasing the column width enables you to see the long text. EXERCISE 15 Change Column Width 1. Make sure you are in any cell under column A. 2. Choose the Home tab. 3. Click the down arrow next to Format in the Cells group. 4. Click Column Width. The Column Width dialog box appears. 5. Type 55 in the Column Width field. 6. Click OK. Column A is set to a width of 55. You should now be able to see all of the text. Page 99
  • 100.
    Module of Office2007 Basic Change a Column Width by Dragging You can also change the column width with the cursor. 1. Place the mouse pointer on the line between the B and C column headings. The mouse pointer should look like the one displayed here , with two arrows. 2. Move your mouse to the right while holding down the left mouse button. The width indicator appears on the screen. 3. Release the left mouse button when the width indicator shows approximately 20. Excel increases the column width to 20. Format Numbers You can format the numbers you enter into Microsoft Excel. For example, you can add commas to separate thousands, specify the number of decimal places, place a dollar sign in front of a number, or display a number as a percent. EXERCISE 16 Format Numbers 1. Move to cell B8. 2. Type 1234567. 3. Click the check mark on the Formula bar. 4. Choose the Home tab. 5. Click the down arrow next to the Number Format box. A menu appears. 6. Click Number. Excel adds two decimal places to the number you typed. Page 100
  • 101.
    Module of Office2007 Basic 7. Click the Comma Style button . Excel separates thousands with a comma. 8. Click the Accounting Number Format button . Excel adds a dollar sign to your number. 9. Click twice on the Increase Decimal button to change the number format to four decimal places. 10. Click the Decrease Decimal button if you wish to decrease the number of decimal places. Change a decimal to a percent. 1. Move to cell B9. 2. Type .35 (note the decimal point). 3. Click the check mark on the formula bar. 4. Choose the Home tab. 5. Click the Percent Style button . Excel turns the decimal to a percent. Page 101
  • 102.
    Module of Office2007 Basic Lesson 3: Creating Excel Functions, Filling Cells, and Printing By using functions, you can quickly and easily make many useful calculations, such as finding an average, the highest number, the lowest number, and a count of the number of items in a list. Microsoft Excel has many functions that you can use. Using Reference Operators To use functions, you need to understand reference operators. Reference operators refer to a cell or a group of cells. There are two types of reference operators: range and union. A range reference refers to all the cells between and including the reference. A range reference consists of two cell addresses separated by a colon. The reference A1:A3 includes cells A1, A2, and A3. The reference A1:C3 includes cells A1, A2, A3, B1, B2, B3, C1, C2, and C3. A union reference includes two or more references. A union reference consists of two or more numbers, range referneces, or cell addresses separated by a comma. The reference A7,B8:B10,C9,10 refers to cells A7, B8 to B10, C9 and the number 10. Understanding Functions Functions are prewritten formulas. Functions differ from regular formulas in that you supply the value but not the operators, such as +, -, *, or /. For example, you can use the SUM function to add. When using a function, remember the following: Use an equal sign to begin a formula. Specify the function name. Enclose arguments within parentheses. Arguments are values on which you want to perform the calculation. For example, arguments specify the numbers or cells you want to add. Use a comma to separate arguments. Here is an example of a function: =SUM(2,13,A1,B2:C7) In this function: The equal sign begins the function. SUM is the name of the function. 2, 13, A1, and B2:C7 are the arguments. Parentheses enclose the arguments. Commas separate the arguments. After you type the first letter of a function name, the AutoComplete list appears. You can double-click on an item in the AutoComplete list to complete your entry quickly. Excel will complete the function name and enter the first parenthesis. Page 102
  • 103.
    Module of Office2007 Basic EXERCISE 1 Functions The SUM function adds argument values. 1. Open Microsoft Excel. 2. Type 12 in cell B1. 3. Press Enter. 4. Type 27 in cell B2. 5. Press Enter. 6. Type 24 in cell B3. 7. Press Enter. 8. Type =SUM(B1:B3) in cell A4. 9. Press Enter. The sum of cells B1 to B3, which is 63, appears. Alternate Method: Enter a Function with the Ribbon 1. Type 150 in cell C1. 2. Press Enter. 3. Type 85 in cell C2. 4. Press Enter. 5. Type 65 in cell C3. 6. Choose the Formulas tab. 7. Click the Insert Function button. The Insert Function dialog box appears. 8. Choose Math & Trig in the Or Select A Category box. 9. Click Sum in the Select A Function box. 10. Click OK. The Function Arguments dialog box appears. Page 103
  • 104.
    Module of Office2007 Basic 12. Type C1:C3 in the Number1 field, if it does not automatically appear. 13. Click OK. The sum of cells C1 to C3, which is 300, appears. Format worksheet 1. Move to cell A4. 2. Type the word Sum. 3. Select cells B4 to C4. 4. Choose the Home tab. 5. Click the down arrow next to the Borders button . 6. Click Top and Double Bottom Border. As you learned in Lesson 2, you can also calculate a sum by using the AutoSum button . Calculate an Average You can use the AVERAGE function to calculate the average of a series of numbers. 1. Move to cell A6. 2. Type Average. Press the right arrow key to move to cell B6. 3. Type =AVERAGE(B1:B3). 4. Press Enter. The average of cells B1 to B3, which is 21, appears. Calculate an Average with the AutoSum Button In Microsoft Excel, you can use the AutoSum button to calculate an average. Page 104
  • 105.
    Module of Office2007 Basic 1. Move to cell C6. 2. Choose the Home tab. 3. Click the down arrow next to the AutoSum button . 4. Click Average. 5. Select cells C1 to C3. 6. Press Enter. The average of cells C1 to C3, which is 100, appears. Find the Lowest Number You can use the MIN function to find the lowest number in a series of numbers. 1. Move to cell A7. 2. Type Min. 3. Press the right arrow key to move to cell B7. 4. Type = MIN(B1:B3). 5. Press Enter. The lowest number in the series, which is 12, appears. Note: You can also use the drop-down button next to the AutoSum button to calculate minimums, maximums, and counts. Find the Highest Number Page 105
  • 106.
    Module of Office2007 Basic You can use the MAX function to find the highest number in a series of numbers. . 1. Move to cell A8. 2. Type Max. 3. Press the right arrow key to move to cell B8. 4. Type = MAX(B1:B3). 5. Press Enter. The highest number in the series, which is 27, appears. Count the Numbers in a Series of Numbers You can use the count function to count the number of numbers in a series. 1. Move to cell A9. 2. Type Count. 3. Press the right arrow key to move to cell B9. 4. Choose the Home tab. 5. Click the down arrow next to the AutoSum button . 6. Click Count Numbers. Excel places the count function in cell C9 and takes a guess at which cells you want to count. The guess is incorrect, so you must select the proper cells. 7. Select B1 to B3. 8. Press Enter. The number of items in the series, which is 3, appears. Page 106
  • 107.
    Module of Office2007 Basic Fill Cells Automatically You can use Microsoft Excel to fill cells automatically with a series. For example, you can have Excel automatically fill your worksheet with days of the week, months of the year, years, or other types of series. EXERCISE 2 Fill Cells Automatically The following demonstrates filling the days of the week: 1. Click the Sheet2 tab. Excel moves to Sheet2. 2. Move to cell A1. 3. Type Sun. 4. Move to cell B1. Page 107
  • 108.
    Module of Office2007 Basic 5. Type Sunday. 6. Select cells A1 to B1. 7. Choose the Home tab. 8. Click the Bold button . Excel bolds cells A1 to B1. 9. Find the small black square in the lower-right corner of the selected area. The small black square is called the fill handle. 10. Grab the fill handle and drag with your mouse to fill cells A1 to B14. Note how the days of the week fill the cells in a series. Also, note that the Auto Fill Options button appears. Copy Cells 1. Click the Auto Fill Options button. The Auto Fill Options menu appears. 2. Choose the Copy Cells radio button. The entry in cells A1 and B1 are copied to all the highlighted cells. 3. Click the Auto Fill Options button again. 4. Choose the Fill Series radio button. The cells fill as a series from Sunday to Saturday again. 5. Click the Auto Fill Options button again. 6. Choose the Fill Without Formatting radio button. The cells fill as a series from Sunday to Saturday, but the entries are not bolded. 7. Click the Auto Fill Options button again. Page 108
  • 109.
    Module of Office2007 Basic 8. Choose the Fill Weekdays radio button. The cells fill as a series from Monday to Friday. Adjust Column Width Some of the entries in column B are too long to fit in the column. You can quickly adjust the column width to fit the longest entry. 1. Move your mouse pointer over the line that separates column B and C. The Width Indicator appears. 2. Double-click. The Column adjusts to fit the longest entry. After you complete the remainder of the exercise, your worksheet will look like the one shown here. Fill Times The following demonstrates filling time: 1. Type 1:00 into cell C1. 2. Grab the fill handle and drag with your mouse to highlight cells C1 to C14. Note that each cell fills, using military time. 3. Press Esc and then click anywhere on the worksheet to remove the highlighting. To change the format of the time: 1. Select cells C1 to C14. 2. Choose the Home tab. 3. Click the down arrow next to the number format box . A menu appears. 4. Click Time. Excel changes the format of the time. Fill Numbers You can also fill numbers. Type a 1 in cell D1. 1. Grab the fill handle and drag with your mouse to highlight cells D1 to D14. The number 1 fills each cell. Page 109
  • 110.
    Module of Office2007 Basic 2. Click the Auto Fill Options button. 3. Choose the Fill Series radio button. The cells fill as a series, starting with 1, 2, 3. Here is another interesting fill feature. 1. Go to cell E1. 2. Type Lesson 1. 3. Grab the fill handle and drag with your mouse to highlight cells E1 to E14. The cells fill in as a series: Lesson 1, Lesson 2, Lesson 3, and so on. Create Headers and Footers You can use the Header & Footer button on the Insert tab to create headers and footers. A header is text that appears at the top of every page of your printed worksheet. A footer is text that appears at the bottom of every page of your printed worksheet. When you click the Header & Footer button, the Design context tab appears and Excel changes to Page Layout view. A context tab is a tab that only appears when you need it. Page Layout view structures your worksheet so that you can easily change the format of your document. You usually work in Normal view. You can type in your header or footer or you can use predefined headers and footers. To find predefined headers and footers, click the Header or Footer button or use the Header & Footer Elements group's buttons. When you choose a header or footer by clicking the Header or Footer button, Excel centers your choice. The table shown here describes each of the Header & Footer Elements group button options. Header & Footer Elements Button Purpose Page Number Inserts the page number. Number of Pages Inserts the number of pages in the document. Current Time Inserts the current time. File Path Inserts the path to the document. File Name Inserts the file name. Sheet Name Inserts the name of the worksheet. Picture Enables you to insert a picture. Both the header and footer areas are divided into three sections: left, right, and center. When you choose a Header or Footer from the Header & Footer Elements group, where you place your information determines whether it appears on the left, right, or center of the printed page. You use the Go To Header and Go To Footer buttons on the Design tab to move between the header and footer areas of your worksheet. EXERCISE 3 Insert Headers and Footers 1. Choose the Insert tab. 2. Click the Header & Footer button in the Text group. Your worksheet changes to Page Layout view and the Design context tab appears. Note that your cursor is located in the center section of the header area. Page 110
  • 111.
    Module of Office2007 Basic 3. Click the right side of the header area. 4. Click Page Number in the Header & Footer Elements group. When you print your document, Excel will place the page number in the upper-right corner. 5. Click the left side of the Header area. 6. Type your name. When you print your document, Excel will place your name in the upper-left corner. 7. Click the Go To Footer button. Excel moves to the footer area. 8. Click the Footer button. A menu appears. 9. Click the path to your document. Excel will place the path to your document at the bottom of every printed page. Return to Normal View To return to Normal view: 1. Choose the View tab. 2. Click the Normal button in the Workbook Views group. Set Print Options There are many print options. You set print options on the Page Layout tab. Among other things, you can set your margins, set your page orientation, and select your paper size. Margins define the amount of white space that appears on the top, bottom, left, and right edges of your document. The Margin option on the Page Layout tab provides several standard margin sizes from which you can choose. There are two page orientations: portrait and landscape. Paper, such as paper sized 8 1/2 by 11, is longer on one edge than it is on the other. If you print in Portrait, the shortest edge of the paper Page 111
  • 112.
    Module of Office2007 Basic becomes the top of the page. Portrait is the default option. If you print in Landscape, the longest edge of the paper becomes the top of the page. Portrait Landscape Paper comes in a variety of sizes. Most business correspondence uses 8 1/2 by 11 paper, which is the default page size in Excel. If you are not using 8 1/2 by 11 paper, you can use the Size option on the Page Layout tab to change the Size setting. EXERCISE 4 Set the Page Layout 1. Choose the Page Layout tab. 2. Click Margins in the Page Setup group. A menu appears. 3. Click Wide. Word sets your margins to the Wide settings. Set the Page Orientation 1. Choose the Page Layout tab. 2. Click Orientation in the Page Setup group. A menu appears. 3. Click Landscape. Excel sets your page orientation to landscape. Page 112
  • 113.
    Module of Office2007 Basic Set the Paper Size 1. Choose the Page Layout tab. 2. Click Size in the Page Setup group. A menu appears. 3. Click the paper size you are using. Excel sets your page size. Print The simplest way to print is to click the Office button, highlight Print on the menu that appears, and then click Quick Print in the Preview and Print the Document pane. Dotted lines appear on your screen, and your document prints. The dotted lines indicate the right, left, top, and bottom edges of your printed pages. You can also use the Print Preview option to print. When using Print Preview, you can see onscreen how your printed document will look when you print it. If you click the Page Setup button while in Print Preview mode, you can set page settings such as centering your data on the page. If your document is several pages long, you can use the Next Page and Previous Page buttons to move forward and backward through your document. If you check the Show Margins check box, you will see margin lines on your document. You can click and drag the margin markers to increase or decrease the size of your margins. To return to Excel, click the Close Print Preview button. You click the Print button when you are ready to print. The Print dialog box appears. You can choose to print the entire worksheet or specific pages. If you want to print specific pages, enter the page numbers in the From and To fields. You can enter the number of copies you want to print in the Number of Copies field. Page 113
  • 114.
    Module of Office2007 Basic EXERCISE 5 Open Print Preview 1. Click the Office button. A menu appears. 2. Highlight Print. The Preview and Print The Document pane appears. 3. Click Print Preview. The Print Preview window appears, with your document in the center. Center Your Document 1. Click the Page Setup button in the Print group. The Page Setup dialog box appears. 2. Choose the Margins tab. Page 114
  • 115.
    Module of Office2007 Basic 3. Click the Horizontally check box. Excel centers your data horizontally. 4. Click the Vertically check box. Excel centers your data vertically. 5. Click OK. The Page Setup dialog box closes. Print 1. Click the Print button. The Print dialog box appears. 2. Click the down arrow next to the name field and select the printer to which you want to print. 3. Click OK. Excel sends your worksheet to the printer. Page 115
  • 116.
    Module of Office2007 Basic Excel Charts In Excel, you can create charts. A chart is a graphical representation of numbers. This tutorial teaches you how to create a chart in Excel. Lesson 4: Creating Charts In Microsoft Excel, you can represent numbers in a chart. On the Insert tab, you can choose from a variety of chart types, including column, line, pie, bar, area, and scatter. The basic procedure for creating a chart is the same no matter what type of chart you choose. As you change your data, your chart will automatically update. Create a Chart You select a chart type by choosing an option from the Insert tab's Chart group. After you choose a chart type, such as column, line, or bar, you choose a chart sub-type. For example, after you choose Column Chart, you can choose to have your chart represented as a two-dimensional chart, a three-dimensional chart, a cylinder chart, a cone chart, or a pyramid chart. There are further sub-types within each of these categories. As you roll your mouse pointer over each option, Excel supplies a brief description of each chart sub-type. To create the column chart shown above, start by creating the worksheet below exactly as shown. After you have created the worksheet, you are ready to create your chart. Page 116
  • 117.
    Module of Office2007 Basic EXERCISE 1 Create a Column Chart . 1. Select cells A3 to D6. You must select all the cells containing the data you want in your chart. You should also include the data labels. 2. Choose the Insert tab. 3. Click the Column button in the Charts group. A list of column chart sub-types types appears. 4. Click the Clustered Column chart sub-type. Excel creates a Clustered Column chart and the Chart Tools context tabs appear. Apply a Chart Layout Context tabs are tabs that only appear when you need them. Called Chart Tools, there are three chart context tabs: Design, Layout, and Format. The tabs become available when you create a new chart or when you click on a chart. You can use these tabs to customize your chart. You can determine what your chart displays by choosing a layout. For example, the layout you choose determines whether your chart displays a title, where the title displays, whether your chart has a legend, where the legend displays, whether the chart has axis labels and so on. Excel provides several layouts from which you can choose. EXERCISE 2 Apply a Chart Layout 1. Click your chart. The Chart Tools become available. Page 117
  • 118.
    Module of Office2007 Basic 2. Choose the Design tab. 3. Click the Quick Layout button in the Chart Layout group. A list of chart layouts appears. 4. Click Layout 5. Excel applies the layout to your chart. Add Labels When you apply a layout, Excel may create areas where you can insert labels. You use labels to give your chart a title or to label your axes. When you applied layout 5, Excel created label areas for a title and for the vertical axis. EXERCISE 3 Add labels Before After 1. Select Chart Title. Click on Chart Title and then place your cursor before the C in Chart and hold down the Shift key while you use the right arrow key to highlight the words Chart Title. 2. Type Toy Sales. Excel adds your title. 3. Select Axis Title. Click on Axis Title. Place your cursor before the A in Axis. Hold down the Shift key while you use the right arrow key to highlight the words Axis Title. 4. Type Sales. Excel labels the axis. 5. Click anywhere on the chart to end your entry. Switch Data If you want to change what displays in your chart, you can switch from row data to column data and vice versa. EXERCISE 4 Switch Data Before After 1. Click your chart. The Chart Tools become available. 2. Choose the Design tab. 3. Click the Switch Row/Column button in the Data group. Excel changes the data in your chart. Change the Style of a Chart Page 118
  • 119.
    Module of Office2007 Basic A style is a set of formatting options. You can use a style to change the color and format of your chart. Excel 2007 has several predefined styles that you can use. They are numbered from left to right, starting with 1, which is located in the upper-left corner. EXERCISE 5 Change the Style of a Chart 1. Click your chart. The Chart Tools become available. 2. Choose the Design tab. 3. Click the More button in the Chart Styles group. The chart styles appear. 4. Click Style 42. Excel applies the style to your chart. Change the Size and Position of a Chart When you click a chart, handles appear on the right and left sides, the top and bottom, and the corners of the chart. You can drag the handles on the top and bottom of the chart to increase or decrease the height of the chart. You can drag the handles on the left and right sides to increase or decrease the width of the chart. You can drag the handles on the corners to increase or decrease the size of the chart proportionally. You can change the position of a chart by clicking on an unused area of the chart and dragging. Page 119
  • 120.
    Module of Office2007 Basic EXERCISE 6 Change the Size and Position of a Chart 1. Use the handles to adjust the size of your chart. 2. Click an unused portion of the chart and drag to position the chart beside the data. Move a Chart to a Chart Sheet By default, when you create a chart, Excel embeds the chart in the active worksheet. However, you can move a chart to another worksheet or to a chart sheet. A chart sheet is a sheet dedicated to a particular chart. By default Excel names each chart sheet sequentially, starting with Chart1. You can change the name. EXERCISE 7 Move a Chart to a Chart Sheet 1. Click your chart. The Chart Tools become available. 2. Choose the Design tab. 3. Click the Move Chart button in the Location group. The Move Chart dialog box appears. Page 120
  • 121.
    Module of Office2007 Basic 4. Click the New Sheet radio button. 5. Type Toy Sales to name the chart sheet. Excel creates a chart sheet named Toy Sales and places your chart on it. Change the Chart Type Any change you can make to a chart that is embedded in a worksheet, you can also make to a chart sheet. For example, you can change the chart type from a column chart to a bar chart. EXERCISE 8 Change the Chart Type 1. Click your chart. The Chart Tools become available. 2. Choose the Design tab. 3. Click Change Chart Type in the Type group. The Chart Type dialog box appears. 4. Click Bar. 5. Click Clustered Horizontal Cylinder. 6. Click OK. Excel changes your chart type. Page 121
  • 122.
    Module of Office2007 Basic Page 122
  • 123.
    Module of Office2007 Basic Microsoft PowerPoint 2007 Table of Contents Lesson 1: The PowerPoint Window PowerPoint is a presentation software package. With PowerPoint, you can easily create slide shows. Trainers and other presenters use slide shows to illustrate their presentations. This tutorial teaches PowerPoint basics. This lesson introduces you to the PowerPoint window. You use the window to interact with PowerPoint. The Microsoft Office Button The Quick Access Toolbar The Title Bar The Ribbon Rulers Slides, Placeholders, and Notes Status Bar, Tabs, View Buttons, and More Lesson 2: Creating Your First PowerPoint Presentation You create your PowerPoint presentation on slides. You use layouts to organize the content on each slide. PowerPoint has several slide layouts from which to choose. Themes are sets of colors, fonts, and special effects. Backgrounds add a colored background to your slides. You can add themes and backgrounds to your slides. After you complete your slides, you can run your presentation. In this lesson you learn how to create slides, makes changes to slides, apply a theme and run a slide show. Create a Title Slide Create New Slides Make Changes to Your Slides Apply a Theme Run Your PowerPoint Slide Show Lesson 3: Animations, Transitions, Spell Check, Outline Tab, Slides Tabs, Sorter View, and Printing Animations control how objects move onto, off of, and around your slides. Transitions control how your presentation moves from one slide to the next. In this lesson you learn how to create animations and transitions. You also learn how to spell-check your document, how to use the Outline and Slides tabs, how to use Sorter view, and how to print. Add Animations Add Transitions Spell Check Use the Outline and Slides Tabs Use Slide Sorter View Print Page 123
  • 124.
    Module of Office2007 Basic PowerPoint Presentation This tutorial takes you step-by-step through the process of developing an effective PowerPoint presentation. Lesson 1: The PowerPoint Window PowerPoint is a presentation software package. With PowerPoint, you can easily create slide shows. Trainers and other presenters use slide shows to illustrate their presentations. This lesson introduces you to the PowerPoint window. You use the window to interact with the software. To begin, open PowerPoint 2007. The window appears and your screen looks similar to the one shown here. Note: Your screen will probably not look exactly like the screen shown. In PowerPoint 2007, how a window displays depends on the size of the window, the size of your monitor, and the resolution to which your monitor is set. Resolution determines how much information your computer monitor can display. If you use a low resolution, less information fits on your screen, but the size of your text and images are larger. If you use a high resolution, more information fits on your screen, but the size of the text and images are smaller. Also, settings in PowerPoint 2007, Windows Vista, and Windows XP allow you to change the color and style of your windows. The Microsoft Office Button In the upper-left corner is the Microsoft Office button. When you click the button, a menu appears. You can use the menu to create a new file, open an existing file, save a file, and perform many other tasks. The Quick Access Toolbar Next to the Microsoft Office button is the Quick Access toolbar. The Quick Access toolbar provides you with access to commands you frequently use. By default, Save, Undo, and Redo Page 124
  • 125.
    Module of Office2007 Basic appear on the Quick Access toolbar. You use Save to save your file, Undo to rollback an action you have taken, and Redo to reapply an action you have rolled back. The Title Bar The Title bar is located at the top in the center of the PowerPoint window. The Title bar displays the name of the presentation on which you are currently working. By default, PowerPoint names presentations sequentially, starting with Presentation1. When you save your file, you can change the name of your presentation. The Ribbon 1 Tabs 2 Command Group 3 Command Buttons 4 Launcher You use commands to tell PowerPoint what to do. In PowerPoint 2007, you use the Ribbon to issue commands. The Ribbon is located near the top of the PowerPoint window, below the Quick Access toolbar. At the top of the Ribbon are several tabs; clicking a tab displays several related command groups. Within each group are related command buttons. You click buttons to issue commands or to access menus and dialog boxes. You may also find a dialog box launcher in the bottom-right corner of a group. When you click the dialog box launcher, a dialog box makes additional commands available. Rulers Rulers are vertical and horizontal guides. You use them to determine where you want to place an object. If the rulers do not display in your PowerPoint window: 1. Click the View tab. 2. Click Ruler in the Show/Hide group. The rulers appear. Slides, Placeholders, and Notes Page 125
  • 126.
    Module of Office2007 Basic 1 Slide 2 Placeholders 3 Notes Slides appear in the center of the window. You create your presentation on slides. Placeholders hold the objects in your slide. You can use placeholders to hold text, clip art, charts, and more. You can use the notes area to creates notes to yourself. You can refer to these notes as you give your presentation. Status Bar, Tabs, View Buttons, and More Status Bar 6 Vertical & Horizontal 1 Splitter Bars 2 Outline Tab 7 Minimize Button 3 Slides Tab 8 Maximize/Restore Button 4 View Buttons 9 Close Button 5 Zoom The Status bar generally appears at the bottom of the window. The Status bar displays the number of the slide that is currently displayed, the total number of slides, and the name of the design template in use or the name of the background. The Outline tab displays the text contained in your presentation. The Slides tab displays a thumbnail of all your slides. You click the thumbnail to view the slide in the Slide pane. The View buttons appear near the bottom of the screen. You use the View buttons to change between Normal view, Slider Sorter view, and the Slide Show view. Normal View Normal view splits your screen into three major sections: the Outline and Slides tabs, the Slide pane, and the Notes area. The Outline and Slides tabs are on the left side of your window. They enable you to shift between two different ways of viewing your slides. The Slides tab shows thumbnails of your slides. The Outline tab shows the text on your slides. The Slide pane is located in the center of your window. The Slide pane shows a large view of the slide on which you are currently working. The Notes area appears below the Slide pane. You can type notes to yourself on the Notes area. Page 126
  • 127.
    Module of Office2007 Basic Slide Sorter View Slide Sorter view shows thumbnails of all your slides. In Slide Sorter view, you can easily add, delete, or change their order of your slides. Slide Show Use the Slide Show view when you want to view your slides, as they will look in your final presentation. When in Slide Show view: Esc Returns you to the view you were using previously. Left- Moves you to the next slide or animation effect. clicking When you reach the last slide, you automatically return to your previous view. Right- Opens a pop-up menu. You can use this menu to clicking navigate the slides, add speaker notes, select a pointer, and mark your presentation. Zoom allows you to zoom in and zoom out on the window. Zooming in makes the window larger so you focus in on an object. Zooming out makes the window smaller so you can see the entire window. You can click and drag the vertical and horizontal splitter bars to change the size of your panes. You use the Minimize button to remove a window from view. While a window is minimized, its title appears on the taskbar. You click the Maximize button to cause a window to fill the screen. After you maximize a window, clicking the Restore button returns the window to its former smaller size. You click the Close button to exit the window and close the program. Page 127
  • 128.
    Module of Office2007 Basic Lesson 2: Creating Your First PowerPoint Presentation You create your PowerPoint presentation on slides. You use layouts to organize the content on each slide. PowerPoint has several slide layouts from which to choose. Themes are sets of colors, fonts, and special effects. Backgrounds add a colored background to your slides. You can add themes and backgrounds to your slides. After you complete your slides, you can run your presentation. Create a Title Slide When you start PowerPoint, PowerPoint displays the title slide in the Slide pane. You can type the title of your presentation and a subtitle on this slide. To enter text: Click and type the title of your presentation in the "Click to add title" area. Click and type a subtitle in the "Click to add subtitle" area. If you do not wish to use the title slide, click the Delete Slide button in the Slides group on the Home tab. EXERCISE 1 Create a Title Slide 1. Open PowerPoint. You are presented with a title slide. 2. Enter the information shown here. Type College Scholarships and Financial Aid in the Click to Add Title text box. Type Paying for College in the Click to Add Subtitle text box. Page 128
  • 129.
    Module of Office2007 Basic Create New Slides After completing your title slide, you can create additional slides. To create a new slide: 1. Choose the Home tab. 2. Click the New Slide button in the Slides group. The Office Theme dialog box appears and displays several layout templates. 3. Click the layout you want. The layout appears in the Slide pane of the PowerPoint window. 3. To add text, click inside the placeholder and type. 4. To add an additional slide to your presentation, do one of the following: Right-click the slide layout. A menu appears. Click Layout and then click the layout you want. Choose the Home tab, click the New Slide button , and then choose the slide layout you want. EXERCISE 2 Create New Slides 1. Choose the Home tab. 2. Click the New Slide button in the Slides group. The Office Theme dialog box appears. 3. Click the Title and Content Layout. The slide appears on the Slides tab. Page 129
  • 130.
    Module of Office2007 Basic 4. Enter the information shown here. Type Here is what to do: (including the colon) in the Click to Add Title text box. Type the bulleted text in the Content text box. Create an Outline If you need to present the information in your slide in outline form, you can easily create an outline by using the Increase List Level button to create a hierarchy. 1. Choose the Home tab. 2. Click the New Slide button in the Slides group. The Office Theme dialog box appears. 3. Click the Title and Content layout. 4. Enter the information shown here. Click the Increase List Level button in the Paragraph group to indent the bullets for Stafford Loans and PLUS Loans. If you ever need to decrease an indent, use the Decrease List Level button in the Praragraph group. Page 130
  • 131.
    Module of Office2007 Basic Use Two-Column Text You can also place text in two separate columns. 1. Choose the Home tab. 2. Click the New Slide button in the Slides group. The Office Theme dialog box appears. 3. Click the Two Content layout. 4. Enter the information shown here. Make Changes to Your Slides After creating a slide, if you want to add text: 1. Place the mouse pointer at the point at which you would like to add text. 2. Type the information you want to add. If you would like to change text: 1. Select the text you want to change. 2. Type the new text. You can use the Backspace key to delete text. You can also delete text by highlighting the text and pressing the Delete key. Apply a Theme A theme is a set of colors, fonts, and special effects. Themes provide attractive backgrounds for your PowerPoint slides. To apply a theme to all of the slides in your presentation: 1. Choose the Design tab. 2. Click the More button in the Themes group. 3. Click the design you want. To apply a theme to selected slides: 1. Click the Slides tab, located on the left side of the window. 2. Hold down the Ctrl key and then click to select the slides to which you want to apply a theme. 3. Choose the Design tab. 4. Click the More button in the Themes group. 5. Right-click the theme you want to apply. A menu appears. 6. Click Apply to Selected Slides. Excel applies the theme to the slides you selected. Page 131
  • 132.
    Module of Office2007 Basic You can add a dramatic effect to your theme by applying a background. 1. Choose the Design tab. 2. Click the Background Styles button . 3. Click the background you want. EXERCISE 3 Apply a Theme 1. Choose the Design tab. 2. Click the More button in the Themes group. 3. Click the theme you want. PowerPoint applies the theme to all of the slides in your presentation. Add a Background 1. Choose the Design tab. 2. Click the Background Styles button . 3. Click the background you want. PowerPoint applies the background to your slides. Run Your PowerPoint Slide Show After you create your slides, you can run your slide show: 1. Do any one of the following: Page 132
  • 133.
    Module of Office2007 Basic o Press F5. o Choose the Slide Show tab. Click the From Beginning button in the Start Slide Show group. o Click the Slide Show icon in the bottom-right corner of your screen. Your slide show appears on your screen. Navigating the Slide Show Task Procedure Go to the next slide. Do one of the following: Press the Right Arrow key. Press the Enter key. Press the Page Down key. Left-click the slide. Go to the previous slide. Do one of the following: Press the Left Arrow key. Press the Backspace key. Press the Page Up key. End the slide show and return to Press the Esc key. PowerPoint. EXERCISE 4 Run Your Slide Show 1. Press F5 to run the slide show. 2. Use the arrow keys on your keyboard to move forward and backward through your slides. 3. Use the Esc key to return to Normal view. Page 133
  • 134.
    Module of Office2007 Basic PowerPoint Animations and Transitions This lesson teaches you how to animate the objects on your PowerPoint slides. Lesson 3: Animations, Transitions, Spell Check, Outline Tab, Slides Tab, Sorter View, and Printing Animations control how objects move onto, off of, and around your slides. Transitions control how your presentation moves from one slide to the next. This lesson teaches you how to create animations and transitions. It also teaches how to spell-check your document, how to use the Outline and Slides tabs, how to use Sorter view, and how to print. Add Animations You can animate the objects on your PowerPoint slides. PowerPoint provides four types of animations: Entrance, Emphasis, Exit, and Motion Paths. An Entrance animation determines the manner in which an object appears on a slide; for example, an object can move onto a slide. An Emphasis animation does something to draw attention to an object; for example, the object can become larger. An Exit animation determines the manner in which an object leaves a slide; for example, an object can move off a slide. A Motion Paths animation determines how an object moves around a slide; for example, an object can move from left to right. After you add an animation, you can use the Custom Animation pane to modify it by choosing an effect. Choosing an effect enables you to define what starts the animation, its properties (such the direction from which an object moves onto the slide), and control the speed of the animation. In addition, you can have an animation start when you click the mouse, start along with the previous animation, or start at a specified time after the previous animation. If the Auto Preview box is checked on the Custom Animation pane, PowerPoint provides you with preview of your animation after you create it and each time you modify it. You can also use the Play button on the Custom Animation pane to preview an animation. To choose an effect: 1. Select the object you want to animate. 2. Choose the Animations tab. 3. Click the Custom Animation button . The Custom Animation pane appears. 4. Click the Add Effect button . A menu appears. 5. Choose the type of effect you want. A submenu appears. 6. Click the effect you want. PowerPoint applies the effect. To modify an effect: 1. Click the down arrow next to the Start field on the Custom Animations pane and then select the start method you want. 2. Click the down arrow next to the Property field on the Custom Animations pane and the select the property you want. The Property field might be labeled Direction, Size, or some other property. 3. Click the down arrow next to the Speed field on the Custom Animations pane and then select the speed you want to apply to your animation. To preview the animation, click the Play button on the Custom Animations pane. Page 134
  • 135.
    Module of Office2007 Basic EXERCISE 1 Add an Animation to a Slide 1. Click Slide 2 on the Slides tab. 2. Select "Start saving early." 3. Choose the Animations tab. 4. Click the Custom Animation button . The Custom Animation pane appears. 5. Click the Add Effect button . A menu appears. 6. Choose Entrance. A submenu appears. 7. Click Fly In. PowerPoint applies the effect. If the Auto preview box is checked, PowerPoint automatically provides you with a preview of the animation. Modify the Effect 1. Click the down arrow next to the Start field and then select After Previous. 2. Click the down arrow next to the Direction field and then select From Bottom. 3. Click the down arrow next to the Speed field and then select Medium. Add Another Animation 1. Select "Apply for financial aid." 2. Click the Add Effect button . A menu appears. Page 135
  • 136.
    Module of Office2007 Basic 3. Choose Entrance. A submenu appears. 4. Click Fly In. PowerPoint applies the effect. If the Auto preview box is checked, PowerPoint automatically provides you with a preview of the animation. Modify the Animation 1. Click the down arrow next to the Start field and then select After Previous. The Apply for Financial Aid field appears in the center of the Custom Animation pane. 2. Click the down arrow next to the Apply for Financial Aid field and then click Timing. The Fly In dialog box appears. 3. Type 0.05 in the Delay text box. 4. Click OK. 5. Click the down arrow next to the Direction field and then select From Bottom. 6. Click the down arrow next to the Speed field and then select Medium. If the Auto preview box is checked, PowerPoint automatically provides you with a preview of the animation. You can click the Play button on the Custom Animation pane at anytime to preview an animation. Page 136
  • 137.
    Module of Office2007 Basic Add Transitions Transitions determine how your presentations move from one slide to the next. For example, a slide can move up onto the screen and replace the previous slide. PowerPoint provides several transition methods. You can add sound to a transition and you can control its speed. You can apply a transition to selected slides or to all of the slides in your presentation. A transition can occur when the presenter clicks the mouse or after the amount of time you specify. To apply a transition to selected slides: 1. On the Slides tab, hold down the Ctrl key and then click the slides to which you want to apply the transition. 2. Choose the Animations tab. 3. Click the More button in the Transition to this Slide group. A menu of transitions appears. 4. Click the transition you want to apply. PowerPoint applies the transition. As you roll your pointer over each transition, PowerPoint provides you with a live preview of the transition. To apply a transition to all slides: 1. Choose the Animations tab. 2. Click the More button in the Transition to this Slide group. A menu of transitions appears. 3. Click the transition you want to apply. As you roll your pointer over each transition, PowerPoint provides you with a live preview of the transition. 4. Click the Apply to All button in the Transition to This Slide group. To add a sound to a transition: 1. Choose the Animations tab. 2. Click the down arrow next to the Transition Sound field and then click the sound you want. As you roll your pointer over each sound, PowerPoint plays the sound. To set the speed of a transition: 1. Choose the Animations tab. 2. Click the down arrow next to the Transition Speed field and then click the speed you want. If you want the transition to occur after the presenter clicks the mouse, check the On Mouse Click check box. If you want a transition to occur after a specified period of time, check the Automatically After check box and then specify the amount of time you want to elapse before the transition occurs. The On Mouse Click check box and the Automatically After check box are both located on the Animations tab in the Transition to This Slide group. EXERCISE 2 Add Transitions Page 137
  • 138.
    Module of Office2007 Basic 1. Choose the Animations tab. 2. Click the More button in the Transition to this Slide group. A menu of transitions appears. s 3. Click the Push Up transition. As you roll your pointer over each transition, PowerPoint provides you with a live preview of the transition. Add Sound and Set the Speed 1. Click the down arrow next to the Transition Sound field and then click Click. 2. Click the down arrow next to the Transition Speed field and then click Slow. Advance Slide 1. Check the On Mouse Click check box. 2. Click the Automatically After check box. 3. Type 00:07 in the Automatically After text box. 4. Click the Apply to All button . PowerPoint applies all of your changes to all of the slides. 5. Click Slide 1 on the Slides tab. 6. Type 00:03 in the Automatically After text box. PowerPoint changes the timing for Slide 1. Spell Check PowerPoint checks your spelling as you type and displays errors with a red wavy line under the misspelled word. You can right-click and then select the correct spelling from the list of offerings on the menu that appears or select Spelling to open the Spelling dialog box. If you need to, you can initiate a spell check anytime you like. To start a spell check, do one of the following: Press F7. Choose the Review tab and then click the Spelling button . If the spell check finds a possible spelling error, the Spelling dialog box opens with the spelling error highlighted. You can respond in several ways. Page 138
  • 139.
    Module of Office2007 Basic Response Procedure Do not change spelling. Click Ignore. Correct spelling. 1. Click the correct spelling in the Suggestions box. 2. Click Change. Add to dictionary. Click Add. Word is correct. Do not change Click Ignore All. presentation. Word is incorrect. Change Click Change All. entire presentation. EXERCISE 3 Spell Check 1. Press F7 2. Correct any spelling errors PowerPoint finds. If PowerPoint does not find any errors, the Spelling Check is Complete message box appears. Click OK. Use the Outline and Slides Tabs By default, the Outline and Slides tabs are located on the left side of your PowerPoint window. The Outline tab displays the text contained in your presentation. The Slides tab displays a thumbnail of all your slides. You click the thumbnail to view the slide in the Slide pane. EXERCISE 4 Use the Outline and Slides Tabs Page 139
  • 140.
    Module of Office2007 Basic 1. Choose the Slides tab to view thumbnails of your slides. 2. Choose the Outline tab to view the text of your presentation as an outline. Use Slide Sorter View After you have created your PowerPoint slides, you can move, cut, copy, paste, duplicate, navigate, and view them in Sorter view. To view the slides in Sorter view, do one of the following: Choose the View tab and then click the Slide Sorter button in the Presentation Views group. Click the Slide Sorter button in the bottom-right corner of the PowerPoint window. Slide Sorter View Task Procedure Move to first slide. Use Ctrl+Home. Move to last slide. Use Ctrl+End. Move to next slide. Use the right arrow. Move to previous slide. Use the left arrow. Select a slide. Single-click the slide. Open a slide in Normal view. Double-click the slide. Select slides. Select a single slide: 1. Click the slide you want to select. Page 140
  • 141.
    Module of Office2007 Basic Slide Sorter View Task Procedure Select multiple slides: 1. Hold down the Ctrl key. 2. Click the slides you want to select. Delete a slide. 1. Select the slide or slides you want to delete. 2. Press the Delete key. 1. Select the slide or slides you want to delete. 2. Choose the Home tab and then click the Delete button . Copy a slide. 1. Select the slide. 2. Choose the Home tab. 3. Click the Copy button in the Clipboard group. 1. Select the slide. 2. Press Ctrl+C. Paste a slide. 1. Select the slide after which you want the new slide or slides to appear. 2. Choose the Home tab. 3. Click the Paste button in the Clipboard group. 1. Select the slide after which you want the new slide or slides to appear. 2. Press Ctrl+V. Cut a slide. 1. Select the slide or slides you want to cut. 2. Choose the Home tab. 3. Click the Cut button in the Clipboard group. 1. Select the slide or slides you want to cut. 2. Press Ctrl+X. Move a slide. 1. Select the slide (or slides) you want to move. 2. Drag it to the new location. Page 141
  • 142.
    Module of Office2007 Basic Slide Sorter View Task Procedure Duplicate a slide. 1. Select the slide (or slides) you want to duplicate. 2. Press Ctrl+D. EXERCISE 5 Use Slide Sorter View 1. Choose the View tab. 2. Click Slide Sorter in the Presentation Views group. 3. Double-click a slide to view it in Normal view. Print PowerPoint provides you with many printing options. You can print a large view of your slides or you can print your slides as handouts with 1, 2, 3, 4, 6, or 9 slides per page. You can also print your Notes pages or the Outline view of your slides. To print: 1. Click the Microsoft Office button. A menu appears. 2. Choose Print. 3. Click Print Preview. 4. Click the down arrow next to the Print What field in the Page Setup group and then select what you would like to print. A preview appears onscreen. 5. Click the Print . The Print dialog box appears. 6. Click the down arrow next to the Color/Grayscale field to select whether you want your slides to print in color, grayscale, or black and white. If you are using a black and white printer, choose black and white. You will use less ink or toner. 7. Click OK. EXERCISE 6 Print an Outline Page 142
  • 143.
    Module of Office2007 Basic 1. Click the Microsoft Office button. A menu appears. 2. Choose Print. 3. Click Print Preview. The Print Preview tab appears. 4. Click the down arrow next to the Print What field in the Page Setup group and then select Outline View. 5. Click the Print button . The Print dialog box appears. Page 143
  • 144.
    Module of Office2007 Basic 6. Click the down arrow next to the Color/Grayscale field to select whether you want your slides to print in color, grayscale, or black and white. If you are using a black and white printer, choose black and white. You will use less ink or toner. 7. Set the other print settings. 8. Click OK. Your outline prints. Print Your Slides 1. Click the Microsoft Office button. A menu appears. 2. Choose Print. 3. Click Print Preview. The Print Preview tab appears. 4. Click the down arrow next to the Print What field in the Page Setup group and then select Slides. 5. Click the Print button . The Print dialog box appears. 6. Click the down arrow next to the Color/Grayscale field to select whether you want your slides to print in color, grayscale, or black and white. If you are using a black and white printer, choose black and white. You will use less ink or toner. 7. Set the other print settings. 8. Click OK. Your slides print. Print Your Slides as a Handout 1. Click the Microsoft Office button. A menu appears. 2. Choose Print. 3. Click Print Preview. The Print Preview tab appears. 4. Click the down arrow next to the Print What field in the Page Setup group and then select Handouts (4 slides per page). 5. Click the Print button . The Print dialog box appears. 6. Click the down arrow next to the Color/Grayscale field to select whether you want your slides to print in color, grayscale, or black and white. If you are using a black and white printer, choose black and white. You will use less ink or toner. 7. Set the other print settings. 8. Click OK. Your handouts print. Page 144
  • 145.
    Module of Office2007 Basic Page 145
  • 146.
    Module of Office2007 Basic Page 146
  • 147.
    Module of Office2007 Basic Page 147