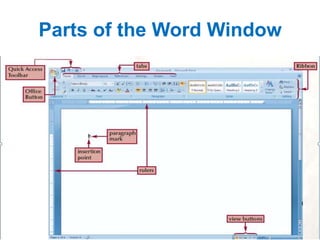
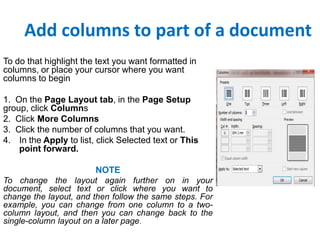
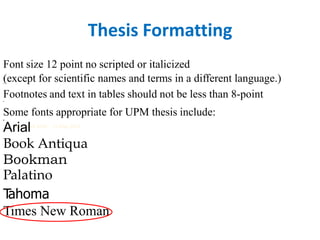
MICROSOFT WORD SEMINAR
Presenter:

Mamma Sawaneh
Faculty of Agriculture
(MSc. in Agricultural Economics)
Presentation Outline
Part A

• Microsoft and menu introduction
• Document creation, editing and saving

• Creating tables, figures and inserting captions
Part B • Graphs, word Art, Charts, text flow
• Systemic header, footer and page numbering
Part C • Page setup and other related features

Part D

Part E

• Reviewing writing( editing, track changes, comparing files, etc)

• Thesis formatting( Creating a table of content, list of tables and list of figures)
Introduction
• Microsoft Word 2010 is a word-processing program, designed
to help you create professional-quality documents
• helps you organize and write your documents more efficiently

• includes powerful editing and revising tools for easy
collaboration with others
Parts of the Word Window
Window Element

Description

Office Button

Provides access to the word options dialog box and to commands that control what
you can do with a document that have created, such as saving, printing, and so on.

Ribbon

Provides access to commands that are grouped according to the tasks you
perform in word
Understanding the Ribbon is a great way to help understand the changes between
Microsoft 2003 to Microsoft 2010.
The ribbon holds all of the information in previous versions of Microsoft Office in a
more visual stream line manner through a series of tabs that include an immense
variety of program features.

Tabs

Provide one-click access to the groups of commands on the ribbon/; the tabs you see
change depending on the task you are currently performing

Quick Access Toolbar

Provides access to common commands you use frequently, such as save

Rulers

Show page margins, tab shops, row heights and column widths

Insertion point

Shows where characters will appear when you start typing

Paragraph mark

Marks the end of a paragraph

View buttons

Allow you to change the way the document is displayed
Parts of the Word Window
Microsoft 2007

.

Microsoft 2010
DIFFERENT TABS
Home Tab
Insert Tab
This tab allows you to insert a variety of items into a document from pictures, clip art, tables and
headers and footers
Page layout
• This tab has commands to adjust page elements such as
margins, orientation, inserting columns, page backgrounds and
themes
Reference tab
• This tab has commands to use when creating a Table of
Contents and citation page for a paper. It provides you with
many simple solutions to create these typically difficult to
produce documents.
Mailing Tab
This tab allows you to create documents to help when sending
out mailings such as printing envelopes, labels and processing
mail merges.
Review Tab
This tab allows you to make any changes to your document due
to spelling and grammar issues. It also holds the track changes
feature which provides people with the ability to make notes
and changes to a document of another person.
View Tab
This tab allows you to change the view of your document to a
different two page document or zoom and can be used to delete
unwanted page from the document
Getting Started
• Now that you have an understanding of where things are located, let’s look at the
steps needed to create a document.
Opening Outlook
• You may have a shortcut to Word on your desktop, if so double click the icon and
Word will open. If not follow the steps below:
1. Click on the Start button
2. Highlight Programs
3. Highlight Microsoft Office
4. Click on Microsoft Word 2010
Create a New Document
1. Click the File tab and then
click New.
2. Under Available
Templates, click Blank
Document.
3. Click Create
Using Templates
Word 2010 allows you to apply built-in templates from a wide selection of
popular Word templates, including resumes, agendas, business cards, and
faxes.
To find and apply a template in Word, do the following:
1. On the File tab, click New.
2. Under Available Templates, do one of the following:
•
To use one of the built-in templates, click Sample Templates, click the
template that you want, and then click Create.
•
To reuse a template that you’ve recently used, click Recent
Templates, click the template that you want, and then click Create.
•
To find a template on Office.com, under Office.com Templates, click the
template category that you want, click the template that you want, and
click Download to download the template from Office.com to your
computer.
• 3. Once you have selected your template you can modify it in any way to
create the document you want.
Opening a document
1. Click the File tab, and then click Open.
2. In the left pane of the Open dialog
box, click the drive or folder that contains the
document.
3. In the right pane of the Open dialog
box, open the folder that contains the
document that you want.
4. Click the document and then click Open.
Cut, Copy and Paste
If you would like to remove text from your document you can copy
or cut the text from the document.
• Simply highlight the text and go to the Home tab in the
Clipboard group and click Cut or Copy.
• You can also right click on your mouse and select Cut or Copy

• Or use ShortcutCtrl+C (copy)
Ctrl+x( cut)

Ctrl +v(paste)
Pasting Text
If you Copy text, you typically need to Paste it somewhere.
• The Paste feature in 2010 is much more detailed than in
previous versions of Word.

• When you paste content, the Paste Options button provides
different options, depending on the source of the content.
Note
To Paste, click on the area you want your information to be inserted and
either go to the Home tab in the Clipboard group and click Paste or
right click on your mouse and select Paste option
Different paste options
Keep Source Formatting: This option preserves the look of the original text.
Keep Text Only: This option removes all the original formatting from the text.
Link & Keep Source Formatting: This option preserves the look of the original text, and it
maintains a link to the source file and updates the pasted text with any changes that are made to the
source file.
Link & Use Destination Styles: This option formats the text to match the style that’s applied where
the text is pasted. It also maintains a link to the source file and updates the pasted text with any
changes that are made to the source file.
Merge Formatting: This option changes the formatting so that it matches the text that surrounds it.
Picture: This option inserts the text as an image.
Use Destination Styles: This option formats the text to match the style that’s applied where the text
is pasted.
Use Destination Theme: This option formats the text to match the theme that’s applied to the
document where the text is pasted.
Undo
• The Quick Access Toolbar holds a variety of commands right
at your finger tips. Found in the top left of the document
above the File and Home tab.
• You can add or remove command by clicking on the arrow to the
right of the Quick Access Toolbar.
• If you make an error in your document click on the Undo
command and it will remove the last thing you did
Show/Hide Formatting Marks
• The Show/Hide command allows you to see every time
you hit the space bar, hit enter or tab.
• This feature can be quite useful when creating
documents to understand where everything is placed
within your document and see if any errors have been
made
• On the Home tab, in the Paragraph group, click
Show/Hide
Formatting Text
Formatting a document can range from modifying text
size to adding graphics. It is easy to add creative
touches to any document with the options Microsoft
Word has to offer.
Modifying Fonts
The Font Group allows you to change your text font
style, size, color and many other elements.
1. Highlight the text you would like to modify.
2. Click on the drop down arrow of font style and font
size and select the changes you would like to make.
3. While text is highlighted you can also click on the
color, bold, italics or underline commands to modify
the text even more.
Change Text Case
You can change the case of selected text in a
document by clicking a single button called
Change Case on the ribbon
1. Highlight the text for which you want to
change the case.
2. On the Home tab, in the Font group, click
Change Case.
3. Choose an option from the dropdown
list, which includes Sentence
case, lowercase, UPPERCASE, Capitalize
Each Word, and tOGGLE cASE.
Formatting Documents
The easiest way to change the line spacing
for an entire document is to highlight the
paragraphs or entire document that you want
to effect the line spacing on.
1. On the Home tab, in the Paragraph
group, click Line Spacing.
2. Click the number of line spaces that you
want.
3. For example, click 1.0 to single-space
with the spacing that is used in earlier
versions of Word. Click 2.0 to
double-space the selected paragraph.
Page Orientation
• You can choose either portrait (vertical) or landscape (horizontal)
orientation for all or part of your document.
Change Page Orientation
1. On the Page Layout tab, in the Page Setup group, click Orientation.
2. Click Portrait or Landscape
Different Page Orientations on
Same Document
1. Highlight the pages or paragraphs that you want to change to
portrait or landscape orientation.
2. On the Page Layout tab, in the Page Setup group, click Margins.
a. Click Custom Margins at the bottom of the drop down menu.
b. A Page Setup dialog box will appear.
c. On the Margins tab, click Portrait or Landscape.
d. In the Apply to list, click Selected text or This point forward.
NOTE
If you select some but not all of the text on a page to change to
portrait or landscape orientation, Word places the selected text on its
own page, and the surrounding text on separate pages
Page Margins
Page margins are the blank space around
the edges of the page.

Setting Predefined Page Margins
1. On the Page Layout tab, in the Page
Setup group, click Margins. The Margins
gallery drop down menu will appear.
2. Click the margin type that you want to
apply.
Create Custom Margins
1. On the Page Layout tab, in the Page Setup
group, click Margins.
2. At the bottom of the Margins gallery drop down
menu, click Custom Margins.
3. The Page Setup dialog box will appear.
4. Enter new values for the margins in all or some of
the Top, Bottom, Left or Right text boxes.
5. Click OK
Note
Most printers require a minimum width for margin
settings. If you try to set margins that are too
narrow, Microsoft Word displays the message One or
more margins are set outside the printable area of the
page.
Page Breaks
Word automatically inserts a page break
when you reach the end of a page. If you
want the page to break in a different
place, you can insert a manual page break.
Inserting a Page Break
1. Click where you want to start a new page.
2. On the Insert tab, in the Pages group, click
Page Break
NOTE
You can also insert breaks into your document
by going to the Page Layout tab, Page Setup
group and click on the Breaks command to view
a variety of page and section breaks you can
insert into your document.
Deleting a Page Break
You cannot delete the page breaks that Word inserts
automatically; you can only delete a page break that you insert
manually.
1. Go to the page break you would like to remove.
2. Select the page break by clicking in the margin next to the
dotted line.

3. Press the DELETE key on your keyboard.
Headers, Footers, and Page
Numbers
You can add headers, footers and page
numbers numerous ways
• The simplest way is to double click on the
top or bottom of the page and the header
and footer area will appear
• Enter the text you wish to be displayed at
the top or bottom of every page.
Add Page Numbers
If you want a page number on each page, you
can quickly add a page number from the gallery
1. On the Insert tab, in the Header & Footer
group, click Page Number.
2. Click the page number location that you want.
3. In the gallery, scroll through the options, and
then click the page number format that you
want.

4. To return to the body of your document, click
Close Header and Footer on the Design tab
(under Header & Footer Tools
Add Header or Footer
1. On the Insert tab, in the Header & Footer
group, click Header or Footer.
2. Click the header or footer that you want to add
to your document and your header or footer area
will open.
3. Type text in the header or footer area.
4. To return to the body of your document, click
Close Header and Footer on the Design tab
(under Header & Footer Tools).
To Remove page numbers, headers, and footers
1. Click on the Header, Footer or Page Number
Command.
2. A drop down menu will appear.
3. Click Remove at the bottom of the menu.
Bulleted or Numbered List
You can quickly add bullets or numbers to
existing lines of text, or Word can
automatically create lists as you type.
By default, if you start a paragraph with an
asterisk or a number 1., Word recognizes that
you are trying to start a bulleted or numbered
list.
If you don't want your text turned into a
list, you can click the AutoCorrect Options
button that appears.
1. Bullets Command
2. Numbering Command
Insert Bulleted or Numbered List
1. Click on the area where you would like your list
to appear or highlight the text you would like to
be in a list.
2. Go to the Home tab, in the Paragraph
group, click Bullets or Numbering.
3. A bullet(s) or number(s) will be inserted.
Select Bullets or Numbering Style
1. Select the items that you want to add bullets or
numbering to.
2. On the Home tab, in the Paragraph group, click
the arrow next to the Bullets or Numbering
command.
3. Select the bullet or number format you would
like to be inserted.
Move a List Left or Right
If you do not like the location of your
bullets or numbers you can easily move
them to a preferred location.
1. Click a bullet or number in the list to
highlight the list
2. Drag the list to a new location. The
entire list moves as you drag.
The numbering levels do not change.
Advanced Formatting Techniques
Create Columns
Columns can be used in documents such as
brochures, newsletters or to save space when
creating lists
Add columns before entering text
1. Go to the Page Layout tab, in the Page
Setup group, click Columns.
2. Click the layout that you want. Your
document will be formatted in columns.
NOTE
To add a vertical line between the columns, click
Columns again, click More Columns, and then
select the Line between check box. You can also
adjust the column width and spacing
Add columns to part of a document
To do that highlight the text you want formatted in
columns, or place your cursor where you want
columns to begin
1. On the Page Layout tab, in the Page Setup
group, click Columns
2. Click More Columns
3. Click the number of columns that you want.
4. In the Apply to list, click Selected text or This
point forward.
NOTE
To change the layout again further on in your
document, select text or click where you want to
change the layout, and then follow the same steps. For
example, you can change from one column to a twocolumn layout, and then you can change back to the
single-column layout on a later page.
Tables
Using tables in Word can provide you with additional
elements to any document. Tables can be used to
create lists or format text in an organized fashion
Inserting a Table
1. Click where you want to insert a table.
2. On the Insert tab, in the Tables group, click Table
3. A drop down box will appear; click and hold your
mouse then drag to select the number of rows
and columns that you want inserted into your
document. You will see your table appearing in
your document as you drag on the grid.
4. Once you have highlighted the rows and columns
you would like let go of your mouse and the table
will be in your document
Add Row/Column to Table
1. Click on the table.
2. Under Table Tools, go to the Layout tab
3. Click on the Insert Above or Insert Below to add
a row, Click on Insert Left or Insert Right to insert
a column.

4. Click on Delete to remove a column, row or cell.
Reviewing a Document
To review /edit a document in the format used by
Word 2010 and Word 2007, do the following:
1. Click the Review tab
2. Click Track changes (make sure is highlighted)
3. Start Editing process

Tracking
• Applying track changes on your document when
your receive comments
• Click Review then go to Accept and Choose
1. Accept and move to next: for one by one
2. Accept all changes in Document (for all together)
Comparing Files
You can view two files at the same time to
see the differences
• For example between original and revised
documents
Steps
1. Click review tab and then go to compare
2. Click compare and select compare two
versions
• Choose the both files for comparison
Thesis Formatting
Font size 12 point no scripted or italicized
(except for scientific names and terms in a different language.)
Footnotes and text in tables should not be less than 8-point
•
•

•

Some fonts appropriate for UPM thesis include:
•

Arial
Book Antiqua
Bookman
Palatino
T
ahoma
Times New Roman
•

MS Word 2010 - 15 May 2013
Margins and Spaces
• Left margin: 40 mm
• Right, top and bottom margins: 25 mm.
• Double-spaced, with four spaces between paragraphs and sections.
However, the following should be single space
i. Footnotes (if absolutely necessary);
ii. Quotations of three lines or more, indented and set in a block;
iii. References or bibliography (except between entries);
iv. Multi-line captions (tables, figures);
v. Appendices, such as questionnaires, letters; and
vi. Headings or subheadings.
NOTE
1. Be mindful of your paragraph spacing (ie before and After: 0pt)
2. Customize indent to 0mm unless otherwise necessary
Customizing your margins
• Click on page layout tab and then
click margins
• Click custom margins below and
type your dimensions
• Click ok
Modifying text styles
• Normal: for text
• Heading1: for first level of headings
• Heading2: for second level of
headings
• Captions: for tables, photos or
charts name
Table of contents
Practical
• Let format this ten page document according to
UPM SGO standard
• Individual tasks follow
References
1. Stephen Moffat, (2011 ). word 2010 introduction. The mouse
training
company.
Downloaded
free
ebook
from
www.bookboon.com
2. Stephen Moffat, (2011 ). word 2010 Advanced part I & II. The mouse
training
company.
Downloaded
free
ebooks
from
www.bookboon.com
3. Amy Beauchemin (2011) Word2010 tutorial . Retrived from
www.office.microsoft.com

Advanced Microsoft word seminar

  • 1.
    MICROSOFT WORD SEMINAR Presenter: MammaSawaneh Faculty of Agriculture (MSc. in Agricultural Economics)
  • 2.
    Presentation Outline Part A •Microsoft and menu introduction • Document creation, editing and saving • Creating tables, figures and inserting captions Part B • Graphs, word Art, Charts, text flow • Systemic header, footer and page numbering Part C • Page setup and other related features Part D Part E • Reviewing writing( editing, track changes, comparing files, etc) • Thesis formatting( Creating a table of content, list of tables and list of figures)
  • 3.
    Introduction • Microsoft Word2010 is a word-processing program, designed to help you create professional-quality documents • helps you organize and write your documents more efficiently • includes powerful editing and revising tools for easy collaboration with others
  • 4.
    Parts of theWord Window Window Element Description Office Button Provides access to the word options dialog box and to commands that control what you can do with a document that have created, such as saving, printing, and so on. Ribbon Provides access to commands that are grouped according to the tasks you perform in word Understanding the Ribbon is a great way to help understand the changes between Microsoft 2003 to Microsoft 2010. The ribbon holds all of the information in previous versions of Microsoft Office in a more visual stream line manner through a series of tabs that include an immense variety of program features. Tabs Provide one-click access to the groups of commands on the ribbon/; the tabs you see change depending on the task you are currently performing Quick Access Toolbar Provides access to common commands you use frequently, such as save Rulers Show page margins, tab shops, row heights and column widths Insertion point Shows where characters will appear when you start typing Paragraph mark Marks the end of a paragraph View buttons Allow you to change the way the document is displayed
  • 5.
    Parts of theWord Window
  • 6.
  • 7.
  • 8.
  • 9.
    Insert Tab This taballows you to insert a variety of items into a document from pictures, clip art, tables and headers and footers
  • 10.
    Page layout • Thistab has commands to adjust page elements such as margins, orientation, inserting columns, page backgrounds and themes
  • 11.
    Reference tab • Thistab has commands to use when creating a Table of Contents and citation page for a paper. It provides you with many simple solutions to create these typically difficult to produce documents.
  • 12.
    Mailing Tab This taballows you to create documents to help when sending out mailings such as printing envelopes, labels and processing mail merges.
  • 13.
    Review Tab This taballows you to make any changes to your document due to spelling and grammar issues. It also holds the track changes feature which provides people with the ability to make notes and changes to a document of another person.
  • 14.
    View Tab This taballows you to change the view of your document to a different two page document or zoom and can be used to delete unwanted page from the document
  • 15.
    Getting Started • Nowthat you have an understanding of where things are located, let’s look at the steps needed to create a document. Opening Outlook • You may have a shortcut to Word on your desktop, if so double click the icon and Word will open. If not follow the steps below: 1. Click on the Start button 2. Highlight Programs 3. Highlight Microsoft Office 4. Click on Microsoft Word 2010
  • 16.
    Create a NewDocument 1. Click the File tab and then click New. 2. Under Available Templates, click Blank Document. 3. Click Create
  • 17.
    Using Templates Word 2010allows you to apply built-in templates from a wide selection of popular Word templates, including resumes, agendas, business cards, and faxes. To find and apply a template in Word, do the following: 1. On the File tab, click New. 2. Under Available Templates, do one of the following: • To use one of the built-in templates, click Sample Templates, click the template that you want, and then click Create. • To reuse a template that you’ve recently used, click Recent Templates, click the template that you want, and then click Create. • To find a template on Office.com, under Office.com Templates, click the template category that you want, click the template that you want, and click Download to download the template from Office.com to your computer. • 3. Once you have selected your template you can modify it in any way to create the document you want.
  • 18.
    Opening a document 1.Click the File tab, and then click Open. 2. In the left pane of the Open dialog box, click the drive or folder that contains the document. 3. In the right pane of the Open dialog box, open the folder that contains the document that you want. 4. Click the document and then click Open.
  • 19.
    Cut, Copy andPaste If you would like to remove text from your document you can copy or cut the text from the document. • Simply highlight the text and go to the Home tab in the Clipboard group and click Cut or Copy. • You can also right click on your mouse and select Cut or Copy • Or use ShortcutCtrl+C (copy) Ctrl+x( cut) Ctrl +v(paste)
  • 20.
    Pasting Text If youCopy text, you typically need to Paste it somewhere. • The Paste feature in 2010 is much more detailed than in previous versions of Word. • When you paste content, the Paste Options button provides different options, depending on the source of the content. Note To Paste, click on the area you want your information to be inserted and either go to the Home tab in the Clipboard group and click Paste or right click on your mouse and select Paste option
  • 21.
    Different paste options KeepSource Formatting: This option preserves the look of the original text. Keep Text Only: This option removes all the original formatting from the text. Link & Keep Source Formatting: This option preserves the look of the original text, and it maintains a link to the source file and updates the pasted text with any changes that are made to the source file. Link & Use Destination Styles: This option formats the text to match the style that’s applied where the text is pasted. It also maintains a link to the source file and updates the pasted text with any changes that are made to the source file. Merge Formatting: This option changes the formatting so that it matches the text that surrounds it. Picture: This option inserts the text as an image. Use Destination Styles: This option formats the text to match the style that’s applied where the text is pasted. Use Destination Theme: This option formats the text to match the theme that’s applied to the document where the text is pasted.
  • 22.
    Undo • The QuickAccess Toolbar holds a variety of commands right at your finger tips. Found in the top left of the document above the File and Home tab. • You can add or remove command by clicking on the arrow to the right of the Quick Access Toolbar. • If you make an error in your document click on the Undo command and it will remove the last thing you did
  • 23.
    Show/Hide Formatting Marks •The Show/Hide command allows you to see every time you hit the space bar, hit enter or tab. • This feature can be quite useful when creating documents to understand where everything is placed within your document and see if any errors have been made • On the Home tab, in the Paragraph group, click Show/Hide
  • 24.
    Formatting Text Formatting adocument can range from modifying text size to adding graphics. It is easy to add creative touches to any document with the options Microsoft Word has to offer. Modifying Fonts The Font Group allows you to change your text font style, size, color and many other elements. 1. Highlight the text you would like to modify. 2. Click on the drop down arrow of font style and font size and select the changes you would like to make. 3. While text is highlighted you can also click on the color, bold, italics or underline commands to modify the text even more.
  • 25.
    Change Text Case Youcan change the case of selected text in a document by clicking a single button called Change Case on the ribbon 1. Highlight the text for which you want to change the case. 2. On the Home tab, in the Font group, click Change Case. 3. Choose an option from the dropdown list, which includes Sentence case, lowercase, UPPERCASE, Capitalize Each Word, and tOGGLE cASE.
  • 26.
    Formatting Documents The easiestway to change the line spacing for an entire document is to highlight the paragraphs or entire document that you want to effect the line spacing on. 1. On the Home tab, in the Paragraph group, click Line Spacing. 2. Click the number of line spaces that you want. 3. For example, click 1.0 to single-space with the spacing that is used in earlier versions of Word. Click 2.0 to double-space the selected paragraph.
  • 27.
    Page Orientation • Youcan choose either portrait (vertical) or landscape (horizontal) orientation for all or part of your document. Change Page Orientation 1. On the Page Layout tab, in the Page Setup group, click Orientation. 2. Click Portrait or Landscape
  • 28.
    Different Page Orientationson Same Document 1. Highlight the pages or paragraphs that you want to change to portrait or landscape orientation. 2. On the Page Layout tab, in the Page Setup group, click Margins. a. Click Custom Margins at the bottom of the drop down menu. b. A Page Setup dialog box will appear. c. On the Margins tab, click Portrait or Landscape. d. In the Apply to list, click Selected text or This point forward. NOTE If you select some but not all of the text on a page to change to portrait or landscape orientation, Word places the selected text on its own page, and the surrounding text on separate pages
  • 29.
    Page Margins Page marginsare the blank space around the edges of the page. Setting Predefined Page Margins 1. On the Page Layout tab, in the Page Setup group, click Margins. The Margins gallery drop down menu will appear. 2. Click the margin type that you want to apply.
  • 30.
    Create Custom Margins CreateCustom Margins 1. On the Page Layout tab, in the Page Setup group, click Margins. 2. At the bottom of the Margins gallery drop down menu, click Custom Margins. 3. The Page Setup dialog box will appear. 4. Enter new values for the margins in all or some of the Top, Bottom, Left or Right text boxes. 5. Click OK Note Most printers require a minimum width for margin settings. If you try to set margins that are too narrow, Microsoft Word displays the message One or more margins are set outside the printable area of the page.
  • 31.
    Page Breaks Word automaticallyinserts a page break when you reach the end of a page. If you want the page to break in a different place, you can insert a manual page break. Inserting a Page Break 1. Click where you want to start a new page. 2. On the Insert tab, in the Pages group, click Page Break NOTE You can also insert breaks into your document by going to the Page Layout tab, Page Setup group and click on the Breaks command to view a variety of page and section breaks you can insert into your document.
  • 32.
    Deleting a PageBreak You cannot delete the page breaks that Word inserts automatically; you can only delete a page break that you insert manually. 1. Go to the page break you would like to remove. 2. Select the page break by clicking in the margin next to the dotted line. 3. Press the DELETE key on your keyboard.
  • 33.
    Headers, Footers, andPage Numbers You can add headers, footers and page numbers numerous ways • The simplest way is to double click on the top or bottom of the page and the header and footer area will appear • Enter the text you wish to be displayed at the top or bottom of every page.
  • 34.
    Add Page Numbers Ifyou want a page number on each page, you can quickly add a page number from the gallery 1. On the Insert tab, in the Header & Footer group, click Page Number. 2. Click the page number location that you want. 3. In the gallery, scroll through the options, and then click the page number format that you want. 4. To return to the body of your document, click Close Header and Footer on the Design tab (under Header & Footer Tools
  • 35.
    Add Header orFooter 1. On the Insert tab, in the Header & Footer group, click Header or Footer. 2. Click the header or footer that you want to add to your document and your header or footer area will open. 3. Type text in the header or footer area. 4. To return to the body of your document, click Close Header and Footer on the Design tab (under Header & Footer Tools). To Remove page numbers, headers, and footers 1. Click on the Header, Footer or Page Number Command. 2. A drop down menu will appear. 3. Click Remove at the bottom of the menu.
  • 36.
    Bulleted or NumberedList You can quickly add bullets or numbers to existing lines of text, or Word can automatically create lists as you type. By default, if you start a paragraph with an asterisk or a number 1., Word recognizes that you are trying to start a bulleted or numbered list. If you don't want your text turned into a list, you can click the AutoCorrect Options button that appears. 1. Bullets Command 2. Numbering Command
  • 37.
    Insert Bulleted orNumbered List Insert Bulleted or Numbered List 1. Click on the area where you would like your list to appear or highlight the text you would like to be in a list. 2. Go to the Home tab, in the Paragraph group, click Bullets or Numbering. 3. A bullet(s) or number(s) will be inserted. Select Bullets or Numbering Style 1. Select the items that you want to add bullets or numbering to. 2. On the Home tab, in the Paragraph group, click the arrow next to the Bullets or Numbering command. 3. Select the bullet or number format you would like to be inserted.
  • 38.
    Move a ListLeft or Right If you do not like the location of your bullets or numbers you can easily move them to a preferred location. 1. Click a bullet or number in the list to highlight the list 2. Drag the list to a new location. The entire list moves as you drag. The numbering levels do not change.
  • 39.
    Advanced Formatting Techniques CreateColumns Columns can be used in documents such as brochures, newsletters or to save space when creating lists Add columns before entering text 1. Go to the Page Layout tab, in the Page Setup group, click Columns. 2. Click the layout that you want. Your document will be formatted in columns. NOTE To add a vertical line between the columns, click Columns again, click More Columns, and then select the Line between check box. You can also adjust the column width and spacing
  • 40.
    Add columns topart of a document To do that highlight the text you want formatted in columns, or place your cursor where you want columns to begin 1. On the Page Layout tab, in the Page Setup group, click Columns 2. Click More Columns 3. Click the number of columns that you want. 4. In the Apply to list, click Selected text or This point forward. NOTE To change the layout again further on in your document, select text or click where you want to change the layout, and then follow the same steps. For example, you can change from one column to a twocolumn layout, and then you can change back to the single-column layout on a later page.
  • 41.
    Tables Using tables inWord can provide you with additional elements to any document. Tables can be used to create lists or format text in an organized fashion Inserting a Table 1. Click where you want to insert a table. 2. On the Insert tab, in the Tables group, click Table 3. A drop down box will appear; click and hold your mouse then drag to select the number of rows and columns that you want inserted into your document. You will see your table appearing in your document as you drag on the grid. 4. Once you have highlighted the rows and columns you would like let go of your mouse and the table will be in your document
  • 42.
    Add Row/Column toTable 1. Click on the table. 2. Under Table Tools, go to the Layout tab 3. Click on the Insert Above or Insert Below to add a row, Click on Insert Left or Insert Right to insert a column. 4. Click on Delete to remove a column, row or cell.
  • 43.
    Reviewing a Document Toreview /edit a document in the format used by Word 2010 and Word 2007, do the following: 1. Click the Review tab 2. Click Track changes (make sure is highlighted) 3. Start Editing process Tracking • Applying track changes on your document when your receive comments • Click Review then go to Accept and Choose 1. Accept and move to next: for one by one 2. Accept all changes in Document (for all together)
  • 44.
    Comparing Files You canview two files at the same time to see the differences • For example between original and revised documents Steps 1. Click review tab and then go to compare 2. Click compare and select compare two versions • Choose the both files for comparison
  • 45.
    Thesis Formatting Font size12 point no scripted or italicized (except for scientific names and terms in a different language.) Footnotes and text in tables should not be less than 8-point • • • Some fonts appropriate for UPM thesis include: • Arial Book Antiqua Bookman Palatino T ahoma Times New Roman • MS Word 2010 - 15 May 2013
  • 46.
    Margins and Spaces •Left margin: 40 mm • Right, top and bottom margins: 25 mm. • Double-spaced, with four spaces between paragraphs and sections. However, the following should be single space i. Footnotes (if absolutely necessary); ii. Quotations of three lines or more, indented and set in a block; iii. References or bibliography (except between entries); iv. Multi-line captions (tables, figures); v. Appendices, such as questionnaires, letters; and vi. Headings or subheadings. NOTE 1. Be mindful of your paragraph spacing (ie before and After: 0pt) 2. Customize indent to 0mm unless otherwise necessary
  • 47.
    Customizing your margins •Click on page layout tab and then click margins • Click custom margins below and type your dimensions • Click ok
  • 48.
    Modifying text styles •Normal: for text • Heading1: for first level of headings • Heading2: for second level of headings • Captions: for tables, photos or charts name
  • 49.
  • 50.
    Practical • Let formatthis ten page document according to UPM SGO standard • Individual tasks follow
  • 52.
    References 1. Stephen Moffat,(2011 ). word 2010 introduction. The mouse training company. Downloaded free ebook from www.bookboon.com 2. Stephen Moffat, (2011 ). word 2010 Advanced part I & II. The mouse training company. Downloaded free ebooks from www.bookboon.com 3. Amy Beauchemin (2011) Word2010 tutorial . Retrived from www.office.microsoft.com