Downloaded 175 times

![NAT Setting for Kali
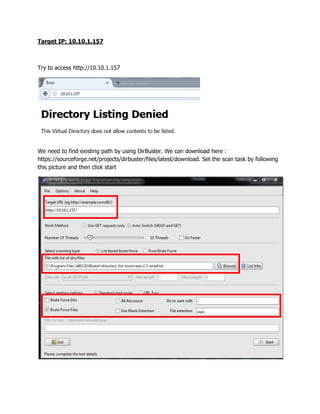
[Scan Phase]
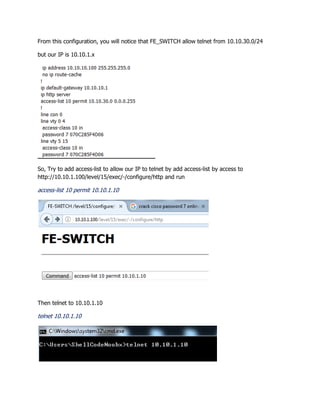
nmap -A -vv -Pn -p- 10.10.1.xxx -oA scan_xxx.txt
The result will show
Host Open ports
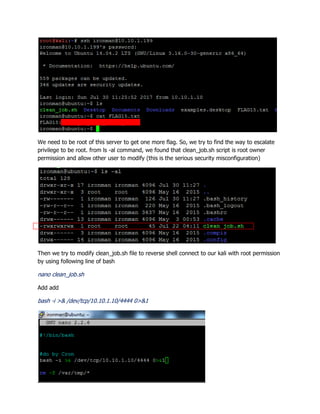
10.10.1.50
10.10.1.100
10.10.1.157
10.10.1.199
10.10.1.201
10.10.1.205
10.10.1.210
10.10.1.249](https://image.slidesharecdn.com/epkisavms2akxcwlsuxd-signature-7af3cb98f3766abdd21826ec0dfedc0b97539b101df521d589a2ff4f7289cbfa-poli-170903144616/85/Mini-CTF-workshop-dump-2-320.jpg)

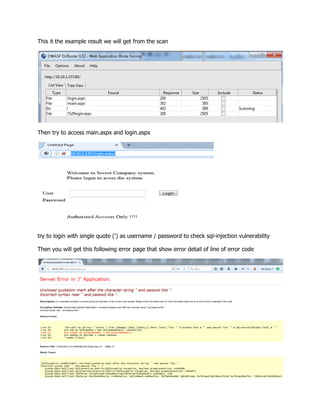
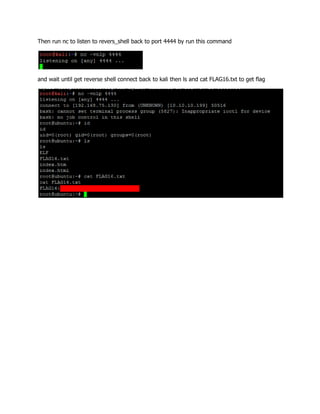
![Try to login again and use BuirpSuite in intercept the request and then use ' OR '1'='1';-- in
user field with any password and then click to intercept off
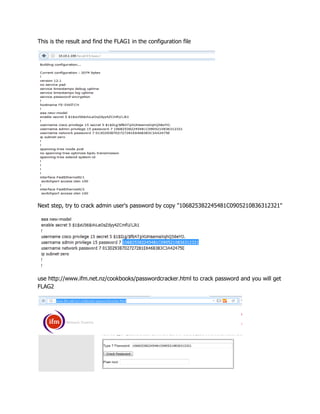
Now, we can access to the system by using SQL injection technique. However, the FLAG will be
show only if we can access the system with CEO account which is the 2nd account in the
database
So, we need to modify the injection statement to select the 2nd user in the database. From the
injection we get user "admin" and in the Error message we get from the previous step has field
name [User] in the table. So, the modify SQL injection statement is
' OR '1'='1' AND [User] not like 'admin';--
We will get FLAG6 from the system](https://image.slidesharecdn.com/epkisavms2akxcwlsuxd-signature-7af3cb98f3766abdd21826ec0dfedc0b97539b101df521d589a2ff4f7289cbfa-poli-170903144616/85/Mini-CTF-workshop-dump-17-320.jpg)


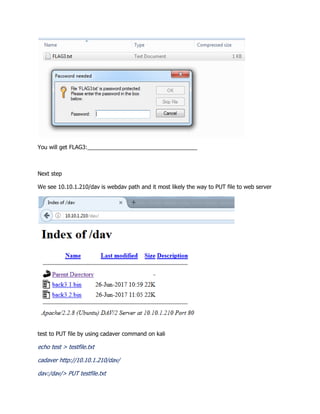
This document provides instructions for hacking into various targets on a network to retrieve flags. It includes steps like port scanning with Nmap, cracking passwords, exploiting vulnerabilities like SQL injection and file inclusion, and using tools like Hydra, Burp Suite, and Metasploit to retrieve hashes, escalate privileges, and access remote systems. The flags are stored on the target systems in files or application interfaces.

![Sebastián Guerrero - Ke ase Android? [Rooted CON 2013]](https://cdn.slidesharecdn.com/ss_thumbnails/sebastianguerrero-130407061021-phpapp01-thumbnail.jpg?width=640&height=640&fit=bounds)