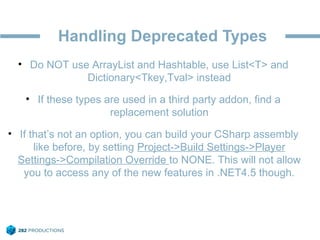
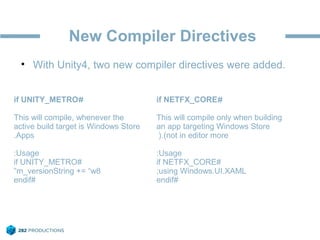
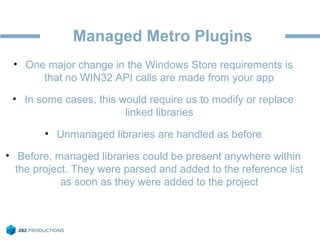
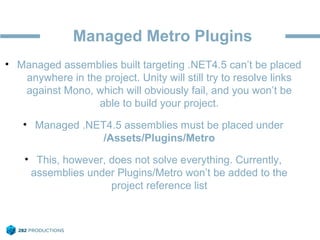
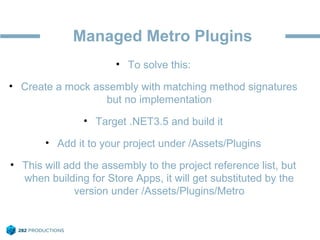
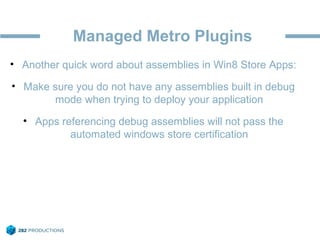
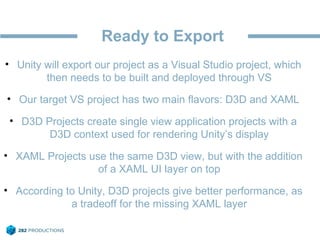
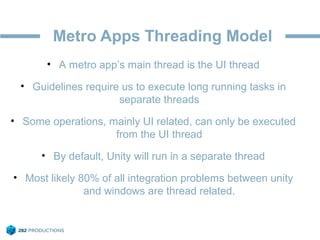
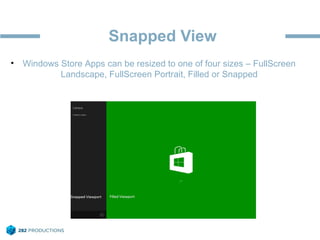
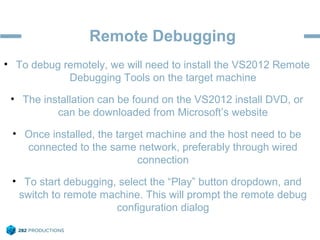
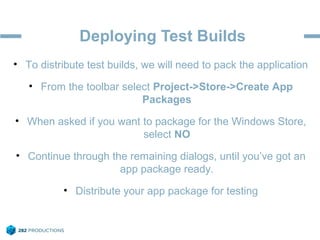
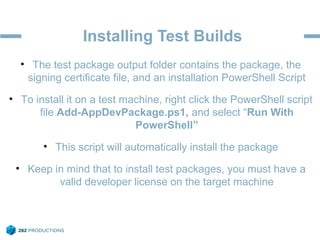
Porting Your Unity3D
Game to Windows 8
Store
About Me
• Co-Founder of 282Productions
• Working in the Israeli game development industry for 2 years
• Released several Unity3D powered games
• Currently working on several Unity3D ports to Windows 8
Goals
• Create a Windows 8 App porting “check-list”
• Highlight problems and pitfalls encountered porting to Win8,
and present practical solutions
• Give hands on examples of new Win8 features integration
Getting Started
Getting Started
• To get started you’ll need:
• A computer running Windows 8
• Visual Studio 2012
• Windows Developer Certificate on that computer – you’ll be
prompted to obtain one automatically when first running VS
• Unity3D 4.x with the Windows Store Apps exporter
Hello, Unity4!
• Windows Store Apps exporter is available from Unity4,
which means we might have to upgrade
• Unity4 introduced a new GameObject active state behavior
• In short, SetActive now affect all of an object’s ancestors
• This has a potential of breaking apps that make use of
GameObjects’ active state in certain situations
Deprecated Types in NET4.5
• By default, when targeting Windows Store Apps, Unity
builds the CSharp assembly targeting .NET4.5
• .NET4.5 removed some obsolete types such as ArrayList
and Hashtable
• These types existed historically, they were introduced in
.NET1.1 and became obsolete with the addition of generics
in .NET2.0
• For some reason, ArrayList and Hashtable are still
somewhat commonly used.
Handling Deprecated Types
• Do NOT use ArrayList and Hashtable, use List<T> and
Dictionary<Tkey,Tval> instead
• If these types are used in a third party addon, find a
replacement solution
• If that’s not an option, you can build your CSharp assembly
like before, by setting Project->Build Settings->Player
Settings->Compilation Override to NONE. This will not allow
you to access any of the new features in .NET4.5 though.
New Compiler Directives
• With Unity4, two new compiler directives were added.
#if UNITY_METRO
This will compile, whenever the
active build target is Windows Store
Apps.
Usage:
#if UNITY_METRO
m_versionString += “w8”
#endif
#if NETFX_CORE
This will compile only when building
an app targeting Windows Store
(not in editor more(.
Usage:
#if NETFX_CORE
using Windows.UI.XAML;
#endif
Managed Metro Plugins
• One major change in the Windows Store requirements is
that no WIN32 API calls are made from your app
• In some cases, this would require us to modify or replace
linked libraries
• Unmanaged libraries are handled as before
• Before, managed libraries could be present anywhere within
the project. They were parsed and added to the reference list
as soon as they were added to the project
Managed Metro Plugins
• Managed assemblies built targeting .NET4.5 can’t be placed
anywhere in the project. Unity will still try to resolve links
against Mono, which will obviously fail, and you won’t be
able to build your project.
• Managed .NET4.5 assemblies must be placed under
/Assets/Plugins/Metro
• This, however, does not solve everything. Currently,
assemblies under Plugins/Metro won’t be added to the
project reference list
Managed Metro Plugins
• To solve this:
• Create a mock assembly with matching method signatures
but no implementation
• Target .NET3.5 and build it
• Add it to your project under /Assets/Plugins
• This will add the assembly to the project reference list, but
when building for Store Apps, it will get substituted by the
version under /Assets/Plugins/Metro
Managed Metro Plugins
• Another quick word about assemblies in Win8 Store Apps:
• Make sure you do not have any assemblies built in debug
mode when trying to deploy your application
• Apps referencing debug assemblies will not pass the
automated windows store certification
Ready to Export
• Unity will export our project as a Visual Studio project, which
then needs to be built and deployed through VS
• Our target VS project has two main flavors: D3D and XAML
• D3D Projects create single view application projects with a
D3D context used for rendering Unity’s display
• XAML Projects use the same D3D view, but with the addition
of a XAML UI layer on top
• According to Unity, D3D projects give better performance, as
a tradeoff for the missing XAML layer
Understanding Metro Apps
Metro Apps Threading Model
• A metro app’s main thread is the UI thread
• Guidelines require us to execute long running tasks in
separate threads
• Some operations, mainly UI related, can only be executed
from the UI thread
• By default, Unity will run in a separate thread
• Most likely 80% of all integration problems between unity
and windows are thread related.
Unity <-> Windows Interop
• Unity is NOT thread safe
• Manipulating any object inheriting from UnityEngine.Object
outside of the engine execution thread will either raise an
exception or cause access violation
• We’ve just mentioned windows UI tasks can only be
executed from the UI thread, and Unity runs in a separate
thread. How do we get them to communicate?
• Using AppCallbacks!
AppCallbacks
• AppCallbacks is a singleton object used to bridge between
the Unity Player and the Windows Runtime
• On export, AppCallbacks is automatically defined in our
App.cs source file
• public AppCallbacks(bool appRunsOnUIThread);
• By default, AppCallbacks will be initialized with
appRunsOnUIThread = false
• Don’t change that, understanding the threading model
instead of hacking around it
Making That Useful
• AppCallbacks.Instance.IntegrateIntoAppThread( item, sync)
• Item = AppCallbacksItem, void task() delegate
Integrate New Features
Snapped View
• Windows Store Apps can be resized to one of four sizes – FullScreen
Landscape, FullScreen Portrait, Filled or Snapped
Reacting To Resolution Changes
• Add an event to our game that will be used to notify game elements the
resolution has changed. From here the event will propagate into our
system
• Next, attach the desired behavior to the event handlers: pause the game,
display a message, etc…
Reacting To Resolution Changes
• In your VS solution, add an event handler to
Window.Current.SizeChanged
• And you’re done!
Live Tiles
• Let’s try something more daring! Let’s update the app live tile from within
our CSharp assembly!
Let’s Recap
The Check List
1. Our project functions properly in Unity4
2. We don’t use any .NET4.5 unsupported types
3. If using plugins, we have a suitable version for Windows 8: no calls to
win32 APIs, and not built in debug mode
4. We handle resolution changes, and our app functions properly in all
resolution modes
5. Support both mouse/keyboard and touch inputs
6. If our app connects to the internet, it has a privacy policy
7. Additionally, we’ve integrated new Windows 8 functionality, such as Live
Tiles, Share Contracts, Store IAPs
When Things Go Wrong
Debugging & Testing
• Feature Support:
• We can debug the code in our CSharp assembly from VS
• We can either deploy and debug locally, or on a remote
machine
• We can create test packages and distribute for testing
Debbuging CSharp Assembly
• To debug our CSharp assembly in Visual Studio, we need to
add Unity’s CS project to our VS solution
• In VS, right click the solution in the solution explorer, select
Add->Existing Project, browse to the Unity project root folder
and add the Assembly-CSharp.csproj
• This will add our CSharp assembly to the solution view, here
we can browse our source files and add breakpoints
Remote Debugging
• To debug remotely, we will need to install the VS2012 Remote
Debugging Tools on the target machine
• The installation can be found on the VS2012 install DVD, or
can be downloaded from Microsoft’s website
• Once installed, the target machine and the host need to be
connected to the same network, preferably through wired
connection
• To start debugging, select the “Play” button dropdown, and
switch to remote machine. This will prompt the remote debug
configuration dialog
Deploying Test Builds
• To distribute test builds, we will need to pack the application
• From the toolbar select Project->Store->Create App
Packages
• When asked if you want to package for the Windows Store,
select NO
• Continue through the remaining dialogs, until you’ve got an
app package ready.
• Distribute your app package for testing
Installing Test Builds
• The test package output folder contains the package, the
signing certificate file, and an installation PowerShell Script
• To install it on a test machine, right click the PowerShell script
file Add-AppDevPackage.ps1, and select “Run With
PowerShell”
• This script will automatically install the package
• Keep in mind that to install test packages, you must have a
valid developer license on the target machine
Questions?
Thanks!

Migrating Unity3D projects to Windows 8

  • 1.
    Porting Your Unity3D Gameto Windows 8 Store
  • 2.
    About Me • Co-Founderof 282Productions • Working in the Israeli game development industry for 2 years • Released several Unity3D powered games • Currently working on several Unity3D ports to Windows 8
  • 3.
    Goals • Create aWindows 8 App porting “check-list” • Highlight problems and pitfalls encountered porting to Win8, and present practical solutions • Give hands on examples of new Win8 features integration
  • 4.
  • 5.
    Getting Started • Toget started you’ll need: • A computer running Windows 8 • Visual Studio 2012 • Windows Developer Certificate on that computer – you’ll be prompted to obtain one automatically when first running VS • Unity3D 4.x with the Windows Store Apps exporter
  • 6.
    Hello, Unity4! • WindowsStore Apps exporter is available from Unity4, which means we might have to upgrade • Unity4 introduced a new GameObject active state behavior • In short, SetActive now affect all of an object’s ancestors • This has a potential of breaking apps that make use of GameObjects’ active state in certain situations
  • 7.
    Deprecated Types inNET4.5 • By default, when targeting Windows Store Apps, Unity builds the CSharp assembly targeting .NET4.5 • .NET4.5 removed some obsolete types such as ArrayList and Hashtable • These types existed historically, they were introduced in .NET1.1 and became obsolete with the addition of generics in .NET2.0 • For some reason, ArrayList and Hashtable are still somewhat commonly used.
  • 8.
    Handling Deprecated Types •Do NOT use ArrayList and Hashtable, use List<T> and Dictionary<Tkey,Tval> instead • If these types are used in a third party addon, find a replacement solution • If that’s not an option, you can build your CSharp assembly like before, by setting Project->Build Settings->Player Settings->Compilation Override to NONE. This will not allow you to access any of the new features in .NET4.5 though.
  • 9.
    New Compiler Directives •With Unity4, two new compiler directives were added. #if UNITY_METRO This will compile, whenever the active build target is Windows Store Apps. Usage: #if UNITY_METRO m_versionString += “w8” #endif #if NETFX_CORE This will compile only when building an app targeting Windows Store (not in editor more(. Usage: #if NETFX_CORE using Windows.UI.XAML; #endif
  • 10.
    Managed Metro Plugins •One major change in the Windows Store requirements is that no WIN32 API calls are made from your app • In some cases, this would require us to modify or replace linked libraries • Unmanaged libraries are handled as before • Before, managed libraries could be present anywhere within the project. They were parsed and added to the reference list as soon as they were added to the project
  • 11.
    Managed Metro Plugins •Managed assemblies built targeting .NET4.5 can’t be placed anywhere in the project. Unity will still try to resolve links against Mono, which will obviously fail, and you won’t be able to build your project. • Managed .NET4.5 assemblies must be placed under /Assets/Plugins/Metro • This, however, does not solve everything. Currently, assemblies under Plugins/Metro won’t be added to the project reference list
  • 12.
    Managed Metro Plugins •To solve this: • Create a mock assembly with matching method signatures but no implementation • Target .NET3.5 and build it • Add it to your project under /Assets/Plugins • This will add the assembly to the project reference list, but when building for Store Apps, it will get substituted by the version under /Assets/Plugins/Metro
  • 13.
    Managed Metro Plugins •Another quick word about assemblies in Win8 Store Apps: • Make sure you do not have any assemblies built in debug mode when trying to deploy your application • Apps referencing debug assemblies will not pass the automated windows store certification
  • 14.
    Ready to Export •Unity will export our project as a Visual Studio project, which then needs to be built and deployed through VS • Our target VS project has two main flavors: D3D and XAML • D3D Projects create single view application projects with a D3D context used for rendering Unity’s display • XAML Projects use the same D3D view, but with the addition of a XAML UI layer on top • According to Unity, D3D projects give better performance, as a tradeoff for the missing XAML layer
  • 15.
  • 16.
    Metro Apps ThreadingModel • A metro app’s main thread is the UI thread • Guidelines require us to execute long running tasks in separate threads • Some operations, mainly UI related, can only be executed from the UI thread • By default, Unity will run in a separate thread • Most likely 80% of all integration problems between unity and windows are thread related.
  • 17.
    Unity <-> WindowsInterop • Unity is NOT thread safe • Manipulating any object inheriting from UnityEngine.Object outside of the engine execution thread will either raise an exception or cause access violation • We’ve just mentioned windows UI tasks can only be executed from the UI thread, and Unity runs in a separate thread. How do we get them to communicate? • Using AppCallbacks!
  • 18.
    AppCallbacks • AppCallbacks isa singleton object used to bridge between the Unity Player and the Windows Runtime • On export, AppCallbacks is automatically defined in our App.cs source file • public AppCallbacks(bool appRunsOnUIThread); • By default, AppCallbacks will be initialized with appRunsOnUIThread = false • Don’t change that, understanding the threading model instead of hacking around it
  • 19.
    Making That Useful •AppCallbacks.Instance.IntegrateIntoAppThread( item, sync) • Item = AppCallbacksItem, void task() delegate
  • 20.
  • 21.
    Snapped View • WindowsStore Apps can be resized to one of four sizes – FullScreen Landscape, FullScreen Portrait, Filled or Snapped
  • 22.
    Reacting To ResolutionChanges • Add an event to our game that will be used to notify game elements the resolution has changed. From here the event will propagate into our system • Next, attach the desired behavior to the event handlers: pause the game, display a message, etc…
  • 23.
    Reacting To ResolutionChanges • In your VS solution, add an event handler to Window.Current.SizeChanged • And you’re done!
  • 24.
    Live Tiles • Let’stry something more daring! Let’s update the app live tile from within our CSharp assembly!
  • 25.
  • 26.
    The Check List 1.Our project functions properly in Unity4 2. We don’t use any .NET4.5 unsupported types 3. If using plugins, we have a suitable version for Windows 8: no calls to win32 APIs, and not built in debug mode 4. We handle resolution changes, and our app functions properly in all resolution modes 5. Support both mouse/keyboard and touch inputs 6. If our app connects to the internet, it has a privacy policy 7. Additionally, we’ve integrated new Windows 8 functionality, such as Live Tiles, Share Contracts, Store IAPs
  • 27.
  • 28.
    Debugging & Testing •Feature Support: • We can debug the code in our CSharp assembly from VS • We can either deploy and debug locally, or on a remote machine • We can create test packages and distribute for testing
  • 29.
    Debbuging CSharp Assembly •To debug our CSharp assembly in Visual Studio, we need to add Unity’s CS project to our VS solution • In VS, right click the solution in the solution explorer, select Add->Existing Project, browse to the Unity project root folder and add the Assembly-CSharp.csproj • This will add our CSharp assembly to the solution view, here we can browse our source files and add breakpoints
  • 30.
    Remote Debugging • Todebug remotely, we will need to install the VS2012 Remote Debugging Tools on the target machine • The installation can be found on the VS2012 install DVD, or can be downloaded from Microsoft’s website • Once installed, the target machine and the host need to be connected to the same network, preferably through wired connection • To start debugging, select the “Play” button dropdown, and switch to remote machine. This will prompt the remote debug configuration dialog
  • 31.
    Deploying Test Builds •To distribute test builds, we will need to pack the application • From the toolbar select Project->Store->Create App Packages • When asked if you want to package for the Windows Store, select NO • Continue through the remaining dialogs, until you’ve got an app package ready. • Distribute your app package for testing
  • 32.
    Installing Test Builds •The test package output folder contains the package, the signing certificate file, and an installation PowerShell Script • To install it on a test machine, right click the PowerShell script file Add-AppDevPackage.ps1, and select “Run With PowerShell” • This script will automatically install the package • Keep in mind that to install test packages, you must have a valid developer license on the target machine
  • 33.
  • 34.