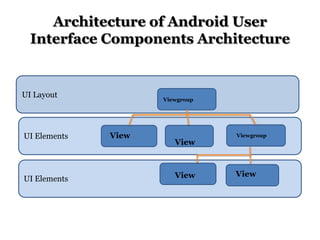
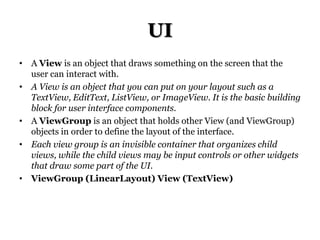
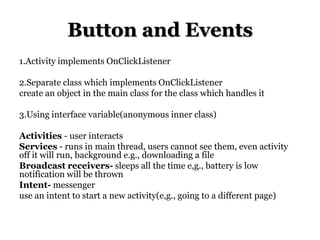
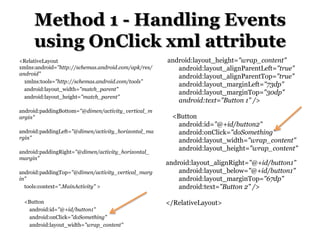
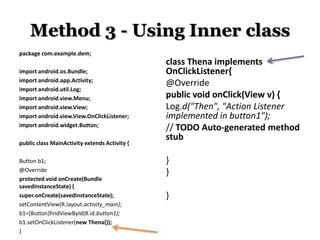
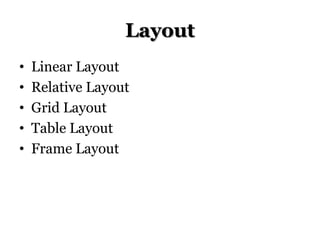
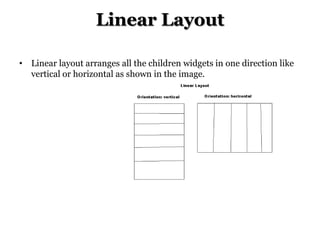
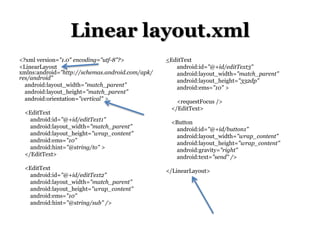
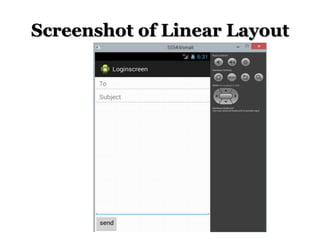
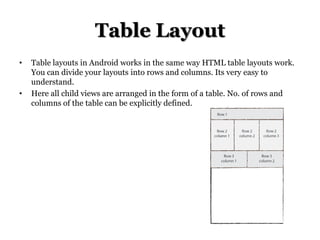
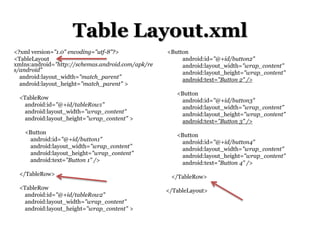
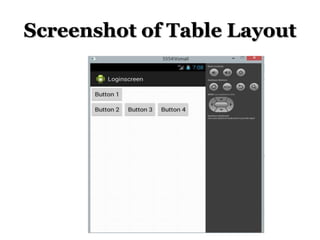
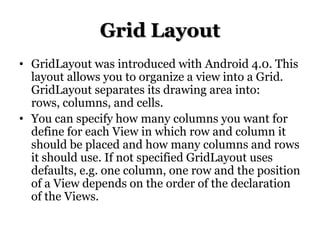
Mobile Computing I
Lab session 3

Thenraja Vettivelraj
Department of Computer Science
Soran University
Last session
Hello world application…
This session
Creating User Interfaces
• Fundamental Android UI Design
• Introducing Views
• Introducing Layouts
• Creating New Views
• Drawable Resources
• Resolution and Density Independence
• Creating and Using Menus
Fundamental Android UI Design
1. Views
2. View Groups
3. Activities
Architecture of Android User
Interface Components Architecture

UI Layout

UI Elements

UI Elements

Viewgroup

View

View

View

Viewgroup

View
UI
• A View is an object that draws something on the screen that the
user can interact with.
• A View is an object that you can put on your layout such as a
TextView, EditText, ListView, or ImageView. It is the basic building
block for user interface components.
• A ViewGroup is an object that holds other View (and ViewGroup)
objects in order to define the layout of the interface.
• Each view group is an invisible container that organizes child
views, while the child views may be input controls or other widgets
that draw some part of the UI.
• ViewGroup (LinearLayout) View (TextView)
Android Views
Button - A push-button that can be pressed, or clicked, by the user to perform an
action.
• TextView - This control is used to display text to the user.
• EditText - EditText is a predefined subclass of TextView that includes rich
editing capabilities.
• AutoCompleteTextView - The AutoCompleteTextView is a view that is similar
to EditText, except that it shows a list of completion suggestions automatically
while the user is typing.
• ImageButton – Absolute Layout enables you to specify the exact location of its
children.
• CheckBox - An on/off switch that can be toggled by the user. You should use
checkboxes when presenting users with a group of selectable options that are not
mutually exclusive.
• ToggleButton - An on/off button with a light indicator.
• RadioButton - The RadioButton has two states: either checked or unchecked.
• Spinner - A drop-down list that allows users to select one value from a set.
• DatePicker - The DatePicker view enables users to select a date of the day.
And others you check in the Eclipse IDE
•
Button and Events
Click button-> Event triggered->received by android os->interested one listens
android.widget.Button
android:onClick="doSomething " attribute one way to respond events
public void doSomething(View v)
implements OnClickListener
link xml and java(findViewById)
refer code in java by saying that this particular class implements the listener.
Step 1: Tell android you are interested in listening to a button clickimplements OnClickListener
Step 2: Bring xml inside java
Step 3: Tell your java button who is responding when it is clicked
Step 4: Tell what should happen when clicked
Button and Events
1.Activity implements OnClickListener

2.Separate class which implements OnClickListener
create an object in the main class for the class which handles it
3.Using interface variable(anonymous inner class)

Activities - user interacts
Services - runs in main thread, users cannot see them, even activity
off it will run, background e.g., downloading a file
Broadcast receivers- sleeps all the time e,g., battery is low
notification will be thrown
Intent- messenger
use an intent to start a new activity(e,g., going to a different page)
Method 1 - Handling Events
using OnClick xml attribute
<RelativeLayout
xmlns:android="http://schemas.android.com/apk/res/
android"
xmlns:tools="http://schemas.android.com/tools"
android:layout_width="match_parent"
android:layout_height="match_parent"
android:paddingBottom="@dimen/activity_vertical_m
argin"
android:paddingLeft="@dimen/activity_horizontal_ma
rgin"
android:paddingRight="@dimen/activity_horizontal_
margin"
android:paddingTop="@dimen/activity_vertical_marg
in"
tools:context=".MainActivity" >
<Button
android:id="@+id/button1"
android:onClick="doSomething"
android:layout_width="wrap_content"

android:layout_height="wrap_content"
android:layout_alignParentLeft="true"
android:layout_alignParentTop="true"
android:layout_marginLeft="73dp"
android:layout_marginTop="30dp"
android:text="Button 1" />
<Button
android:id="@+id/button2"
android:onClick="doSomething"
android:layout_width="wrap_content"
android:layout_height="wrap_content"
android:layout_alignRight="@+id/button1"
android:layout_below="@+id/button1"
android:layout_marginTop="67dp"
android:text="Button 2" />
</RelativeLayout>
Java file
package com.example.andon;
import android.os.Bundle;
import android.app.Activity;
import android.util.Log;
import android.view.Menu;
import android.view.View;
public class MainActivity extends Activity {
@Override
protected void onCreate(Bundle savedInstanceState)
{
super.onCreate(savedInstanceState);
setContentView(R.layout.activity_main);
}

public void doSomething(View v)
{
if(v.getId()==R.id.button1)
{
Log.d("Thens", "Button1");
Intent browserIntent = new
Intent(Intent.ACTION_VIEW, Uri.parse("http://www.googl
e.com"));
startActivity(browserIntent);
}
else if(v.getId()==R.id.button2)
{
Log.d("Thens", "Button2");
Intent browserIntent = new
Intent(Intent.ACTION_VIEW, Uri.parse("http://developer.a
ndroid.com"));
startActivity(browserIntent);
}
}
}
Screenshots of handling the
Events
•

When clicked on button 1
Method 2 - Activity implementing
OnClickListener

package com.example.bz;

import android.net.Uri;
import android.os.Bundle;
import android.app.Activity;
import android.content.Intent;
import android.util.Log;
import android.view.Menu;
import android.view.View;
import android.view.View.OnClickListener;
import android.widget.Button;
public class MainActivity extends Activity implements
OnClickListener {
Button b1,b2;
@Override
protected void onCreate(Bundle
savedInstanceState) {

public void onClick(View v)
{
if(v.getId()==R.id.button1)
{
Log.d("Thens", "Button1");
Intent browserIntent = new
Intent(Intent.ACTION_VIEW, Uri.parse("http:/
/www.google.com"));
startActivity(browserIntent);
}
else if(v.getId()==R.id.button2)
{
Log.d("Thens", "Button2");
}

super.onCreate(savedInstanceState);
setContentView(R.layout.activity_main);
b1=(Button)findViewById(R.id.button1);
b1.setOnClickListener(this);
b2=(Button)findViewById(R.id.button2);
b2.setOnClickListener(this);
}
@Override

}
}
Method 3 - Using Inner class
package com.example.dem;
import android.os.Bundle;
import android.app.Activity;
import android.util.Log;
import android.view.Menu;
import android.view.View;
import android.view.View.OnClickListener;
import android.widget.Button;
public class MainActivity extends Activity {
Button b1;
@Override
protected void onCreate(Bundle
savedInstanceState) {
super.onCreate(savedInstanceState);
setContentView(R.layout.activity_main);
b1=(Button)findViewById(R.id.button1);
b1.setOnClickListener(new Thena());
}

class Thena implements
OnClickListener{
@Override
public void onClick(View v) {
Log.d("Then", "Action Listener
implemented in button1");
// TODO Auto-generated method
stub
}
}
}
Method 4 - Using Interface
Variable
package com.example.dem;
import android.os.Bundle;
import android.app.Activity;
import android.util.Log;
import android.view.Menu;
import android.view.View;
import android.view.View.OnClickListener;
import android.widget.Button;
public class MainActivity extends Activity {
Button b1;
@Override
protected void onCreate(Bundle
savedInstanceState) {
super.onCreate(savedInstanceState);
setContentView(R.layout.activity_main);
b1=(Button)findViewById(R.id.button1);
b1.setOnClickListener(thenI);
}

@Override
public boolean onCreateOptionsMenu(Menu menu) {
// Inflate the menu; this adds items to the action bar if it is
present.
getMenuInflater().inflate(R.menu.main, menu);
return true;
}
OnClickListener thenI =new OnClickListener(){
@Override
public void onClick(View v) {
Log.d("Then", "Action Listener in button1 using Interface
variable");
// TODO Auto-generated method stub
}
};
}
}
Method 5 - Anonymous Inner
Class
package com.example.dem;
import android.os.Bundle;
import android.app.Activity;
import android.util.Log;
import android.view.Menu;
import android.view.View;
import android.view.View.OnClickListener;
import android.widget.Button;
public class MainActivity extends Activity {
Button b1;
@Override
protected void onCreate(Bundle
savedInstanceState) {
super.onCreate(savedInstanceState);

setContentView(R.layout.activity_main);
b1=(Button)findViewById(R.id.button1);
b1.setOnClickListener(new OnClickListener(){
@Override
public void onClick(View v) {
Log.d("Then", "Anonymous Inner class");
// TODO Auto-generated method stub
}}
);}
}
Layout
•
•
•
•
•

Linear Layout
Relative Layout
Grid Layout
Table Layout
Frame Layout
Values used
•

•

wrap_content – The component just want to display big enough to
enclose its content only.
fill_parent – The component want to display as big as its parent, and fill
in the remaining spaces.
Linear Layout
• Linear layout arranges all the children widgets in one direction like
vertical or horizontal as shown in the image.
Linear layout.xml
<?xml version="1.0" encoding="utf-8"?>
<LinearLayout
xmlns:android="http://schemas.android.com/apk/
res/android"
android:layout_width="match_parent"
android:layout_height="match_parent"
android:orientation="vertical" >
<EditText
android:id="@+id/editText1"
android:layout_width="match_parent"
android:layout_height="wrap_content"
android:ems="10"
android:hint="@string/to" >
</EditText>
<EditText
android:id="@+id/editText2"
android:layout_width="match_parent"
android:layout_height="wrap_content"
android:ems="10"
android:hint="@string/sub" />

<EditText
android:id="@+id/editText3"
android:layout_width="match_parent"
android:layout_height="332dp"
android:ems="10" >
<requestFocus />
</EditText>
<Button
android:id="@+id/button1"
android:layout_width="wrap_content"
android:layout_height="wrap_content"
android:gravity="right"
android:text="send" />
</LinearLayout>
Linear layout xml attributes
Screenshot of Linear Layout
Relative Layout
•

•

Position of each view(e.g, Textview, Radiobutton) is decided with respect to another
view.
Relative layout arranges the children widgets relative to the parent layout or relative
to each other. Best way to understand it, look at the image.
Relative Layout.xml
<RelativeLayout
xmlns:android="http://schemas.android.com/apk/res/android"
xmlns:tools="http://schemas.android.com/tools"
android:layout_width="match_parent"
android:layout_height="match_parent"
android:paddingBottom="@dimen/activity_vertical_margin"
android:paddingLeft="@dimen/activity_horizontal_margin"
android:paddingRight="@dimen/activity_horizontal_margin"
android:paddingTop="@dimen/activity_vertical_margin"
tools:context=".MainActivity" >
<TextView
android:id="@+id/textView1"
android:layout_width="wrap_content"
android:layout_height="wrap_content"
android:layout_alignParentLeft="true"
android:layout_alignParentTop="true"
android:layout_marginLeft="58dp"
android:layout_marginTop="21dp"
android:layout_toLeftOf="@+id/button2"
android:text="LOGIN" />
<TextView
android:id="@+id/textView2"
android:layout_width="wrap_content"
android:layout_height="wrap_content"
android:layout_alignLeft="@+id/textView3"

android:layout_below="@+id/textView1"
android:layout_marginTop="40dp"
android:text="Username" />
<EditText
android:id="@+id/editText1"
android:layout_width="wrap_content"
android:layout_height="wrap_content"
android:layout_alignBaseline="@+id/textView2"
android:layout_alignBottom="@+id/textView2"
android:layout_alignParentRight="true"
android:ems="10"
android:inputType="text" >

<requestFocus />
</EditText>
<TextView
android:id="@+id/textView3"
android:layout_width="wrap_content"
android:layout_height="wrap_content"
android:layout_alignLeft="@+id/button3"
android:layout_below="@+id/editText1"
android:layout_marginTop="48dp"
android:layout_toLeftOf="@+id/editText1"
android:text="Password" />
Relative Layout.xml
<EditText
android:id="@+id/editText2"
android:layout_width="wrap_content"
android:layout_height="wrap_content"
android:layout_alignLeft="@+id/editText1"
android:layout_alignRight="@+id/editText1"
android:layout_alignTop="@+id/textView3"
android:ems="10"
android:inputType="textPassword" />
<Button
android:id="@+id/button1"
android:layout_width="wrap_content"
android:layout_height="wrap_content"
android:layout_below="@+id/editText2"
android:layout_marginTop="26dp"
android:layout_toRightOf="@+id/button3"
android:text="Submit" />

<Button
android:id="@+id/button2"
android:layout_width="wrap_content"
android:layout_height="wrap_content"
android:layout_alignBaseline="@+id/button1"
android:layout_alignBottom="@+id/button1"
android:layout_toRightOf="@+id/button1"
android:text="CLEAR" />
<Button
android:id="@+id/button3"
android:layout_width="wrap_content"
android:layout_height="wrap_content"
android:layout_alignBottom="@+id/button1"
android:text="CANCEL" />
</RelativeLayout>
Screenshot of Relative Layout
Table Layout
•

•

Table layouts in Android works in the same way HTML table layouts work.
You can divide your layouts into rows and columns. Its very easy to
understand.
Here all child views are arranged in the form of a table. No. of rows and
columns of the table can be explicitly defined.
Table Layout.xml
<?xml version="1.0" encoding="utf-8"?>
<TableLayout
xmlns:android="http://schemas.android.com/apk/re
s/android"
android:layout_width="match_parent"
android:layout_height="match_parent" >

<Button
android:id="@+id/button2"
android:layout_width="wrap_content"
android:layout_height="wrap_content"
android:text="Button 2" />

<TableRow
android:id="@+id/tableRow1"
android:layout_width="wrap_content"
android:layout_height="wrap_content" >

<Button
android:id="@+id/button3"
android:layout_width="wrap_content"
android:layout_height="wrap_content"
android:text="Button 3" />

<Button
android:id="@+id/button1"
android:layout_width="wrap_content"
android:layout_height="wrap_content"
android:text="Button 1" />

<Button
android:id="@+id/button4"
android:layout_width="wrap_content"
android:layout_height="wrap_content"
android:text="Button 4" />

</TableRow>
<TableRow
android:id="@+id/tableRow2"
android:layout_width="wrap_content"
android:layout_height="wrap_content" >

</TableRow>

</TableLayout>
Screenshot of Table Layout
Frame Layout
•

•

FrameLayout is designed to display a single item at a time. You can have multiple
elements within a FrameLayout but each element will be positioned based on the top
left of the screen. Elements that overlap will be displayed overlapping. I have created
a simple XML layout using FrameLayout that shows how this works.
Since Frame Layout is only able to display single UI element at a time or multiple UI
elements but each of them is overlapping on each others, so you can see that
Frame Layout.xml
<?xml version="1.0" encoding="utf-8"?>
<FrameLayout xmlns:android="http://schemas.android.com/apk/res/android"
android:layout_width="match_parent"
android:layout_height="match_parent" >
<ImageView
android:id="@+id/imageView1"
android:layout_width="match_parent"
android:layout_height="match_parent"
android:src="@drawable/ic_launcher" />
<TextView
android:id="@+id/textView1"
android:layout_width="fill_parent"
android:layout_height="fill_parent"
android:gravity="center"
android:maxHeight="@dimen/activity_horizontal_margin"
android:text="Mobile Computing" />

</FrameLayout>
Screenshot of Frame Layout
Grid View and Grid Layout
• A GridView is a ViewGroup that displays items in twodimensional scrolling grid. The items in the grid come from
the ListAdapter associated with this view.
• This is what you'd want to use (keep using). Because a
GridView gets its data from a ListAdapter, the only data
loaded in memory will be the one displayed on screen.
GridViews, much like ListViews reuse and recycle their views
for better performance.
• Whereas a GridLayout is a layout that places its children in
a rectangular grid.
• It was introduced in API level 14, and was recently backported
in the Support Library. Its main purpose is to solve alignment
and performance problems in other layouts.
Grid Layout
• GridLayout was introduced with Android 4.0. This
layout allows you to organize a view into a Grid.
GridLayout separates its drawing area into:
rows, columns, and cells.
• You can specify how many columns you want for
define for each View in which row and column it
should be placed and how many columns and rows
it should use. If not specified GridLayout uses
defaults, e.g. one column, one row and the position
of a View depends on the order of the declaration
of the Views.
Designing a Login screen
• Will be continued next in next lab
session…

Android App development III

  • 1.
    Mobile Computing I Labsession 3 Thenraja Vettivelraj Department of Computer Science Soran University
  • 2.
  • 3.
    This session Creating UserInterfaces • Fundamental Android UI Design • Introducing Views • Introducing Layouts • Creating New Views • Drawable Resources • Resolution and Density Independence • Creating and Using Menus
  • 4.
    Fundamental Android UIDesign 1. Views 2. View Groups 3. Activities
  • 5.
    Architecture of AndroidUser Interface Components Architecture UI Layout UI Elements UI Elements Viewgroup View View View Viewgroup View
  • 6.
    UI • A Viewis an object that draws something on the screen that the user can interact with. • A View is an object that you can put on your layout such as a TextView, EditText, ListView, or ImageView. It is the basic building block for user interface components. • A ViewGroup is an object that holds other View (and ViewGroup) objects in order to define the layout of the interface. • Each view group is an invisible container that organizes child views, while the child views may be input controls or other widgets that draw some part of the UI. • ViewGroup (LinearLayout) View (TextView)
  • 7.
    Android Views Button -A push-button that can be pressed, or clicked, by the user to perform an action. • TextView - This control is used to display text to the user. • EditText - EditText is a predefined subclass of TextView that includes rich editing capabilities. • AutoCompleteTextView - The AutoCompleteTextView is a view that is similar to EditText, except that it shows a list of completion suggestions automatically while the user is typing. • ImageButton – Absolute Layout enables you to specify the exact location of its children. • CheckBox - An on/off switch that can be toggled by the user. You should use checkboxes when presenting users with a group of selectable options that are not mutually exclusive. • ToggleButton - An on/off button with a light indicator. • RadioButton - The RadioButton has two states: either checked or unchecked. • Spinner - A drop-down list that allows users to select one value from a set. • DatePicker - The DatePicker view enables users to select a date of the day. And others you check in the Eclipse IDE •
  • 8.
    Button and Events Clickbutton-> Event triggered->received by android os->interested one listens android.widget.Button android:onClick="doSomething " attribute one way to respond events public void doSomething(View v) implements OnClickListener link xml and java(findViewById) refer code in java by saying that this particular class implements the listener. Step 1: Tell android you are interested in listening to a button clickimplements OnClickListener Step 2: Bring xml inside java Step 3: Tell your java button who is responding when it is clicked Step 4: Tell what should happen when clicked
  • 9.
    Button and Events 1.Activityimplements OnClickListener 2.Separate class which implements OnClickListener create an object in the main class for the class which handles it 3.Using interface variable(anonymous inner class) Activities - user interacts Services - runs in main thread, users cannot see them, even activity off it will run, background e.g., downloading a file Broadcast receivers- sleeps all the time e,g., battery is low notification will be thrown Intent- messenger use an intent to start a new activity(e,g., going to a different page)
  • 10.
    Method 1 -Handling Events using OnClick xml attribute <RelativeLayout xmlns:android="http://schemas.android.com/apk/res/ android" xmlns:tools="http://schemas.android.com/tools" android:layout_width="match_parent" android:layout_height="match_parent" android:paddingBottom="@dimen/activity_vertical_m argin" android:paddingLeft="@dimen/activity_horizontal_ma rgin" android:paddingRight="@dimen/activity_horizontal_ margin" android:paddingTop="@dimen/activity_vertical_marg in" tools:context=".MainActivity" > <Button android:id="@+id/button1" android:onClick="doSomething" android:layout_width="wrap_content" android:layout_height="wrap_content" android:layout_alignParentLeft="true" android:layout_alignParentTop="true" android:layout_marginLeft="73dp" android:layout_marginTop="30dp" android:text="Button 1" /> <Button android:id="@+id/button2" android:onClick="doSomething" android:layout_width="wrap_content" android:layout_height="wrap_content" android:layout_alignRight="@+id/button1" android:layout_below="@+id/button1" android:layout_marginTop="67dp" android:text="Button 2" /> </RelativeLayout>
  • 11.
    Java file package com.example.andon; importandroid.os.Bundle; import android.app.Activity; import android.util.Log; import android.view.Menu; import android.view.View; public class MainActivity extends Activity { @Override protected void onCreate(Bundle savedInstanceState) { super.onCreate(savedInstanceState); setContentView(R.layout.activity_main); } public void doSomething(View v) { if(v.getId()==R.id.button1) { Log.d("Thens", "Button1"); Intent browserIntent = new Intent(Intent.ACTION_VIEW, Uri.parse("http://www.googl e.com")); startActivity(browserIntent); } else if(v.getId()==R.id.button2) { Log.d("Thens", "Button2"); Intent browserIntent = new Intent(Intent.ACTION_VIEW, Uri.parse("http://developer.a ndroid.com")); startActivity(browserIntent); } } }
  • 12.
    Screenshots of handlingthe Events • When clicked on button 1
  • 13.
    Method 2 -Activity implementing OnClickListener package com.example.bz; import android.net.Uri; import android.os.Bundle; import android.app.Activity; import android.content.Intent; import android.util.Log; import android.view.Menu; import android.view.View; import android.view.View.OnClickListener; import android.widget.Button; public class MainActivity extends Activity implements OnClickListener { Button b1,b2; @Override protected void onCreate(Bundle savedInstanceState) { public void onClick(View v) { if(v.getId()==R.id.button1) { Log.d("Thens", "Button1"); Intent browserIntent = new Intent(Intent.ACTION_VIEW, Uri.parse("http:/ /www.google.com")); startActivity(browserIntent); } else if(v.getId()==R.id.button2) { Log.d("Thens", "Button2"); } super.onCreate(savedInstanceState); setContentView(R.layout.activity_main); b1=(Button)findViewById(R.id.button1); b1.setOnClickListener(this); b2=(Button)findViewById(R.id.button2); b2.setOnClickListener(this); } @Override } }
  • 14.
    Method 3 -Using Inner class package com.example.dem; import android.os.Bundle; import android.app.Activity; import android.util.Log; import android.view.Menu; import android.view.View; import android.view.View.OnClickListener; import android.widget.Button; public class MainActivity extends Activity { Button b1; @Override protected void onCreate(Bundle savedInstanceState) { super.onCreate(savedInstanceState); setContentView(R.layout.activity_main); b1=(Button)findViewById(R.id.button1); b1.setOnClickListener(new Thena()); } class Thena implements OnClickListener{ @Override public void onClick(View v) { Log.d("Then", "Action Listener implemented in button1"); // TODO Auto-generated method stub } } }
  • 15.
    Method 4 -Using Interface Variable package com.example.dem; import android.os.Bundle; import android.app.Activity; import android.util.Log; import android.view.Menu; import android.view.View; import android.view.View.OnClickListener; import android.widget.Button; public class MainActivity extends Activity { Button b1; @Override protected void onCreate(Bundle savedInstanceState) { super.onCreate(savedInstanceState); setContentView(R.layout.activity_main); b1=(Button)findViewById(R.id.button1); b1.setOnClickListener(thenI); } @Override public boolean onCreateOptionsMenu(Menu menu) { // Inflate the menu; this adds items to the action bar if it is present. getMenuInflater().inflate(R.menu.main, menu); return true; } OnClickListener thenI =new OnClickListener(){ @Override public void onClick(View v) { Log.d("Then", "Action Listener in button1 using Interface variable"); // TODO Auto-generated method stub } }; } }
  • 16.
    Method 5 -Anonymous Inner Class package com.example.dem; import android.os.Bundle; import android.app.Activity; import android.util.Log; import android.view.Menu; import android.view.View; import android.view.View.OnClickListener; import android.widget.Button; public class MainActivity extends Activity { Button b1; @Override protected void onCreate(Bundle savedInstanceState) { super.onCreate(savedInstanceState); setContentView(R.layout.activity_main); b1=(Button)findViewById(R.id.button1); b1.setOnClickListener(new OnClickListener(){ @Override public void onClick(View v) { Log.d("Then", "Anonymous Inner class"); // TODO Auto-generated method stub }} );} }
  • 17.
  • 18.
    Values used • • wrap_content –The component just want to display big enough to enclose its content only. fill_parent – The component want to display as big as its parent, and fill in the remaining spaces.
  • 19.
    Linear Layout • Linearlayout arranges all the children widgets in one direction like vertical or horizontal as shown in the image.
  • 20.
    Linear layout.xml <?xml version="1.0"encoding="utf-8"?> <LinearLayout xmlns:android="http://schemas.android.com/apk/ res/android" android:layout_width="match_parent" android:layout_height="match_parent" android:orientation="vertical" > <EditText android:id="@+id/editText1" android:layout_width="match_parent" android:layout_height="wrap_content" android:ems="10" android:hint="@string/to" > </EditText> <EditText android:id="@+id/editText2" android:layout_width="match_parent" android:layout_height="wrap_content" android:ems="10" android:hint="@string/sub" /> <EditText android:id="@+id/editText3" android:layout_width="match_parent" android:layout_height="332dp" android:ems="10" > <requestFocus /> </EditText> <Button android:id="@+id/button1" android:layout_width="wrap_content" android:layout_height="wrap_content" android:gravity="right" android:text="send" /> </LinearLayout>
  • 21.
  • 22.
  • 23.
    Relative Layout • • Position ofeach view(e.g, Textview, Radiobutton) is decided with respect to another view. Relative layout arranges the children widgets relative to the parent layout or relative to each other. Best way to understand it, look at the image.
  • 24.
    Relative Layout.xml <RelativeLayout xmlns:android="http://schemas.android.com/apk/res/android" xmlns:tools="http://schemas.android.com/tools" android:layout_width="match_parent" android:layout_height="match_parent" android:paddingBottom="@dimen/activity_vertical_margin" android:paddingLeft="@dimen/activity_horizontal_margin" android:paddingRight="@dimen/activity_horizontal_margin" android:paddingTop="@dimen/activity_vertical_margin" tools:context=".MainActivity" > <TextView android:id="@+id/textView1" android:layout_width="wrap_content" android:layout_height="wrap_content" android:layout_alignParentLeft="true" android:layout_alignParentTop="true" android:layout_marginLeft="58dp" android:layout_marginTop="21dp" android:layout_toLeftOf="@+id/button2" android:text="LOGIN"/> <TextView android:id="@+id/textView2" android:layout_width="wrap_content" android:layout_height="wrap_content" android:layout_alignLeft="@+id/textView3" android:layout_below="@+id/textView1" android:layout_marginTop="40dp" android:text="Username" /> <EditText android:id="@+id/editText1" android:layout_width="wrap_content" android:layout_height="wrap_content" android:layout_alignBaseline="@+id/textView2" android:layout_alignBottom="@+id/textView2" android:layout_alignParentRight="true" android:ems="10" android:inputType="text" > <requestFocus /> </EditText> <TextView android:id="@+id/textView3" android:layout_width="wrap_content" android:layout_height="wrap_content" android:layout_alignLeft="@+id/button3" android:layout_below="@+id/editText1" android:layout_marginTop="48dp" android:layout_toLeftOf="@+id/editText1" android:text="Password" />
  • 25.
    Relative Layout.xml <EditText android:id="@+id/editText2" android:layout_width="wrap_content" android:layout_height="wrap_content" android:layout_alignLeft="@+id/editText1" android:layout_alignRight="@+id/editText1" android:layout_alignTop="@+id/textView3" android:ems="10" android:inputType="textPassword" /> <Button android:id="@+id/button1" android:layout_width="wrap_content" android:layout_height="wrap_content" android:layout_below="@+id/editText2" android:layout_marginTop="26dp" android:layout_toRightOf="@+id/button3" android:text="Submit"/> <Button android:id="@+id/button2" android:layout_width="wrap_content" android:layout_height="wrap_content" android:layout_alignBaseline="@+id/button1" android:layout_alignBottom="@+id/button1" android:layout_toRightOf="@+id/button1" android:text="CLEAR" /> <Button android:id="@+id/button3" android:layout_width="wrap_content" android:layout_height="wrap_content" android:layout_alignBottom="@+id/button1" android:text="CANCEL" /> </RelativeLayout>
  • 27.
  • 28.
    Table Layout • • Table layoutsin Android works in the same way HTML table layouts work. You can divide your layouts into rows and columns. Its very easy to understand. Here all child views are arranged in the form of a table. No. of rows and columns of the table can be explicitly defined.
  • 29.
    Table Layout.xml <?xml version="1.0"encoding="utf-8"?> <TableLayout xmlns:android="http://schemas.android.com/apk/re s/android" android:layout_width="match_parent" android:layout_height="match_parent" > <Button android:id="@+id/button2" android:layout_width="wrap_content" android:layout_height="wrap_content" android:text="Button 2" /> <TableRow android:id="@+id/tableRow1" android:layout_width="wrap_content" android:layout_height="wrap_content" > <Button android:id="@+id/button3" android:layout_width="wrap_content" android:layout_height="wrap_content" android:text="Button 3" /> <Button android:id="@+id/button1" android:layout_width="wrap_content" android:layout_height="wrap_content" android:text="Button 1" /> <Button android:id="@+id/button4" android:layout_width="wrap_content" android:layout_height="wrap_content" android:text="Button 4" /> </TableRow> <TableRow android:id="@+id/tableRow2" android:layout_width="wrap_content" android:layout_height="wrap_content" > </TableRow> </TableLayout>
  • 30.
  • 31.
    Frame Layout • • FrameLayout isdesigned to display a single item at a time. You can have multiple elements within a FrameLayout but each element will be positioned based on the top left of the screen. Elements that overlap will be displayed overlapping. I have created a simple XML layout using FrameLayout that shows how this works. Since Frame Layout is only able to display single UI element at a time or multiple UI elements but each of them is overlapping on each others, so you can see that
  • 32.
    Frame Layout.xml <?xml version="1.0"encoding="utf-8"?> <FrameLayout xmlns:android="http://schemas.android.com/apk/res/android" android:layout_width="match_parent" android:layout_height="match_parent" > <ImageView android:id="@+id/imageView1" android:layout_width="match_parent" android:layout_height="match_parent" android:src="@drawable/ic_launcher" /> <TextView android:id="@+id/textView1" android:layout_width="fill_parent" android:layout_height="fill_parent" android:gravity="center" android:maxHeight="@dimen/activity_horizontal_margin" android:text="Mobile Computing" /> </FrameLayout>
  • 33.
  • 34.
    Grid View andGrid Layout • A GridView is a ViewGroup that displays items in twodimensional scrolling grid. The items in the grid come from the ListAdapter associated with this view. • This is what you'd want to use (keep using). Because a GridView gets its data from a ListAdapter, the only data loaded in memory will be the one displayed on screen. GridViews, much like ListViews reuse and recycle their views for better performance. • Whereas a GridLayout is a layout that places its children in a rectangular grid. • It was introduced in API level 14, and was recently backported in the Support Library. Its main purpose is to solve alignment and performance problems in other layouts.
  • 35.
    Grid Layout • GridLayoutwas introduced with Android 4.0. This layout allows you to organize a view into a Grid. GridLayout separates its drawing area into: rows, columns, and cells. • You can specify how many columns you want for define for each View in which row and column it should be placed and how many columns and rows it should use. If not specified GridLayout uses defaults, e.g. one column, one row and the position of a View depends on the order of the declaration of the Views.
  • 36.
  • 37.
    • Will becontinued next in next lab session…