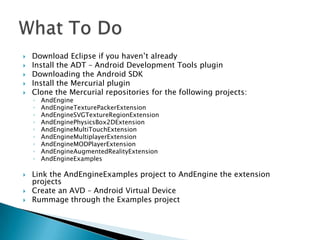
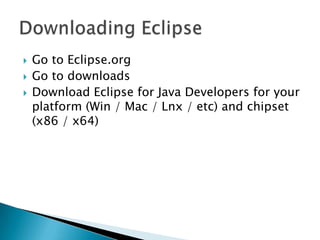
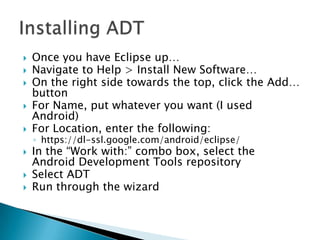
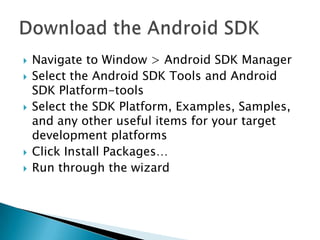
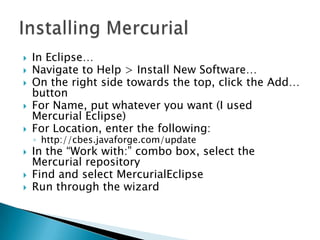
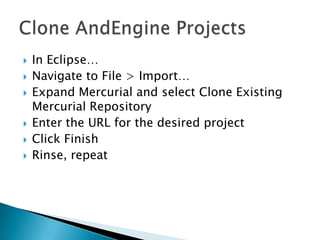
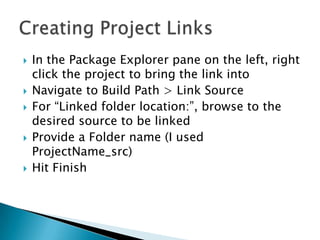
   Eclipse
   These instructions
   A whole lot of patience
   Download Eclipse if you haven’t already
   Install the ADT – Android Development Tools plugin
   Downloading the Android SDK
   Install the Mercurial plugin
   Clone the Mercurial repositories for the following projects:
    ◦   AndEngine
    ◦   AndEngineTexturePackerExtension
    ◦   AndEngineSVGTextureRegionExtension
    ◦   AndEnginePhysicsBox2DExtension
    ◦   AndEngineMultiTouchExtension
    ◦   AndEngineMultiplayerExtension
    ◦   AndEngineMODPlayerExtension
    ◦   AndEngineAugmentedRealityExtension
    ◦   AndEngineExamples

   Link the AndEngineExamples project to AndEngine the extension
    projects
   Create an AVD – Android Virtual Device
   Rummage through the Examples project
   Go to Eclipse.org
   Go to downloads
   Download Eclipse for Java Developers for your
    platform (Win / Mac / Lnx / etc) and chipset
    (x86 / x64)
   Once you have Eclipse up…
   Navigate to Help > Install New Software…
   On the right side towards the top, click the Add…
    button
   For Name, put whatever you want (I used
    Android)
   For Location, enter the following:
    ◦ https://dl-ssl.google.com/android/eclipse/
   In the “Work with:” combo box, select the
    Android Development Tools repository
   Select ADT
   Run through the wizard
   Navigate to Window > Android SDK Manager
   Select the Android SDK Tools and Android
    SDK Platform-tools
   Select the SDK Platform, Examples, Samples,
    and any other useful items for your target
    development platforms
   Click Install Packages…
   Run through the wizard
   In Eclipse…
   Navigate to Help > Install New Software…
   On the right side towards the top, click the Add…
    button
   For Name, put whatever you want (I used
    Mercurial Eclipse)
   For Location, enter the following:
    ◦ http://cbes.javaforge.com/update
   In the “Work with:” combo box, select the
    Mercurial repository
   Find and select MercurialEclipse
   Run through the wizard
   In Eclipse…
   Navigate to File > Import…
   Expand Mercurial and select Clone Existing
    Mercurial Repository
   Enter the URL for the desired project
   Click Finish
   Rinse, repeat
   In the Package Explorer pane on the left, right
    click the project to bring the link into
   Navigate to Build Path > Link Source
   For “Linked folder location:”, browse to the
    desired source to be linked
   Provide a Folder name (I used
    ProjectName_src)
   Hit Finish
   Navigate to Window > AVD Manager
   On the right side, click New..
   Fill in the necessary info
    ◦ Select the Target corresponding to your desired
      target platform
    ◦ It will yell at you if it’s not happy with your input
   Click Create AVD
   When you run your project, ADT will be
    intelligent enough to select the AVD
    appropriate for your project
   There is no official documentation
   The forums are hit or miss
   There are a few YouTube videos

   Your best bet is to find an example closest to
    your desired outcome and reverse engineer it
    ◦ Oddly enough, it works pretty well
   Find an example closest to your game
    Create a new Android project
    ◦ Navigate to File > New > Android Project
    ◦ Fill in the Project Name
    ◦ Click Next
    ◦ Select your target API and any additional Add-Ons
      you need
    ◦ Decide on a package name
         Typical structure is
          <com/edu/org>.<orgname>.<projectname>
    ◦ Hit Finish
   Copy your selected example’s Activity class
    into your project
   Cannibalize that class into your premade
    Activity class for your project
   The central component of AndEngine is the main
    Activity class
    ◦ The Activity class features four core functions in which
      you do your work that are executed in the following
      order
      onLoadEngine
         Construct rendering objects (Engine, Camera, etc)
      onLoadResources
        Import your assets (images, audio, data files, etc)
      onLoadScene
         Setup the objects that appear in your scene using the assets
          you’ve imported (Maps, Sprites, etc)
      onLoadComplete
         I haven’t used it, but I imagine it’s for any manipulations that
          must be made after all of the previous steps
   The Android Manifest File
    ◦ XML file that defines information and requirements
      relating to your application
        SDK version
        Hardware requirements
        Permissions Requirements
        Icon
        Other stuff – explore!
    ◦ Always named AndroidManifest.xml

AndEngine

  • 2.
    Eclipse  These instructions  A whole lot of patience
  • 3.
    Download Eclipse if you haven’t already  Install the ADT – Android Development Tools plugin  Downloading the Android SDK  Install the Mercurial plugin  Clone the Mercurial repositories for the following projects: ◦ AndEngine ◦ AndEngineTexturePackerExtension ◦ AndEngineSVGTextureRegionExtension ◦ AndEnginePhysicsBox2DExtension ◦ AndEngineMultiTouchExtension ◦ AndEngineMultiplayerExtension ◦ AndEngineMODPlayerExtension ◦ AndEngineAugmentedRealityExtension ◦ AndEngineExamples  Link the AndEngineExamples project to AndEngine the extension projects  Create an AVD – Android Virtual Device  Rummage through the Examples project
  • 4.
    Go to Eclipse.org  Go to downloads  Download Eclipse for Java Developers for your platform (Win / Mac / Lnx / etc) and chipset (x86 / x64)
  • 5.
    Once you have Eclipse up…  Navigate to Help > Install New Software…  On the right side towards the top, click the Add… button  For Name, put whatever you want (I used Android)  For Location, enter the following: ◦ https://dl-ssl.google.com/android/eclipse/  In the “Work with:” combo box, select the Android Development Tools repository  Select ADT  Run through the wizard
  • 6.
    Navigate to Window > Android SDK Manager  Select the Android SDK Tools and Android SDK Platform-tools  Select the SDK Platform, Examples, Samples, and any other useful items for your target development platforms  Click Install Packages…  Run through the wizard
  • 7.
    In Eclipse…  Navigate to Help > Install New Software…  On the right side towards the top, click the Add… button  For Name, put whatever you want (I used Mercurial Eclipse)  For Location, enter the following: ◦ http://cbes.javaforge.com/update  In the “Work with:” combo box, select the Mercurial repository  Find and select MercurialEclipse  Run through the wizard
  • 8.
    In Eclipse…  Navigate to File > Import…  Expand Mercurial and select Clone Existing Mercurial Repository  Enter the URL for the desired project  Click Finish  Rinse, repeat
  • 9.
    In the Package Explorer pane on the left, right click the project to bring the link into  Navigate to Build Path > Link Source  For “Linked folder location:”, browse to the desired source to be linked  Provide a Folder name (I used ProjectName_src)  Hit Finish
  • 10.
    Navigate to Window > AVD Manager  On the right side, click New..  Fill in the necessary info ◦ Select the Target corresponding to your desired target platform ◦ It will yell at you if it’s not happy with your input  Click Create AVD  When you run your project, ADT will be intelligent enough to select the AVD appropriate for your project
  • 11.
    There is no official documentation  The forums are hit or miss  There are a few YouTube videos  Your best bet is to find an example closest to your desired outcome and reverse engineer it ◦ Oddly enough, it works pretty well
  • 12.
    Find an example closest to your game  Create a new Android project ◦ Navigate to File > New > Android Project ◦ Fill in the Project Name ◦ Click Next ◦ Select your target API and any additional Add-Ons you need ◦ Decide on a package name  Typical structure is <com/edu/org>.<orgname>.<projectname> ◦ Hit Finish
  • 13.
    Copy your selected example’s Activity class into your project  Cannibalize that class into your premade Activity class for your project
  • 14.
    The central component of AndEngine is the main Activity class ◦ The Activity class features four core functions in which you do your work that are executed in the following order  onLoadEngine  Construct rendering objects (Engine, Camera, etc)  onLoadResources  Import your assets (images, audio, data files, etc)  onLoadScene  Setup the objects that appear in your scene using the assets you’ve imported (Maps, Sprites, etc)  onLoadComplete  I haven’t used it, but I imagine it’s for any manipulations that must be made after all of the previous steps
  • 15.
    The Android Manifest File ◦ XML file that defines information and requirements relating to your application  SDK version  Hardware requirements  Permissions Requirements  Icon  Other stuff – explore! ◦ Always named AndroidManifest.xml