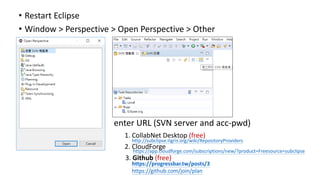
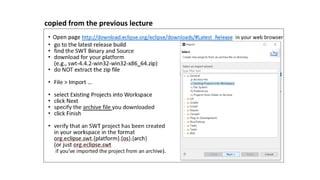
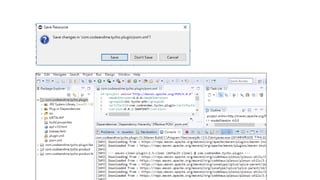
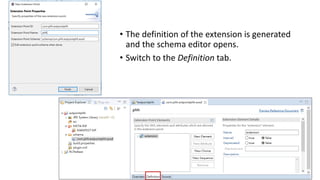
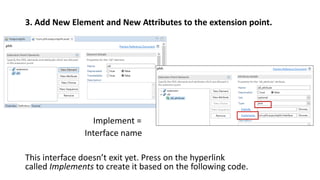
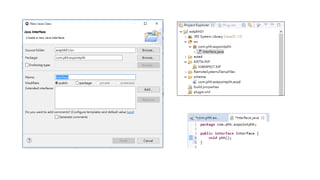
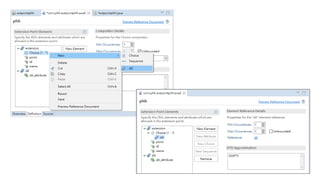
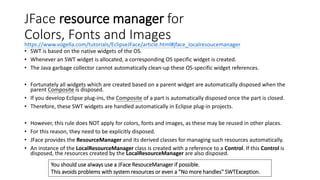
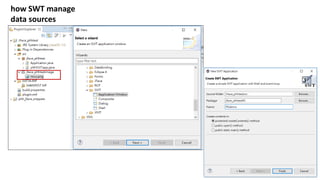
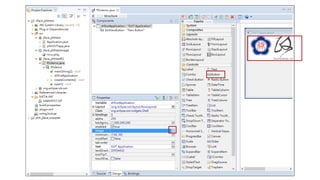
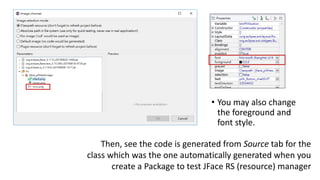
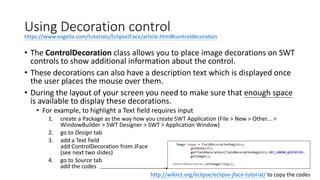
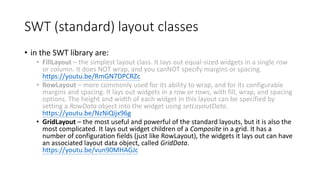
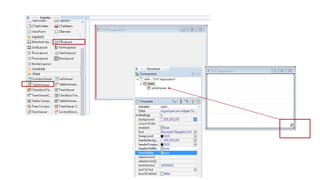
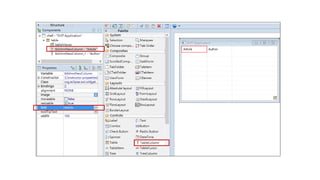
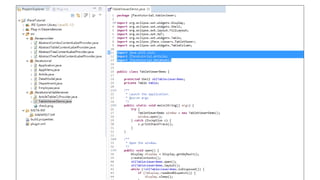
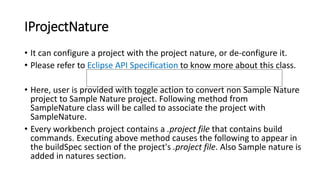
The document provides instructions for using decorations with controls in SWT/JFace applications. It discusses how the ControlDecoration class allows placing image decorations on controls to provide additional information. Creating a decoration involves adding a ControlDecoration to a Text field in the design view and then adding code in the source view to initialize the decoration. The decoration can display an image and tooltip text when the user hovers over it. Developers must leave space in the UI layout for decorations to be visible.
HoloLens Unity Build Pipelines on Azure DevOpsSarah Sexton
Developers of Unity UWP apps: stop wasting time compiling builds in Unity, then Visual Studio, then manually deploying. Save time with an automated pipeline! Create builds from start to finish, implement Unit Tests, save every build artifact, and even distribute using App Center! Learn how to create a Azure DevOps pipeline that can be used to build any Mixed Reality solution.
Automating your build process with Continuous Integration is certainly a great idea, but why stop there? Why not go the whole nine yards and automate the deployment process as well? Staging and production deployments are typically more complicated and more involved than a simple development deployment, but doing them by hand can be time-consuming, tricky and error-prone. Indeed, turning your staging and production deployments into a one-click affair has a lot going for it.
I. Converting Selenium IDE tests to run in a
programming language and getting them running
II. Writing Selenium Remote Control tests from
scratch
III. Applying best practices such as Page Object
design pattern to create lasting tests
IV. Running tests against a continuous integration
server
Selenium is an open source tool for automating web application testing across browsers. It supports recording and playback of test cases and has several components including Selenium IDE, Selenium Remote Control, WebDriver, and Selenium Grid. WebDriver is the successor to Remote Control and allows controlling the browser at the OS level. Tests can be written in various programming languages and are used mainly for regression testing.
Infinum Android Talks #17 - Testing your Android applications by Ivan KustInfinum
van will show you how to setup unit tests using Robolectric, how to test user interactions using Espresso and provide some tips and tricks for stress-free testing.
Selenium is used in many IT companies due to its numerous advantages compared to other automation testing tools in the market.We provide best Selenium training in Chennai with real time scenarios. We are the best training institute in Chennai providing the real time training in Chennai
how to write functional tests with Selenium. how to set up Selenium Testing On Grails Apps In Continuous
Integration Using two approaches: The long way – using Maven and/or Ant The fast way, using the grails-
selenium-rc plug-in - ( see
http://buildchimp.com/wordpress/?p=241 )
The document provides an overview of Maven basics, including the POM.xml file, standard directory layout, dependency mechanism, build lifecycle, goals and plugins. Maven is a build tool that standardizes project structure, manages dependencies, and automates common build processes like compilation and testing. It uses a POM file and plugins to execute goals bound to phases in the build lifecycle.
A part of a lecture by Martin Climatiano, Co-Founder @ 282Productions, at the Microsoft Unity3D Event in Israel.
June 6, 2013
The Video of the lecture is available here http://youtu.be/Ksw3txvhIUA [Hebrew]
Selenium is an open source tool for automating web application testing. There are three main variants: Selenium IDE for recording and playing back tests in Firefox, Selenium Core for running tests on a web server, and Selenium Remote Control (RC) for running tests across browsers from any programming language. Selenium RC requires installing a Java server and client library for the chosen language. Tests are then written in that language and can execute across browsers by starting the server. Selenium IDE provides a simple recording and playback option directly in Firefox but has limited browser support.
Rewriting a Plugin Architecture 3 Times to Harness the API EconomyTim Pettersen
Tim Pettersen and Ian Buchanan discuss the benefits and pitfalls of building an plugin SPI, and unveil Atlassian's new remote add-ons framework: Atlassian Connect.
This document provides an introduction to Maven, an open source build automation tool. It describes Maven's key concepts including the build lifecycle, architecture, plugins, goals, phases, repositories, artifacts, project object model, and dependencies. The lifecycle consists of default, clean, and site phases made up of goals from plugins like compiler and surefire. Maven uses a plugin architecture and dependencies from local and remote repositories to manage projects and builds in a standardized way.
The Spring Framework has undergone a lot of innovation in the 4.0 and 4.1 releases, and so has its testing support. Join Spring Test component lead Sam Brannen in this talk to discover what's new in Spring's testing support in 4.0 through 4.1.
This talk will provide attendees an overview of what's been deprecated, what's changed, and what's been introduced in Spring's testing support over the last two years, with real life examples and tips for best practices. Highlights include using SocketUtils to scan for free TCP & UDP server ports, the ActiveProfilesResolver API, meta-annotation support for test annotations including attribute overrides, best practices with TestNG, using Groovy scripts to configure an ApplicationContext for integration tests, improvements to SQL script execution and embedded databases, the new TestContext framework bootstrap strategy, programmatic transaction management in tests, and more.
Maven is an open source build automation tool used primarily for Java projects to manage builds, documentation, dependencies, and reports. It uses a project object model (POM) file to manage build configuration and dependencies. Maven has defined build lifecycles consisting of phases that execute plugin goals. It provides standard project layout and dependency management. Maven searches dependencies in local, central, and remote repositories. Build profiles allow customizing builds for different environments. Plugins are used to perform tasks like compiling, testing, packaging, and generating documentation.
Uploading files using selenium web driverPankaj Biswas
The document discusses different methods for automating the uploading of files in Selenium tests. It describes using the sendKeys method to upload files for input tags, but also covers using third party tools like AutoIt and Sikuli when upload buttons are not input tags. AutoIt and Sikuli can interact with OS level windows that Selenium cannot access directly. The document provides instructions on setting up AutoIt and Sikuli, identifies common methods like click and type, and includes examples of uploading a file using each tool within a Selenium test.
This document provides an overview of Apache Maven, an open-source build automation tool. It discusses Maven's goals of making the build process easy, providing a uniform build system, and guidelines for best practices. The key aspects covered include the project object model (POM) file, dependency management, repositories, IDE integration, advantages over Apache Ant including easier reuse and standardization, and some disadvantages like understanding exotic plugins.
Maven Presentation - SureFire vs FailSafeHolasz Kati
Maven is a build automation tool used primarily for Java projects. It can be used for building and managing any Java-based project. Maven uses a project object model (POM) to manage a project's build, reporting and documentation from a central piece of information. The POM contains details like dependencies, plugins, repositories used, and other configuration details. Maven projects follow a standard directory structure and use the POM file to define build properties and dependencies. Maven manages dependencies by downloading required JARs from repositories. It supports profiles to customize builds for different environments. Common plugins include those for testing, packaging, site generation and other goals.
The presentation walks you through Apache maven and how to do a build management for java based applications. It starts with basic introduction on the technology and how it plays an important role for build management. The presentation then talks about details on how the maven works and its philosophy to creating builds. Furthermore, it also covers in detail the plugins based architecture to better understand how to use maven effectively.
The document discusses using Maven to implement a continuous deployment pipeline. It addresses how to structure Maven projects to support various test stages like integration and acceptance testing in separate modules. It also provides solutions to issues Maven causes, such as rebuilding artifacts unnecessarily and an inability to simulate release versions, through the use of unique versioning and the Versions plugin. Continuous deployment is achieved by running tests and deploying builds from separate modules after each commit.
The document provides instructions for installing the Java SDK, creating a project, running and testing a project locally using the Eclipse development environment and Google Plugin for Eclipse, and deploying the project to Google App Engine. Key steps include installing the Google Plugin for Eclipse, creating a new App Engine project, running the project locally using the development server within Eclipse, and deploying the project to App Engine.
The document is a guide to Selenium that discusses:
1. The history and types of Selenium including Selenium IDE, Remote Control, Core, and Grid.
2. How to install and use Selenium IDE with features like recording, commands, locators, and test suites.
3. An overview of Selenium commands and how to perform actions like clicking, typing, and selecting.
Maven is a project management tool that provides conventions for building Java projects, including a standard project structure, dependency management, and lifecycle phases. It simplifies development by standardizing common tasks like compiling, testing, packaging, and deploying. Compared to Ant, Maven takes a more convention-based approach and handles dependencies and lifecycles automatically. The document provides an overview of Maven's key features and how it can help manage Java projects.
This document provides an overview of Maven, including what it is, how to set it up, the project object model (POM), relationships between Maven projects, executing Maven commands, built-in lifecycles, dependency management, and common problems and activities when using Maven. Maven is a build automation tool used primarily for Java projects to manage dependencies, build processes, documentation, and project metadata. Key aspects include the POM file which defines the project structure and dependencies, relationships between parent and child projects, and Maven's built-in lifecycles for compiling, testing, packaging, and deploying code.
Maven is a build automation tool used primarily for Java projects. This presentation will cover the basics of Maven and its usage while developing Java application.This is for anyone interested to learn Maven especially the Java developers.
Eclipse is an integrated development environment used primarily for Java development. It contains components like an editor, compiler, and plugins for additional functionality. Eclipse loads plugins like the workbench graphical user interface and manages resources for projects. Users can work with Eclipse by creating Java projects and classes, writing and refactoring code, importing and exporting projects, and using features like CVS integration.
Maven is a build system that provides:
1) A standard directory structure for projects;
2) A standard build lifecycle of phases like compile, test, package; and
3) The ability to override defaults through plugins.
The document then discusses several key aspects of Maven including:
1) The standard Maven directory structure for source code, resources, and test code;
2) The default Maven lifecycle phases like compile, test, package; and
3) The pom.xml file which is Maven's build specification and configuration file.
IBM ConnectED 2015 - BP106 From XPages Hero To OSGi Guru: Taking The Scary Ou...Paul Withers
BP106 From XPages Hero To OSGi Guru: Taking The Scary Out Of Building Extension Libraries. From IBM ConnectED 2015, delivered jointly with Christian Guedemann
Intelligent Projects with Maven - DevFest IstanbulMert Çalışkan
The document discusses Maven, an open source build automation tool used primarily for Java projects. It provides an overview of Maven's key features like dependency management, build lifecycles, and the project object model (POM). The presentation also demonstrates how to create a basic Maven project, configure dependencies and repositories, and manage multi-module builds.
This document provides an agenda for the BLUG 2012 conference on XPages Beyond the Basics taking place March 22-23, 2012 in Antwerp. The agenda covers topics like JavaScript/CSS aggregation, pre-loading for XPages, Java design elements, themes, the XPages Extension Library, relational database support, and recommended resources. It also includes background information on the presenter Ulrich Krause and his experience with Lotus Notes, Domino, and XPages development.
Jenkins is an open source automation server written in Java. Jenkins helps to automate the non-human part of software development process, with continuous integration and facilitating technical aspects of continuous delivery. It is a server-based system that runs in servlet containers such as Apache Tomcat.
The document discusses deploying Java microservices applications to Kubernetes. It covers running a sample Spring Boot app in Docker containers, then deploying it and its MongoDB dependency to a local Kubernetes cluster using Minishift. It also discusses using the Fabric8 Maven plugin to simplify building Docker images and generating Kubernetes manifests from a Maven project. Helm is introduced as a way to package full applications and dependencies for Kubernetes.
This document provides an overview of Force.com deployments, including environments/organizations, development environments, deployment methods, and requirements. Key points include: there are various environments for development, testing, and production; deployments require at least 75% Apex code coverage by unit tests; common deployment methods include the Force.com IDE, ANT migration tool, change sets, and Dreamfactory Snapshot tool.
The document discusses various developer tools for the WebObjects framework. It provides information on available versions of WOLips, what's new in the latest version, how to link to WebObjects javadoc documentation, how to decompile code on the fly in Eclipse, and two in-browser tools - ERProfiling and SnapshotExplorer. ERProfiling helps profile application performance at the page level, while SnapshotExplorer allows browsing application snapshots to see what the object graph looks like compared to the database.
This document discusses Reactive Blocks, a tool for building robust IoT applications using ready-to-use building blocks. It provides a library of blocks that can represent components, functions, parts of a system, or protocols for standards like MQTT, Kura, CoAP, Modbus and OPC UA. Applications are constructed by combining blocks in a hierarchical structure. The tool automatically analyzes, compiles, and generates executable code from the blocks. It also provides tutorials and examples to help users get started developing applications using this approach.
The document summarizes an event called UKLUG 2012 that was held from September 2-4, 2012 at Cardiff University in Wales. It focused on XPages topics beyond the basics. The agenda included sessions on JavaScript/CSS aggregation, enabling pre-load for XPages, Java design elements, JAR design elements, Faces-config design elements, themes, and the XPages Extension Library.
The document discusses the OpenDaylight SDN controller. It provides an overview of OpenDaylight, describing it as an open-source project that promotes Software Defined Networking using technologies like Eclipse, Maven, and OSGi. The document also covers basic hands-on steps for installing and using the OpenDaylight controller, including setting up the environment, writing controller code, using Mininet and the controller's web UI.
The document provides an overview of using Maven, an open source project management and comprehension tool. It discusses Maven's project object model (POM) file, which defines project identifiers and dependencies. It also outlines Maven's build lifecycle phases like compile, test, and package. Dependency management features are explained, including transitive dependencies, exclusions, and optional dependencies.
DevOps with Elastic Beanstalk - TCCC-2014scolestock
This document discusses using AWS Elastic Beanstalk for deploying applications. It describes Elastic Beanstalk as a platform as a service that handles provisioning infrastructure and managing application deployments. It covers how to deploy application versions through the AWS console, command line, IDE plugins, or a CI/CD tool like Jenkins. It also discusses how Elastic Beanstalk uses applications, environments, and versions to model deployments and provides configuration, monitoring, logging and scaling capabilities.
OSGI is a Java framework that implements a dynamic component model. It allows modular Java applications to be built from separate bundles that can be loaded, started, stopped and updated independently. Key aspects include:
- Bundles are JAR files with additional configuration that can be loaded and stopped independently without affecting other bundles.
- Services allow bundles to publish and discover capabilities via a registry. Dependencies between bundles are resolved dynamically.
- The OSGi framework provides a lifecycle to manage the loading, starting and stopping of bundles.
- Annotations like @Component, @Service and @Reference allow defining OSGi components and services using declarative services.
- The OSGi specification is implemented by frameworks like
The document announces the Entwicklercamp 2012 event from March 26-28 at the Maritim Hotel in Gelsenkirchen, Germany. It will feature sessions on XPages, the Extension Library, pre-loading for XPages, Java design elements, themes, and more. The event is organized by Ulrich Krause of is@web, an IBM Champion for collaboration solutions.
Jenkins Pipeline allows automating the process of software delivery with continuous integration and deployment. It uses Jenkinsfiles to define the build pipeline through stages like build, test and deploy. Jenkinsfiles can be written declaratively using a domain-specific language or scripted using Groovy. The pipeline runs on agent nodes and is composed of stages containing steps. Maven is a build tool that manages Java projects and dependencies through a POM file. The POM defines project properties, dependencies, plugins and profiles to customize builds.
This document provides an agenda for a conference on XPages Beyond the Basics held from February 2-3, 2012 in Denmark. The agenda includes topics like JavaScript/CSS aggregation, pre-loading for XPages, Java design elements, themes, the XPages Extension Library, relational database support using JDBC, exporting data to Excel/PDF, and more. The document also introduces the speaker, Ulrich Krause, an IBM Champion and experienced Notes/Domino developer.
This document provides an introduction and overview of Selenium WebDriver. It discusses what WebDriver is, the programming languages it supports, and how it compares to the previous Selenium RC tool. It also provides step-by-step instructions on how to install WebDriver and create a simple test script in Java using the Eclipse IDE. Finally, it covers how to access forms, links, tables, perform keyboard/mouse actions, and upload files using WebDriver.
The document provides step-by-step instructions for installing OpenNI and NITE on a Windows PC to enable skeleton tracking and gesture recognition capabilities with a Kinect sensor. It describes downloading and installing OpenNI binaries, Kinect drivers, and NITE middleware. It also provides tests to validate the installation and additional configuration steps for using OpenNI in Visual Studio projects.
Using the Corporate Geographic Data Model with SubversionDebbie Wilson
This document provides instructions for setting up the Corporate Geographic Data Model for use with Subversion version control. It outlines 4 key steps: 1) installing Subversion clients, 2) checking out local copies of relevant UML repositories, 3) configuring a local Enterprise Architect file for version control, and 4) getting model packages from the repository. Editing, committing changes, viewing history, and adding new packages to the repository are also described.
Similar to Eclipse IDE, 2019.09, Java Development (20)
Communications Mining Series - Zero to Hero - Session 1DianaGray10
This session provides introduction to UiPath Communication Mining, importance and platform overview. You will acquire a good understand of the phases in Communication Mining as we go over the platform with you. Topics covered:
• Communication Mining Overview
• Why is it important?
• How can it help today’s business and the benefits
• Phases in Communication Mining
• Demo on Platform overview
• Q/A
Infrastructure Challenges in Scaling RAG with Custom AI modelsZilliz
Building Retrieval-Augmented Generation (RAG) systems with open-source and custom AI models is a complex task. This talk explores the challenges in productionizing RAG systems, including retrieval performance, response synthesis, and evaluation. We’ll discuss how to leverage open-source models like text embeddings, language models, and custom fine-tuned models to enhance RAG performance. Additionally, we’ll cover how BentoML can help orchestrate and scale these AI components efficiently, ensuring seamless deployment and management of RAG systems in the cloud.
GraphSummit Singapore | The Future of Agility: Supercharging Digital Transfor...Neo4j
Leonard Jayamohan, Partner & Generative AI Lead, Deloitte
This keynote will reveal how Deloitte leverages Neo4j’s graph power for groundbreaking digital twin solutions, achieving a staggering 100x performance boost. Discover the essential role knowledge graphs play in successful generative AI implementations. Plus, get an exclusive look at an innovative Neo4j + Generative AI solution Deloitte is developing in-house.
Best 20 SEO Techniques To Improve Website Visibility In SERPPixlogix Infotech
Boost your website's visibility with proven SEO techniques! Our latest blog dives into essential strategies to enhance your online presence, increase traffic, and rank higher on search engines. From keyword optimization to quality content creation, learn how to make your site stand out in the crowded digital landscape. Discover actionable tips and expert insights to elevate your SEO game.
UiPath Test Automation using UiPath Test Suite series, part 6DianaGray10
Welcome to UiPath Test Automation using UiPath Test Suite series part 6. In this session, we will cover Test Automation with generative AI and Open AI.
UiPath Test Automation with generative AI and Open AI webinar offers an in-depth exploration of leveraging cutting-edge technologies for test automation within the UiPath platform. Attendees will delve into the integration of generative AI, a test automation solution, with Open AI advanced natural language processing capabilities.
Throughout the session, participants will discover how this synergy empowers testers to automate repetitive tasks, enhance testing accuracy, and expedite the software testing life cycle. Topics covered include the seamless integration process, practical use cases, and the benefits of harnessing AI-driven automation for UiPath testing initiatives. By attending this webinar, testers, and automation professionals can gain valuable insights into harnessing the power of AI to optimize their test automation workflows within the UiPath ecosystem, ultimately driving efficiency and quality in software development processes.
What will you get from this session?
1. Insights into integrating generative AI.
2. Understanding how this integration enhances test automation within the UiPath platform
3. Practical demonstrations
4. Exploration of real-world use cases illustrating the benefits of AI-driven test automation for UiPath
Topics covered:
What is generative AI
Test Automation with generative AI and Open AI.
UiPath integration with generative AI
Speaker:
Deepak Rai, Automation Practice Lead, Boundaryless Group and UiPath MVP
Climate Impact of Software Testing at Nordic Testing DaysKari Kakkonen
My slides at Nordic Testing Days 6.6.2024
Climate impact / sustainability of software testing discussed on the talk. ICT and testing must carry their part of global responsibility to help with the climat warming. We can minimize the carbon footprint but we can also have a carbon handprint, a positive impact on the climate. Quality characteristics can be added with sustainability, and then measured continuously. Test environments can be used less, and in smaller scale and on demand. Test techniques can be used in optimizing or minimizing number of tests. Test automation can be used to speed up testing.
GraphSummit Singapore | The Art of the Possible with Graph - Q2 2024Neo4j
Neha Bajwa, Vice President of Product Marketing, Neo4j
Join us as we explore breakthrough innovations enabled by interconnected data and AI. Discover firsthand how organizations use relationships in data to uncover contextual insights and solve our most pressing challenges – from optimizing supply chains, detecting fraud, and improving customer experiences to accelerating drug discoveries.
Removing Uninteresting Bytes in Software FuzzingAftab Hussain
Imagine a world where software fuzzing, the process of mutating bytes in test seeds to uncover hidden and erroneous program behaviors, becomes faster and more effective. A lot depends on the initial seeds, which can significantly dictate the trajectory of a fuzzing campaign, particularly in terms of how long it takes to uncover interesting behaviour in your code. We introduce DIAR, a technique designed to speedup fuzzing campaigns by pinpointing and eliminating those uninteresting bytes in the seeds. Picture this: instead of wasting valuable resources on meaningless mutations in large, bloated seeds, DIAR removes the unnecessary bytes, streamlining the entire process.
In this work, we equipped AFL, a popular fuzzer, with DIAR and examined two critical Linux libraries -- Libxml's xmllint, a tool for parsing xml documents, and Binutil's readelf, an essential debugging and security analysis command-line tool used to display detailed information about ELF (Executable and Linkable Format). Our preliminary results show that AFL+DIAR does not only discover new paths more quickly but also achieves higher coverage overall. This work thus showcases how starting with lean and optimized seeds can lead to faster, more comprehensive fuzzing campaigns -- and DIAR helps you find such seeds.
- These are slides of the talk given at IEEE International Conference on Software Testing Verification and Validation Workshop, ICSTW 2022.
Full-RAG: A modern architecture for hyper-personalizationZilliz
Mike Del Balso, CEO & Co-Founder at Tecton, presents "Full RAG," a novel approach to AI recommendation systems, aiming to push beyond the limitations of traditional models through a deep integration of contextual insights and real-time data, leveraging the Retrieval-Augmented Generation architecture. This talk will outline Full RAG's potential to significantly enhance personalization, address engineering challenges such as data management and model training, and introduce data enrichment with reranking as a key solution. Attendees will gain crucial insights into the importance of hyperpersonalization in AI, the capabilities of Full RAG for advanced personalization, and strategies for managing complex data integrations for deploying cutting-edge AI solutions.
Sudheer Mechineni, Head of Application Frameworks, Standard Chartered Bank
Discover how Standard Chartered Bank harnessed the power of Neo4j to transform complex data access challenges into a dynamic, scalable graph database solution. This keynote will cover their journey from initial adoption to deploying a fully automated, enterprise-grade causal cluster, highlighting key strategies for modelling organisational changes and ensuring robust disaster recovery. Learn how these innovations have not only enhanced Standard Chartered Bank’s data infrastructure but also positioned them as pioneers in the banking sector’s adoption of graph technology.
Dr. Sean Tan, Head of Data Science, Changi Airport Group
Discover how Changi Airport Group (CAG) leverages graph technologies and generative AI to revolutionize their search capabilities. This session delves into the unique search needs of CAG’s diverse passengers and customers, showcasing how graph data structures enhance the accuracy and relevance of AI-generated search results, mitigating the risk of “hallucinations” and improving the overall customer journey.
TrustArc Webinar - 2024 Global Privacy SurveyTrustArc
How does your privacy program stack up against your peers? What challenges are privacy teams tackling and prioritizing in 2024?
In the fifth annual Global Privacy Benchmarks Survey, we asked over 1,800 global privacy professionals and business executives to share their perspectives on the current state of privacy inside and outside of their organizations. This year’s report focused on emerging areas of importance for privacy and compliance professionals, including considerations and implications of Artificial Intelligence (AI) technologies, building brand trust, and different approaches for achieving higher privacy competence scores.
See how organizational priorities and strategic approaches to data security and privacy are evolving around the globe.
This webinar will review:
- The top 10 privacy insights from the fifth annual Global Privacy Benchmarks Survey
- The top challenges for privacy leaders, practitioners, and organizations in 2024
- Key themes to consider in developing and maintaining your privacy program
Unlock the Future of Search with MongoDB Atlas_ Vector Search Unleashed.pdfMalak Abu Hammad
Discover how MongoDB Atlas and vector search technology can revolutionize your application's search capabilities. This comprehensive presentation covers:
* What is Vector Search?
* Importance and benefits of vector search
* Practical use cases across various industries
* Step-by-step implementation guide
* Live demos with code snippets
* Enhancing LLM capabilities with vector search
* Best practices and optimization strategies
Perfect for developers, AI enthusiasts, and tech leaders. Learn how to leverage MongoDB Atlas to deliver highly relevant, context-aware search results, transforming your data retrieval process. Stay ahead in tech innovation and maximize the potential of your applications.
#MongoDB #VectorSearch #AI #SemanticSearch #TechInnovation #DataScience #LLM #MachineLearning #SearchTechnology
Driving Business Innovation: Latest Generative AI Advancements & Success StorySafe Software
Are you ready to revolutionize how you handle data? Join us for a webinar where we’ll bring you up to speed with the latest advancements in Generative AI technology and discover how leveraging FME with tools from giants like Google Gemini, Amazon, and Microsoft OpenAI can supercharge your workflow efficiency.
During the hour, we’ll take you through:
Guest Speaker Segment with Hannah Barrington: Dive into the world of dynamic real estate marketing with Hannah, the Marketing Manager at Workspace Group. Hear firsthand how their team generates engaging descriptions for thousands of office units by integrating diverse data sources—from PDF floorplans to web pages—using FME transformers, like OpenAIVisionConnector and AnthropicVisionConnector. This use case will show you how GenAI can streamline content creation for marketing across the board.
Ollama Use Case: Learn how Scenario Specialist Dmitri Bagh has utilized Ollama within FME to input data, create custom models, and enhance security protocols. This segment will include demos to illustrate the full capabilities of FME in AI-driven processes.
Custom AI Models: Discover how to leverage FME to build personalized AI models using your data. Whether it’s populating a model with local data for added security or integrating public AI tools, find out how FME facilitates a versatile and secure approach to AI.
We’ll wrap up with a live Q&A session where you can engage with our experts on your specific use cases, and learn more about optimizing your data workflows with AI.
This webinar is ideal for professionals seeking to harness the power of AI within their data management systems while ensuring high levels of customization and security. Whether you're a novice or an expert, gain actionable insights and strategies to elevate your data processes. Join us to see how FME and AI can revolutionize how you work with data!
Let's Integrate MuleSoft RPA, COMPOSER, APM with AWS IDP along with Slackshyamraj55
Discover the seamless integration of RPA (Robotic Process Automation), COMPOSER, and APM with AWS IDP enhanced with Slack notifications. Explore how these technologies converge to streamline workflows, optimize performance, and ensure secure access, all while leveraging the power of AWS IDP and real-time communication via Slack notifications.
8. • go back to your local Java site
• select a Project you want to share
• Right click on the Project > Team > Share Project…
• Similar procedures as ‘import a new Project into a SVN Project…’
http://help.collab.net/index.jsp?topic=/org.tigris.subclip
se.doc/topics/new-location.html
9. • must specify the folder
name where you want
to store the project
• The folder name is
relative to the URL of
the repository location
you specified in the
previous step.
• All intermediate folders
must already exist in the
repository, but the final
folder name must NOT
already exist.
(e.g., ProjectName must
exist; trunk must NOT)
• You can use the
Browse... button to help
you create
(intermediate) folders.
• the convention of
storing the project in a
ProjectName/trunk
structure.
10. • SVN’s default folders: trunk, branches
• Files must be placed under trunk
before uploading them
• Trunk is like a root
If any error occurred, see the next slide
11. Files must be placed
under trunk before
commit them to a
remote platform, such
at Github
http://chrislin1015-
blog.logdown.com/posts/1
082135-svn-and-encounter-
mkcol-not-allowed-github-
upload-error-messages
12.
13.
14. • making a copy of a project from a repository into your local workspace
• In SVN, the check out process creates a working copy.
• A working copy is a specially formatted folder structure which contains
additional .svn folders that store SVN information, as well as a pristine copy of
each item that is checked out.
• Process
• navigate to
the SVN Repository
Exploring Perspective
15. • If an Eclipse .project file already exists in the selected repository folder, the check out
wizard will automatically default the method of checkout and using the project
definition file.
• If no .project file exists in the selected repository location, the wizard will give you the
option of checking out the folder as a regular Eclipse project or launching the New
Project Wizard.
• To select an alternative
location, uncheck the use default workspace
location option and type or Browse for a
new target location.
17. What is CBI
• Maven with the Tycho plugins
• Tycho plugins teach Maven how to build Eclipse plugins and OSGi bundles.
• This enables building Eclipse projects with “maven clean install” just as one would
build other Maven projects.
• Common services
• Jar signing facility
• MacOS signing facility
• Windows signing facility
• mature templates and common pom.xml files will be provided
• part of CBI
• Git, Hudson, the build slaves
• Nexus (aka. the artifact repository & server side of Maven)
• Gerrit, Bugzilla, and the Downloads site
18. • Before using tycho, create a short
sample project consisting of a small
eclipse-like product along with an
additional feature.
• Download sample project from here
https://github.com/Pontesegger/code
andme/blob/master/Code%20&%20
Me%20Blog/tycho_01_build_plugins.
zip?raw=true
21. • The wizard asks for a Group Id.
• All projects that belong together will get the same Group Id.
• Use a name that represents the component you want to build.
• Artifact Id should match the Bundle-SymbolicName found in MANIFEST.MF.
• Version should be set accordingly to Bundle-Version from the manifest.
• SNAPSHOT in maven is similar to qualifier in you plug-in version.
• Packaging tells maven what type of build instructions to use.
• Set it to eclipse-plugin.
22. • Maven creates a pom.xml for you !
• Current version of Tycho version is
1.4.0
• Replace the codes
• Build our bundle
https://www.eclipse.org/tycho/
23. • Replace the codes
• property for the tycho version to be used.
• For future tycho versions you will need to upgrade this.
• the Mars p2 repository for resolving dependencies during build time.
• build section tells maven to use the tycho plug-in for the build process.
• You will see some errors/problems.
• Build our bundle
• Right click on the project → select Run As → Maven build...
• Under Goals enter clean install.
• Goals are related to the maven lifecycle. we tell maven to delete previous
build artifacts, to build our plug-in and to install build results.
http://codeandme.blogspot.com/2012/12/tycho-build-1-building-plug-ins.html
28. • Extension (contribution): contribute functionality to a certain type of API
• Contribution can be code or data
• Extension point: to define the type of API by a plug-in
• Plug-in: contains the necessary code to …
• defines extension point
• declare the extension point in its plugin.xml file
• be responsible for evaluating the extensions
• allow other plug-ins to add contributions (extensions) to the extension point.
• provides an extension (contribution) based on the contract defined by an existing
extension point
29. Prerequisites
• you should have basic understanding of development for the Eclipse
platform. Eclipse RCP Tutorial or Eclipse Plug-in Tutorial.
Please complete the following steps:
• 3. Install the e4 tools
• 4. Install the e4 spies
• 5. Create an RCP application with the wizard
30. Creating an extension point
• an XML schema file
• contains code to evaluate the extensions
32. Accessing extensions
• After adding one extension you can right-click on it to add elements
or attributes.
• The information about the available extension points and the
provided extensions are stored in a class of type IExtensionRegistry.
• The Eclipse platform reads the extension points and provided
extensions once the plug-in is in the RESOLVED life cycle status as
defined by the OSGi specification.
• You can use the dependency injection mechanism to get the
IExtensionRegistry class injected.
33. Extension factories
• If you create your class directly via the IConfigurationElement class of
the extension you are limited to classes which have a default
constructor. To avoid this restriction you can use extension factories.
• To use a factory implement the interface
IExecutableExtensionFactory in the class attribute of your extension
point definition. The factory receives the configuration elements and
can construct the required object.
34. Exercise: create two new plug-ins
Create and evaluate an extension point
1. Creating a plug-in for the extension point definition
35. 2. Create an extension point
Open the MANIFEST.MF file or the plugin.xml file and select
the Extension Points tab.
36. • The definition of the extension is generated
and the schema editor opens.
• Switch to the Definition tab.
37. 3. Add New Element and New Attributes to the extension point.
Implement =
Interface name
This interface doesn’t exit yet. Press on the hyperlink
called Implements to create it based on the following code.
38.
39. • Go back to your extension point definition and add a choice to the
extension point.
• This defines how often the extension “zkl" can be provided by
contributing plug-ins. We will set no restrictions (unbound).
40.
41. 4. Export the package
Select the MANIFEST.MF file switch to the Runtime tab and export the
package which contains the com.phh.expointphh.Interface.
42. 5. Add dependencies
• Add the following dependencies via the MANIFEST.MF file of your new plug-in:
org.eclipse.core.runtime
org.eclipse.e4.core.di
6. Evaluating the registered extensions
- create a handler class which can evaluate the existing extensions.
43.
44. • The code uses the
ISafeRunnable interface.
This interface protects the
plug-in which defines the
extension point from
malfunction extensions.
• If an extension throws an
Exception, it will be caught
by ISafeRunnable and the
remaining extensions will
still get executed.
• Review the .exsd schema
file and the reference to this
file in the plugin.xml file
45. 7. Create a menu entry and add it to
your product
in the MANIFEST.MF file of
your application plug-in.
Add a dependency to the
com.phh.extpointphh plug-in
Afterwards create a new menu entry
called Evaluate extensions and
define a command and handler for this
menu entry. In the handler point to the
EvaluateContributionsHandler class.
46. 8. Providing an extension
• Create a new simple plug-in
• Open
the MANIFEST.MF editor of
this new plug-in and select
the Dependencies tab.
• Add the
org.eclipse.core.runtime and
the plug-ins you created as
dependencies.
• Make sure your plug-in has
the This plug-in is a
singleton flag set on
the Overview tab for
your MANIFEST.MF file.
47. • Switch to the Extensions tab
• Select your custom extension point to Finish
• Add zkl to your extension point via right-click.
49. 9. Add the new plug-ins to your product
com.phh.extpointphh
com.phh.extpointphh2
10. Validate
• Start your application via the product
configuration file. This updates the plug-
ins included in the run configuration.
• In your running application select your
new menu entry. The handler class write
the output of your extensions to
the Console view of your Eclipse IDE.
51. SWT Snippets
• minimal stand-alone programs
• demonstrate specific techniques or functionality
• if you are programming with JFace, you may find JFace Snippets useful
• To run a snippet
• import SWT .zip file into your workspace
• File > import …> Existing Projects Into Workspace
• create a project called org.eclipse.swt in your workspace.
• Your Java projects can then add the SWT project as a dependency.
• Open the properties dialog of your Java project
• on the Java Build Path page, include the org.eclipse.swt project.
https://download.eclipse.org/eclipse/downloads/
https://download.eclipse.org/eclipse/downloads/drops4/R-4.13-201909161045/
https://www.eclipse.org/swt/snippets/
52. • copy the desired snippet
(e.g., JFaceSnippets) to the
clipboard, and paste it
into a new snippet
class (under src folder).
JFaceSnippets
https://wiki.eclipse.org/JFaceSnip
pets#Snippet012_-
_Dialog_with_Image_Buttons
53. SWT Examples
• much larger and more
comprehensive than SWT
Snippets.
1. Install the examples
• Running the SWT Examples
inside Eclipse
• Installing the examples
• Ensure Group items by category is
unchecked.
• Type "Eclipse SDK Examples" in the
search field.
• Next > Next > accept the license
terms > Finish
• Restart Eclipse to take effect.
https://www.eclipse.org/swt/examples.php
54. • You may also installing
examples manually
• Download the appropriate Eclipse
SDK Example zip file from the
Eclipse project web site at
http://download.eclipse.org/eclip
se.
• Extract the contents of the zip file
to a new empty directory inside
the dropins directory of your
Eclipse installation.
• Start or restart Eclipse.
• You can verify that examples have
been installed by looking for
File > New > Example... in the
workbench menu bar.
55. 2. Running the SWT examples
with the SWT Example Launcher
56. 3. Running the SWT standalone
examples
Browse ... button to locate the following
directory (according to the Eclipse version and
the original installation location):
eclipse/plugins/org.eclipse.sdk.examples.source
_3.1.0/src/org.eclipse.swt.examples_3.1.0
C:Userspclabeclipsejava-2019-
09eclipsepluginsorg.eclipse.sdk.examples.source-4.13plugins
57. Next > Project > Add > org.eclipse.swt >
OK > Finish
• At this point your SWT examples
should be compiled without any errors.
• Check the Problems view for errors.
• If you get an error like "java.lang.Object
not found" it means you have not
configured a JRE.
• Go to the Window > Preferences ... dialog
and select the Java > Installed JREs
preference page.
• Ensure that a JRE is installed and that the
path to the JRE is correct.
58. • run the SWT standalone examples
• Open the Java perspective.
• In the Packages view, select the main
class that you want to run.
• Select Run > Run As... > Java
Application from the main menu.
64. JFace
you need to create a SWT Project before starting with JFace
Step 1. http://wikiict.org/java/java-swt-programming-tutorials/java-desktop-application-programming-using-swt/
note: follow the instruction of “7- Using WindowBuilder”
Step 2. download the SWT Binary and Source (see next slide, you should have installed)
Step 3. create a new plug-in project (you should know how to do it)
note: RCP Plugin Project has to be created no matter what.
http://wikiict.org/eclipse/eclipse-jface-tutorial/
68. JFace resource manager for
Colors, Fonts and Images
• SWT is based on the native widgets of the OS.
• Whenever an SWT widget is allocated, a corresponding OS specific widget is created.
• The Java garbage collector cannot automatically clean-up these OS-specific widget references.
• Fortunately all widgets which are created based on a parent widget are automatically disposed when the
parent Composite is disposed.
• If you develop Eclipse plug-ins, the Composite of a part is automatically disposed once the part is closed.
• Therefore, these SWT widgets are handled automatically in Eclipse plug-in projects.
• However, this rule does NOT apply for colors, fonts and images, as these may be reused in other places.
• For this reason, they need to be explicitly disposed.
• JFace provides the ResourceManager and its derived classes for managing such resources automatically.
• An instance of the LocalResourceManager class is created with a reference to a Control. If this Control is
disposed, the resources created by the LocalResourceManager are also disposed.
https://www.vogella.com/tutorials/EclipseJFace/article.html#jface_localresoucemanager
You should use always use a JFace ResouceManager if possible.
This avoids problems with system resources or even a "No more handles" SWTException.
69. • create a Package
• copy and paste an
image
• create another
Package to test
how SWT manage
data sources
(color, font, image)
and how JFace
manages
71. • A class SWTResourceManager is automatically created.
• It is a class with utility methods for managing image, Font, Color.
You may change the title “SWT Application”
e.g., “Rsdemo Application”
Go to Properties > text in the Design tab
72.
73. • You may also change
the foreground and
font style.
Then, see the code is generated from Source tab for the
class which was the one automatically generated when you
create a Package to test JFace RS (resource) manager
74. • Please read those codes…and try to understand how/what they work/do
75. Using Decoration control
• The ControlDecoration class allows you to place image decorations on SWT
controls to show additional information about the control.
• These decorations can also have a description text which is displayed once
the user places the mouse over them.
• During the layout of your screen you need to make sure that enough space
is available to display these decorations.
• For example, to highlight a Text field requires input
1. create a Package as the way how you create SWT Application (File > New > Other… >
WindowBuilder > SWT Designer > SWT > Application Window)
2. go to Design tab
3. add a Text field
add ControlDecoration from JFace
(see next two slides)
4. go to Source tab
add the codes
http://wikiict.org/eclipse/eclipse-jface-tutorial/ to copy the codes
https://www.vogella.com/tutorials/EclipseJFace/article.html#controldecoration
76.
77. Q1. How to re-allocate the Text field ?
Q2. How to input from Right ?
Answers are in the next slide !!!
78. A: SWT Widgets
Q1. Layouts > Grid >
Q2. Properties > Style >
Note: Widgets can
contain other widgets
(container)
http://wikiict.org/java/java-swt-programming-tutorials/java-
desktop-application-programming-using-swt/
You can view the demo of the
Control at the link below, it’s
RWT (RAP Widget Toolkit)
Control, but they are essentially
the same as SWT control.
http://rap.eclipsesource.com/de
mo/release/controls/
79. JFaceSnippets
• Select one snippet
• The header section of each snippet is a link to the plain source.
• Copy the source and then Paste it directly on the src folder or package
in an eclipse project.
• The package and the class will be created automatically.
• Run the snippet as Java Application
https://wiki.eclipse.org/JFaceSnippets
83. Preparation
• Maker sure WindowBuilder has been installed
• Create RCP Plugin Project: File > New > Other…
• Add swt library: MANIFEST.MF > Dependencies > Add
org.eclipse.swt
org.eclipse.swt.win32.win32x86_64
• SWT snippets
https://www.eclipse.org/swt/snippets/#browser
copy and paste the desired snippet into a new snippet class (under src folder).
84. Method 1:
• Window > Perspective > Open Perspective >
Java
• File > Import... > Plug-in Development >
Plug-ins and Fragments > Next
Method 2:
• Open page
http://download.eclipse.org/eclipse/downloads/#La
test_Release in your web browser
• go to the latest release build
• find the SWT Binary and Source
• Download zip file for your platform
(e.g., swt-4.4.2-win32-win32-x86_64.zip)
• do NOT extract the zip file
• File > Import …
• select Existing Projects into Workspace
• click Next
• specify the archive file you downloaded
• click Finish
85. SWT (standard) layout classes
• in the SWT library are:
• FillLayout – the simplest layout class. It lays out equal-sized widgets in a single row
or column. It does NOT wrap, and you canNOT specify margins or spacing.
https://youtu.be/RmGN7DPCRZc
• RowLayout – more commonly used for its ability to wrap, and for its configurable
margins and spacing. It lays out widgets in a row or rows, with fill, wrap, and spacing
options. The height and width of each widget in this layout can be specified by
setting a RowData object into the widget using setLayoutData.
https://youtu.be/NzNiQijx96g
• GridLayout – the most useful and powerful of the standard layouts, but it is also the
most complicated. It lays out widget children of a Composite in a grid. It has a
number of configuration fields (just like RowLayout), the widgets it lays out can have
an associated layout data object, called GridData.
https://youtu.be/vun90MHAGJc
86.
87.
88.
89.
90. SWT (standard) layout classes
• in the SWT library are:
• FillLayout – the simplest layout class. It lays out equal-sized widgets in a single row
or column. It does NOT wrap, and you canNOT specify margins or spacing.
https://youtu.be/RmGN7DPCRZc
• RowLayout – more commonly used for its ability to wrap, and for its configurable
margins and spacing. It lays out widgets in a row or rows, with fill, wrap, and spacing
options. The height and width of each widget in this layout can be specified by
setting a RowData object into the widget using setLayoutData.
https://youtu.be/NzNiQijx96g
• GridLayout – the most useful and powerful of the standard layouts, but it is also the
most complicated. It lays out widget children of a Composite in a grid. It has a
number of configuration fields (just like RowLayout), the widgets it lays out can have
an associated layout data object, called GridData.
https://youtu.be/vun90MHAGJc
93. SWT (standard) layout classes
• in the SWT library are:
• FillLayout – the simplest layout class. It lays out equal-sized widgets in a single row
or column. It does NOT wrap, and you canNOT specify margins or spacing.
https://youtu.be/RmGN7DPCRZc
• RowLayout – more commonly used for its ability to wrap, and for its configurable
margins and spacing. It lays out widgets in a row or rows, with fill, wrap, and spacing
options. The height and width of each widget in this layout can be specified by
setting a RowData object into the widget using setLayoutData.
https://youtu.be/NzNiQijx96g
• GridLayout – the most useful and powerful of the standard layouts, but it is also the
most complicated. It lays out widget children of a Composite in a grid. It has a
number of configuration fields (just like RowLayout), the widgets it lays out can have
an associated layout data object, called GridData.
https://youtu.be/vun90MHAGJc
97. SWT StackLayout
• stacks all the controls one on top of the
other and resizes all controls to have the
same size and location.
• topControl is visible and all other
controls are not visible.
• Users must set the topControl value to
flip between the visible items and then
call layout() method on the composite
which has the StackLayout.
103. • Similarly, create class
BottomComposite
• Similarly create class
MainComposite:
drag and drop to the main
Finally, create a Java app by
using the main composite !
105. JFace Viewer (makes coding life easier when creating Tables)
• allows you to display a domain model in a standard SWT widget
• E.g., list, combo, tree or table
• without converting the domain model beforehand.
• allows you to set a content provider which provides the data for the viewer
and makes no assumption about the presentation of the data model.
• You can also assign at least one label provider to a viewer so as to define
how the data from the model will be displayed in the viewer.
• Standard JFace viewer (ComboViewer, ListViewer, TreeViewer, TableViewer)
• These viewers are part of the org.eclipse.jface.viewers package
• Standard content provider (IStructuredContentProvider, ITreeContentProvider)
• Standard label provider (ILabelProvider, CellLabelProvider)
• JFace ComboViewer
• The ComboViewer class simplifies the implementation of a SWT Combo (Drop-down box).
https://www.vogella.com/tutorials/EclipseJFace/article.html#purpose-of-the-jface-viewer-framework
107. Model & Content/Label Provider
• Please read the codes in the following java classes…and try to
understand how/what they work/do.
• AppMenu.java
• Article.java
• Employee.java
• Department.java
• DataModel.java
• How to differentiate which provider should be implemented for the
following java classes?
• AbstractComboContentLabelProvider.java
• AbstractTableContentLabelProvider.java
• AbstractTreeContentLabelProvider.java
• AbstractTreeTableContentLabelProvider.java
126. Creating
Ant buildfiles
• by default the Ant editor
only has an association with
build.xml named files.
• as long as the file has a .xml
extension, Eclipse will
consider it to be a possible
Ant buildfile
• create a *.xml first
• right click the *.xml
• Add an association between
*.xml and the Ant editor.
131. Running Ant buildfiles
• Any file with a .xml extension can be run as an Ant buildfile.
• not all such files really are Ant buildfiles, but no harm is done if an attempt is
made to mistakenly run a non-Ant .xml file as an Ant buildfile.
132.
133. Saving & Reusing Ant options
• Creating multiple launch configurations in this manner allows you to
quickly run your Ant buildfile in any configuration by simply specifying
the corresponding launch configuration.
137. • The history is ordered so that the most frequently run configurations
are at the top of the drop-down.
138. Using the Ant view
• The main advantage of this view is that you can work with all of your
Ant buildfiles in one place, as opposed to hunting them down in one
of the navigation views.
143. • You can change the order so that
your Ant buildfile runs before the
Java builder, though that wouldn't
make sense in this example.
• The Java builder runs the internal
Eclipse Java compiler which inturn is
responsible for indexing your source
so that searching, refactoring and
many other features are available.
• Thus it is not possible to replace the
internal Eclipse Java compiler by
using a project builder. You can
disable the Java builder and you can
control when the Java Builder runs
with respect to the project builders
that you define.
145. Track Resource Changes
to keep track of resource changes in the workspace
(as the files and folders that have been added,
modified, and removed from the workspace)
interface org.eclipse.core.resources.*;
146. public interface IResourceChangeEvent
• According to Eclipse API Specification, there are currently 5+1 different
types of resource change events
• PRE_BUILD
• POST_BUILD
• POST_CHANGE
• PRE_CLOSE
• PRE_DELETE
• PRE_REFRESH
https://help.eclipse.org/kepler/nftopic/org.eclipse.platform.doc.isv/referenc
e/api/org/eclipse/core/resources/IResourceChangeEvent.html
https://www.wideskills.com/eclipse-plugin-tutorial/eclipse-
plugin-track-resource-changes-tutorial
147. PRE_BUILD
• Before-the-fact batch reports of arbitrary creations, deletions and
modifications to one or more resources expressed as a hierarchical
resource delta. Event type is PRE_BUILD, and getDelta returns the
hierarchical delta rooted at the workspace root. The getBuildKind method
returns the kind of build that is about to occur, and the getSource method
returns the scope of the build (either the workspace or a single project).
These events are broadcast to interested parties immediately before each
build operation. If autobuilding is not enabled, these events still occur at
times when autobuild would have occurred. The workspace is open for
change during notification of these events. The delta reported in this event
cycle is identical across all listeners registered for this type of event.
Resource changes attempted during a PRE_BUILD callback must be done in
the thread doing the notification.
148. POST_BUILD
• After-the-fact batch reports of arbitrary creations, deletions and
modifications to one or more resources expressed as a hierarchical
resource delta. Event type is POST_BUILD, and getDelta returns the
hierarchical delta rooted at the workspace root. The getBuildKind method
returns the kind of build that occurred, and the getSource method returns
the scope of the build (either the workspace or a single project). These
events are broadcast to interested parties at the end of every build
operation. If autobuilding is not enabled, these events still occur at times
when autobuild would have occurred. The workspace is open for change
during notification of these events. The delta reported in this event cycle is
identical across all listeners registered for this type of event. Resource
changes attempted during a POST_BUILD callback must be done in the
thread doing the notification.
149. POST_CHANGE
• After-the-fact batch reports of arbitrary creations, deletions and
modifications to one or more resources expressed as a hierarchical
resource delta. Event type is POST_CHANGE, and getDelta returns the
hierarchical delta. The resource delta is rooted at the workspace root.
These events are broadcast to interested parties after a set of
resource changes and happen whether or not autobuilding is
enabled. The workspace is closed for change during notification of
these events. The delta reported in this event cycle is identical across
all listeners registered for this type of event.
150. PRE_CLOSE
• Before-the-fact reports of the impending closure of a single project.
Event type is PRE_CLOSE, and getResource returns the project being
closed. The workspace is closed for change during notification of
these events.
• Before-the-fact reports of the impending deletion of a single project.
Event type is PRE_DELETE, and getResource returns the project being
deleted. The workspace is closed for change during notification of
these events.
PRE_DELETE
151. • Before-the-fact reports of the impending refresh of a single project or
the workspace. Event type is PRE_REFRESH and the getSource
method returns the scope of the refresh (either the workspace or a
single project). If the event is fired by a project refresh the
getResource method returns the project being refreshed. The
workspace is closed for changes during notification of these events.
PRE_REFRESH
152. public interface IResourceChangeListener
extends EventListener
void resourceChanged (IResourceChangeEvent event)
• To modify PropertyManagerView so as to implement
IResourceChangeListener and use IResourceChangeEvent to update
itself.
153. public interface IResourceDelta
extends IAdaptable
• A resource delta represents changes in the state of a resource
tree between two discrete points in time.
• To modify PropertyManagerView so as to implement the
IAdaptable interface; extensions are managed by the platform's
adapter manager.
154. EGit
• Help > Install new Software
• …complete the installation
http://download.eclipse.org/egit/updates
https://wiki.eclipse.org/EGit/User_Guide
http://javaandeclipse.blogspot.com/p/egit-and-eclipse.html
若無法安裝可取消勾選,否則重新安裝更新版的Eclipse
155. setting up EGit
• Window > Preferences
or change the Default
repository folder
156.
157. Working with a local Git repository
• create a new Java project and a package
• add one sample class like following
• select the project > Team
> Share Project
158. • It is recommended to place your Git
repositories outside the Eclipse
workspace. After pressing
the Finish button in create dialog,
the wizard displays the settings for
your local Git repository.
• Select the Finish button again to put
your repository under Git version
control.
• You have created a local Git
repository. The Git repository is in this
case directly stored in the specified
folder in a .git folder.
159. • Window > Perspective > Open Perspective > Team Synchronizing
• Creating a file .gitignore in the project folder with the
following content:
160. • A gitignore file specifies intentionally
untracked files that Git should ignore.
• Files already tracked by Git are not affected.
• All files and directories which apply to the
pattern described in this file will be ignored
by Git. In this example all files in the bin and
the .metadata directory will be ignored.
161. • Using the Git Staging view drag only the all files you want to commit
into the Staged Changes area, write a meaningful commit message
and press the commit button.
• Right click the project > Window > Show View > Team > History
• Alt+Shift+W shortcut > History
162. • dirty (folder) - At least one file below the folder is dirty; that means that it has
changes in the working tree that are neither in the index nor in the repository.
• tracked - The resource is known to the Git repository and hence under version
control.
• untracked - The resource is not known to the Git repository and will not be version
controlled until it is explicitly added.
• ignored - The resource is ignored by the Git team provider. The preference settings
under Team -> Ignored Resources, "derived" flag and settings from .gitignore files are
taken into account.
• dirty - The resource has changes in the working tree that are neither in the index
nor in the repository.
• staged - The resource has changes which have been added to the index. Note that
adding changes to the index is currently possible only in the commit dialog via the
context menu of a resource.
• partially-staged - The resource has changes which are added to the index and
additional changes in the working tree that neither reached the index nor have been
committed to the repository. See partial staging from the Git Staging view for how to
do that.
• added - The resource has not yet reached any commit in the repository but has
been freshly added to the Git repository in order to be tracked in future.
• removed - The resource is staged for removal from the Git repository.
• conflict - A merge conflict exists for the file.
• assume-valid - The resource has the "assume unchanged" flag. This means that Git
stops checking the working tree files for possible modifications, so you need to
manually unset the bit to tell Git when you change the working tree file.
The button's icon changes
depending on the selected mode.
http://javaandeclipse.blogspot.com/p/egit-and-eclipse.html#egit-Inspecting-State-Of-Repository
163. • to add an existing local Git repository to the view,
• to clone a Git repository
• to create a new Git repository
The button's icon changes
depending on the selected mode.
164. • The content area shows the existing
Git repositories and the structural
elements of this view.
• A right-click (context menu) on an
element in the Git repository view
allows you to perform related Git
operations.
166. • enter the location
of the remote
repository.
• note: URI, Host and
Repository path
may be different
167. • choose which branches shall be
cloned from the remote repository.
• define where you want to store the
repository on the local file system
and define some initial settings.
• note: The default is "origin"
168.
169. Performing Git operations
• Once you have placed a
project under version control
you can start using team
operations on your project.
• The team operations are
available via right-click on
your project or file.
170. The most important operations are described in the following list. Select:
• Team -> Add to index, to add the selected resource(s) to the index of Git
• Team -> Commit, to open the commit dialog for committing to your Git repository
• Team -> Create Patch..., to create a patch
• Team -> Apply Patch..., to apply a patch to your file system
• Team -> Ignore, to add the file to a .gitignore file
• Team -> Show in History, to display the selected files and folders in the History view
• Team -> Pull to pull in changes from your remote Git repository
• Team -> Fetch to fetch the current state from the remote repository
• Team -> Switch To to switch or create new branches.
• Team -> Push to push changes to your remote Git repository
• Team -> Tag to create and manage tags.
http://javaandeclipse.blogspot.com/p/egit-and-eclipse.html#egit-PerformingGitOperations
171. • If you recognize that you
missed something when
committing a change
you may fix this: open
the staging view or
commit dialog again and
specify that the current
commit shall "amend"
the previous commit in
the current branch.
• note: do NOT amend
commits if they have
already been published
to a shared repository
since this may disturb
others if they already
based their changes on
the published change.
drag
173. • You may switch back to ‘master’
• select the branch to rename
• enter the new branch name > OK
174. • two alternative ways to Rename Branch…
• Deleting a Branch takes
the same three ways to
complete as mentioned
above when renaming a
branch.
• The currently checked out
branch can not be deleted
• If deletion of the branch
may result in data loss, a
warning is displayed that
must be confirmed
175. Merging • A merge include changes from another
branch or tag, since the time their
histories diverged from the current branch,
into the currently checked out branch.
176. • A merge can result in conflicts which require user action.
• select the top level resource showing the red conflict label decorator.
• click Team -> Merge Tool
• select the merge mode Use HEAD (the last local version) of conflicting files and click OK
• more details about how conflicts are presented:
https://mirrors.edge.kernel.org/pub/software/scm/git/docs/git-
merge.html#_how_conflicts_are_presented
• Ways to resolve the conflicts:
• Using Merge Tool
• Manually editing the conflicting resource by telling EGit (Team > Add) to resolve the
conflict (Team > Commit)
• Finding conflicting files to resolve the conflicts.
• Committing or Aborting a merge
177. Rebasing
• The Git Repositories view
allows you to rebase your
currently checkout branch
onto another branch.
• If the rebase was successful a
dialog is shown.
• You have to resolve rebase
conflicts if they occur.
• if you want to cancel the
rebase operation select Rebase
-> Skip and Rebase -> Abort.
178.
179. • You may also reset to specific
branch or tag: Select Team ->
Reset... on a project (or
(Repositories view or History view)
• You may also revert all local and
staged changes: reset to the
current HEAD by using a hard
reset. (right click on a project or
Repositories view or History view)
• soft - the HEAD points now to the new commit,
the index and the working tree are unchanged.
• mixed - the HEAD points now to the new
commit, the index is updated, the working tree
is unchanged.
• hard - the HEAD points now to the new commit,
the index and the working tree are updated
180. More details about EGit, please open Eclipse
> Help > EGit Documentation > EGit User Guide
181. Builders, Markers and Natures
https://www.wideskills.com/eclipse-plugin-tutorial/eclipse-builders-natures-and-markers
182. • builders are used to take java source as input and generate
corresponding class files
• Incremental Builders - These contribute to performance improvement by
rebuilding only the delta since last full build.
• markers are used to mark error locations, warnings, book marks etc. in
(Java) editor.
• natures are used to link project with various functionalities such as
builders in a project.
• For ex: if we add java nature to a project inside eclipse. It associates project with
incremental java compiler. natures are added in .project file of the project.
183. Creating Builders Nature using existing templates
• an builder's (incremental) name: sample
builder
• this builder validates XML file and if
required adds a problem marker to
problematic xml files
• this builder will run only for projects
which have declared themselves as having
sample nature projects
• Creating a plug-in project first !
File > New > Project… > Plug-in
Development > Plug-in Project >
MANIFEST.MF
185. Eclipse Builders
• New builder is created by extending the
org.eclipse.core.resources.builders extension point.
• ID and name are used to give builder a data value and
name respectively.
• the builder element.
• the hasNature attribute
flags whether this builder
is associated with any
nature.
• the run element.
• the class attribute
• here we specify the actual
java class which provides
the functionality of the
builder.
186. IncrementalProjectBuilder
• the java class (testplugin.builder.SampleBuilder) needs more attention as
this is the class which is doing the actual work.
• Any builder class must be a subclass of IncrementalProjectBuilder.
• All builders must subclass this class according to the following guidelines:
• Subclasses should implement the build method of this class
• Subclasses may implement remaining methods
• Subclasses should supply a public and NO arg constructor
• More details about class IncrementalProjectBuilder
https://help.eclipse.org/kepler/index.jsp?topic=/org.eclipse.platform.doc.isv
/reference/api/org/eclipse/core/resources/IncrementalProjectBuilder.html
187. • The build method requires special attention as well.
• This method of the builder is called whenever build is required
188. build (int kind, Map args, IProgressMonitor monitor)
we are using kind parameter to understand the kind of build request.
• kind: what kind of build is required?
• kind parameter could be a FULL_BUILD, INCREMENTAL_BUILD, and AUTO_BUILD.
• args: a Map to pass arguments/information to builder.
• monitor: a progress monitor
• Eclipse will call build method of the builder whenever any type of build is
required.
• Here has implemented two methods for each kind of build
• full build
• incremental build
189. • we are delegating calls to Visitors.
• visitor will visit all the resources (in
case of delta only the modified
resources since last build).
• For each resource we are calling
checkXML() method.
• CheckXML method essentially
delegates call to XMLErrorHandler
defined in builder class which will
check if XML document is well
formed or not.
• In case it is not well formed it will
create a marker (as shown below).
190. Markers
• There are many types of predefined markers defined as constants in
IMarker interface.
• org.eclipse.core.resources.bookmarkIMarker.BOOKMARK
org.eclipse.core.resources.markerIMarker.MARKER
org.eclipse.core.resources.problemmarker IMarker.PROBLEM
org.eclipse.core.resources.taskmarkerIMarker.TASK
org.eclipse.core.resources.textmarkerIMarker.TEXT
191. IMarker
• New marker is created by extending
org.eclipse.core.resources.markers extension point.
• ID and Name are datavalue and name respectively.
• Next, we need to define the super type marker for
new marker.
• Since we want to show errors in Problems View we are using
org.eclipse.core.resources.problemmarker as supertype.
IMarker is the main interface when we are dealing with eclipse markers.
• Next is the
persistent element.
• Since we want this
markers to persist
across eclipse
sessions we are
setting this property
to true.
192. • addMarker method in SampleBuilder class is used to show above
defined marker in the editor whenever problem/error occurs.
• more details about IMarker interface
https://help.eclipse.org/kepler/index.jsp?topic=%2Forg.eclipse.platform.doc.isv%2F
reference%2Fapi%2Forg%2Feclipse%2Fcore%2Fresources%2FIMarker.html
193. Natures
• Natures are not only used to associate builders but are also used to
define many other functionalities
• for ex: only java nature projects are shown in Package Explorer.
• Some of the predefined natures are
org.eclipse.jdt.core.javanature,org.eclipse.pde.PluginNature.
• Nature is created by extending org.eclipse.core.resources.natures
extension point.
• ID is the unique identifier for this nature.
• Name is the human readable name of the nature.
194. • Next element is the builder. Here we will add a builder to this nature.
• We have associated SampleBuilder created earlier with this nature. So that
projects with SampleNature use SampleBuilder whenever an XML file is saved.
195. • Next elements are runtime and run. Here
we will specify a class named
SampleNature which will be used to
configure/deconfigure project with
Sample Nature.
• With the help of this class we will be able to
configure non Sample Nature project to
Sample Nature project at run time.
• OR we will be able to convert Sample Nature
Project to non Sample Nature project.
• Repercussions of making a Project as
Sample Nature project will be that a
Sample builder will be attached to project
which will run whenever an XML file is
saved and will look for any errors in XML.
196. IProjectNature
• It can configure a project with the project nature, or de-configure it.
• Please refer to Eclipse API Specification to know more about this class.
• Here, user is provided with toggle action to convert non Sample Nature
project to Sample Nature project. Following method from
SampleNature class will be called to associate the project with
SampleNature.
• Every workbench project contains a .project file that contains build
commands. Executing above method causes the following to appear in
the buildSpec section of the project's .project file. Also Sample nature is
added in natures section.
https://help.eclipse.org/kepler/index.jsp?topic=/org.eclipse.platform.doc.isv/
reference/api/org/eclipse/core/resources/IncrementalProjectBuilder.html
199. The Eclipse help system
• uses a browser-based presentation and therefore has full support for HTML.
• search is automatically included in the help system
• context help and keyword index are supported if you provide the appropriate
content files.
1. Create a Rich Client Application
• File > New > Project... > Plug-in Project
2. Create a Product Configuration
3. Add Source Code
4. Test
5. Add Required Plug-ins
6. Test Again
7. Add Sample Help Content
8. Add Context Help Support
9. Test context help
10. Setting Help Preferences
200.
201. 2. Create a Product Configuration
• Switch to the Plug-in Development perspective
• Select "File > New > Product Configuration" from the main menu.
• Select "org.eclipse.helprcp" in the resulting "New Product Configuration" wizard page.
• Input "helprcp.product" into the "File name" text box.
• Select the "Use an existing product" radio button inside the "Initialize the file content"
group and click "Finish". The "Product Configuration Editor" will open.
202. 2. Create a Product Configuration (continued)
• Input "Help RCP Application" into the "Product Name" text box.
• Verify "org.eclipse.helprcp.product" is the default value in the "Product ID" drop down menu.
• Select "File > Save" from the main menu.
• From the "Overview" tab of the "Product Configuration Editor" click on "Launch an Eclipse
Application" and verify that the application launches.
203. 3. Add Source Code
• make a few source changes to add the help actions
to the menu.
• add the lines marked "// NEW" to the class
• add the lines marked "// NEW" to function
"ApplicationActionBarAdvisor.makeActions()"
• add the lines marked "// NEW" to function
"ApplicationActionBarAdvisor.fillMenuBar()"
https://www.eclipse.org/articles/article.php
?file=Article-AddingHelpToRCP/index.html
4. Test
Launch the application from the
"Product Configuration Editor"
> Help > now has additional entries
but neither of them does anything.
This is because we still need to
import the plug-ins that comprise
the Eclipse help system.
204. 5. Add Required Plug-ins
1) Click the “product configuration" link in the Overview tab
2) Add "org.eclipse.help.webapp" and "org.eclipse.help.ui" to the list in the "Plug-ins and Fragments"
section.
3) Click the "Add Required Plug-ins" button.
4) Select the checkbox to "Include optional dependencies when computing required plug-ins".
• If you omit this step the help system will not have all the plug-ins it needs and you will see an exception at startup.
5) Select "File > Save" from the main menu.
208. Custom Text Editor
Eclipse provides rich support for creating editors that operate on text,
such as programming language editors or document editors.
209. • change font style for a text file
• change text color by modifying the Appearance color
options for Foreground and Background color
https://stackoverflow.com/questions/59251808/changing-font-and-colour-of-text-in-eclipse-text-editor
210. various plug-ins that provide facilities for
text processing
• org.eclipse.text: provides a model for manipulating text and has no visual components, so it can
be used by headless programs that process or manipulate text.
• org.eclipse.swt: the class StyledText is the SWT user-interface object for displaying and editing
text. Everything the user sees is rooted here: colors, fonts, selections, the caret (I-beam cursor),
and more. You can add all kinds of listeners to this widget to follow what the user is doing. It also
supports some fancier features, such as word wrapping and printing.
• org.eclipse.jface.text: This is the marriage of the model provided by org.eclipse.text and the view
provided by StyledText. It is the heart of the text framework.
• org.eclipse.ui.workbench.texteditor: You can't use the features provided here without being part
of a running Eclipse workbench. It supports text editors that appear in the workbench editor area
and features a large collection of Action subclasses for manipulating the contents of an editor, as
well as support for annotations, incremental search, and more.
• org.eclipse.ui.editors: It provides the main concrete editor in the base Eclipse Platform, the
default text editor.
• and more text infrastructures…
https://wiki.eclipse.org/FAQ_What_support_is_there_for_creating_custom_text_editors%3F
211. All editors start by making a subclass of EditorPart
from the org.eclipse.ui.part package.
• create a plug-in project
• add one or more new extensions by using Extension Wizards
• MANIFEST > Extension > Add > Extension Wizard > Editor or Extensible Editor…
• E.g., a simple XML Editor will be created > go to “src” folder > search XMLEditor and
XMLConfiguration java classes > modify the constructor of the XMLEditor class >
modify XMLConfiguration class
• note: debug a little bit by yourself; since it is an XML Editor, only quoted strings
should be spell checked and the XML tags should be skipped.
http://blog.ankursharma.org/2009/08/adding-spellchecking-to-custom-editors_19.html
212. • If you are using a product, add your new plug-ins
(org.eclipse.core.contenttype.contentTypes and org.eclipse.ui.editors) to
your feature and start a runtime Eclipse via the product.
• set the preferenceStore for checking dictionary and other preferences from
Window > Preferences > General > Editors > Text Editors > Spelling .
https://www.vogella.com/tutorials/EclipseEditors/article.html
214. Rich Text Editor
• Help -> Install New Software...
• Add a new site using the url http://static-
tmsoftstudio.appspot.com/richtexteditor to the Eclipse Update Manager.
• Select the bundles from the list that you would like to install and click Next.
https://marketplace.eclipse.org/content/rich-text-editor/help
https://projects.eclipse.org/projects/technology.dltk/releases/6.0
Note: Eclipse Dynamic Languages Toolkit 5.11 is a part of Eclipse IDE 2019-09
216. The Common component provides key concepts and infrastructure to be potentially used by all other GEF
components
https://help.eclipse.org/2019-09/index.jsp?topic=%2Forg.eclipse.gef.layout.doc%2Freference%2Fwiki%2FLayout.html
218. • an open source framework dedicated to
providing a rich, consistent graphical editing
environment for applications on the Eclipse
Platform
• https://wiki.eclipse.org/GEF/Developer_FAQ
• GEF (MVC) is interactive model-view-
controler fraDraw2d-based graphical
editors mework, which fosters the
implementation of SWT-based tree and for
the Eclipse Workbench UI.
• https://www.eclipse.org/gef/gef_mvc/
• https://www.eclipse.org/gef/
• Download GEF update 5.3.0 (latest *.zip)
• https://www.eclipse.org/gef/download.php?fil
e=/tools/gef/downloads/drops//5.3.0/I201912
070301/GEF-Update-5.3.0.zip
• https://www.eclipse.org/gef/downloads/index
.php?showAll=1&hlbuild=S201905091638
• https://projects.eclipse.org/projects/tools.gef
219. • After complete the install, follow the steps on this page
• https://github.com/eclipse/gef#eclipse-graphical-editing-framework-gef
• Set up an Eclipse IDE
• Set up a Target Definition containing GEF
• Run the examples
• Other resources
• https://help.eclipse.org/kepler/index.jsp?topic=%2Forg.eclipse.gef.doc.isv%2F
guide%2Fguide.html
• https://www.eclipse.org/articles/Article-GEF-diagram-editor/shape.html