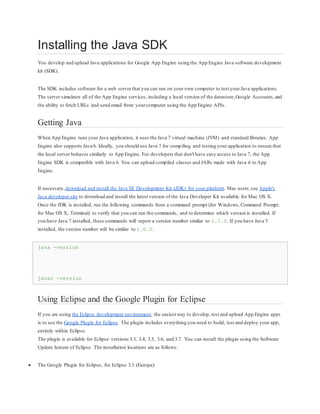
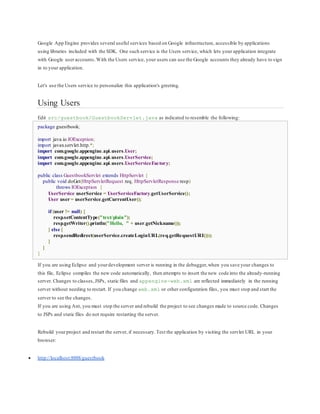
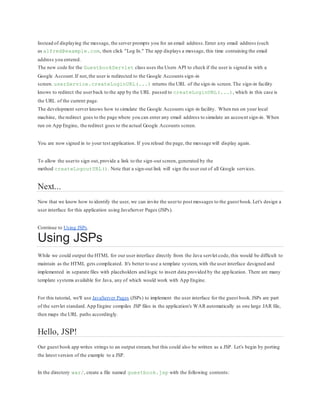
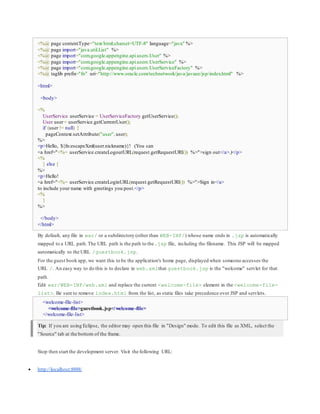
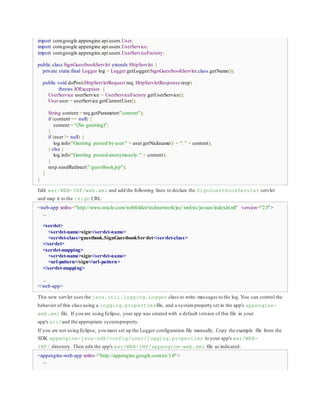
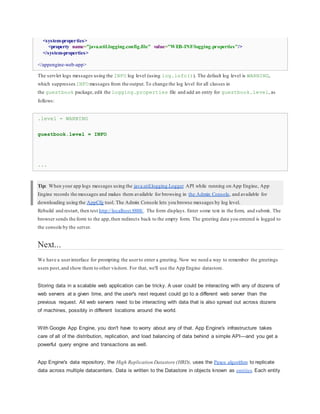
The document provides instructions for installing the Java SDK, creating a project, running and testing a project locally using the Eclipse development environment and Google Plugin for Eclipse, and deploying the project to Google App Engine. Key steps include installing the Google Plugin for Eclipse, creating a new App Engine project, running the project locally using the development server within Eclipse, and deploying the project to App Engine.
Complete steps to Integrate Push Notification for Your Cocos2dx App with Push...ShepHertz
Integrating push notification for ios and android in cocos2dx is always a big challenge for developers. So, this blog will walk you through step-by-step integration process by taking the examples from the sample.
Selenium Automation in Java Using HttpWatch Plug-in Sandeep Tol
This article will give the developers and testers who use Java selenium script for Browser Simulations and automation for IE browser to capture HTTP logs using HTTPWatch Plug-in
HTTP Watch comes with inbuilt API support to integrate with selenium scripts written in C# or PHP scripts . But unfortunately they don’t have Support for JAVA.
The solution given here is to use Java COM bridge and invoke HTTP Watch plugin API from Java based selenium scripts.
Using this article you would learn how HttpWatch plug-in which component can be easily interfaced with Java code and then executed via selenium script.
Using HttpWatch Plug-in with Selenium Automation in JavaSandeep Tol
This article will give the developers and testers to use Java programming for capturing IE browser HTTP logs using HTTP Watch Plug-in (V10) , in Selenium scripts
HTTP Watch comes with inbuilt API support to integrate with selenium scripts written in C# or PHP scripts . Refer http://apihelp.httpwatch.com/#Automation%20Overview.html
But unfortunately they don’t have API written for JAVA. There are no samples or articles available to use Httpwtach with Java interface.
Using this article you would learn how HttpWatch plug-in which component can be easily interfaced with Java code and then executed via selenium script.
The solution is to use Java COM bridge and invoke HTTP Watch plugin API from Java based selenium scripts.
This document is designed for those who wants to get enter in Android development.
if you follow this doc correctly you will able to set your Hello World Android App.
It is requested to all Experts that kindly don't read this doc if you are already aware of all the facts of Android development
Integrating external products into eclipseGirish Balre
One of the nice things about an IDE is that you can do the majority of your development tasks in one application — hence, integrated. It takes time away from
your work to have to switch from your IDE to another program. This presentation talks about how external applications can be made a part of an Eclipse IDE by hosting them within Eclipse and integrating them to leverage Eclipse offered usability.
I. Converting Selenium IDE tests to run in a
programming language and getting them running
II. Writing Selenium Remote Control tests from
scratch
III. Applying best practices such as Page Object
design pattern to create lasting tests
IV. Running tests against a continuous integration
server
Test automation using selenium presented by Quontra SolutionsQUONTRASOLUTIONS
Quontra Solutions provides Selenium Testing online training by Real time IT experts. Selenium is having good demand in the market. Our Selenium online training Instructors are very much experienced and highly qualified and dedicated.
Our Selenium online training program is job oriented. After completion of Selenium training with us you should be able to work on any kind of project. After completion of Selenium online training our dedicated team will be supporting you.
Please call us for demo on Selenium. Quontra Solutions is the best Selenium online training Institute in United Kingdom.
Highlights in our training:
* Very in depth course material with real time scenarios.
* We are providing class with highly qualified trainer.
* We will provide class and demo session at student flexible timings.
* In training case studies and real time scenarios covered.
* Each topic covers real time solutions.
* We will give every recorded session for play later.
* We are giving placement support by multiple consultancies in USA, UK etc.
* We will give full support while attending the interviews and contact us after completion of the course.
Pre-requisites:
• Manual Testing Skills
• Basic Programming Skills, OOPS Concepts
• Knowledge on Test Automation Principles and practices
Appium Meetup #2 - Mobile Web Automation Introductionsnevesbarros
These were the slides for the second appium meetup held at the Gamesys in London, presented by Dan Cueller and Sergio Neves Barros
The demo project mentioned in the slides can be found here:
https://drive.google.com/file/d/0ByIdcWPvw1I3Ny1QWkJzZWpvbzA/view?usp=sharing
The tools and practices refined over the last decade by web developers have not crossed over easily into the mobile community. Mobile devs have been without tools like continuous integration and automated testing, which enable delivery of high-quality apps more rapidly. A key piece of the solution for mobile is Appium, an open-source, cross-platform, language-agnostic mobile automation framework you can use to write automated UI tests for Android and iOS apps (native, hybrid, web), to be run on emulators or devices.
In this talk we will explore the philosophy that underlies the work behind Appium, including the open-source nature of Appium’s diverse, active and friendly community. Then, after a brief explanation of the technology that powers Appium, we’ll move into the technical portion of the talk, where attendees will see easy it is to write Appium scripts using the WebDriver protocol in their favorite language, and integrate Appium tests into a CI system using Selenium Grid or Sauce Labs.
Finally, we’ll look at some concrete examples of how Appium has been used in a large project with 20 Android Apps at Swiss Post to dramatically improve mobile QA. Ultimately, the talk provides an argument for moving from manual QA to automated testing, an understanding of the mobile automation landscape, and a solid introduction to Appium, which leading projects and companies around the world have chosen as their mobile automation framework of choice.
Google App Engine tutorial for Java. Demonstrates how to open an account, setup a connection between your server and an Android app and some more features of GAE.
Using galen framework for automated cross browser layout testingSarah Elson
Galen Framework is a test automation framework which was originally introduced to perform cross browser layout testing of a web application in a browser. Nowadays, it has become a fully functional testing framework with rich reporting and test management system. This framework supports both Java and Javascript.
how to write functional tests with Selenium. how to set up Selenium Testing On Grails Apps In Continuous
Integration Using two approaches: The long way – using Maven and/or Ant The fast way, using the grails-
selenium-rc plug-in - ( see
http://buildchimp.com/wordpress/?p=241 )
Android software development – the first few hourssjmarsh
My challenge for this year is to learn a new programming language or software development technology. While I don’t intend adopting the suggestion of The Pragmatic Programmer and learning one new language each year, I do think that there is much to be gained by seeing what else is out there. With the booming popularity of the Android platform for mobile devices I thought what better place to start? Over the past few weeks I have taken the first few steps in learning about Android application development.
"Impact of front-end architecture on development cost", Viktor TurskyiFwdays
I have heard many times that architecture is not important for the front-end. Also, many times I have seen how developers implement features on the front-end just following the standard rules for a framework and think that this is enough to successfully launch the project, and then the project fails. How to prevent this and what approach to choose? I have launched dozens of complex projects and during the talk we will analyze which approaches have worked for me and which have not.
GraphRAG is All You need? LLM & Knowledge GraphGuy Korland
Guy Korland, CEO and Co-founder of FalkorDB, will review two articles on the integration of language models with knowledge graphs.
1. Unifying Large Language Models and Knowledge Graphs: A Roadmap.
https://arxiv.org/abs/2306.08302
2. Microsoft Research's GraphRAG paper and a review paper on various uses of knowledge graphs:
https://www.microsoft.com/en-us/research/blog/graphrag-unlocking-llm-discovery-on-narrative-private-data/
Search and Society: Reimagining Information Access for Radical FuturesBhaskar Mitra
The field of Information retrieval (IR) is currently undergoing a transformative shift, at least partly due to the emerging applications of generative AI to information access. In this talk, we will deliberate on the sociotechnical implications of generative AI for information access. We will argue that there is both a critical necessity and an exciting opportunity for the IR community to re-center our research agendas on societal needs while dismantling the artificial separation between the work on fairness, accountability, transparency, and ethics in IR and the rest of IR research. Instead of adopting a reactionary strategy of trying to mitigate potential social harms from emerging technologies, the community should aim to proactively set the research agenda for the kinds of systems we should build inspired by diverse explicitly stated sociotechnical imaginaries. The sociotechnical imaginaries that underpin the design and development of information access technologies needs to be explicitly articulated, and we need to develop theories of change in context of these diverse perspectives. Our guiding future imaginaries must be informed by other academic fields, such as democratic theory and critical theory, and should be co-developed with social science scholars, legal scholars, civil rights and social justice activists, and artists, among others.
Slack (or Teams) Automation for Bonterra Impact Management (fka Social Soluti...Jeffrey Haguewood
Sidekick Solutions uses Bonterra Impact Management (fka Social Solutions Apricot) and automation solutions to integrate data for business workflows.
We believe integration and automation are essential to user experience and the promise of efficient work through technology. Automation is the critical ingredient to realizing that full vision. We develop integration products and services for Bonterra Case Management software to support the deployment of automations for a variety of use cases.
This video focuses on the notifications, alerts, and approval requests using Slack for Bonterra Impact Management. The solutions covered in this webinar can also be deployed for Microsoft Teams.
Interested in deploying notification automations for Bonterra Impact Management? Contact us at sales@sidekicksolutionsllc.com to discuss next steps.
Key Trends Shaping the Future of Infrastructure.pdfCheryl Hung
Keynote at DIGIT West Expo, Glasgow on 29 May 2024.
Cheryl Hung, ochery.com
Sr Director, Infrastructure Ecosystem, Arm.
The key trends across hardware, cloud and open-source; exploring how these areas are likely to mature and develop over the short and long-term, and then considering how organisations can position themselves to adapt and thrive.
Builder.ai Founder Sachin Dev Duggal's Strategic Approach to Create an Innova...Ramesh Iyer
In today's fast-changing business world, Companies that adapt and embrace new ideas often need help to keep up with the competition. However, fostering a culture of innovation takes much work. It takes vision, leadership and willingness to take risks in the right proportion. Sachin Dev Duggal, co-founder of Builder.ai, has perfected the art of this balance, creating a company culture where creativity and growth are nurtured at each stage.
Transcript: Selling digital books in 2024: Insights from industry leaders - T...BookNet Canada
The publishing industry has been selling digital audiobooks and ebooks for over a decade and has found its groove. What’s changed? What has stayed the same? Where do we go from here? Join a group of leading sales peers from across the industry for a conversation about the lessons learned since the popularization of digital books, best practices, digital book supply chain management, and more.
Link to video recording: https://bnctechforum.ca/sessions/selling-digital-books-in-2024-insights-from-industry-leaders/
Presented by BookNet Canada on May 28, 2024, with support from the Department of Canadian Heritage.
Connector Corner: Automate dynamic content and events by pushing a buttonDianaGray10
Here is something new! In our next Connector Corner webinar, we will demonstrate how you can use a single workflow to:
Create a campaign using Mailchimp with merge tags/fields
Send an interactive Slack channel message (using buttons)
Have the message received by managers and peers along with a test email for review
But there’s more:
In a second workflow supporting the same use case, you’ll see:
Your campaign sent to target colleagues for approval
If the “Approve” button is clicked, a Jira/Zendesk ticket is created for the marketing design team
But—if the “Reject” button is pushed, colleagues will be alerted via Slack message
Join us to learn more about this new, human-in-the-loop capability, brought to you by Integration Service connectors.
And...
Speakers:
Akshay Agnihotri, Product Manager
Charlie Greenberg, Host
Essentials of Automations: Optimizing FME Workflows with ParametersSafe Software
Are you looking to streamline your workflows and boost your projects’ efficiency? Do you find yourself searching for ways to add flexibility and control over your FME workflows? If so, you’re in the right place.
Join us for an insightful dive into the world of FME parameters, a critical element in optimizing workflow efficiency. This webinar marks the beginning of our three-part “Essentials of Automation” series. This first webinar is designed to equip you with the knowledge and skills to utilize parameters effectively: enhancing the flexibility, maintainability, and user control of your FME projects.
Here’s what you’ll gain:
- Essentials of FME Parameters: Understand the pivotal role of parameters, including Reader/Writer, Transformer, User, and FME Flow categories. Discover how they are the key to unlocking automation and optimization within your workflows.
- Practical Applications in FME Form: Delve into key user parameter types including choice, connections, and file URLs. Allow users to control how a workflow runs, making your workflows more reusable. Learn to import values and deliver the best user experience for your workflows while enhancing accuracy.
- Optimization Strategies in FME Flow: Explore the creation and strategic deployment of parameters in FME Flow, including the use of deployment and geometry parameters, to maximize workflow efficiency.
- Pro Tips for Success: Gain insights on parameterizing connections and leveraging new features like Conditional Visibility for clarity and simplicity.
We’ll wrap up with a glimpse into future webinars, followed by a Q&A session to address your specific questions surrounding this topic.
Don’t miss this opportunity to elevate your FME expertise and drive your projects to new heights of efficiency.
State of ICS and IoT Cyber Threat Landscape Report 2024 previewPrayukth K V
The IoT and OT threat landscape report has been prepared by the Threat Research Team at Sectrio using data from Sectrio, cyber threat intelligence farming facilities spread across over 85 cities around the world. In addition, Sectrio also runs AI-based advanced threat and payload engagement facilities that serve as sinks to attract and engage sophisticated threat actors, and newer malware including new variants and latent threats that are at an earlier stage of development.
The latest edition of the OT/ICS and IoT security Threat Landscape Report 2024 also covers:
State of global ICS asset and network exposure
Sectoral targets and attacks as well as the cost of ransom
Global APT activity, AI usage, actor and tactic profiles, and implications
Rise in volumes of AI-powered cyberattacks
Major cyber events in 2024
Malware and malicious payload trends
Cyberattack types and targets
Vulnerability exploit attempts on CVEs
Attacks on counties – USA
Expansion of bot farms – how, where, and why
In-depth analysis of the cyber threat landscape across North America, South America, Europe, APAC, and the Middle East
Why are attacks on smart factories rising?
Cyber risk predictions
Axis of attacks – Europe
Systemic attacks in the Middle East
Download the full report from here:
https://sectrio.com/resources/ot-threat-landscape-reports/sectrio-releases-ot-ics-and-iot-security-threat-landscape-report-2024/
Accelerate your Kubernetes clusters with Varnish CachingThijs Feryn
A presentation about the usage and availability of Varnish on Kubernetes. This talk explores the capabilities of Varnish caching and shows how to use the Varnish Helm chart to deploy it to Kubernetes.
This presentation was delivered at K8SUG Singapore. See https://feryn.eu/presentations/accelerate-your-kubernetes-clusters-with-varnish-caching-k8sug-singapore-28-2024 for more details.
Accelerate your Kubernetes clusters with Varnish Caching
Installing the java sdk
1. Installing the Java SDK
You develop and upload Java applications for Google App Engine using the App Engine Java software development
kit (SDK).
The SDK includes software for a web server that you can run on your own computer to test yourJava applications.
The server simulates all of the App Engine services, including a local version of the datastore,Google Accounts,and
the ability to fetch URLs and send email from yourcomputer using the App Engine APIs.
Getting Java
When App Engine runs your Java application, it uses the Java 7 virtual machine (JVM) and standard libraries. App
Engine also supports Java 6. Ideally, you should use Java 7 for compiling and testing your application to ensure that
the local server behaves similarly to App Engine. For developers that don't have easy access to Java 7, the App
Engine SDK is compatible with Java 6. You can upload compiled classes and JARs made with Java 6 to App
Engine.
If necessary,download and install the Java SE Development Kit (JDK) for your platform. Mac users,see Apple's
Java developer site to download and install the latest version of the Java Developer Kit available for Mac OS X.
Once the JDK is installed, run the following commands from a command prompt (for Windows, Command Prompt;
for Mac OS X, Terminal) to verify that you can run the commands, and to determine which version is installed. If
you have Java 7 installed, these commands will report a version number similar to 1.7.0. If you have Java 5
installed, the version number will be similar to 1.6.0.
java -version
javac -version
Using Eclipse and the Google Plugin for Eclipse
If you are using the Eclipse development environment, the easiest way to develop, test and upload App Engine apps
is to use the Google Plugin for Eclipse. The plugin includes everything you need to build, test and deploy your app,
entirely within Eclipse.
The plugin is available for Eclipse versions 3.3, 3.4, 3.5, 3.6, and 3.7. You can install the plugin using the Software
Update feature of Eclipse. The installation locations are as follows:
The Google Plugin for Eclipse, for Eclipse 3.3 (Europa):
2. https://dl.google.com/eclipse/plugin/3.3
The Google Plugin for Eclipse, for Eclipse 3.4 (Ganymede):
https://dl.google.com/eclipse/plugin/3.4
The Google Plugin for Eclipse, for Eclipse 3.5 (Galileo):
https://dl.google.com/eclipse/plugin/3.5
The Google Plugin for Eclipse, for Eclipse 3.6 (Helios):
https://dl.google.com/eclipse/plugin/3.6
The Google Plugin for Eclipse, for Eclipse 3.7 (Indigo):
https://dl.google.com/eclipse/plugin/3.7
The Google Plugin for Eclipse, for Eclipse 3.8/4.2 (Juno):
https://dl.google.com/eclipse/plugin/4.2
For details on how to use Software Update to install the plugin, and how to create a new project, see Using the
Google Eclipse Plugin.
Using Apache Ant
If you want to compile and run yourapplication using the command line, or an IDE other than Eclipse, you will
need to install something to manage this process. Apache Antis one such solution.Full directions on installing and
setting up Apache Ant to work with App Engine can be found at Using Apache Ant.
Getting the SDK
If you are using Eclipse and the Google Plugin, you can install the App Engine SDK from Eclipse using Software
Update. If you haven't already, install the "Google App Engine Java SDK" component using the locations above.
3. If you are not using Eclipse or the Google Plugin, you can download the App Engine Java SDK as a Zip archive.
Download the App Engine Java SDK. Unpack the archive in a convenient location on your hard drive.
Note: Unpacking the archive creates a directory whose name is something like appengine-java-sdk-X.X.X,
where X.X.X is the SDK version number. Throughout this documentation, this directory will be referred to
as appengine-java-sdk/. You may want to rename the directory after unpacking.
Trying a Demo Application
The App Engine Java SDK includes several demo applications in the demos/ directory. The final version of the
guest book application you will create in this tutorial is included under the directory guestbook/. This demo has
been precompiled for you so you can try it right away.
If you are using Eclipse, the SDK is located in your Eclipse installation directory,
under plugins/com.google.appengine.eclipse.sdkbundle_VERSION/, whereVERSION is a
version identifier for the SDK. From the command line, change the current working directory to this directory to run
the following command. If you're using Mac OS X or Linux, you may need to give the command files executable
permissions before you can run them (such as with the command chmod u+x dev_appserver.sh).
If you are using Windows, start the guest book demo in the development server by running the following command
at a command prompt:
appengine-java-sdkbindev_appserver.cmd appengine-java-
sdkdemosguestbookwar
If you are using Mac OS X or Linux, run the following command:
./appengine-java-sdk/bin/dev_appserver.sh appengine-java-
sdk/demos/guestbook/war
The development server starts,and listens for requests on port 8080. Visit the following URL in your browser:
http://localhost:8080/
Note: When you start the development server from within Eclipse using the Google Plugin for Eclipse (discussed
later), the server uses the port 8888 by default:http://localhost:8888/
For more information about running the development web server from the command line, including how to change
which port it uses,see the Dev Web Server reference.
To stop the server, make sure the command prompt window is active, then press Control-C.
Next...
4. The development environment lets you develop and test complete App Engine applications on your computer. Let's
start with a simple project.
Continue to Creating a Project.
Using the Google Plugin for Eclipse
It's easy to use the Eclipse development environment to develop your Java App Engine application, just as you can
to develop any other servlet-based web application. With the Google Plugin for Eclipse, it's even easier. The plugin
lets you create, test and upload App Engine applications from within Eclipse.
The Google Plugin for Eclipse also makes it easy to develop applications using Google Web Toolkit (GWT), to run
on App Engine or in any other environment.
This article describes how to install the Google Plugin for Eclipse, create a new App Engine project, and debug it
using the development server running within Eclipse. The article also describes how to use the plugin to upload your
project to App Engine.
For more information about the plugin, including how to use it for Google Web Toolkit projects,see the Google
Plugin for Eclipse documentation.
Getting Eclipse
Installing the Google Plugin for Eclipse
Creating a Project
Running the Project
Uploading to Google App Engine
Running the Command Line Tools
Getting Eclipse
The Google Plugin for Eclipse is available for Eclipse 3.3 (Europa), Eclipse 3.4 (Ganymede), Eclipse 3.5 (Galileo),
Eclipse 3.6 (Helios), Eclipse 3.7 (Indigo), and Eclipse 4.2 (Juno). The "Eclipse IDE for Java EE Developers"
includes all of the components you will need for web application development.
In addition to the Google Plugin for Eclipse, we recommend the Web Tools Platform (WTP) plugins for web
development. See the Web Tools Platform website. Among other things,WTP provides editing modes for JSP and
HTML files.
Installing the Google Plugin for Eclipse
You can install the Google Plugin for Eclipse using the Software Update feature of Eclipse.
5. To install the plugin, using Eclipse 4.2 (Juno):
1. Select the Help menu > Install New Software....
2. In the Work with text box, enter:
https://dl.google.com/eclipse/plugin/4.2
Click the Add... button.In the dialog that shows,click OK (keep the name blank, it will be retrieved from the
update site.)
3. Click the plus icon next to "Google Plugin for Eclipse" and "SDKs". Check the boxes next to "Google Plugin
for Eclipse 4.2" and "Google App Engine Java SDK". You can also select the "Google Web Toolkit SDK" if
you'd like to use Google Web Toolkit with your apps.Make sure you check the checkbox labeled "Contact all
update sites during install to find required software." Click the Next button.Follow the prompts to accept the
terms of service and install the plugin.
4. When the installation is complete, Eclipse prompts you to restart. Click Yes. Eclipse restarts.The plugin is
installed.
To install the plugin, using Eclipse 3.7 (Indigo):
1. Select the Help menu > Install New Software....
2. In the Work with text box, enter:
https://dl.google.com/eclipse/plugin/3.7
Click the Add... button.In the dialog that shows,click OK (keep the name blank, it will be retrieved from the
update site.)
3. Click the plus icon next to "Google Plugin for Eclipse" and "SDKs". Check the boxes next to "Google Plugin
for Eclipse 3.7" and "Google App Engine Java SDK". You can also select the "Google Web Toolkit SDK" if
you'd like to use Google Web Toolkit with your apps.Make sure you check the checkbox labeled "Contact all
update sites during install to find required software." Click the Next button.Follow the prompts to accept the
terms of service and install the plugin.
4. When the installation is complete, Eclipse prompts you to restart. Click Yes. Eclipse restarts.The plugin is
installed.
To install the plugin, using Eclipse 3.6 (Helios):
1. Select the Help menu > Install New Software....
2. In the Work with text box, enter:
https://dl.google.com/eclipse/plugin/3.6
6. Click the Add... button.In the dialog that shows,click OK (keep the name blank, it will be retrieved from the
update site.)
3. Click the triangle next to "Plugin" and "SDKs". Check the boxes next to "Google Plugin for Eclipse 3.6" and
"Google App Engine Java SDK". You can also select the "Google Web Toolkit SDK" if you'd like to
use Google Web Toolkit with your apps.Make sure you check the checkbox labeled "Contact all update sites
during install to find required software." Click the Next button.Follow the prompts to accept the terms of
service and install the plugin.
4. When the installation is complete, Eclipse prompts you to restart. Click Yes. Eclipse restarts.The plugin is
installed.
The process for installing the plugin for Eclipse 3.5 (Galileo) is almost exactly the same, with only a different install
location. The location for the Google Plugin for Eclipse 3.5 is as follows:
https://dl.google.com/eclipse/plugin/3.5
To install the plugin, using Eclipse 3.4 (Ganymede):
1. Select the Help menu > Software Updates... The "Software Updates and Add-ons" window opens.
2. Select the Available Software tab. Click the Add Site... button.The "Add Site" window opens.For "Location,"
enter the install location for the Eclipse 3.4 version of the plugin:
https://dl.google.com/eclipse/plugin/3.4
Click OK. The dialog closes, and the new location is added to the list of available software.
3. Click the triangle next to the new install location, then click the triangle next to "Google" to display installation
options.Check the boxes next to "Google Plugin for Eclipse 3.4" and "Google App Engine Java SDK". You can
also select the "Google Web Toolkit SDK" if you'd like to use Google Web Toolkit with yourapps. Click
the Install... button.Follow the prompts to accept the terms of service and install the plugin.
Note: The plugin install process may take several minutes to complete as Eclipse updates dependencies.See the
FAQ for more information.
4. When the installation is complete, Eclipse prompts you to restart. Click Yes. Eclipse restarts.The plugin is
installed.
The process for installing the plugin for Eclipse 3.3 (Europa) is similar, but with different prompts and a different
install location. The location for the Google Plugin for Eclipse 3.3 is as follows:
https://dl.google.com/eclipse/plugin/3.3
See the Eclipse documentation for more information about Software Update.
7. Creating a Project
To create a new App Engine project:
1. Select the File menu > New > Web Application Project (If you do not see this menu option,select
the Window menu > Reset Perspective..., click OK, then try the File menu again.) Alternatively, click the
Google button in the Eclipse toolbar and select "New Web Application Project."
2. The "Create a Web Application Project" wizard opens.For "Project name," enter a name for yourproject, such
as Guestbook for the project described in theGetting Started Guide. For "Package," enter an appropriate
package name, such as guestbook.
3. If you're not using Google Web Toolkit, uncheck "Use Google Web Toolkit." Verify that "Use Google App
Engine" is checked.
4. If you installed the App Engine SDK using Software Update, the plugin is already configured to use the SDKs
that were installed. If you would like to use a separate installation of the App Engine SDK, click Configure
SDKs..., and follow the prompts to add a configuration with yourSDK's appengine-java-sdk/ directory.
5. Click Finish to create the project.
The wizard creates a directory structure for the project, including a src/ directory for Java source files, and
a war/ directory for compiled classes and other files for the application, libraries, configuration files, static files
such as images and CSS, and other data files. The wizard also creates a servlet source file and two configuration
files. The complete directory structure looks like this:
Guestbook/
src/
guestbook/
server/
GuestbookServlet.java
META-INF/
jdoconfig.xml
log4j.properties
logging.properties
8. war/
WEB-INF/
lib/
...App Engine JARs...
appengine-web.xml
web.xml
index.html
The war/ directory uses the WAR standard layout for bundling web applications. (WAR archive files are not yet
supported by the SDK.) The Eclipse plugin uses this directory for running the development server, and for deploying
the app to App Engine.
When Eclipse builds your project, it creates a directory named classes/ in war/WEB-INF/, and puts compiled
class files here. Eclipse also copies non-source files found in src/ to war/WEB-INF/classes/,
including META-INF/ and the log4j.properties and logging.properties files. The final contents of
the war/ directory make up your application for testing and deployment.
For details about the new project that the plugin creates, see the Getting Started Guide.
Running the Project
The App Engine SDK includes a web server for testing your application in a simulated environment. The Google
Plugin for Eclipse adds new items to the Run menu for starting this server.
To run your application in the web serverinside the Eclipse debugger,select the Run menu, Debug As > Web
Application. Eclipse builds the project, switches to the Debug perspective,and the server starts.If the server starts
successfully,the serverdisplays several messages,including a message similar to the following, in the Console:
The server is running at http://localhost:8888/
If you want to customize how the server is started,you can create a new Run/Debug configuration of the type "Web
Application."
To test the new application that the plugin created, start the server as above,then visit the following URL in your
browser (using a URL path appropriate to your application):
9. http://localhost:8888/guestbook
With Eclipse, you can leave the server running in the debuggerwhile you make changes to source code, JSPs, static
files and appengine-web.xml. When you save changes to source code, Eclipse compiles the class
automatically, then attempts to insert it into the running web server dynamically. In most cases,you can simply
reload the page in yourbrowser to test the new version of the code. Changes to JSPs, static files and appengine-
web.xml are recognized by the development server automatically, and also take effect without restarting the
server. If you change web.xml or otherconfiguration files, you must stop and start the server for the changes to
take effect.
To stop the server, make sure the Debug panel is selected, then click the Terminate button:
Uploading to Google App Engine
Before you upload yourapp for the first time, you must register an application ID with App Engine using the Admin
Console. Register an application ID, then edit theappengine-web.xml file and change
the <application>...</application> element to contain the new ID.
To begin deployment of your application, click the Google button in the Eclipse toolbar, and select "Deploy to
App Engine." Eclipse may prompt you for your administrator account username (your email address)and password.
Enter your account information and click the Upload button to complete the upload. Eclipse gets the application ID
and version information from the appengine-web.xml file, and uploads the contents of the war/ directory.
Test your application on App Engine by visiting its URL:
http://your_app_id.appspot.com/guestbook
Running the Command Line Tools
Some features of the App Engine Java SDK tools are only available by running the tools directly from the command
line. If you have installed the SDK using Eclipse, you can run these tools from the Eclipse plugin installation
directory.
The SDK is located in your Eclipse installation directory,
under plugins/com.google.appengine.eclipse.sdkbundle_VERSION/, where VERSION is a
version identifier for the SDK. In this directory is the appengine-java-sdk/bin/ subdirectory containing the
tools.
Note: If you are using Mac OS X or Linux, you must give the command files executable permission before you can
run them. For example, to give appcfg.shexecutable permission, enter the following command from
the appengine-java-sdk/bin/ directory: chmod u+x appcfg.sh
For more information on the features available exclusively from the command line, see Uploading and Managing.
Using the Users Service
10. Google App Engine provides several useful services based on Google infrastructure, accessible by applications
using libraries included with the SDK. One such service is the Users service, which lets your application integrate
with Google useraccounts.With the Users service, your users can use the Google accounts they already have to sign
in to your application.
Let's use the Users service to personalize this application's greeting.
Using Users
Edit src/guestbook/GuestbookServlet.java as indicated to resemble the following:
package guestbook;
import java.io.IOException;
import javax.servlet.http.*;
import com.google.appengine.api.users.User;
import com.google.appengine.api.users.UserService;
import com.google.appengine.api.users.UserServiceFactory;
public class GuestbookServlet extends HttpServlet {
public void doGet(HttpServletRequest req, HttpServletResponse resp)
throws IOException {
UserService userService = UserServiceFactory.getUserService();
User user = userService.getCurrentUser();
if (user != null) {
resp.setContentType("text/plain");
resp.getWriter().println("Hello, " + user.getNickname());
} else {
resp.sendRedirect(userService.createLoginURL(req.getRequestURI()));
}
}
}
If you are using Eclipse and yourdevelopment server is running in the debugger,when you save your changes to
this file, Eclipse compiles the new code automatically, then attempts to insert the new code into the already-running
server. Changes to classes,JSPs, static files and appengine-web.xml are reflected immediately in the running
server without needing to restart. If you change web.xml or other configuration files, you must stop and start the
server to see the changes.
If you are using Ant, you must stop the server and rebuild the project to see changes made to source code. Changes
to JSPs and static files do not require restarting the server.
Rebuild yourproject and restart the server, if necessary.Test the application by visiting the servlet URL in your
browser:
http://localhost:8888/guestbook
11. Instead of displaying the message, the server prompts you for an email address.Enter any email address (such
as alfred@example.com, then click "Log In." The app displays a message, this time containing the email
address you entered.
The new code for the GuestbookServlet class uses the Users API to check if the user is signed in with a
Google Account.If not,the user is redirected to the Google Accounts sign-in
screen. userService.createLoginURL(...) returns the URL of the sign-in screen.The sign-in facility
knows to redirect the userback to the app by the URL passed to createLoginURL(...), which in this case is
the URL of the current page.
The development server knows how to simulate the Google Accounts sign-in facility. When run on your local
machine, the redirect goes to the page where you can enter any email address to simulate an account sign-in. When
run on App Engine, the redirect goes to the actual Google Accounts screen.
You are now signed in to your test application. If you reload the page, the message will display again.
To allow the userto sign out,provide a link to the sign-out screen, generated by the
method createLogoutURL(). Note that a sign-out link will sign the user out of all Google services.
Next...
Now that we know how to identify the user, we can invite the userto post messages to the guest book. Let's design a
user interface for this application using JavaServer Pages (JSPs).
Continue to Using JSPs.
Using JSPs
While we could output the HTML for our user interface directly from the Java servlet code, this would be difficult to
maintain as the HTML gets complicated. It's better to use a template system, with the user interface designed and
implemented in separate files with placeholders and logic to insert data provided by the application. There are many
template systems available for Java, any of which would work with App Engine.
For this tutorial, we'll use JavaServer Pages (JSPs) to implement the user interface for the guest book. JSPs are part
of the servlet standard.App Engine compiles JSP files in the application's WAR automatically as one large JAR file,
then maps the URL paths accordingly.
Hello, JSP!
Our guest book app writes strings to an output stream, but this could also be written as a JSP. Let's begin by porting
the latest version of the example to a JSP.
In the directory war/, create a file named guestbook.jsp with the following contents:
12. <%@ page contentType="text/html;charset=UTF-8" language="java" %>
<%@ page import="java.util.List" %>
<%@ page import="com.google.appengine.api.users.User" %>
<%@ page import="com.google.appengine.api.users.UserService" %>
<%@ page import="com.google.appengine.api.users.UserServiceFactory" %>
<%@ taglib prefix="fn" uri="http://www.oracle.com/technetwork/java/javaee/jsp/index.html" %>
<html>
<body>
<%
UserService userService = UserServiceFactory.getUserService();
User user= userService.getCurrentUser();
if (user != null) {
pageContext.setAttribute("user",user);
%>
<p>Hello, ${fn:escapeXml(user.nickname)}! (You can
<a href="<%= userService.createLogoutURL(request.getRequestURI()) %>">sign out</a>.)</p>
<%
} else {
%>
<p>Hello!
<a href="<%= userService.createLoginURL(request.getRequestURI()) %>">Sign in</a>
to include your name with greetings you post.</p>
<%
}
%>
</body>
</html>
By default, any file in war/ or a subdirectory (other than WEB-INF/) whose name ends in .jsp is automatically
mapped to a URL path.The URL path is the path to the.jsp file, including the filename. This JSP will be mapped
automatically to the URL /guestbook.jsp.
For the guest book app, we want this to be the application's home page, displayed when someone accesses the
URL /. An easy way to do this is to declare in web.xmlthat guestbook.jsp is the "welcome" servlet for that
path.
Edit war/WEB-INF/web.xml and replace the current <welcome-file> element in the <welcome-file-
list>. Be sure to remove index.html from the list, as static files take precedence over JSP and servlets.
<welcome-file-list>
<welcome-file>guestbook.jsp</welcome-file>
</welcome-file-list>
Tip: If you are using Eclipse, the editor may open this file in "Design" mode. To edit this file as XML, select the
"Source" tab at the bottom of the frame.
Stop then start the development server. Visit the following URL:
http://localhost:8888/
13. The app displays the contents of guestbook.jsp, including the usernickname if the useris signed in. We want
to HTML-escape any text which users provide in case that text contains HTML. To do this for the user nickname,
we use the JSP's pageContext so that java code can "see" the string, then call the escapeXML function we imported
via the taglib element.
When you upload your application to App Engine, the SDK compiles all JSPs into one JAR file, and that is what
gets uploaded.
The Guestbook Form
Our guest book application will need a web form so the usercan post a new greeting, and a way to process that
form. The HTML of the form will go into the JSP. The destination of the form will be a new URL, /sign, to be
handled by a new servlet class, SignGuestbookServlet. SignGuestbookServlet will process the form,
then redirect the user's browser back to /guestbook.jsp. For now, the new servlet will just write the posted
message to the log.
Edit guestbook.jsp, and put the following lines just above the closing </body> tag:
...
<form action="/sign" method="post">
<div><textarea name="content" rows="3" cols="60"></textarea></div>
<div><input type="submit" value="Post Greeting" /></div>
</form>
</body>
</html>
Create a new class named SignGuestbookServlet in the package guestbook. (Non-Eclipse users,create the
file SignGuestbookServlet.java in the directorysrc/guestbook/.) Give the source file the following
contents:
package guestbook;
import java.io.IOException;
import java.util.logging.Logger;
import javax.servlet.http.*;
14. import com.google.appengine.api.users.User;
import com.google.appengine.api.users.UserService;
import com.google.appengine.api.users.UserServiceFactory;
public class SignGuestbookServlet extends HttpServlet {
private static final Logger log = Logger.getLogger(SignGuestbookServlet.class.getName());
public void doPost(HttpServletRequest req, HttpServletResponse resp)
throws IOException {
UserService userService = UserServiceFactory.getUserService();
User user = userService.getCurrentUser();
String content = req.getParameter("content");
if (content == null) {
content = "(No greeting)";
}
if (user != null) {
log.info("Greeting posted by user" + user.getNickname() + ": " + content);
} else {
log.info("Greeting posted anonymously:" + content);
}
resp.sendRedirect("/guestbook.jsp");
}
}
Edit war/WEB-INF/web.xml and add the following lines to declare the SignGuestbookServlet servlet
and map it to the /sign URL:
<web-app xmlns="http://www.oracle.com/webfolder/technetwork/jsc/xml/ns/javaee/index.html" version="2.5">
...
<servlet>
<servlet-name>sign</servlet-name>
<servlet-class>guestbook.SignGuestbookServlet</servlet-class>
</servlet>
<servlet-mapping>
<servlet-name>sign</servlet-name>
<url-pattern>/sign</url-pattern>
</servlet-mapping>
...
</web-app>
This new servlet uses the java.util.logging.Logger class to write messages to the log. You can control the
behavior of this class using a logging.propertiesfile, and a systemproperty set in the app's appengine-
web.xml file. If you are using Eclipse, your app was created with a default version of this file in your
app's src/and the appropriate systemproperty.
If you are not using Eclipse, you must set up the Logger configuration file manually. Copy the example file from the
SDK appengine-java-sdk/config/user/logging.properties to your app's war/WEB-
INF/ directory. Then edit the app's war/WEB-INF/appengine-web.xml file as indicated:
<appengine-web-app xmlns="http://appengine.google.com/ns/1.0">
...
15. <system-properties>
<property name="java.util.logging.config.file" value="WEB-INF/logging.properties"/>
</system-properties>
</appengine-web-app>
The servlet logs messages using the INFO log level (using log.info()). The default log level is WARNING,
which suppresses INFO messages from the output.To change the log level for all classes in
the guestbook package, edit the logging.properties file and add an entry for guestbook.level, as
follows:
.level = WARNING
guestbook.level = INFO
...
Tip: When your app logs messages using the java.util.logging.Logger API while running on App Engine, App
Engine records the messages and makes them available for browsing in the Admin Console, and available for
downloading using the AppCfg tool. The Admin Console lets you browse messages by log level.
Rebuild and restart, then test http://localhost:8888/. The form displays. Enter some text in the form, and submit. The
browser sends the form to the app,then redirects back to the empty form. The greeting data you entered is logged to
the console by the server.
Next...
We have a userinterface for prompting the userto enter a greeting. Now we need a way to remember the greetings
users post,and show them to other visitors. For that, we'll use the App Engine datastore.
Storing data in a scalable web application can be tricky. A user could be interacting with any of dozens of
web servers at a given time, and the user's next request could go to a different web server than the
previous request. All web servers need to be interacting with data that is also spread out across dozens
of machines, possibly in different locations around the world.
With Google App Engine, you don't have to worry about any of that. App Engine's infrastructure takes
care of all of the distribution, replication, and load balancing of data behind a simple API—and you get a
powerful query engine and transactions as well.
App Engine's data repository, the High Replication Datastore (HRD), uses the Paxos algorithm to replicate
data across multiple datacenters. Data is written to the Datastore in objects known as entities. Each entity
16. has a key that uniquely identifies it. An entity can optionally designate another entity as its parent; the first
entity is a child of the parent entity. The entities in the Datastore thus form a hierarchically structured
space similar to the directory structure of a file system. An entity's parent, parent's parent, and so on
recursively, are its ancestors; its children, children's children, and so on, are its descendants. An entity
without a parent is a root entity.
The Datastore is extremely resilient in the face of catastrophic failure, but its consistency guarantees may
differ from what you're familiar with. Entities descended from a common ancestor are said to belong to the
same entity group; the common ancestor's key is the group's parent key, which serves to identify the entire
group. Queries over a single entity group, called ancestor queries, refer to the parent key instead of a
specific entity's key. Entity groups are a unit of both consistency and transactionality: whereas queries
over multiple entity groups may return stale, eventually consistent results, those limited to a single entity
group always return up-to-date, strongly consistentresults.
The code samples in this guide organize related entities into entity groups, and use ancestor queries on
those entity groups to return strongly consistent results. In the example code comments, we highlight
some ways this might affect the design of your application. For more detailed information, see Structuring
Data for Strong Consistency.
Note: If you built your application using an earlier version of this Getting Started Guide, please note that
the sample application has changed. You can still find the sample code for the original Guestbook
application, which does not use ancestor queries, in the demos directory of the SDK.
The Datastore is one of several App Engine services offering a choice of standards-based or low-level
APIs. The standards-based APIs decouple your application from the underlying App Engine services,
making it easier to port your application to other hosting environments and other database technologies, if
you ever need to. The low-level APIs expose the service's capabilities directly; you can use them as a
base on which to implement new adapter interfaces, or just use them directly in your application.
App Engine includes support for two different API standards for the Datastore: Java Data Objects (JDO) and
the Java Persistence API (JPA). These interfaces are provided byDataNucleus Access Platform, an open-
source implementation of several Java persistence standards, with an adapter for the App Engine
Datastore.
For clarity getting started, we'll use the low-level API to retrieve and post messages left by users.
Updating Our Servlet to Store Data
Here is an updated version of src/SignGuestbookServlet.java that stores greetings in the
Datastore. We will discuss the changes made here below.
package guestbook;
import com.google.appengine.api.datastore.DatastoreService;
import com.google.appengine.api.datastore.DatastoreServiceFactory;
import com.google.appengine.api.datastore.Entity;
17. import com.google.appengine.api.datastore.Key;
import com.google.appengine.api.datastore.KeyFactory;
import com.google.appengine.api.users.User;
import com.google.appengine.api.users.UserService;
import com.google.appengine.api.users.UserServiceFactory;
import java.io.IOException;
import java.util.Date;
import javax.servlet.http.HttpServlet;
import javax.servlet.http.HttpServletRequest;
import javax.servlet.http.HttpServletResponse;
public class SignGuestbookServlet extends HttpServlet {
public void doPost(HttpServletRequest req, HttpServletResponse resp)
throws IOException {
UserService userService = UserServiceFactory.getUserService();
User user = userService.getCurrentUser();
// We have one entity group per Guestbook with all Greetings residing
// in the same entity group as the Guestbook to which they belong.
// This lets us run a transactionalancestorquery to retrieve all
// Greetings for a given Guestbook. However, the write rate to each
// Guestbook should be limited to ~1/second.
String guestbookName = req.getParameter("guestbookName");
Key guestbookKey = KeyFactory.createKey("Guestbook", guestbookName);
String content = req.getParameter("content");
Date date = new Date();
Entity greeting = new Entity("Greeting", guestbookKey);
greeting.setProperty("user",user);
greeting.setProperty("date",date);
greeting.setProperty("content",content);
DatastoreService datastore = DatastoreServiceFactory.getDatastoreService();
datastore.put(greeting);
resp.sendRedirect("/guestbook.jsp?guestbookName=" + guestbookName);
}
}
Storing the Submitted Greetings
The low-level Datastore API for Java provides a schemaless interface for creating and storing entities.
The low-level API does not require entities of the same kind to have the same properties, nor for a given
property to have the same type for different entities. The following code snippet constructs
the Greeting entity in the same entity group as the guestbook to which it belongs:
Entity greeting = new Entity("Greeting", guestbookKey);
greeting.setProperty("user",user);
greeting.setProperty("date",date);
greeting.setProperty("content",content);
18. In our example, each Greeting has the posted content, and also stores the user information about who
posted, and the date on which the post was submitted. When initializing the entity, we supply the entity
name, Greeting, as well as a guestbookKey argument that sets the parent of the entity we are storing.
Objects in the Datastore that share a common ancestor belong to the same entity group.
After we construct the entity, we instantiate the Datastore service, and put the entity in the Datastore:
DatastoreService datastore =
DatastoreServiceFactory.getDatastoreService();
datastore.put(greeting);
Because querying is strongly consistent only within entity groups, we assign all Greetings to the same
entity group by setting the same parent for each Greeting. This means a user will always see a Greeting
immediately after it was written. However, the rate at which you can write to the same entity group is
limited to 1 write to the entity group per second. When you design a real application, you'll need to keep
this fact in mind. Note that by using services such as Memcache, you can mitigate the chance that a user
won't see fresh results when querying across entity groups immediately after a write.
Updating the JSP
We also need to modify the JSP we wrote earlier to display Greetings from the Datastore, and also
include a form for submitting Greetings. Here is our updated guestbook.jsp:
<%@ page contentType="text/html;charset=UTF-8" language="java" %>
<%@ page import="java.util.List" %>
<%@ page import="com.google.appengine.api.users.User" %>
<%@ page import="com.google.appengine.api.users.UserService" %>
<%@ page import="com.google.appengine.api.users.UserServiceFactory" %>
<%@ page import="com.google.appengine.api.datastore.DatastoreServiceFactory" %>
<%@ page import="com.google.appengine.api.datastore.DatastoreService" %>
<%@ page import="com.google.appengine.api.datastore.Query" %>
<%@ page import="com.google.appengine.api.datastore.Entity" %>
<%@ page import="com.google.appengine.api.datastore.FetchOptions" %>
<%@ page import="com.google.appengine.api.datastore.Key" %>
<%@ page import="com.google.appengine.api.datastore.KeyFactory" %>
<%@ taglib prefix="fn" uri="http://java.sun.com/jsp/jstl/functions" %>
<html>
<head>
<link type="text/css" rel="stylesheet" href="/stylesheets/main.css" />
</head>
<body>
<%
String guestbookName = request.getParameter("guestbookName");
if (guestbookName == null) {
guestbookName = "default";
}
19. pageContext.setAttribute("guestbookName", guestbookName);
UserService userService = UserServiceFactory.getUserService();
User user= userService.getCurrentUser();
if (user != null) {
pageContext.setAttribute("user",user);
%>
<p>Hello, ${fn:escapeXml(user.nickname)}! (You can
<a href="<%= userService.createLogoutURL(request.getRequestURI()) %>">sign out</a>.)</p>
<%
} else {
%>
<p>Hello!
<a href="<%= userService.createLoginURL(request.getRequestURI()) %>">Sign in</a>
to include your name with greetings you post.</p>
<%
}
%>
<%
DatastoreService datastore = DatastoreServiceFactory.getDatastoreService();
Key guestbookKey = KeyFactory.createKey("Guestbook", guestbookName);
// Run an ancestorquery to ensure we see the most up-to-date
// view of the Greetings belonging to the selected Guestbook.
Query query = new Query("Greeting", guestbookKey).addSort("date",Query.SortDirection.DESCENDING);
List<Entity> greetings = datastore.prepare(query).asList(FetchOptions.Builder.withLimit(5));
if (greetings.isEmpty()) {
%>
<p>Guestbook '${fn:escapeXml(guestbookName)}' has no messages.</p>
<%
} else {
%>
<p>Messages in Guestbook '${fn:escapeXml(guestbookName)}'.</p>
<%
for (Entity greeting : greetings) {
pageContext.setAttribute("greeting_content",
greeting.getProperty("content"));
if (greeting.getProperty("user")== null) {
%>
<p>An anonymous person wrote:</p>
<%
} else {
pageContext.setAttribute("greeting_user",
greeting.getProperty("user"));
%>
<p><b>${fn:escapeXml(greeting_user.nickname)}</b> wrote:</p>
<%
}
%>
<blockquote>${fn:escapeXml(greeting_content)}</blockquote>
<%
}
}
%>
<form action="/sign" method="post">
20. <div><textarea name="content" rows="3" cols="60"></textarea></div>
<div><input type="submit" value="Post Greeting" /></div>
<input type="hidden" name="guestbookName" value="${fn:escapeXml(guestbookName)}"/>
</form>
</body>
</html>
Warning! Whenever you display user-supplied text in HTML, you must escape the string using
the fn:escapeXml JSTL function, or a similar escaping mechanism. If you do not correctly and
consistently escape user-supplied data, the user could supply a malicious script as text input, causing
harm to later visitors.
Retrieving the Stored Greetings
The low-level Java API provides a Query class for constructing queries and a PreparedQuery class for
fetching and returning the entities that match the query from the Datastore. The code that fetches the
data is here:
Query query = new Query("Greeting", guestbookKey).addSort("date",Query.SortDirection.DESCENDING);
List<Entity> greetings = datastore.prepare(query).asList(FetchOptions.Builder.withLimit(5));
This code creates a new query on the Greeting entity, and sets the guestbookKey as the required
parent entity for all entities that will be returned. We also sort on thedate property, returning the newest
Greeting first.
After you construct the query, it is prepared and returned as a list of Entity objects. For a description of
the Query and PreparedQuery interfaces, see the Datastore reference.
A Word About Datastore Indexes
Every query in the App Engine Datastore is computed from one or more indexes. Indexes are tables that
map ordered property values to entity keys. This is how App Engine is able to serve results quickly
regardless of the size of your application's Datastore. Many queries can be computed from the builtin
indexes, but the Datastore requires you to specify a custom index for some, more complex, queries.
Without a custom index, the Datastore can't execute the query efficiently.
Our guest book example above, which filters results by ancestor and orders by date, uses an ancestor
query and a sort order. This query requires a custom index to be specified in your
application's datastore-indexes.xml file. When you run your application in the SDK, it will
automatically add an entry to this file. When you upload your application, the custom index definition will
be automatically uploaded, too. The entry for this query will look like:
<?xml version="1.0" encoding="utf-8"?>
<datastore-indexes
autoGenerate="true">
<datastore-index kind="Greeting" ancestor="true">
21. <property name="date" direction="desc" />
</datastore-index>
</datastore-indexes>
You can read all about Datastore indexes on the Datastore Indexes page.
Clearing the Datastore
The development web server uses a local version of the Datastore for testing your application, using local
files. The data persists as long as the temporary files exist, and the web server does not reset these files
unless you ask it to do so.
The file is named local_db.bin, and it is created in your application's WAR directory, in the WEB-
INF/appengine-generated/ directory. To clear the Datastore, delete this file.
Next...
Every web application returns dynamically generated HTML from the application code, via templates or
some other mechanism. Most web applications also need to serve static content, such as images, CSS
stylesheets, or JavaScript files. For efficiency, App Engine treats static files differently from application
source and data files. Let's create a CSS stylesheet for this application, as a static file.
Continue to Using Static Files.
Using Static Files
There are many cases where you want to serve static files directly to the web browser. Images, CSS stylesheets,
JavaScript code, movies and Flash animations are all typically served directly to the browser. For efficiency , App
Engine serves static files from separate servers than those that invoke servlets.
By default, App Engine makes all files in the WAR available as static files except JSPs and files in WEB-INF/.
Any request for a URL whose path matches a static file serves the file directly to the browser—even if the path also
matches a servlet or filter mapping. You can configure which files App Engine treats as static files using
theappengine-web.xml file.
Let's spruce up our guest book's appearance with a CSS stylesheet.For this example, we will not change the
configuration for static files. See App Configuration for more information on configuring static files and
resource files.
A Simple Stylesheet
In the directory war/, create a directory named stylesheets/. In this directory, create a file
named main.css with the following contents:
22. body {
font-family: Verdana, Helvetica, sans-serif;
background-color: #FFFFCC;
}
Edit war/guestbook.jsp and insert the following lines just after the <html> line at the top:
<html>
<head>
<link type="text/css" rel="stylesheet" href="/stylesheets/main.css" />
</head>
<body>
...
</body>
</html>
Visit http://localhost:8888/. The new version uses the stylesheet.
Next...
The time has come to reveal your finished application to the world.
Uploading Your Application
You create and manage applications in App Engine using the Administration Console. Once you have registered an
application ID for your application, you upload it to App Engine using either the Eclipse plugin, or a command -line
tool in the SDK.
23. Note: Once you register an application ID, you can delete it, but you can't re-register that same application ID after
it has been deleted. You can skip these next steps if you don't want to register an ID at this time.
Note : If you have an App Engine Premier account,you can specify that your new application should reside in the
European Union rather than the United States. For developers that do not have a Premier account, you will need
to enable billing for applications that should reside in the European Union.
Hosting applications in the European Union is especially useful if your users are closer to Europe than to the United
States. There is less network latency and the End User Content will be stored at rest in the European Union. You
must specify this location by clicking the "Edit" link in the "Location Options" section when you register the
application; you cannot change it later.
Registering the Application
You create and manage App Engine web applications from the App Engine Administration Console, at the
following URL:
https://appengine.google.com/
Sign in to App Engine using your Google account.If you do not have a Google account, you can create a Google
account with an email address and password.
To create a new application, click the "Create an Application" button.Follow the instructions to register an
application ID, a name unique to this application.
Edit the appengine-web.xml file, then change the value of the <application> element to be your
registered application ID.
For this tutorial, you should probably elect to use the free appspot.comdomain name, and so the full URL for the
application will behttp://your_app_id.appspot.com/. You can also purchase a top-level domain name
for your app, or use one that you have already registered.
For Authentication Options (Advanced), the default option,"Open to all Google Accounts users",is the simplest
choice for this tutorial. If you choose "Restricted to the following Google Apps domain", then your domain
administrator must add your new app as a service on that domain. If you choose the Google Apps domain
authentication option, then failure to add your app to yourGoogle Apps domain will result in an HTTP 500 where
the stacktrace shows the error "Unexpected exception from servlet: java.lang.IllegalArgumentException: The
requested URL was not allowed: /guestbook.jsp".If you see this error, add the app to your domain. See Configuring
Google Apps to Authenticate on Appspot forinstructions.
If you have an App Engine Premier account,you can specify that yournew application should reside in the
European Union rather than the United States. This is especially useful if your application's users are closer to
Europe than to the United States. There is less network latency and the End User Content will be stored at rest in the
European Union. You must specify this location when you register the application; you cannot change it later. Click
the Edit link in the Location Options section; select a location option, either United States or European Union.
24. Uploading the Application
You can upload your application using Eclipse, or using a command at the command prompt.
Currently, you can only upload applications with a maximum size of 32 megabytes.
Uploading From Eclipse
You can upload your application code and files from within Eclipse using the Google Plugin.
To upload your application from Eclipse, click on the Google button in the Eclipse toolbar, then select
"Deploy to App Engine."
If prompted, follow the instructions to provide the Application ID from the App Engine console that you would like
to use for this app, your Google account username (your email address),and your password.Then click
the Deploy button.Eclipse will then automatically upload the contents ofthe war/ directory.
Uploading Using the Command Prompt
You can upload your application code and files using a command included in the SDK
named appcfg.cmd (Windows) or appcfg.sh (Mac OS X, Linux).
AppCfg is a multi-purpose tool for interacting with your app on App Engine. The command takes the name of an
action, the path to your app's war/ directory, and otheroptions.To upload the app code and files to App Engine,
you use the update action.
To upload the app, using Windows:
..appengine-java-sdkbinappcfg.cmd update war
To upload the app, using Mac OS X or Linux:
../appengine-java-sdk/bin/appcfg.sh update war
Enter your Google username and password at the prompts.
Checking Your Application State
After your application is uploaded, its Datastore Indexes will be automatically generated.This operation may take
some time, and any visitors to your site will receive aDatastoreNeedIndexException until the indexes have
25. been built. You can monitor the progress of the operation by visiting the App Engine console, selecting your
application, and then selecting the Datastore Indexes link.
Accessing Your Application
You can now see your application running on App Engine. If you set up a free appspot.comdomain name, the URL
for your website begins with your application ID:
http://your_app_id.appspot.com/