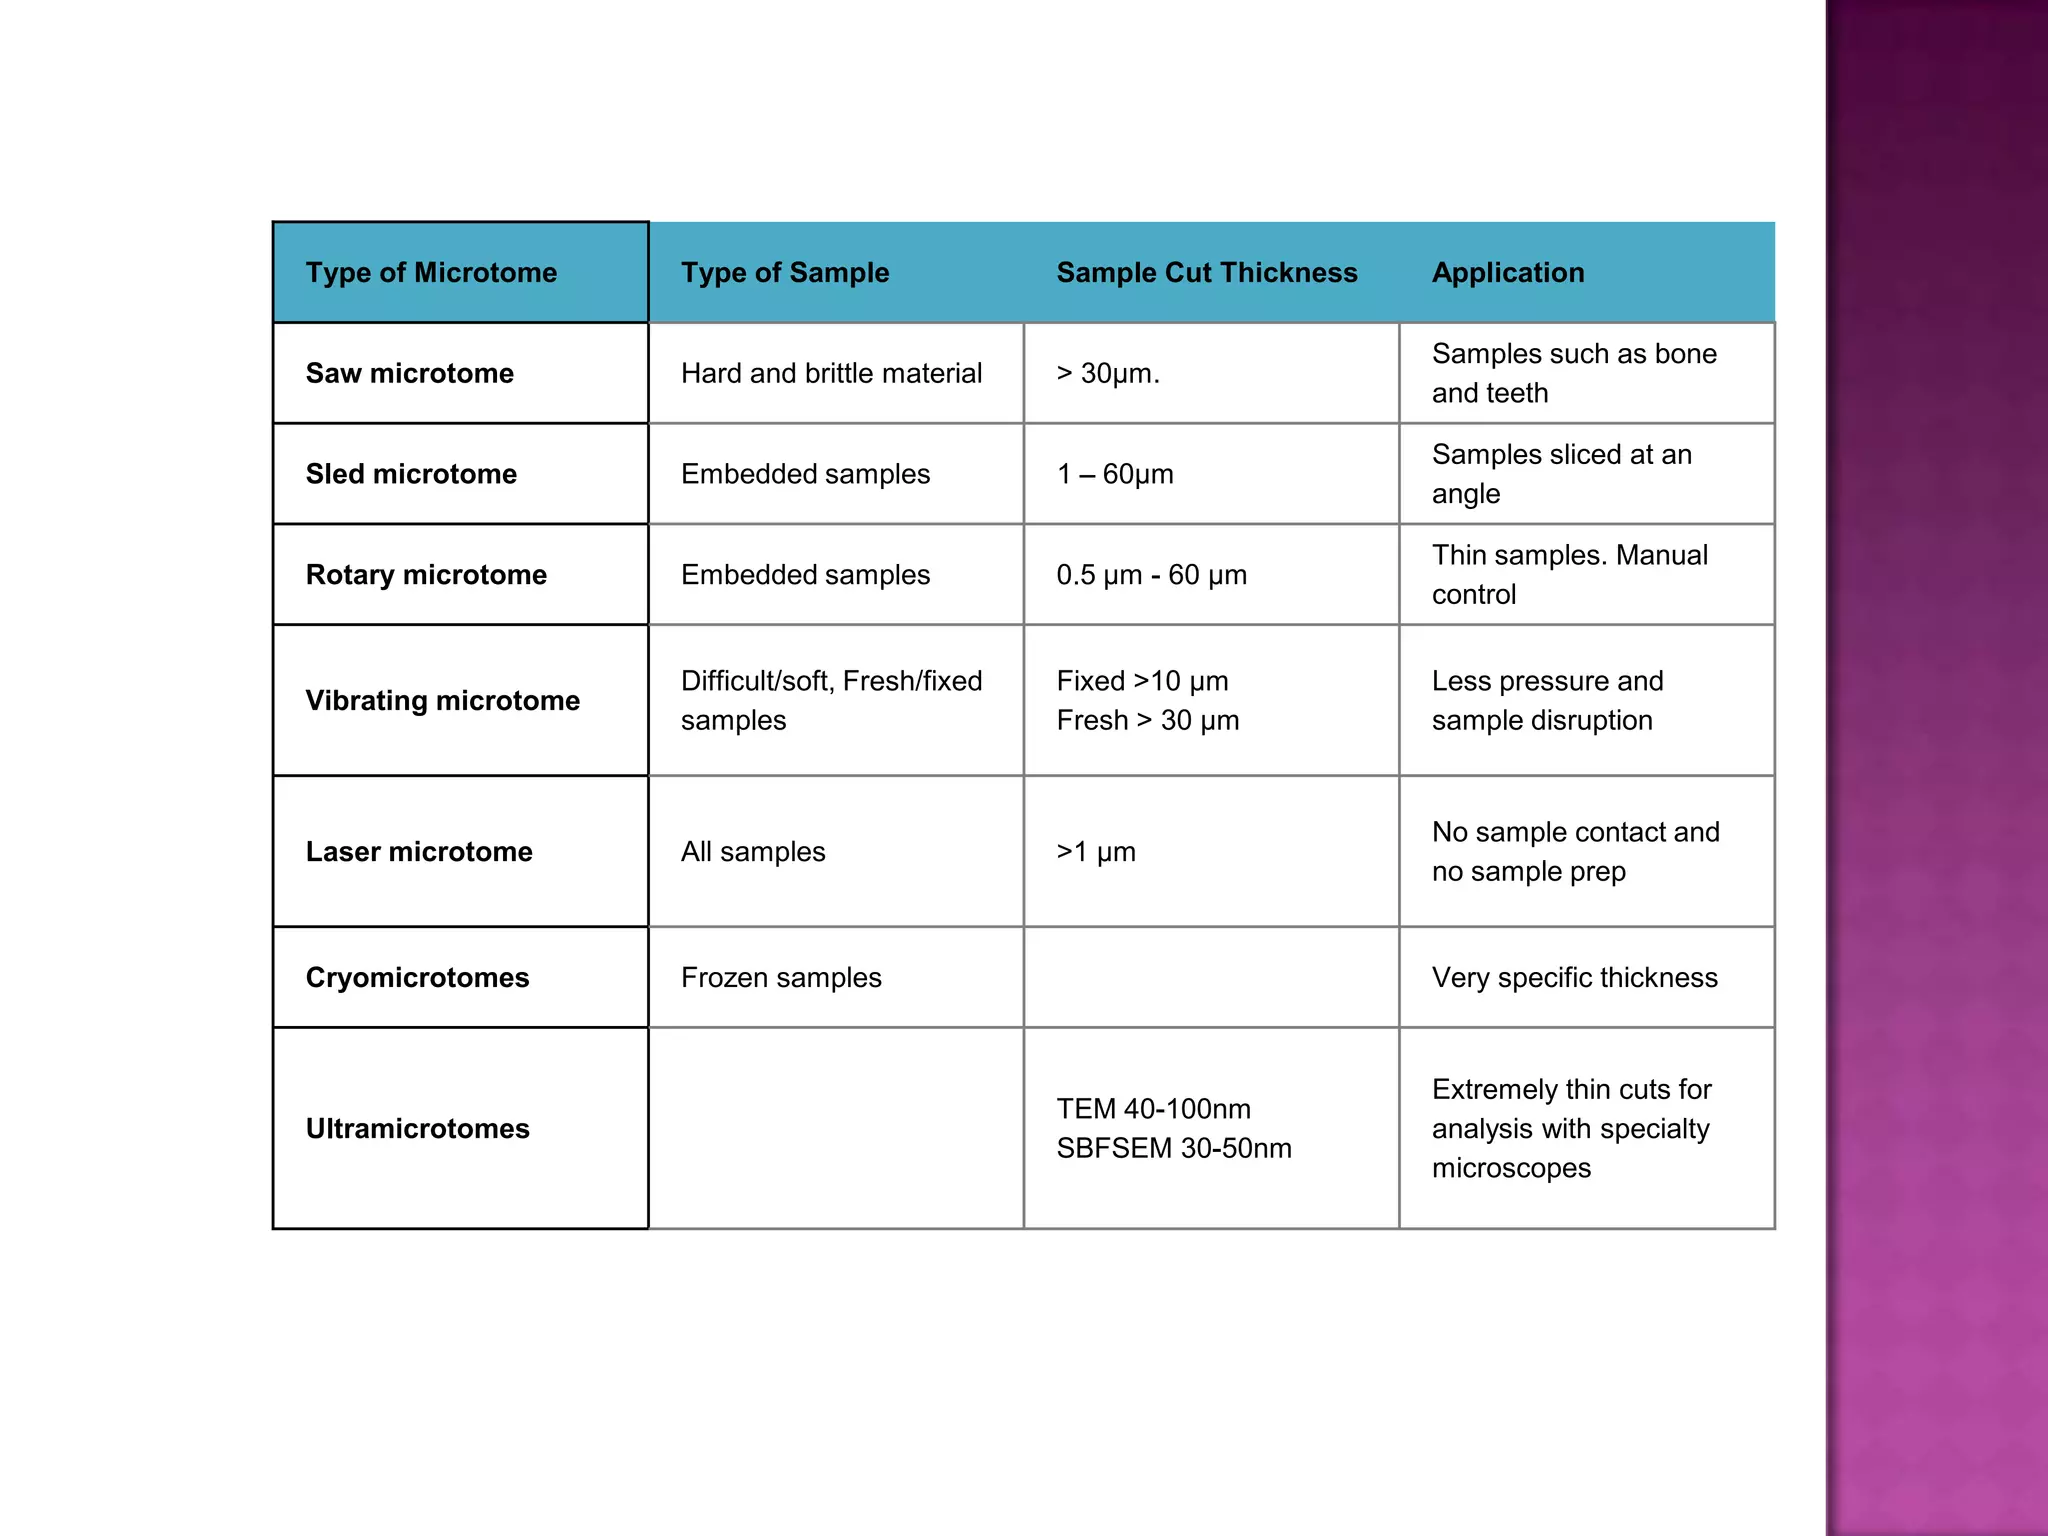
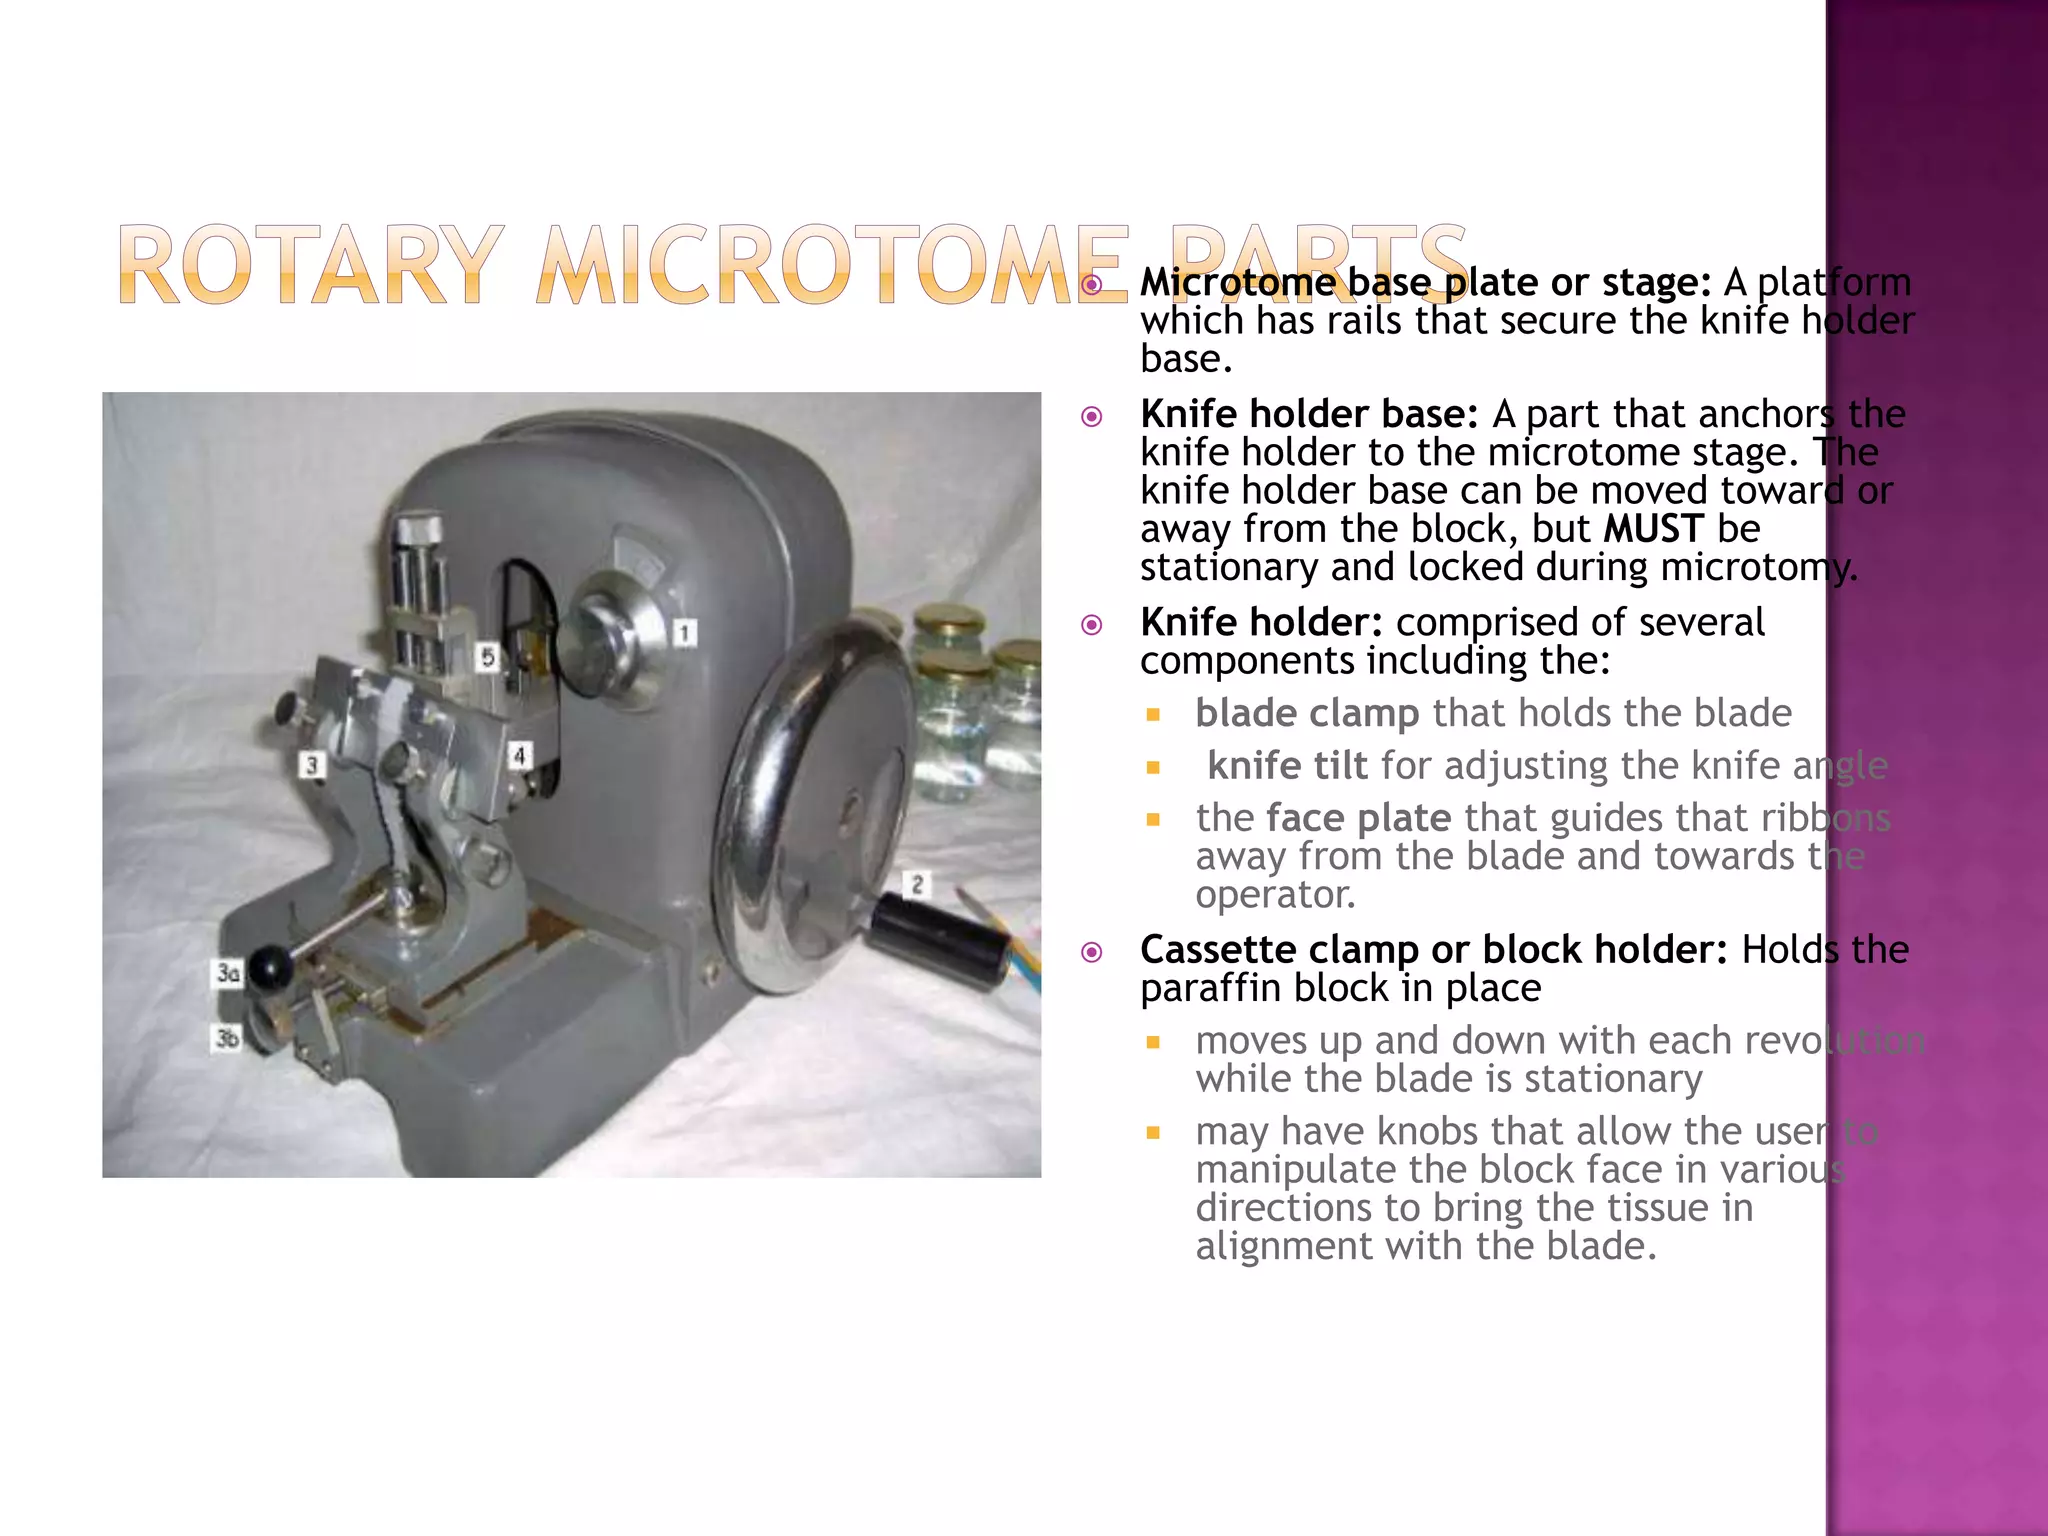
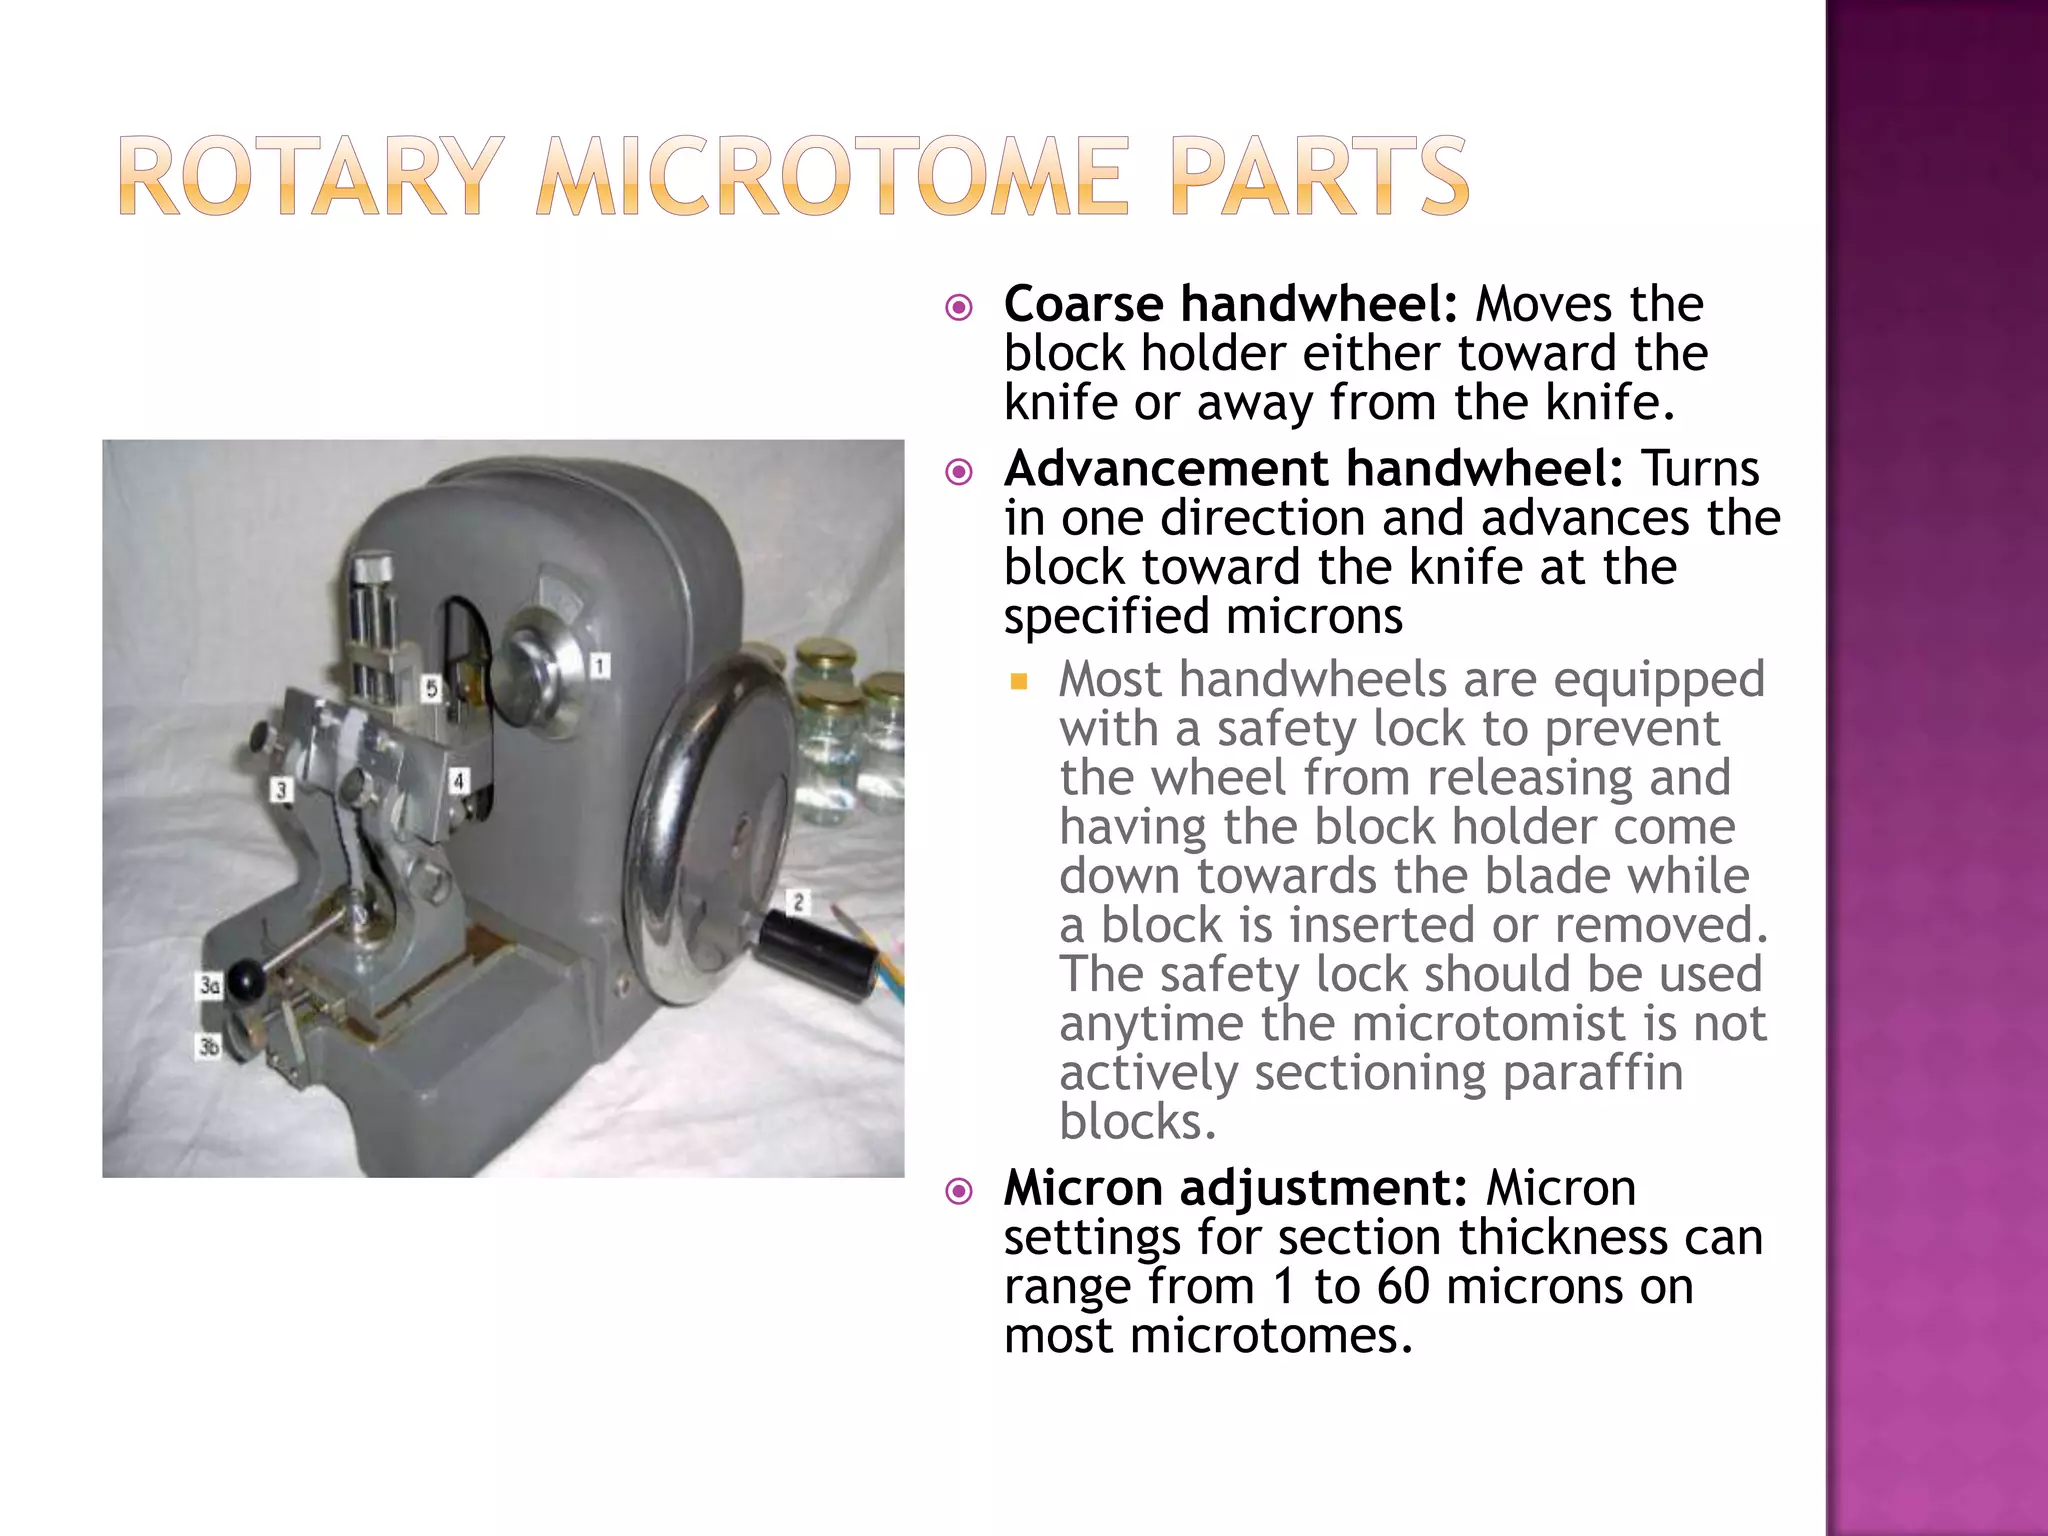
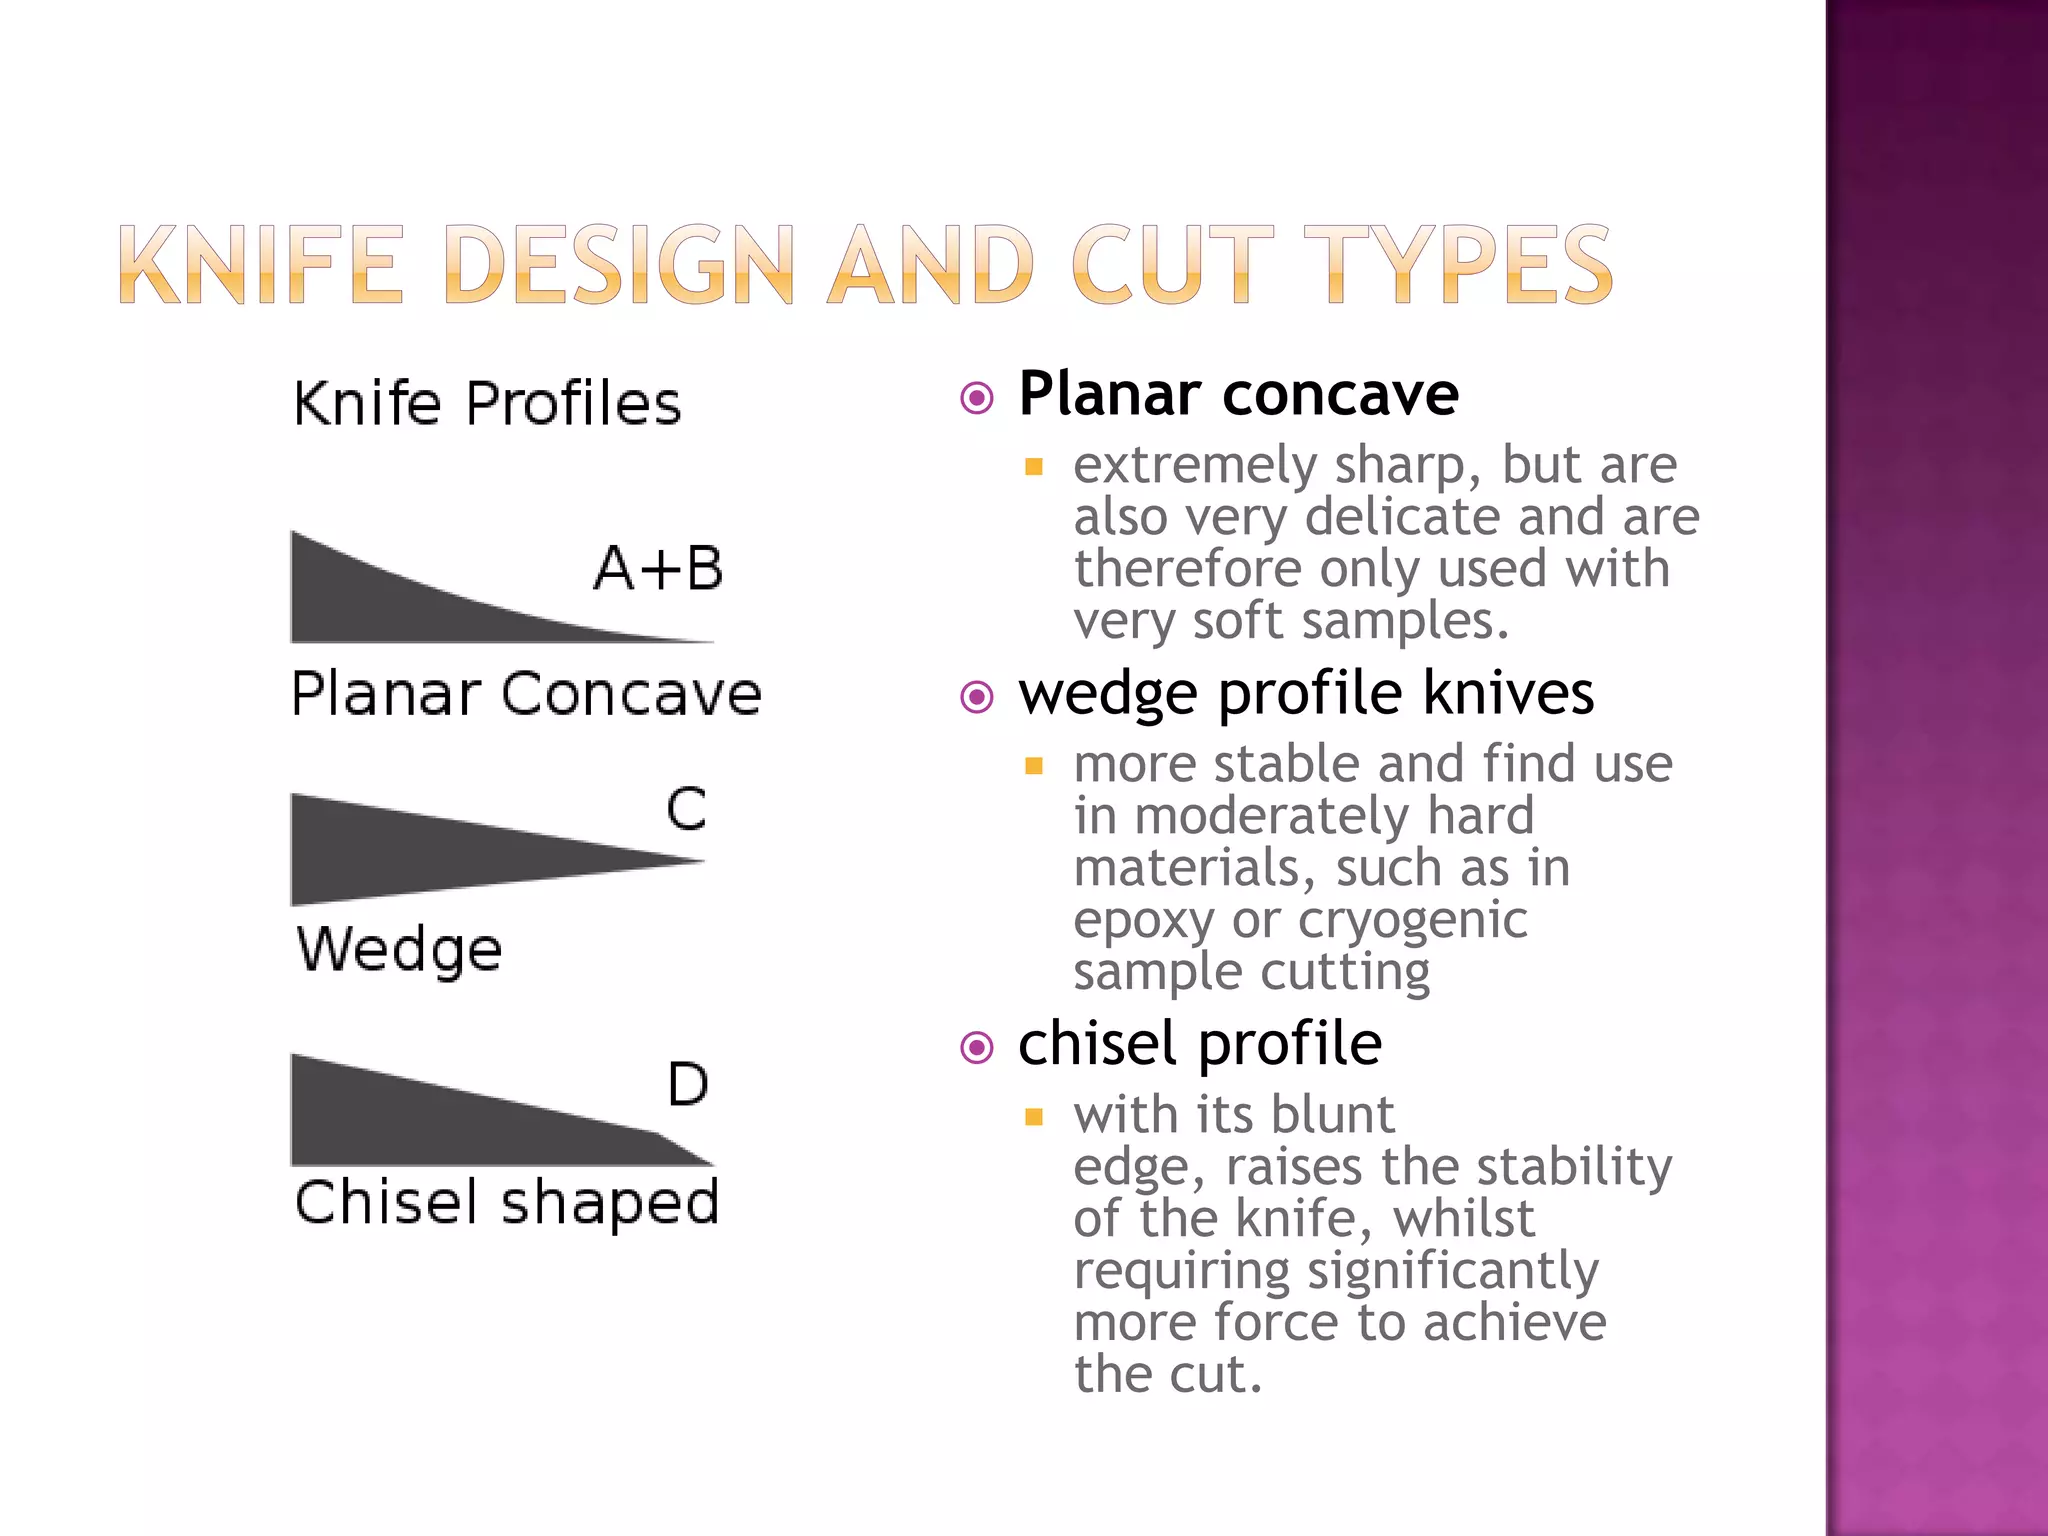
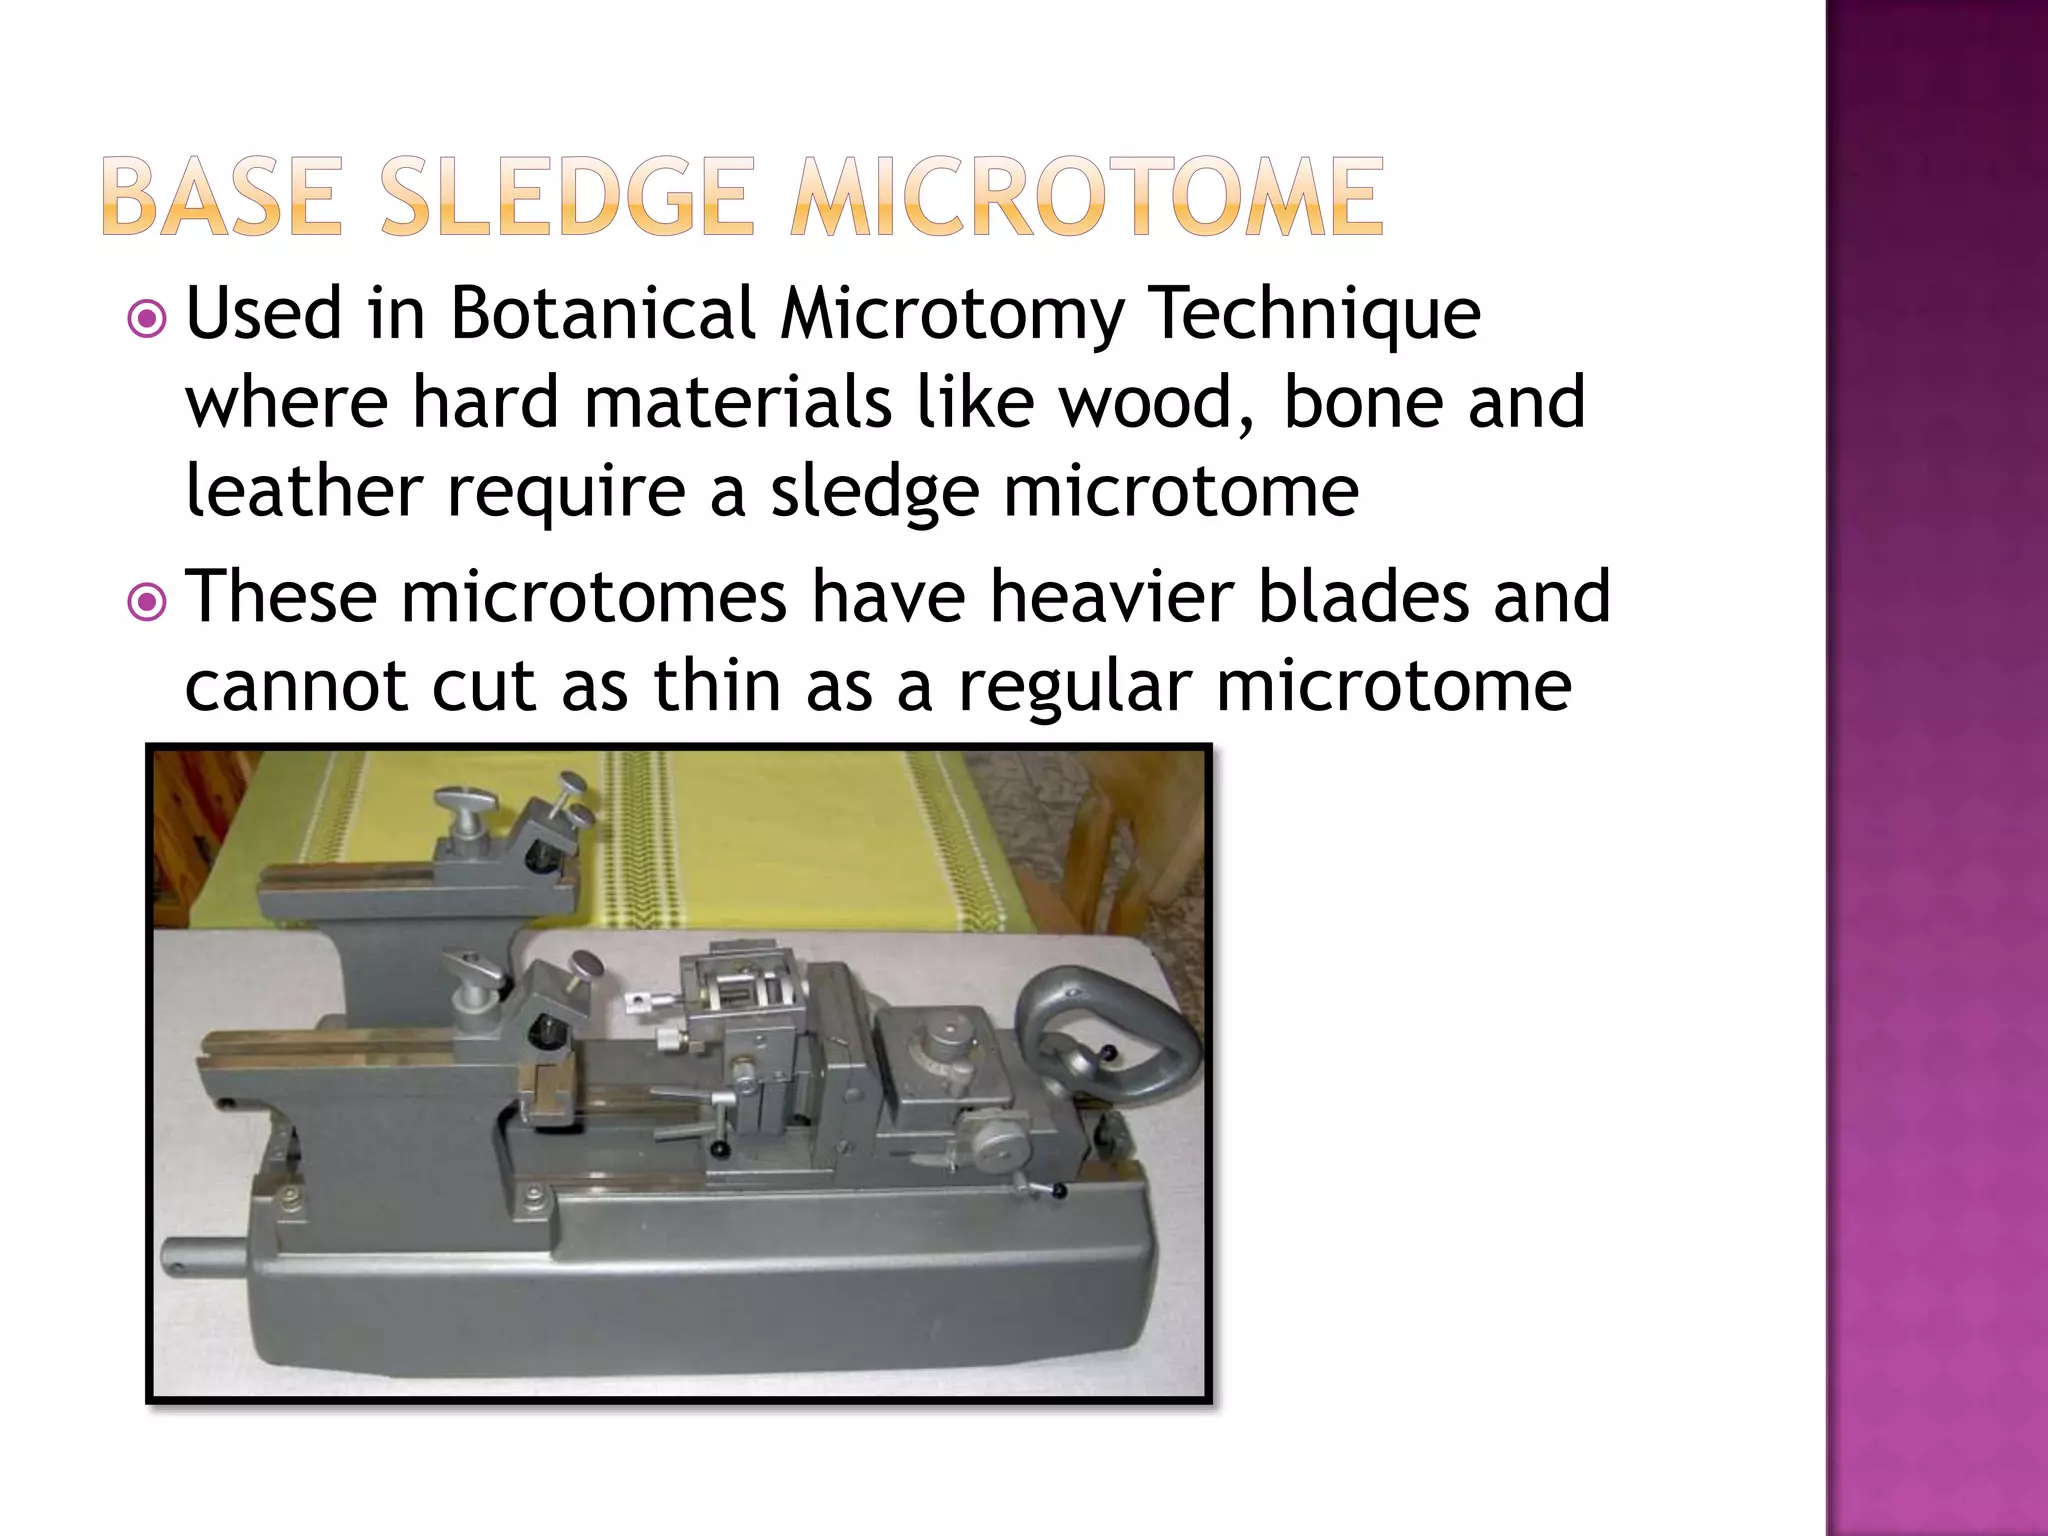
 machines that cut extremely thin sections from a sample
for applications in histology or pathology
 use special metal, glass, or diamond blades, depending on
the type of specimen and the desired thickness.
 consists of a blade holding unit with a blade holder and
clamped blade, the object clamp, an advancing
mechanism, and a mechanism for adjusting section
thickness.
 Glass microtome blades
 used in sample preparation activities for light
microscopy and electron microscopy
applications.
 Diamond blades
 may be industrial-grade or gem-quality.
i. Industrial-grade blades are used to slice
hard materials such as bone and teeth.
ii. Gem-quality blades for microtomes are
used mainly in electron microscopy
applications
 Base Sledge microtomes
 place the sample in a fixed holder or shuttle which
moves back and forth across a knife or blade
 the sled rests upon a linear bearing and permits angular
adjustment
 used with biological materials and samples that are
embedded in paraffin
 cut thickness ranges from 1 -60 µm
 Rotary microtomes
 used to cut thin sections of samples visible only
with the aid of a light microscope. They are
often operated manually but can be motorized.
The sample is cut upon the rotary action of a
hand wheel which advances the sample towards
a blade. Rotary microtomes are used with hard
materials, such as samples embedded in resins or
paraffin. The thickness for manual operation
ranges from 0.5.µm to 60µm
Type of Microtome Type of Sample Sample Cut Thickness Application
Saw microtome Hard and brittle material > 30µm.
Samples such as bone
and teeth
Sled microtome Embedded samples 1 – 60µm
Samples sliced at an
angle
Rotary microtome Embedded samples 0.5 µm - 60 µm
Thin samples. Manual
control
Vibrating microtome
Difficult/soft, Fresh/fixed
samples
Fixed >10 µm
Fresh > 30 µm
Less pressure and
sample disruption
Laser microtome All samples >1 µm
No sample contact and
no sample prep
Cryomicrotomes Frozen samples Very specific thickness
Ultramicrotomes
TEM 40-100nm
SBFSEM 30-50nm
Extremely thin cuts for
analysis with specialty
microscopes
 This device operates with a staged rotary action such that
the actual cutting is part of the rotary motion. In a rotary
microtome, the knife is typically fixed in a horizontal
position
 Microtome base plate or stage: A platform
which has rails that secure the knife holder
base.
 Knife holder base: A part that anchors the
knife holder to the microtome stage. The
knife holder base can be moved toward or
away from the block, but MUST be
stationary and locked during microtomy.
 Knife holder: comprised of several
components including the:
 blade clamp that holds the blade
 knife tilt for adjusting the knife angle
 the face plate that guides that ribbons
away from the blade and towards the
operator.
 Cassette clamp or block holder: Holds the
paraffin block in place
 moves up and down with each revolution
while the blade is stationary
 may have knobs that allow the user to
manipulate the block face in various
directions to bring the tissue in
alignment with the blade.
 Coarse handwheel: Moves the
block holder either toward the
knife or away from the knife.
 Advancement handwheel: Turns
in one direction and advances the
block toward the knife at the
specified microns
 Most handwheels are equipped
with a safety lock to prevent
the wheel from releasing and
having the block holder come
down towards the blade while
a block is inserted or removed.
The safety lock should be used
anytime the microtomist is not
actively sectioning paraffin
blocks.
 Micron adjustment: Micron
settings for section thickness can
range from 1 to 60 microns on
most microtomes.
 Planar concave
 extremely sharp, but are
also very delicate and are
therefore only used with
very soft samples.
 wedge profile knives
 more stable and find use
in moderately hard
materials, such as in
epoxy or cryogenic
sample cutting
 chisel profile
 with its blunt
edge, raises the stability
of the knife, whilst
requiring significantly
more force to achieve
the cut.
 Used in Botanical Microtomy Technique
where hard materials like wood, bone and
leather require a sledge microtome
 These microtomes have heavier blades and
cannot cut as thin as a regular microtome
 Operating handle
 Semi automatic advance – when pushed towards the knife the sledge will
move along the runners and will also advance the specimen the selected
amount (thickness). When pulled back the specimen retraction
mechanism is activated.
 Thickness control
 A knob, calibrated in microns, is used to select the thickness of sections
to be cut from 1μm – 40μm, in 1μm steps. Always set the thickness by
turning the knob anticlockwise. If the thickness has to be reduced then
turn clockwise past the required thickness, then anticlockwise.
 Coarse advance/trim control
 Quickly raises or lowers the specimen 450μm per turn.
 Specimen holder
 Specimens are clamped in the vice or alternative holder if fitted
 can be raised and lowered after releasing the clamp lever
 Trimming the Specimen
 Fit the specimen securely into the appropriate specimen
holder on the microtome.To trim excess material from the
surface of the specimen block:
a. First move the sledge towards the knife and adjust the
specimen height using the coarse advance so that the
specimen is just below the knife.
b. Either set the thickness control to cut thick sections, eg:
20μm, and move the sledge back and forth repeatedly to
trim the specimen.
c. Or set the thickness control to zero and alternately raise the
specimen slightly using the coarse advance and move the
sledge forward then backwards. This method isquicker but
should only be used if the operator is experienced in the
use of base sledge microtomes.
 Knife clamps
 Two screws, turned by a lever , are used to fix the knife in the knife
clamp and the knife clamp in the knife block
 The cutting angle of the knife is adjustable from 0-40º. Slew angles of the
knife can be obtained by loosening the knife block clamp levers and the
knife clamp levers and moving knife to slew angle required.
 Knife guards
 Each knife guard can be moved to the central position to cover the
working area of the knife, or to the outer position while section cutting.
 The black knobs secure the guards in the chosen position.
 Side pillars
 In normal use, these pillars slope inwards slightly. For large area sections
they can be unbolted from the base, swapped left to right and refitted, so
that they slop outwards, so providing more space.
 Fitting the Object Holder
 Pull the sledge away from the knife holders.
Secure the required object holder by placing
it in the holder in the sledge slide.Set to
correct height and lock by tightening clamp
lever
 Note that the clamp lever has a ratchet with
its movement limited to prevent the lever
being left in positions where it could impact
on other parts during sectioning.
 Fitting and Adjusting the Knife
 NB: The term ‘knife’ used here also includes disposable blade holder.
a. Slacken the knife clamp levers just enough to let the knife slide into the
knife clamps from the side.
b. Insert the knife, taking care to avoid touching the edge against the
metalwork.
c. Check that the knife lies flat on the pad pieces in the knife clamps and
that the heel of the knife is not caught up on the slot in the knife
clamps.
d. Screw the knife clamp levers down just sufficiently to steady the knife in
position.
e. Slacken the knife block clamp levers . Set the knife holders to the desired
slew angle, ensure the knife clamps still cover the ends of the knife. Set
the knife to the desired cutting angle and tighten the knife clamping
levers.
f. Check that the knife is still at the desired slew angles and tighten the
knife block clamp levers.
 NB: To ensure that the knife clamps are correctly aligned in the
holders, the knife block clamp levers must always be slackened before
the knife clamping levers are tightened.
 Cleaning
 Wipe off sectioning debris etc with a paper
towel. Alcohols (industrial methylated
spirits, ethanol or methanol) may be used.
Xylene may be used sparingly to remove built-up
wax, but ensure surplus Xylene is wiped off.
 Avoid harsh solvents such as acetone
 Lubrication
 After cleaning, oil both the sliding surfaces of
the sledge base with Microtome Sledge Oil. Now
move the sledge several times over the full
length of travel to distribute oil
 Decontamination
 It is the responsibility of the user to ensure that
a decontamination procedure is employed which
is appropriate to the nature of the work carried
out.

Microtome

  • 2.
     machines thatcut extremely thin sections from a sample for applications in histology or pathology  use special metal, glass, or diamond blades, depending on the type of specimen and the desired thickness.  consists of a blade holding unit with a blade holder and clamped blade, the object clamp, an advancing mechanism, and a mechanism for adjusting section thickness.
  • 3.
     Glass microtomeblades  used in sample preparation activities for light microscopy and electron microscopy applications.  Diamond blades  may be industrial-grade or gem-quality. i. Industrial-grade blades are used to slice hard materials such as bone and teeth. ii. Gem-quality blades for microtomes are used mainly in electron microscopy applications
  • 4.
     Base Sledgemicrotomes  place the sample in a fixed holder or shuttle which moves back and forth across a knife or blade  the sled rests upon a linear bearing and permits angular adjustment  used with biological materials and samples that are embedded in paraffin  cut thickness ranges from 1 -60 µm
  • 5.
     Rotary microtomes used to cut thin sections of samples visible only with the aid of a light microscope. They are often operated manually but can be motorized. The sample is cut upon the rotary action of a hand wheel which advances the sample towards a blade. Rotary microtomes are used with hard materials, such as samples embedded in resins or paraffin. The thickness for manual operation ranges from 0.5.µm to 60µm
  • 6.
    Type of MicrotomeType of Sample Sample Cut Thickness Application Saw microtome Hard and brittle material > 30µm. Samples such as bone and teeth Sled microtome Embedded samples 1 – 60µm Samples sliced at an angle Rotary microtome Embedded samples 0.5 µm - 60 µm Thin samples. Manual control Vibrating microtome Difficult/soft, Fresh/fixed samples Fixed >10 µm Fresh > 30 µm Less pressure and sample disruption Laser microtome All samples >1 µm No sample contact and no sample prep Cryomicrotomes Frozen samples Very specific thickness Ultramicrotomes TEM 40-100nm SBFSEM 30-50nm Extremely thin cuts for analysis with specialty microscopes
  • 7.
     This deviceoperates with a staged rotary action such that the actual cutting is part of the rotary motion. In a rotary microtome, the knife is typically fixed in a horizontal position
  • 8.
     Microtome baseplate or stage: A platform which has rails that secure the knife holder base.  Knife holder base: A part that anchors the knife holder to the microtome stage. The knife holder base can be moved toward or away from the block, but MUST be stationary and locked during microtomy.  Knife holder: comprised of several components including the:  blade clamp that holds the blade  knife tilt for adjusting the knife angle  the face plate that guides that ribbons away from the blade and towards the operator.  Cassette clamp or block holder: Holds the paraffin block in place  moves up and down with each revolution while the blade is stationary  may have knobs that allow the user to manipulate the block face in various directions to bring the tissue in alignment with the blade.
  • 9.
     Coarse handwheel:Moves the block holder either toward the knife or away from the knife.  Advancement handwheel: Turns in one direction and advances the block toward the knife at the specified microns  Most handwheels are equipped with a safety lock to prevent the wheel from releasing and having the block holder come down towards the blade while a block is inserted or removed. The safety lock should be used anytime the microtomist is not actively sectioning paraffin blocks.  Micron adjustment: Micron settings for section thickness can range from 1 to 60 microns on most microtomes.
  • 10.
     Planar concave extremely sharp, but are also very delicate and are therefore only used with very soft samples.  wedge profile knives  more stable and find use in moderately hard materials, such as in epoxy or cryogenic sample cutting  chisel profile  with its blunt edge, raises the stability of the knife, whilst requiring significantly more force to achieve the cut.
  • 11.
     Used inBotanical Microtomy Technique where hard materials like wood, bone and leather require a sledge microtome  These microtomes have heavier blades and cannot cut as thin as a regular microtome
  • 12.
     Operating handle Semi automatic advance – when pushed towards the knife the sledge will move along the runners and will also advance the specimen the selected amount (thickness). When pulled back the specimen retraction mechanism is activated.  Thickness control  A knob, calibrated in microns, is used to select the thickness of sections to be cut from 1μm – 40μm, in 1μm steps. Always set the thickness by turning the knob anticlockwise. If the thickness has to be reduced then turn clockwise past the required thickness, then anticlockwise.  Coarse advance/trim control  Quickly raises or lowers the specimen 450μm per turn.  Specimen holder  Specimens are clamped in the vice or alternative holder if fitted  can be raised and lowered after releasing the clamp lever
  • 13.
     Trimming theSpecimen  Fit the specimen securely into the appropriate specimen holder on the microtome.To trim excess material from the surface of the specimen block: a. First move the sledge towards the knife and adjust the specimen height using the coarse advance so that the specimen is just below the knife. b. Either set the thickness control to cut thick sections, eg: 20μm, and move the sledge back and forth repeatedly to trim the specimen. c. Or set the thickness control to zero and alternately raise the specimen slightly using the coarse advance and move the sledge forward then backwards. This method isquicker but should only be used if the operator is experienced in the use of base sledge microtomes.
  • 14.
     Knife clamps Two screws, turned by a lever , are used to fix the knife in the knife clamp and the knife clamp in the knife block  The cutting angle of the knife is adjustable from 0-40º. Slew angles of the knife can be obtained by loosening the knife block clamp levers and the knife clamp levers and moving knife to slew angle required.  Knife guards  Each knife guard can be moved to the central position to cover the working area of the knife, or to the outer position while section cutting.  The black knobs secure the guards in the chosen position.  Side pillars  In normal use, these pillars slope inwards slightly. For large area sections they can be unbolted from the base, swapped left to right and refitted, so that they slop outwards, so providing more space.
  • 15.
     Fitting theObject Holder  Pull the sledge away from the knife holders. Secure the required object holder by placing it in the holder in the sledge slide.Set to correct height and lock by tightening clamp lever  Note that the clamp lever has a ratchet with its movement limited to prevent the lever being left in positions where it could impact on other parts during sectioning.
  • 16.
     Fitting andAdjusting the Knife  NB: The term ‘knife’ used here also includes disposable blade holder. a. Slacken the knife clamp levers just enough to let the knife slide into the knife clamps from the side. b. Insert the knife, taking care to avoid touching the edge against the metalwork. c. Check that the knife lies flat on the pad pieces in the knife clamps and that the heel of the knife is not caught up on the slot in the knife clamps. d. Screw the knife clamp levers down just sufficiently to steady the knife in position. e. Slacken the knife block clamp levers . Set the knife holders to the desired slew angle, ensure the knife clamps still cover the ends of the knife. Set the knife to the desired cutting angle and tighten the knife clamping levers. f. Check that the knife is still at the desired slew angles and tighten the knife block clamp levers.  NB: To ensure that the knife clamps are correctly aligned in the holders, the knife block clamp levers must always be slackened before the knife clamping levers are tightened.
  • 19.
     Cleaning  Wipeoff sectioning debris etc with a paper towel. Alcohols (industrial methylated spirits, ethanol or methanol) may be used. Xylene may be used sparingly to remove built-up wax, but ensure surplus Xylene is wiped off.  Avoid harsh solvents such as acetone  Lubrication  After cleaning, oil both the sliding surfaces of the sledge base with Microtome Sledge Oil. Now move the sledge several times over the full length of travel to distribute oil
  • 20.
     Decontamination  Itis the responsibility of the user to ensure that a decontamination procedure is employed which is appropriate to the nature of the work carried out.