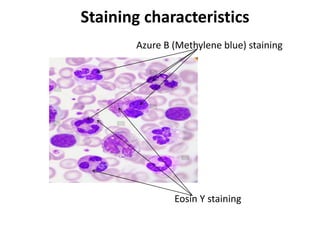
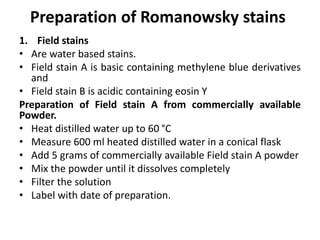
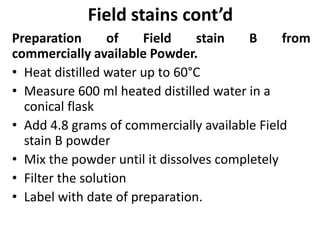
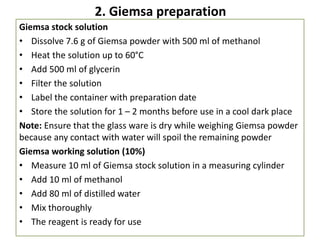
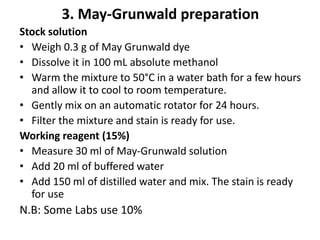
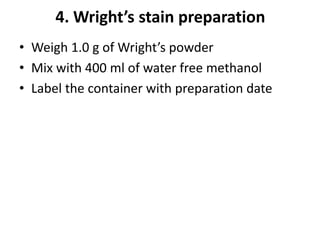
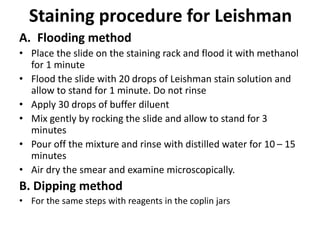
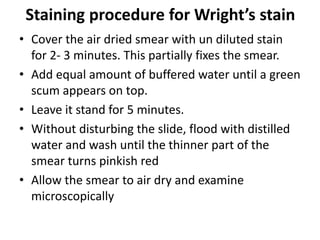
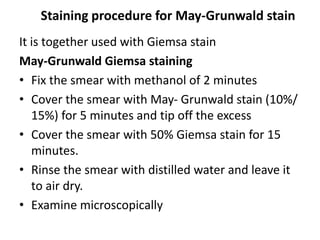
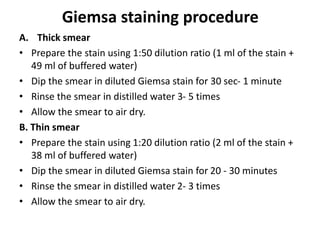
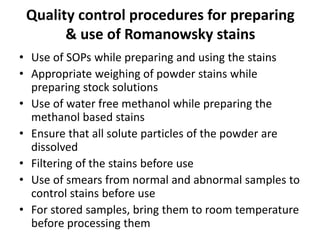
MBARARA UNIVERSITY OF SCIENCE &
TECHNOLOGY
DEPARTMENT OF MEDICAL LABORATORY
SCIENCE
MLS 2112: HAEMATOLOGY & BLOOD
TRANSFUSION
TOPIC: ROMANOWSKY STAINS
BY
Tumukunde Benjamin
Objectives
By the end of the topic, we should be able to;-
• Define Romanowsky stains,
• State the principle of Romanowsky stains,
• Know the types of Romanowsky stains,
• Know how different Romanowsky stains are
prepared,
• Know how different Romanowsky stains are
used,
• Know QC procedures in the use of
Romanowsky stains.
Introduction
• Romanowsky Stains are named after a man called
Dmitri Leonovich Romanowsky who invented it
in 1891
• Defined as; stains that are used in haematology
and cytological studies to differentiate cells in
microscopic examinations of blood and bone
marrow samples.
• They are also applied to detect the presence of
haemoparasites such as malaria, trypanosomes,
leishmania and others parasites.
Introduction cont’d
• Romanowsky stains are neutral in a way that
they are composed of oxidized methylene
blue (azure) dyes and Eosin Y.
• The azures are purplish- blue and are basic
while the eosin is pinkish red and is acidic.
• They stain the cell components differently
depending on their PH.
• This ability to produce a wide range of hues
(colours) allowing cellular components to be
easily differentiated is called Romanowsky
effect/ metachromasia
Principle
• Romanowsky stains work on the principle that
“the acidic components of the cell are stained
by the basic dye (azure) forming a blue-purple
colour while the basic components of the cell
are stained by the acidic dye (eosin Y) forming
a pin- red colouration.”
Staining characteristics
Azure B (Methylene blue) staining
Eosin Y staining
Types of Romanowsky stains
• Field stains (A and B)
• Giemsa stain
• May-Grünwald
• Leishman stain
• Wright's
Uses of Romanowsky stains
• Staining of blood and bone marrow specimens
for cytopathological findings. Eg Leukemias
• Detection of malaria and other
haemoparasites. Eg Trypanosomes.
Preparation of Romanowsky stains
1. Field stains
• Are water based stains.
• Field stain A is basic containing methylene blue derivatives
and
• Field stain B is acidic containing eosin Y
Preparation of Field stain A from commercially available
Powder.
• Heat distilled water up to 60 °C
• Measure 600 ml heated distilled water in a conical flask
• Add 5 grams of commercially available Field stain A powder
• Mix the powder until it dissolves completely
• Filter the solution
• Label with date of preparation.
Field stains cont’d
Preparation of Field stain B from
commercially available Powder.
• Heat distilled water up to 60°C
• Measure 600 ml heated distilled water in a
conical flask
• Add 4.8 grams of commercially available Field
stain B powder
• Mix the powder until it dissolves completely
• Filter the solution
• Label with date of preparation.
2. Giemsa preparation
Giemsa stock solution
• Dissolve 7.6 g of Giemsa powder with 500 ml of methanol
• Heat the solution up to 60°C
• Add 500 ml of glycerin
• Filter the solution
• Label the container with preparation date
• Store the solution for 1 – 2 months before use in a cool dark place
Note: Ensure that the glass ware is dry while weighing Giemsa powder
because any contact with water will spoil the remaining powder
Giemsa working solution (10%)
• Measure 10 ml of Giemsa stock solution in a measuring cylinder
• Add 10 ml of methanol
• Add 80 ml of distilled water
• Mix thoroughly
• The reagent is ready for use
3. May-Grunwald preparation
Stock solution
• Weigh 0.3 g of May Grunwald dye
• Dissolve it in 100 mL absolute methanol
• Warm the mixture to 50°C in a water bath for a few hours
and allow it to cool to room temperature.
• Gently mix on an automatic rotator for 24 hours.
• Filter the mixture and stain is ready for use.
Working reagent (15%)
• Measure 30 ml of May-Grunwald solution
• Add 20 ml of buffered water
• Add 150 ml of distilled water and mix. The stain is ready
for use
N.B: Some Labs use 10%
4. Wright’s stain preparation
• Weigh 1.0 g of Wright’s powder
• Mix with 400 ml of water free methanol
• Label the container with preparation date
5. Leishman stain preparation
Leishman stock solution
• Weigh 0.15g of Leishman stain powder and grind it in a glass
• Put the powder into a bottle through a funnel and gently add
20 ml of methanol through the same funnel to ensure that all
the dry stain is washed into the bottle
• Shake the mixture in a circular motion for 2-3 minutes
• Add the remaining amount of methanol to the mixture
through the same funnel up to 100ml mark
• Cap the bottle and shake for more 2 minutes
• Label the bottle and keep the mixture for a week. There after,
the stain is ready for use.
Leishman stain preparation cont’d
Leishman working reagent
• Measure 50 ml of Leishman stock solution into
a measuring cylinder
• Add 75 ml of phosphate buffer (PH btn 6.4 –
7.0)
• Add distilled water up to 250 ml mark (175 ml)
• Mix and let the solution stand for 10 minutes
before use
Staining procedure for Leishman
A. Flooding method
• Place the slide on the staining rack and flood it with methanol
for 1 minute
• Flood the slide with 20 drops of Leishman stain solution and
allow to stand for 1 minute. Do not rinse
• Apply 30 drops of buffer diluent
• Mix gently by rocking the slide and allow to stand for 3
minutes
• Pour off the mixture and rinse with distilled water for 10 – 15
minutes
• Air dry the smear and examine microscopically.
B. Dipping method
• For the same steps with reagents in the coplin jars
Staining procedure for Wright’s stain
• Cover the air dried smear with un diluted stain
for 2- 3 minutes. This partially fixes the smear.
• Add equal amount of buffered water until a green
scum appears on top.
• Leave it stand for 5 minutes.
• Without disturbing the slide, flood with distilled
water and wash until the thinner part of the
smear turns pinkish red
• Allow the smear to air dry and examine
microscopically
Staining procedure for May-Grunwald stain
It is together used with Giemsa stain
May-Grunwald Giemsa staining
• Fix the smear with methanol of 2 minutes
• Cover the smear with May- Grunwald stain (10%/
15%) for 5 minutes and tip off the excess
• Cover the smear with 50% Giemsa stain for 15
minutes.
• Rinse the smear with distilled water and leave it
to air dry.
• Examine microscopically
Giemsa staining procedure
A. Thick smear
• Prepare the stain using 1:50 dilution ratio (1 ml of the stain +
49 ml of buffered water)
• Dip the smear in diluted Giemsa stain for 30 sec- 1 minute
• Rinse the smear in distilled water 3- 5 times
• Allow the smear to air dry.
B. Thin smear
• Prepare the stain using 1:20 dilution ratio (2 ml of the stain +
38 ml of buffered water)
• Dip the smear in diluted Giemsa stain for 20 - 30 minutes
• Rinse the smear in distilled water 2- 3 times
• Allow the smear to air dry.
Staining procedure for Field stains
A. Thick smear
• Dip an air dried smear in Field stain A for 4 seconds
• Rinse with tap water
• Dip the smear in Field stain B for 3 seconds
• Rinse with tap water
• Clean the back of the slide and leave to air dry.
B. Thin smear
• Fix the air dried smear with methanol for 1 minute
• Dry in the air.
• Dip fixed smear to Field Stain B (Red Stain) for 5 to 6 seconds.
• Wash in running tap water.
• Dip smear into Field Stain A (Blue Stain) for 10 to 30 seconds.
• Wash in running tap water.
• Leave to air dry
Quality control procedures for preparing
& use of Romanowsky stains
• Use of SOPs while preparing and using the stains
• Appropriate weighing of powder stains while
preparing stock solutions
• Use of water free methanol while preparing the
methanol based stains
• Ensure that all solute particles of the powder are
dissolved
• Filtering of the stains before use
• Use of smears from normal and abnormal samples to
control stains before use
• For stored samples, bring them to room temperature
before processing them
All the best in your endeavours

ROMANOWSKY STAINS-1.pptx

  • 1.
    MBARARA UNIVERSITY OFSCIENCE & TECHNOLOGY DEPARTMENT OF MEDICAL LABORATORY SCIENCE MLS 2112: HAEMATOLOGY & BLOOD TRANSFUSION TOPIC: ROMANOWSKY STAINS BY Tumukunde Benjamin
  • 2.
    Objectives By the endof the topic, we should be able to;- • Define Romanowsky stains, • State the principle of Romanowsky stains, • Know the types of Romanowsky stains, • Know how different Romanowsky stains are prepared, • Know how different Romanowsky stains are used, • Know QC procedures in the use of Romanowsky stains.
  • 3.
    Introduction • Romanowsky Stainsare named after a man called Dmitri Leonovich Romanowsky who invented it in 1891 • Defined as; stains that are used in haematology and cytological studies to differentiate cells in microscopic examinations of blood and bone marrow samples. • They are also applied to detect the presence of haemoparasites such as malaria, trypanosomes, leishmania and others parasites.
  • 4.
    Introduction cont’d • Romanowskystains are neutral in a way that they are composed of oxidized methylene blue (azure) dyes and Eosin Y. • The azures are purplish- blue and are basic while the eosin is pinkish red and is acidic. • They stain the cell components differently depending on their PH. • This ability to produce a wide range of hues (colours) allowing cellular components to be easily differentiated is called Romanowsky effect/ metachromasia
  • 5.
    Principle • Romanowsky stainswork on the principle that “the acidic components of the cell are stained by the basic dye (azure) forming a blue-purple colour while the basic components of the cell are stained by the acidic dye (eosin Y) forming a pin- red colouration.”
  • 6.
    Staining characteristics Azure B(Methylene blue) staining Eosin Y staining
  • 7.
    Types of Romanowskystains • Field stains (A and B) • Giemsa stain • May-Grünwald • Leishman stain • Wright's
  • 8.
    Uses of Romanowskystains • Staining of blood and bone marrow specimens for cytopathological findings. Eg Leukemias • Detection of malaria and other haemoparasites. Eg Trypanosomes.
  • 9.
    Preparation of Romanowskystains 1. Field stains • Are water based stains. • Field stain A is basic containing methylene blue derivatives and • Field stain B is acidic containing eosin Y Preparation of Field stain A from commercially available Powder. • Heat distilled water up to 60 °C • Measure 600 ml heated distilled water in a conical flask • Add 5 grams of commercially available Field stain A powder • Mix the powder until it dissolves completely • Filter the solution • Label with date of preparation.
  • 10.
    Field stains cont’d Preparationof Field stain B from commercially available Powder. • Heat distilled water up to 60°C • Measure 600 ml heated distilled water in a conical flask • Add 4.8 grams of commercially available Field stain B powder • Mix the powder until it dissolves completely • Filter the solution • Label with date of preparation.
  • 11.
    2. Giemsa preparation Giemsastock solution • Dissolve 7.6 g of Giemsa powder with 500 ml of methanol • Heat the solution up to 60°C • Add 500 ml of glycerin • Filter the solution • Label the container with preparation date • Store the solution for 1 – 2 months before use in a cool dark place Note: Ensure that the glass ware is dry while weighing Giemsa powder because any contact with water will spoil the remaining powder Giemsa working solution (10%) • Measure 10 ml of Giemsa stock solution in a measuring cylinder • Add 10 ml of methanol • Add 80 ml of distilled water • Mix thoroughly • The reagent is ready for use
  • 12.
    3. May-Grunwald preparation Stocksolution • Weigh 0.3 g of May Grunwald dye • Dissolve it in 100 mL absolute methanol • Warm the mixture to 50°C in a water bath for a few hours and allow it to cool to room temperature. • Gently mix on an automatic rotator for 24 hours. • Filter the mixture and stain is ready for use. Working reagent (15%) • Measure 30 ml of May-Grunwald solution • Add 20 ml of buffered water • Add 150 ml of distilled water and mix. The stain is ready for use N.B: Some Labs use 10%
  • 13.
    4. Wright’s stainpreparation • Weigh 1.0 g of Wright’s powder • Mix with 400 ml of water free methanol • Label the container with preparation date
  • 14.
    5. Leishman stainpreparation Leishman stock solution • Weigh 0.15g of Leishman stain powder and grind it in a glass • Put the powder into a bottle through a funnel and gently add 20 ml of methanol through the same funnel to ensure that all the dry stain is washed into the bottle • Shake the mixture in a circular motion for 2-3 minutes • Add the remaining amount of methanol to the mixture through the same funnel up to 100ml mark • Cap the bottle and shake for more 2 minutes • Label the bottle and keep the mixture for a week. There after, the stain is ready for use.
  • 15.
    Leishman stain preparationcont’d Leishman working reagent • Measure 50 ml of Leishman stock solution into a measuring cylinder • Add 75 ml of phosphate buffer (PH btn 6.4 – 7.0) • Add distilled water up to 250 ml mark (175 ml) • Mix and let the solution stand for 10 minutes before use
  • 16.
    Staining procedure forLeishman A. Flooding method • Place the slide on the staining rack and flood it with methanol for 1 minute • Flood the slide with 20 drops of Leishman stain solution and allow to stand for 1 minute. Do not rinse • Apply 30 drops of buffer diluent • Mix gently by rocking the slide and allow to stand for 3 minutes • Pour off the mixture and rinse with distilled water for 10 – 15 minutes • Air dry the smear and examine microscopically. B. Dipping method • For the same steps with reagents in the coplin jars
  • 17.
    Staining procedure forWright’s stain • Cover the air dried smear with un diluted stain for 2- 3 minutes. This partially fixes the smear. • Add equal amount of buffered water until a green scum appears on top. • Leave it stand for 5 minutes. • Without disturbing the slide, flood with distilled water and wash until the thinner part of the smear turns pinkish red • Allow the smear to air dry and examine microscopically
  • 18.
    Staining procedure forMay-Grunwald stain It is together used with Giemsa stain May-Grunwald Giemsa staining • Fix the smear with methanol of 2 minutes • Cover the smear with May- Grunwald stain (10%/ 15%) for 5 minutes and tip off the excess • Cover the smear with 50% Giemsa stain for 15 minutes. • Rinse the smear with distilled water and leave it to air dry. • Examine microscopically
  • 19.
    Giemsa staining procedure A.Thick smear • Prepare the stain using 1:50 dilution ratio (1 ml of the stain + 49 ml of buffered water) • Dip the smear in diluted Giemsa stain for 30 sec- 1 minute • Rinse the smear in distilled water 3- 5 times • Allow the smear to air dry. B. Thin smear • Prepare the stain using 1:20 dilution ratio (2 ml of the stain + 38 ml of buffered water) • Dip the smear in diluted Giemsa stain for 20 - 30 minutes • Rinse the smear in distilled water 2- 3 times • Allow the smear to air dry.
  • 20.
    Staining procedure forField stains A. Thick smear • Dip an air dried smear in Field stain A for 4 seconds • Rinse with tap water • Dip the smear in Field stain B for 3 seconds • Rinse with tap water • Clean the back of the slide and leave to air dry. B. Thin smear • Fix the air dried smear with methanol for 1 minute • Dry in the air. • Dip fixed smear to Field Stain B (Red Stain) for 5 to 6 seconds. • Wash in running tap water. • Dip smear into Field Stain A (Blue Stain) for 10 to 30 seconds. • Wash in running tap water. • Leave to air dry
  • 21.
    Quality control proceduresfor preparing & use of Romanowsky stains • Use of SOPs while preparing and using the stains • Appropriate weighing of powder stains while preparing stock solutions • Use of water free methanol while preparing the methanol based stains • Ensure that all solute particles of the powder are dissolved • Filtering of the stains before use • Use of smears from normal and abnormal samples to control stains before use • For stored samples, bring them to room temperature before processing them
  • 22.
    All the bestin your endeavours