MICROTOMY
• Microtomy isthe means by which tissue can be
sectioned and attached to a surface for further
microscopic examination.
• Performed on paraffin-embedded tissue blocks
• Basic instrument used is the Microtome
3.
TYPES OF MICROTOME
Severaltypes of microtome are used depending on the type of
work, nature of tissue preparation and embedding.
Rotary Cryomicrotome
Rocking Ultrathin microtome
Base sledge microtomy Laser microtome
Sliding microtome
4.
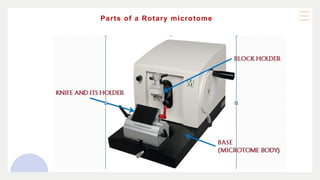
Rotary microtome
Often referredto as the ‘Minot’ after its inventor
Basic mechanism- rotation of a fine advance hand-
wheel through 3600
, moving the block moves down
then up in one rotation.
Rotary microtome may be-
o Manual (completely manipulated by operator)
o Semi-automated (one motor)
o Fully automated (two motors)
5.
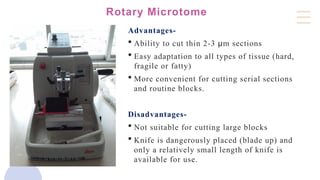
Rotary Microtome
Advantages-
Abilityto cut thin 2-3 µm sections
Easy adaptation to all types of tissue (hard,
fragile or fatty)
More convenient for cutting serial sections
and routine blocks.
Disadvantages-
Not suitable for cutting large blocks
Knife is dangerously placed (blade up) and
only a relatively small length of knife is
available for use.
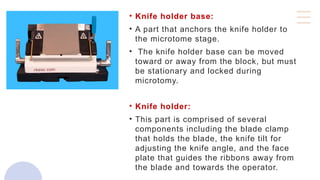
• Knife holderbase:
• A part that anchors the knife holder to
the microtome stage.
• The knife holder base can be moved
toward or away from the block, but must
be stationary and locked during
microtomy.
• Knife holder:
• This part is comprised of several
components including the blade clamp
that holds the blade, the knife tilt for
adjusting the knife angle, and the face
plate that guides the ribbons away from
the blade and towards the operator.
8.
• Coarse handwheel:
•Moves the block holder either
toward the knife or away from
the knife.
• Micron adjustment: Micron
settings for section thickness
can range from 1 to 60 microns
on most microtomes.
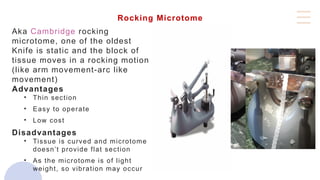
Rocking Microtome
Aka Cambridgerocking
microtome, one of the oldest
Knife is static and the block of
tissue moves in a rocking motion
(like arm movement-arc like
movement)
Advantages
• Thin section
• Easy to operate
• Low cost
Disadvantages
• Tissue is curved and microtome
doesn’t provide flat section
• As the microtome is of light
weight, so vibration may occur
11.
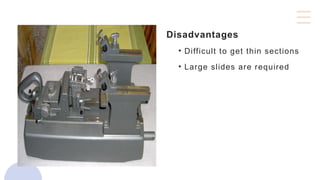
Base sledge microtome
Specimenis held stationary and the knife slides across the
top of the specimen during processing.
Advantages-
• Large sections can be cut and serial sections can be
obtained with ease
• Also useful for hard tissues or whole mounts
• Easy to operate and maintain
• Gives sections of excellent quality; especially useful in
large neuropathic and ophthalmic sections.
Sliding Microtome
oKnife isstationary and block moves horizontally over kinfe.
oSpecimen slides under the knife during sectioning
oDeveloped for use with celloidin- embedded tissue block.
oLarge sections can be cut
oDisadvantage:
o Knife may glide in case of hard tissue and may jump
o Long knife are difficult to sharpen
14.
Freezing Microtome/ Cryomicrotome
oThe freezing microtome is equipped with a stage upon which tissue can be quickly frozen using
either liquid carbon dioxide, from a cylinder, or a low temperature recirculating coolant.
o blade moves, block fixed
o Principle: Water is turned into ice, and works as embedding medium
o Used for cutting thin to semi-thin sections of fresh, frozen tissue .
• Advantage:
o To get rapid section for rapid diagnosis (importance of forzen section: intra-operative to look
for margin; inbreast to look for sentinel LN`)
o To study nerve biopsy
o To study enzyme histochemistry
• Diaadvantage:
• Needs continuous supervision to maintain the temperature
• Freezing artefact is often seen (water bubble, dried ice = hyperchromatic nucleus)
• Very expensive
• Fixed tissue is difficult to cut
15.
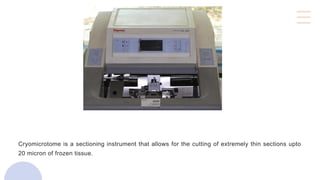
Cryomicrotome is asectioning instrument that allows for the cutting of extremely thin sections upto
20 micron of frozen tissue.
16.
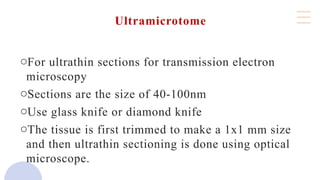
Ultramicrotome
oFor ultrathin sectionsfor transmission electron
microscopy
oSections are the size of 40-100nm
oUse glass knife or diamond knife
oThe tissue is first trimmed to make a 1x1 mm size
and then ultrathin sectioning is done using optical
microscope.
17.
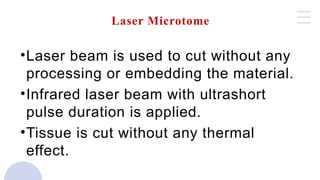
Laser Microtome
•Laser beamis used to cut without any
processing or embedding the material.
•Infrared laser beam with ultrashort
pulse duration is applied.
•Tissue is cut without any thermal
effect.
19.
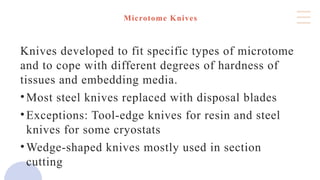
Microtome Knives
Knives developedto fit specific types of microtome
and to cope with different degrees of hardness of
tissues and embedding media.
•Most steel knives replaced with disposal blades
•Exceptions: Tool-edge knives for resin and steel
knives for some cryostats
•Wedge-shaped knives mostly used in section
cutting
20.
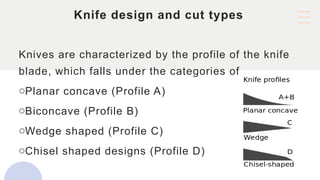
Knife design andcut types
Knives are characterized by the profile of the knife
blade, which falls under the categories of
oPlanar concave (Profile A)
oBiconcave (Profile B)
oWedge shaped (Profile C)
oChisel shaped designs (Profile D)
21.
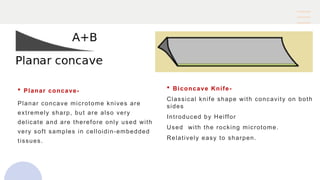
Planar concave-
Planarconcave microtome knives are
extremely sharp, but are also very
delicate and are therefore only used with
very soft samples in celloidin-embedded
tissues.
Biconcave Knife-
Classical knife shape with concavity on both
sides
Introduced by Heiffor
Used with the rocking microtome.
Relatively easy to sharpen.
22.
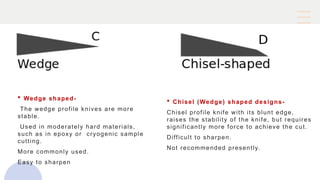
Wedge shaped-
Thewedge profile knives are more
stable.
Used in moderately hard materials,
such as in epoxy or cryogenic sample
cutting.
More commonly used.
Easy to sharpen
Chisel (Wedge) shaped designs-
Chisel profile knife with its blunt edge,
raises the stability of the knife, but requires
significantly more force to achieve the cut.
Difficult to sharpen.
Not recommended presently.
23.
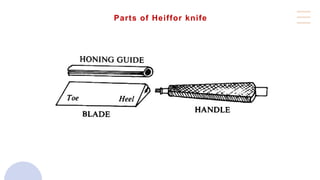
Parts of Heifforknife
Heiffor knife is a biconcave knife used in the Rocking Microtome.
It has following parts-
Blade-
Heel- Angle formed by the cutting edge and end of the knife
nearest the handle.
Toe- Angle formed by the cutting edge and end of the knife farthest
from the handle.
Handle
Heiffer Knife
• Length-100to 250 mm
• Less rigid
• Prone to vibration
• Used for cutting soft, celloidin embedded material.
• To obtain the best result the knife should always be oblique to the
object when cutting sections.
• Not suitable for relatively hard materials, which cause the edge to
vibrate and produce the phenomenon known as chattering.
26.
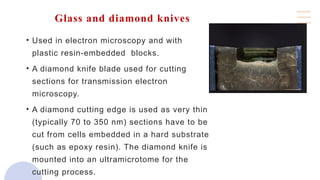
Glass and diamondknives
• Used in electron microscopy and with
plastic resin-embedded blocks.
• A diamond knife blade used for cutting
sections for transmission electron
microscopy.
• A diamond cutting edge is used as very thin
(typically 70 to 350 nm) sections have to be
cut from cells embedded in a hard substrate
(such as epoxy resin). The diamond knife is
mounted into an ultramicrotome for the
cutting process.
27.
Disposable knife
• Types:
•Low profile: Small biopsy or soft large tissue
• High profile: Firm to relatively hard tissue eg; Uterus and heart
• Advantages
• Easy to replace
• No need to sharpen
• Overall cost of disposable blade system is low, as no need for
knife sharpner and abraisive powders
• Disadvantages
• Not rigid. So vibration effect may be seen.
28.
Disposable Blades
Disposable stainlesssteel blades has replaced steel knives nowadays.
oUsed for routine microtomy and cryotomy.
Provides a sharp cutting edge
Can produce almost flawless 2-4 micron sections.
Disposable blade holders are incorporated into the microtome.
Honing
• Microtome knivesare sharpened against a special stone known as “Hone”.
• Honing refers to grinding the cutting edge of the knife on a hard abrasive surface to
sharpen the knife.
TYPES OF HONE-
• Belgian black vein
• Arkansas
• Aloxite
• Tam’o Shanter Scotch
• Carborundum
• Plate glass
31.
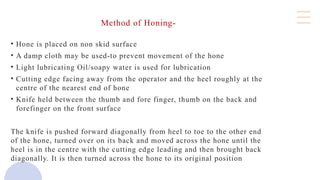
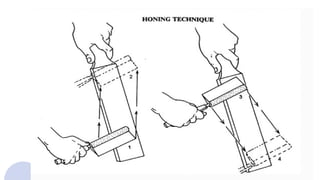
Method of Honing-
•Hone is placed on non skid surface
• A damp cloth may be used-to prevent movement of the hone
• Light lubricating Oil/soapy water is used for lubrication
• Cutting edge facing away from the operator and the heel roughly at the
centre of the nearest end of hone
• Knife held between the thumb and fore finger, thumb on the back and
forefinger on the front surface
The knife is pushed forward diagonally from heel to toe to the other end
of the hone, turned over on its back and moved across the hone until the
heel is in the centre with the cutting edge leading and then brought back
diagonally. It is then turned across the hone to its original position
33.
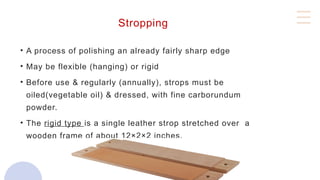
Stropping
• A processof polishing an already fairly sharp edge
• May be flexible (hanging) or rigid
• Before use & regularly (annually), strops must be
oiled(vegetable oil) & dressed, with fine carborundum
powder.
• The rigid type is a single leather strop stretched over a
wooden frame of about 12×2×2 inches.
34.
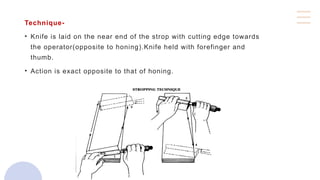
Technique-
• Knife islaid on the near end of the strop with cutting edge towards
the operator(opposite to honing).Knife held with forefinger and
thumb.
• Action is exact opposite to that of honing.
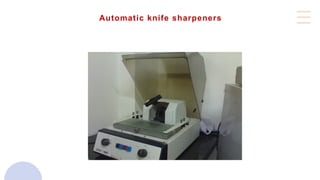
Automatic knife sharpeners
Twobasic designs available.
1) Knife is held vertically with revolving sharpening wheels grinding
the cutting edge (Automatic Hone, here, is a large circular glass
plate)
2) Knife is held horizontally against the surface of a slowly rotating
flat plate. (Automatic Hone, here, is a relatively small rectangular
frosted glass plate)
The best automatic knife sharpeners are those using a large circular
glass plate.
37.
Considerations/ Precautions:-
• Clearanceangle should be adjusted to eliminate problems that
occur with the ribboning of the tissue.
• Over-tightening the disposable blade in the clamping device may
cause cutting artifacts .
• Clamping device must be clean and free of defects.
• Extremely hard tissues may pose a problem for disposable blades.
38.
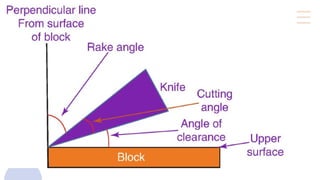
Instrumentation for Microtomy:Knife Angles
Various angles play important roles in obtaining the perfect tissue
sections.
The clearance angle is the only knife angle that can be adjusted on a
microtome using the knife tilt.
The angles associated with Microtomy Knives are-
1) Bevel Angle
2) Clearance Angle
3) Cutting Angle
4) Rake Angle
40.
Bevel Angle /Cutting angle
• Angle of the very tip of knife or blade, between cutting
facets. (Between two planes of knife)
• Normally 27-32°.
• Angle between the block face and upper facet of knife.
• This is not an angle that can be adjusted on a
microtome.
• It is the result of the clearance angle and the upper
bevel angle of the knife or blade.
41.
Clearance Angle
• Anglebetween the block face and lower facet of knife.
• Dependent on tilt or knife holder.
• Set between 3-8°.
• This is the angle that can be adjusted easily to suit the blade and
block for better sectioning.
• Once the proper clearance angle is found for a particular blade, it
rarely needs to be changed.
• Most microtomes using low profile blades cut best when the
clearance angle is set at 5°.
• When the clearance angle is too wide, the tip of the blade will
scrape the block and chatter will result.
• When the clearance angle is too small, the body of the blade will
scrape the block and skipped sections or poor ribboning will
result.
42.
Rake angle
• Anglebetween the upper bevel of the knife and a line at 90 degrees
to the block surface ,i.e, 90° minus angle of upper facet of knife.
• Increased rake angle makes the section cutting easier.
43.
Paraffin section cutting
Equipmentsrequired :-
• Microtome
• Floatation(water) bath
• Slide drying oven or hot plate
• Fine pointed or curved forceps
• Sable or camel haired brush
• Scalpel
• Slide rack
• Clean slides
• Teasing needle
• Ice tray
• Chemical resistant pencil or pen
44.
Floatation (water) bath
•Thermostatically controlled water bath is used for floating out tissue
ribbons after sectioning.
• Temperature of water in the bath should be 10 degree celsius below
the melting point of paraffin employed.
• Distilled water may be used to prevent water bubbles from being
trapped under the sections.
• Alcohol or a small drop of detergent may be added to the water to
reduce the surface tension- to flatten out the sections with
ease.water bath used for floating out tissue ribbons after sectioning
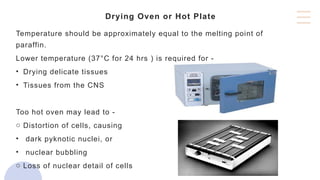
Drying Oven orHot Plate
Temperature should be approximately equal to the melting point of
paraffin.
Lower temperature (37°C for 24 hrs ) is required for -
• Drying delicate tissues
• Tissues from the CNS
Too hot oven may lead to -
o Distortion of cells, causing
• dark pyknotic nuclei, or
• nuclear bubbling
o Loss of nuclear detail of cells
47.
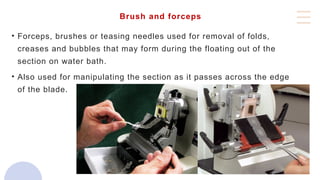
Brush and forceps
•Forceps, brushes or teasing needles used for removal of folds,
creases and bubbles that may form during the floating out of the
section on water bath.
• Also used for manipulating the section as it passes across the edge
of the blade.
48.
SLIDES
• For normalroutine work, 76 x 25 mm slides are universally used.
• 1.0-1.2 mm thick slides are preferred as they do not break easily.
• Larger size of slides are used for sections of eyes or CNS tissues.
• Identification details such as name or serial number are inscribed
on the slide by a diamond marker.
• Chemical resistant pens and pencils routinely used to label the
slide.
• Automatic slide labeling machines, now available, has reduced the
number of transcription errors.
49.
SECTION ADHESIVES
• Usedto prevent section detachment from slide during staining.
Causes of section detachment –
• Exposure to strong alkali solutions during staining
• Cryostat sections for immunofluorescence, immunohistochemistry
or intraoperative diagnosis
• CNS tissues
• Decalcified tissues.
• Tissues containing blood and mucus.
• Sections submitted to extreme temperatures.
50.
Adhesive commonly usedare-
• Albumin (Meyer’s egg albumin-glycerol)
• Gelatin (chrome gelatin)
• Starch
• Dilute serum or plasma
• Poly-L-Lysine (PLL)
• 3-AminoPropyltriEthoxySilane ( APES)
• Charged or Plus slides
51.
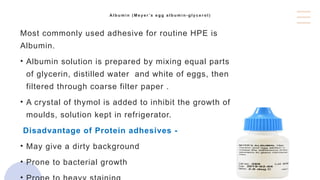
A l bu m i n ( M e y e r ’s e g g a l b u m i n - g l y c e r o l )
Most commonly used adhesive for routine HPE is
Albumin.
• Albumin solution is prepared by mixing equal parts
of glycerin, distilled water and white of eggs, then
filtered through coarse filter paper .
• A crystal of thymol is added to inhibit the growth of
moulds, solution kept in refrigerator.
Disadvantage of Protein adhesives -
• May give a dirty background
• Prone to bacterial growth
52.
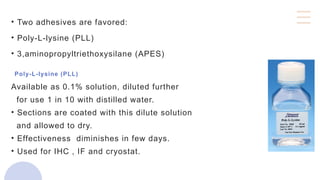
• Two adhesivesare favored:
• Poly-L-lysine (PLL)
• 3,aminopropyltriethoxysilane (APES)
Poly-L-lysine (PLL)
Available as 0.1% solution, diluted further
for use 1 in 10 with distilled water.
• Sections are coated with this dilute solution
and allowed to dry.
• Effectiveness diminishes in few days.
• Used for IHC , IF and cryostat.
53.
3-aminopropyltriethoxysilane (APES)
• Thisis by far the best section adhesive available and
coated slides can be stored for a long time.
• Slides are dipped in 2% solution of APES in acetone,
drained then dipped in acetone, drained again and finally
dipped in distilled water.
• Slides are placed upright in a rack to dry.
• Useful for cytology, especially for specimens that may be
bloody or contain proteinaceous material.
54.
Charged or plusslides
• Slides manufactured with a permanent positive charge.
• Done by coating the slide with basic polymer in which a
chemical reaction occurs, leaving the amino groups linked
by covalent bonds to silicon atoms of the glass.
• Proven to be superior in their resistance to cell and tissue
loss during staining or pre-treatments such as enzyme and
antigen retrieval.
55.
Practical microtomy
Sectioning :-discussed under
1. Trimming the tissue blocks
2. Cutting Sections
3. Floating Out Sections
4. Drying sections
5. Cutting hard tissues
6. Surface decalcification
56.
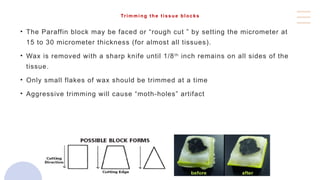
Trimming the tissueblocks
• The Paraffin block may be faced or “rough cut ” by setting the micrometer at
15 to 30 micrometer thickness (for almost all tissues).
• Wax is removed with a sharp knife until 1/8th
inch remains on all sides of the
tissue.
• Only small flakes of wax should be trimmed at a time
• Aggressive trimming will cause “moth-holes” artifact
57.
Cutting Sections
After trimmingblocks are cooled by keeping , face down on
ice-tray (2-3min) and this leads to :
• Cooling both tissue and paraffin wax, giving them a
consistent temperature .
• A small amount of water gets absorbed into the tissue,
slightly swelling it and making sectioning easier.
• Routine sections are cut at 3-4 μm, however micrometer
setting of section cutting thickness may vary from this.
• Serial sections are best cut in ribbons of 10-12 inches in
length, successive section sticking edge-to-edge.
58.
Cutting Sections (contd)
Thicknessof section depends on factors such as-
o Temperature
o Knife angle
o Cutting speed
• Temperature:
Tissues are more easily sectioned at a lower temperature than that of the
atmosphere.
• Lowering temperature brings tissues of differing composition to a more uniform
consistency and degree of hardness ensuring a uniform cutting process.
59.
Knife angle
• Greaterthe rake angle(flatter the knife) more likely is a smooth
plastic flow type cutting action.
• Higher rake angles are more suitable to softer tissues
• Lower rake angles for harder tissues.
Speed of cutting/ consistency of tissue
• Soft tissues are cut more easily at a slow speed.
• Hard tissues are cut easily at a little fast rate.
• If sections are cut at too fast speed, compression will become more
marked.
• If cut too slowly, difficult to maintain the rhythmic action required.
60.
Slant
• Commonly usedto refer to the relationship of the
knife edge to the block when cutting nitrocellulose-
embedded tissue on a sliding microtome.
• Advantages: larger area of the edge is employed.
• Resistance to cutting force is applied more gently.
61.
Cutting Sections (contd)
•Ribbons measuring 9 to 12 inches in length is easily secured by a
routine section cutting professional.
• When a ribbon of several sections has been cut, the first section is
held by forceps, or teasing needle and the last section eased from
the knife edge with a small brush.
• After cutting, ribbons are laid out in serial order on a sheet of
cardboard or black x-ray wrapping paper, with each end of the
ribbon secured by pressing the wax border onto the paper with the
back of a scalpel blade.
62.
Cutting Sections (contd)
•For mounting, the ribbons are cut into convenient lengths (2
inches).
• Then they are placed on numbered slides, the serial order being
maintained.
• A few ml of water are added to each slide, then placed on a hot
plate until such time as the sections have flattened out (5 to 10
minutes)
• Any excess water is drained off and the slides are stood at an angle
of about 40 to 85 degrees to drain
63.
FLOATING OUT SECTIONS
•Sections are floated in the water bath to remove folds
• Ideal floatation time is 30 seconds
• Prolonged floatation causes tissue expansion & distortion
• Pre-flooded slides with 50% alcohol – used for circular structure
like eye
• Water bath to be cleaned to remove debris after each cut
• Done by dragging tissue paper across the surface
64.
DRYING SECTIONS
Small amountof water held under the section will
allow further flattening to occur when heat is applied
to dry the section .
Temperature should be at the melting point of the
paraffin.
For delicate tissues the temperature is reduced and
time is prolonged .
65.
CUTTING HARD TISSUES
Causes of cutting difficulty -
o poor-fixation
o over processing
Troubleshooting -
o Prolonged soaking of the block in water
o Exposing the block surface to running tap water for 30 min
o Reduction in knife slant may yield result
o Lastly softening agents may be used on the surface of the block.
SURFACE DECALCIFICATION
• Whensmall foci of calcium are present in the tissue
section, cutting a quality section may be difficult.
• The block may be removed from the chuck after
rough cutting the tissue and placing the block face
down in a dish that contains a small amount of
decalcification solution .
• The block is rinsed well and blotted dry .
• Immediate section taken since decal achieved will
be limited.
68.
SURFACE DECALCIFICATION (contd)
In over decalcification – diagnostic material may be
compromised.
Common decalcification solutions –
o5-10% Nitric acid
o5-10% Hydrochloric acid
69.
Precautions to betaken before section cutting
Proper fixation
• No matter how much care is taken in processing and sectioning
tissue specimens, essential morphologic detail will only be
demonstrated if the tissue is promptly and adequately fixed.
• Poorly fixed tissue will always produce inferior morphology even if
optimally processed and carefully sectioned
70.
Proper Processing
• Specimensmay be under-processed (specimen too large,
schedule too short) or over-processed (schedule too long
for size and nature of specimen). In both cases, they may
be difficult or impossible to cut.
• Considerable shrinkage of the specimen within the
surrounding wax.
• The tissue is soft and mushy and impossible to section.
• Requires reprocessing
71.
Proper embeding
• Avoidunder-filling the cassette as this can allow unstable clamping
in the microtome and lead to cutting “thick then thin” sections and
other problems.
• Avoid over-filling cassettes as this can interfere with the correct
alignment of the block face for sectioning.
• Any excess wax on the outside of a cassette should be removed
before clamping to ensure the block is firmly held during sectioning
72.
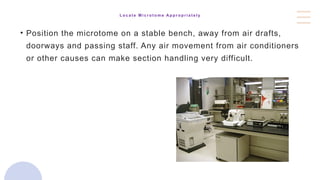
L o ca t e M i c r o t o m e A p p r o p r i a t e l y
• Position the microtome on a stable bench, away from air drafts,
doorways and passing staff. Any air movement from air conditioners
or other causes can make section handling very difficult.
73.
• It isvery important that staff are not distracted when using the
microtome because of the risks of injury from extremely sharp
blades.
• It is preferable to have non-slip flooring in the vicinity of
microtomes because inevitably, wax fragments will find their way
onto the floor where they can produce a slippery surface.
74.
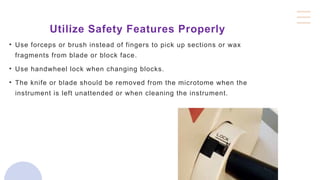
Utilize Safety FeaturesProperly
• Use forceps or brush instead of fingers to pick up sections or wax
fragments from blade or block face.
• Use handwheel lock when changing blocks.
• The knife or blade should be removed from the microtome when the
instrument is left unattended or when cleaning the instrument.
75.
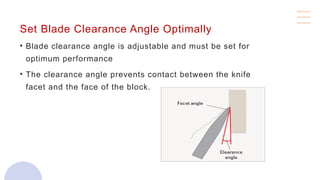
Set Blade ClearanceAngle Optimally
• Blade clearance angle is adjustable and must be set for
optimum performance
• The clearance angle prevents contact between the knife
facet and the face of the block.
77.
Maximize Blade Life
•When cleaning the blade avoid dragging anything
along the cutting edge. Even cellulose fibres can
cause damage to the blade.
• Avoid touching the edge with any hard objects such
as forceps or brush.
78.
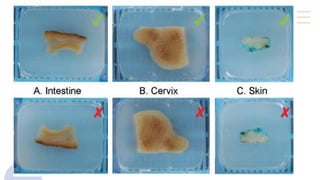
Orient Specimen Appropriately
•Intestine: blade passes through the mucosa last
• Skin: blade passes through the epidermis last.
• Cervix: it is better to present a point of dense tissue to the blade rather than a
straight edge.
80.
Ensure Blocks areCold
• Sectioning is generally improved when the specimen and the wax are
well matched in hardness.
• Cold wax provides better support for the harder elements in a
specimen allowing thinner sections to be obtained.
81.
• Water penetratesa small distance into the block face, swelling
tissues and making them more amenable to cutting. This is
particularly important to over-dehydrated, dry or crumbly tissues.
• Placing blocks in a freezer can cause surface cracking, where
tissue separates from the surrounding wax
82.
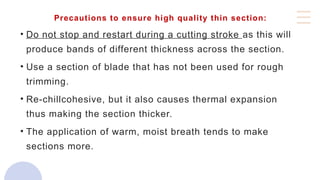
Precautions to ensurehigh quality thin section:
• Do not stop and restart during a cutting stroke as this will
produce bands of different thickness across the section.
• Use a section of blade that has not been used for rough
trimming.
• Re-chillcohesive, but it also causes thermal expansion
thus making the section thicker.
• The application of warm, moist breath tends to make
sections more.
83.
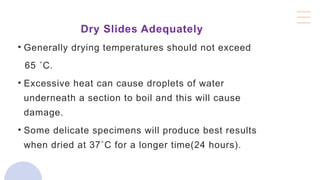
Dry Slides Adequately
•Generally drying temperatures should not exceed
65 ˚C.
• Excessive heat can cause droplets of water
underneath a section to boil and this will cause
damage.
• Some delicate specimens will produce best results
when dried at 37˚C for a longer time(24 hours).
84.
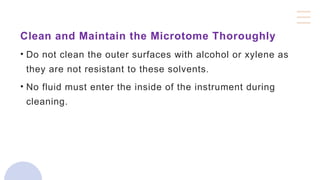
Clean and Maintainthe Microtome Thoroughly
• Do not clean the outer surfaces with alcohol or xylene as
they are not resistant to these solvents.
• No fluid must enter the inside of the instrument during
cleaning.
85.
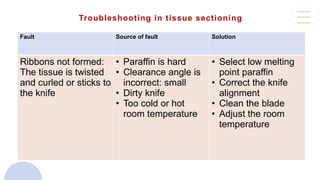
Troubleshooting in tissuesectioning
Fault Source of fault Solution
Ribbons not formed:
The tissue is twisted
and curled or sticks to
the knife
• Paraffin is hard
• Clearance angle is
incorrect: small
• Dirty knife
• Too cold or hot
room temperature
• Select low melting
point paraffin
• Correct the knife
alignment
• Clean the blade
• Adjust the room
temperature
86.
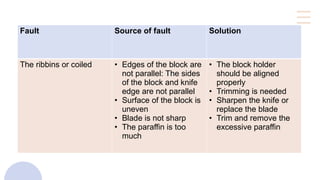
Fault Source offault Solution
The ribbins or coiled • Edges of the block are
not parallel: The sides
of the block and knife
edge are not parallel
• Surface of the block is
uneven
• Blade is not sharp
• The paraffin is too
much
• The block holder
should be aligned
properly
• Trimming is needed
• Sharpen the knife or
replace the blade
• Trim and remove the
excessive paraffin
87.
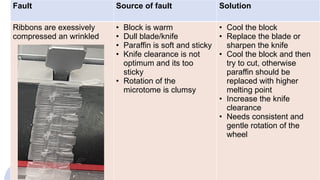
Fault Source offault Solution
Ribbons are exessively
compressed an wrinkled
• Block is warm
• Dull blade/knife
• Paraffin is soft and sticky
• Knife clearance is not
optimum and its too
sticky
• Rotation of the
microtome is clumsy
• Cool the block
• Replace the blade or
sharpen the knife
• Cool the block and then
try to cut, otherwise
paraffin should be
replaced with higher
melting point
• Increase the knife
clearance
• Needs consistent and
gentle rotation of the
wheel
88.
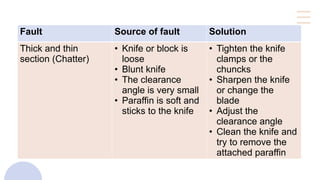
Fault Source offault Solution
Thick and thin
section (Chatter)
• Knife or block is
loose
• Blunt knife
• The clearance
angle is very small
• Paraffin is soft and
sticks to the knife
• Tighten the knife
clamps or the
chuncks
• Sharpen the knife
or change the
blade
• Adjust the
clearance angle
• Clean the knife and
try to remove the
attached paraffin
89.
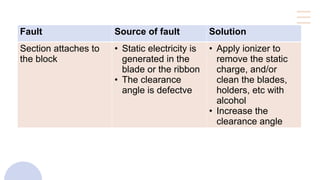
Fault Source offault Solution
Section attaches to
the block
• Static electricity is
generated in the
blade or the ribbon
• The clearance
angle is defectve
• Apply ionizer to
remove the static
charge, and/or
clean the blades,
holders, etc with
alcohol
• Increase the
clearance angle
90.
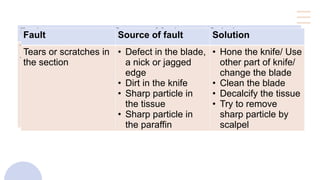
Fault Source offault Solution
Tears or scratches in
the section
• Defect in the blade,
a nick or jagged
edge
• Dirt in the knife
• Sharp particle in
the tissue
• Sharp particle in
the paraffin
• Hone the knife/ Use
other part of knife/
change the blade
• Clean the blade
• Decalcify the tissue
• Try to remove
sharp particle by
scalpel
Fault Source of fault Solution
Tears or scratches in
the section
• Defect in the blade,
a nick or jagged
edge
• Dirt in the knife
• Sharp particle in
the tissue
• Sharp particle in
the paraffin
• Hone the knife/ Use
other part of knife/
change the blade
• Clean the blade
• Decalcify the tissue
• Try to remove
sharp particle by
scalpel
91.
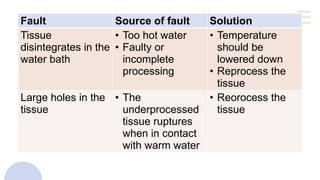
Fault Source offault Solution
Tissue
disintegrates in the
water bath
• Too hot water
• Faulty or
incomplete
processing
• Temperature
should be
lowered down
• Reprocess the
tissue
Large holes in the
tissue
• The
underprocessed
tissue ruptures
when in contact
with warm water
• Reorocess the
tissue
92.
REFERENCES
1) Bancroft JohnD. Christopher Layton and S. Kim Suvarna. Bancroft’s Theory and Practice of
Histological Techniques. 8th ed. Oxford: Churchill Livingstone Elsevier.Histotechniques; Page 85-95
2) Pranav Dey. Basic and Advanced Laboratory Techniques in Histopathology and Cytology, 2018, Page
41-55
3) Freida L Carlson. Histotechnology, a self-introductional text, 3rd Edition


![Hypothalamus short ppt by Dr. Neha [PT].pptx](https://cdn.slidesharecdn.com/ss_thumbnails/hypothalamusbydr-260124145759-b9f94a93-thumbnail.jpg?width=640&height=640&fit=bounds)


