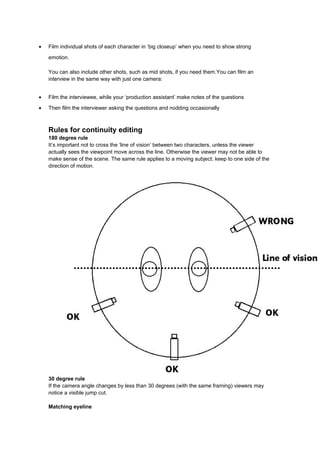
Making your film make sense
    When you’re making a film you should use the camera and editing to help your audience
    know what’s happening and what your characters are doing, thinking and feeling.

    You need to make sure that you have a variety of shots, usually including


•   long shots

•   mid shots

•   closeups

    Things you can use to help you plan are


•   a script

•   a storyboard

•   a shot list

    Camera movements
    Camera movements should be used for a purpose, not just to avoid editing! If you do need
    movements, make sure the movement is smooth and goes in only one direction. Tracking
    shots where the camera itself moves usually look much better than zooms. For smooth
    tracking, mount the camera on a wheelchair, skateboard or trolley.

    Shot duration
    When you’re filming, each shot should last longer than you want it to appear in the finished
    film: editing longer shots down is much easier then refilming missing footage if the shots are
    too short to use. When you’re editing dialogue, you may think all you need to use is each
    character’s line, but significant pauses can add hugely to the tension and dramatic impact of a
    scene.

    Continuity editing
    In continuity editing everything is filmed so that the viewer thinks they are seeing continuous
    action. As well as following the rules below, you will need to ensure that characters’
    appearance, the set and the lighting (colour and direction) remain consistent from shot to
    shot.

    Shot/reverse/shot
    If you’re shooting two characters talking to each other, here’s how to do it.


•   Film it once with a ‘master shot’, which shows both characters

•   Film it again with the camera in closeup on one character

•   Film it again with the camera in closeup on the second character.
•   Film individual shots of each character in ‘big closeup’ when you need to show strong

    emotion.

    You can also include other shots, such as mid shots, if you need them.You can film an
    interview in the same way with just one camera:


•   Film the interviewee, while your ‘production assistant’ make notes of the questions

•   Then film the interviewer asking the questions and nodding occasionally


    Rules for continuity editing
    180 degree rule
    It’s important not to cross the ‘line of vision’ between two characters, unless the viewer
    actually sees the viewpoint move across the line. Otherwise the viewer may not be able to
    make sense of the scene. The same rule applies to a moving subject: keep to one side of the
    direction of motion.


    30 degree rule
    If the camera angle changes by less than 30 degrees (with the same framing) viewers may
    notice a visible jump cut.

    Matching eyeline
You need to ensure that the direction of characters’ gazes stays the same so if one character
    is taller than the other, the smaller character should be looking up and the taller looking down.

    Editing
    You can edit a shot reverse shot scene or single-camera interview by splitting a clip into
    subclips (eg by using iMovie’s ‘Split clip at playhead’ command) to divide up the clip into the
    lines you want, then putting the clips in order so they alternate between characters, then
    trimming the clips. It’s easier if you rename the clips so that you know which clip has which
    line of dialogue.

    If you don’t mind fiddling with the ‘Extract audio’ command (in iMovie), you can even include
    ‘split edits’ and where the picture and sound change at different points. If you're using a
    professional programme such as Final Cut Pro or Premiere you will need to unlink the sound
    and video tracks of your clip to do this.

    You should edit movement (eg a character running) ‘on the action’ and make sure that the
    character has clearly moved forward between shots, rather than having the action appearing
    as if it’s repeated.

    Transitions
    Fades and dissolves (or ‘cross-fades’) can add to the meaning of a sequence.


•   Dissolves can be used to provide a slow, relaxed way of linking shots eg in a ‘montage’ of

    different shots within an opening sequence.
•   They can also be used in continuity editing to show that we have moved forward in time

    and/or space.
•   Fades to black and back are usually used to show that a more significant period of time has

    elapsed between two sequences.
•   Wipes and other unusual transitions are best avoided!

    Thinking in shots
    To start thinking in terms of individual shots, try planning and filming an action sequence while
    following the rules below:


•   MORE CLOSE-UPS: Don’t go more than three shots without a close up.

•   NO ZOOMS: Don’t touch the zoom button when the camera is running just use it to set the

    framing for the shot.
•   NO CAMERA MOVEMENTS: Frame separate shots rather than scanning the scene.

    Montage
    Not all editing is continuity editing. Title sequences often use ‘montage’, where the
    combination of contrasting images builds up meaning.

Making your film make sense

  • 1.
    Making your filmmake sense When you’re making a film you should use the camera and editing to help your audience know what’s happening and what your characters are doing, thinking and feeling. You need to make sure that you have a variety of shots, usually including • long shots • mid shots • closeups Things you can use to help you plan are • a script • a storyboard • a shot list Camera movements Camera movements should be used for a purpose, not just to avoid editing! If you do need movements, make sure the movement is smooth and goes in only one direction. Tracking shots where the camera itself moves usually look much better than zooms. For smooth tracking, mount the camera on a wheelchair, skateboard or trolley. Shot duration When you’re filming, each shot should last longer than you want it to appear in the finished film: editing longer shots down is much easier then refilming missing footage if the shots are too short to use. When you’re editing dialogue, you may think all you need to use is each character’s line, but significant pauses can add hugely to the tension and dramatic impact of a scene. Continuity editing In continuity editing everything is filmed so that the viewer thinks they are seeing continuous action. As well as following the rules below, you will need to ensure that characters’ appearance, the set and the lighting (colour and direction) remain consistent from shot to shot. Shot/reverse/shot If you’re shooting two characters talking to each other, here’s how to do it. • Film it once with a ‘master shot’, which shows both characters • Film it again with the camera in closeup on one character • Film it again with the camera in closeup on the second character.
  • 2.
    Film individual shots of each character in ‘big closeup’ when you need to show strong emotion. You can also include other shots, such as mid shots, if you need them.You can film an interview in the same way with just one camera: • Film the interviewee, while your ‘production assistant’ make notes of the questions • Then film the interviewer asking the questions and nodding occasionally Rules for continuity editing 180 degree rule It’s important not to cross the ‘line of vision’ between two characters, unless the viewer actually sees the viewpoint move across the line. Otherwise the viewer may not be able to make sense of the scene. The same rule applies to a moving subject: keep to one side of the direction of motion. 30 degree rule If the camera angle changes by less than 30 degrees (with the same framing) viewers may notice a visible jump cut. Matching eyeline
  • 3.
    You need toensure that the direction of characters’ gazes stays the same so if one character is taller than the other, the smaller character should be looking up and the taller looking down. Editing You can edit a shot reverse shot scene or single-camera interview by splitting a clip into subclips (eg by using iMovie’s ‘Split clip at playhead’ command) to divide up the clip into the lines you want, then putting the clips in order so they alternate between characters, then trimming the clips. It’s easier if you rename the clips so that you know which clip has which line of dialogue. If you don’t mind fiddling with the ‘Extract audio’ command (in iMovie), you can even include ‘split edits’ and where the picture and sound change at different points. If you're using a professional programme such as Final Cut Pro or Premiere you will need to unlink the sound and video tracks of your clip to do this. You should edit movement (eg a character running) ‘on the action’ and make sure that the character has clearly moved forward between shots, rather than having the action appearing as if it’s repeated. Transitions Fades and dissolves (or ‘cross-fades’) can add to the meaning of a sequence. • Dissolves can be used to provide a slow, relaxed way of linking shots eg in a ‘montage’ of different shots within an opening sequence. • They can also be used in continuity editing to show that we have moved forward in time and/or space. • Fades to black and back are usually used to show that a more significant period of time has elapsed between two sequences. • Wipes and other unusual transitions are best avoided! Thinking in shots To start thinking in terms of individual shots, try planning and filming an action sequence while following the rules below: • MORE CLOSE-UPS: Don’t go more than three shots without a close up. • NO ZOOMS: Don’t touch the zoom button when the camera is running just use it to set the framing for the shot. • NO CAMERA MOVEMENTS: Frame separate shots rather than scanning the scene. Montage Not all editing is continuity editing. Title sequences often use ‘montage’, where the combination of contrasting images builds up meaning.