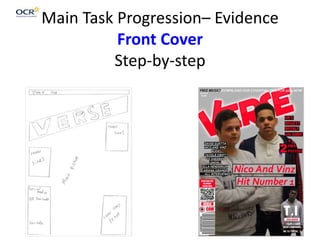
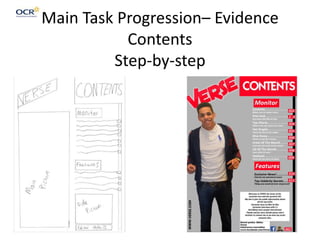
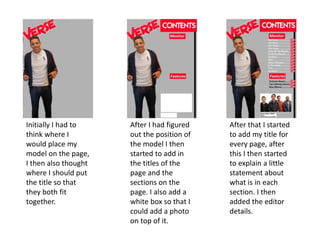
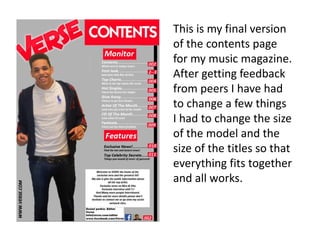
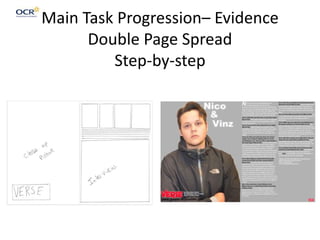
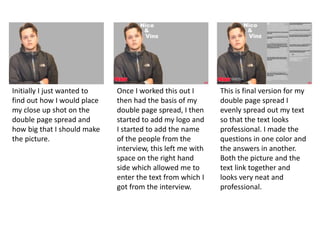
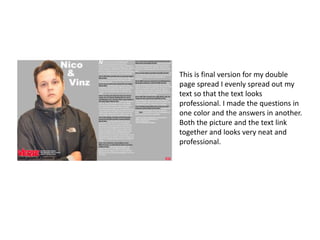
Main Task Progression– Evidence
Front Cover
Step-by-step
Initially I added my
models and I added
in my tile so that I
could get the basic
layout of how I
wanted my front
cover for my music
magazine.
Here I added a cover
line story with a
picture that
corresponds with the
story. The other thing
that I have added is
the social media links
the QR barcode is
made so that it will
go to a personal blog.
Here Is my final
version of my front
over page for the
music magazine it has
2 cover story lines, it
also ha a strap line on
the top. After getting
many feedback I had
to change a few
things to make it look
professional.
Here Is my final version
of my front over page for
the music magazine it
has 2 cover story lines, it
also ha a strap line on
the top. After getting
many feedback I had to
change a few things to
make it look
professional.
Main Task Progression– Evidence
Contents
Step-by-step
Initially I had to
think where I
would place my
model on the page,
I then also thought
where I should put
the title so that
they both fit
together.
After I had figured
out the position of
the model I then
started to add in
the titles of the
page and the
sections on the
page. I also add a
white box so that I
could add a photo
on top of it.
After that I started
to add my title for
every page, after
this I then started
to explain a little
statement about
what is in each
section. I then
added the editor
details.
This is my final version
of the contents page
for my music magazine.
After getting feedback
from peers I have had
to change a few things
I had to change the size
of the model and the
size of the titles so that
everything fits together
and all works.
Main Task Progression– Evidence
Double Page Spread
Step-by-step
Initially I just wanted to
find out how I would place
my close up shot on the
double page spread and
how big that I should make
the picture.
Once I worked this out I
then had the basis of my
double page spread, I then
started to add my logo and
I started to add the name
of the people from the
interview, this left me with
space on the right hand
side which allowed me to
enter the text from which I
got from the interview.
This is final version for my
double page spread I
evenly spread out my text
so that the text looks
professional. I made the
questions in one color and
the answers in another.
Both the picture and the
text link together and
looks very neat and
professional.
This is final version for my double
page spread I evenly spread out my
text so that the text looks
professional. I made the questions in
one color and the answers in another.
Both the picture and the text link
together and looks very neat and
professional.

Main task

  • 1.
    Main Task Progression–Evidence Front Cover Step-by-step
  • 2.
    Initially I addedmy models and I added in my tile so that I could get the basic layout of how I wanted my front cover for my music magazine. Here I added a cover line story with a picture that corresponds with the story. The other thing that I have added is the social media links the QR barcode is made so that it will go to a personal blog. Here Is my final version of my front over page for the music magazine it has 2 cover story lines, it also ha a strap line on the top. After getting many feedback I had to change a few things to make it look professional.
  • 3.
    Here Is myfinal version of my front over page for the music magazine it has 2 cover story lines, it also ha a strap line on the top. After getting many feedback I had to change a few things to make it look professional.
  • 4.
    Main Task Progression–Evidence Contents Step-by-step
  • 5.
    Initially I hadto think where I would place my model on the page, I then also thought where I should put the title so that they both fit together. After I had figured out the position of the model I then started to add in the titles of the page and the sections on the page. I also add a white box so that I could add a photo on top of it. After that I started to add my title for every page, after this I then started to explain a little statement about what is in each section. I then added the editor details.
  • 6.
    This is myfinal version of the contents page for my music magazine. After getting feedback from peers I have had to change a few things I had to change the size of the model and the size of the titles so that everything fits together and all works.
  • 7.
    Main Task Progression–Evidence Double Page Spread Step-by-step
  • 8.
    Initially I justwanted to find out how I would place my close up shot on the double page spread and how big that I should make the picture. Once I worked this out I then had the basis of my double page spread, I then started to add my logo and I started to add the name of the people from the interview, this left me with space on the right hand side which allowed me to enter the text from which I got from the interview. This is final version for my double page spread I evenly spread out my text so that the text looks professional. I made the questions in one color and the answers in another. Both the picture and the text link together and looks very neat and professional.
  • 9.
    This is finalversion for my double page spread I evenly spread out my text so that the text looks professional. I made the questions in one color and the answers in another. Both the picture and the text link together and looks very neat and professional.