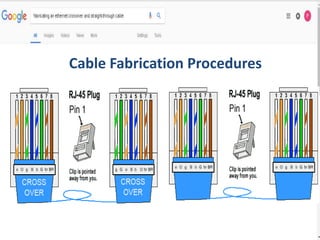
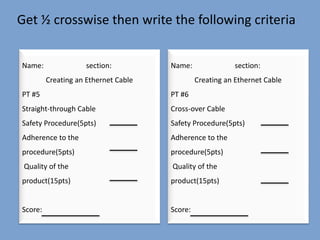
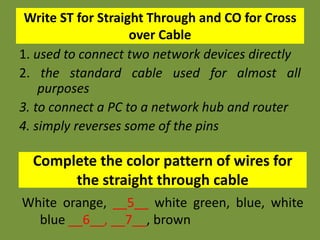
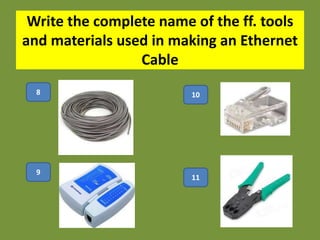
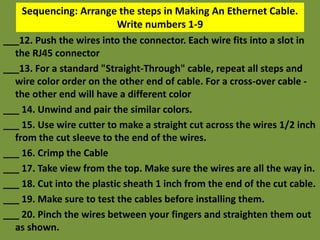
Creating Ethernet cable
Ethernet cabling has been the standard in
networking installation for years. It is the
fastest way of connecting PC to a peer or to
your router or a central switch.
Creating Ethernet Cable
Fabricating an Ethernet Cross-over and Straight-
through Cable
• The straight-through Ethernet cable is
used in local area network to connect a
PC to a network hub and router.
• A cross-over cable, on the other hand,
can be used to connect two network
devices directly, without the need for a
router in the middle.
Fabricating an Ethernet Cross-over
and Straight-through Cable
Ethernet Cable Category 5e or Cat5e- standard wire for cabling;
The following items are the materials and tools
used for making Ethernet cables:
• Ethernet Cable Category 5e or
Cat5e- standard wire for cabling;
• RJ45 crimpable connectors for
Cat5e;
• RJ45 Crimping tool;
• Wire cutter, stripper or pliers; and
• Ethernet cable tester.
Cable Fabrication Procedures
STEPS:
1. Cut into the plastic sheath 1
inch from the end of the cut
cable. The crimping tool has
a razor blade that will do the
trick with practice.
2. Unwind and pair the similar
colors.
3. Pinch the wires between
your fingers and straighten
them out as shown. The color
order is important to do this
correctly.
4. Use wire cutter to make a
straight cut across the wires
1/2 inch from the cut sleeve
to the end of the wires.
5. Push the wires into the
connector. Each wire fits
into a slot in the RJ45
connector. Note the
position of the blue plastic
shielding. Also note how
the wires go all the way to
the end.
6. Take view from the
top. Make sure the
wires are all the way in.
There should be no
short wires.
7. Crimping the Cable – carefully
place the connector into the
Ethernet Crimper and cinch down
on the handles tightly. The copper
splicing tabs on the connector will
pierce into each of the eight wires.
There is also a locking tab that
holds the blue plastic sleeve in
place for a tight compression fit.
When you remove the cable from
the crimper, that end is ready to
use.
8. For a standard "Straight-
Through" cable, repeat all
steps and wire color order on
the other end of cable. For a
cross-over cable - the other
end will have a different color
order
9. Make sure to test the
cables before installing them.
An inexpensive Ethernet cable
tester does this quite well.
Performance Task
5&6
September, 2017
Get ½ crosswise then write the following criteria
Name: section:
Creating an Ethernet Cable
PT #5
Straight-through Cable
Safety Procedure(5pts)
Adherence to the
procedure(5pts)
Quality of the
product(15pts)
Score:
Name: section:
Creating an Ethernet Cable
PT #6
Cross-over Cable
Safety Procedure(5pts)
Adherence to the
procedure(5pts)
Quality of the
product(15pts)
Score:
Written Test #4
September, 2017
Write ST for Straight Through and CO for Cross
over Cable
1. used to connect two network devices directly
2. the standard cable used for almost all
purposes
3. to connect a PC to a network hub and router
4. simply reverses some of the pins
Complete the color pattern of wires for
the straight through cable
White orange, __5__ white green, blue, white
blue __6__, __7__, brown
Write the complete name of the ff. tools
and materials used in making an Ethernet
Cable
8
9
10
11
Sequencing: Arrange the steps in Making An Ethernet Cable.
Write numbers 1-9
___12. Push the wires into the connector. Each wire fits into a slot in
the RJ45 connector
___13. For a standard "Straight-Through" cable, repeat all steps and
wire color order on the other end of cable. For a cross-over cable -
the other end will have a different color
___ 14. Unwind and pair the similar colors.
___ 15. Use wire cutter to make a straight cut across the wires 1/2 inch
from the cut sleeve to the end of the wires.
___ 16. Crimp the Cable
___ 17. Take view from the top. Make sure the wires are all the way in.
___ 18. Cut into the plastic sheath 1 inch from the end of the cut cable.
___ 19. Make sure to test the cables before installing them.
___ 20. Pinch the wires between your fingers and straighten them out
as shown.
Answer
1. CO 8. UTP cable
2. ST 9. LAN tester
3. ST 10. RJ45
4. CO 11. Crimping
5. Orange Tool
6. Green
7. White Brown
12. 5
13. 8
14. 2
15. 4
16. 7
17. 6
18. 1
19. 9
20. 3

Lesson #1 (creating ethernet cable)

  • 2.
  • 3.
    Ethernet cabling hasbeen the standard in networking installation for years. It is the fastest way of connecting PC to a peer or to your router or a central switch. Creating Ethernet Cable
  • 5.
    Fabricating an EthernetCross-over and Straight- through Cable
  • 6.
    • The straight-throughEthernet cable is used in local area network to connect a PC to a network hub and router. • A cross-over cable, on the other hand, can be used to connect two network devices directly, without the need for a router in the middle. Fabricating an Ethernet Cross-over and Straight-through Cable
  • 7.
    Ethernet Cable Category5e or Cat5e- standard wire for cabling; The following items are the materials and tools used for making Ethernet cables: • Ethernet Cable Category 5e or Cat5e- standard wire for cabling; • RJ45 crimpable connectors for Cat5e; • RJ45 Crimping tool; • Wire cutter, stripper or pliers; and • Ethernet cable tester.
  • 8.
  • 9.
    STEPS: 1. Cut intothe plastic sheath 1 inch from the end of the cut cable. The crimping tool has a razor blade that will do the trick with practice. 2. Unwind and pair the similar colors.
  • 10.
    3. Pinch thewires between your fingers and straighten them out as shown. The color order is important to do this correctly. 4. Use wire cutter to make a straight cut across the wires 1/2 inch from the cut sleeve to the end of the wires.
  • 11.
    5. Push thewires into the connector. Each wire fits into a slot in the RJ45 connector. Note the position of the blue plastic shielding. Also note how the wires go all the way to the end.
  • 12.
    6. Take viewfrom the top. Make sure the wires are all the way in. There should be no short wires.
  • 13.
    7. Crimping theCable – carefully place the connector into the Ethernet Crimper and cinch down on the handles tightly. The copper splicing tabs on the connector will pierce into each of the eight wires. There is also a locking tab that holds the blue plastic sleeve in place for a tight compression fit. When you remove the cable from the crimper, that end is ready to use.
  • 14.
    8. For astandard "Straight- Through" cable, repeat all steps and wire color order on the other end of cable. For a cross-over cable - the other end will have a different color order 9. Make sure to test the cables before installing them. An inexpensive Ethernet cable tester does this quite well.
  • 15.
  • 16.
    Get ½ crosswisethen write the following criteria Name: section: Creating an Ethernet Cable PT #5 Straight-through Cable Safety Procedure(5pts) Adherence to the procedure(5pts) Quality of the product(15pts) Score: Name: section: Creating an Ethernet Cable PT #6 Cross-over Cable Safety Procedure(5pts) Adherence to the procedure(5pts) Quality of the product(15pts) Score:
  • 17.
  • 18.
    Write ST forStraight Through and CO for Cross over Cable 1. used to connect two network devices directly 2. the standard cable used for almost all purposes 3. to connect a PC to a network hub and router 4. simply reverses some of the pins Complete the color pattern of wires for the straight through cable White orange, __5__ white green, blue, white blue __6__, __7__, brown
  • 19.
    Write the completename of the ff. tools and materials used in making an Ethernet Cable 8 9 10 11
  • 20.
    Sequencing: Arrange thesteps in Making An Ethernet Cable. Write numbers 1-9 ___12. Push the wires into the connector. Each wire fits into a slot in the RJ45 connector ___13. For a standard "Straight-Through" cable, repeat all steps and wire color order on the other end of cable. For a cross-over cable - the other end will have a different color ___ 14. Unwind and pair the similar colors. ___ 15. Use wire cutter to make a straight cut across the wires 1/2 inch from the cut sleeve to the end of the wires. ___ 16. Crimp the Cable ___ 17. Take view from the top. Make sure the wires are all the way in. ___ 18. Cut into the plastic sheath 1 inch from the end of the cut cable. ___ 19. Make sure to test the cables before installing them. ___ 20. Pinch the wires between your fingers and straighten them out as shown.
  • 21.
    Answer 1. CO 8.UTP cable 2. ST 9. LAN tester 3. ST 10. RJ45 4. CO 11. Crimping 5. Orange Tool 6. Green 7. White Brown 12. 5 13. 8 14. 2 15. 4 16. 7 17. 6 18. 1 19. 9 20. 3