International Research Journal of Engineering and Technology (IRJET) e-ISSN: 2395-0056
Volume: 06 Issue: 04 | Apr 2019 www.irjet.net p-ISSN: 2395-0072
© 2019, IRJET | Impact Factor value: 7.211 | ISO 9001:2008 Certified Journal | Page 994
Optimization of Cutting Parameters During Turning of AISI 1018 using
Taguchi Method
Mr .Vinayak H. Salgar1, Mr. Mohit M. Patil2 , Mr. Nitin S. More3, Mr. Aditya S. Nikam4,
Ajay P. Dhawan5
1,2,3,4Students of Sanjay Godawat Institute, Atigre.
5Assistant Professor, Mechanical Engineering Department, Sanjay Ghodawat Group of Institutions, Kolhapur,
Maharashtra, India
------------------------------------------------------------------------***-------------------------------------------------------------------------
Abstract: This paper presents an optimization method of cutting parameters (cutting speed, feed rate and depth of cut) during
turning of AISI 1018 mild steel to achieve the Maximum Material Removal Rate (MRR) and the Minimum Surface Roughness(SR).
The design of experiment is based on the Taguchi's L9 (33) Orthogonal array technique and analysisofS/Nratio wasperformedto
identify the effect of the cuting parameters on the response variables. The taguchi method is used to optimize cutting parameters
for the material removal rate (MRR) and the surface roughness surface. The main effect plots are then generated and then
analysed to find the relationship between the cutting parameter and variables. The detailed of the design of experimentation and
the analysis are given in the following data
Keywords: Taguchi Method, Orthogonal Array, Material Removal Rate(MRR), Surface Roughness(SR),S/N RatioandMinitab.
I. INTRODUCTION
Metal cutting is one in all the necessary and widely used producing processes in engineering industries. The metal
cutting studies focus on the features of tools, work material composition and mechanical properties,andaboveall themachine
parameter settings that influence the process efficiency and output quality characteristics ( or responses).A significant
improvement in method potency may be obtained by method parameter improvement that identifies and determines the
regions of crucial method management factors resulting in desired outputs or responses with acceptable
variations guaranteeing a lower value of producing.
The primary objective in machining operations is to produce products with low Surface Roughness andhighMaterial
Removal Rate(MRR). Machining parameter optimization plays an important role in achieving this goal. Machining parameter
optimization operations usually involves the optimal selection of cutting speed, feed rate and depth of cut. Determination of
optimal cutting parameters for satisfying certain technological and economical conditions has beenoneofthemost important
elements in process planning for metal cutting operations. Examining the economics of machining operations has significant
practical importance. Machining is outlined as a method, during which themetal isremoved withinthe kindof chipsby means
that of single or multiple wedge-shaped cutting tools. Spindle speed :The rotational speed of the spindle and the work piecein
revolutions per minute (RPM). The spindle speed is nothing but the cutting speed / circumferenceofthework piece wherethe
cut is done. Feed rate :The speed of cutting tool' movement relative to the work piece as the tool makes a cut. The feed rate is
measured in (mm/min).Depth of cut :A large depth of cut will require a low feed rate, or else it will result in a high load on the
tool and reduce the tool life. For rough turning depth of cut is not matters because it is not dealing with surface quality.
II. RESEARCH METHODOLOGY AND APPROACH
A. Taguchi Method
Taguchi is the developer of the Taguchi method. He projectedthatengineeringoptimizationofa processedproducttobe meted
out in an exceedingly three-step approach, as follows.
1) System design: In system design, the engineer applies scientific and engineering knowledge to produce a basic functional
design prototype, this design including the product design stage and the process design stage.
2) Parameter design: The objective of parameter design is to optimize the settings of the process parameter values for
improving quality characteristics and to identify the product parameter values under the optimal process parameter values.
3) Tolerance design: Tolerance design is used to determine and analyze tolerances for the optimal settings recommendbythe
parameter design. Tolerance design is required if the reduced variation obtained by the parameter design does not meet the
International Research Journal of Engineering and Technology (IRJET) e-ISSN: 2395-0056
Volume: 06 Issue: 04 | Apr 2019 www.irjet.net p-ISSN: 2395-0072
© 2019, IRJET | Impact Factor value: 7.211 | ISO 9001:2008 Certified Journal | Page 995
required performance, and involves tightening tolerances on the product parameters or process parameters that variations
lead to an outsized negative influence on the desired product performance.
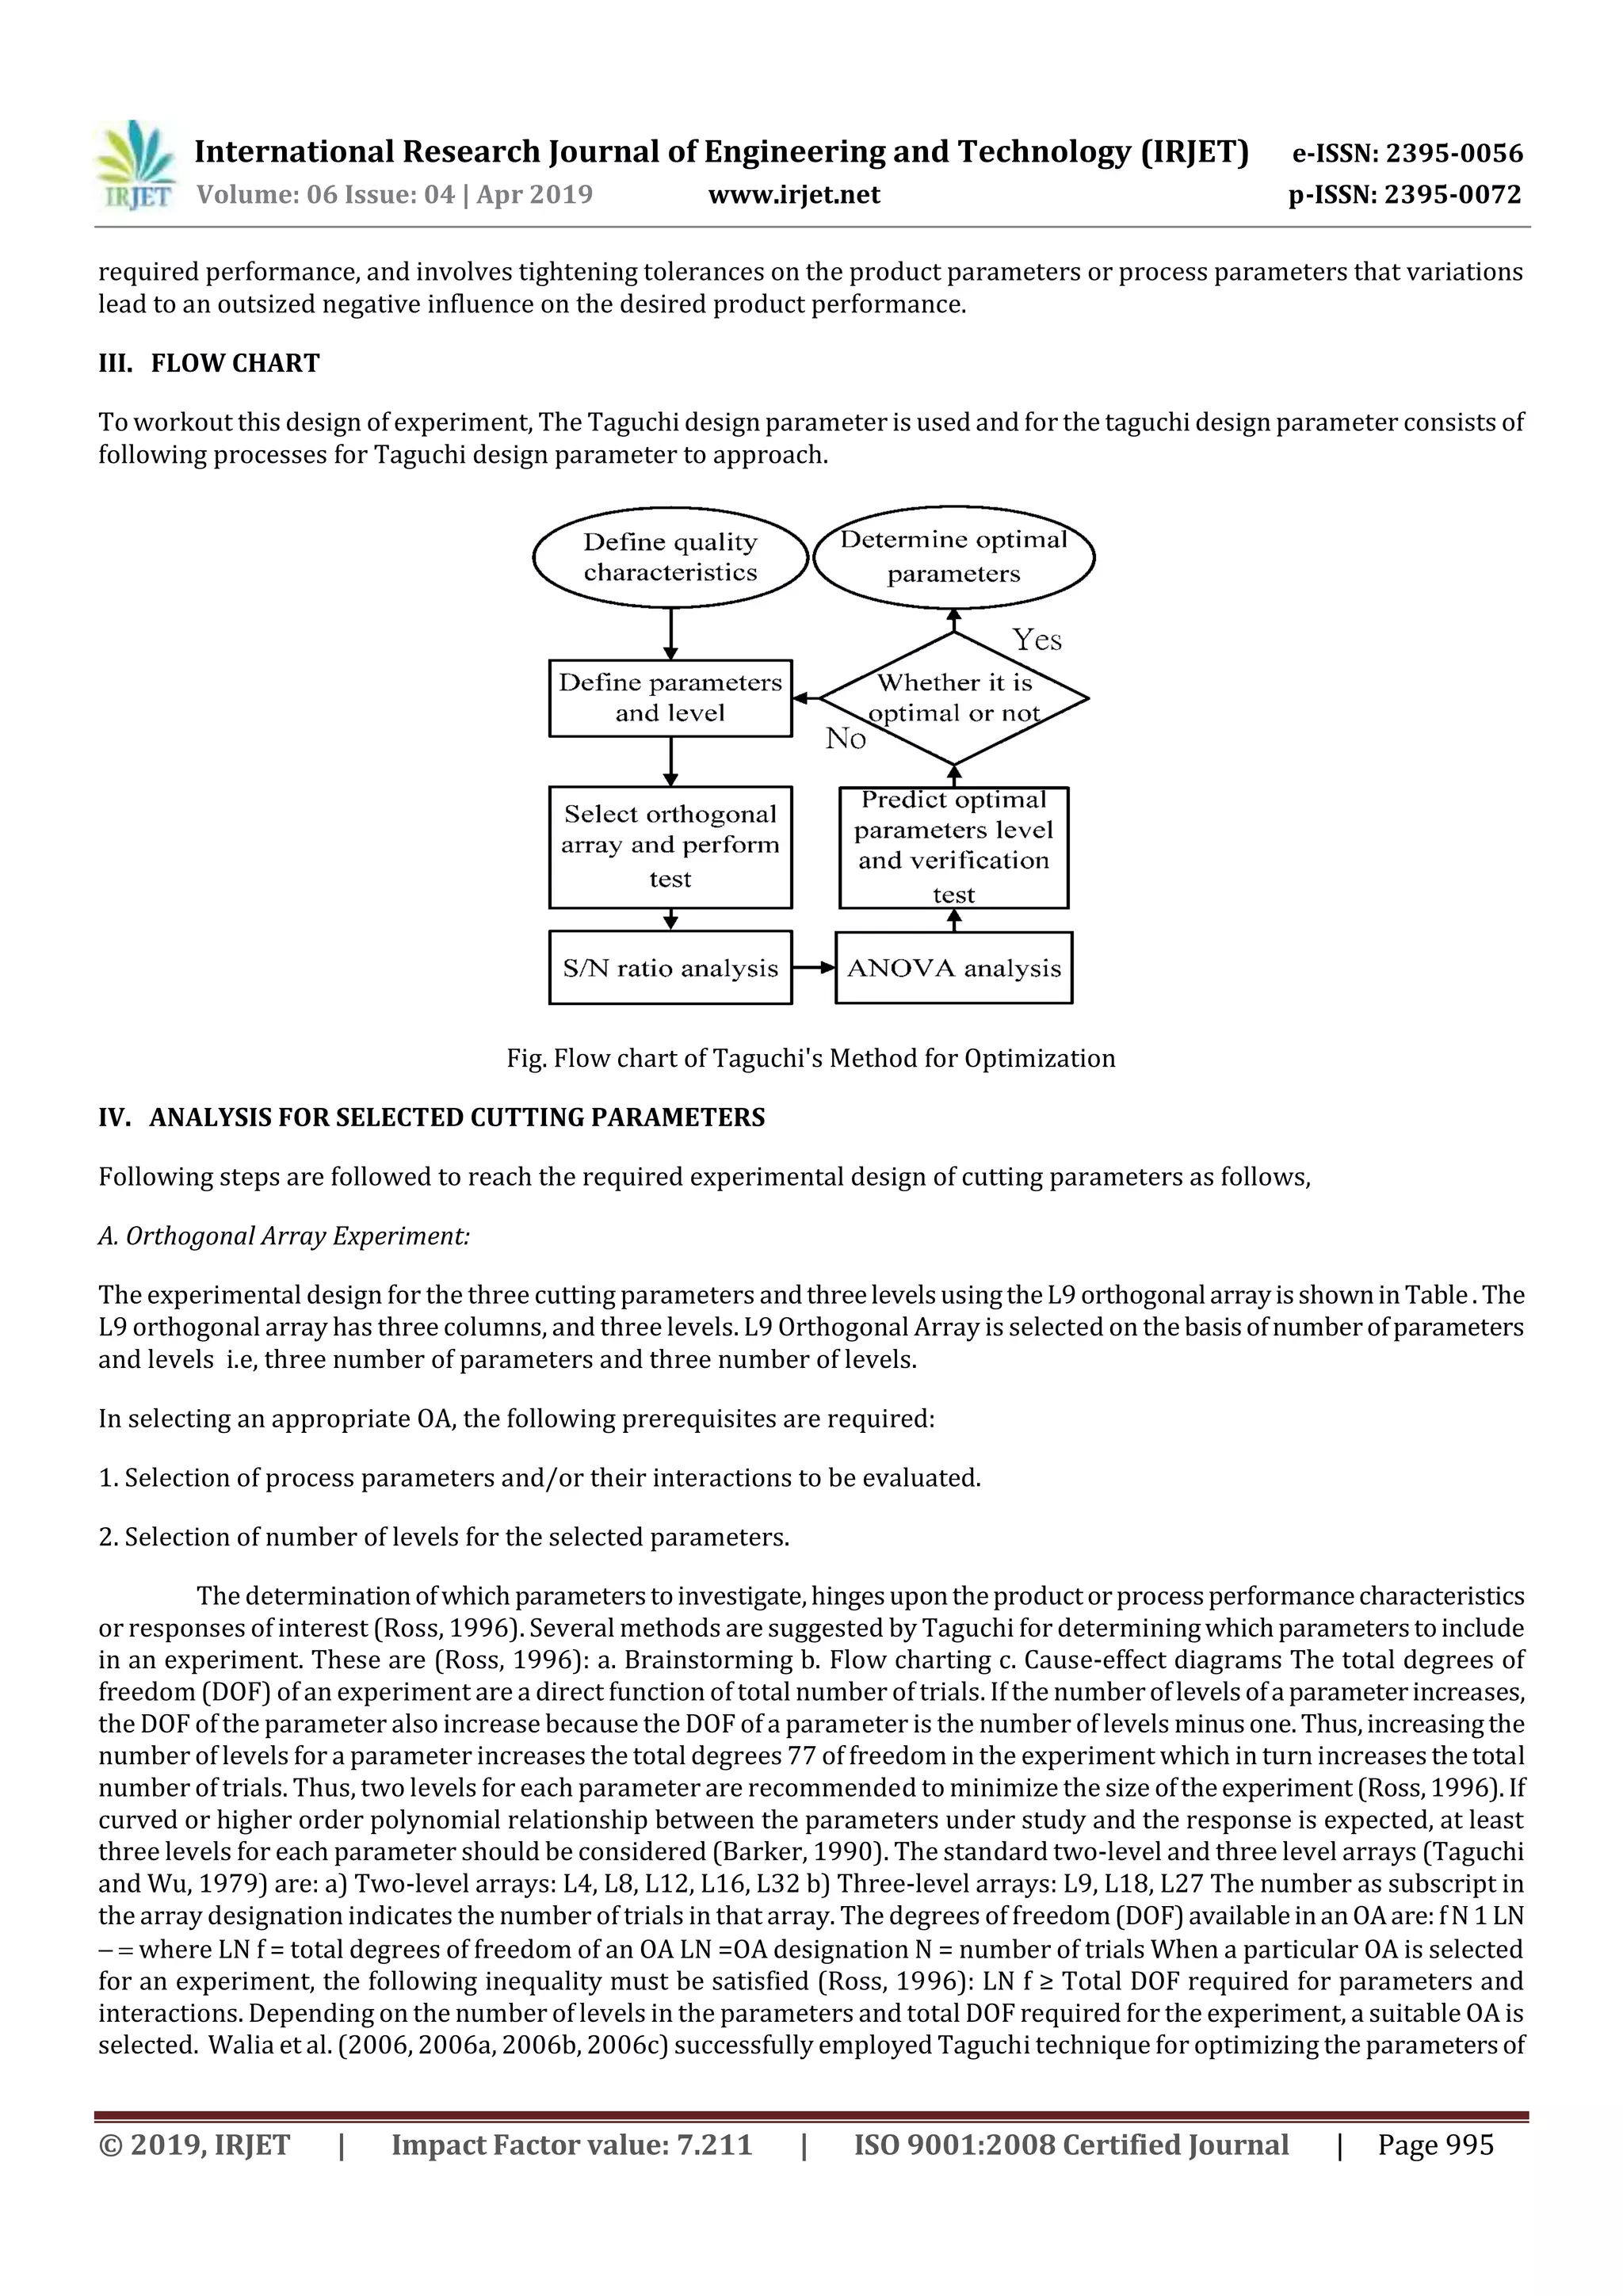
III. FLOW CHART
To workout this design of experiment, The Taguchi design parameter is used and for the taguchi design parameter consists of
following processes for Taguchi design parameter to approach.
Fig. Flow chart of Taguchi's Method for Optimization
IV. ANALYSIS FOR SELECTED CUTTING PARAMETERS
Following steps are followed to reach the required experimental design of cutting parameters as follows,
A. Orthogonal Array Experiment:
The experimental design for the three cutting parameters andthreelevelsusingtheL9 orthogonal arrayisshownin Table.The
L9 orthogonal array has three columns, and three levels. L9 Orthogonal Array is selected on the basisofnumberofparameters
and levels i.e, three number of parameters and three number of levels.
In selecting an appropriate OA, the following prerequisites are required:
1. Selection of process parameters and/or their interactions to be evaluated.
2. Selection of number of levels for the selected parameters.
The determinationofwhich parameterstoinvestigate,hingesupontheproductorprocessperformancecharacteristics
or responses of interest (Ross, 1996). Several methods are suggested by Taguchi for determiningwhichparameterstoinclude
in an experiment. These are (Ross, 1996): a. Brainstorming b. Flow charting c. Cause-effect diagrams The total degrees of
freedom (DOF) of an experiment are a direct function of total number of trials. If the numberoflevelsofa parameterincreases,
the DOF of the parameter also increase because the DOF of a parameter is the number of levels minusone. Thus,increasingthe
number of levels for a parameter increases the total degrees 77 of freedom in the experiment which in turn increases thetotal
number of trials. Thus, two levels for each parameter are recommended to minimize the size oftheexperiment(Ross,1996).If
curved or higher order polynomial relationship between the parameters under study and the response is expected, at least
three levels for each parameter should be considered (Barker, 1990). The standard two-level and three level arrays (Taguchi
and Wu, 1979) are: a) Two-level arrays: L4, L8, L12, L16, L32 b) Three-level arrays: L9, L18, L27 The number as subscript in
the array designation indicates the number of trials in that array. The degrees of freedom(DOF)availableinanOAare:fN 1LN
  where LN f = total degrees of freedom of an OA LN =OA designation N = number of trials When a particular OA is selected
for an experiment, the following inequality must be satisfied (Ross, 1996): LN f ≥ Total DOF required for parameters and
interactions. Depending on the number of levels in the parameters and total DOF required for the experiment, a suitable OA is
selected. Walia et al. (2006, 2006a, 2006b, 2006c) successfully employed Taguchi technique for optimizing the parametersof
International Research Journal of Engineering and Technology (IRJET) e-ISSN: 2395-0056
Volume: 06 Issue: 04 | Apr 2019 www.irjet.net p-ISSN: 2395-0072
© 2019, IRJET | Impact Factor value: 7.211 | ISO 9001:2008 Certified Journal | Page 996
Centrifugal Force assisted Abrasive Flow Machining (CFAFM) process. Singh et al. (2011, 2010, 2008) successfully optimized
the process parameters of Ceramic Shell Investment Castings using Taguchi method.
B. Analysis of the S/N Ratio:
Taguchi uses the S/N ratio to measure the quality characteristic deviating from the desired value. The S/N ratio n is defined as,
n = -10 log (M.S.D.) (1)
Where M.S.D. is the mean-square deviation for the output characteristic. As mentioned earlier, there are three categories of
quality
characteristics, i.e. the-lower-the-better, the higher-the-better, and the-nominal-the-better. To obtain optimal cutting
performance,
the-higher-the-better quality characteristic for material removal ratemust betaken.Themean-squaredeviation(M.S.D.)forthe-
higher-the-better quality characteristic can be expressed as:
M.S.D. = 1/ m ∑ 1/Ti
2 (2)
Where m is the number of tests and Ti is the value of material removal rate and the i th test. On the other hand, the-lower-the-
better
quality characteristics for surface roughness should be taken for obtaining optimal cutting performance. The M.S.D. for the the-
lower-the-better quality characteristic can be expressed as:
M.S.D= 1/m ∑ si
2 (3)
Where Si is the value of surface roughness for the ith test. Regardless of the-lower-the-better of the higher-the-better quality
characteristic, the greater S/N ratio corresponds to the smaller variance of the output characteristic around the desired value.
This is
to accomplished by separating the total variability of the SIN ratios, whichismeasuredbythesumofthesquareddeviations from
the total mean S/N ratio, into contributions by each of the design parameters and the error. First, the total sum of squared
deviations
SST from the total mean SIN ratio nm can be calculated as:
SST = ∑ (ni-nm)2 (4)
Where n is the number of experiments in the orthogonal and ni is the mean S/N ratio for the ith experiment. The total sum of
spared deviations SST is decomposed into two sources: thesumofsquareddeviationsSSd duetoeachdesignparameterandthe
sum of squared error SSe. The percentage contribution % by each of the design parameters in the total sum of squared
deviations SST is a ratio of the sum of squared deviations SSd due to each design parameter to the total sum of squared
deviations SST.
MSD denotes mean square deviation, which presents the average of squares of all deviations from the targetvalueratherthan
around the average value.
Taguchi transformed the loss function into a concurrent statistic called S/N ratio, which combines both the mean level of the
quality characteristic and variance around this mean into a single metric (Ross, 1996; and Barker, 1986). The S/N ratio
consolidates several repetitions (at least two data points are required) into one value. A high value of S/N ratio indicates
optimum value of quality with minimum variation. Depending upon the typeofresponse,thefollowingthreetypes ofS/N ratio
are employed in practice (Byrne and Taguchi, 1987).
1. Larger the better: 2. Lower the better: 3. Nominal the best:
International Research Journal of Engineering and Technology (IRJET) e-ISSN: 2395-0056
Volume: 06 Issue: 04 | Apr 2019 www.irjet.net p-ISSN: 2395-0072
© 2019, IRJET | Impact Factor value: 7.211 | ISO 9001:2008 Certified Journal | Page 997
It is to be mentioned that for nominal the best type of characteristic, the standard definition of MSDhasbeenused.Forsmaller
the better type the target value is zero. For larger the better type, the inverse of each large value becomes a small value and
again the target value is zero. Therefore, for all the three expressions the smallest magnitude of MSD is being sought. The
constant 10 has been purposely used to magnify S/N number for each analysis and negative sign is used to set S/N ratio of
larger the better relative to the square deviation of smaller the better.
C. Confirmation Tests:
Once the optimal level of the design parameters has been selected, the final stepistopredictandverifytheimprovementof the
quality characteristic using the optimal level of the design parameters. TheestimatedS/N ration·usingtheoptimal level ofthe
design parameters can be calculated as,
n- = nm+∑o
i=0 (ni-nm)
Where nm is the total mean S/N ratio, ni is the mean S/N ratio at the optimal level, and is the number of the main design
parameters that affect the quality characteristic.
V. EXPERIMENTATION
Turning operations are accomplished using a cutting tool, the high forces and temperature duringmachiningcreatea veryhot
environment for the cutting tool. Therefore, MRR is an important index to evaluatecuttingperformanceina turningoperation.
In addition, the purpose of turning operations is to produce a low Surface Roughness of the machined work pieceandwiththe
high Material Removal Rate. Therefore, Surface Roughness is another important index to evaluate cutting performance. The
cutting experiments are carried out in our collage workshop on CNC Turning Centre, Minitab software.
A. Work Material:
1) Material selected is : MILD STEEL(AISI 1018)
2) Yield strength : 370 Mpa
3) Tensile Strength : 440 Mpa
4) Specimen Dimensions: D= 32mm , L=80mm
B. Cutting Insert Used for Operation:
Turning insert: VNMG160408
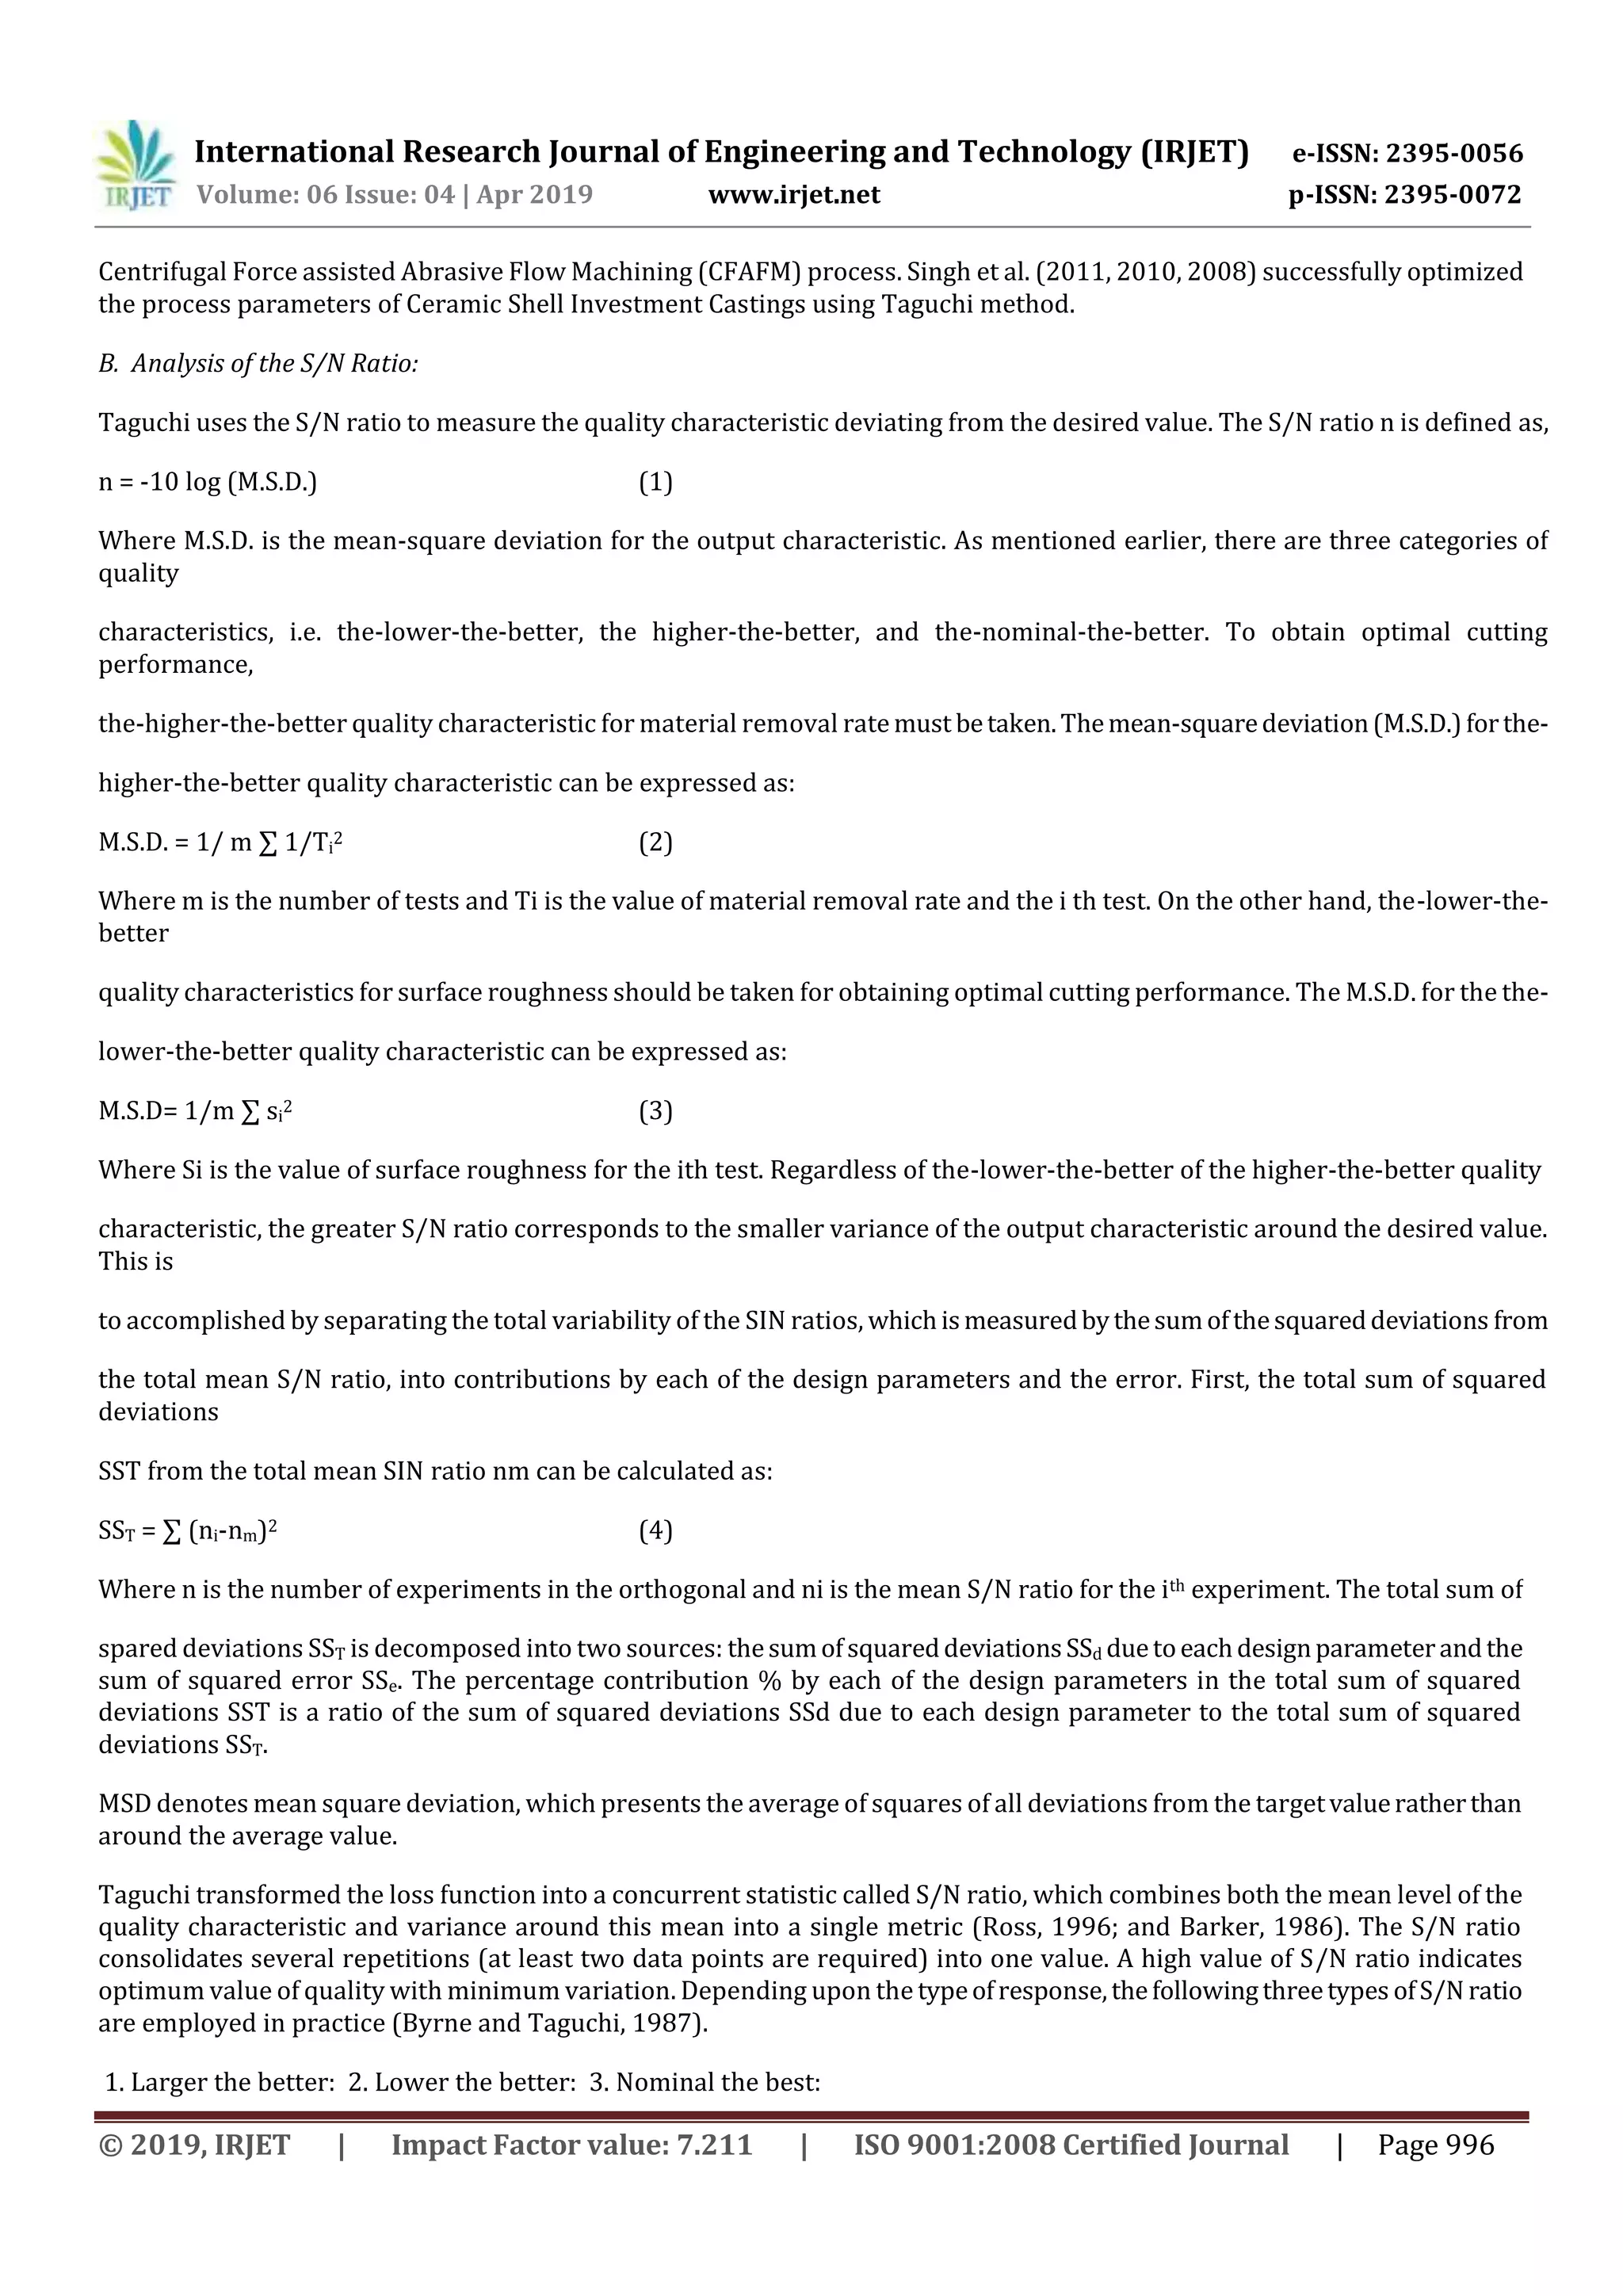
symbol Cutting Parameters Level 1 Level 2 Level 3
A Cutting speed 450 600 750
B Feed rate 0.04 0.07 0.1
C Depth of cut 0.5 1 1.5
Fig: Table according to selected cutting parameters with respect to levels
VI. OBSERVATIONS OF EXPERIMENT
The experimental observations are as shown in the table below,
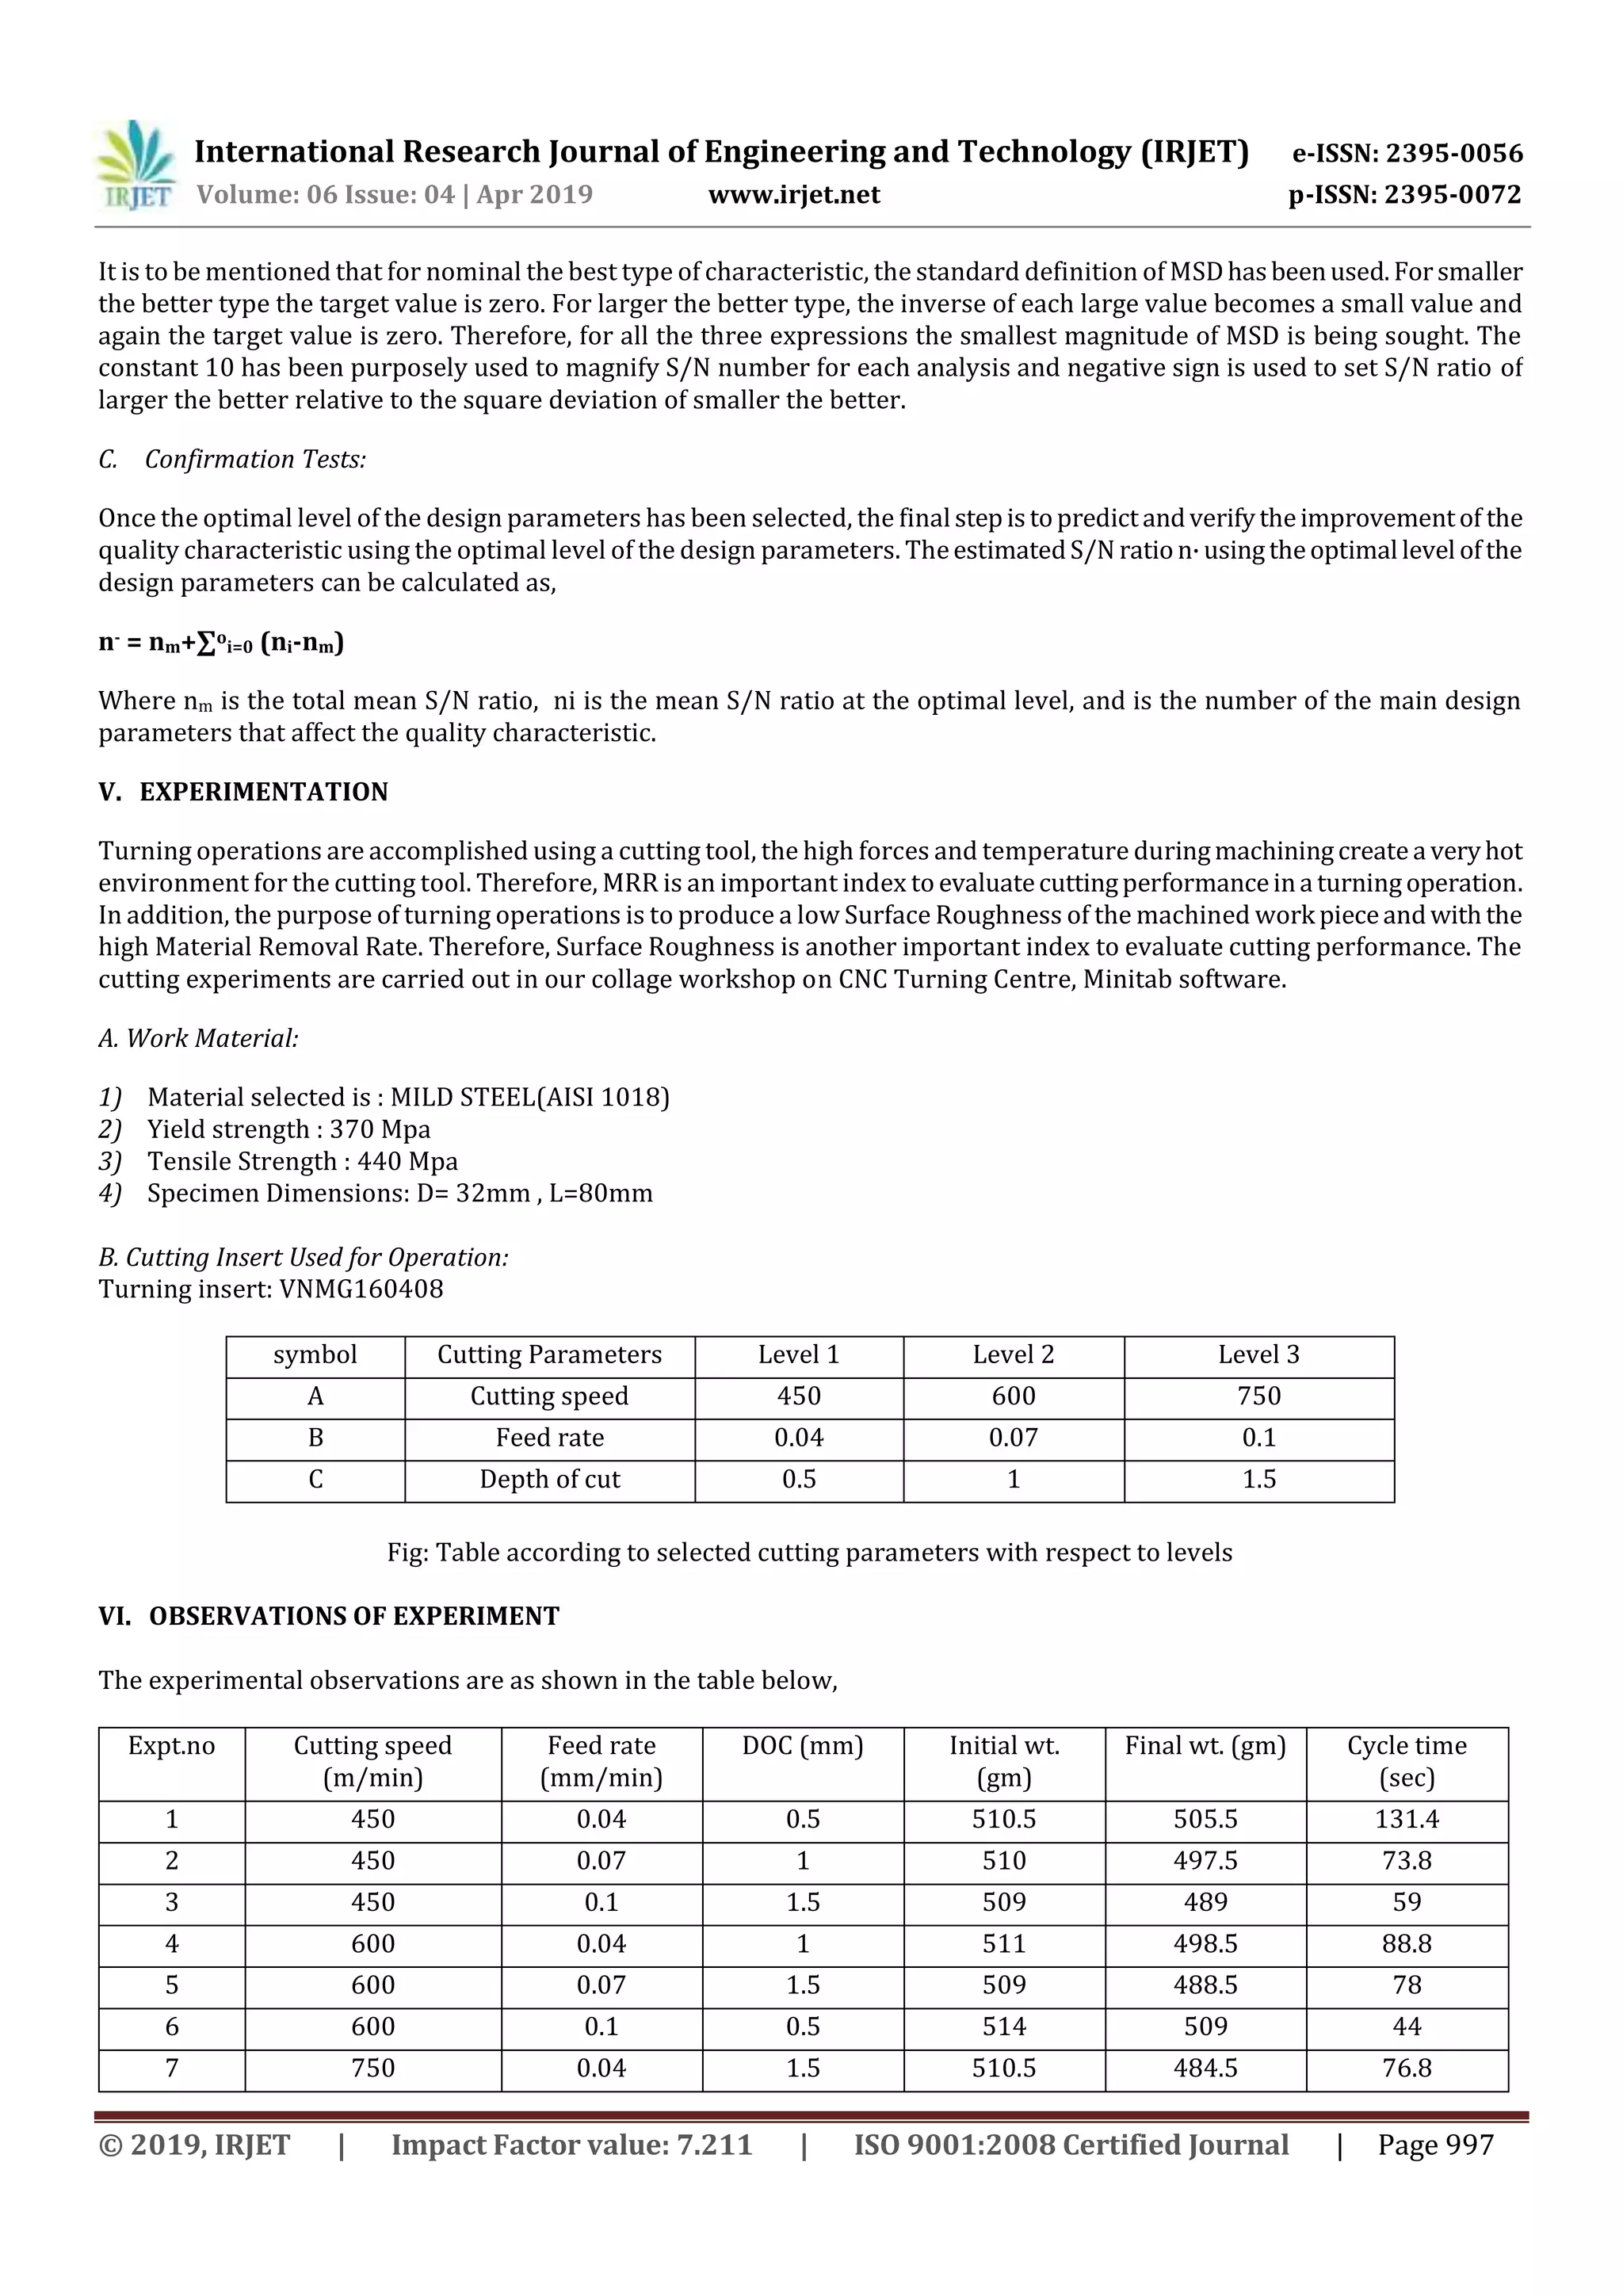
Expt.no Cutting speed
(m/min)
Feed rate
(mm/min)
DOC (mm) Initial wt.
(gm)
Final wt. (gm) Cycle time
(sec)
1 450 0.04 0.5 510.5 505.5 131.4
2 450 0.07 1 510 497.5 73.8
3 450 0.1 1.5 509 489 59
4 600 0.04 1 511 498.5 88.8
5 600 0.07 1.5 509 488.5 78
6 600 0.1 0.5 514 509 44
7 750 0.04 1.5 510.5 484.5 76.8
International Research Journal of Engineering and Technology (IRJET) e-ISSN: 2395-0056
Volume: 06 Issue: 04 | Apr 2019 www.irjet.net p-ISSN: 2395-0072
© 2019, IRJET | Impact Factor value: 7.211 | ISO 9001:2008 Certified Journal | Page 998
8 750 0.07 0.5 510.5 505.5 50
9 750 0.1 1 514 500.5 36
Table: Experimental results for MRR
A. MRR Calculations:
For calculation of Material Removal Rate the mild steel bar of 32 diameter and 80mm in length is selected. Initial weight of
each test bar is taken before machining and final weight after machining. Depth of cut, speed & feed rateareselectedasperL9
orthogonal array. Machining is carried out on specified length of material . Machining cycle time is taken for each specific
component/job directly from CNC machine. After machining, final weight of each test bar is determined. Finally MRR is
calculated by using formula,
MRR= (Initial weight -Final weight) / machining time
The S/N ratio n is defined as,
S/N= -10 log (M.S.D.
Where, M.S.D. is the mean-square deviation for the output characteristic. To obtain optimal cutting performance, the-higher -
the-better quality characteristic for MRR must be taken. The mean-square deviation (M.S.D.) for the-higher-the-betterquality
characteristic can be expressed as:
MSD= 1/n ∑ (1/y2
The calculations of S/N ratio for Material Removal Rate is shown in table below as follows,
Expt. No. Cutting Speed (m/min) Feed Rate (mm/min) Depth of cut (mm) MRR (gm/sec) S/N ratio
1 450 0.04 0.5 0.038 -28.403
2 450 0.07 1 0.169 -15.443
3 450 0.1 1.5 0.339 -9.3960
4 600 0.04 1 0.141 -17.016
5 600 0.07 1.5 0.263 -11.609
6 600 0.1 0.5 0.114 -18.869
7 750 0.04 1.5 0.339 -9.3960
8 750 0.07 0.5 0.100 -20.000
9 750 0.1 1 0.375 -8.5194
Table: Experimental results for MRR and S/N ratio
Calculation of S/N ratio for MRR:
S/N= -10 log (M.S.D.)
Where, MSD= 1/n∑ (1/y2)
Calculation is done according to above formula:
For the Example ,
Expt. No. I:
Initial Weight (gm) = 510.5,
Final Weight (gm) = 505.5,
Machining Time (sec) = 131.4,
International Research Journal of Engineering and Technology (IRJET) e-ISSN: 2395-0056
Volume: 06 Issue: 04 | Apr 2019 www.irjet.net p-ISSN: 2395-0072
© 2019, IRJET | Impact Factor value: 7.211 | ISO 9001:2008 Certified Journal | Page 999
MRR = ( 510.5-505.5)/131.4
MRR= 0.038 gm/sec
For S/N Ratio,
S/N= 10 log (1/1 *[1/ 0.0382]] = -28.4043.
For quality characteristic, a greater S/N ratio corresponds to better quality characteristics. Therefore, the optimal level of the
process parameters is the level with the greatest S/N ratio.
B. Surface Roughness:
A roughness tester is used to quickly and accurately determine the surface texture or surface roughness of a material.
A roughness tester shows the measured roughness depth (Rz) as well as the mean roughness value (Ra) in micrometers or
microns (µm). Surface roughness often shortened to roughness, is a component of surface texture. It is quantified by the
deviations in the direction of the normal vector of a real surface from its ideal form. If these deviations are large, the surfaceis
rough; if they are small, the surface is smooth. In surface metrology,roughnessistypicallyconsideredto bethehigh-frequency,
short-wavelength component of a measured surface. However, in practiceitisoftennecessarytoknow boththeamplitudeand
frequency to ensure that a surface is fit for a purpose. Roughness plays an important role in determining how a real objectwill
interact with its environment. In tribology, roughsurfacesusually wear morequicklyandhavehigher friction coefficientsthan
smooth surfaces. Roughness is often a good predictor of the performance of a mechanical component, since irregularities on
the surface may form nucleation sites for cracks or corrosion. On the other hand, roughness may promote adhesion.Generally
speaking, rather than scale specific descriptors, cross-scale descriptors such as surface fractality provide more meaningful
predictions of mechanical interactions at surfaces including contact stiffness and static friction.
Although a high roughness value is often undesirable, it can be difficult and expensive to control in manufacturing. For
example, it is difficult and expensive to control surface roughness of fused deposition modelling (FDM) manufactured
parts. Decreasing the roughness of a surface usually increases its manufacturing cost. This often resultsina trade-offbetween
the manufacturing cost of a component and its performance in application.
Roughness can be measured by manual comparison against a "surface roughness comparator" (a sample of known surface
roughness), but more generally a surface profile measurement is madewitha profilometer. Thesecanbeofthecontactvariety
(typically a diamond stylus) or optical (e.g.: a white light interferometer or laser scanning confocal microscope).
However, controlled roughness can often be desirable. For example, a gloss surfacecanbetooshinytotheeyeand tooslippery
to the finger (a touchpad is a good example) so a controlled roughness is required. This is a case where both amplitude and
frequency are very important.
Expt.No Cutting speed
(m/min)
Feed rate
(mm/min)
DOC (mm) SR (micrometer) S/N ratio
1 450 0.04 0.5 2.894 -9.23
2 450 0.07 1 4.033 -12.1126
3 450 0.1 1.5 1.628 -4.2331
4 600 0.04 1 2.387 -7.5570
5 600 0.07 1.5 0.786 2.0915
6 600 0.1 0.5 2.960 -9.4258
7 750 0.04 1.5 1.830 -5.2490
8 750 0.07 0.5 2.110 -6.4856
9 750 0.1 1 1.617 -4.1742
Table: Experimental results for SR and S/N ratio.
Calculation of S/N ratio for Surface Roughness:
S/N ratio= -10 log (M.S.D)2
Calculation is done according to above formula,
International Research Journal of Engineering and Technology (IRJET) e-ISSN: 2395-0056
Volume: 06 Issue: 04 | Apr 2019 www.irjet.net p-ISSN: 2395-0072
© 2019, IRJET | Impact Factor value: 7.211 | ISO 9001:2008 Certified Journal | Page 1000
For example,
Expt. No. 1
S/N= -10 log (2.8942) = -9.230
The lower – the – better of the higher –the –better quality characteristics,thegreaters/nratiocorrespondstosmallervariance
of the output characteristics around the desired value the S/N for Surface Roughness is shown in table.
VII. ANALYSIS OF EXPERIMENTAL
750600450
-10
-15
-20
0.100.070.04
1.51.00.5
-10
-15
-20
A
MeanofSNratios
B
C
Main Effects Plot for SN ratios
Data Means
Signal-to-noise: Larger is better
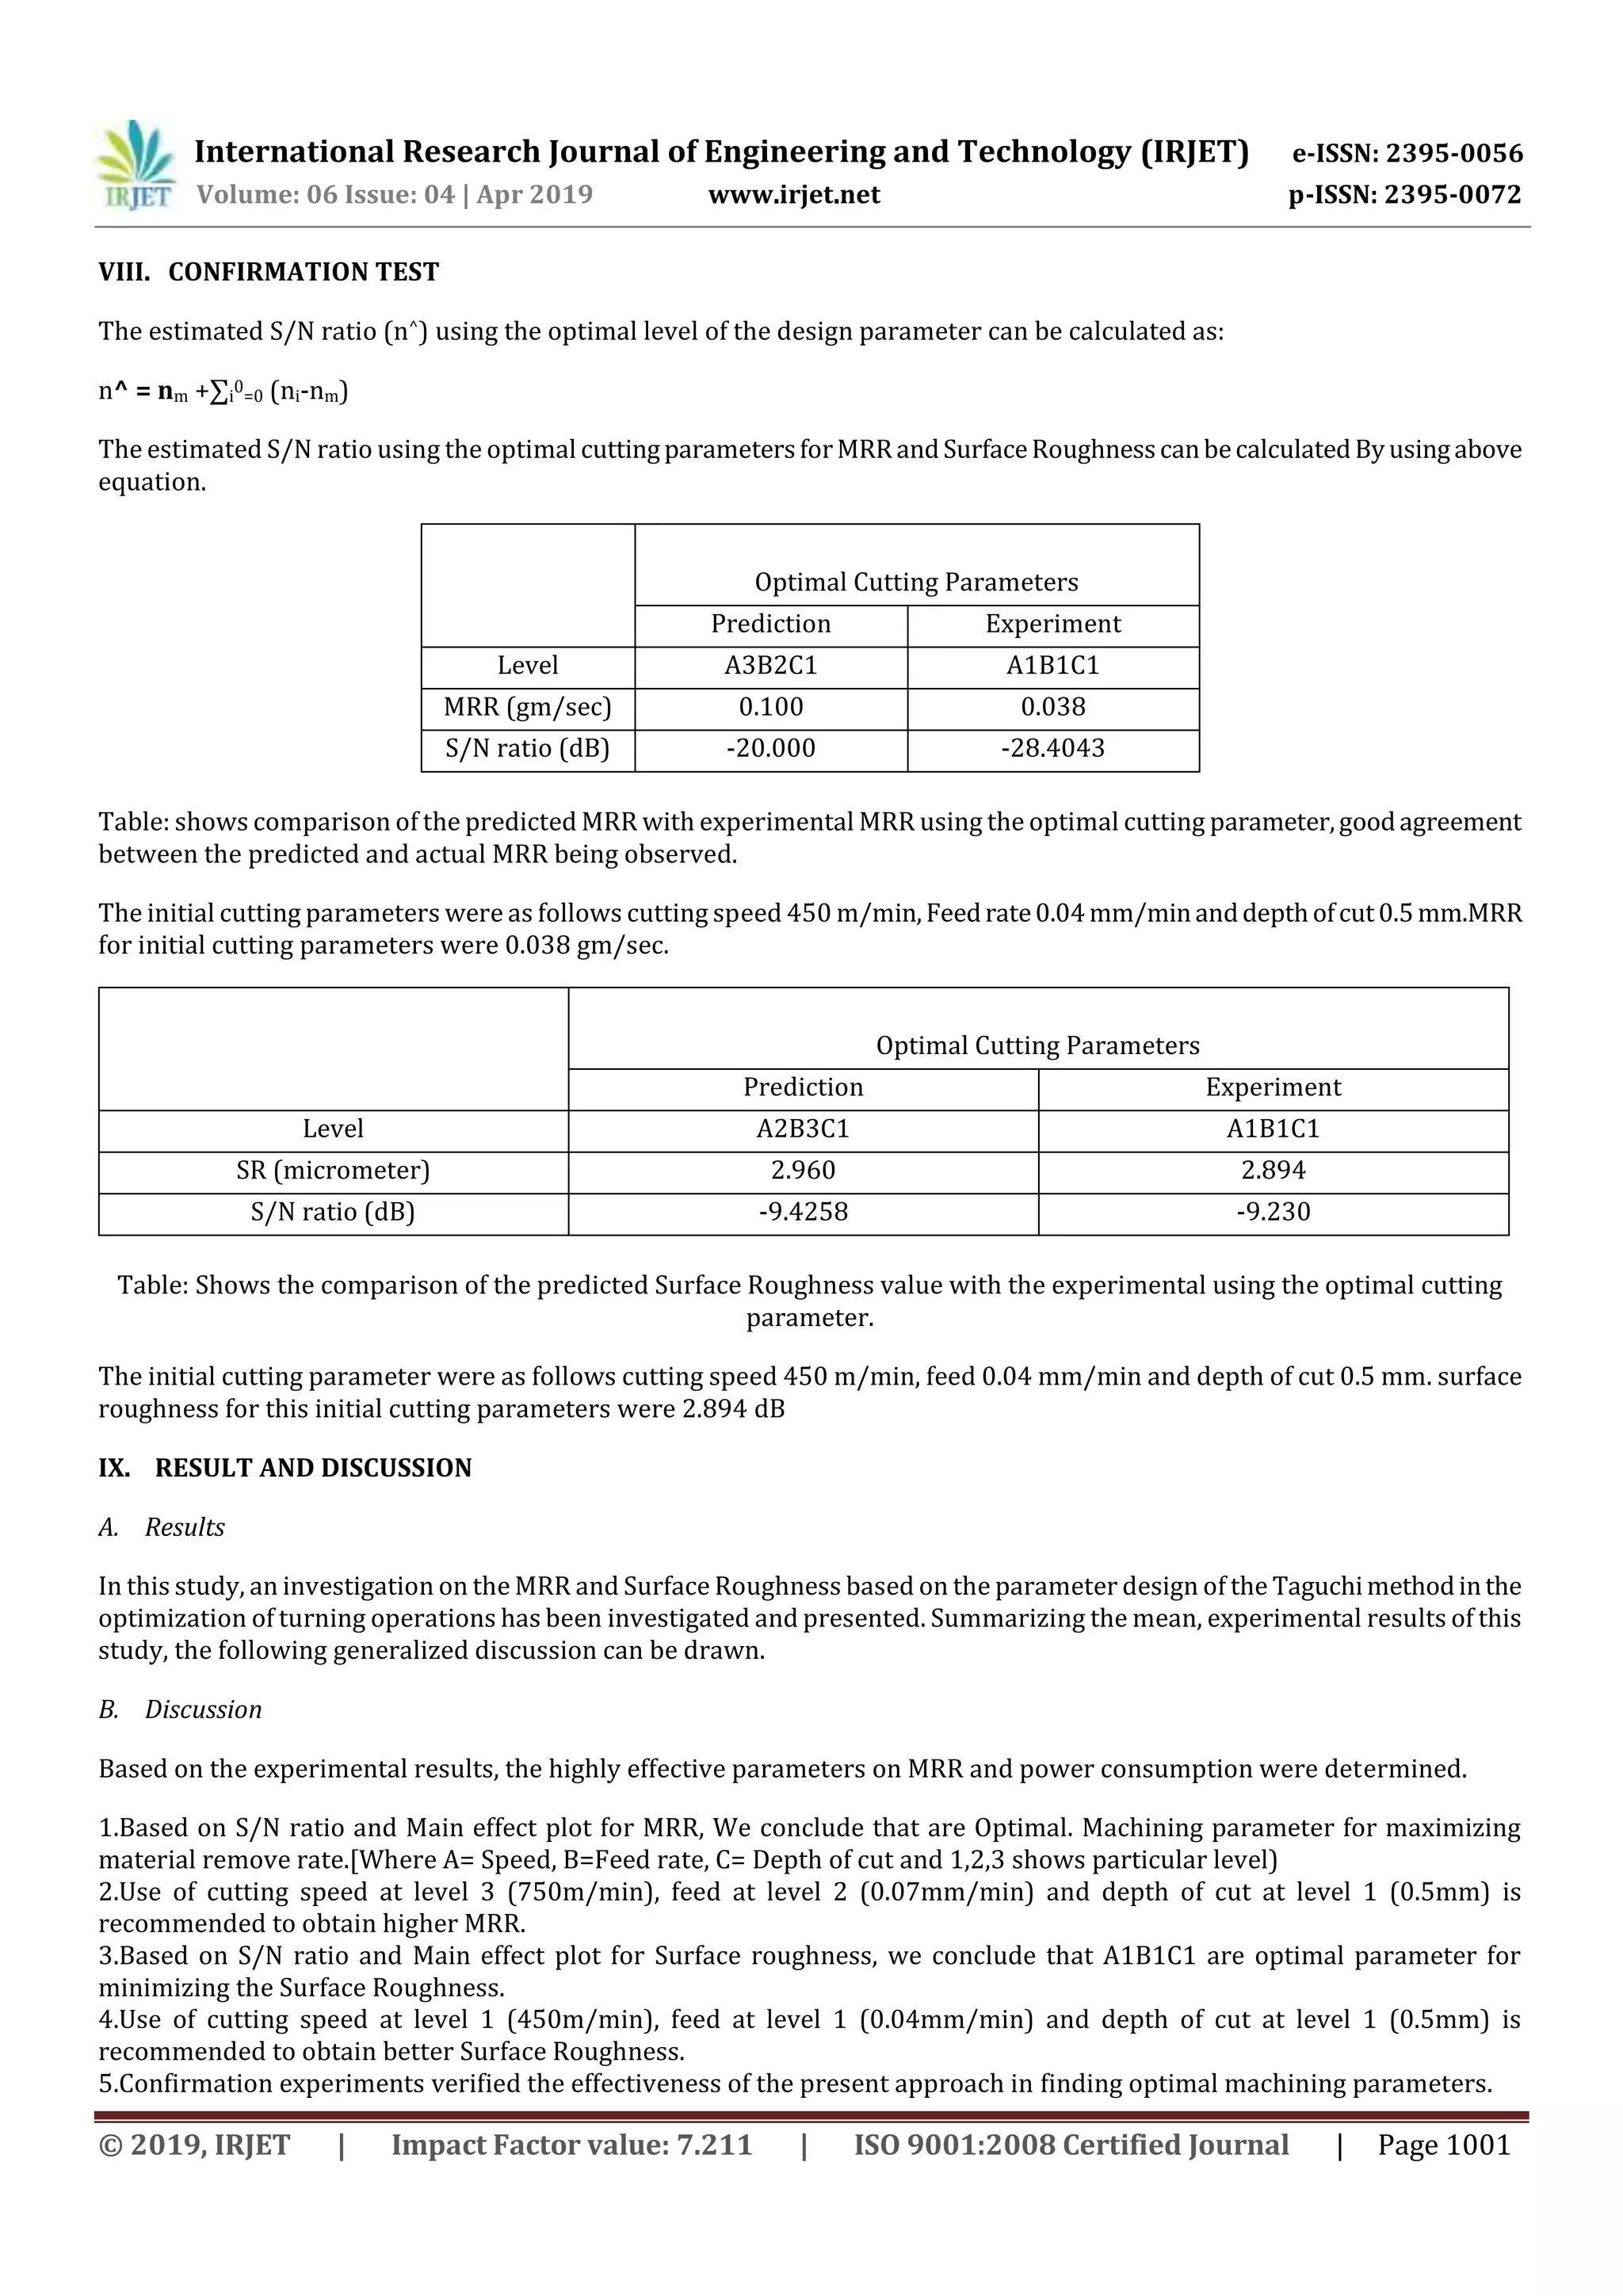
Fig no: Plots for Material Removal Rate
750600450
-2
-4
-6
-8
0.100.070.04
1.51.00.5
-2
-4
-6
-8
A
MeanofSNratios
B
C
Main Effects Plot for SN ratios
Data Means
Signal-to-noise: Smaller is better
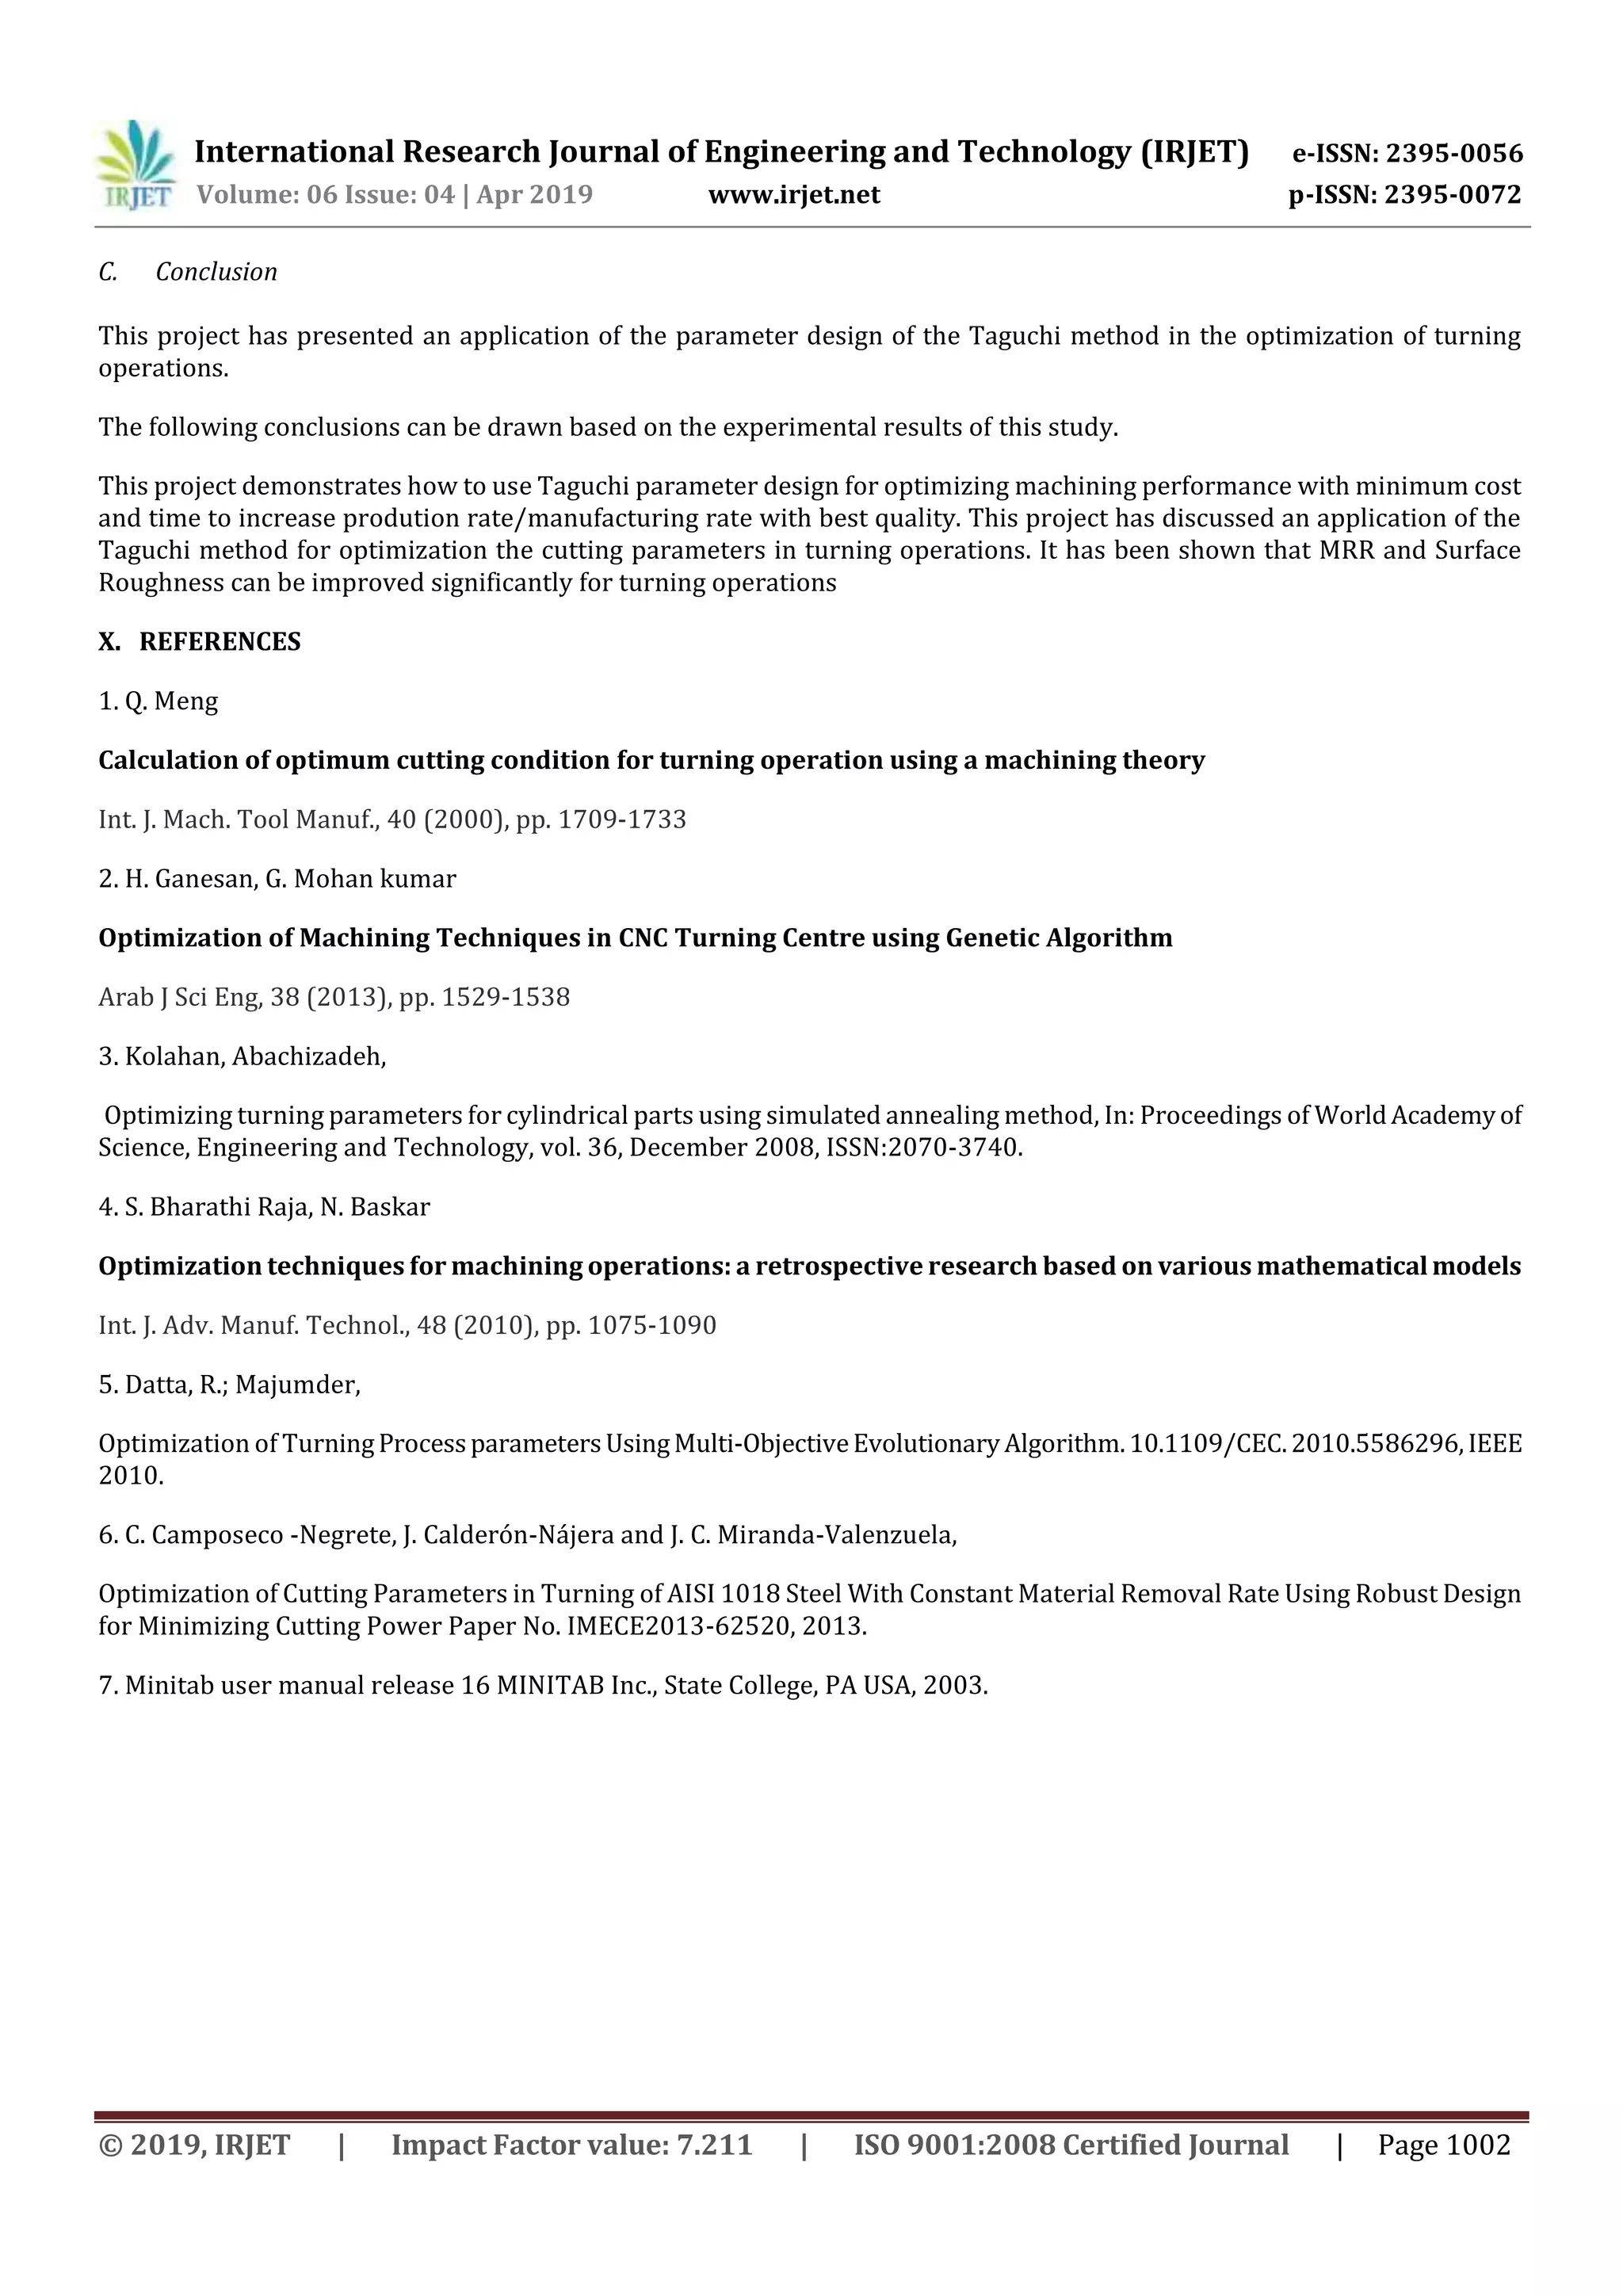
Fig no: Plots for Surface Roughness.
International Research Journal of Engineering and Technology (IRJET) e-ISSN: 2395-0056
Volume: 06 Issue: 04 | Apr 2019 www.irjet.net p-ISSN: 2395-0072
© 2019, IRJET | Impact Factor value: 7.211 | ISO 9001:2008 Certified Journal | Page 1001
VIII. CONFIRMATION TEST
The estimated S/N ratio (n^) using the optimal level of the design parameter can be calculated as:
n^ = nm +∑i
0
=0 (ni-nm)
The estimated S/N ratio using the optimal cuttingparametersforMRRandSurfaceRoughnesscanbecalculatedByusingabove
equation.
Optimal Cutting Parameters
Prediction Experiment
Level A3B2C1 A1B1C1
MRR (gm/sec) 0.100 0.038
S/N ratio (dB) -20.000 -28.4043
Table: shows comparison of the predicted MRR with experimental MRR using the optimal cutting parameter,goodagreement
between the predicted and actual MRR being observed.
The initial cutting parameters were as follows cutting speed 450 m/min,Feedrate0.04mm/minanddepthofcut0.5mm.MRR
for initial cutting parameters were 0.038 gm/sec.
Optimal Cutting Parameters
Prediction Experiment
Level A2B3C1 A1B1C1
SR (micrometer) 2.960 2.894
S/N ratio (dB) -9.4258 -9.230
Table: Shows the comparison of the predicted Surface Roughness value with the experimental using the optimal cutting
parameter.
The initial cutting parameter were as follows cutting speed 450 m/min, feed 0.04 mm/min and depth of cut 0.5 mm. surface
roughness for this initial cutting parameters were 2.894 dB
IX. RESULT AND DISCUSSION
A. Results
In this study, an investigation on the MRR and Surface Roughness based on the parameter design of the Taguchimethodinthe
optimization of turning operations has been investigated and presented. Summarizing the mean, experimental results of this
study, the following generalized discussion can be drawn.
B. Discussion
Based on the experimental results, the highly effective parameters on MRR and power consumption were determined.
1. 1.Based on S/N ratio and Main effect plot for MRR, We conclude that are Optimal. Machining parameter for maximizing
material remove rate.[Where A= Speed, B=Feed rate, C= Depth of cut and 1,2,3 shows particular level)
2.Use of cutting speed at level 3 (750m/min), feed at level 2 (0.07mm/min) and depth of cut at level 1 (0.5mm) is
recommended to obtain higher MRR.
3.Based on S/N ratio and Main effect plot for Surface roughness, we conclude that A1B1C1 are optimal parameter for
minimizing the Surface Roughness.
4.Use of cutting speed at level 1 (450m/min), feed at level 1 (0.04mm/min) and depth of cut at level 1 (0.5mm) is
recommended to obtain better Surface Roughness.
5.Confirmation experiments verified the effectiveness of the present approach in finding optimal machining parameters.
International Research Journal of Engineering and Technology (IRJET) e-ISSN: 2395-0056
Volume: 06 Issue: 04 | Apr 2019 www.irjet.net p-ISSN: 2395-0072
© 2019, IRJET | Impact Factor value: 7.211 | ISO 9001:2008 Certified Journal | Page 1002
C. Conclusion
This project has presented an application of the parameter design of the Taguchi method in the optimization of turning
operations.
The following conclusions can be drawn based on the experimental results of this study.
This project demonstrates how to use Taguchi parameter design for optimizing machining performance with minimum cost
and time to increase prodution rate/manufacturing rate with best quality. This project has discussed an application of the
Taguchi method for optimization the cutting parameters in turning operations. It has been shown that MRR and Surface
Roughness can be improved significantly for turning operations
X. REFERENCES
1. Q. Meng
Calculation of optimum cutting condition for turning operation using a machining theory
Int. J. Mach. Tool Manuf., 40 (2000), pp. 1709-1733
2. H. Ganesan, G. Mohan kumar
Optimization of Machining Techniques in CNC Turning Centre using Genetic Algorithm
Arab J Sci Eng, 38 (2013), pp. 1529-1538
3. Kolahan, Abachizadeh,
Optimizing turning parameters for cylindrical parts using simulated annealing method, In: Proceedings of WorldAcademyof
Science, Engineering and Technology, vol. 36, December 2008, ISSN:2070-3740.
4. S. Bharathi Raja, N. Baskar
Optimization techniques for machining operations: a retrospective research based on various mathematicalmodels
Int. J. Adv. Manuf. Technol., 48 (2010), pp. 1075-1090
5. Datta, R.; Majumder,
Optimization of TurningProcessparametersUsingMulti-ObjectiveEvolutionaryAlgorithm.10.1109/CEC.2010.5586296,IEEE
2010.
6. C. Camposeco -Negrete, J. Calderón-Nájera and J. C. Miranda-Valenzuela,
Optimization of Cutting Parameters in Turning of AISI 1018 Steel With Constant Material Removal Rate Using Robust Design
for Minimizing Cutting Power Paper No. IMECE2013-62520, 2013.
7. Minitab user manual release 16 MINITAB Inc., State College, PA USA, 2003.

IRJET- Optimization of Cutting Parameters During Turning of AISI 1018 using Taguchi Method

  • 1.
    International Research Journalof Engineering and Technology (IRJET) e-ISSN: 2395-0056 Volume: 06 Issue: 04 | Apr 2019 www.irjet.net p-ISSN: 2395-0072 © 2019, IRJET | Impact Factor value: 7.211 | ISO 9001:2008 Certified Journal | Page 994 Optimization of Cutting Parameters During Turning of AISI 1018 using Taguchi Method Mr .Vinayak H. Salgar1, Mr. Mohit M. Patil2 , Mr. Nitin S. More3, Mr. Aditya S. Nikam4, Ajay P. Dhawan5 1,2,3,4Students of Sanjay Godawat Institute, Atigre. 5Assistant Professor, Mechanical Engineering Department, Sanjay Ghodawat Group of Institutions, Kolhapur, Maharashtra, India ------------------------------------------------------------------------***------------------------------------------------------------------------- Abstract: This paper presents an optimization method of cutting parameters (cutting speed, feed rate and depth of cut) during turning of AISI 1018 mild steel to achieve the Maximum Material Removal Rate (MRR) and the Minimum Surface Roughness(SR). The design of experiment is based on the Taguchi's L9 (33) Orthogonal array technique and analysisofS/Nratio wasperformedto identify the effect of the cuting parameters on the response variables. The taguchi method is used to optimize cutting parameters for the material removal rate (MRR) and the surface roughness surface. The main effect plots are then generated and then analysed to find the relationship between the cutting parameter and variables. The detailed of the design of experimentation and the analysis are given in the following data Keywords: Taguchi Method, Orthogonal Array, Material Removal Rate(MRR), Surface Roughness(SR),S/N RatioandMinitab. I. INTRODUCTION Metal cutting is one in all the necessary and widely used producing processes in engineering industries. The metal cutting studies focus on the features of tools, work material composition and mechanical properties,andaboveall themachine parameter settings that influence the process efficiency and output quality characteristics ( or responses).A significant improvement in method potency may be obtained by method parameter improvement that identifies and determines the regions of crucial method management factors resulting in desired outputs or responses with acceptable variations guaranteeing a lower value of producing. The primary objective in machining operations is to produce products with low Surface Roughness andhighMaterial Removal Rate(MRR). Machining parameter optimization plays an important role in achieving this goal. Machining parameter optimization operations usually involves the optimal selection of cutting speed, feed rate and depth of cut. Determination of optimal cutting parameters for satisfying certain technological and economical conditions has beenoneofthemost important elements in process planning for metal cutting operations. Examining the economics of machining operations has significant practical importance. Machining is outlined as a method, during which themetal isremoved withinthe kindof chipsby means that of single or multiple wedge-shaped cutting tools. Spindle speed :The rotational speed of the spindle and the work piecein revolutions per minute (RPM). The spindle speed is nothing but the cutting speed / circumferenceofthework piece wherethe cut is done. Feed rate :The speed of cutting tool' movement relative to the work piece as the tool makes a cut. The feed rate is measured in (mm/min).Depth of cut :A large depth of cut will require a low feed rate, or else it will result in a high load on the tool and reduce the tool life. For rough turning depth of cut is not matters because it is not dealing with surface quality. II. RESEARCH METHODOLOGY AND APPROACH A. Taguchi Method Taguchi is the developer of the Taguchi method. He projectedthatengineeringoptimizationofa processedproducttobe meted out in an exceedingly three-step approach, as follows. 1) System design: In system design, the engineer applies scientific and engineering knowledge to produce a basic functional design prototype, this design including the product design stage and the process design stage. 2) Parameter design: The objective of parameter design is to optimize the settings of the process parameter values for improving quality characteristics and to identify the product parameter values under the optimal process parameter values. 3) Tolerance design: Tolerance design is used to determine and analyze tolerances for the optimal settings recommendbythe parameter design. Tolerance design is required if the reduced variation obtained by the parameter design does not meet the
  • 2.
    International Research Journalof Engineering and Technology (IRJET) e-ISSN: 2395-0056 Volume: 06 Issue: 04 | Apr 2019 www.irjet.net p-ISSN: 2395-0072 © 2019, IRJET | Impact Factor value: 7.211 | ISO 9001:2008 Certified Journal | Page 995 required performance, and involves tightening tolerances on the product parameters or process parameters that variations lead to an outsized negative influence on the desired product performance. III. FLOW CHART To workout this design of experiment, The Taguchi design parameter is used and for the taguchi design parameter consists of following processes for Taguchi design parameter to approach. Fig. Flow chart of Taguchi's Method for Optimization IV. ANALYSIS FOR SELECTED CUTTING PARAMETERS Following steps are followed to reach the required experimental design of cutting parameters as follows, A. Orthogonal Array Experiment: The experimental design for the three cutting parameters andthreelevelsusingtheL9 orthogonal arrayisshownin Table.The L9 orthogonal array has three columns, and three levels. L9 Orthogonal Array is selected on the basisofnumberofparameters and levels i.e, three number of parameters and three number of levels. In selecting an appropriate OA, the following prerequisites are required: 1. Selection of process parameters and/or their interactions to be evaluated. 2. Selection of number of levels for the selected parameters. The determinationofwhich parameterstoinvestigate,hingesupontheproductorprocessperformancecharacteristics or responses of interest (Ross, 1996). Several methods are suggested by Taguchi for determiningwhichparameterstoinclude in an experiment. These are (Ross, 1996): a. Brainstorming b. Flow charting c. Cause-effect diagrams The total degrees of freedom (DOF) of an experiment are a direct function of total number of trials. If the numberoflevelsofa parameterincreases, the DOF of the parameter also increase because the DOF of a parameter is the number of levels minusone. Thus,increasingthe number of levels for a parameter increases the total degrees 77 of freedom in the experiment which in turn increases thetotal number of trials. Thus, two levels for each parameter are recommended to minimize the size oftheexperiment(Ross,1996).If curved or higher order polynomial relationship between the parameters under study and the response is expected, at least three levels for each parameter should be considered (Barker, 1990). The standard two-level and three level arrays (Taguchi and Wu, 1979) are: a) Two-level arrays: L4, L8, L12, L16, L32 b) Three-level arrays: L9, L18, L27 The number as subscript in the array designation indicates the number of trials in that array. The degrees of freedom(DOF)availableinanOAare:fN 1LN   where LN f = total degrees of freedom of an OA LN =OA designation N = number of trials When a particular OA is selected for an experiment, the following inequality must be satisfied (Ross, 1996): LN f ≥ Total DOF required for parameters and interactions. Depending on the number of levels in the parameters and total DOF required for the experiment, a suitable OA is selected. Walia et al. (2006, 2006a, 2006b, 2006c) successfully employed Taguchi technique for optimizing the parametersof
  • 3.
    International Research Journalof Engineering and Technology (IRJET) e-ISSN: 2395-0056 Volume: 06 Issue: 04 | Apr 2019 www.irjet.net p-ISSN: 2395-0072 © 2019, IRJET | Impact Factor value: 7.211 | ISO 9001:2008 Certified Journal | Page 996 Centrifugal Force assisted Abrasive Flow Machining (CFAFM) process. Singh et al. (2011, 2010, 2008) successfully optimized the process parameters of Ceramic Shell Investment Castings using Taguchi method. B. Analysis of the S/N Ratio: Taguchi uses the S/N ratio to measure the quality characteristic deviating from the desired value. The S/N ratio n is defined as, n = -10 log (M.S.D.) (1) Where M.S.D. is the mean-square deviation for the output characteristic. As mentioned earlier, there are three categories of quality characteristics, i.e. the-lower-the-better, the higher-the-better, and the-nominal-the-better. To obtain optimal cutting performance, the-higher-the-better quality characteristic for material removal ratemust betaken.Themean-squaredeviation(M.S.D.)forthe- higher-the-better quality characteristic can be expressed as: M.S.D. = 1/ m ∑ 1/Ti 2 (2) Where m is the number of tests and Ti is the value of material removal rate and the i th test. On the other hand, the-lower-the- better quality characteristics for surface roughness should be taken for obtaining optimal cutting performance. The M.S.D. for the the- lower-the-better quality characteristic can be expressed as: M.S.D= 1/m ∑ si 2 (3) Where Si is the value of surface roughness for the ith test. Regardless of the-lower-the-better of the higher-the-better quality characteristic, the greater S/N ratio corresponds to the smaller variance of the output characteristic around the desired value. This is to accomplished by separating the total variability of the SIN ratios, whichismeasuredbythesumofthesquareddeviations from the total mean S/N ratio, into contributions by each of the design parameters and the error. First, the total sum of squared deviations SST from the total mean SIN ratio nm can be calculated as: SST = ∑ (ni-nm)2 (4) Where n is the number of experiments in the orthogonal and ni is the mean S/N ratio for the ith experiment. The total sum of spared deviations SST is decomposed into two sources: thesumofsquareddeviationsSSd duetoeachdesignparameterandthe sum of squared error SSe. The percentage contribution % by each of the design parameters in the total sum of squared deviations SST is a ratio of the sum of squared deviations SSd due to each design parameter to the total sum of squared deviations SST. MSD denotes mean square deviation, which presents the average of squares of all deviations from the targetvalueratherthan around the average value. Taguchi transformed the loss function into a concurrent statistic called S/N ratio, which combines both the mean level of the quality characteristic and variance around this mean into a single metric (Ross, 1996; and Barker, 1986). The S/N ratio consolidates several repetitions (at least two data points are required) into one value. A high value of S/N ratio indicates optimum value of quality with minimum variation. Depending upon the typeofresponse,thefollowingthreetypes ofS/N ratio are employed in practice (Byrne and Taguchi, 1987). 1. Larger the better: 2. Lower the better: 3. Nominal the best:
  • 4.
    International Research Journalof Engineering and Technology (IRJET) e-ISSN: 2395-0056 Volume: 06 Issue: 04 | Apr 2019 www.irjet.net p-ISSN: 2395-0072 © 2019, IRJET | Impact Factor value: 7.211 | ISO 9001:2008 Certified Journal | Page 997 It is to be mentioned that for nominal the best type of characteristic, the standard definition of MSDhasbeenused.Forsmaller the better type the target value is zero. For larger the better type, the inverse of each large value becomes a small value and again the target value is zero. Therefore, for all the three expressions the smallest magnitude of MSD is being sought. The constant 10 has been purposely used to magnify S/N number for each analysis and negative sign is used to set S/N ratio of larger the better relative to the square deviation of smaller the better. C. Confirmation Tests: Once the optimal level of the design parameters has been selected, the final stepistopredictandverifytheimprovementof the quality characteristic using the optimal level of the design parameters. TheestimatedS/N ration·usingtheoptimal level ofthe design parameters can be calculated as, n- = nm+∑o i=0 (ni-nm) Where nm is the total mean S/N ratio, ni is the mean S/N ratio at the optimal level, and is the number of the main design parameters that affect the quality characteristic. V. EXPERIMENTATION Turning operations are accomplished using a cutting tool, the high forces and temperature duringmachiningcreatea veryhot environment for the cutting tool. Therefore, MRR is an important index to evaluatecuttingperformanceina turningoperation. In addition, the purpose of turning operations is to produce a low Surface Roughness of the machined work pieceandwiththe high Material Removal Rate. Therefore, Surface Roughness is another important index to evaluate cutting performance. The cutting experiments are carried out in our collage workshop on CNC Turning Centre, Minitab software. A. Work Material: 1) Material selected is : MILD STEEL(AISI 1018) 2) Yield strength : 370 Mpa 3) Tensile Strength : 440 Mpa 4) Specimen Dimensions: D= 32mm , L=80mm B. Cutting Insert Used for Operation: Turning insert: VNMG160408 symbol Cutting Parameters Level 1 Level 2 Level 3 A Cutting speed 450 600 750 B Feed rate 0.04 0.07 0.1 C Depth of cut 0.5 1 1.5 Fig: Table according to selected cutting parameters with respect to levels VI. OBSERVATIONS OF EXPERIMENT The experimental observations are as shown in the table below, Expt.no Cutting speed (m/min) Feed rate (mm/min) DOC (mm) Initial wt. (gm) Final wt. (gm) Cycle time (sec) 1 450 0.04 0.5 510.5 505.5 131.4 2 450 0.07 1 510 497.5 73.8 3 450 0.1 1.5 509 489 59 4 600 0.04 1 511 498.5 88.8 5 600 0.07 1.5 509 488.5 78 6 600 0.1 0.5 514 509 44 7 750 0.04 1.5 510.5 484.5 76.8
  • 5.
    International Research Journalof Engineering and Technology (IRJET) e-ISSN: 2395-0056 Volume: 06 Issue: 04 | Apr 2019 www.irjet.net p-ISSN: 2395-0072 © 2019, IRJET | Impact Factor value: 7.211 | ISO 9001:2008 Certified Journal | Page 998 8 750 0.07 0.5 510.5 505.5 50 9 750 0.1 1 514 500.5 36 Table: Experimental results for MRR A. MRR Calculations: For calculation of Material Removal Rate the mild steel bar of 32 diameter and 80mm in length is selected. Initial weight of each test bar is taken before machining and final weight after machining. Depth of cut, speed & feed rateareselectedasperL9 orthogonal array. Machining is carried out on specified length of material . Machining cycle time is taken for each specific component/job directly from CNC machine. After machining, final weight of each test bar is determined. Finally MRR is calculated by using formula, MRR= (Initial weight -Final weight) / machining time The S/N ratio n is defined as, S/N= -10 log (M.S.D. Where, M.S.D. is the mean-square deviation for the output characteristic. To obtain optimal cutting performance, the-higher - the-better quality characteristic for MRR must be taken. The mean-square deviation (M.S.D.) for the-higher-the-betterquality characteristic can be expressed as: MSD= 1/n ∑ (1/y2 The calculations of S/N ratio for Material Removal Rate is shown in table below as follows, Expt. No. Cutting Speed (m/min) Feed Rate (mm/min) Depth of cut (mm) MRR (gm/sec) S/N ratio 1 450 0.04 0.5 0.038 -28.403 2 450 0.07 1 0.169 -15.443 3 450 0.1 1.5 0.339 -9.3960 4 600 0.04 1 0.141 -17.016 5 600 0.07 1.5 0.263 -11.609 6 600 0.1 0.5 0.114 -18.869 7 750 0.04 1.5 0.339 -9.3960 8 750 0.07 0.5 0.100 -20.000 9 750 0.1 1 0.375 -8.5194 Table: Experimental results for MRR and S/N ratio Calculation of S/N ratio for MRR: S/N= -10 log (M.S.D.) Where, MSD= 1/n∑ (1/y2) Calculation is done according to above formula: For the Example , Expt. No. I: Initial Weight (gm) = 510.5, Final Weight (gm) = 505.5, Machining Time (sec) = 131.4,
  • 6.
    International Research Journalof Engineering and Technology (IRJET) e-ISSN: 2395-0056 Volume: 06 Issue: 04 | Apr 2019 www.irjet.net p-ISSN: 2395-0072 © 2019, IRJET | Impact Factor value: 7.211 | ISO 9001:2008 Certified Journal | Page 999 MRR = ( 510.5-505.5)/131.4 MRR= 0.038 gm/sec For S/N Ratio, S/N= 10 log (1/1 *[1/ 0.0382]] = -28.4043. For quality characteristic, a greater S/N ratio corresponds to better quality characteristics. Therefore, the optimal level of the process parameters is the level with the greatest S/N ratio. B. Surface Roughness: A roughness tester is used to quickly and accurately determine the surface texture or surface roughness of a material. A roughness tester shows the measured roughness depth (Rz) as well as the mean roughness value (Ra) in micrometers or microns (µm). Surface roughness often shortened to roughness, is a component of surface texture. It is quantified by the deviations in the direction of the normal vector of a real surface from its ideal form. If these deviations are large, the surfaceis rough; if they are small, the surface is smooth. In surface metrology,roughnessistypicallyconsideredto bethehigh-frequency, short-wavelength component of a measured surface. However, in practiceitisoftennecessarytoknow boththeamplitudeand frequency to ensure that a surface is fit for a purpose. Roughness plays an important role in determining how a real objectwill interact with its environment. In tribology, roughsurfacesusually wear morequicklyandhavehigher friction coefficientsthan smooth surfaces. Roughness is often a good predictor of the performance of a mechanical component, since irregularities on the surface may form nucleation sites for cracks or corrosion. On the other hand, roughness may promote adhesion.Generally speaking, rather than scale specific descriptors, cross-scale descriptors such as surface fractality provide more meaningful predictions of mechanical interactions at surfaces including contact stiffness and static friction. Although a high roughness value is often undesirable, it can be difficult and expensive to control in manufacturing. For example, it is difficult and expensive to control surface roughness of fused deposition modelling (FDM) manufactured parts. Decreasing the roughness of a surface usually increases its manufacturing cost. This often resultsina trade-offbetween the manufacturing cost of a component and its performance in application. Roughness can be measured by manual comparison against a "surface roughness comparator" (a sample of known surface roughness), but more generally a surface profile measurement is madewitha profilometer. Thesecanbeofthecontactvariety (typically a diamond stylus) or optical (e.g.: a white light interferometer or laser scanning confocal microscope). However, controlled roughness can often be desirable. For example, a gloss surfacecanbetooshinytotheeyeand tooslippery to the finger (a touchpad is a good example) so a controlled roughness is required. This is a case where both amplitude and frequency are very important. Expt.No Cutting speed (m/min) Feed rate (mm/min) DOC (mm) SR (micrometer) S/N ratio 1 450 0.04 0.5 2.894 -9.23 2 450 0.07 1 4.033 -12.1126 3 450 0.1 1.5 1.628 -4.2331 4 600 0.04 1 2.387 -7.5570 5 600 0.07 1.5 0.786 2.0915 6 600 0.1 0.5 2.960 -9.4258 7 750 0.04 1.5 1.830 -5.2490 8 750 0.07 0.5 2.110 -6.4856 9 750 0.1 1 1.617 -4.1742 Table: Experimental results for SR and S/N ratio. Calculation of S/N ratio for Surface Roughness: S/N ratio= -10 log (M.S.D)2 Calculation is done according to above formula,
  • 7.
    International Research Journalof Engineering and Technology (IRJET) e-ISSN: 2395-0056 Volume: 06 Issue: 04 | Apr 2019 www.irjet.net p-ISSN: 2395-0072 © 2019, IRJET | Impact Factor value: 7.211 | ISO 9001:2008 Certified Journal | Page 1000 For example, Expt. No. 1 S/N= -10 log (2.8942) = -9.230 The lower – the – better of the higher –the –better quality characteristics,thegreaters/nratiocorrespondstosmallervariance of the output characteristics around the desired value the S/N for Surface Roughness is shown in table. VII. ANALYSIS OF EXPERIMENTAL 750600450 -10 -15 -20 0.100.070.04 1.51.00.5 -10 -15 -20 A MeanofSNratios B C Main Effects Plot for SN ratios Data Means Signal-to-noise: Larger is better Fig no: Plots for Material Removal Rate 750600450 -2 -4 -6 -8 0.100.070.04 1.51.00.5 -2 -4 -6 -8 A MeanofSNratios B C Main Effects Plot for SN ratios Data Means Signal-to-noise: Smaller is better Fig no: Plots for Surface Roughness.
  • 8.
    International Research Journalof Engineering and Technology (IRJET) e-ISSN: 2395-0056 Volume: 06 Issue: 04 | Apr 2019 www.irjet.net p-ISSN: 2395-0072 © 2019, IRJET | Impact Factor value: 7.211 | ISO 9001:2008 Certified Journal | Page 1001 VIII. CONFIRMATION TEST The estimated S/N ratio (n^) using the optimal level of the design parameter can be calculated as: n^ = nm +∑i 0 =0 (ni-nm) The estimated S/N ratio using the optimal cuttingparametersforMRRandSurfaceRoughnesscanbecalculatedByusingabove equation. Optimal Cutting Parameters Prediction Experiment Level A3B2C1 A1B1C1 MRR (gm/sec) 0.100 0.038 S/N ratio (dB) -20.000 -28.4043 Table: shows comparison of the predicted MRR with experimental MRR using the optimal cutting parameter,goodagreement between the predicted and actual MRR being observed. The initial cutting parameters were as follows cutting speed 450 m/min,Feedrate0.04mm/minanddepthofcut0.5mm.MRR for initial cutting parameters were 0.038 gm/sec. Optimal Cutting Parameters Prediction Experiment Level A2B3C1 A1B1C1 SR (micrometer) 2.960 2.894 S/N ratio (dB) -9.4258 -9.230 Table: Shows the comparison of the predicted Surface Roughness value with the experimental using the optimal cutting parameter. The initial cutting parameter were as follows cutting speed 450 m/min, feed 0.04 mm/min and depth of cut 0.5 mm. surface roughness for this initial cutting parameters were 2.894 dB IX. RESULT AND DISCUSSION A. Results In this study, an investigation on the MRR and Surface Roughness based on the parameter design of the Taguchimethodinthe optimization of turning operations has been investigated and presented. Summarizing the mean, experimental results of this study, the following generalized discussion can be drawn. B. Discussion Based on the experimental results, the highly effective parameters on MRR and power consumption were determined. 1. 1.Based on S/N ratio and Main effect plot for MRR, We conclude that are Optimal. Machining parameter for maximizing material remove rate.[Where A= Speed, B=Feed rate, C= Depth of cut and 1,2,3 shows particular level) 2.Use of cutting speed at level 3 (750m/min), feed at level 2 (0.07mm/min) and depth of cut at level 1 (0.5mm) is recommended to obtain higher MRR. 3.Based on S/N ratio and Main effect plot for Surface roughness, we conclude that A1B1C1 are optimal parameter for minimizing the Surface Roughness. 4.Use of cutting speed at level 1 (450m/min), feed at level 1 (0.04mm/min) and depth of cut at level 1 (0.5mm) is recommended to obtain better Surface Roughness. 5.Confirmation experiments verified the effectiveness of the present approach in finding optimal machining parameters.
  • 9.
    International Research Journalof Engineering and Technology (IRJET) e-ISSN: 2395-0056 Volume: 06 Issue: 04 | Apr 2019 www.irjet.net p-ISSN: 2395-0072 © 2019, IRJET | Impact Factor value: 7.211 | ISO 9001:2008 Certified Journal | Page 1002 C. Conclusion This project has presented an application of the parameter design of the Taguchi method in the optimization of turning operations. The following conclusions can be drawn based on the experimental results of this study. This project demonstrates how to use Taguchi parameter design for optimizing machining performance with minimum cost and time to increase prodution rate/manufacturing rate with best quality. This project has discussed an application of the Taguchi method for optimization the cutting parameters in turning operations. It has been shown that MRR and Surface Roughness can be improved significantly for turning operations X. REFERENCES 1. Q. Meng Calculation of optimum cutting condition for turning operation using a machining theory Int. J. Mach. Tool Manuf., 40 (2000), pp. 1709-1733 2. H. Ganesan, G. Mohan kumar Optimization of Machining Techniques in CNC Turning Centre using Genetic Algorithm Arab J Sci Eng, 38 (2013), pp. 1529-1538 3. Kolahan, Abachizadeh, Optimizing turning parameters for cylindrical parts using simulated annealing method, In: Proceedings of WorldAcademyof Science, Engineering and Technology, vol. 36, December 2008, ISSN:2070-3740. 4. S. Bharathi Raja, N. Baskar Optimization techniques for machining operations: a retrospective research based on various mathematicalmodels Int. J. Adv. Manuf. Technol., 48 (2010), pp. 1075-1090 5. Datta, R.; Majumder, Optimization of TurningProcessparametersUsingMulti-ObjectiveEvolutionaryAlgorithm.10.1109/CEC.2010.5586296,IEEE 2010. 6. C. Camposeco -Negrete, J. Calderón-Nájera and J. C. Miranda-Valenzuela, Optimization of Cutting Parameters in Turning of AISI 1018 Steel With Constant Material Removal Rate Using Robust Design for Minimizing Cutting Power Paper No. IMECE2013-62520, 2013. 7. Minitab user manual release 16 MINITAB Inc., State College, PA USA, 2003.