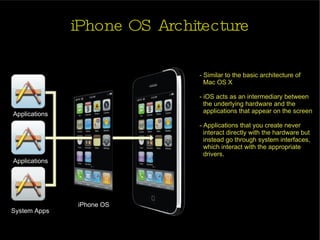
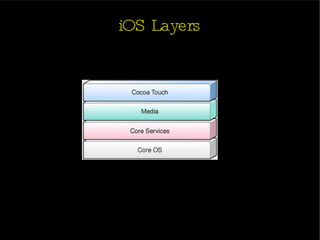
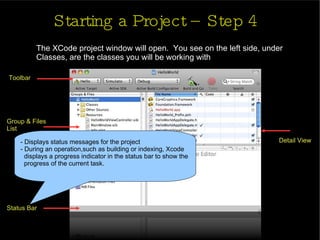
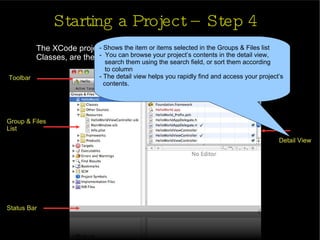
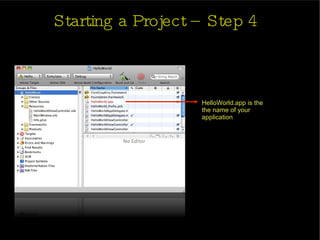
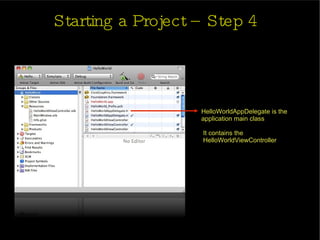
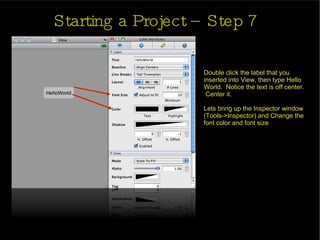
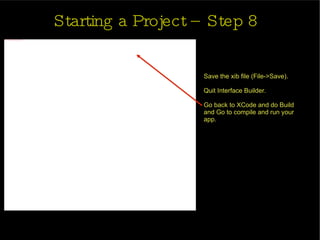
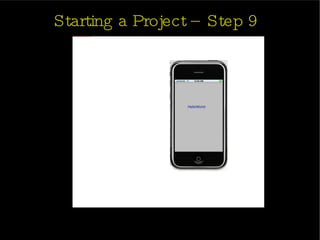
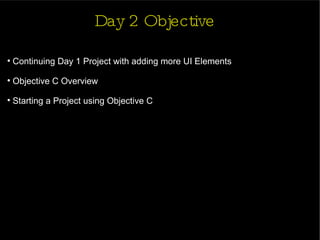
Introduction to iPhone Development Shyamala Prayaga Day 1
Agenda Prerequisite   Introduction -  iPhone OS Architecture - iOS Layers iPhone Application Development Tools iPhone Application Structure  Starting a Project Day 2 Objective
Prerequisite Intel Based Mac or Macbook Apple Developer Connection  Membership Membership is free iPhone  SDK  iPhone Application Development Tools  Membership is free C Basic Knowledge
Introduction iPhone is the trademark of Apple Inc
iPhone OS Architecture iPhone OS System Apps Applications Applications - Similar to the basic architecture of  Mac OS X - iOS acts as an intermediary between  the underlying hardware and the  applications that appear on the screen - Applications that you create never interact directly with the hardware but  instead go through system interfaces,  which interact with the appropriate  drivers.
iOS Layers
iPhone App Development Tools
iPhone App Development Tools XCode Objective-C, GDB Interface Builder Graphical UI Development Instruments Profiling, Leak Finding Simulator/ Emulator Testing
XCode XCode is an Integrated development environment, like Eclipse. While Eclipse is for Java, XCode is for Mac native code XCode can manage all your testing devices, automatically packaging iPhone apps with the proper certificates, and installing apps on the iPhone itself Apple makes XCode and distributes it for free, we can get it from  Apple's developer website: http://developer.apple.com/tools/xcode/ Xcode is free, but Apple makes you register as a new developer and wants your name and email address
XCode
Interface Builder Interface Builder is the easy-to-use graphical editor for designing every aspect of iPhone Application's graphical user interface Interface Builder stores your user interface design in one or more resource files, as a set of interface objects and their relationships Changes you make in the interface are automatically synchronized with XCode Interface Builder also makes it easy to drop in your own effects, including Quartz Composer animations
Interface Builder
Instruments Instruments environment lets you analyze the performance of your applications while running in the simulator or on a  device Instruments gathers data from your running application and presents that data in a graphical display called the timeline You can gather data about your application’s memory usage, disk activity, network activity, and graphics performance
Instruments Your Project Instruments Simulator Devices
Organizer Organizer keeps track of your iPhone devices and certificates Works with the Keychain to ensure that your application has been signed properly before installing it to an iPhone device keeps track of multiple devices, multiple provisioning profiles, and even help prepare your application for submission to the App Store Gives you quick access to frequently used files and projects, and allows for scripted operations across many projects
Organizer
iPhone Simulator/Emulator The iPhone Simulator runs your application in much the same way as an actual iPhone device It is quick to launch and debug The Simulator is a great way to test user interface You can simulate touch gestures by using the mouse.  The Simulator is a great time saver
iPhone Simulator/Emulator
Tools Overview Project XCode Device Simulator
iPhone Application Structure
iPhone Application Structure  Linked Frameworks Graphics, sound, blue tooth etc
iPhone Application Structure  The Executable
iPhone Application Structure  Target Different build setup
iPhone Application Structure  Resources Images, sounds, data, IB files
iPhone Application Structure  Boilerplate code
Starting a Project
Starting a Project – Step 1 Start up XCode
Starting a Project – Step 2 XCode provides several project templates to get you up and  develop your application - Navigation-based Application: that presents data hierarchically, using multiple screens - OpenGL ES Application: to present images or animation. Tab Bar Application: that presents a radio interface that lets the user choose from several screens Utility Application: that implements a main view and lets the user access a flip-side view to perform simple customizations.  View-based Application: that uses a single view to implement its user interface. Window-based Application: serves as a starting point for any application, containing an application delegate and a window. Use this template when you want to implement your own view hierarchy.
Starting a Project – Step 2 Create a new project  (File->New Project)  A dialog will pop up Select View-Based Application then click Choose.
Starting a Project – Step 2
Starting a Project – Step 3 A dialog will pop up, asking for a project name.  Name it HelloWorld
Starting a Project – Step 4 The XCode project window will open.  You see on the left side, under Classes, are the classes you will be working with Toolbar Group & Files  List Status Bar Detail View
Starting a Project – Step 4 The XCode project window will open.  You see on the left side, under Classes, are the classes you will be working with Toolbar Group & Files  List Status Bar Detail View Provides quick access to the most  common XCode commands
Starting a Project – Step 4 The XCode project window will open.  You see on the left side, under Classes, are the classes you will be working with Toolbar Group & Files  List Status Bar Detail View - Provides an outline view of your project’ contents - You can move files and folders around and organize  your project contents in this list
Starting a Project – Step 4 The XCode project window will open.  You see on the left side, under Classes, are the classes you will be working with Toolbar Group & Files  List Status Bar Detail View - Displays status messages for the project - During an operation,such as building or indexing, Xcode  displays a progress indicator in the status bar to show the  progress of the current task.
Starting a Project – Step 4 The XCode project window will open.  You see on the left side, under Classes, are the classes you will be working with Toolbar Group & Files  List Status Bar Detail View - Shows the item or items selected in the Groups & Files list -  You can browse your project’s contents in the detail view,  search them using the search field, or sort them according  to column - The detail view helps you rapidly find and access your project’s  contents.
Starting a Project – Step 4 HelloWorld.app is the  the name of your  application
Starting a Project – Step 4 HelloWorldAppDelegate is the application main class It contains the  HelloWorldViewController
Starting a Project – Step 4 HelloWorldViewController is the “view” that you will see on the application
Starting a Project – Step 4 HelloWorldViewController.xib will be loaded by the application and is sort of a “canvas” where you can design the look of the application
Starting a Project – Step 5 Double click HelloWorldViewController.xib.  The Interface Builder should open The View window is our  HelloWorld screen.  It’s blank now, but we are going to add a Label
Starting a Project – Step 6 Find Label on the Library window Objects->Cocoa Touch Plugin window  and drag the Label instance onto View
Starting a Project – Step 7 Double click the label that you inserted into View, then type Hello World.  Notice the text is off center.  Center it. Lets bring up the Inspector window (Tools->Inspector) and Change the font color and font size
Starting a Project – Step 8 Save the xib file (File->Save).  Quit Interface Builder.  Go back to XCode and do Build and Go to compile and run your app.
Starting a Project – Step 9
Day 2 Objective Continuing Day 1 Project with adding more UI Elements Objective C Overview Starting a Project using Objective C
Questions

iPhone application development training day 1

  • 1.
    Introduction to iPhoneDevelopment Shyamala Prayaga Day 1
  • 2.
    Agenda Prerequisite Introduction - iPhone OS Architecture - iOS Layers iPhone Application Development Tools iPhone Application Structure Starting a Project Day 2 Objective
  • 3.
    Prerequisite Intel BasedMac or Macbook Apple Developer Connection Membership Membership is free iPhone SDK iPhone Application Development Tools Membership is free C Basic Knowledge
  • 4.
    Introduction iPhone isthe trademark of Apple Inc
  • 5.
    iPhone OS ArchitectureiPhone OS System Apps Applications Applications - Similar to the basic architecture of Mac OS X - iOS acts as an intermediary between the underlying hardware and the applications that appear on the screen - Applications that you create never interact directly with the hardware but instead go through system interfaces, which interact with the appropriate drivers.
  • 6.
  • 7.
  • 8.
    iPhone App DevelopmentTools XCode Objective-C, GDB Interface Builder Graphical UI Development Instruments Profiling, Leak Finding Simulator/ Emulator Testing
  • 9.
    XCode XCode isan Integrated development environment, like Eclipse. While Eclipse is for Java, XCode is for Mac native code XCode can manage all your testing devices, automatically packaging iPhone apps with the proper certificates, and installing apps on the iPhone itself Apple makes XCode and distributes it for free, we can get it from Apple's developer website: http://developer.apple.com/tools/xcode/ Xcode is free, but Apple makes you register as a new developer and wants your name and email address
  • 10.
  • 11.
    Interface Builder InterfaceBuilder is the easy-to-use graphical editor for designing every aspect of iPhone Application's graphical user interface Interface Builder stores your user interface design in one or more resource files, as a set of interface objects and their relationships Changes you make in the interface are automatically synchronized with XCode Interface Builder also makes it easy to drop in your own effects, including Quartz Composer animations
  • 12.
  • 13.
    Instruments Instruments environmentlets you analyze the performance of your applications while running in the simulator or on a device Instruments gathers data from your running application and presents that data in a graphical display called the timeline You can gather data about your application’s memory usage, disk activity, network activity, and graphics performance
  • 14.
    Instruments Your ProjectInstruments Simulator Devices
  • 15.
    Organizer Organizer keepstrack of your iPhone devices and certificates Works with the Keychain to ensure that your application has been signed properly before installing it to an iPhone device keeps track of multiple devices, multiple provisioning profiles, and even help prepare your application for submission to the App Store Gives you quick access to frequently used files and projects, and allows for scripted operations across many projects
  • 16.
  • 17.
    iPhone Simulator/Emulator TheiPhone Simulator runs your application in much the same way as an actual iPhone device It is quick to launch and debug The Simulator is a great way to test user interface You can simulate touch gestures by using the mouse. The Simulator is a great time saver
  • 18.
  • 19.
    Tools Overview ProjectXCode Device Simulator
  • 20.
  • 21.
    iPhone Application Structure Linked Frameworks Graphics, sound, blue tooth etc
  • 22.
  • 23.
    iPhone Application Structure Target Different build setup
  • 24.
    iPhone Application Structure Resources Images, sounds, data, IB files
  • 25.
  • 26.
  • 27.
    Starting a Project– Step 1 Start up XCode
  • 28.
    Starting a Project– Step 2 XCode provides several project templates to get you up and develop your application - Navigation-based Application: that presents data hierarchically, using multiple screens - OpenGL ES Application: to present images or animation. Tab Bar Application: that presents a radio interface that lets the user choose from several screens Utility Application: that implements a main view and lets the user access a flip-side view to perform simple customizations. View-based Application: that uses a single view to implement its user interface. Window-based Application: serves as a starting point for any application, containing an application delegate and a window. Use this template when you want to implement your own view hierarchy.
  • 29.
    Starting a Project– Step 2 Create a new project (File->New Project) A dialog will pop up Select View-Based Application then click Choose.
  • 30.
  • 31.
    Starting a Project– Step 3 A dialog will pop up, asking for a project name. Name it HelloWorld
  • 32.
    Starting a Project– Step 4 The XCode project window will open. You see on the left side, under Classes, are the classes you will be working with Toolbar Group & Files List Status Bar Detail View
  • 33.
    Starting a Project– Step 4 The XCode project window will open. You see on the left side, under Classes, are the classes you will be working with Toolbar Group & Files List Status Bar Detail View Provides quick access to the most common XCode commands
  • 34.
    Starting a Project– Step 4 The XCode project window will open. You see on the left side, under Classes, are the classes you will be working with Toolbar Group & Files List Status Bar Detail View - Provides an outline view of your project’ contents - You can move files and folders around and organize your project contents in this list
  • 35.
    Starting a Project– Step 4 The XCode project window will open. You see on the left side, under Classes, are the classes you will be working with Toolbar Group & Files List Status Bar Detail View - Displays status messages for the project - During an operation,such as building or indexing, Xcode displays a progress indicator in the status bar to show the progress of the current task.
  • 36.
    Starting a Project– Step 4 The XCode project window will open. You see on the left side, under Classes, are the classes you will be working with Toolbar Group & Files List Status Bar Detail View - Shows the item or items selected in the Groups & Files list - You can browse your project’s contents in the detail view, search them using the search field, or sort them according to column - The detail view helps you rapidly find and access your project’s contents.
  • 37.
    Starting a Project– Step 4 HelloWorld.app is the the name of your application
  • 38.
    Starting a Project– Step 4 HelloWorldAppDelegate is the application main class It contains the HelloWorldViewController
  • 39.
    Starting a Project– Step 4 HelloWorldViewController is the “view” that you will see on the application
  • 40.
    Starting a Project– Step 4 HelloWorldViewController.xib will be loaded by the application and is sort of a “canvas” where you can design the look of the application
  • 41.
    Starting a Project– Step 5 Double click HelloWorldViewController.xib. The Interface Builder should open The View window is our HelloWorld screen. It’s blank now, but we are going to add a Label
  • 42.
    Starting a Project– Step 6 Find Label on the Library window Objects->Cocoa Touch Plugin window and drag the Label instance onto View
  • 43.
    Starting a Project– Step 7 Double click the label that you inserted into View, then type Hello World. Notice the text is off center. Center it. Lets bring up the Inspector window (Tools->Inspector) and Change the font color and font size
  • 44.
    Starting a Project– Step 8 Save the xib file (File->Save). Quit Interface Builder. Go back to XCode and do Build and Go to compile and run your app.
  • 45.
  • 46.
    Day 2 ObjectiveContinuing Day 1 Project with adding more UI Elements Objective C Overview Starting a Project using Objective C
  • 47.