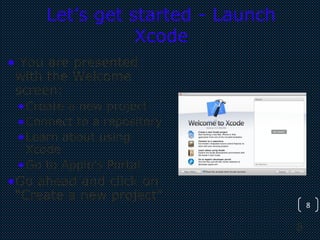
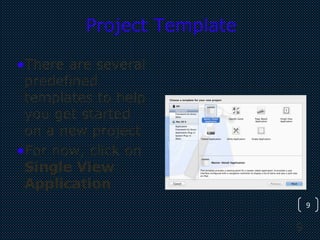
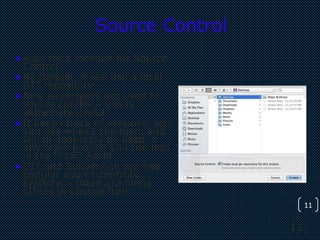
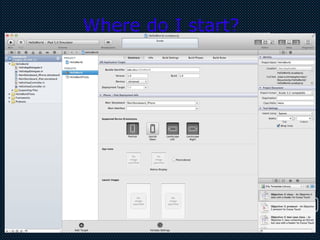
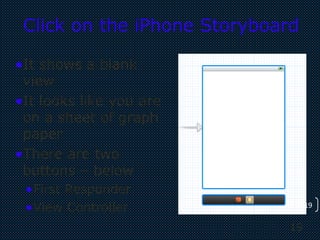
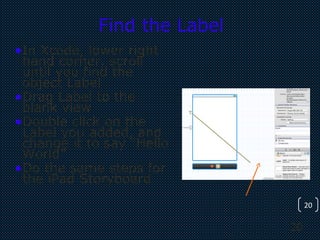
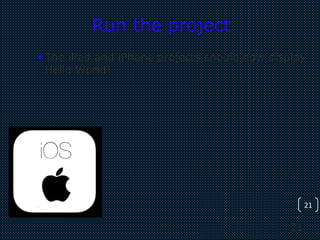
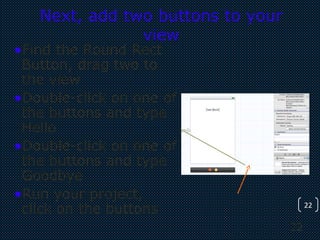
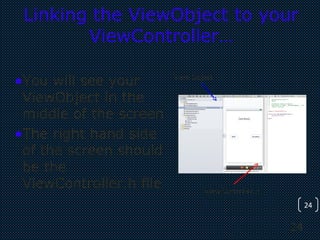
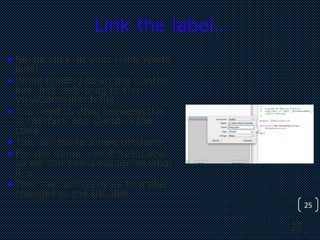
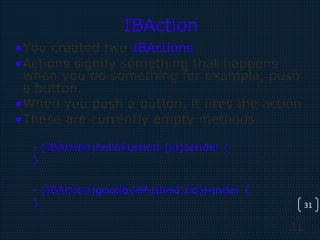
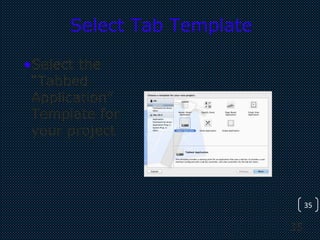
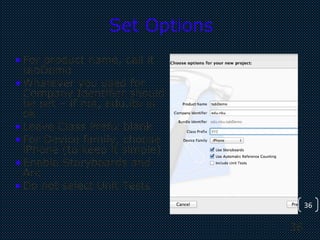
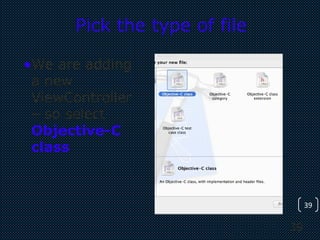
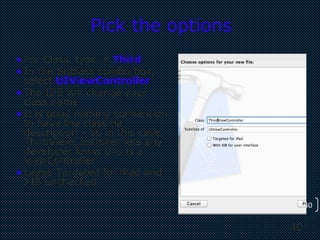
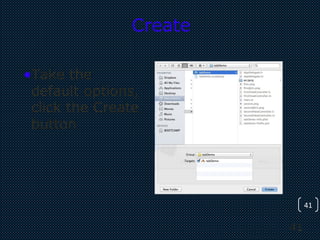
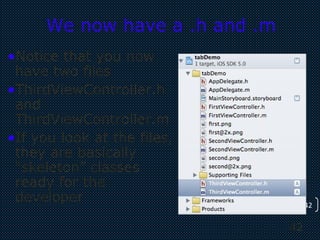
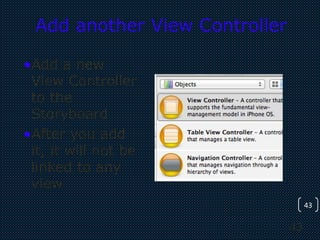
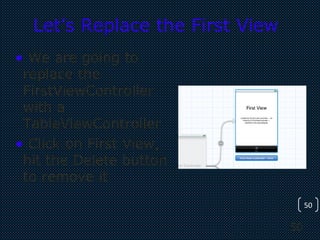
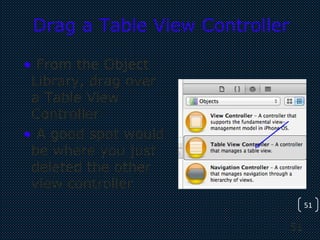
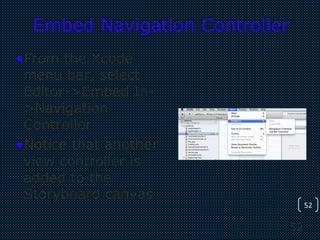
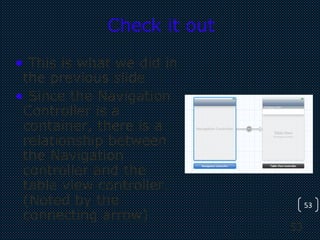
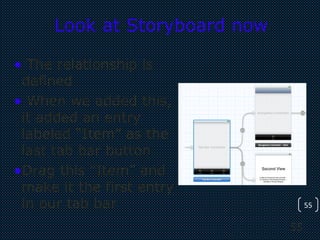
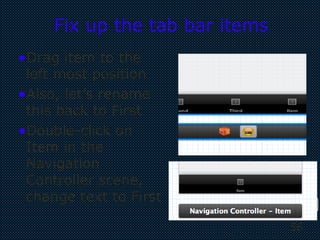
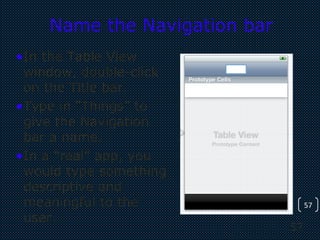
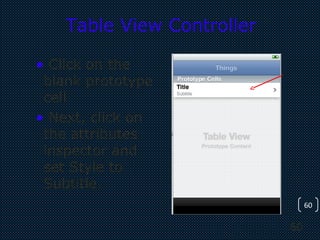
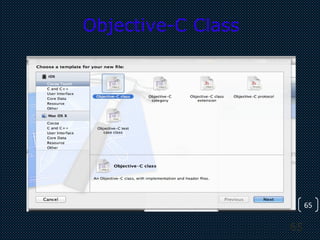
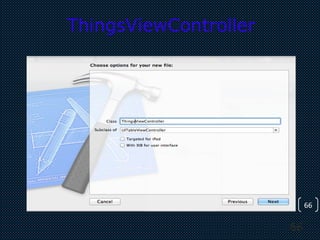
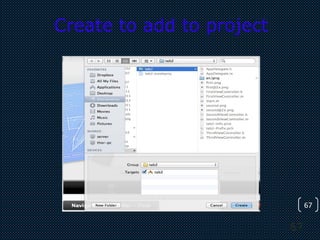
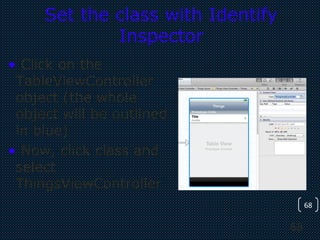
SlideShare a Scribd company logo
1 of 71
1
1
iOS - iPhone/iPad
Vibrant Technology &
Computers
Vashi,Navi Mumbai
2
iOS (previously iPhone OS) is a mobile operating system
developed by Apple Inc. and distributed exclusively for Apple
hardware. It is the operating system that powers many of the
company's iDevices
2
3
3
What do you need?
•Previous experience in another Object Oriented
Programming (OOP) language will be helpful
•Some understanding of C can be helpful, but is
not required. Objective-C builds on C++.
•Development Environment (IDE) is helpful
•Mac computer running OS X Lion or higher!
•If you plan to submit to the App Store, you will
need Apple devices to do real testing on. The
simulator is not good enough.
4
4
Introduction
•iOS is the operating system that runs iPhones,
iPod Touches, iPads, and Apple TVs.
•The language used to develop software for iOS is
Objective-C. (very similar to C)
•This workshop will teach you how to get started
but will not have time to teach you everything.
•This workshop is good preparation for a real full
iPhone/iPad, iOS Development class!
5
5
What is iOS?
•iOS is an OS. It’s a subset of Mac OS X.
•The iOS SDK is the software development kit that
allows application programs to utilize classes and
frameworks provided by the SDK. This workshop
will focus on iOS SDK 5
•iOS is multitasking and runs on different devices
(iPhones, iPod Touches, iPads, and Apple TVs).
•Apple provides an IDE called Xcode.
•Xcode is the IDE used by iOS (and OS X)
developers. It does NOT run on MS Windows.
•Xcode provides an interface to the compiler, editor,
debugger, and code profiling tools.
6
6
Device Features
•SQLite for structured data storage
•Media support for common audio, video, and still
image formats (MPEG4, H.264, MP3, AAC, AMR,
JPG, PNG, GIF)
•GSM Telephony (hardware dependent)
•Bluetooth, EDGE, 3G, and WiFi (hardware
dependent)
•Camera, GPS, compass, and accelerometer
(hardware dependent)
•Rich development environment including a device
simulator, tools for debugging, memory and
performance profiling
7
7
Download the iOS SDK
•Download the latest from the Apple App store
•This is only available for Apple Macintosh
computers
•It’s free
•To build to device and submit to the app store,
you will be required to becomes a register Apple
iOS developer
•It’s $99 year for the basic account
•If you plan to get a job in iOS development, you
will need to establish a basic account and submit
something to the Apple Store. Maybe a game?
8
8
Let’s get started - Launch
Xcode
• You are presented
with the Welcome
screen:
•Create a new project
•Connect to a repository
•Learn about using
Xcode
•Go to Apple’s Portal
•Go ahead and click on
“Create a new project”
9
9
Project Template
•There are several
predefined
templates to help
you get started
on a new project
•For now, click on
Single View
Application
10
10
Project Options
• The Product Name is the name of
your app
• Company Identifier is your
organization name – such as
edu.itu (reverse domain)
• Class Prefix (leave empty)
• Device Family: iPad, iPhone,
Universal (Universal means that a
single binary will have screens for
iPhone, iPod Touch, and iPads)
• Storyboards
• Automatic Reference Counting
• Include Unit Tests (leave
unchecked as we are not using)
11
11
Source Control
• Asks for a location for Source
Control
• By Default, it will use a local
GIT repository
• New developers not used to
source control – this is
extremely useful!
• It keeps track of versions, lets
you see what’s changed, and
will undoubtedly be used in
any team project you run into
in the “real” world
• GIT and Subversion are two
popular source controls
systems – there are many
others to choose from
12
12
Where do I start?
13
13
Let’s build the default project
•Click the Run button (upper left of the screen)
•The iPad simulator will launch (You can also
change this to iPhone if you want)
•You will have a blank white screen
•Press Command-Q to end the simulator
14
14
Quick Terminology: MVC
•Model-View-Controller (MVC)
•MVC is the paradigm of iOS programming
•Model: Holds data, should know nothing of the
interface
•View: Code for getting data in/out of a view.
Deals with items like buttons, lists, tables, etc
•Controller: Keeps the Model objects and View
objects in sync
15
15
Quick Terminology: Delegate
•AppDelegate.h
•AppDelegate.m
•The Delegate is essentially
the “controller” of your
app. It links buttons, labels
and views together
•.h files are header files and
interfaces are defined here
•.m files are implementation
files. These contain your
classes, code, etc.
16
16
Quick Terminology:
Storyboard
•These are new to iOS5
•Storyboards help you graphically lay out your app
before you code it.
•It makes it easy to see the “flow” of your app
•You are advised to use Storyboards going forward
with you iOS programming adventures
•If you have tinkered with iOS in the past, you might
be asking about the xib/nibs. They are still there,
however, Storyboards offer similar functionality and
make it easier to visualize your views.
•We will not be covering nibs in this workshop.
17
17
Quick Terminology: ARC
•Automatic Reference Counting (ARC)
•The LLVM 3.0 compiler handles memory
management for you
•It is not a garbage collector!
•Prior to iOS5 – memory management was the single
most difficult item to grasp in Objective-C.
•Unless you have specific reasons, all of your projects
should use ARC.
18
18
Quick Terminology: Unit Tests
•We will not be discussing Unit Tests in this
workshop
•Be advised – unit tests are very useful for your
programs
•The tests can help you make sure your code
changes are not breaking anything.
•The goal is to be able to find bugs quicker and fix
them before your code goes to QA (or the
customer!)
19
19
Click on the iPhone Storyboard
•It shows a blank
view
•It looks like you are
on a sheet of graph
paper
•There are two
buttons – below
•First Responder
•View Controller
20
20
Find the Label
•In Xcode, lower right
hand corner, scroll
until you find the
object Label
•Drag Label to the
blank view
•Double click on the
Label you added, and
change it to say “Hello
World”
•Do the same steps for
the iPad Storyboard
21
21
Run the project
•The iPad and iPhone projects should now display
Hello World!
22
22
Next, add two buttons to your
view
•Find the Round Rect
Button, drag two to
the view
•Double-click on one of
the buttons and type
Hello
•Double-click on one of
the buttons and type
Goodbye
•Run your project,
click on the buttons
23
23
Nothing Happens – we have to
tell it to do something
•Click on the
Assistant Editor
•It looks like a
tuxedo
•It will be in the
upper right hand
corner of your
screen
24
24
Linking the ViewObject to your
ViewController…
•You will see your
ViewObject in the
middle of the screen
•The right hand side
of the screen should
be the
ViewController.h file
View Object
ViewController.h
25
25
Link the label…
• Single click on your Hello World
label
• While holding down the Control
key, left click-drag to the
ViewController.h file
• You need to drag between the
@interface and @end in the
code
• This will make a new property
• For the name, call it helloLabel
so we can easily recognize what
it is
• This step will allow us to make
changes to the UILabel
26
26
@interface and @end
•Remember that Objective-C is an
extensive to the C language
•The @ symbol denotes an Objective-C
keyword
•@interface is the start of a class.
•@interface Classname: Superclass
•Anything between the declaration and
end is part of the class
27
27
@property (weak, nonatomic)
IBOutlet UILabel *helloLabel;
•A property is an attribute of the class
•Getters and Setters are automatically created for
you
•Weak is a memory management term
•Nonatomic has to do with adding mutexes around
your getters and setters
•IBOutlet stands for Interface Builder Outlet.
•Interface Builder still exists in iOS5 but we are
using the new Storyboard feature instead.
28
28
@synthesize helloLabel
•Synthesize – this creates the
accessor/mutators (getters/setters)
for you
•You can write your own if you want,
but in general, there is no reason to
do this.
29
29
Link the rest of the buttons
•Link helloButton to
ViewController.h
•Link goodbyeButton
to ViewController.h
•When done, you will
have two properties
•Now, switch the
Assistant window to
the ViewController.m
file
30
30
TouchUpInside Actions
TouchUpInside events occur
if you touch a button and lift
off while inside the button
This corresponds to a user
tapping a button
Right-Click on the Hello
button
On the far right, locate Touch
Up Inside
Left click-drag this over to
your ViewController.m
Notice it creates some code
Do the same for the goodbye
button
31
31
IBAction
•You created two IBActions
•Actions signify something that happens
when you do something for example, push
a button.
•When you push a button, it fires the action
•These are currently empty methods
- (IBAction)helloPushed:(id)sender {
}
- (IBAction)goodbyePushed:(id)sender {
}
32
32
Change the UILabel
- (IBAction)helloPushed:(id)sender {
self.helloLabel.text=@"Hello Pushed";
}
- (IBAction)goodbyePushed:(id)sender {
self.helloLabel.text=@"Goodbye Pushed";
}
• Self refers to the ViewController class
• We defined the property helloLabel earlier
• Text is a property of UILabel’s that we can set.
• The @”Some text” is an NSString object that UILabels can
display.
• Run your program and push the buttons. You should see
the UILabel change when you press the buttons
33
33
Tab Controller
•If you’ve ever used an iOS device, you have come
across apps that use the tab controller.
•Several of the built in apps (such as the phone
app) use this controller
•For the next exercise, we are going to create a
simple tab controller
34
34
Create a new project
•Close any existing
projects you have
open (to make
things easier!)
•Select File->New-
>Project from the
application menu
35
35
Select Tab Template
•Select the
“Tabbed
Application”
Template for
your project
36
36
Set Options
•For product name, call it
tabDemo
•Whatever you used for
Company Identifier should
be set – if not, edu.itu is
ok
•Leave Class Prefix blank
•For Device family, choose
iPhone (to keep it simple)
•Enable Storyboards and
Arc
•Do not select Unit Tests
37
37
Look at the Storyboard
• Click on
MainStoryboard.Storyboard
• Notice how the Tab Bar
Controller is shown
• It also shows the child views
associated with the tab bar
buttons
• This lets the developer see the
views and path to them at a
quick glance.
• Go ahead and run the project,
observe what happens when
you tap the tab items. It
switches between the views
38
38
Let’s add a new class:
ThirdViewController
•On the left
hand side,
right-click on
the tabDemo
folder and
select New File
39
39
Pick the type of file
•We are adding
a new
ViewController
– so select
Objective-C
class
40
40
Pick the options
• For Class, type in Third
• In the Sublass combo box,
select UIViewController
• The IDE will change your
class name
• It is good naming convention
to have the class be
description – so in this case,
ThirdViewController lets any
developer know this is a
ViewController
• Leave Targeted for iPad and
XIB unchecked
41
41
Create
•Take the
default options,
click the Create
button
42
42
We now have a .h and .m
•Notice that you now
have two files
•ThirdViewController.h
and
ThirdViewController.m
•If you look at the files,
they are basically
“skeleton” classes
ready for the
developer
43
43
Add another View Controller
•Add a new
View Controller
to the
Storyboard
•After you add
it, it will not be
linked to any
view
44
44
Our new view, all alone
•Notice that Storyboard
does not have any
arrows pointing to it
•The developer will have
to make the
association as this view
could be a sub view of
any of the views shown
45
45
Link this ViewController to the
Tab Controller
•Hold down the Control
key, left-click drag
from the Tab
Controller to the new
view we just added
•This tells Storyboard
that this view is going
to be accessed from
the tab controller
46
46
Select Relationship
47
47
Label this before we forget
•Click on the Text
•Change this to say
Third
•We do not have any
graphics – if we did, we
would want to go
ahead and add a
graphic for this.
•Note: you will need
graphics for standard
iPhones, retina, and
iPads.
48
48
Lets be more specific about the
class
• Left Click on your new
view in Storyboard –
icon on right bottom
• Click the Identify
Inspector (upper right)
• Notice how the class is
currently
UIViewController
• We need to make this
to be associated with
our ThirdViewController
(which is a subclass of
UIViewController)
49
49
Select ThirdViewController
•From the combo box,
scroll until you find
ThirdViewController
•This will let us do any
custom actions we
might need to do
•Remember:
ThirdViewController
has all of the methods
and properties of a
UIViewController!
50
50
Let’s Replace the First View
• We are going to
replace the
FirstViewController
with a
TableViewController
• Click on First View,
hit the Delete button
to remove it
51
51
Drag a Table View Controller
• From the Object
Library, drag over
a Table View
Controller
• A good spot would
be where you just
deleted the other
view controller
52
52
Embed Navigation Controller
•From the Xcode
menu bar, select
Editor->Embed In-
>Navigation
Controller
•Notice that another
view controller is
added to the
Storyboard canvas
53
53
Check it out
• This is what we did in
the previous slide
• Since the Navigation
Controller is a
container, there is a
relationship between
the Navigation
controller and the
table view controller.
(Noted by the
connecting arrow)
54
54
Hook up the Scenes
•Ctrl-drag from
the Tab Bar
controller to the
Navigation
controller
•Select
Relationship –
View Controllers
55
55
Look at Storyboard now
• The relationship is
defined
• When we added this,
it added an entry
labeled “Item” as the
last tab bar button
•Drag this “Item” and
make it the first entry
in our tab bar
56
56
Fix up the tab bar items
•Drag item to the
left most position
•Also, let’s rename
this back to First
•Double-click on
Item in the
Navigation
Controller scene,
change text to First
57
57
Name the Navigation bar
•In the Table View
window, double-click
on the Title bar.
•Type in “Things” to
give the Navigation
bar a name.
•In a “real” app, you
would type something
descriptive and
meaningful to the
user.
58
58
The Navigation Bar has a title
•You can now see the
title has a name.
•If you have noticed,
we have been getting
a warning from the
compiler for our
storyboard.
•“Prototype table cells
must have reuse
identifiers”
59
59
Let’s get rid of the warning
• Warnings are typically not
something you want in your
program.
• We are getting this warning because
we have not configured the cells yet
– so the compiler does not know
what they are.
60
60
Table View Controller
• Click on the
blank prototype
cell
• Next, click on
the attributes
inspector and
set Style to
Subtitle.
61
61
Attributes Inspector
62
62
More cell attributes
•Set the Accessory attribute
to Disclosure Indicator.
•Give the cell an identifier of
ThingsCell.
•The warning from Xcode is
a reminder to developers –
there is something you
need to do if you want this
to work.
•(Side note – warnings are
something you should not
overlook. Several program
crashes can stem from
warnings people don’t pay
attention to.)
63
63
Add a UIViewController
subclass template…
• Add a new file to the project.
• Choose UIViewController subclass
template.
• Name the class
ThingsViewController, this will be
a subclass of UITableViewController
64
64
New file
65
65
Objective-C Class
66
66
ThingsViewController
67
67
Create to add to project
68
68
Set the class with Identify
Inspector
• Click on the
TableViewController
object (the whole
object will be outlined
in blue)
• Now, click class and
select
ThingsViewController
69
69
Build and run!
• Go ahead and build the app
• You can now add items to the table view
if you want to continue working with this
app.
70
70
HelloTabBar Example
•Download:
•http://bhecker.com/ip-HelloTabBar.zip
•Save to your desktop.
•Double-click to uncompress the file
•Double-click on
“HelloTabBar.xcode.proj” to load the
project in XCode
•Examine and customize as you wish!
71
71
Thank you…

More Related Content

Similar to Ios training-cum-course-in-mumbai-

Ios-training-institute-in-mumbai
Ios-training-institute-in-mumbaiIos-training-institute-in-mumbai
Ios-training-institute-in-mumbaivibrantuser
 
Ios-training-institute-in-mumbai
Ios-training-institute-in-mumbaiIos-training-institute-in-mumbai
Ios-training-institute-in-mumbaivibrantuser
 
I phone first app ducat
I phone first app ducatI phone first app ducat
I phone first app ducatPragati Singh
 
iPhone Programming [2/17] : Introduction to iOS Programming
iPhone Programming [2/17] : Introduction to iOS ProgrammingiPhone Programming [2/17] : Introduction to iOS Programming
iPhone Programming [2/17] : Introduction to iOS ProgrammingIMC Institute
 
I pad uicatalog_lesson02
I pad uicatalog_lesson02I pad uicatalog_lesson02
I pad uicatalog_lesson02Rich Helton
 
Coding Lesson (iOS for non-developers) by Zakery Kline and Roger Kerse
Coding Lesson (iOS for non-developers) by Zakery Kline and Roger KerseCoding Lesson (iOS for non-developers) by Zakery Kline and Roger Kerse
Coding Lesson (iOS for non-developers) by Zakery Kline and Roger KerseEuropean Innovation Academy
 
outgoing again
outgoing againoutgoing again
outgoing againspredslide
 
Session 8 - Xcode 5 and interface builder for iOS 7 application
Session 8 - Xcode 5 and interface builder for iOS 7 applicationSession 8 - Xcode 5 and interface builder for iOS 7 application
Session 8 - Xcode 5 and interface builder for iOS 7 applicationVu Tran Lam
 
Membangun Desktop App
Membangun Desktop AppMembangun Desktop App
Membangun Desktop AppFajar Baskoro
 
Week 1 lesson 4 for Intro to tech class
Week 1 lesson 4 for Intro to tech classWeek 1 lesson 4 for Intro to tech class
Week 1 lesson 4 for Intro to tech classrdubroy
 
Migrating Unity3D projects to Windows 8
Migrating Unity3D projects to Windows 8Migrating Unity3D projects to Windows 8
Migrating Unity3D projects to Windows 8282productions
 
Building your first iOS app using Xamarin
Building your first iOS app using XamarinBuilding your first iOS app using Xamarin
Building your first iOS app using XamarinGill Cleeren
 
iOS Programming 101
iOS Programming 101iOS Programming 101
iOS Programming 101rwenderlich
 

Similar to Ios training-cum-course-in-mumbai- (20)

Ios-training-institute-in-mumbai
Ios-training-institute-in-mumbaiIos-training-institute-in-mumbai
Ios-training-institute-in-mumbai
 
Ios-training-institute-in-mumbai
Ios-training-institute-in-mumbaiIos-training-institute-in-mumbai
Ios-training-institute-in-mumbai
 
Ios - Intorduction to view controller
Ios - Intorduction to view controllerIos - Intorduction to view controller
Ios - Intorduction to view controller
 
I phone first app ducat
I phone first app ducatI phone first app ducat
I phone first app ducat
 
iPhone Programming [2/17] : Introduction to iOS Programming
iPhone Programming [2/17] : Introduction to iOS ProgrammingiPhone Programming [2/17] : Introduction to iOS Programming
iPhone Programming [2/17] : Introduction to iOS Programming
 
Unit a 2010
Unit a 2010Unit a 2010
Unit a 2010
 
Project anatomy & hello world
Project anatomy & hello worldProject anatomy & hello world
Project anatomy & hello world
 
I pad uicatalog_lesson02
I pad uicatalog_lesson02I pad uicatalog_lesson02
I pad uicatalog_lesson02
 
Coding Lesson (iOS for non-developers) by Zakery Kline and Roger Kerse
Coding Lesson (iOS for non-developers) by Zakery Kline and Roger KerseCoding Lesson (iOS for non-developers) by Zakery Kline and Roger Kerse
Coding Lesson (iOS for non-developers) by Zakery Kline and Roger Kerse
 
outgoing again
outgoing againoutgoing again
outgoing again
 
Delphi L01 Intro
Delphi L01 IntroDelphi L01 Intro
Delphi L01 Intro
 
Session 8 - Xcode 5 and interface builder for iOS 7 application
Session 8 - Xcode 5 and interface builder for iOS 7 applicationSession 8 - Xcode 5 and interface builder for iOS 7 application
Session 8 - Xcode 5 and interface builder for iOS 7 application
 
Membangun Desktop App
Membangun Desktop AppMembangun Desktop App
Membangun Desktop App
 
UNIT I.pptx
UNIT I.pptxUNIT I.pptx
UNIT I.pptx
 
Week 1 lesson 4 for Intro to tech class
Week 1 lesson 4 for Intro to tech classWeek 1 lesson 4 for Intro to tech class
Week 1 lesson 4 for Intro to tech class
 
Introduction of Xcode
Introduction of XcodeIntroduction of Xcode
Introduction of Xcode
 
Migrating Unity3D projects to Windows 8
Migrating Unity3D projects to Windows 8Migrating Unity3D projects to Windows 8
Migrating Unity3D projects to Windows 8
 
Training in iOS Development
Training in iOS DevelopmentTraining in iOS Development
Training in iOS Development
 
Building your first iOS app using Xamarin
Building your first iOS app using XamarinBuilding your first iOS app using Xamarin
Building your first iOS app using Xamarin
 
iOS Programming 101
iOS Programming 101iOS Programming 101
iOS Programming 101
 

Recently uploaded

Human Factors of XR: Using Human Factors to Design XR Systems
Human Factors of XR: Using Human Factors to Design XR SystemsHuman Factors of XR: Using Human Factors to Design XR Systems
Human Factors of XR: Using Human Factors to Design XR SystemsMark Billinghurst
 
Unblocking The Main Thread Solving ANRs and Frozen Frames
Unblocking The Main Thread Solving ANRs and Frozen FramesUnblocking The Main Thread Solving ANRs and Frozen Frames
Unblocking The Main Thread Solving ANRs and Frozen FramesSinan KOZAK
 
IAC 2024 - IA Fast Track to Search Focused AI Solutions
IAC 2024 - IA Fast Track to Search Focused AI SolutionsIAC 2024 - IA Fast Track to Search Focused AI Solutions
IAC 2024 - IA Fast Track to Search Focused AI SolutionsEnterprise Knowledge
 
Snow Chain-Integrated Tire for a Safe Drive on Winter Roads
Snow Chain-Integrated Tire for a Safe Drive on Winter RoadsSnow Chain-Integrated Tire for a Safe Drive on Winter Roads
Snow Chain-Integrated Tire for a Safe Drive on Winter RoadsHyundai Motor Group
 
Benefits Of Flutter Compared To Other Frameworks
Benefits Of Flutter Compared To Other FrameworksBenefits Of Flutter Compared To Other Frameworks
Benefits Of Flutter Compared To Other FrameworksSoftradix Technologies
 
Understanding the Laravel MVC Architecture
Understanding the Laravel MVC ArchitectureUnderstanding the Laravel MVC Architecture
Understanding the Laravel MVC ArchitecturePixlogix Infotech
 
Next-generation AAM aircraft unveiled by Supernal, S-A2
Next-generation AAM aircraft unveiled by Supernal, S-A2Next-generation AAM aircraft unveiled by Supernal, S-A2
Next-generation AAM aircraft unveiled by Supernal, S-A2Hyundai Motor Group
 
Automating Business Process via MuleSoft Composer | Bangalore MuleSoft Meetup...
Automating Business Process via MuleSoft Composer | Bangalore MuleSoft Meetup...Automating Business Process via MuleSoft Composer | Bangalore MuleSoft Meetup...
Automating Business Process via MuleSoft Composer | Bangalore MuleSoft Meetup...shyamraj55
 
SQL Database Design For Developers at php[tek] 2024
SQL Database Design For Developers at php[tek] 2024SQL Database Design For Developers at php[tek] 2024
SQL Database Design For Developers at php[tek] 2024Scott Keck-Warren
 
Integration and Automation in Practice: CI/CD in Mule Integration and Automat...
Integration and Automation in Practice: CI/CD in Mule Integration and Automat...Integration and Automation in Practice: CI/CD in Mule Integration and Automat...
Integration and Automation in Practice: CI/CD in Mule Integration and Automat...Patryk Bandurski
 
AI as an Interface for Commercial Buildings
AI as an Interface for Commercial BuildingsAI as an Interface for Commercial Buildings
AI as an Interface for Commercial BuildingsMemoori
 
Transcript: #StandardsGoals for 2024: What’s new for BISAC - Tech Forum 2024
Transcript: #StandardsGoals for 2024: What’s new for BISAC - Tech Forum 2024Transcript: #StandardsGoals for 2024: What’s new for BISAC - Tech Forum 2024
Transcript: #StandardsGoals for 2024: What’s new for BISAC - Tech Forum 2024BookNet Canada
 
The Codex of Business Writing Software for Real-World Solutions 2.pptx
The Codex of Business Writing Software for Real-World Solutions 2.pptxThe Codex of Business Writing Software for Real-World Solutions 2.pptx
The Codex of Business Writing Software for Real-World Solutions 2.pptxMalak Abu Hammad
 
Breaking the Kubernetes Kill Chain: Host Path Mount
Breaking the Kubernetes Kill Chain: Host Path MountBreaking the Kubernetes Kill Chain: Host Path Mount
Breaking the Kubernetes Kill Chain: Host Path MountPuma Security, LLC
 
How to convert PDF to text with Nanonets
How to convert PDF to text with NanonetsHow to convert PDF to text with Nanonets
How to convert PDF to text with Nanonetsnaman860154
 
GenCyber Cyber Security Day Presentation
GenCyber Cyber Security Day PresentationGenCyber Cyber Security Day Presentation
GenCyber Cyber Security Day PresentationMichael W. Hawkins
 
Transforming Data Streams with Kafka Connect: An Introduction to Single Messa...
Transforming Data Streams with Kafka Connect: An Introduction to Single Messa...Transforming Data Streams with Kafka Connect: An Introduction to Single Messa...
Transforming Data Streams with Kafka Connect: An Introduction to Single Messa...HostedbyConfluent
 
Pigging Solutions Piggable Sweeping Elbows
Pigging Solutions Piggable Sweeping ElbowsPigging Solutions Piggable Sweeping Elbows
Pigging Solutions Piggable Sweeping ElbowsPigging Solutions
 
Swan(sea) Song – personal research during my six years at Swansea ... and bey...
Swan(sea) Song – personal research during my six years at Swansea ... and bey...Swan(sea) Song – personal research during my six years at Swansea ... and bey...
Swan(sea) Song – personal research during my six years at Swansea ... and bey...Alan Dix
 

Recently uploaded (20)

Human Factors of XR: Using Human Factors to Design XR Systems
Human Factors of XR: Using Human Factors to Design XR SystemsHuman Factors of XR: Using Human Factors to Design XR Systems
Human Factors of XR: Using Human Factors to Design XR Systems
 
Unblocking The Main Thread Solving ANRs and Frozen Frames
Unblocking The Main Thread Solving ANRs and Frozen FramesUnblocking The Main Thread Solving ANRs and Frozen Frames
Unblocking The Main Thread Solving ANRs and Frozen Frames
 
IAC 2024 - IA Fast Track to Search Focused AI Solutions
IAC 2024 - IA Fast Track to Search Focused AI SolutionsIAC 2024 - IA Fast Track to Search Focused AI Solutions
IAC 2024 - IA Fast Track to Search Focused AI Solutions
 
Snow Chain-Integrated Tire for a Safe Drive on Winter Roads
Snow Chain-Integrated Tire for a Safe Drive on Winter RoadsSnow Chain-Integrated Tire for a Safe Drive on Winter Roads
Snow Chain-Integrated Tire for a Safe Drive on Winter Roads
 
Benefits Of Flutter Compared To Other Frameworks
Benefits Of Flutter Compared To Other FrameworksBenefits Of Flutter Compared To Other Frameworks
Benefits Of Flutter Compared To Other Frameworks
 
Understanding the Laravel MVC Architecture
Understanding the Laravel MVC ArchitectureUnderstanding the Laravel MVC Architecture
Understanding the Laravel MVC Architecture
 
Next-generation AAM aircraft unveiled by Supernal, S-A2
Next-generation AAM aircraft unveiled by Supernal, S-A2Next-generation AAM aircraft unveiled by Supernal, S-A2
Next-generation AAM aircraft unveiled by Supernal, S-A2
 
Automating Business Process via MuleSoft Composer | Bangalore MuleSoft Meetup...
Automating Business Process via MuleSoft Composer | Bangalore MuleSoft Meetup...Automating Business Process via MuleSoft Composer | Bangalore MuleSoft Meetup...
Automating Business Process via MuleSoft Composer | Bangalore MuleSoft Meetup...
 
SQL Database Design For Developers at php[tek] 2024
SQL Database Design For Developers at php[tek] 2024SQL Database Design For Developers at php[tek] 2024
SQL Database Design For Developers at php[tek] 2024
 
Integration and Automation in Practice: CI/CD in Mule Integration and Automat...
Integration and Automation in Practice: CI/CD in Mule Integration and Automat...Integration and Automation in Practice: CI/CD in Mule Integration and Automat...
Integration and Automation in Practice: CI/CD in Mule Integration and Automat...
 
AI as an Interface for Commercial Buildings
AI as an Interface for Commercial BuildingsAI as an Interface for Commercial Buildings
AI as an Interface for Commercial Buildings
 
E-Vehicle_Hacking_by_Parul Sharma_null_owasp.pptx
E-Vehicle_Hacking_by_Parul Sharma_null_owasp.pptxE-Vehicle_Hacking_by_Parul Sharma_null_owasp.pptx
E-Vehicle_Hacking_by_Parul Sharma_null_owasp.pptx
 
Transcript: #StandardsGoals for 2024: What’s new for BISAC - Tech Forum 2024
Transcript: #StandardsGoals for 2024: What’s new for BISAC - Tech Forum 2024Transcript: #StandardsGoals for 2024: What’s new for BISAC - Tech Forum 2024
Transcript: #StandardsGoals for 2024: What’s new for BISAC - Tech Forum 2024
 
The Codex of Business Writing Software for Real-World Solutions 2.pptx
The Codex of Business Writing Software for Real-World Solutions 2.pptxThe Codex of Business Writing Software for Real-World Solutions 2.pptx
The Codex of Business Writing Software for Real-World Solutions 2.pptx
 
Breaking the Kubernetes Kill Chain: Host Path Mount
Breaking the Kubernetes Kill Chain: Host Path MountBreaking the Kubernetes Kill Chain: Host Path Mount
Breaking the Kubernetes Kill Chain: Host Path Mount
 
How to convert PDF to text with Nanonets
How to convert PDF to text with NanonetsHow to convert PDF to text with Nanonets
How to convert PDF to text with Nanonets
 
GenCyber Cyber Security Day Presentation
GenCyber Cyber Security Day PresentationGenCyber Cyber Security Day Presentation
GenCyber Cyber Security Day Presentation
 
Transforming Data Streams with Kafka Connect: An Introduction to Single Messa...
Transforming Data Streams with Kafka Connect: An Introduction to Single Messa...Transforming Data Streams with Kafka Connect: An Introduction to Single Messa...
Transforming Data Streams with Kafka Connect: An Introduction to Single Messa...
 
Pigging Solutions Piggable Sweeping Elbows
Pigging Solutions Piggable Sweeping ElbowsPigging Solutions Piggable Sweeping Elbows
Pigging Solutions Piggable Sweeping Elbows
 
Swan(sea) Song – personal research during my six years at Swansea ... and bey...
Swan(sea) Song – personal research during my six years at Swansea ... and bey...Swan(sea) Song – personal research during my six years at Swansea ... and bey...
Swan(sea) Song – personal research during my six years at Swansea ... and bey...
 

Ios training-cum-course-in-mumbai-

  • 1. 1 1 iOS - iPhone/iPad Vibrant Technology & Computers Vashi,Navi Mumbai
  • 2. 2 iOS (previously iPhone OS) is a mobile operating system developed by Apple Inc. and distributed exclusively for Apple hardware. It is the operating system that powers many of the company's iDevices 2
  • 3. 3 3 What do you need? •Previous experience in another Object Oriented Programming (OOP) language will be helpful •Some understanding of C can be helpful, but is not required. Objective-C builds on C++. •Development Environment (IDE) is helpful •Mac computer running OS X Lion or higher! •If you plan to submit to the App Store, you will need Apple devices to do real testing on. The simulator is not good enough.
  • 4. 4 4 Introduction •iOS is the operating system that runs iPhones, iPod Touches, iPads, and Apple TVs. •The language used to develop software for iOS is Objective-C. (very similar to C) •This workshop will teach you how to get started but will not have time to teach you everything. •This workshop is good preparation for a real full iPhone/iPad, iOS Development class!
  • 5. 5 5 What is iOS? •iOS is an OS. It’s a subset of Mac OS X. •The iOS SDK is the software development kit that allows application programs to utilize classes and frameworks provided by the SDK. This workshop will focus on iOS SDK 5 •iOS is multitasking and runs on different devices (iPhones, iPod Touches, iPads, and Apple TVs). •Apple provides an IDE called Xcode. •Xcode is the IDE used by iOS (and OS X) developers. It does NOT run on MS Windows. •Xcode provides an interface to the compiler, editor, debugger, and code profiling tools.
  • 6. 6 6 Device Features •SQLite for structured data storage •Media support for common audio, video, and still image formats (MPEG4, H.264, MP3, AAC, AMR, JPG, PNG, GIF) •GSM Telephony (hardware dependent) •Bluetooth, EDGE, 3G, and WiFi (hardware dependent) •Camera, GPS, compass, and accelerometer (hardware dependent) •Rich development environment including a device simulator, tools for debugging, memory and performance profiling
  • 7. 7 7 Download the iOS SDK •Download the latest from the Apple App store •This is only available for Apple Macintosh computers •It’s free •To build to device and submit to the app store, you will be required to becomes a register Apple iOS developer •It’s $99 year for the basic account •If you plan to get a job in iOS development, you will need to establish a basic account and submit something to the Apple Store. Maybe a game?
  • 8. 8 8 Let’s get started - Launch Xcode • You are presented with the Welcome screen: •Create a new project •Connect to a repository •Learn about using Xcode •Go to Apple’s Portal •Go ahead and click on “Create a new project”
  • 9. 9 9 Project Template •There are several predefined templates to help you get started on a new project •For now, click on Single View Application
  • 10. 10 10 Project Options • The Product Name is the name of your app • Company Identifier is your organization name – such as edu.itu (reverse domain) • Class Prefix (leave empty) • Device Family: iPad, iPhone, Universal (Universal means that a single binary will have screens for iPhone, iPod Touch, and iPads) • Storyboards • Automatic Reference Counting • Include Unit Tests (leave unchecked as we are not using)
  • 11. 11 11 Source Control • Asks for a location for Source Control • By Default, it will use a local GIT repository • New developers not used to source control – this is extremely useful! • It keeps track of versions, lets you see what’s changed, and will undoubtedly be used in any team project you run into in the “real” world • GIT and Subversion are two popular source controls systems – there are many others to choose from
  • 13. 13 13 Let’s build the default project •Click the Run button (upper left of the screen) •The iPad simulator will launch (You can also change this to iPhone if you want) •You will have a blank white screen •Press Command-Q to end the simulator
  • 14. 14 14 Quick Terminology: MVC •Model-View-Controller (MVC) •MVC is the paradigm of iOS programming •Model: Holds data, should know nothing of the interface •View: Code for getting data in/out of a view. Deals with items like buttons, lists, tables, etc •Controller: Keeps the Model objects and View objects in sync
  • 15. 15 15 Quick Terminology: Delegate •AppDelegate.h •AppDelegate.m •The Delegate is essentially the “controller” of your app. It links buttons, labels and views together •.h files are header files and interfaces are defined here •.m files are implementation files. These contain your classes, code, etc.
  • 16. 16 16 Quick Terminology: Storyboard •These are new to iOS5 •Storyboards help you graphically lay out your app before you code it. •It makes it easy to see the “flow” of your app •You are advised to use Storyboards going forward with you iOS programming adventures •If you have tinkered with iOS in the past, you might be asking about the xib/nibs. They are still there, however, Storyboards offer similar functionality and make it easier to visualize your views. •We will not be covering nibs in this workshop.
  • 17. 17 17 Quick Terminology: ARC •Automatic Reference Counting (ARC) •The LLVM 3.0 compiler handles memory management for you •It is not a garbage collector! •Prior to iOS5 – memory management was the single most difficult item to grasp in Objective-C. •Unless you have specific reasons, all of your projects should use ARC.
  • 18. 18 18 Quick Terminology: Unit Tests •We will not be discussing Unit Tests in this workshop •Be advised – unit tests are very useful for your programs •The tests can help you make sure your code changes are not breaking anything. •The goal is to be able to find bugs quicker and fix them before your code goes to QA (or the customer!)
  • 19. 19 19 Click on the iPhone Storyboard •It shows a blank view •It looks like you are on a sheet of graph paper •There are two buttons – below •First Responder •View Controller
  • 20. 20 20 Find the Label •In Xcode, lower right hand corner, scroll until you find the object Label •Drag Label to the blank view •Double click on the Label you added, and change it to say “Hello World” •Do the same steps for the iPad Storyboard
  • 21. 21 21 Run the project •The iPad and iPhone projects should now display Hello World!
  • 22. 22 22 Next, add two buttons to your view •Find the Round Rect Button, drag two to the view •Double-click on one of the buttons and type Hello •Double-click on one of the buttons and type Goodbye •Run your project, click on the buttons
  • 23. 23 23 Nothing Happens – we have to tell it to do something •Click on the Assistant Editor •It looks like a tuxedo •It will be in the upper right hand corner of your screen
  • 24. 24 24 Linking the ViewObject to your ViewController… •You will see your ViewObject in the middle of the screen •The right hand side of the screen should be the ViewController.h file View Object ViewController.h
  • 25. 25 25 Link the label… • Single click on your Hello World label • While holding down the Control key, left click-drag to the ViewController.h file • You need to drag between the @interface and @end in the code • This will make a new property • For the name, call it helloLabel so we can easily recognize what it is • This step will allow us to make changes to the UILabel
  • 26. 26 26 @interface and @end •Remember that Objective-C is an extensive to the C language •The @ symbol denotes an Objective-C keyword •@interface is the start of a class. •@interface Classname: Superclass •Anything between the declaration and end is part of the class
  • 27. 27 27 @property (weak, nonatomic) IBOutlet UILabel *helloLabel; •A property is an attribute of the class •Getters and Setters are automatically created for you •Weak is a memory management term •Nonatomic has to do with adding mutexes around your getters and setters •IBOutlet stands for Interface Builder Outlet. •Interface Builder still exists in iOS5 but we are using the new Storyboard feature instead.
  • 28. 28 28 @synthesize helloLabel •Synthesize – this creates the accessor/mutators (getters/setters) for you •You can write your own if you want, but in general, there is no reason to do this.
  • 29. 29 29 Link the rest of the buttons •Link helloButton to ViewController.h •Link goodbyeButton to ViewController.h •When done, you will have two properties •Now, switch the Assistant window to the ViewController.m file
  • 30. 30 30 TouchUpInside Actions TouchUpInside events occur if you touch a button and lift off while inside the button This corresponds to a user tapping a button Right-Click on the Hello button On the far right, locate Touch Up Inside Left click-drag this over to your ViewController.m Notice it creates some code Do the same for the goodbye button
  • 31. 31 31 IBAction •You created two IBActions •Actions signify something that happens when you do something for example, push a button. •When you push a button, it fires the action •These are currently empty methods - (IBAction)helloPushed:(id)sender { } - (IBAction)goodbyePushed:(id)sender { }
  • 32. 32 32 Change the UILabel - (IBAction)helloPushed:(id)sender { self.helloLabel.text=@"Hello Pushed"; } - (IBAction)goodbyePushed:(id)sender { self.helloLabel.text=@"Goodbye Pushed"; } • Self refers to the ViewController class • We defined the property helloLabel earlier • Text is a property of UILabel’s that we can set. • The @”Some text” is an NSString object that UILabels can display. • Run your program and push the buttons. You should see the UILabel change when you press the buttons
  • 33. 33 33 Tab Controller •If you’ve ever used an iOS device, you have come across apps that use the tab controller. •Several of the built in apps (such as the phone app) use this controller •For the next exercise, we are going to create a simple tab controller
  • 34. 34 34 Create a new project •Close any existing projects you have open (to make things easier!) •Select File->New- >Project from the application menu
  • 35. 35 35 Select Tab Template •Select the “Tabbed Application” Template for your project
  • 36. 36 36 Set Options •For product name, call it tabDemo •Whatever you used for Company Identifier should be set – if not, edu.itu is ok •Leave Class Prefix blank •For Device family, choose iPhone (to keep it simple) •Enable Storyboards and Arc •Do not select Unit Tests
  • 37. 37 37 Look at the Storyboard • Click on MainStoryboard.Storyboard • Notice how the Tab Bar Controller is shown • It also shows the child views associated with the tab bar buttons • This lets the developer see the views and path to them at a quick glance. • Go ahead and run the project, observe what happens when you tap the tab items. It switches between the views
  • 38. 38 38 Let’s add a new class: ThirdViewController •On the left hand side, right-click on the tabDemo folder and select New File
  • 39. 39 39 Pick the type of file •We are adding a new ViewController – so select Objective-C class
  • 40. 40 40 Pick the options • For Class, type in Third • In the Sublass combo box, select UIViewController • The IDE will change your class name • It is good naming convention to have the class be description – so in this case, ThirdViewController lets any developer know this is a ViewController • Leave Targeted for iPad and XIB unchecked
  • 42. 42 42 We now have a .h and .m •Notice that you now have two files •ThirdViewController.h and ThirdViewController.m •If you look at the files, they are basically “skeleton” classes ready for the developer
  • 43. 43 43 Add another View Controller •Add a new View Controller to the Storyboard •After you add it, it will not be linked to any view
  • 44. 44 44 Our new view, all alone •Notice that Storyboard does not have any arrows pointing to it •The developer will have to make the association as this view could be a sub view of any of the views shown
  • 45. 45 45 Link this ViewController to the Tab Controller •Hold down the Control key, left-click drag from the Tab Controller to the new view we just added •This tells Storyboard that this view is going to be accessed from the tab controller
  • 47. 47 47 Label this before we forget •Click on the Text •Change this to say Third •We do not have any graphics – if we did, we would want to go ahead and add a graphic for this. •Note: you will need graphics for standard iPhones, retina, and iPads.
  • 48. 48 48 Lets be more specific about the class • Left Click on your new view in Storyboard – icon on right bottom • Click the Identify Inspector (upper right) • Notice how the class is currently UIViewController • We need to make this to be associated with our ThirdViewController (which is a subclass of UIViewController)
  • 49. 49 49 Select ThirdViewController •From the combo box, scroll until you find ThirdViewController •This will let us do any custom actions we might need to do •Remember: ThirdViewController has all of the methods and properties of a UIViewController!
  • 50. 50 50 Let’s Replace the First View • We are going to replace the FirstViewController with a TableViewController • Click on First View, hit the Delete button to remove it
  • 51. 51 51 Drag a Table View Controller • From the Object Library, drag over a Table View Controller • A good spot would be where you just deleted the other view controller
  • 52. 52 52 Embed Navigation Controller •From the Xcode menu bar, select Editor->Embed In- >Navigation Controller •Notice that another view controller is added to the Storyboard canvas
  • 53. 53 53 Check it out • This is what we did in the previous slide • Since the Navigation Controller is a container, there is a relationship between the Navigation controller and the table view controller. (Noted by the connecting arrow)
  • 54. 54 54 Hook up the Scenes •Ctrl-drag from the Tab Bar controller to the Navigation controller •Select Relationship – View Controllers
  • 55. 55 55 Look at Storyboard now • The relationship is defined • When we added this, it added an entry labeled “Item” as the last tab bar button •Drag this “Item” and make it the first entry in our tab bar
  • 56. 56 56 Fix up the tab bar items •Drag item to the left most position •Also, let’s rename this back to First •Double-click on Item in the Navigation Controller scene, change text to First
  • 57. 57 57 Name the Navigation bar •In the Table View window, double-click on the Title bar. •Type in “Things” to give the Navigation bar a name. •In a “real” app, you would type something descriptive and meaningful to the user.
  • 58. 58 58 The Navigation Bar has a title •You can now see the title has a name. •If you have noticed, we have been getting a warning from the compiler for our storyboard. •“Prototype table cells must have reuse identifiers”
  • 59. 59 59 Let’s get rid of the warning • Warnings are typically not something you want in your program. • We are getting this warning because we have not configured the cells yet – so the compiler does not know what they are.
  • 60. 60 60 Table View Controller • Click on the blank prototype cell • Next, click on the attributes inspector and set Style to Subtitle.
  • 62. 62 62 More cell attributes •Set the Accessory attribute to Disclosure Indicator. •Give the cell an identifier of ThingsCell. •The warning from Xcode is a reminder to developers – there is something you need to do if you want this to work. •(Side note – warnings are something you should not overlook. Several program crashes can stem from warnings people don’t pay attention to.)
  • 63. 63 63 Add a UIViewController subclass template… • Add a new file to the project. • Choose UIViewController subclass template. • Name the class ThingsViewController, this will be a subclass of UITableViewController
  • 67. 67 67 Create to add to project
  • 68. 68 68 Set the class with Identify Inspector • Click on the TableViewController object (the whole object will be outlined in blue) • Now, click class and select ThingsViewController
  • 69. 69 69 Build and run! • Go ahead and build the app • You can now add items to the table view if you want to continue working with this app.
  • 70. 70 70 HelloTabBar Example •Download: •http://bhecker.com/ip-HelloTabBar.zip •Save to your desktop. •Double-click to uncompress the file •Double-click on “HelloTabBar.xcode.proj” to load the project in XCode •Examine and customize as you wish!