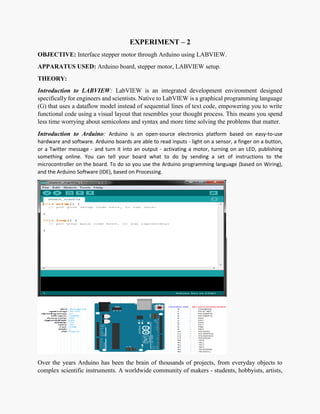
EXPERIMENT – 2
OBJECTIVE: Interface stepper motor through Arduino using LABVIEW.
APPARATUS USED: Arduino board, stepper motor, LABVIEW setup.
THEORY:
Introduction to LABVIEW: LabVIEW is an integrated development environment designed
specifically for engineers and scientists. Native to LabVIEW is a graphical programming language
(G) that uses a dataflow model instead of sequential lines of text code, empowering you to write
functional code using a visual layout that resembles your thought process. This means you spend
less time worrying about semicolons and syntax and more time solving the problems that matter.
Introduction to Arduino: Arduino is an open-source electronics platform based on easy-to-use
hardware and software. Arduino boards are able to read inputs - light on a sensor, a finger on a button,
or a Twitter message - and turn it into an output - activating a motor, turning on an LED, publishing
something online. You can tell your board what to do by sending a set of instructions to the
microcontroller on the board. To do so you use the Arduino programming language (based on Wiring),
and the Arduino Software (IDE), based on Processing.
Over the years Arduino has been the brain of thousands of projects, from everyday objects to
complex scientific instruments. A worldwide community of makers - students, hobbyists, artists,
programmers, and professionals - has gathered around this open-source platform, their
contributions have added up to an incredible amount of accessible knowledge that can be of great
help to novices and experts alike.
Stepper Motor: A stepper motor or step motor or stepping motor is a brushless DC electric motor
that divides a full rotation into a number of equal steps. The motor's position can then be
commanded to move and hold at one of these steps without any feedback sensor (an open-loop
controller), as long as the motor is carefully sized to the application in respect to torque and speed.
Relay Driver IC: A Relay driver IC is an electro-magnetic switch that will be used whenever we
want to use a low voltage circuit to switch a light bulb ON and OFF which is connected to 220V
mains supply. Bipolar NPN transistor driver.
Interfacing Relay Driver with Stepper Motor:
Interface Arduino through LabVIEW:
Step 1: In LabVIEW (any version) establish the following front panel
Step 2: Establish the following block diagram.
Step 3: This virtual instrument:
>> Starts communication with Arduino.
>> Detects if there is a change in control knob value.
>> If there is a change it sends the new value to Arduino.
>> Else, it clears serial port Input/output register to avoid data overflow and serial port
overloading.
>> When pressing STOP, it sends “0” (brake or hold order) to Arduino.
Step 4: Arduino Code
(Attachment available)
Checks if LabVIEW sent a new value. If there is a new value, it converts it into integer byte with
the same value. This integer byte represents the delay interval used in stepping sequence. That,
the greater the delay the lower the speed and vice versa. Else, Arduino continue running the
motor at current speed. This prevents the processor from overloading the serial port and pushes it
to avoid Arduino Serial port hanging.
Calculates motor speed from its resolution and delay intervals between steps as following:
Rpm = (60 x 1000 x step angle) / (360 x (delay msec))
Rpm = (1000 x step angle) / (6 x (delay in msec))
Rpm = 300 / (delay in msec). Sends the calculated motor speed to another Serial port of Arduino
Mega to show if our code works
RESULT: Successfully running the stepper motor by interfacing Arduino with LabVIEW.

Interface stepper motor through Arduino using LABVIEW.

  • 1.
    EXPERIMENT – 2 OBJECTIVE:Interface stepper motor through Arduino using LABVIEW. APPARATUS USED: Arduino board, stepper motor, LABVIEW setup. THEORY: Introduction to LABVIEW: LabVIEW is an integrated development environment designed specifically for engineers and scientists. Native to LabVIEW is a graphical programming language (G) that uses a dataflow model instead of sequential lines of text code, empowering you to write functional code using a visual layout that resembles your thought process. This means you spend less time worrying about semicolons and syntax and more time solving the problems that matter. Introduction to Arduino: Arduino is an open-source electronics platform based on easy-to-use hardware and software. Arduino boards are able to read inputs - light on a sensor, a finger on a button, or a Twitter message - and turn it into an output - activating a motor, turning on an LED, publishing something online. You can tell your board what to do by sending a set of instructions to the microcontroller on the board. To do so you use the Arduino programming language (based on Wiring), and the Arduino Software (IDE), based on Processing. Over the years Arduino has been the brain of thousands of projects, from everyday objects to complex scientific instruments. A worldwide community of makers - students, hobbyists, artists,
  • 2.
    programmers, and professionals- has gathered around this open-source platform, their contributions have added up to an incredible amount of accessible knowledge that can be of great help to novices and experts alike. Stepper Motor: A stepper motor or step motor or stepping motor is a brushless DC electric motor that divides a full rotation into a number of equal steps. The motor's position can then be commanded to move and hold at one of these steps without any feedback sensor (an open-loop controller), as long as the motor is carefully sized to the application in respect to torque and speed. Relay Driver IC: A Relay driver IC is an electro-magnetic switch that will be used whenever we want to use a low voltage circuit to switch a light bulb ON and OFF which is connected to 220V mains supply. Bipolar NPN transistor driver.
  • 3.
    Interfacing Relay Driverwith Stepper Motor: Interface Arduino through LabVIEW: Step 1: In LabVIEW (any version) establish the following front panel Step 2: Establish the following block diagram.
  • 4.
    Step 3: Thisvirtual instrument: >> Starts communication with Arduino. >> Detects if there is a change in control knob value. >> If there is a change it sends the new value to Arduino. >> Else, it clears serial port Input/output register to avoid data overflow and serial port overloading. >> When pressing STOP, it sends “0” (brake or hold order) to Arduino. Step 4: Arduino Code (Attachment available) Checks if LabVIEW sent a new value. If there is a new value, it converts it into integer byte with the same value. This integer byte represents the delay interval used in stepping sequence. That, the greater the delay the lower the speed and vice versa. Else, Arduino continue running the motor at current speed. This prevents the processor from overloading the serial port and pushes it to avoid Arduino Serial port hanging. Calculates motor speed from its resolution and delay intervals between steps as following: Rpm = (60 x 1000 x step angle) / (360 x (delay msec)) Rpm = (1000 x step angle) / (6 x (delay in msec)) Rpm = 300 / (delay in msec). Sends the calculated motor speed to another Serial port of Arduino Mega to show if our code works RESULT: Successfully running the stepper motor by interfacing Arduino with LabVIEW.