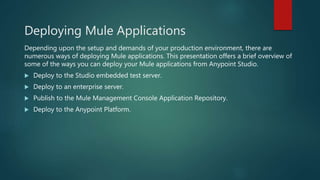
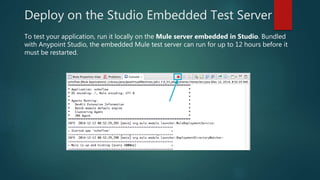
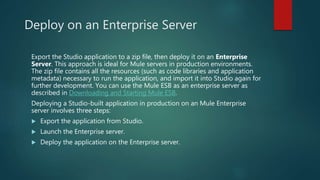
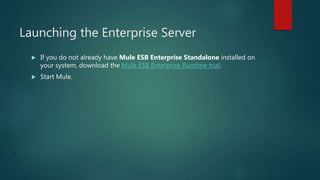
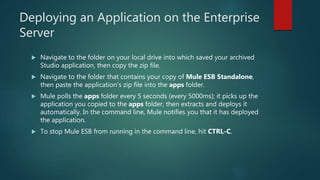
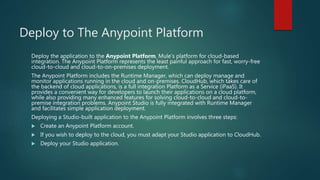
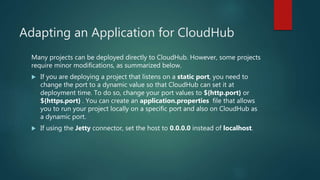
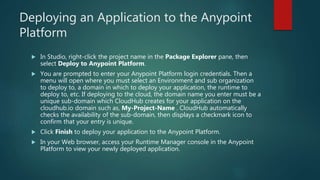
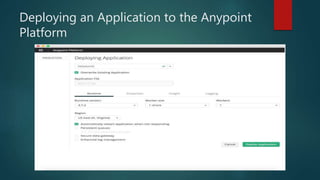
Deploying Mule
Applications
Deploying Mule Applications
Depending upon the setup and demands of your production environment, there are
numerous ways of deploying Mule applications. This presentation offers a brief overview of
some of the ways you can deploy your Mule applications from Anypoint Studio.
 Deploy to the Studio embedded test server.
 Deploy to an enterprise server.
 Publish to the Mule Management Console Application Repository.
 Deploy to the Anypoint Platform.
Deploy on the Studio Embedded Test Server
To test your application, run it locally on the Mule server embedded in Studio. Bundled
with Anypoint Studio, the embedded Mule test server can run for up to 12 hours before it
must be restarted.
Deploy on an Enterprise Server
Export the Studio application to a zip file, then deploy it on an Enterprise
Server. This approach is ideal for Mule servers in production environments.
The zip file contains all the resources (such as code libraries and application
metadata) necessary to run the application, and import it into Studio again for
further development. You can use the Mule ESB as an enterprise server as
described in Downloading and Starting Mule ESB.
Deploying a Studio-built application in production on an Mule Enterprise
server involves three steps:
 Export the application from Studio.
 Launch the Enterprise server.
 Deploy the application on the Enterprise server.
Exporting an Application from Studio
Studio lets you save a project as a Mule Deployable Archive (a zip file). Such a
packaged Mule archive provides a convenient method for transferring files
between editions of Studio or backing up Studio projects. The package includes
all information specific to your application(s), including flows, configuration files,
Java classes, referenced HTML files, and more.
 Right-click the project name in the Package Explorer pane, then
select Export.
 In the Export wizard, click Mule to expand the associated node,
select Anypoint Studio Project to Mule Deployable Archive (includes
Studio metadata), then click Next.
 Select an output folder where you want to save your project archive, and
click Finish.
Exporting an Application from Studio
Launching the Enterprise Server
 If you do not already have Mule ESB Enterprise Standalone installed on
your system, download the Mule ESB Enterprise Runtime trial.
 Start Mule.
Deploying an Application on the Enterprise
Server
 Navigate to the folder on your local drive into which saved your archived
Studio application, then copy the zip file.
 Navigate to the folder that contains your copy of Mule ESB Standalone,
then paste the application’s zip file into the apps folder.
 Mule polls the apps folder every 5 seconds (every 5000ms); it picks up the
application you copied to the apps folder, then extracts and deploys it
automatically. In the command line, Mule notifies you that it has deployed
the application.
 To stop Mule ESB from running in the command line, hit CTRL-C.
Deploy to The Anypoint Platform
Deploy the application to the Anypoint Platform, Mule’s platform for cloud-based
integration. The Anypoint Platform represents the least painful approach for fast, worry-free
cloud-to-cloud and cloud-to-on-premises deployment.
The Anypoint Platform includes the Runtime Manager, which can deploy manage and
monitor applications running in the cloud and on-premises. CloudHub, which takes care of
the backend of cloud applications, is a full integration Platform as a Service (iPaaS). It
provides a convenient way for developers to launch their applications on a cloud platform,
while also providing many enhanced features for solving cloud-to-cloud and cloud-to-
premise integration problems. Anypoint Studio is fully integrated with Runtime Manager
and facilitates simple application deployment.
Deploying a Studio-built application to the Anypoint Platform involves three steps:
 Create an Anypoint Platform account.
 If you wish to deploy to the cloud, you must adapt your Studio application to CloudHub.
 Deploy your Studio application.
Adapting an Application for CloudHub
Many projects can be deployed directly to CloudHub. However, some projects
require minor modifications, as summarized below.
 If you are deploying a project that listens on a static port, you need to
change the port to a dynamic value so that CloudHub can set it at
deployment time. To do so, change your port values to ${http.port} or
${https.port} . You can create an application.properties file that allows
you to run your project locally on a specific port and also on CloudHub as
a dynamic port.
 If using the Jetty connector, set the host to 0.0.0.0 instead of localhost.
Deploying an Application to the Anypoint
Platform
 In Studio, right-click the project name in the Package Explorer pane, then
select Deploy to Anypoint Platform.
 You are prompted to enter your Anypoint Platform login credentials. Then a
menu will open where you must select an Environment and sub organization
to deploy to, a domain in which to deploy your application, the runtime to
deploy to, etc. If deploying to the cloud, the domain name you enter must be a
unique sub-domain which CloudHub creates for your application on the
cloudhub.io domain such as, My-Project-Name . CloudHub automatically
checks the availability of the sub-domain, then displays a checkmark icon to
confirm that your entry is unique.
 Click Finish to deploy your application to the Anypoint Platform.
 In your Web browser, access your Runtime Manager console in the Anypoint
Platform to view your newly deployed application.
Deploying an Application to the Anypoint
Platform
Sharing Resources
 If you’re deploying multiple applications to the same server or servers
(except for CloudHub), in whichever of the ways explained above, and
those applications could share the same resources, then you can create a
common domain where you can define common configurations that can
then be referenced by multiple projects. This allows you to, for example,
expose different services in different projects through the same HTTP host
and port and be able to deploy everything without any conflicts.
Publish to the Mule Management Console
Application Repository
You can publish the application to the Application Repository in the Mule
Management Console. Once in the repository, the application can be
deployed from the repository to multiple Mule server instances, and even to
multi-node Muleclusters.
Publish to the Mule Management Console
Application Repository
 Once in the repository, the application can be deployed from the
Repository to multiple Mule server instances and even to multi-node high-
availability clusters. To publish an application to the management
console’s app repo, you must first download, then install and set-up Mule
ESB Standalone with Mule Management Console.
 In Studio, right-click the project name in the Package Explorer pane, then
select Deploy to Anypoint Platform > Mule Management Console.
 In the publication wizard, input a value for each of the fields to specify the
location, login credentials of your management console, and settings for
your application.
 Click Finish to publish the app to the repository.
Mulesoft Documentation Link:
https://docs.mulesoft.com/mule-fundamentals/v/3.7/deploying-mule-
applications
Thank You.

Deploying mule applications

  • 1.
  • 2.
    Deploying Mule Applications Dependingupon the setup and demands of your production environment, there are numerous ways of deploying Mule applications. This presentation offers a brief overview of some of the ways you can deploy your Mule applications from Anypoint Studio.  Deploy to the Studio embedded test server.  Deploy to an enterprise server.  Publish to the Mule Management Console Application Repository.  Deploy to the Anypoint Platform.
  • 3.
    Deploy on theStudio Embedded Test Server To test your application, run it locally on the Mule server embedded in Studio. Bundled with Anypoint Studio, the embedded Mule test server can run for up to 12 hours before it must be restarted.
  • 4.
    Deploy on anEnterprise Server Export the Studio application to a zip file, then deploy it on an Enterprise Server. This approach is ideal for Mule servers in production environments. The zip file contains all the resources (such as code libraries and application metadata) necessary to run the application, and import it into Studio again for further development. You can use the Mule ESB as an enterprise server as described in Downloading and Starting Mule ESB. Deploying a Studio-built application in production on an Mule Enterprise server involves three steps:  Export the application from Studio.  Launch the Enterprise server.  Deploy the application on the Enterprise server.
  • 5.
    Exporting an Applicationfrom Studio Studio lets you save a project as a Mule Deployable Archive (a zip file). Such a packaged Mule archive provides a convenient method for transferring files between editions of Studio or backing up Studio projects. The package includes all information specific to your application(s), including flows, configuration files, Java classes, referenced HTML files, and more.  Right-click the project name in the Package Explorer pane, then select Export.  In the Export wizard, click Mule to expand the associated node, select Anypoint Studio Project to Mule Deployable Archive (includes Studio metadata), then click Next.  Select an output folder where you want to save your project archive, and click Finish.
  • 6.
  • 7.
    Launching the EnterpriseServer  If you do not already have Mule ESB Enterprise Standalone installed on your system, download the Mule ESB Enterprise Runtime trial.  Start Mule.
  • 8.
    Deploying an Applicationon the Enterprise Server  Navigate to the folder on your local drive into which saved your archived Studio application, then copy the zip file.  Navigate to the folder that contains your copy of Mule ESB Standalone, then paste the application’s zip file into the apps folder.  Mule polls the apps folder every 5 seconds (every 5000ms); it picks up the application you copied to the apps folder, then extracts and deploys it automatically. In the command line, Mule notifies you that it has deployed the application.  To stop Mule ESB from running in the command line, hit CTRL-C.
  • 9.
    Deploy to TheAnypoint Platform Deploy the application to the Anypoint Platform, Mule’s platform for cloud-based integration. The Anypoint Platform represents the least painful approach for fast, worry-free cloud-to-cloud and cloud-to-on-premises deployment. The Anypoint Platform includes the Runtime Manager, which can deploy manage and monitor applications running in the cloud and on-premises. CloudHub, which takes care of the backend of cloud applications, is a full integration Platform as a Service (iPaaS). It provides a convenient way for developers to launch their applications on a cloud platform, while also providing many enhanced features for solving cloud-to-cloud and cloud-to- premise integration problems. Anypoint Studio is fully integrated with Runtime Manager and facilitates simple application deployment. Deploying a Studio-built application to the Anypoint Platform involves three steps:  Create an Anypoint Platform account.  If you wish to deploy to the cloud, you must adapt your Studio application to CloudHub.  Deploy your Studio application.
  • 10.
    Adapting an Applicationfor CloudHub Many projects can be deployed directly to CloudHub. However, some projects require minor modifications, as summarized below.  If you are deploying a project that listens on a static port, you need to change the port to a dynamic value so that CloudHub can set it at deployment time. To do so, change your port values to ${http.port} or ${https.port} . You can create an application.properties file that allows you to run your project locally on a specific port and also on CloudHub as a dynamic port.  If using the Jetty connector, set the host to 0.0.0.0 instead of localhost.
  • 11.
    Deploying an Applicationto the Anypoint Platform  In Studio, right-click the project name in the Package Explorer pane, then select Deploy to Anypoint Platform.  You are prompted to enter your Anypoint Platform login credentials. Then a menu will open where you must select an Environment and sub organization to deploy to, a domain in which to deploy your application, the runtime to deploy to, etc. If deploying to the cloud, the domain name you enter must be a unique sub-domain which CloudHub creates for your application on the cloudhub.io domain such as, My-Project-Name . CloudHub automatically checks the availability of the sub-domain, then displays a checkmark icon to confirm that your entry is unique.  Click Finish to deploy your application to the Anypoint Platform.  In your Web browser, access your Runtime Manager console in the Anypoint Platform to view your newly deployed application.
  • 12.
    Deploying an Applicationto the Anypoint Platform
  • 13.
    Sharing Resources  Ifyou’re deploying multiple applications to the same server or servers (except for CloudHub), in whichever of the ways explained above, and those applications could share the same resources, then you can create a common domain where you can define common configurations that can then be referenced by multiple projects. This allows you to, for example, expose different services in different projects through the same HTTP host and port and be able to deploy everything without any conflicts.
  • 14.
    Publish to theMule Management Console Application Repository You can publish the application to the Application Repository in the Mule Management Console. Once in the repository, the application can be deployed from the repository to multiple Mule server instances, and even to multi-node Muleclusters.
  • 15.
    Publish to theMule Management Console Application Repository  Once in the repository, the application can be deployed from the Repository to multiple Mule server instances and even to multi-node high- availability clusters. To publish an application to the management console’s app repo, you must first download, then install and set-up Mule ESB Standalone with Mule Management Console.  In Studio, right-click the project name in the Package Explorer pane, then select Deploy to Anypoint Platform > Mule Management Console.  In the publication wizard, input a value for each of the fields to specify the location, login credentials of your management console, and settings for your application.  Click Finish to publish the app to the repository.
  • 16.