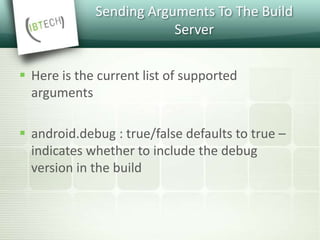
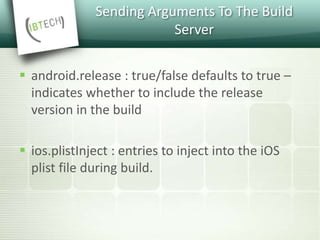
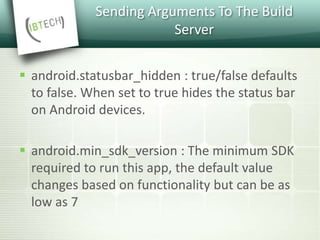
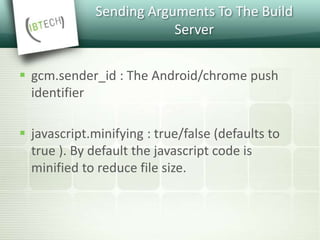
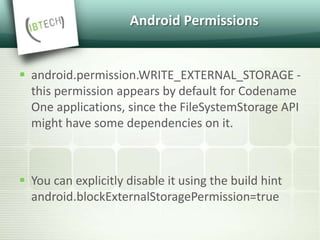
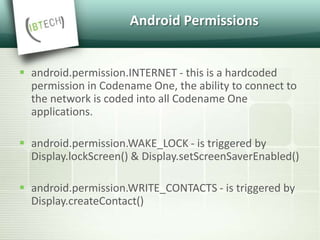
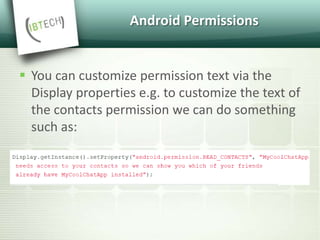
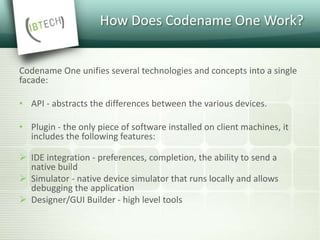
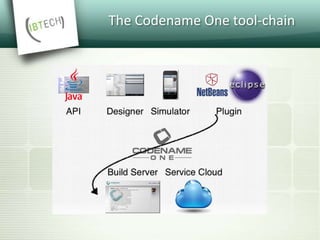
06.06.2017
Recep Düzdemir | SMG Web And Mobile
 Codename One is a set of tools for mobile
application development that derive a great
deal of its architecture from Java.
Codename One’s Mission Statement
 Unify the complex and fragmented task of
mobile device programming into a single set
of tools, APIs & services. As a result create a
more manageable approach to mobile
application development without sacrificing
the power/control given to developers.
 This effectively means bringing that old "Write
Once Run Anywhere" (WORA) Java mantra to
mobile devices.
Is Codename One Free?
 Codename One has a free version and paid
versions.
 The base product is open source but build
system requires servers and CodenameOne
place a quota on their usage to prevent
overuse.
Is Codename One Free?
 With the free version you are limited to 100
build credits per month.
 1 credit is the equivalent of 1 build with the
exception of iOS where 8 credits equal 1 build
to offset the higher costs of Mac servers.
How Does Codename One Work?
Codename One unifies several technologies and concepts into a single
facade:
• API - abstracts the differences between the various devices.
• Plugin - the only piece of software installed on client machines, it
includes the following features:
 IDE integration - preferences, completion, the ability to send a
native build
 Simulator - native device simulator that runs locally and allows
debugging the application
 Designer/GUI Builder - high level tools
How Does Codename One Work?
• Build Servers - The build servers accept native
device builds sent by the plugin and convert
the binaries (JAR’s, not sources) to native
applications.
The Codename One tool-chain
Why Build Servers?
 The build servers allow building native iOS
Apps without a Mac and native Windows apps
without a Windows machine.
 They remove the need to install/update
complex toolchains and simplify the process of
building a native app to a right click.
Why Build Servers?
 E.g.: Since building native iOS applications
requires a Mac OS X machine with a recent
version of xcode Codename One maintains
such machines in the cloud.
 When developers send an iOS build such a
Mac will be used to generate C source code
using ParparVM and it will then compile the C
source code using xcode & sign the resulting
binary using xcode.
Why Build Servers?
 You can install the binary to your device or
build a distribution binary for the appstore.
 Since C code is generated it also means that
your app will be "future proof" in a case of
changes from Apple.
 You can also inject Objective-C native code
into the app while keeping it 100% portable
thanks to the "native interfaces" capability of
Codename One.
Why Build Servers?
 Subscribers can receive the C source code
back using the include sources feature of
Codename One and use those sources for
benchmarking, debugging on devices etc.
Why Build Servers?
 Java 8 syntax is supported
thru retrolambda installed on the Codename One
servers.
 This is used to convert bytecode seamlessly down
to Java 5 syntax levels.
 Notice that this architecture is transparent to
developers as the build servers abstract most of
the painful differences between devices.
Why ParparVM
 On iOS, Codename One uses ParparVM which
translates Java bytecode to C code and boasts
a non-blocking GC as well as 64 bit/bitcode
support.
 This VM is fully open source in the Codename
One git repository.
Why ParparVM
 In the past Codename One used XMLVM to
generate native code in a very similar way but
the XMLVM solution was too generic for the
needs of Codename One.
Why ParparVM
 ParparVM boasts a unique architecture of
translating code to C (similarly to XMLVM),
because of that Codename One is the only
solution of its kind that can guarantee future
iOS compatibility.
Why ParparVM
 The key advantages of ParparVM over other
approaches are:
 Truly native - since code is translated to C the
app is "more native".
 Concurrent GC that doesn't block the current
execution thread
Why ParparVM
 Smaller class library - ParparVM includes a
very small segment of the full JavaAPI’s
resulting in final binaries. This maps directly to
performance and memory overhead.
Why ParparVM
 Simple & extensible - to work with ParparVM
you only need a basic understanding of C. This
is important for the fast moving world of
mobile development, as Apple changes things
left and right we need a more agile VM.
Windows Phone/UWP
 The old Windows Phone port was deprecated and is no
longer supported, the UWP port is the main focus.
 Codename One now targets UWP by leveraging a
modified version of iKVM to build native Windows
Universal Applications.
 iKVM uses a bytecode to CLR translation process that
effectively converts Java bytecode directly to the .net
equivalent. This is paired with a port of the Codename
One API’s that was built for the UWP environment.
JavaScript Port
 The JavaScript port of Codename One is based
on the amazing work of the TeaVM project.
 The team behind TeaVM effectively built a
JVM that translates Java bytecode into
JavaScript source code while maintaining
threading semantics using a very imaginative
approach.
JavaScript Port
 The JavaScript port allows Codename One
applications to run within a desktop or mobile
browser.
 The JavaScript port is only available for
Enterprise grade subscribers of Codename
One.
Lightweight Components
 Codename One uses a "lightweight
architecture" thus allowing the UI to work
seamlessly across all platforms.
 As a result most of the UI is developed in Java
and is thus remarkably portable and
debuggable.
Lightweight Components
 A Lightweight component is a component that
is written entirely in Java, it draws its own
interface and handles its own events/states.
 This has huge portability advantages since the
same code executes on all platforms.
Lightweight Components
 Lightweight components are infinitely
customizable by using standard inheritance
and overriding paint/event handling.
 Since a lightweight component is written
entirely in Java, developers can preview the
application accurately in the simulators & GUI
builder.
History
 Codename One was started by Chen Fishbein
& Shai Almog who authored the Open Source
LWUIT project at Sun Microsystems starting at
2007.
 The LWUIT project aimed at solving the
fragmentation within J2ME/Blackberry devices
by creating a higher standard of user interface
than the common baseline at the time.
History
 LWUIT used by several companies including
Nokia, it was used as the base standard for
DTV in Brazil, Toyota.
 LWUIT later adapted Codename One as well.
 In 2012 Shai & Chen formed Codename One
as they left Oracle
Installing Codename One In
NetBeans
 Select the Tools→Plugins menu option
 Select the Available Plugins Tab
 Check The CodenameOne Plugin
Installing Codename One In
NetBeans
Installing Codename One In Eclipse
 Startup Eclipse and click Help→`Install New
Software`.
Installing Codename One In Eclipse
 Click the Add button on the right side & fill out
the entries.
 Enter Codename One for the name and
https://www.codenameone.com/files/eclipse/sit
e.xml for the location.
Installing Codename One In Eclipse
New Project Dialog
New Project Dialog Step 2
Setting a proper package name
A good package name
in a project is crucial
and very
hard/impossible to
change after the fact.
App stores recognize
your app based on its
package name so if
you would want/need
to change that in the
future this might
become impossible.
Default project structure
 There are two important files that are generated:
SuperDuperApp.java - your main java source file,
this is where your app starts/stops and handles
system notifications (e.g push).
theme.res - the theme file contains the
application styling, localization, images etc.
Default project structure
When we double click the theme.res file it opens in the Codename One designer
tool. We can then edit the styles of any element within the theme.
The Default Hello World
Codename One App
To run the application just press the IDE’s
play button.
The Source Code Of The Hello
World App
 The main class doesn’t implement any interface or extend a
base class, however the Codename One runtime expects it to
have these 4 methods and maintain the method signatures.
public class SuperDuperApp {
private Form current;
private Resources theme;
public void init(Object context) { }
public void start() { }
public void stop() { }
public void destroy() { }
}
The Source Code Of The Hello
World App
 init(Object) - invoked when the application is
started but not when its restored from the
background. E.g. if the app isn’t running, init
will be invoked. However, if the app was
minimized and is then restored init will not be
invoked.
The Source Code Of The Hello
World App
 start() - the start method is invoked with every
launch of the app.
 This includes restoring a minimized application.
 This is very useful for initializing UI’s which
usually need to be refreshed both when the user
launches the app and when he returns to it after
leaving it in the background for any duration.
The Source Code Of The Hello
World App
 stop() - stop is invoked when the user
minimizes the app.
 If you have ongoing operations (e.g.
download/media) you should stop them here
or the operating system might kill your
application due to CPU usage in the
background.
The Source Code Of The Hello
World App
 destroy() - this callback isn’t guaranteed since
an OS might kill the app and neglect to invoke
this method.
 However, most OS’s will invoke this method
before completely closing the app. Since
stop() will be invoked first its far better to
write code there.
Codename One Settings
 Just right click your Codename One project
icon in any IDE, select Codename One →
Codename One Settings.
 There are many options within this UI that
control almost every aspect of the application
from signing to basic settings.
Codename One Settings
Sending A Build
 In order to get a native application for the
devices you need to send a build to the build
server.
 For that purpose you will need to signup
at https://www.codenameone.com/
Sending A Build
 Once you
signed up
you can
right click
the project
and select
one of the
build target
options and
a build will
be sent to
the servers.
Sending A Build
 Desktop & JavaScript builds are for high grade
paying subscriptions.
Sending A Build
Once the build is sent successfully you can get the result
at https://www.codenameone.com/build-server.html
Sending A Build
 Older builds are cleared within 3 days from
the build servers.
Themes, Styles,
Components & Layouts
 What Is A Theme?
 What Is A Style?
 What Is a Component?
What is a Component?
 Every visual element within Codename One is
a Component, the button on the screen is a
Component and so is the Form in which it’s
placed.
 Every component has 4 standard style objects
associated with it: Selected, Unselected,
Disabled & Pressed.
What is a Theme?
 A theme allows the designer to define the
styles externally via a set of UIID’s (User
Interface ID’s), the themes are created via the
Codename One Designer tool and allow
developers to separate the look of the
component from the application logic.
Component/Container Hierarchy
 The component class is the basis of all UI widgets in
Codename One, to arrange multiple components together we
use the Container class which itself “IS A” Component
subclass.
Layout Managers
 Layout managers are installed on the
Container class and effectively position the
Components within the given container.
Flow Layout
Flow layout can be used to just let the
components “flow” horizontally and break a
line when reaching the edge of the container.
It is the default layout manager for containers.
Form hi = new Form("Flow Layout", new
FlowLayout());
hi.add(new Label("First")).
add(new Label("Second")).
add(new Label("Third")).
add(new Label("Fourth")).
add(new Label("Fifth"));
hi.show();
Flow Layout
Flow layout aligned to the center
Flow layout can be aligned to the
left (the default), to the center, or
to the right. It can also be
vertically aligned to the top (the
default), middle (center), or
bottom.
Flow Layout
Flow layout aligned to the right
Flow Layout
Flow layout aligned to the center
horizontally & the middle vertically
Box Layout
You can create a box layout Y using
something like this:
Form hi = new Form("Box Y Layout", new
BoxLayout(BoxLayout.Y_AXIS));
hi.add(new Label("First"))
. add(new Label("Second"))
. add(new Label("Third"))
. add(new Label("Fourth"))
. add(new Label("Fifth"));
Box Layout
Box layout also supports a shorter terse
notation which we use here to demonstrate
the X axis box.
Container box = BoxLayout.encloseX(new
Label("First"), new Label("Second"), new
Label("Third"), new Label("Fourth"),
new Label("Fifth")));
Border Layout
Form hi = new Form("Border Layout", new
BorderLayout());
hi.add(BorderLayout.CENTER, new
Label("Center")).
add(BorderLayout.SOUTH, new
Label("South")).
add(BorderLayout.NORTH, new
Label("North")).
add(BorderLayout.EAST, new
Label("East")).
add(BorderLayout.WEST, new
Label("West"));
hi.show();
Grid Layout
Form hi = new Form("Grid Layout 2x2", new
GridLayout(2, 2));
hi.add(new Label("First"))
. add(new Label("Second"))
. add(new Label("Third"))
. add(new Label("Fourth"))
. add(new Label("Fifth"));
Table Layout
Unlike grid layout table layout won’t
implicitly add a row if the row/column
count is incorrect
Form hi = new Form("Table Layout 2x2",
new TableLayout(2, 2));
hi.add(new Label("First"))
. add(new Label("Second"))
. add(new Label("Third"))
. add(new Label("Fourth"))
. add(new Label("Fifth"));
hi.show();
Layered Layout
The Layered Layout places the components
in order one on top of the other.
An “x” button to allow removing the
component.
The layered pane is used internally by
components such as InteractionDialog,
Auto Complete etc.
GUI Builder
 The GUI builder allows us to arrange
components visually within a UI using drag &
drop,property sheets etc.
 With the GUI builder we can create elaborate,
rich UI’s without writing the layout code.
GUI Builder
 The new GUI builder is still in beta state at this
time, it shouldn’t be confused with the old
GUI builder that is a part of the Codename
One designer tool
Old GUI Builder
New GUI Builder
Hello World – GUI Builder in
NetBeans
 Following are the instructions for creating a
form and launching the GUI builder.
 In NetBeans you need to follow these 4 steps:
Hello World – GUI Builder in
NetBeans
Right click the package select New → Other
Hello World – GUI Builder in
NetBeans
In the Codename One section select the GUI builder form
Hello World – GUI Builder in
NetBeans
Type in the name of the form and click finish, you can change the type to be a
Container or Dialog
Hello World – GUI Builder in
NetBeans
Launch the GUI builder thru the right click menu on
the newly created file
Hello World – GUI Builder in
NetBeans- Basic Usage
The GUI builder is controlled via it’s main toolbar, notice that your
changes will only be applied when you click the Save button on
the right.
Hello World – GUI Builder in
NetBeans- Basic Usage
The sidebar options
Hello World – GUI Builder in
NetBeans- Basic Usage
You can drag any component you want from the
sidebar to the main UI
Hello World – GUI Builder in
NetBeans- Basic Usage
Properties allow you to customize everything about a
component
Hello World – GUI Builder in
NetBeans-Events
When a component supports broadcasting
events you can bind such events by selecting it,
then selecting the events tab and clicking the
button matching the event type.
Once an event is bound the IDE will open to the
event code e.g.:
public void
onButton_1ActionEvent(com.codename1.ui.even
ts.ActionEvent ev) { }
Hello World – GUI Builder in
NetBeans-Layouts
Layouts can be picked via the GUI builder UI
Hello World – GUI Builder in
NetBeans-Underlying XML
 Saving the project generates an XML file
representing the UI into the res directory in
the project.
 The GUI file is created in a matching hierarchy
in the project under the res/guibuilder
directory:
Hello World – GUI Builder in
NetBeans-Underlying XML
 The Components Of Codename One
Form
 Form is the top-level container of Codename One.
 Form derives from Container and is the element we
“show”.
 Only one form can be visible at any given time. We can
get the currently visible Form using the code:
 Form currentForm = Display.getInstance().getCurrent();
Form
Form layout graphic
Form
 Every Form has space allocated for the title
area.
 If you don’t set the title it won’t show up (its
size will be zero), but it will still be there.
Dialog
 A Dialog is a special kind of Form that can occupy only a
portion of the screen.
 It also has the additional functionality of the modal show
method.
 When showing a dialog we have two basic options:
modeless and modal.
 Modal dialogs (the default) block the current EDT(Event
Dispatch Thread) thread until the dialog is dismissed.
Dialog
 A modal dialog can be expressed as such:
 Notice that during the show call above the execution
of the next line was "paused" until we got a response
from the user and once the response was returned
we could proceed directly.
Dialog
You can either ask Codename One to position
the dialog in a specific general location or
position it by spacing it (in pixels) from the 4
edges of the screen.
Dialog
 The tint color can be manipulated on the
parent form, you can set it to any AARRGGBB
value to set any color using the setTintColor
method.
Dialog
Dialog
 We can apply blur to the background of a
dialog to highlight the foreground further and
produce a very attractive effect.
Dialog
Popup Dialog
Label
 Label represents a text, icon or both.
 Label is also the base class of Button which in turn is
the base class for RadioButton & CheckBox .
 Thus the functionality of the Label class extends to all
of these components.
 Label allows only a single line of text, line breaking is a
very expensive operation on mobile devices and so the
Label class doesn’t support it.
Label
Label text can be positioned in one of 4
locations as such
TextField & TextArea
 The TextField class derives from the TextArea
class, and both are used for text input in
Codename One.
 TextArea defaults to multi-line input.
 TextField defaults to single line input.
TextField & TextArea
 The main differences between TextField and TextArea
are:
 Blinking cursor is rendered on TextField only.
 DataChangeListener is only available in TextField. This
is crucial for character by character input event
tracking
 Done listener is only available in the TextField
TextField & TextArea
Button
 Button is a subclass of Label and as a result it
inherits all of its functionality, specifically icon
placement, tickering, etc.
CheckBox/RadioButton
ComponentGroup
This allows us to create a button bar effect
MultiButton
 MultiButton is a composite component (lead
component) that acts like a versatile Button.
 It supports up to 4 lines of text, an emblem and
an icon.
 MultiButton can be used as a button, a CheckBox
or a RadioButton for creating rich UI’s.
MultiButton
Multiple usage scenarios for the MultiButton
SpanButton
 SpanButton is a composite component (lead
component) that looks/acts like a Button but
can break lines rather than crop them when
the text is very long.
SpanButton
SpanButton is slower than both Button and MultiButton. Use it only
when there is a genuine need for its functionality.
SpanLabel
 SpanLabel is a composite component (lead
component) that looks/acts like a Label but
can break lines rather than crop them when
the text is very long.
 SpanLabel uses the TextArea internally to
break lines
SpanLabel
SpanLabel is significantly slower
than Label. Use it only when there
is a genuine need for its
functionality.
OnOffSwitch
 The OnOffSwitch allows you to write an
application where the user can swipe a switch
between two states (on/off).
 This is a common UI paradigm in Android and
iOS,although it’s implemented in a radically
different way in both platforms.
OnOffSwitch
The OnOffSwitch component
as it appears on/off on
iOS (top) and on Android
(bottom)
Validation
 You can enable validation thru the Validator class
to add constraints for a specific component.
 A Constraint is an interface that represents
validation requirements.
 You can define a constraint in Java or use some of
the builtin constraints such as LengthConstraint,
RegexConstraint, etc.
Validation
Validation
InfiniteProgress
 The InfiniteProgress indicator spins an image
infinitely to indicate that a background process is
still working.
 InfiniteProgress can also appear over the entire
screen, thus blocking all input.
 This tints the background while the infinite
progress rotates.
InfiniteProgress
InfiniteProgress
MultiList
MultiList
ComboBox
 The ComboBox is a specialization of List that
displays a single selected entry.
 When clicking that entry a popup is presented
allowing the user to pick an entry from the full
list of entries.
ComboBox
ComboBox
Slider
 A Slider is an empty component that can be
filled horizontally or vertically to allow
indicating progress, setting volume etc.
Table
Table
Tree
 Tree allows displaying hierarchical data such
as folders and files in a collapsible/expandable
UI.
ShareButton
 ShareButton is a button you can add into the UI
to let a user share an image or block of text.
 The ShareButton uses a set of predefined share
options on the simulator.
 On Android & iOS the ShareButton is mapped to
the OS native sharing functionality and can share
the image/text with the services configured on
the device (e.g. Twitter,Facebook etc.).
ShareButton
ShareButton behaves very
differently on the device…
The share button running on the
simulator
ShareButton
The share button running on the Android device and screenshot sent
into twitter
Tabs
 The Tabs Container arranges components into
groups within "tabbed" containers.
 The tabs can be placed in multiple different
ways (top, bottom, left or right) with the
default being determined by the platform.
Tabs
Tabs
ImageViewer
 The ImageViewer allows us to inspect, zoom
and pan into an image.
 It also allows swiping between images if you
have a set of images (using an image list
model).
ImageViewer
Toolbar
 The Toolbar API provides deep customization
of the title bar area with more flexibility e.g.
placing a TextField for search or buttons in
arbitrary title area positions.
 The Toolbar needs to be installed into the
Form in order for it to work.
Toolbar
 You can setup the Toolbar in one of these three ways:
 form.setToolbar(new Toolbar()); - allows you to activate
the Toolbar to a specific Form and not for the entire
application
 Toolbar.setGlobalToolbar(true); - enables the Toolbar
for all the forms in the app
 Theme constant globalToobarBool - this is equivalent
to Toolbar.setGlobalToolbar(true);
Toolbar
 The basic functionality of the Toolbar includes
the ability to add a command to the following
4 places.
Toolbar
 Left side of the title – addCommandToLeftBar
 Right side of the title – addCommandToRightBar
 Side menu bar (the drawer that opens when you click
the icon on the top left or swipe the screen from left to
right) – addCommandToSideMenu
 Overflow menu (the menu that opens when you tap
the 3 vertical dots in the top right corner) -
addCommandToOverflowMenu
Toolbar
Toolbar
The default sidemenu of the Toolbar
Toolbar
The overflow menu of the Toolbar
Toolbar
 Normally you can just set a title with a String
but if you would want the component to be a
text field or a multi line label you can use
setTitleComponent(Component) which allows
you to install any component into the title
area.
Toolbar
Toolbar
BrowserComponent &
WebBrowser
 The WebBrowser component shows the native
device web browser when supported by the
device.
 If you only intend to target smartphones you
should use the BrowserComponent directly
instead of the WebBrowser .
BrowserComponent
BrowserComponent
 At the core of the BrowserComponent we have the
BrowserNavigationCallback.
 It might not seem like the most important interface within
the browser but it is the "glue” that allows the JavaScript
code to communicate back into the Java layer.
 You can bind a BrowserNavigationCallback by invoking
setBrowserNavigationCallback on the BrowserComponent.
 At that point with every navigation within the browser the
callback will get invoked.
BrowserComponent
BrowserComponent
 BrowserComponent can communicate with
the HTML code using JavaScript calls.
 E.g. we can create HTML like this:
BrowserComponent
BrowserComponent
We use the execute method
above to execute custom
JavaScript code.
We also have an
executeAndReturnString method
that allows us to receive a
response value from the
JavaScript side.
BrowserComponent
 We can access JavaScript variables easily from the
context by using code like this:
BrowserComponent
 Notice that when you work with numeric values
or anything related to the types mentioned above
your code must be aware of the typing. E.g. in
this case the type is Double and not String:
 Double outerWidth =
(Double)ctx.get("window.outerWidth");
 JSObject jo = (JSObject)ctx.get("window");
AutoCompleteTextField
 The AutoCompleteTextField allows us to write
text into a text field and select a completion
entry from the list in a similar way to a search
engine.
AutoCompleteTextField
Picker
 There are 4 types of pickers:
 Time
 Date & Time
 Date
 Strings
Picker
Picker
Date picker String Picker TimePicker
MapComponent
 The MapComponent uses the OpenStreetMap
webservice by default to display a navigatable map.
Calendar
 The Calendar class allows us to display a traditional
calendar picker
ToastBar
 The ToastBar class allows us to display none-
obtrusive status messages to the user at the
bottom of the screen.
 This is useful for such things as informing the
user of a long-running task (like downloading
a file in the background), or popping up an
error message that doesn’t require a response
from the user.
ToastBar
We can automatically clear a status
message/progress after a timeout using the
setExpires method .
status.setExpires(3000); // only show the
status for 3 seconds, then have
it automatically clear
Accordion
 The Accordion displays collapsible content panels.
Accordion
Floating Button
 The floating action button is a powerful tool
for promoting an action within your
application.
 FloatingActionButton is a round button that
resides on top of the UI typically in the bottom
right hand side.
Floating Button
Floating Button
 The EDT - Event Dispatch Thread
 What Is The EDT?
EDT
 Codename One allows developers to create as
many threads as they want; however in order to
interact with the Codename One user interface
components a developer must use the EDT.
 Normally, every call you receive from Codename
One will occur on the EDT. E.g. Every event, calls
to paint(), lifecycle calls (start etc.) should all
occur on the EDT.
EDT
 Codename One assumes all modifications to
the UI are performed on the EDT but if we
spawned a separate thread. How do we force
our modifications back into the EDT?
EDT
 Codename One includes 3 methods in the
Display class to help in these situations:
isEDT() , callSerially(Runnable ) &
callSeriallyAndWait(Runnable) .
 isEDT() is useful for generic code that needs to
test whether the current code isexecuting on
the EDT.
Call Serially (And Wait)
 callSerially(Runnable) should normally be
called off the EDT (in a separate thread), the
run method within the submitted runnable
will be invoked on the EDT.
Call Serially (And Wait)
 The callSeriallyAndWait(Runnable) method
blocks the current thread until the method
completes, this is useful for cases such as user
notification e.g.:
Call Serially (And Wait)
Invoke And Block
 Invoke and block is the exact opposite of
callSeriallyAndWait() , it blocks the EDT and
opens a separate thread for the runnable call.
 This is best explained by an example. When
we write typical code in Java we like that code
is in sequence as such:
Invoke And Block
Notice that the first and last operations must be
conducted on the EDT but the middle operation might be
really slow!
Since updateUIWithContentOfFile needs
readAndParseFile to occur before it starts doing the new
thread won’t be enough.
InvokeAndBlock
 A simplistic approach is to do something like
this:
InvokeAndBlock
 But updateUIWithContentOfFile should be
executed on the EDT and not on a random
thread. So the right way to do this would be
something like this:
InvokeAndBlock
InvokeAndBlock
 Invoke and block solves this in a unique way
you can get almost the exact same behavior
by using this:
InvokeAndBlock
 Invoke and block effectively blocks the current
EDT in a legal way.
 It spawns a separate thread that runs the
run() method and when that run method
completes it goes back to the EDT.
 Advanced Topics
Sending Arguments To The Build
Server
 When sending a build to the server we can
provide additional parameters to the build,
which are incorporated into the build process
on the server to "hint" on multiple different
build time options.
Sending Arguments To The Build
Server
 These hints are often referred to as "build
hints" or "build arguments", they are
effectively very much like souped up compiler
flags that you can use to tune the build
server’s behavior.
 This is useful for fast iteration on new
functionality without building plugin UI for
every change
Sending Arguments To The Build
Server
 You can set these hints by right clicking the
project in the IDE and selecting Codename
One → Codename One Settings → Build Hints.
The hints use the key=value style of data.
Sending Arguments To The Build
Server
Sending Arguments To The Build
Server
 Here is the current list of supported
arguments
 android.debug : true/false defaults to true –
indicates whether to include the debug
version in the build
Sending Arguments To The Build
Server
 android.release : true/false defaults to true –
indicates whether to include the release
version in the build
 ios.plistInject : entries to inject into the iOS
plist file during build.
Sending Arguments To The Build
Server
 android.statusbar_hidden : true/false defaults
to false. When set to true hides the status bar
on Android devices.
 android.min_sdk_version : The minimum SDK
required to run this app, the default value
changes based on functionality but can be as
low as 7
Sending Arguments To The Build
Server
 gcm.sender_id : The Android/chrome push
identifier
 javascript.minifying : true/false (defaults to
true ). By default the javascript code is
minified to reduce file size.
Offline Build
 Offline build is an enterprise feature
 Codename One supports iOS & Android
targets for offline builds
 Why only Enterprise?
Offline Build
 The support effort for offline builds is huge, as
evidence despite the fact that all of our code
is open source very few people bothered
trying to compile it because of the
complexities.
 However, some government and regulated
industries have issues with SaaS delivered
solutions and thus must use offline build.
Offline Build - Prerequisites for iOS
Builds
 You need the following installed tools/versions
for Codename One’s offline build process:
 Mac ideally with El Capitan, newer should work
 Xcode 7+ (but not 8+ at this time)
 Oracle’s JDK 8
 Cocoapods
 xcodeproj
Offline Build - Prerequisites for
Android Builds
 Android builds need the following:
 Android Studio
 Oracle’s JDK 8
 Gradle version 2.11
Offline Build - Installation
 To build offline you need to install the offline
builder code.
 To install an offline builder open the
Codename One Settings UI by right clicking
the project and selecting Codename One →
Codename One Settings.
Offline Build - Installation
 Once the Codename One settings UI launches select the
Offline Builds entry:
Offline Build - Installation
 This should launch the settings UI which
would be blank the first time around:
Offline Build - Building
 Offline building is almost like building with the cloud. In the right click
menu you can select one of the offline build targets as such:
Offline Build - Building
 Once selected build generates a project under
the build/and or build/iphone respectively.
 Open these directories in Android Studio or
xcode to run/build in the native IDE to the
device or native emulator/simulator.
Android Permissions
 The build server automatically introspects the
classes sent to it as part of the build and injects
the right set of permissions required by the app.
 However, sometimes developers might find the
permissions that come up a bit confusing and
might not understand why a specific permission
came up. This maps Android permissions to the
methods/classes in Codename One that would
trigger them.
Android Permissions
 android.permission.WRITE_EXTERNAL_STORAGE -
this permission appears by default for Codename
One applications, since the FileSystemStorage API
might have some dependencies on it.
 You can explicitly disable it using the build hint
android.blockExternalStoragePermission=true
Android Permissions
 android.permission.INTERNET - this is a hardcoded
permission in Codename One, the ability to connect to
the network is coded into all Codename One
applications.
 android.permission.WAKE_LOCK - is triggered by
Display.lockScreen() & Display.setScreenSaverEnabled()
 android.permission.WRITE_CONTACTS - is triggered by
Display.createContact()
Android Permissions
 You can customize permission text via the
Display properties e.g. to customize the text of
the contacts permission we can do something
such as:
 Native Interfaces
Native Interfaces
 Sometimes you may wish to use an API that is
unsupported by Codename One or integrate
with a 3rd party library/framework that isn’t
supported.
 These are achievable tasks when writing
native code and Codename One lets you
encapsulate such native code using native
interfaces.
Native Interfaces
Native Interfaces
 We now need to right click the class in the IDE and select the Generate
Native Access menu item:
We can now look int the native directory in
the project root (in NetBeans you can see
that in the Files tab) and you can see
something that looks like this:
Native Interfaces
These are effectively stubs you can edit to
implement the methods in native code.
Native Interfaces
 From the Codename One Java code we can
call the implementation of this native
interface using:
Native Interfaces
Notice that we are using the
Android native android.util.Log
class which
isn’t accessible from standard
Codename One code
Native Interfaces
 When generating the Objective-C code the "Generate
Native Sources" tool produces two files:
 com_mycompany_myapp_MyNativeImpl.h
 com_mycompany_myapp_MyNativeImpl.m
 The .m files are the Objective-C equivalent of .c files
 .h files contain the header/include information.
Native Interfaces
com_mycompany_myapp_MyNativeImpl.h
Native Interfaces
com_mycompany_myapp_MyNativeImpl.m
Compare Codename One
 Its often an Apples == Oranges comparison
since Codename One is so different from
everything else...
Codename One Benefits:
 Java based:
 Love it or hate it Java is still king of the hill.
With 9-10 million active Java developers and a
permanent spot as one of the top
programming languages.
Codename One Benefits:
 Fast:
 Codename One translates all the code to
native code resulting in performance that
matches the performance of native code.
Codename One Benefits:
 Easy to use:
 Developers can use the rich tools available for Java
developers such as Eclipse/NetBeans to work with the
code.
 Codename One has its own GUI builder and many
niceties to track issues in your code.
 The biggest benefit though is in the build server which
generates a native application for you without having
to deal with all of the complexities of building a native
app for every platform.
Codename One Benefits:
 Portable – WORA:
 Due to its unique lightweight architecture
Codename One boast greater portability than
HTML5 and more supported devices! Thanks
to its unique cloud build system it doesn't
require any native toolchain or dedicated
hardware.
Xamarin vs CodenameOne
 Codename One differs from Xamarin in the
following ways:
 Doesn't need a Mac for iOS development
 WORA (Write Once Run Anywhere) - Xamarin has
some portability libraries mostly for IO etc. but it
isn't designed to be a WORA solution. Developers
need to learn platform native API's and behaviors
for every platform.
Xamarin vs CodenameOne
 Java - Xamarin is a C# solution. This is a matter
of developer preferences although Java has
the advantage of being the language of
Android.
 GUI Builder - Since Xamarin isn't a WORA
solution the GUI isn't portable, thus
localization, branding and all resources need
to be adapted to every platform.
Xamarin vs CodenameOne
 IDE - Xamarin has its own IDE or Visual Studio
from Microsoft. Codename One works with all
major Java IDE's NetBeans, Eclipse & IDEA.
 Open Source - Xamarin has a free version with
very limiting stipulations and isn't open
source. Codename One's free version is far
more generous. Codename One is open
source!
React Native vs CodenameOne
 React native isn't a WORA solution
 React Native requires a Mac for iOS development and a
complex toolchain for every platform
 React abstracts everything behind callbacks reducing code
size but making the behavior and flow more opaque
 JavaScript is a fragile language and the practice of working
outside of an IDE is inferior as projects grow in size
Thank you for listening...

Codename one

  • 1.
    06.06.2017 Recep Düzdemir |SMG Web And Mobile
  • 2.
     Codename Oneis a set of tools for mobile application development that derive a great deal of its architecture from Java.
  • 3.
    Codename One’s MissionStatement  Unify the complex and fragmented task of mobile device programming into a single set of tools, APIs & services. As a result create a more manageable approach to mobile application development without sacrificing the power/control given to developers.
  • 4.
     This effectivelymeans bringing that old "Write Once Run Anywhere" (WORA) Java mantra to mobile devices.
  • 5.
    Is Codename OneFree?  Codename One has a free version and paid versions.  The base product is open source but build system requires servers and CodenameOne place a quota on their usage to prevent overuse.
  • 6.
    Is Codename OneFree?  With the free version you are limited to 100 build credits per month.  1 credit is the equivalent of 1 build with the exception of iOS where 8 credits equal 1 build to offset the higher costs of Mac servers.
  • 7.
    How Does CodenameOne Work? Codename One unifies several technologies and concepts into a single facade: • API - abstracts the differences between the various devices. • Plugin - the only piece of software installed on client machines, it includes the following features:  IDE integration - preferences, completion, the ability to send a native build  Simulator - native device simulator that runs locally and allows debugging the application  Designer/GUI Builder - high level tools
  • 8.
    How Does CodenameOne Work? • Build Servers - The build servers accept native device builds sent by the plugin and convert the binaries (JAR’s, not sources) to native applications.
  • 9.
    The Codename Onetool-chain
  • 10.
    Why Build Servers? The build servers allow building native iOS Apps without a Mac and native Windows apps without a Windows machine.  They remove the need to install/update complex toolchains and simplify the process of building a native app to a right click.
  • 11.
    Why Build Servers? E.g.: Since building native iOS applications requires a Mac OS X machine with a recent version of xcode Codename One maintains such machines in the cloud.  When developers send an iOS build such a Mac will be used to generate C source code using ParparVM and it will then compile the C source code using xcode & sign the resulting binary using xcode.
  • 12.
    Why Build Servers? You can install the binary to your device or build a distribution binary for the appstore.  Since C code is generated it also means that your app will be "future proof" in a case of changes from Apple.  You can also inject Objective-C native code into the app while keeping it 100% portable thanks to the "native interfaces" capability of Codename One.
  • 13.
    Why Build Servers? Subscribers can receive the C source code back using the include sources feature of Codename One and use those sources for benchmarking, debugging on devices etc.
  • 14.
    Why Build Servers? Java 8 syntax is supported thru retrolambda installed on the Codename One servers.  This is used to convert bytecode seamlessly down to Java 5 syntax levels.  Notice that this architecture is transparent to developers as the build servers abstract most of the painful differences between devices.
  • 15.
    Why ParparVM  OniOS, Codename One uses ParparVM which translates Java bytecode to C code and boasts a non-blocking GC as well as 64 bit/bitcode support.  This VM is fully open source in the Codename One git repository.
  • 16.
    Why ParparVM  Inthe past Codename One used XMLVM to generate native code in a very similar way but the XMLVM solution was too generic for the needs of Codename One.
  • 17.
    Why ParparVM  ParparVMboasts a unique architecture of translating code to C (similarly to XMLVM), because of that Codename One is the only solution of its kind that can guarantee future iOS compatibility.
  • 18.
    Why ParparVM  Thekey advantages of ParparVM over other approaches are:  Truly native - since code is translated to C the app is "more native".  Concurrent GC that doesn't block the current execution thread
  • 19.
    Why ParparVM  Smallerclass library - ParparVM includes a very small segment of the full JavaAPI’s resulting in final binaries. This maps directly to performance and memory overhead.
  • 20.
    Why ParparVM  Simple& extensible - to work with ParparVM you only need a basic understanding of C. This is important for the fast moving world of mobile development, as Apple changes things left and right we need a more agile VM.
  • 21.
    Windows Phone/UWP  Theold Windows Phone port was deprecated and is no longer supported, the UWP port is the main focus.  Codename One now targets UWP by leveraging a modified version of iKVM to build native Windows Universal Applications.  iKVM uses a bytecode to CLR translation process that effectively converts Java bytecode directly to the .net equivalent. This is paired with a port of the Codename One API’s that was built for the UWP environment.
  • 22.
    JavaScript Port  TheJavaScript port of Codename One is based on the amazing work of the TeaVM project.  The team behind TeaVM effectively built a JVM that translates Java bytecode into JavaScript source code while maintaining threading semantics using a very imaginative approach.
  • 23.
    JavaScript Port  TheJavaScript port allows Codename One applications to run within a desktop or mobile browser.  The JavaScript port is only available for Enterprise grade subscribers of Codename One.
  • 24.
    Lightweight Components  CodenameOne uses a "lightweight architecture" thus allowing the UI to work seamlessly across all platforms.  As a result most of the UI is developed in Java and is thus remarkably portable and debuggable.
  • 25.
    Lightweight Components  ALightweight component is a component that is written entirely in Java, it draws its own interface and handles its own events/states.  This has huge portability advantages since the same code executes on all platforms.
  • 26.
    Lightweight Components  Lightweightcomponents are infinitely customizable by using standard inheritance and overriding paint/event handling.  Since a lightweight component is written entirely in Java, developers can preview the application accurately in the simulators & GUI builder.
  • 27.
    History  Codename Onewas started by Chen Fishbein & Shai Almog who authored the Open Source LWUIT project at Sun Microsystems starting at 2007.  The LWUIT project aimed at solving the fragmentation within J2ME/Blackberry devices by creating a higher standard of user interface than the common baseline at the time.
  • 28.
    History  LWUIT usedby several companies including Nokia, it was used as the base standard for DTV in Brazil, Toyota.  LWUIT later adapted Codename One as well.  In 2012 Shai & Chen formed Codename One as they left Oracle
  • 29.
    Installing Codename OneIn NetBeans  Select the Tools→Plugins menu option  Select the Available Plugins Tab  Check The CodenameOne Plugin
  • 30.
  • 31.
    Installing Codename OneIn Eclipse  Startup Eclipse and click Help→`Install New Software`.
  • 32.
    Installing Codename OneIn Eclipse  Click the Add button on the right side & fill out the entries.  Enter Codename One for the name and https://www.codenameone.com/files/eclipse/sit e.xml for the location.
  • 33.
  • 34.
  • 35.
  • 36.
    Setting a properpackage name A good package name in a project is crucial and very hard/impossible to change after the fact. App stores recognize your app based on its package name so if you would want/need to change that in the future this might become impossible.
  • 37.
  • 38.
    Default project structure There are two important files that are generated: SuperDuperApp.java - your main java source file, this is where your app starts/stops and handles system notifications (e.g push). theme.res - the theme file contains the application styling, localization, images etc.
  • 39.
    Default project structure Whenwe double click the theme.res file it opens in the Codename One designer tool. We can then edit the styles of any element within the theme.
  • 40.
    The Default HelloWorld Codename One App To run the application just press the IDE’s play button.
  • 41.
    The Source CodeOf The Hello World App  The main class doesn’t implement any interface or extend a base class, however the Codename One runtime expects it to have these 4 methods and maintain the method signatures. public class SuperDuperApp { private Form current; private Resources theme; public void init(Object context) { } public void start() { } public void stop() { } public void destroy() { } }
  • 42.
    The Source CodeOf The Hello World App  init(Object) - invoked when the application is started but not when its restored from the background. E.g. if the app isn’t running, init will be invoked. However, if the app was minimized and is then restored init will not be invoked.
  • 43.
    The Source CodeOf The Hello World App  start() - the start method is invoked with every launch of the app.  This includes restoring a minimized application.  This is very useful for initializing UI’s which usually need to be refreshed both when the user launches the app and when he returns to it after leaving it in the background for any duration.
  • 44.
    The Source CodeOf The Hello World App  stop() - stop is invoked when the user minimizes the app.  If you have ongoing operations (e.g. download/media) you should stop them here or the operating system might kill your application due to CPU usage in the background.
  • 45.
    The Source CodeOf The Hello World App  destroy() - this callback isn’t guaranteed since an OS might kill the app and neglect to invoke this method.  However, most OS’s will invoke this method before completely closing the app. Since stop() will be invoked first its far better to write code there.
  • 46.
    Codename One Settings Just right click your Codename One project icon in any IDE, select Codename One → Codename One Settings.  There are many options within this UI that control almost every aspect of the application from signing to basic settings.
  • 47.
  • 48.
    Sending A Build In order to get a native application for the devices you need to send a build to the build server.  For that purpose you will need to signup at https://www.codenameone.com/
  • 49.
    Sending A Build Once you signed up you can right click the project and select one of the build target options and a build will be sent to the servers.
  • 50.
    Sending A Build Desktop & JavaScript builds are for high grade paying subscriptions.
  • 51.
    Sending A Build Oncethe build is sent successfully you can get the result at https://www.codenameone.com/build-server.html
  • 52.
    Sending A Build Older builds are cleared within 3 days from the build servers.
  • 53.
    Themes, Styles, Components &Layouts  What Is A Theme?  What Is A Style?  What Is a Component?
  • 54.
    What is aComponent?  Every visual element within Codename One is a Component, the button on the screen is a Component and so is the Form in which it’s placed.  Every component has 4 standard style objects associated with it: Selected, Unselected, Disabled & Pressed.
  • 55.
    What is aTheme?  A theme allows the designer to define the styles externally via a set of UIID’s (User Interface ID’s), the themes are created via the Codename One Designer tool and allow developers to separate the look of the component from the application logic.
  • 56.
    Component/Container Hierarchy  Thecomponent class is the basis of all UI widgets in Codename One, to arrange multiple components together we use the Container class which itself “IS A” Component subclass.
  • 57.
    Layout Managers  Layoutmanagers are installed on the Container class and effectively position the Components within the given container.
  • 58.
    Flow Layout Flow layoutcan be used to just let the components “flow” horizontally and break a line when reaching the edge of the container. It is the default layout manager for containers. Form hi = new Form("Flow Layout", new FlowLayout()); hi.add(new Label("First")). add(new Label("Second")). add(new Label("Third")). add(new Label("Fourth")). add(new Label("Fifth")); hi.show();
  • 59.
    Flow Layout Flow layoutaligned to the center Flow layout can be aligned to the left (the default), to the center, or to the right. It can also be vertically aligned to the top (the default), middle (center), or bottom.
  • 60.
    Flow Layout Flow layoutaligned to the right
  • 61.
    Flow Layout Flow layoutaligned to the center horizontally & the middle vertically
  • 62.
    Box Layout You cancreate a box layout Y using something like this: Form hi = new Form("Box Y Layout", new BoxLayout(BoxLayout.Y_AXIS)); hi.add(new Label("First")) . add(new Label("Second")) . add(new Label("Third")) . add(new Label("Fourth")) . add(new Label("Fifth"));
  • 63.
    Box Layout Box layoutalso supports a shorter terse notation which we use here to demonstrate the X axis box. Container box = BoxLayout.encloseX(new Label("First"), new Label("Second"), new Label("Third"), new Label("Fourth"), new Label("Fifth")));
  • 64.
    Border Layout Form hi= new Form("Border Layout", new BorderLayout()); hi.add(BorderLayout.CENTER, new Label("Center")). add(BorderLayout.SOUTH, new Label("South")). add(BorderLayout.NORTH, new Label("North")). add(BorderLayout.EAST, new Label("East")). add(BorderLayout.WEST, new Label("West")); hi.show();
  • 65.
    Grid Layout Form hi= new Form("Grid Layout 2x2", new GridLayout(2, 2)); hi.add(new Label("First")) . add(new Label("Second")) . add(new Label("Third")) . add(new Label("Fourth")) . add(new Label("Fifth"));
  • 66.
    Table Layout Unlike gridlayout table layout won’t implicitly add a row if the row/column count is incorrect Form hi = new Form("Table Layout 2x2", new TableLayout(2, 2)); hi.add(new Label("First")) . add(new Label("Second")) . add(new Label("Third")) . add(new Label("Fourth")) . add(new Label("Fifth")); hi.show();
  • 67.
    Layered Layout The LayeredLayout places the components in order one on top of the other. An “x” button to allow removing the component. The layered pane is used internally by components such as InteractionDialog, Auto Complete etc.
  • 68.
    GUI Builder  TheGUI builder allows us to arrange components visually within a UI using drag & drop,property sheets etc.  With the GUI builder we can create elaborate, rich UI’s without writing the layout code.
  • 69.
    GUI Builder  Thenew GUI builder is still in beta state at this time, it shouldn’t be confused with the old GUI builder that is a part of the Codename One designer tool
  • 70.
  • 71.
  • 72.
    Hello World –GUI Builder in NetBeans  Following are the instructions for creating a form and launching the GUI builder.  In NetBeans you need to follow these 4 steps:
  • 73.
    Hello World –GUI Builder in NetBeans Right click the package select New → Other
  • 74.
    Hello World –GUI Builder in NetBeans In the Codename One section select the GUI builder form
  • 75.
    Hello World –GUI Builder in NetBeans Type in the name of the form and click finish, you can change the type to be a Container or Dialog
  • 76.
    Hello World –GUI Builder in NetBeans Launch the GUI builder thru the right click menu on the newly created file
  • 77.
    Hello World –GUI Builder in NetBeans- Basic Usage The GUI builder is controlled via it’s main toolbar, notice that your changes will only be applied when you click the Save button on the right.
  • 78.
    Hello World –GUI Builder in NetBeans- Basic Usage The sidebar options
  • 79.
    Hello World –GUI Builder in NetBeans- Basic Usage You can drag any component you want from the sidebar to the main UI
  • 80.
    Hello World –GUI Builder in NetBeans- Basic Usage Properties allow you to customize everything about a component
  • 81.
    Hello World –GUI Builder in NetBeans-Events When a component supports broadcasting events you can bind such events by selecting it, then selecting the events tab and clicking the button matching the event type. Once an event is bound the IDE will open to the event code e.g.: public void onButton_1ActionEvent(com.codename1.ui.even ts.ActionEvent ev) { }
  • 82.
    Hello World –GUI Builder in NetBeans-Layouts Layouts can be picked via the GUI builder UI
  • 83.
    Hello World –GUI Builder in NetBeans-Underlying XML  Saving the project generates an XML file representing the UI into the res directory in the project.  The GUI file is created in a matching hierarchy in the project under the res/guibuilder directory:
  • 84.
    Hello World –GUI Builder in NetBeans-Underlying XML
  • 85.
     The ComponentsOf Codename One
  • 86.
    Form  Form isthe top-level container of Codename One.  Form derives from Container and is the element we “show”.  Only one form can be visible at any given time. We can get the currently visible Form using the code:  Form currentForm = Display.getInstance().getCurrent();
  • 87.
  • 88.
    Form  Every Formhas space allocated for the title area.  If you don’t set the title it won’t show up (its size will be zero), but it will still be there.
  • 89.
    Dialog  A Dialogis a special kind of Form that can occupy only a portion of the screen.  It also has the additional functionality of the modal show method.  When showing a dialog we have two basic options: modeless and modal.  Modal dialogs (the default) block the current EDT(Event Dispatch Thread) thread until the dialog is dismissed.
  • 90.
    Dialog  A modaldialog can be expressed as such:  Notice that during the show call above the execution of the next line was "paused" until we got a response from the user and once the response was returned we could proceed directly.
  • 91.
    Dialog You can eitherask Codename One to position the dialog in a specific general location or position it by spacing it (in pixels) from the 4 edges of the screen.
  • 92.
    Dialog  The tintcolor can be manipulated on the parent form, you can set it to any AARRGGBB value to set any color using the setTintColor method.
  • 93.
  • 94.
    Dialog  We canapply blur to the background of a dialog to highlight the foreground further and produce a very attractive effect.
  • 95.
  • 96.
  • 97.
    Label  Label representsa text, icon or both.  Label is also the base class of Button which in turn is the base class for RadioButton & CheckBox .  Thus the functionality of the Label class extends to all of these components.  Label allows only a single line of text, line breaking is a very expensive operation on mobile devices and so the Label class doesn’t support it.
  • 98.
    Label Label text canbe positioned in one of 4 locations as such
  • 99.
    TextField & TextArea The TextField class derives from the TextArea class, and both are used for text input in Codename One.  TextArea defaults to multi-line input.  TextField defaults to single line input.
  • 100.
    TextField & TextArea The main differences between TextField and TextArea are:  Blinking cursor is rendered on TextField only.  DataChangeListener is only available in TextField. This is crucial for character by character input event tracking  Done listener is only available in the TextField
  • 101.
  • 102.
    Button  Button isa subclass of Label and as a result it inherits all of its functionality, specifically icon placement, tickering, etc.
  • 103.
  • 104.
    ComponentGroup This allows usto create a button bar effect
  • 105.
    MultiButton  MultiButton isa composite component (lead component) that acts like a versatile Button.  It supports up to 4 lines of text, an emblem and an icon.  MultiButton can be used as a button, a CheckBox or a RadioButton for creating rich UI’s.
  • 106.
  • 107.
    SpanButton  SpanButton isa composite component (lead component) that looks/acts like a Button but can break lines rather than crop them when the text is very long.
  • 108.
    SpanButton SpanButton is slowerthan both Button and MultiButton. Use it only when there is a genuine need for its functionality.
  • 109.
    SpanLabel  SpanLabel isa composite component (lead component) that looks/acts like a Label but can break lines rather than crop them when the text is very long.  SpanLabel uses the TextArea internally to break lines
  • 110.
    SpanLabel SpanLabel is significantlyslower than Label. Use it only when there is a genuine need for its functionality.
  • 111.
    OnOffSwitch  The OnOffSwitchallows you to write an application where the user can swipe a switch between two states (on/off).  This is a common UI paradigm in Android and iOS,although it’s implemented in a radically different way in both platforms.
  • 112.
    OnOffSwitch The OnOffSwitch component asit appears on/off on iOS (top) and on Android (bottom)
  • 113.
    Validation  You canenable validation thru the Validator class to add constraints for a specific component.  A Constraint is an interface that represents validation requirements.  You can define a constraint in Java or use some of the builtin constraints such as LengthConstraint, RegexConstraint, etc.
  • 114.
  • 115.
  • 116.
    InfiniteProgress  The InfiniteProgressindicator spins an image infinitely to indicate that a background process is still working.  InfiniteProgress can also appear over the entire screen, thus blocking all input.  This tints the background while the infinite progress rotates.
  • 117.
  • 118.
  • 119.
  • 120.
  • 121.
    ComboBox  The ComboBoxis a specialization of List that displays a single selected entry.  When clicking that entry a popup is presented allowing the user to pick an entry from the full list of entries.
  • 122.
  • 123.
  • 124.
    Slider  A Slideris an empty component that can be filled horizontally or vertically to allow indicating progress, setting volume etc.
  • 125.
  • 126.
  • 127.
    Tree  Tree allowsdisplaying hierarchical data such as folders and files in a collapsible/expandable UI.
  • 128.
    ShareButton  ShareButton isa button you can add into the UI to let a user share an image or block of text.  The ShareButton uses a set of predefined share options on the simulator.  On Android & iOS the ShareButton is mapped to the OS native sharing functionality and can share the image/text with the services configured on the device (e.g. Twitter,Facebook etc.).
  • 129.
    ShareButton ShareButton behaves very differentlyon the device… The share button running on the simulator
  • 130.
    ShareButton The share buttonrunning on the Android device and screenshot sent into twitter
  • 131.
    Tabs  The TabsContainer arranges components into groups within "tabbed" containers.  The tabs can be placed in multiple different ways (top, bottom, left or right) with the default being determined by the platform.
  • 132.
  • 133.
  • 134.
    ImageViewer  The ImageViewerallows us to inspect, zoom and pan into an image.  It also allows swiping between images if you have a set of images (using an image list model).
  • 135.
  • 136.
    Toolbar  The ToolbarAPI provides deep customization of the title bar area with more flexibility e.g. placing a TextField for search or buttons in arbitrary title area positions.  The Toolbar needs to be installed into the Form in order for it to work.
  • 137.
    Toolbar  You cansetup the Toolbar in one of these three ways:  form.setToolbar(new Toolbar()); - allows you to activate the Toolbar to a specific Form and not for the entire application  Toolbar.setGlobalToolbar(true); - enables the Toolbar for all the forms in the app  Theme constant globalToobarBool - this is equivalent to Toolbar.setGlobalToolbar(true);
  • 138.
    Toolbar  The basicfunctionality of the Toolbar includes the ability to add a command to the following 4 places.
  • 139.
    Toolbar  Left sideof the title – addCommandToLeftBar  Right side of the title – addCommandToRightBar  Side menu bar (the drawer that opens when you click the icon on the top left or swipe the screen from left to right) – addCommandToSideMenu  Overflow menu (the menu that opens when you tap the 3 vertical dots in the top right corner) - addCommandToOverflowMenu
  • 140.
  • 141.
  • 142.
  • 143.
    Toolbar  Normally youcan just set a title with a String but if you would want the component to be a text field or a multi line label you can use setTitleComponent(Component) which allows you to install any component into the title area.
  • 144.
  • 145.
  • 146.
    BrowserComponent & WebBrowser  TheWebBrowser component shows the native device web browser when supported by the device.  If you only intend to target smartphones you should use the BrowserComponent directly instead of the WebBrowser .
  • 147.
  • 148.
    BrowserComponent  At thecore of the BrowserComponent we have the BrowserNavigationCallback.  It might not seem like the most important interface within the browser but it is the "glue” that allows the JavaScript code to communicate back into the Java layer.  You can bind a BrowserNavigationCallback by invoking setBrowserNavigationCallback on the BrowserComponent.  At that point with every navigation within the browser the callback will get invoked.
  • 149.
  • 150.
    BrowserComponent  BrowserComponent cancommunicate with the HTML code using JavaScript calls.  E.g. we can create HTML like this:
  • 151.
  • 152.
    BrowserComponent We use theexecute method above to execute custom JavaScript code. We also have an executeAndReturnString method that allows us to receive a response value from the JavaScript side.
  • 153.
    BrowserComponent  We canaccess JavaScript variables easily from the context by using code like this:
  • 154.
    BrowserComponent  Notice thatwhen you work with numeric values or anything related to the types mentioned above your code must be aware of the typing. E.g. in this case the type is Double and not String:  Double outerWidth = (Double)ctx.get("window.outerWidth");  JSObject jo = (JSObject)ctx.get("window");
  • 155.
    AutoCompleteTextField  The AutoCompleteTextFieldallows us to write text into a text field and select a completion entry from the list in a similar way to a search engine.
  • 156.
  • 157.
    Picker  There are4 types of pickers:  Time  Date & Time  Date  Strings
  • 158.
  • 159.
    Picker Date picker StringPicker TimePicker
  • 160.
    MapComponent  The MapComponentuses the OpenStreetMap webservice by default to display a navigatable map.
  • 161.
    Calendar  The Calendarclass allows us to display a traditional calendar picker
  • 162.
    ToastBar  The ToastBarclass allows us to display none- obtrusive status messages to the user at the bottom of the screen.  This is useful for such things as informing the user of a long-running task (like downloading a file in the background), or popping up an error message that doesn’t require a response from the user.
  • 163.
    ToastBar We can automaticallyclear a status message/progress after a timeout using the setExpires method . status.setExpires(3000); // only show the status for 3 seconds, then have it automatically clear
  • 164.
    Accordion  The Accordiondisplays collapsible content panels.
  • 165.
  • 166.
    Floating Button  Thefloating action button is a powerful tool for promoting an action within your application.  FloatingActionButton is a round button that resides on top of the UI typically in the bottom right hand side.
  • 167.
  • 168.
  • 169.
     The EDT- Event Dispatch Thread  What Is The EDT?
  • 170.
    EDT  Codename Oneallows developers to create as many threads as they want; however in order to interact with the Codename One user interface components a developer must use the EDT.  Normally, every call you receive from Codename One will occur on the EDT. E.g. Every event, calls to paint(), lifecycle calls (start etc.) should all occur on the EDT.
  • 171.
    EDT  Codename Oneassumes all modifications to the UI are performed on the EDT but if we spawned a separate thread. How do we force our modifications back into the EDT?
  • 172.
    EDT  Codename Oneincludes 3 methods in the Display class to help in these situations: isEDT() , callSerially(Runnable ) & callSeriallyAndWait(Runnable) .  isEDT() is useful for generic code that needs to test whether the current code isexecuting on the EDT.
  • 173.
    Call Serially (AndWait)  callSerially(Runnable) should normally be called off the EDT (in a separate thread), the run method within the submitted runnable will be invoked on the EDT.
  • 174.
    Call Serially (AndWait)  The callSeriallyAndWait(Runnable) method blocks the current thread until the method completes, this is useful for cases such as user notification e.g.:
  • 175.
  • 176.
    Invoke And Block Invoke and block is the exact opposite of callSeriallyAndWait() , it blocks the EDT and opens a separate thread for the runnable call.  This is best explained by an example. When we write typical code in Java we like that code is in sequence as such:
  • 177.
    Invoke And Block Noticethat the first and last operations must be conducted on the EDT but the middle operation might be really slow! Since updateUIWithContentOfFile needs readAndParseFile to occur before it starts doing the new thread won’t be enough.
  • 178.
    InvokeAndBlock  A simplisticapproach is to do something like this:
  • 179.
    InvokeAndBlock  But updateUIWithContentOfFileshould be executed on the EDT and not on a random thread. So the right way to do this would be something like this:
  • 180.
  • 181.
    InvokeAndBlock  Invoke andblock solves this in a unique way you can get almost the exact same behavior by using this:
  • 182.
    InvokeAndBlock  Invoke andblock effectively blocks the current EDT in a legal way.  It spawns a separate thread that runs the run() method and when that run method completes it goes back to the EDT.
  • 183.
  • 184.
    Sending Arguments ToThe Build Server  When sending a build to the server we can provide additional parameters to the build, which are incorporated into the build process on the server to "hint" on multiple different build time options.
  • 185.
    Sending Arguments ToThe Build Server  These hints are often referred to as "build hints" or "build arguments", they are effectively very much like souped up compiler flags that you can use to tune the build server’s behavior.  This is useful for fast iteration on new functionality without building plugin UI for every change
  • 186.
    Sending Arguments ToThe Build Server  You can set these hints by right clicking the project in the IDE and selecting Codename One → Codename One Settings → Build Hints. The hints use the key=value style of data.
  • 187.
    Sending Arguments ToThe Build Server
  • 188.
    Sending Arguments ToThe Build Server  Here is the current list of supported arguments  android.debug : true/false defaults to true – indicates whether to include the debug version in the build
  • 189.
    Sending Arguments ToThe Build Server  android.release : true/false defaults to true – indicates whether to include the release version in the build  ios.plistInject : entries to inject into the iOS plist file during build.
  • 190.
    Sending Arguments ToThe Build Server  android.statusbar_hidden : true/false defaults to false. When set to true hides the status bar on Android devices.  android.min_sdk_version : The minimum SDK required to run this app, the default value changes based on functionality but can be as low as 7
  • 191.
    Sending Arguments ToThe Build Server  gcm.sender_id : The Android/chrome push identifier  javascript.minifying : true/false (defaults to true ). By default the javascript code is minified to reduce file size.
  • 192.
    Offline Build  Offlinebuild is an enterprise feature  Codename One supports iOS & Android targets for offline builds  Why only Enterprise?
  • 193.
    Offline Build  Thesupport effort for offline builds is huge, as evidence despite the fact that all of our code is open source very few people bothered trying to compile it because of the complexities.  However, some government and regulated industries have issues with SaaS delivered solutions and thus must use offline build.
  • 194.
    Offline Build -Prerequisites for iOS Builds  You need the following installed tools/versions for Codename One’s offline build process:  Mac ideally with El Capitan, newer should work  Xcode 7+ (but not 8+ at this time)  Oracle’s JDK 8  Cocoapods  xcodeproj
  • 195.
    Offline Build -Prerequisites for Android Builds  Android builds need the following:  Android Studio  Oracle’s JDK 8  Gradle version 2.11
  • 196.
    Offline Build -Installation  To build offline you need to install the offline builder code.  To install an offline builder open the Codename One Settings UI by right clicking the project and selecting Codename One → Codename One Settings.
  • 197.
    Offline Build -Installation
  • 198.
    Offline Build -Installation  Once the Codename One settings UI launches select the Offline Builds entry:
  • 199.
    Offline Build -Installation  This should launch the settings UI which would be blank the first time around:
  • 200.
    Offline Build -Building  Offline building is almost like building with the cloud. In the right click menu you can select one of the offline build targets as such:
  • 201.
    Offline Build -Building  Once selected build generates a project under the build/and or build/iphone respectively.  Open these directories in Android Studio or xcode to run/build in the native IDE to the device or native emulator/simulator.
  • 202.
    Android Permissions  Thebuild server automatically introspects the classes sent to it as part of the build and injects the right set of permissions required by the app.  However, sometimes developers might find the permissions that come up a bit confusing and might not understand why a specific permission came up. This maps Android permissions to the methods/classes in Codename One that would trigger them.
  • 203.
    Android Permissions  android.permission.WRITE_EXTERNAL_STORAGE- this permission appears by default for Codename One applications, since the FileSystemStorage API might have some dependencies on it.  You can explicitly disable it using the build hint android.blockExternalStoragePermission=true
  • 204.
    Android Permissions  android.permission.INTERNET- this is a hardcoded permission in Codename One, the ability to connect to the network is coded into all Codename One applications.  android.permission.WAKE_LOCK - is triggered by Display.lockScreen() & Display.setScreenSaverEnabled()  android.permission.WRITE_CONTACTS - is triggered by Display.createContact()
  • 205.
    Android Permissions  Youcan customize permission text via the Display properties e.g. to customize the text of the contacts permission we can do something such as:
  • 206.
  • 207.
    Native Interfaces  Sometimesyou may wish to use an API that is unsupported by Codename One or integrate with a 3rd party library/framework that isn’t supported.  These are achievable tasks when writing native code and Codename One lets you encapsulate such native code using native interfaces.
  • 208.
  • 209.
    Native Interfaces  Wenow need to right click the class in the IDE and select the Generate Native Access menu item: We can now look int the native directory in the project root (in NetBeans you can see that in the Files tab) and you can see something that looks like this:
  • 210.
    Native Interfaces These areeffectively stubs you can edit to implement the methods in native code.
  • 211.
    Native Interfaces  Fromthe Codename One Java code we can call the implementation of this native interface using:
  • 212.
    Native Interfaces Notice thatwe are using the Android native android.util.Log class which isn’t accessible from standard Codename One code
  • 213.
    Native Interfaces  Whengenerating the Objective-C code the "Generate Native Sources" tool produces two files:  com_mycompany_myapp_MyNativeImpl.h  com_mycompany_myapp_MyNativeImpl.m  The .m files are the Objective-C equivalent of .c files  .h files contain the header/include information.
  • 214.
  • 215.
  • 216.
    Compare Codename One Its often an Apples == Oranges comparison since Codename One is so different from everything else...
  • 217.
    Codename One Benefits: Java based:  Love it or hate it Java is still king of the hill. With 9-10 million active Java developers and a permanent spot as one of the top programming languages.
  • 218.
    Codename One Benefits: Fast:  Codename One translates all the code to native code resulting in performance that matches the performance of native code.
  • 219.
    Codename One Benefits: Easy to use:  Developers can use the rich tools available for Java developers such as Eclipse/NetBeans to work with the code.  Codename One has its own GUI builder and many niceties to track issues in your code.  The biggest benefit though is in the build server which generates a native application for you without having to deal with all of the complexities of building a native app for every platform.
  • 220.
    Codename One Benefits: Portable – WORA:  Due to its unique lightweight architecture Codename One boast greater portability than HTML5 and more supported devices! Thanks to its unique cloud build system it doesn't require any native toolchain or dedicated hardware.
  • 221.
    Xamarin vs CodenameOne Codename One differs from Xamarin in the following ways:  Doesn't need a Mac for iOS development  WORA (Write Once Run Anywhere) - Xamarin has some portability libraries mostly for IO etc. but it isn't designed to be a WORA solution. Developers need to learn platform native API's and behaviors for every platform.
  • 222.
    Xamarin vs CodenameOne Java - Xamarin is a C# solution. This is a matter of developer preferences although Java has the advantage of being the language of Android.  GUI Builder - Since Xamarin isn't a WORA solution the GUI isn't portable, thus localization, branding and all resources need to be adapted to every platform.
  • 223.
    Xamarin vs CodenameOne IDE - Xamarin has its own IDE or Visual Studio from Microsoft. Codename One works with all major Java IDE's NetBeans, Eclipse & IDEA.  Open Source - Xamarin has a free version with very limiting stipulations and isn't open source. Codename One's free version is far more generous. Codename One is open source!
  • 224.
    React Native vsCodenameOne  React native isn't a WORA solution  React Native requires a Mac for iOS development and a complex toolchain for every platform  React abstracts everything behind callbacks reducing code size but making the behavior and flow more opaque  JavaScript is a fragile language and the practice of working outside of an IDE is inferior as projects grow in size
  • 225.
    Thank you forlistening...