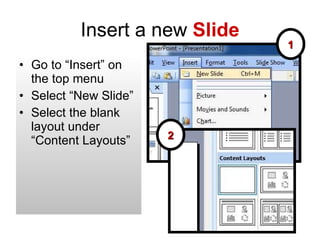
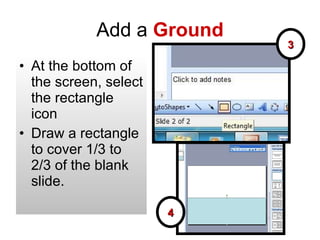
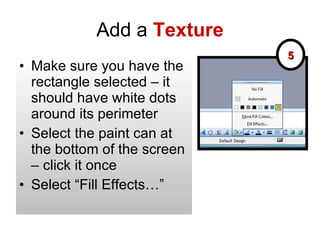
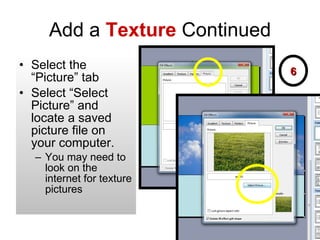
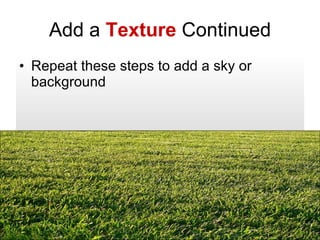
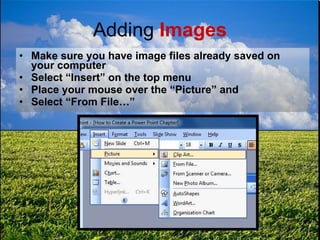
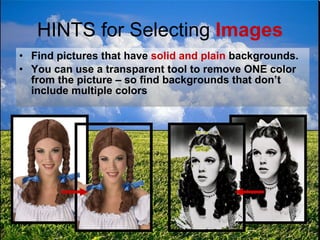
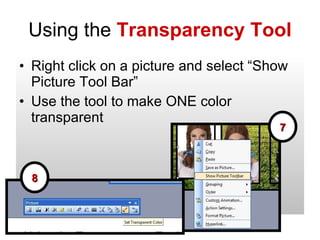
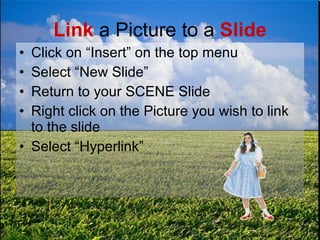
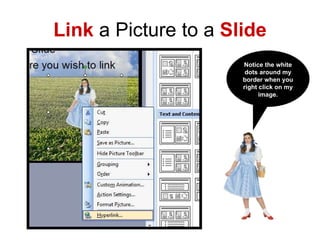
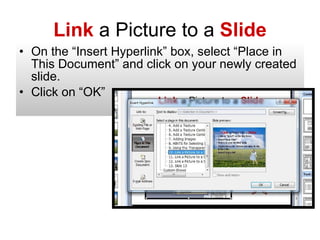
How to Create a Power Point Chapter By David Mann
Insert a new  Slide Go to “Insert” on the top menu Select “New Slide” Select the blank layout under “Content Layouts” 1 2
Add a  Ground At the bottom of the screen, select the rectangle icon Draw a rectangle to cover 1/3 to 2/3 of the blank slide. 3 4
Add a  Texture Make sure you have the rectangle selected – it should have white dots around its perimeter Select the paint can at the bottom of the screen – click it once Select “Fill Effects…” 5
Add a  Texture  Continued Select the “Picture” tab Select “Select Picture” and locate a saved picture file on your computer. You may need to look on the internet for texture pictures 6
Add a  Texture  Continued Repeat these steps to add a sky or background
Adding  Images Make sure you have image files already saved on your computer Select “Insert” on the top menu Place your mouse over the “Picture” and Select “From File…”
HINTS for Selecting  Images Find pictures that have  solid and plain  backgrounds. You can use a transparent tool to remove ONE color from the picture – so find backgrounds that don’t include multiple colors
Using the  Transparency Tool Right click on a picture and select “Show Picture Tool Bar” Use the tool to make ONE color transparent 7 8
Link  a Picture to a  Slide Click on “Insert” on the top menu Select “New Slide” Return to your SCENE Slide Right click on the Picture you wish to link to the slide Select “Hyperlink”
Link  a Picture to a  Slide Notice the white dots around my border when you right click on my image.
Link  a Picture to a  Slide On the “Insert Hyperlink” box, select “Place in This Document” and click on your newly created slide. Click on “OK”
Linking  Scene to New Slide  and Back Again Copy and Paste your image into the new slide and repeat the “ Link  a Picture to a  Slide ” instructions to make your copied image link back to the SCENE slide.
Hyperlink from Slide to Slide using the Images
Using the  New Slide Use this space to include writing about your story. You can use this space to: Describe details Narrate your story Write dialogue
Further Instructions Include multiple images in your scene and Link them to many slides to tell your reader about your chapter Include a link to a page that publishes your entire story Only use clear and easy to see images in your presentation – making sure they are large enough not to blur when they are stretched larger

How To Create A Power Point Chapter

  • 1.
    How to Createa Power Point Chapter By David Mann
  • 2.
    Insert a new Slide Go to “Insert” on the top menu Select “New Slide” Select the blank layout under “Content Layouts” 1 2
  • 3.
    Add a Ground At the bottom of the screen, select the rectangle icon Draw a rectangle to cover 1/3 to 2/3 of the blank slide. 3 4
  • 4.
    Add a Texture Make sure you have the rectangle selected – it should have white dots around its perimeter Select the paint can at the bottom of the screen – click it once Select “Fill Effects…” 5
  • 5.
    Add a Texture Continued Select the “Picture” tab Select “Select Picture” and locate a saved picture file on your computer. You may need to look on the internet for texture pictures 6
  • 6.
    Add a Texture Continued Repeat these steps to add a sky or background
  • 7.
    Adding ImagesMake sure you have image files already saved on your computer Select “Insert” on the top menu Place your mouse over the “Picture” and Select “From File…”
  • 8.
    HINTS for Selecting Images Find pictures that have solid and plain backgrounds. You can use a transparent tool to remove ONE color from the picture – so find backgrounds that don’t include multiple colors
  • 9.
    Using the Transparency Tool Right click on a picture and select “Show Picture Tool Bar” Use the tool to make ONE color transparent 7 8
  • 10.
    Link aPicture to a Slide Click on “Insert” on the top menu Select “New Slide” Return to your SCENE Slide Right click on the Picture you wish to link to the slide Select “Hyperlink”
  • 11.
    Link aPicture to a Slide Notice the white dots around my border when you right click on my image.
  • 12.
    Link aPicture to a Slide On the “Insert Hyperlink” box, select “Place in This Document” and click on your newly created slide. Click on “OK”
  • 13.
    Linking Sceneto New Slide and Back Again Copy and Paste your image into the new slide and repeat the “ Link a Picture to a Slide ” instructions to make your copied image link back to the SCENE slide.
  • 14.
    Hyperlink from Slideto Slide using the Images
  • 15.
    Using the New Slide Use this space to include writing about your story. You can use this space to: Describe details Narrate your story Write dialogue
  • 16.
    Further Instructions Includemultiple images in your scene and Link them to many slides to tell your reader about your chapter Include a link to a page that publishes your entire story Only use clear and easy to see images in your presentation – making sure they are large enough not to blur when they are stretched larger