Google Tag
Manager?
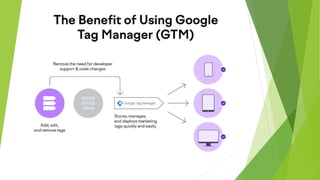
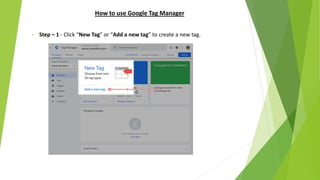
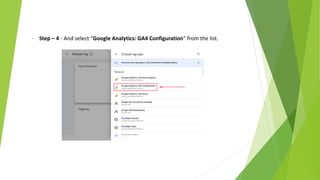
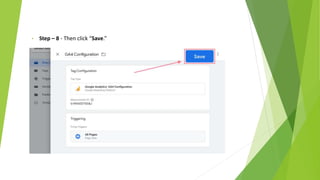
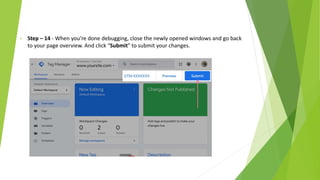
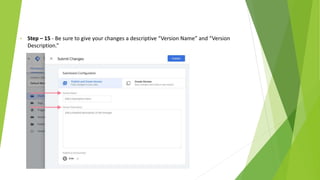
Google Tag Manager is a tag management
system. It allows you to easily create, maintain
and deploy tracking code on your website.
 Reduced reliance on developers
 Testing and debugging:
 User permission control
 Versions:
 Easy configuration of many popular tools
 Tag storage and management
 Enables multiple workspaces
Why should I use Google Tag Manager?
Pros:
 You'll group all your third parties on a single tool which will ease their
maintenance.
 GTM will offer you a lot of premade integrations that will save you a lot of time.
 Your integrations will be loaded asynchronously which may improve the
performances of your website.
 Addition / modification / deletion of your third parties will be done without
deploying any update of you source code.
 Possibility to test your changes before publishing them.
Cons:
 It can be time consuming to migrate all your third parties to GTM.
 As already mentioned, you'd better get some technical knowledge to master
GTM.
What Is Google Tag Manager Used For?
Tag Manager allows you to track almost any kind of event or user behavior you can
think of. Below are some examples of commonly tracked events:
• Link clicks
• Button clicks
• Form submissions
• Conversions
• Shopping cart abandonment
• Adding items to cart
• Removing items from cart
• File downloads
• Scroll behavior
• Video views
• Call to action (CTA) performance
• Table of contents (TOC) clicks
• Custom events
How to use Google Tag Manager
• Step – 1 - Click “New Tag” or “Add a new tag” to create a new tag.
• Step – 2 - Add a name for your tag. We suggest something like “GA4 Configuration.”
• Step – 3 - Next, click on “Tag Configuration.”
• Step – 4 - And select “Google Analytics: GA4 Configuration” from the list.
• Step – 5 - Enter the measurement ID for your GA4 property. Alternatively, you can
create a variable to house your measurement ID for future use.
• Step – 6 - Click the “Triggering” box.
• Step – 7 - And select “All Pages” from the list that pops up.
• Step – 8 - Then click “Save.”
• Step – 9 - Go back to your workspace overview page and click “Preview” to test your
new changes.
• Step – 10 - Enter your website’s URL in the next screen and click “Connect” to open
your site in a new window and begin testing and debugging.
• Step – 11 - Once you’re connected, your site should open in a new pop-up. With the
Tag Assistant in the lower right corner of your window.
• Step – 12- Keep that window open and return to the preview page. The preview page
should say, “Connected”.
• Step – 13 - After you hit “Continue,” start debugging your tags in the preview window.
You should see your newly created GA4 Configuration tag firing on each page as you navigate
your website.
This means your tag implementation was successful.
• Step – 14 - When you’re done debugging, close the newly opened windows and go back
to your page overview. And click “Submit” to submit your changes.
• Step – 15 - Be sure to give your changes a descriptive “Version Name” and “Version
Description.”
Step – 16 - Lastly, click “Publish” to push your changes to your live website and enable GA4.
This will publish a new version of your container to your website.
You should now see hits registering in the “Realtime” report of your GA4 property as you and
other users navigate the website.
Tip - We strongly recommend always using the “Preview” function to test and debug your
tags before you publish them.
Thank you!

Google Tag Manager.pptx

  • 1.
  • 2.
    Google Tag Manageris a tag management system. It allows you to easily create, maintain and deploy tracking code on your website.
  • 4.
     Reduced relianceon developers  Testing and debugging:  User permission control  Versions:  Easy configuration of many popular tools  Tag storage and management  Enables multiple workspaces
  • 5.
    Why should Iuse Google Tag Manager? Pros:  You'll group all your third parties on a single tool which will ease their maintenance.  GTM will offer you a lot of premade integrations that will save you a lot of time.  Your integrations will be loaded asynchronously which may improve the performances of your website.  Addition / modification / deletion of your third parties will be done without deploying any update of you source code.  Possibility to test your changes before publishing them. Cons:  It can be time consuming to migrate all your third parties to GTM.  As already mentioned, you'd better get some technical knowledge to master GTM.
  • 6.
    What Is GoogleTag Manager Used For? Tag Manager allows you to track almost any kind of event or user behavior you can think of. Below are some examples of commonly tracked events: • Link clicks • Button clicks • Form submissions • Conversions • Shopping cart abandonment • Adding items to cart • Removing items from cart • File downloads • Scroll behavior • Video views • Call to action (CTA) performance • Table of contents (TOC) clicks • Custom events
  • 7.
    How to useGoogle Tag Manager • Step – 1 - Click “New Tag” or “Add a new tag” to create a new tag.
  • 8.
    • Step –2 - Add a name for your tag. We suggest something like “GA4 Configuration.”
  • 9.
    • Step –3 - Next, click on “Tag Configuration.”
  • 10.
    • Step –4 - And select “Google Analytics: GA4 Configuration” from the list.
  • 11.
    • Step –5 - Enter the measurement ID for your GA4 property. Alternatively, you can create a variable to house your measurement ID for future use.
  • 12.
    • Step –6 - Click the “Triggering” box.
  • 13.
    • Step –7 - And select “All Pages” from the list that pops up.
  • 14.
    • Step –8 - Then click “Save.”
  • 15.
    • Step –9 - Go back to your workspace overview page and click “Preview” to test your new changes.
  • 16.
    • Step –10 - Enter your website’s URL in the next screen and click “Connect” to open your site in a new window and begin testing and debugging.
  • 17.
    • Step –11 - Once you’re connected, your site should open in a new pop-up. With the Tag Assistant in the lower right corner of your window.
  • 18.
    • Step –12- Keep that window open and return to the preview page. The preview page should say, “Connected”.
  • 19.
    • Step –13 - After you hit “Continue,” start debugging your tags in the preview window. You should see your newly created GA4 Configuration tag firing on each page as you navigate your website. This means your tag implementation was successful.
  • 20.
    • Step –14 - When you’re done debugging, close the newly opened windows and go back to your page overview. And click “Submit” to submit your changes.
  • 21.
    • Step –15 - Be sure to give your changes a descriptive “Version Name” and “Version Description.”
  • 22.
    Step – 16- Lastly, click “Publish” to push your changes to your live website and enable GA4. This will publish a new version of your container to your website. You should now see hits registering in the “Realtime” report of your GA4 property as you and other users navigate the website. Tip - We strongly recommend always using the “Preview” function to test and debug your tags before you publish them.
  • 23.