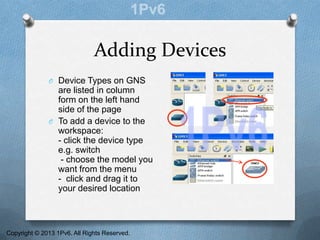
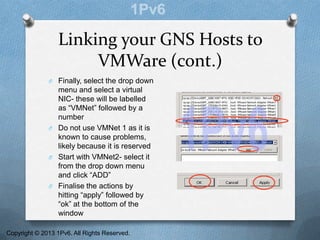
GNS3
A Brief User Guide
By
Zahra
Copyright © 2013 1Pv6. All Rights Reserved.
Understanding GNS
O GNS is a software that
allows us to work with
networks virtually
O It differs from “Packet
Tracer” in that it is less of
an illustrated simulation
and more of a genuine
virtual worktop
O This being the case- to
run it you need both
“GNS3” (can be
downloaded for free on
the internet) and Vmware
Workstation- a virtual
desktop software
Copyright © 2013 1Pv6. All Rights Reserved.
Adding Devices
O Device Types on GNS
are listed in column
form on the left hand
side of the page
O To add a device to the
workspace:
- click the device type
e.g. switch
- choose the model you
want from the menu
- click and drag it to
your desired location
Copyright © 2013 1Pv6. All Rights Reserved.
Configuring Devices:
Routers
O Configuration is required to add
interfaces to your routers
O To do this, simply right-click
your router and select
“configure”
O When the window appears,
select the router name on the
left (e.g. R2) and go to the
“slots” tab
O Unlike with Packet Tracer- the
available interface ports are not
illustrated visually- instead you
must remember the name of the
interface you wish to add and
select it from the drop down
menu
O Serial interfaces will require the
“WIC” section near the bottom
Copyright © 2013 1Pv6. All Rights Reserved.
Configuring Devices:
End Devices/Hosts
O For this section you will
need “VMWare” and
its“Network Editor”
O GNS works by having the
machine you are working
on directly interact with
your simulated set up,
therefore if you wish to
have multiple end
devices in your topology,
they will need to be
virtual and consequently
require virtual network
cards and machines for
each device
Copyright © 2013 1Pv6. All Rights Reserved.
Network Cards / NICs
O NIC stands for “Network
Interface Card”
O This is a small piece of
hardware installed into
a computer that allows it
to connect to a network
O “Network Editor” allows
for the creation of virtual
NICs so that virtual
devices are able to
connect
Copyright © 2013 1Pv6. All Rights Reserved.
Creating a Virtual NIC
O To create a virtual
NIC for your end
device go to start and
find the program
“Network Editor”
O When it opens, click
“Add Network” and
then click “OK”
O You will need one for
each Host device in
your topology +1
Copyright © 2013 1Pv6. All Rights Reserved.
Creating a Virtual Machine
O To create a virtual machine- open the
program “VMWare Workstation”, go
to file  new virtual machine
O A wizard will take you through the
next steps
O You will require an operating system
either from an external source e.g.
CD, USB OR an ISO file
O You won’t need to allocate much
RAM- go just above the
recommended, and don’t worry
about splitting disks
O Once created it will appear in the
column on the left
O To avoid going through the process
multiple times, when it is completed:
- Power off the machine by right
clicking it Power Power Off
- Then right click it again, Manage 
Clone.
A wizard will take you through the
next steps- make sure to make a
FULL clone.
Copyright © 2013 1Pv6. All Rights Reserved.
Linking your GNS Hosts to
VMWare
O To link your Host to
VMware you first need to
assign virtual NICs to
each of your Hosts
O To do this- right click your
Host and select
“configure”
O Select your device in the
column on the left and a
page will appear with all
the NICs you have
created- delete them all
to leave your device
clean by selecting them
and hitting “delete”
Copyright © 2013 1Pv6. All Rights Reserved.
Linking your GNS Hosts to
VMWare (cont.)
O Finally, select the drop down
menu and select a virtual
NIC- these will be labelled
as “VMNet” followed by a
number
O Do not use VMNet 1 as it is
known to cause problems,
likely because it is reserved
O Start with VMNet2- select it
from the drop down menu
and click “ADD”
O Finalise the actions by
hitting “apply” followed by
“ok” at the bottom of the
window
Copyright © 2013 1Pv6. All Rights Reserved.
Linking your GNS Hosts to
VMWare (cont2.)
O Now enter VMWare
Workstation to connect your
virtual NIC to the Virtual
Machine (VM)
O Right click your VM and
select “settings”
O Select “Network Adapter”
and new options will appear
on the left
O Select the Virtual NIC from
the drop down menu and
click “ok” at the bottom of
the page
O These steps must be done
for each Host device
Copyright © 2013 1Pv6. All Rights Reserved.
Powering on Devices
O To gain access to
command consoles etc.
the devices need to be
turned on
O In GNS, to turn on
singular device right-click
it and select “start”
O Alternatively, to power on
all devices click the
green button with the
“play” symbol on the tool
bar along the top of the
page
O In VMWare, right click
the virtual machine, go to
Power  Power On
Copyright © 2013 1Pv6. All Rights Reserved.
Connecting Devices
O Provided that where need be
the correct interfaces have
been added- the next step is
to connect them
O Unlike with Packet Tracer,
there is no need for selecting
specific cabling
O Simply click the cable symbol,
click the first device and
select the desired interface,
then click the second device
you wish to connect to and
select the correct interface
there as well
O Finally click the cable symbol
again to cancel out of that
mode
Copyright © 2013 1Pv6. All Rights Reserved.
Command Consoles
O Finally, with everything
configured, connected and
powered on- you will need
to access the command
consoles
O In GNS right click the
router and select “console”
O In Vmware, enter the VM
as if it were a desktop and
bring up the command
prompt from the start
menu- you will have to do
all pinging for that host
from within the VM
Copyright © 2013 1Pv6. All Rights Reserved.
Configuring Host IP Addresses
O Each host will need an IP
address that has to be
configured from within the
VM
O To do this, enter each VM
individually, go to:
Start  Control Panel 
Network and Sharing Centre
O Then look under the
network and select “View
Status”
O Go to Properties  TCP/IP
Version 4  Properties
O Then simply type in your
desired IP, subnet and
default gateway
O “OK” to save settings and
close out
Copyright © 2013 1Pv6. All Rights Reserved.

GNS3- A Brief User Guide

  • 1.
    GNS3 A Brief UserGuide By Zahra Copyright © 2013 1Pv6. All Rights Reserved.
  • 2.
    Understanding GNS O GNSis a software that allows us to work with networks virtually O It differs from “Packet Tracer” in that it is less of an illustrated simulation and more of a genuine virtual worktop O This being the case- to run it you need both “GNS3” (can be downloaded for free on the internet) and Vmware Workstation- a virtual desktop software Copyright © 2013 1Pv6. All Rights Reserved.
  • 3.
    Adding Devices O DeviceTypes on GNS are listed in column form on the left hand side of the page O To add a device to the workspace: - click the device type e.g. switch - choose the model you want from the menu - click and drag it to your desired location Copyright © 2013 1Pv6. All Rights Reserved.
  • 4.
    Configuring Devices: Routers O Configurationis required to add interfaces to your routers O To do this, simply right-click your router and select “configure” O When the window appears, select the router name on the left (e.g. R2) and go to the “slots” tab O Unlike with Packet Tracer- the available interface ports are not illustrated visually- instead you must remember the name of the interface you wish to add and select it from the drop down menu O Serial interfaces will require the “WIC” section near the bottom Copyright © 2013 1Pv6. All Rights Reserved.
  • 5.
    Configuring Devices: End Devices/Hosts OFor this section you will need “VMWare” and its“Network Editor” O GNS works by having the machine you are working on directly interact with your simulated set up, therefore if you wish to have multiple end devices in your topology, they will need to be virtual and consequently require virtual network cards and machines for each device Copyright © 2013 1Pv6. All Rights Reserved.
  • 6.
    Network Cards /NICs O NIC stands for “Network Interface Card” O This is a small piece of hardware installed into a computer that allows it to connect to a network O “Network Editor” allows for the creation of virtual NICs so that virtual devices are able to connect Copyright © 2013 1Pv6. All Rights Reserved.
  • 7.
    Creating a VirtualNIC O To create a virtual NIC for your end device go to start and find the program “Network Editor” O When it opens, click “Add Network” and then click “OK” O You will need one for each Host device in your topology +1 Copyright © 2013 1Pv6. All Rights Reserved.
  • 8.
    Creating a VirtualMachine O To create a virtual machine- open the program “VMWare Workstation”, go to file  new virtual machine O A wizard will take you through the next steps O You will require an operating system either from an external source e.g. CD, USB OR an ISO file O You won’t need to allocate much RAM- go just above the recommended, and don’t worry about splitting disks O Once created it will appear in the column on the left O To avoid going through the process multiple times, when it is completed: - Power off the machine by right clicking it Power Power Off - Then right click it again, Manage  Clone. A wizard will take you through the next steps- make sure to make a FULL clone. Copyright © 2013 1Pv6. All Rights Reserved.
  • 9.
    Linking your GNSHosts to VMWare O To link your Host to VMware you first need to assign virtual NICs to each of your Hosts O To do this- right click your Host and select “configure” O Select your device in the column on the left and a page will appear with all the NICs you have created- delete them all to leave your device clean by selecting them and hitting “delete” Copyright © 2013 1Pv6. All Rights Reserved.
  • 10.
    Linking your GNSHosts to VMWare (cont.) O Finally, select the drop down menu and select a virtual NIC- these will be labelled as “VMNet” followed by a number O Do not use VMNet 1 as it is known to cause problems, likely because it is reserved O Start with VMNet2- select it from the drop down menu and click “ADD” O Finalise the actions by hitting “apply” followed by “ok” at the bottom of the window Copyright © 2013 1Pv6. All Rights Reserved.
  • 11.
    Linking your GNSHosts to VMWare (cont2.) O Now enter VMWare Workstation to connect your virtual NIC to the Virtual Machine (VM) O Right click your VM and select “settings” O Select “Network Adapter” and new options will appear on the left O Select the Virtual NIC from the drop down menu and click “ok” at the bottom of the page O These steps must be done for each Host device Copyright © 2013 1Pv6. All Rights Reserved.
  • 12.
    Powering on Devices OTo gain access to command consoles etc. the devices need to be turned on O In GNS, to turn on singular device right-click it and select “start” O Alternatively, to power on all devices click the green button with the “play” symbol on the tool bar along the top of the page O In VMWare, right click the virtual machine, go to Power  Power On Copyright © 2013 1Pv6. All Rights Reserved.
  • 13.
    Connecting Devices O Providedthat where need be the correct interfaces have been added- the next step is to connect them O Unlike with Packet Tracer, there is no need for selecting specific cabling O Simply click the cable symbol, click the first device and select the desired interface, then click the second device you wish to connect to and select the correct interface there as well O Finally click the cable symbol again to cancel out of that mode Copyright © 2013 1Pv6. All Rights Reserved.
  • 14.
    Command Consoles O Finally,with everything configured, connected and powered on- you will need to access the command consoles O In GNS right click the router and select “console” O In Vmware, enter the VM as if it were a desktop and bring up the command prompt from the start menu- you will have to do all pinging for that host from within the VM Copyright © 2013 1Pv6. All Rights Reserved.
  • 15.
    Configuring Host IPAddresses O Each host will need an IP address that has to be configured from within the VM O To do this, enter each VM individually, go to: Start  Control Panel  Network and Sharing Centre O Then look under the network and select “View Status” O Go to Properties  TCP/IP Version 4  Properties O Then simply type in your desired IP, subnet and default gateway O “OK” to save settings and close out Copyright © 2013 1Pv6. All Rights Reserved.