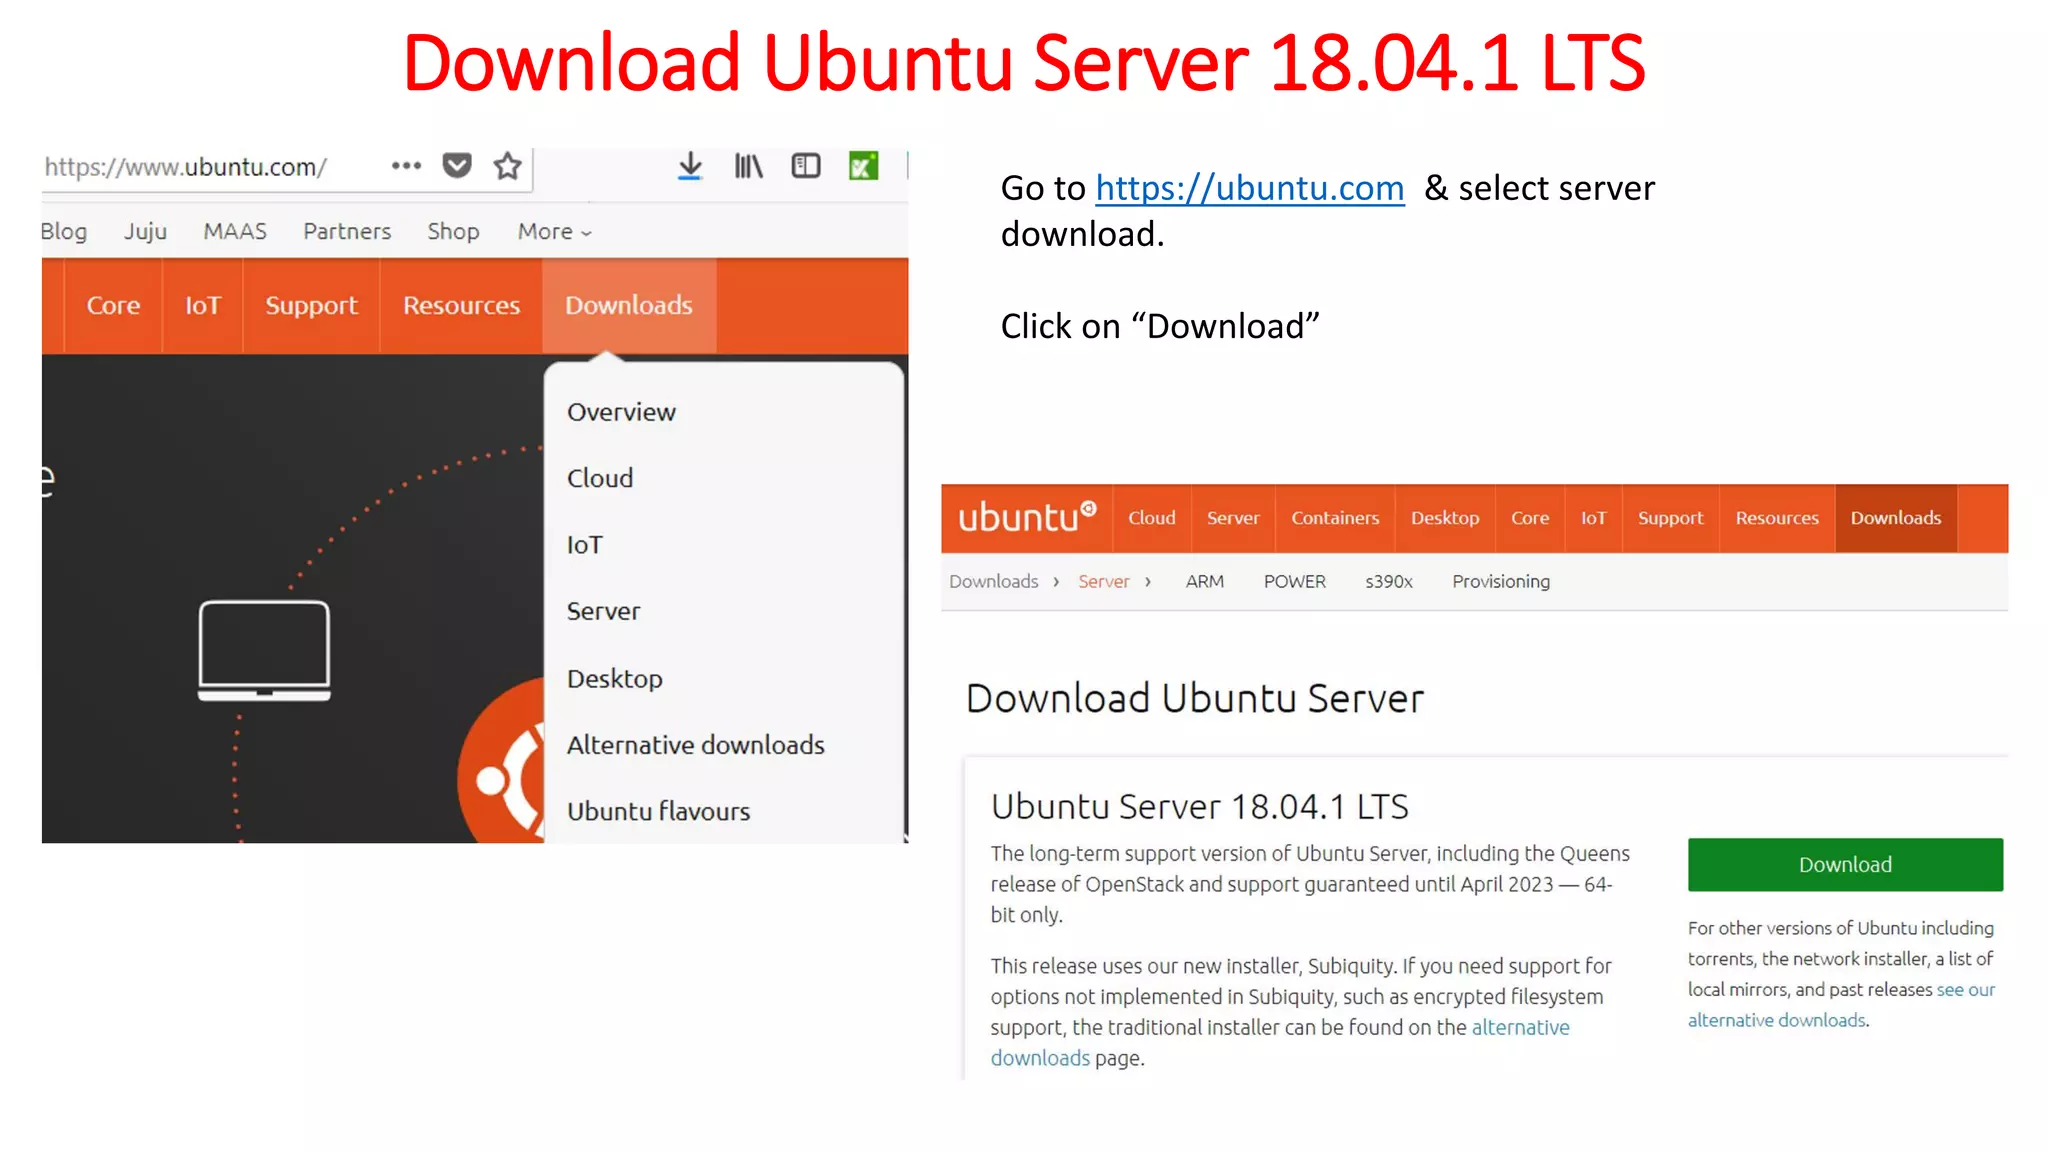
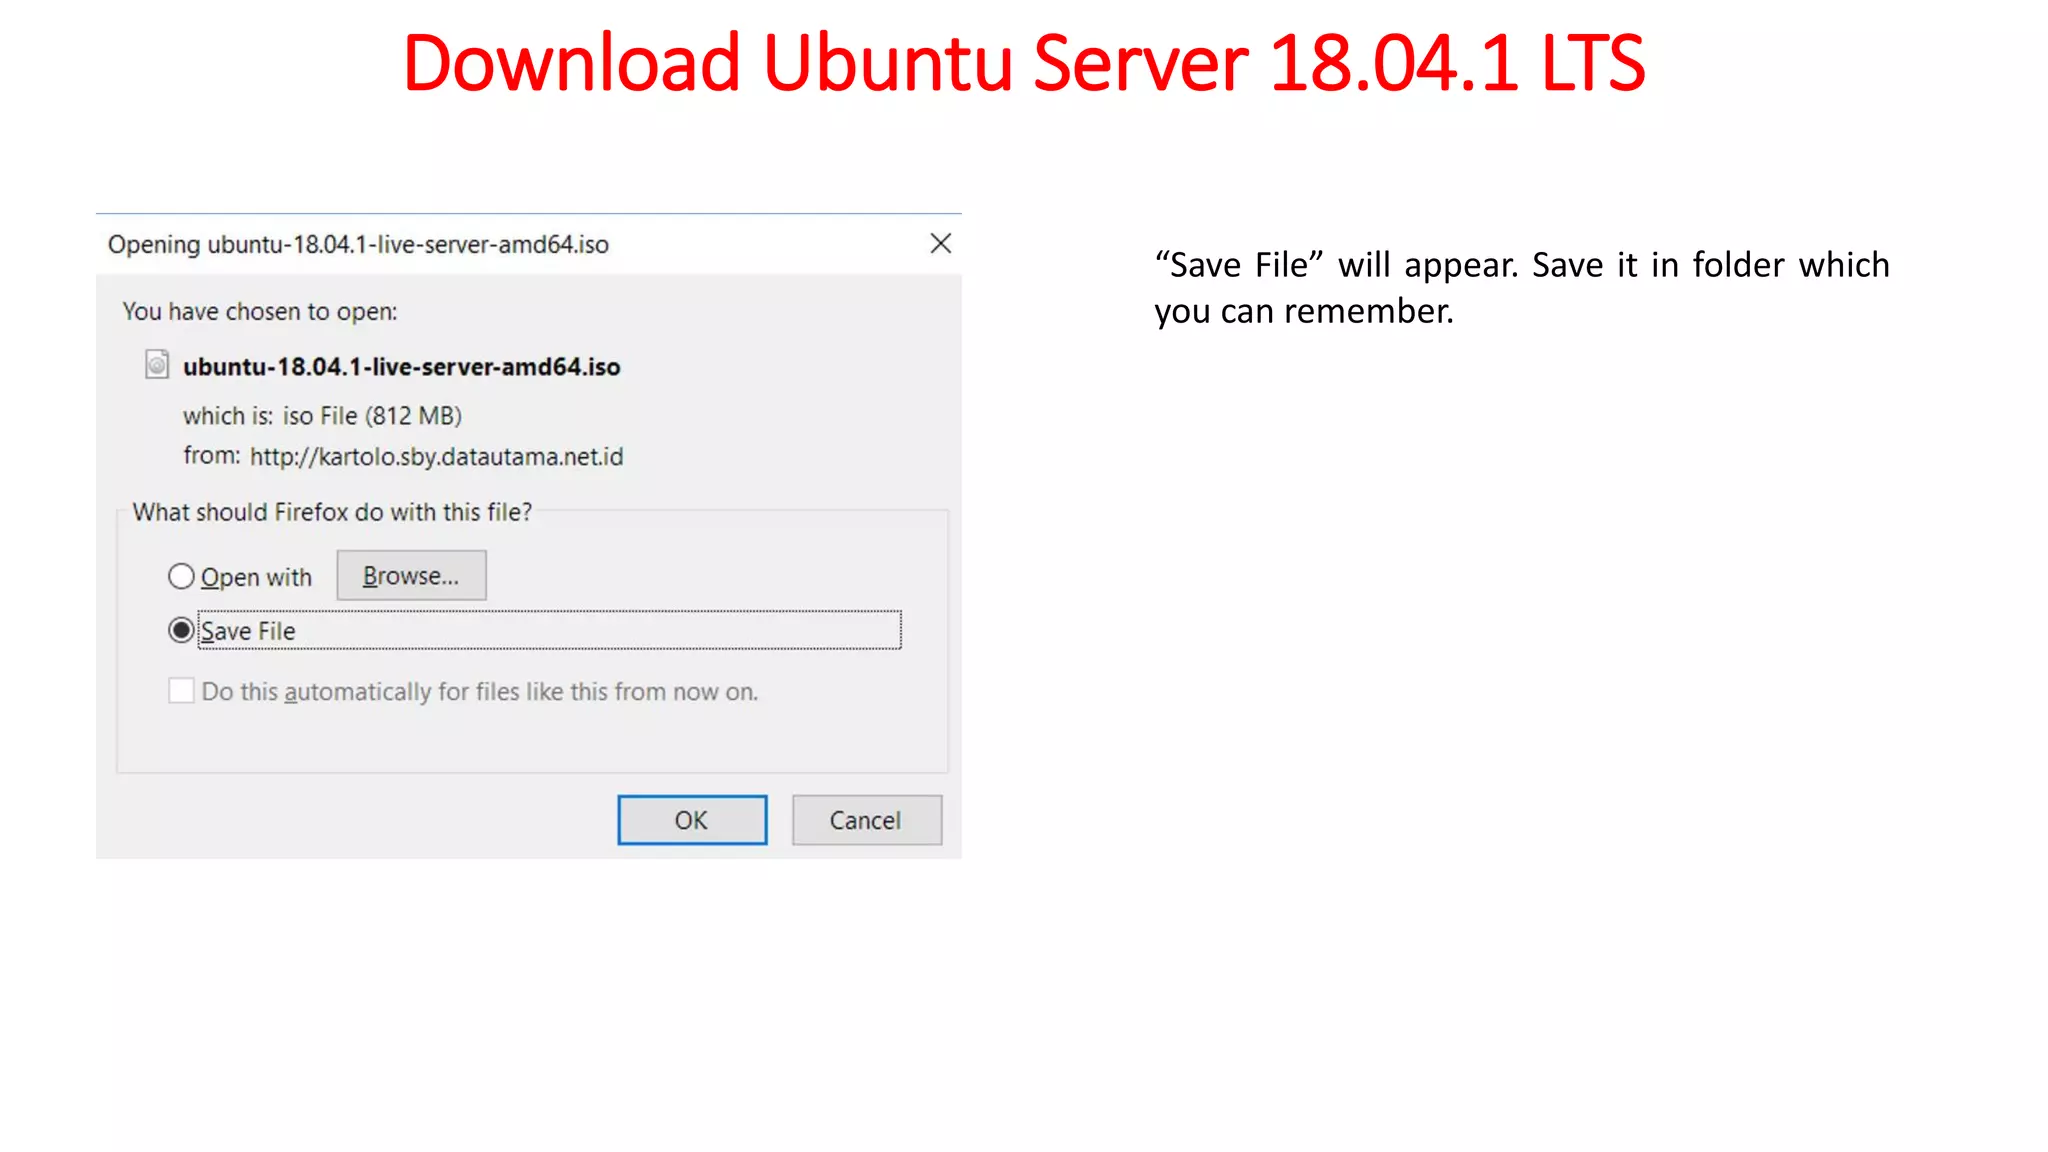
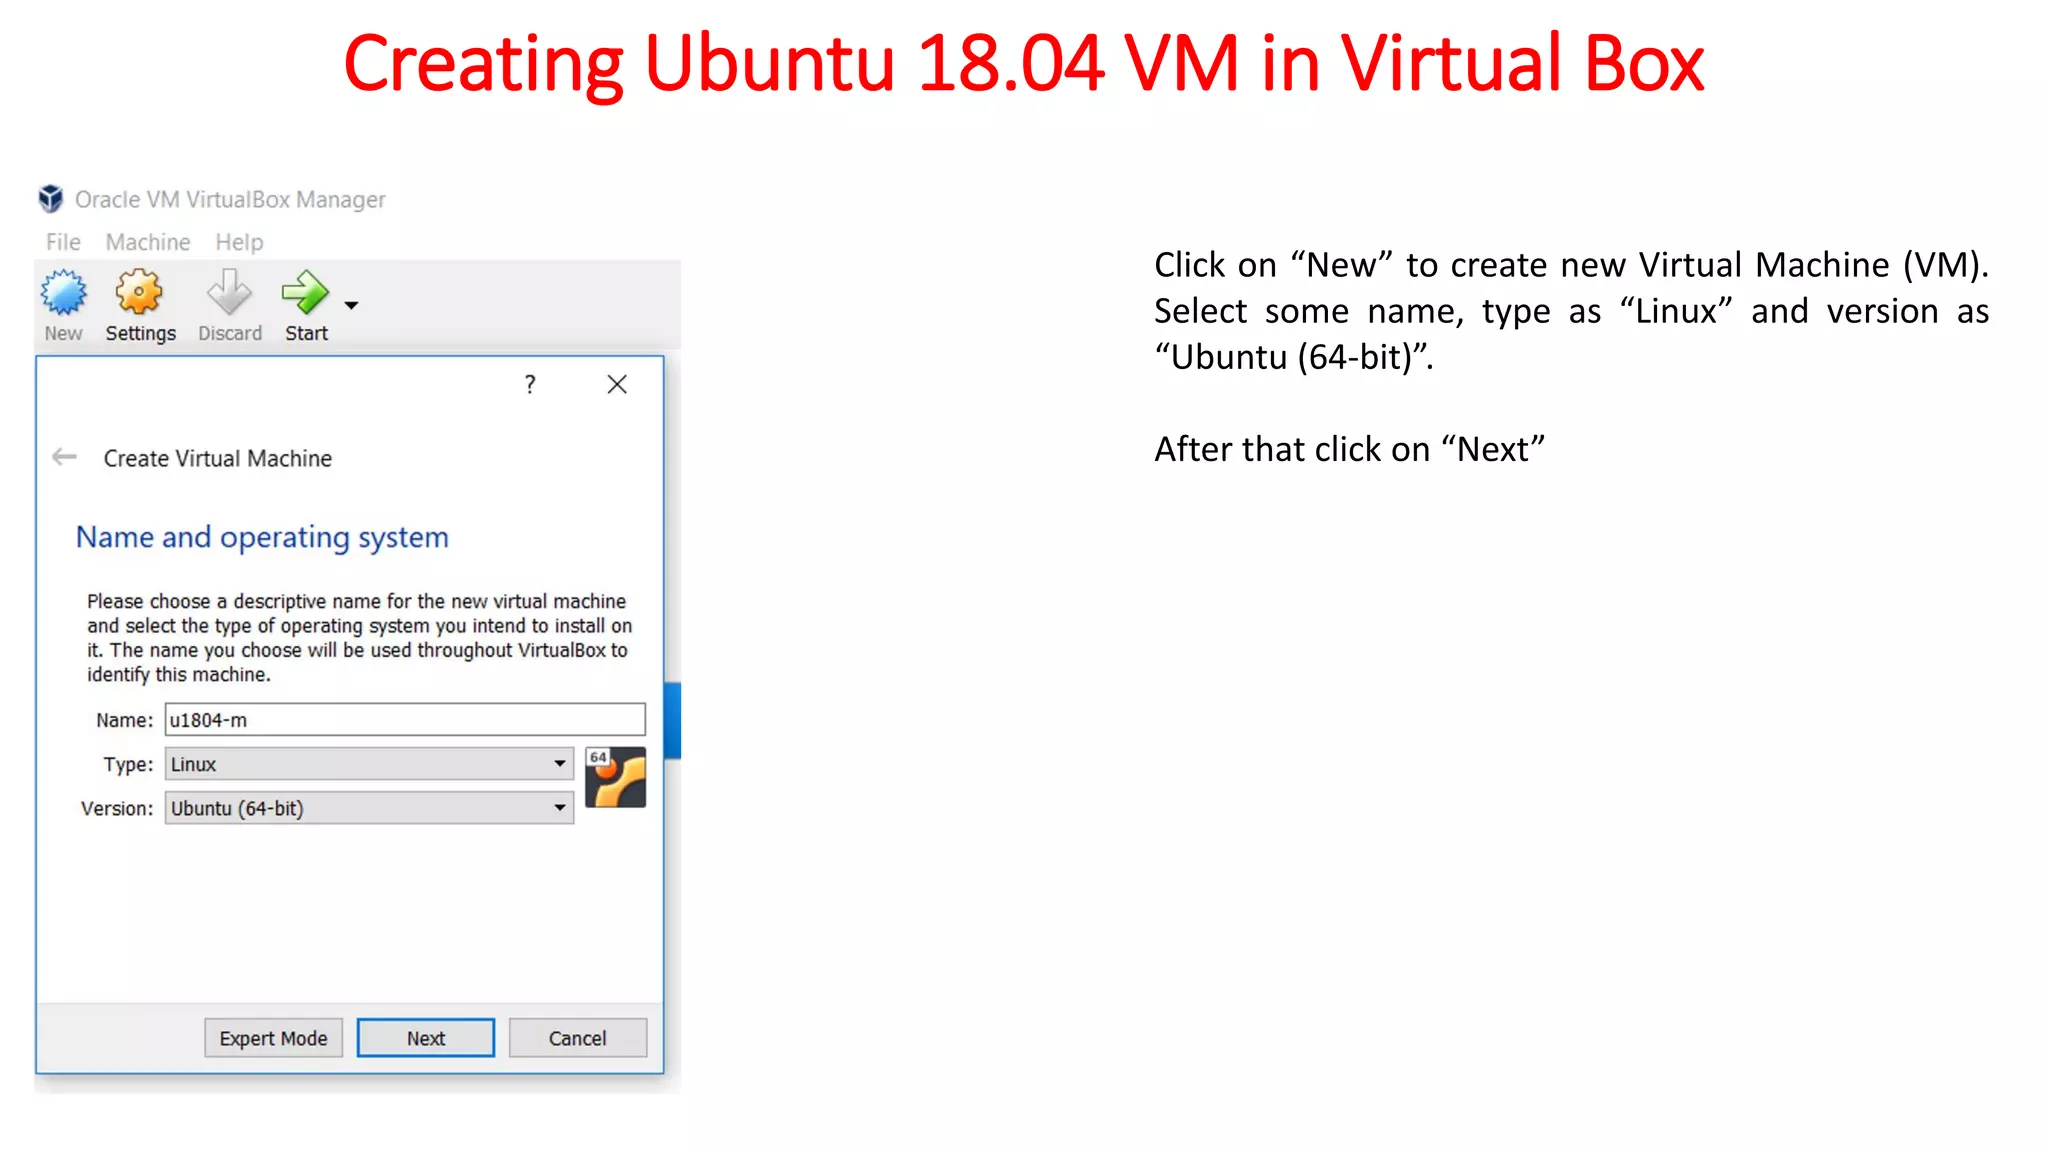
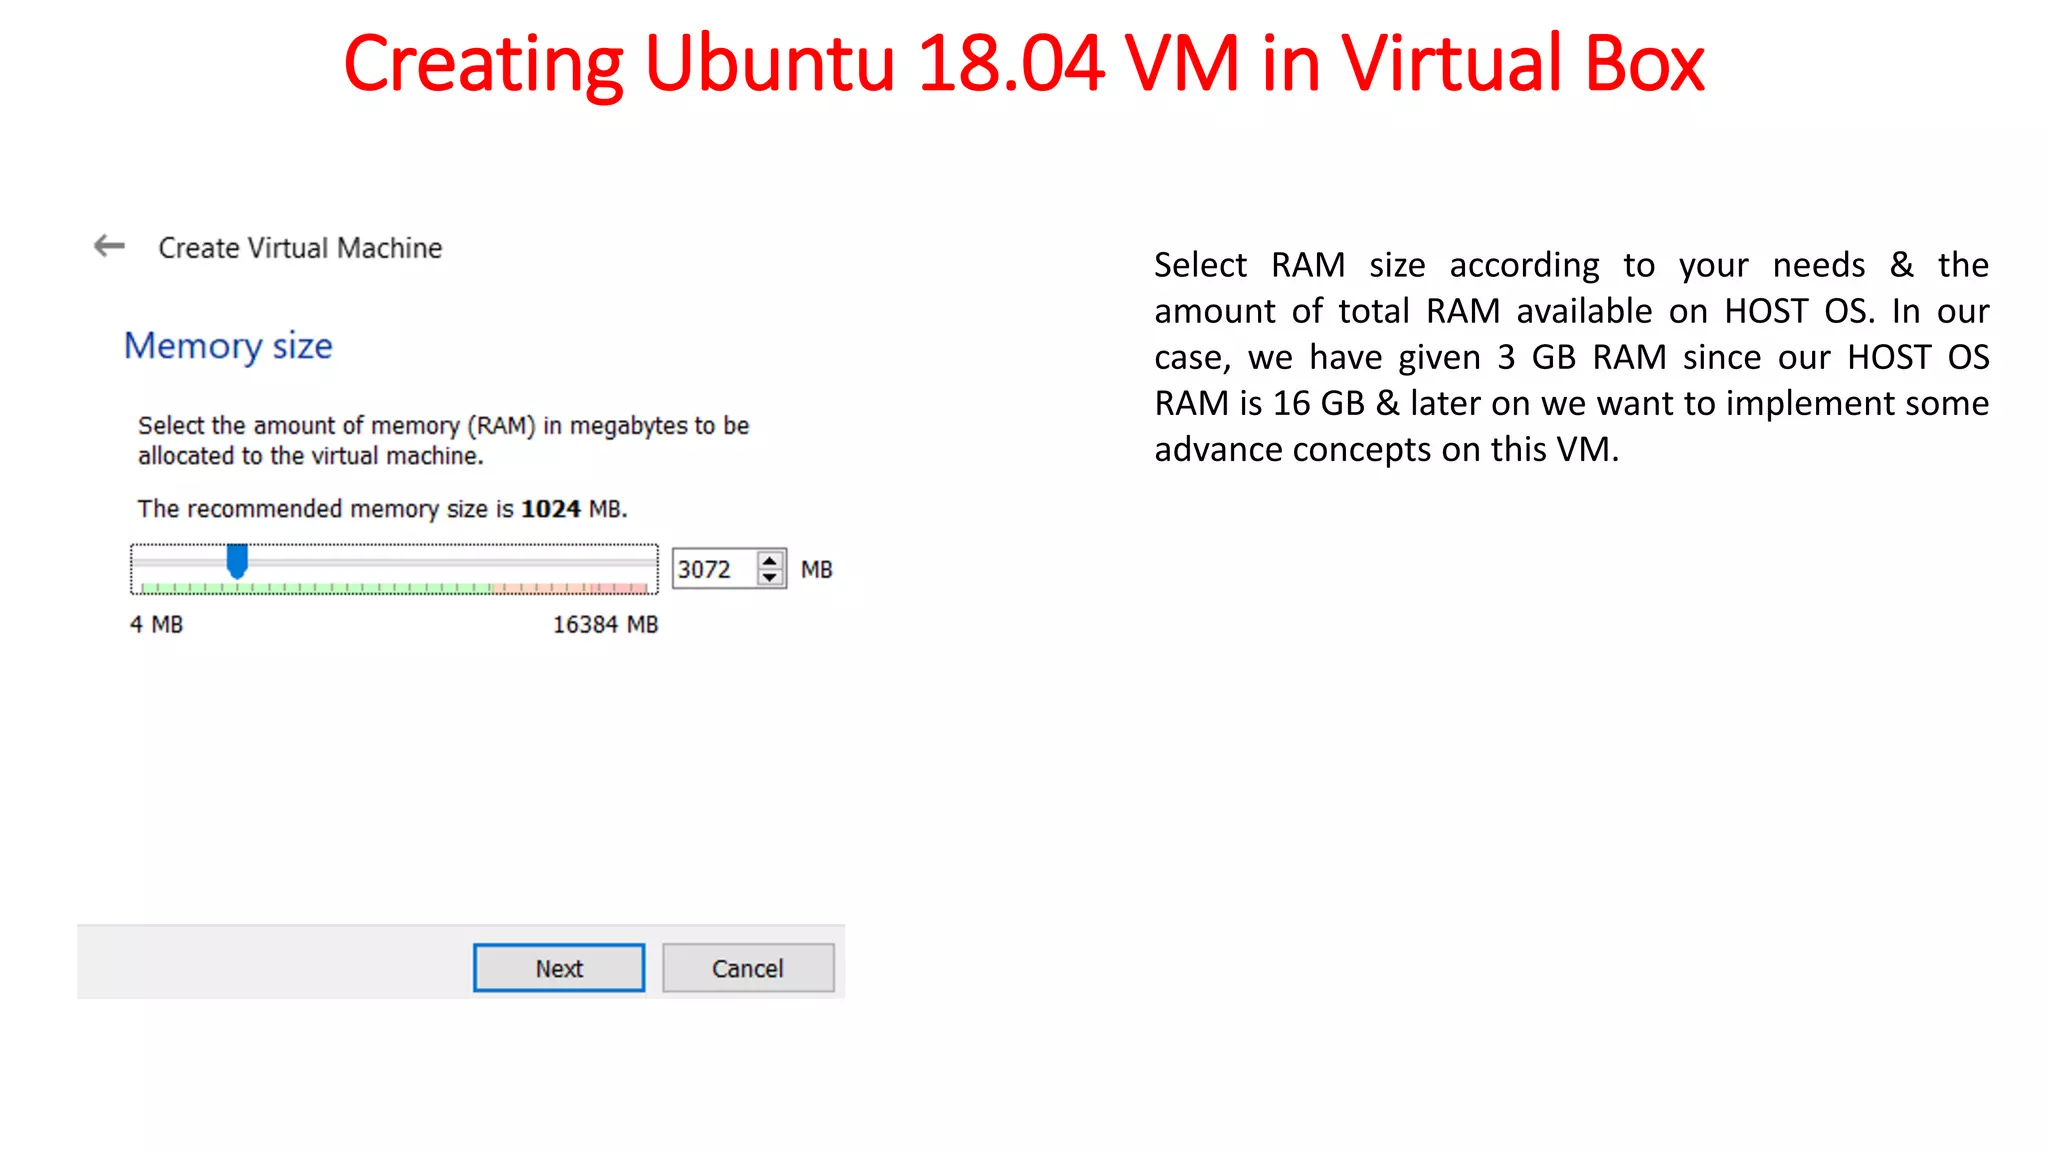
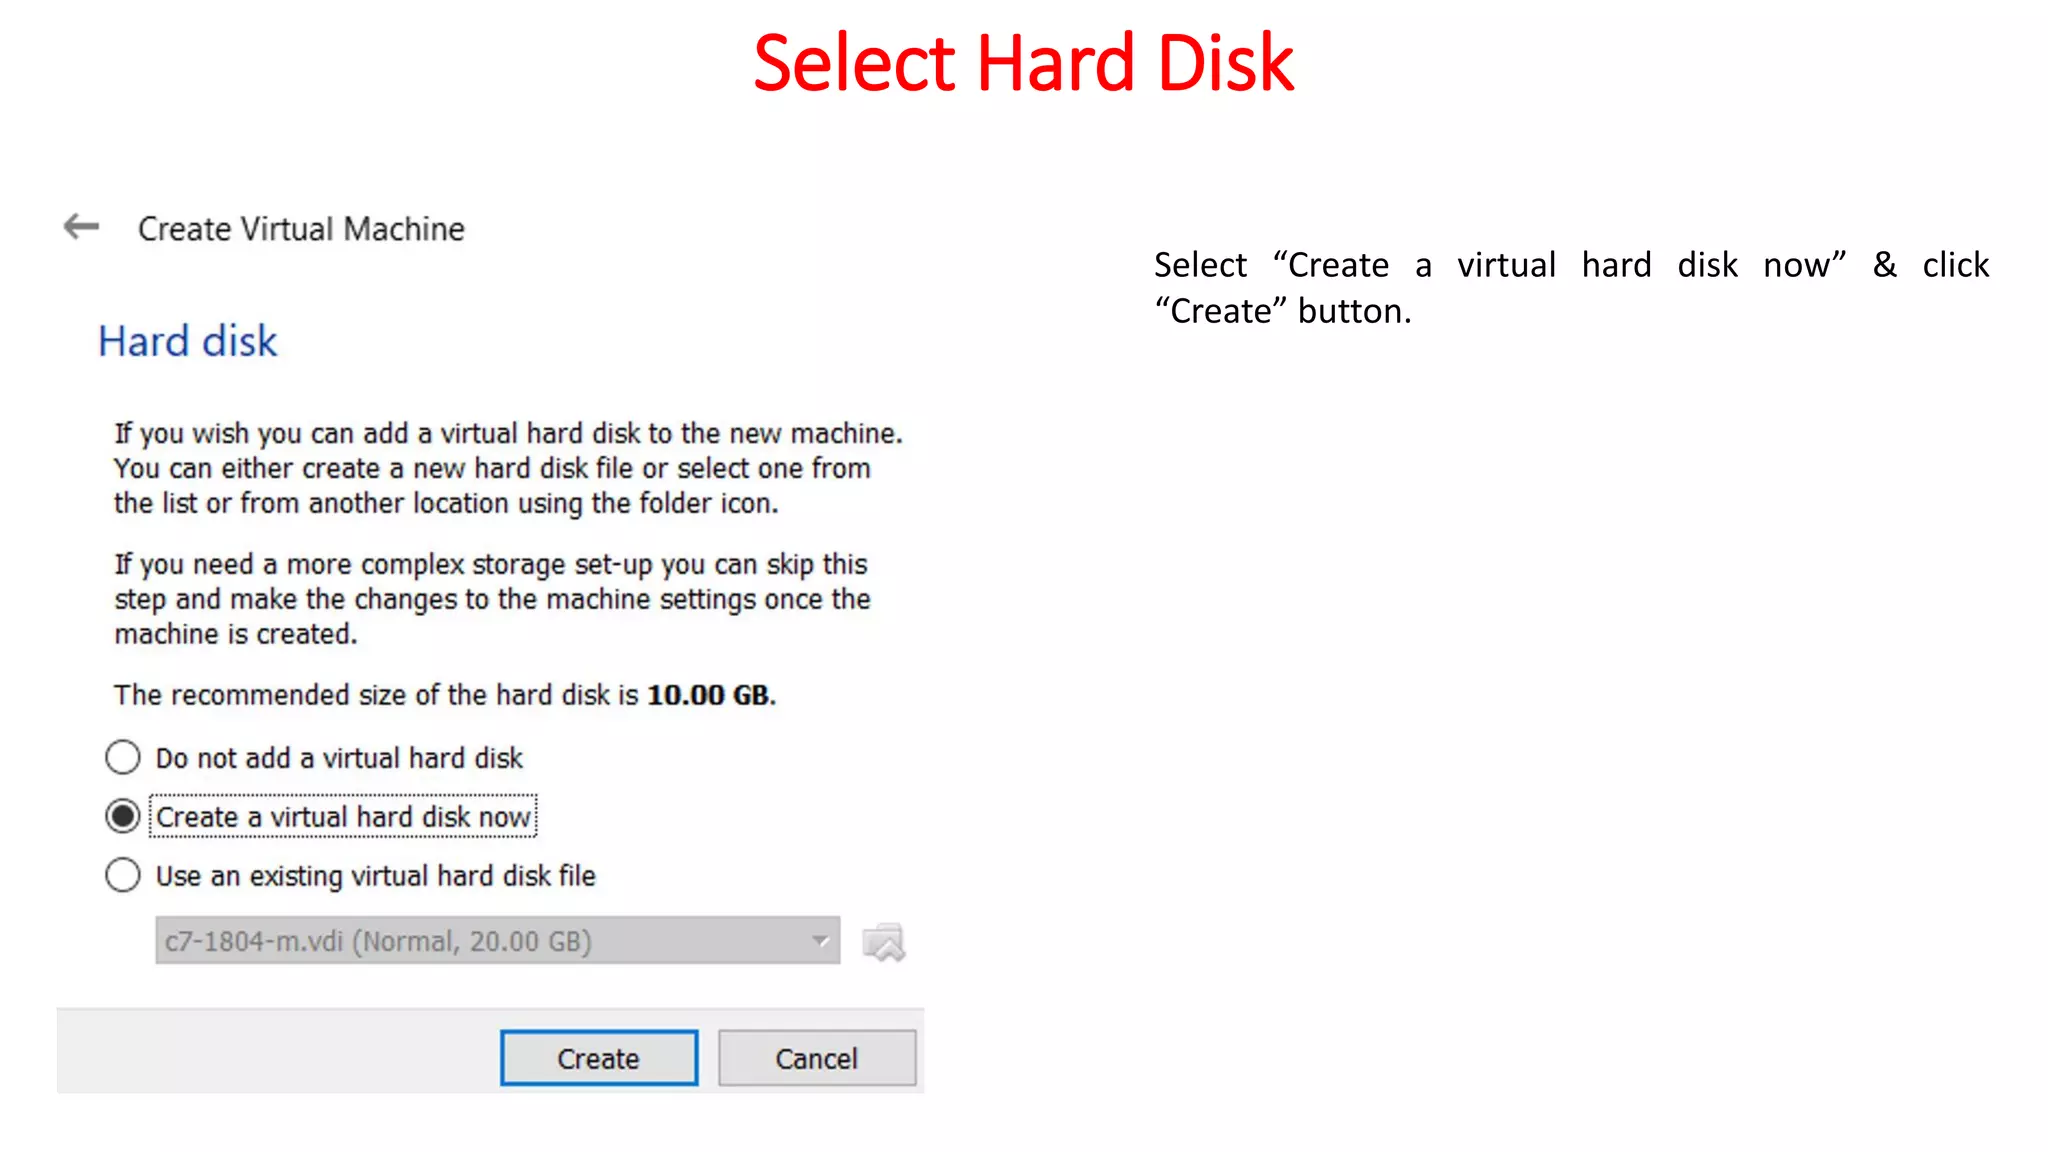
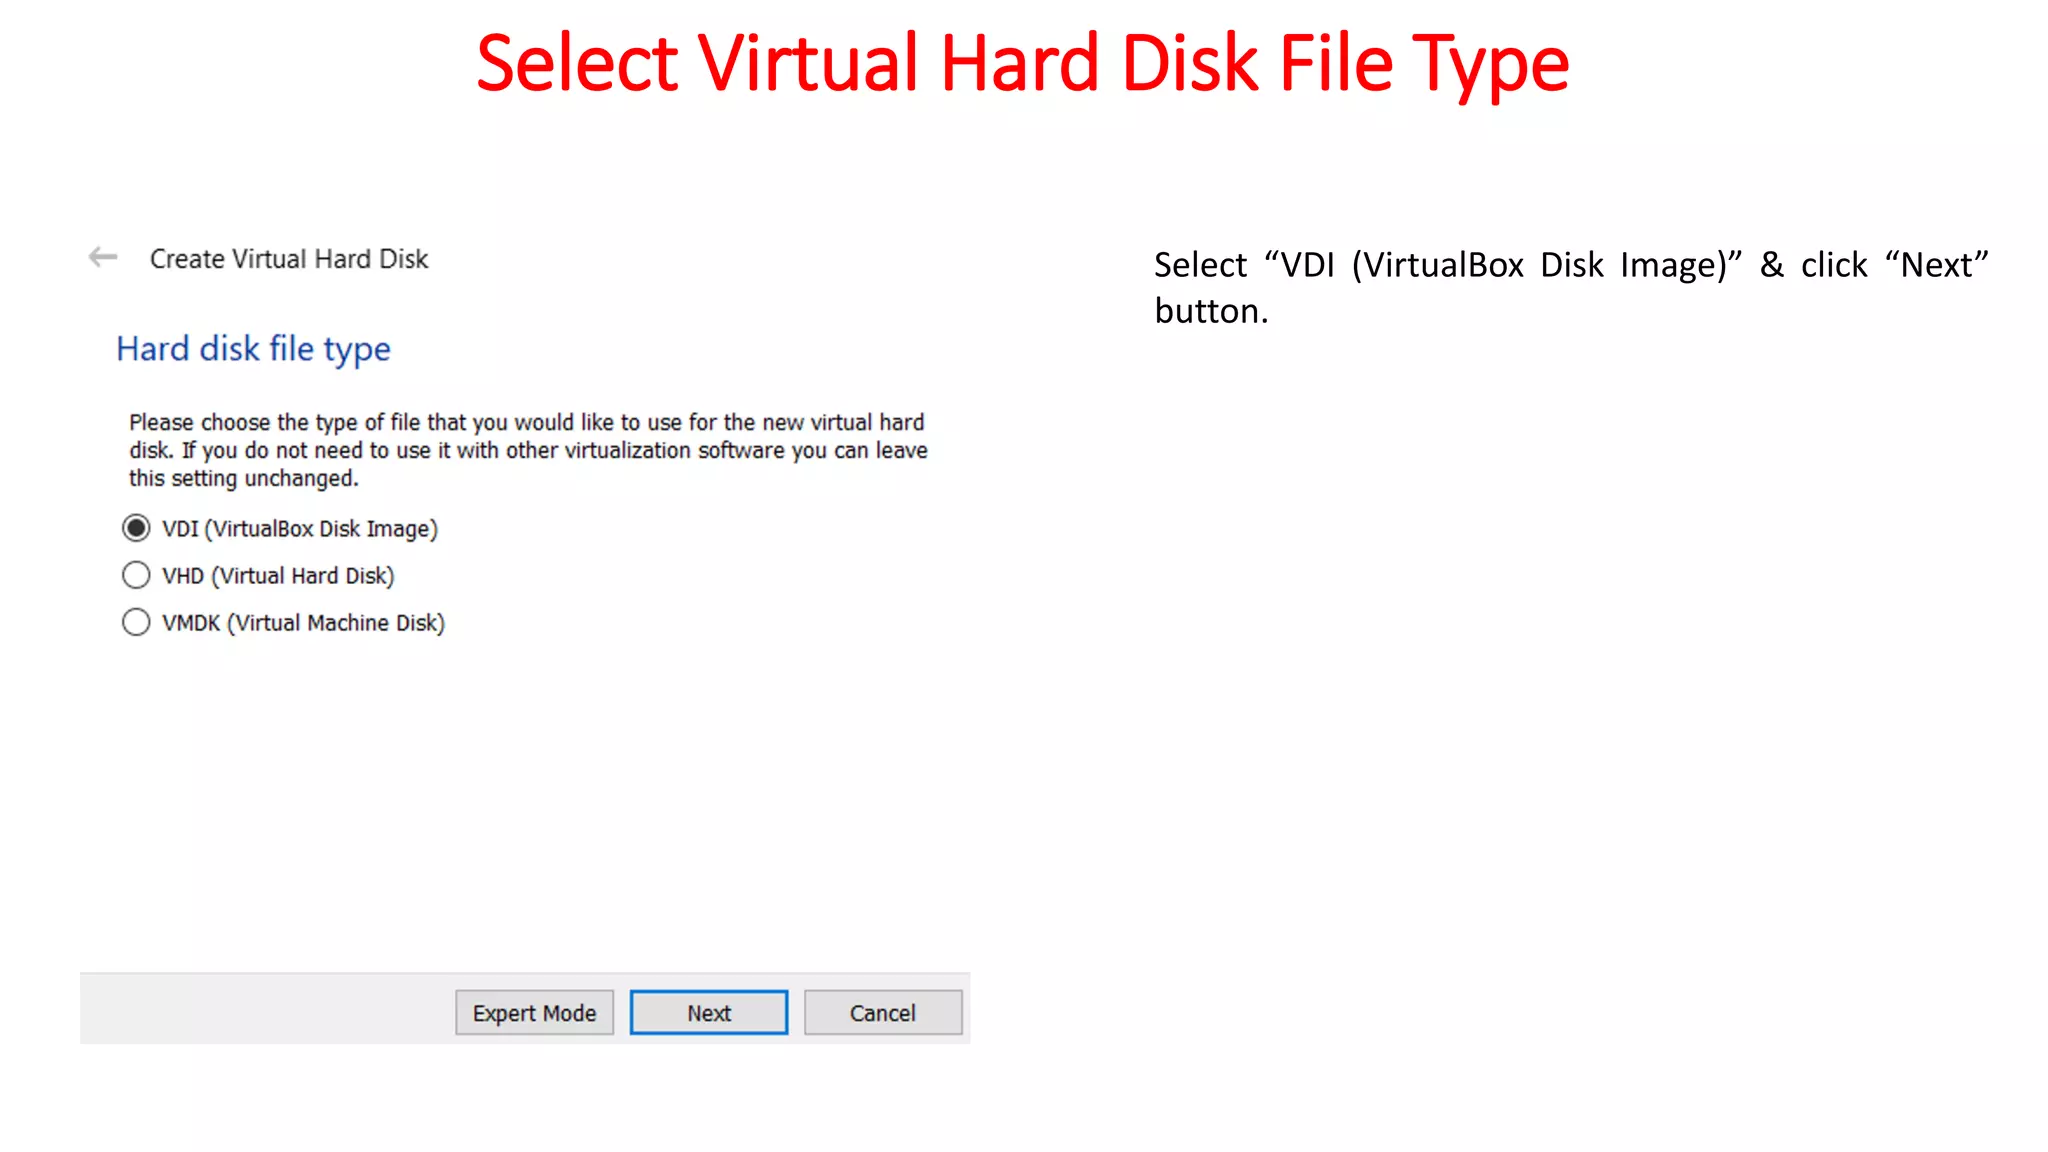
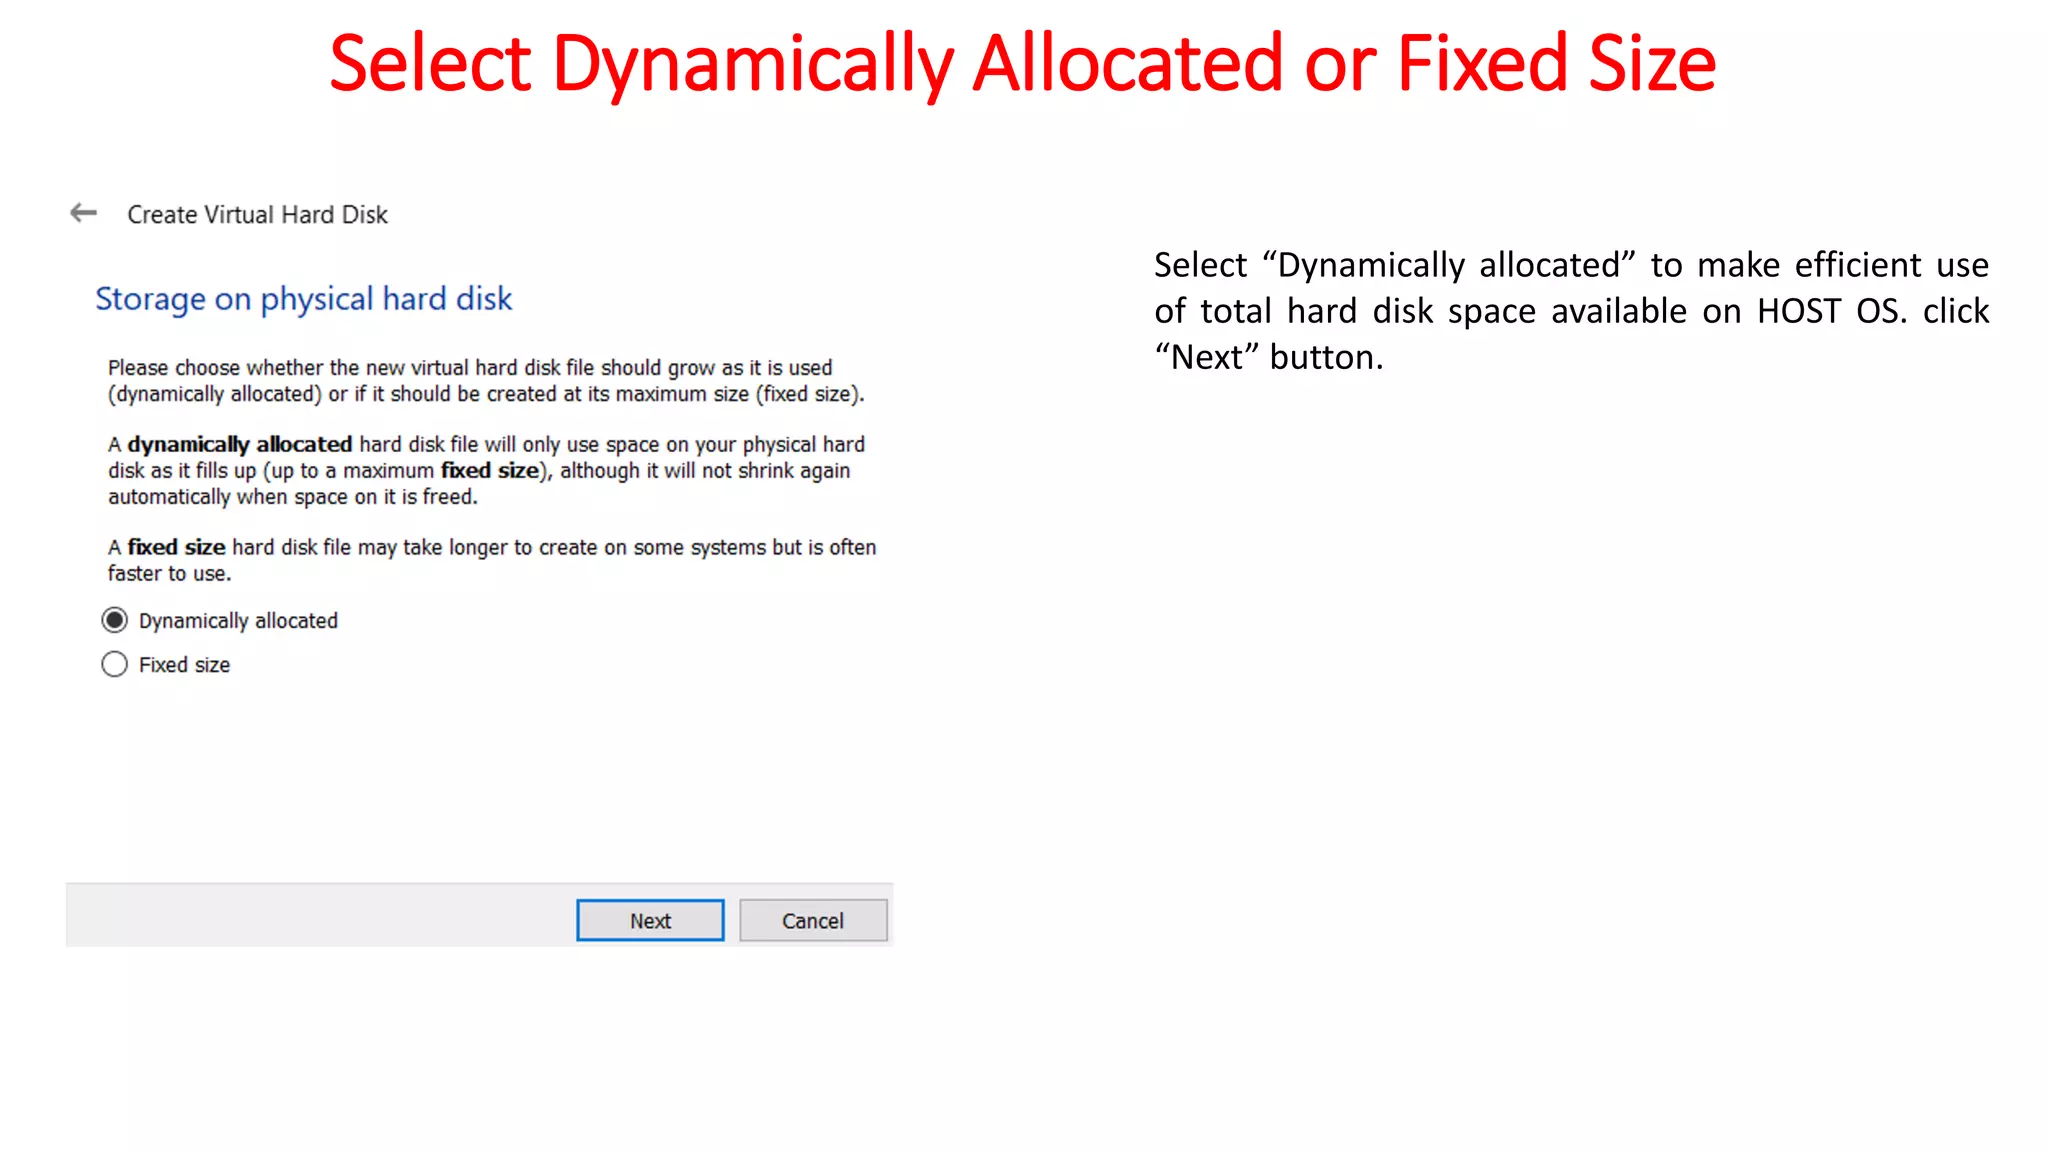
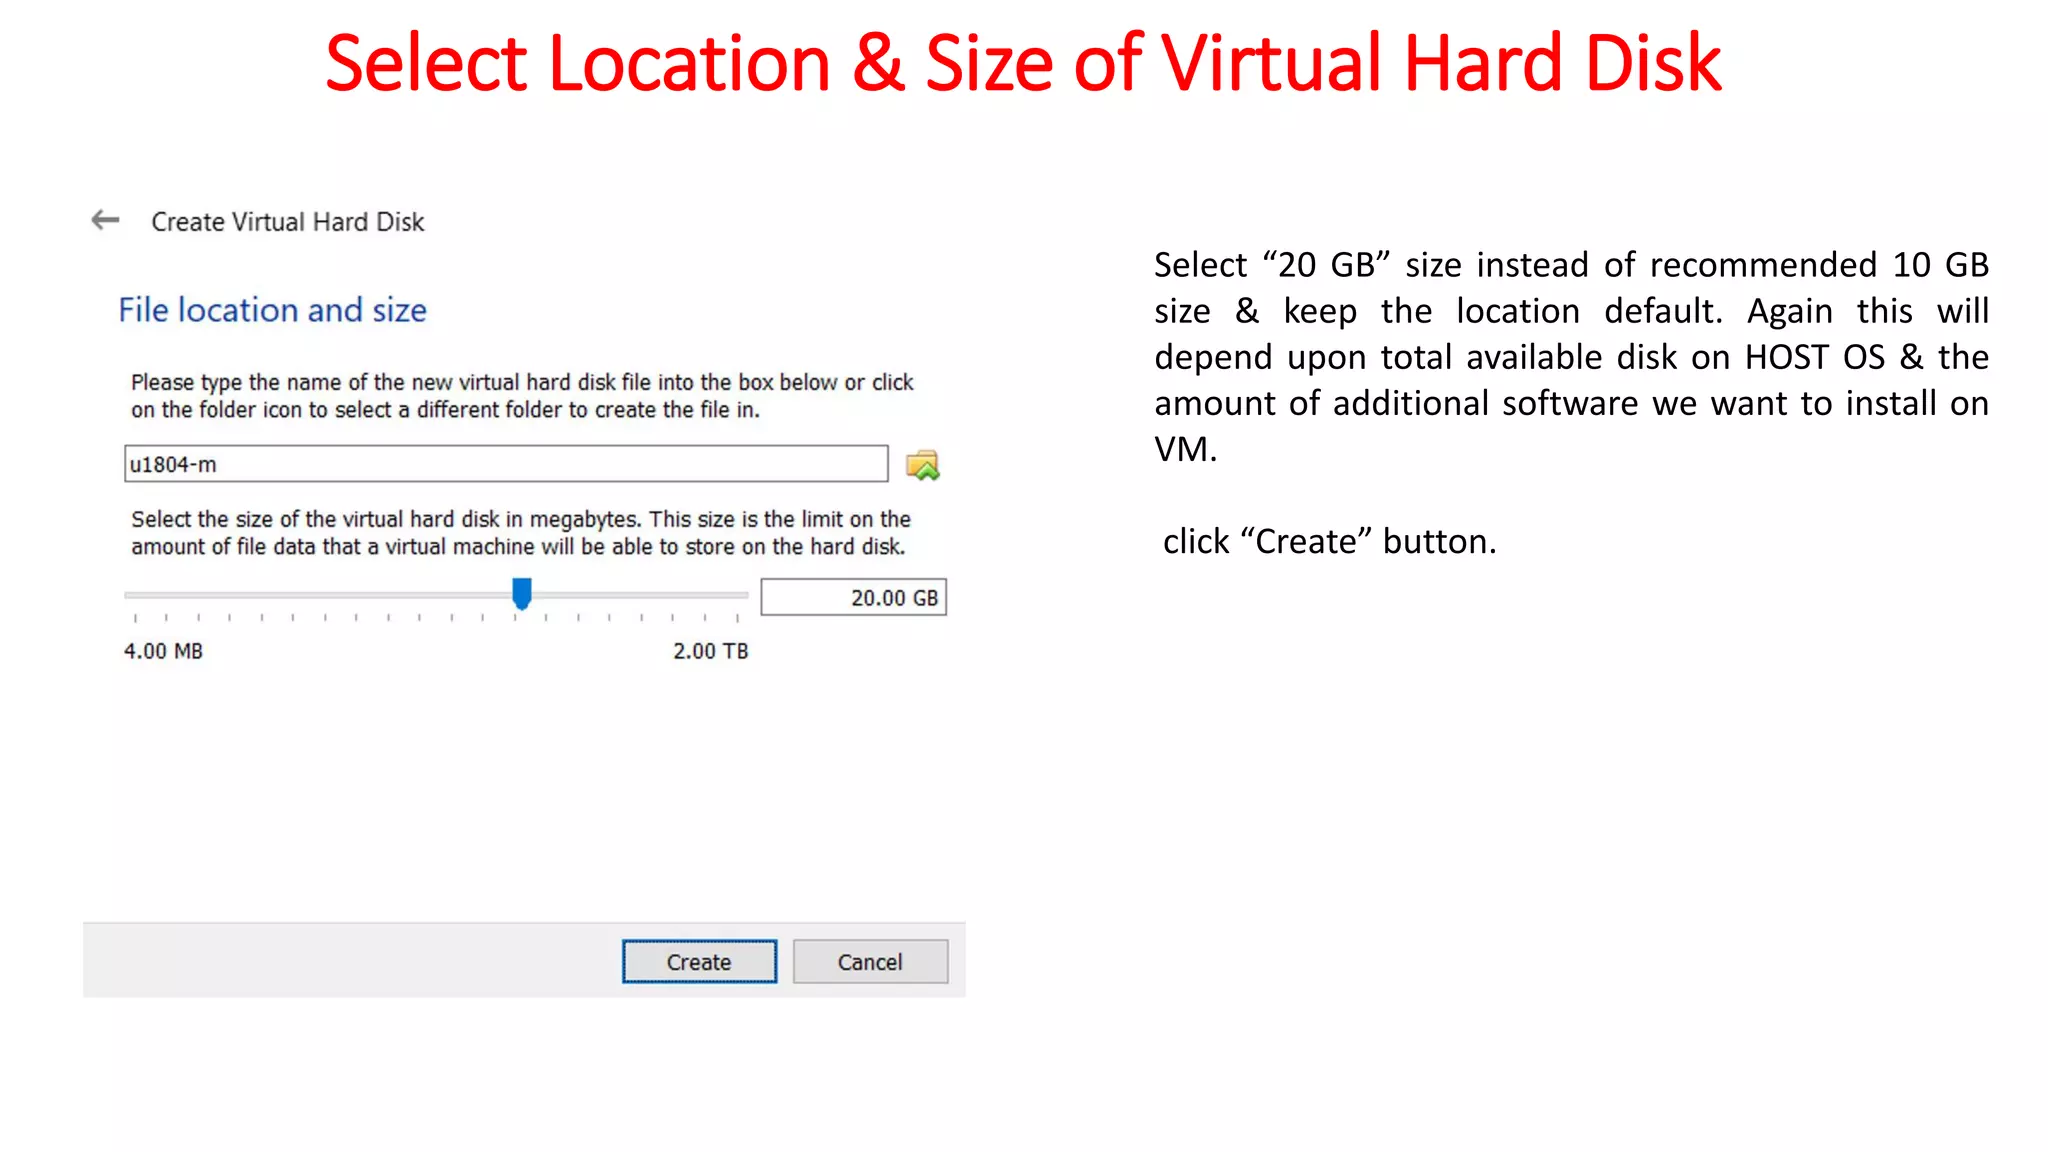
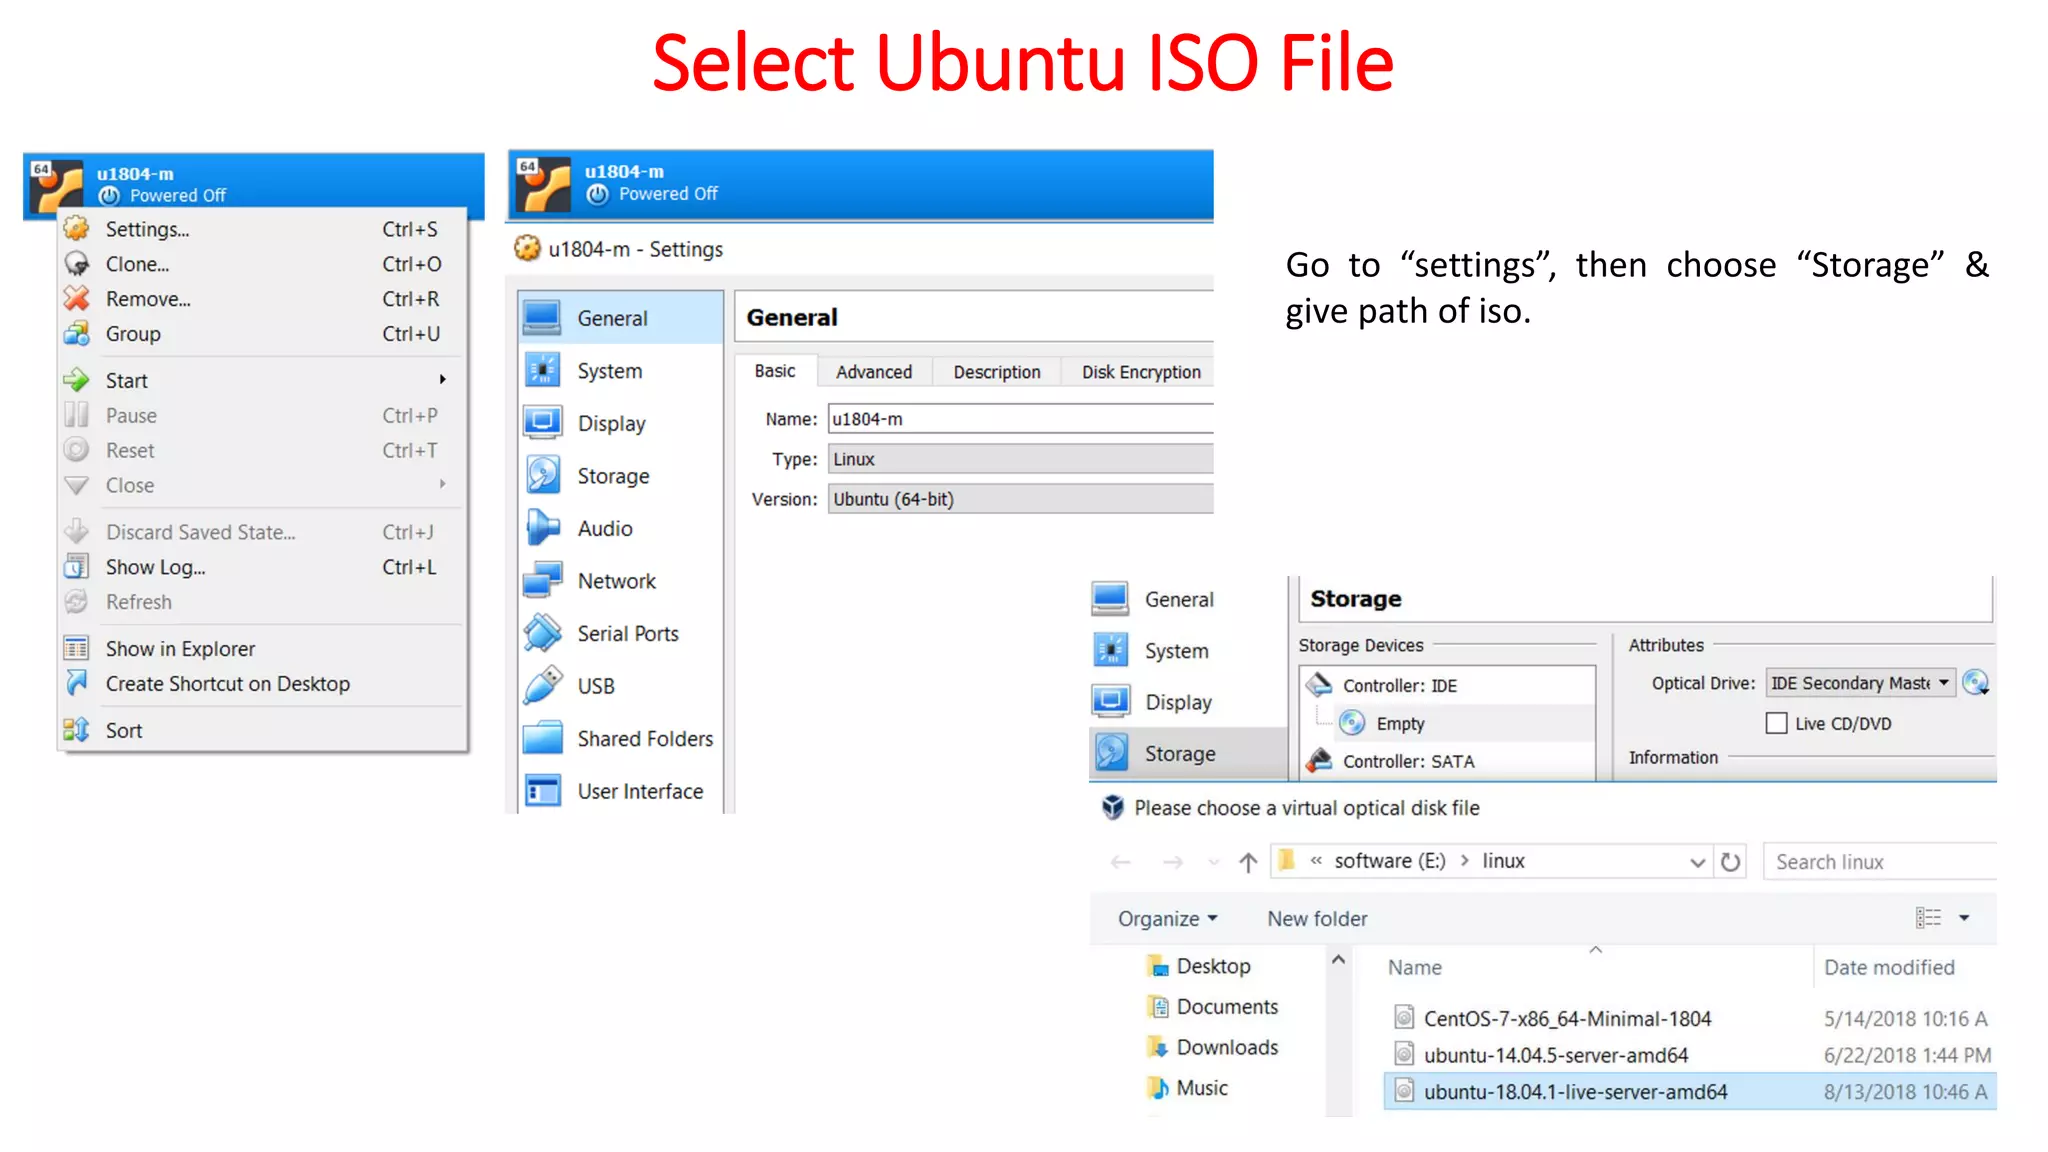
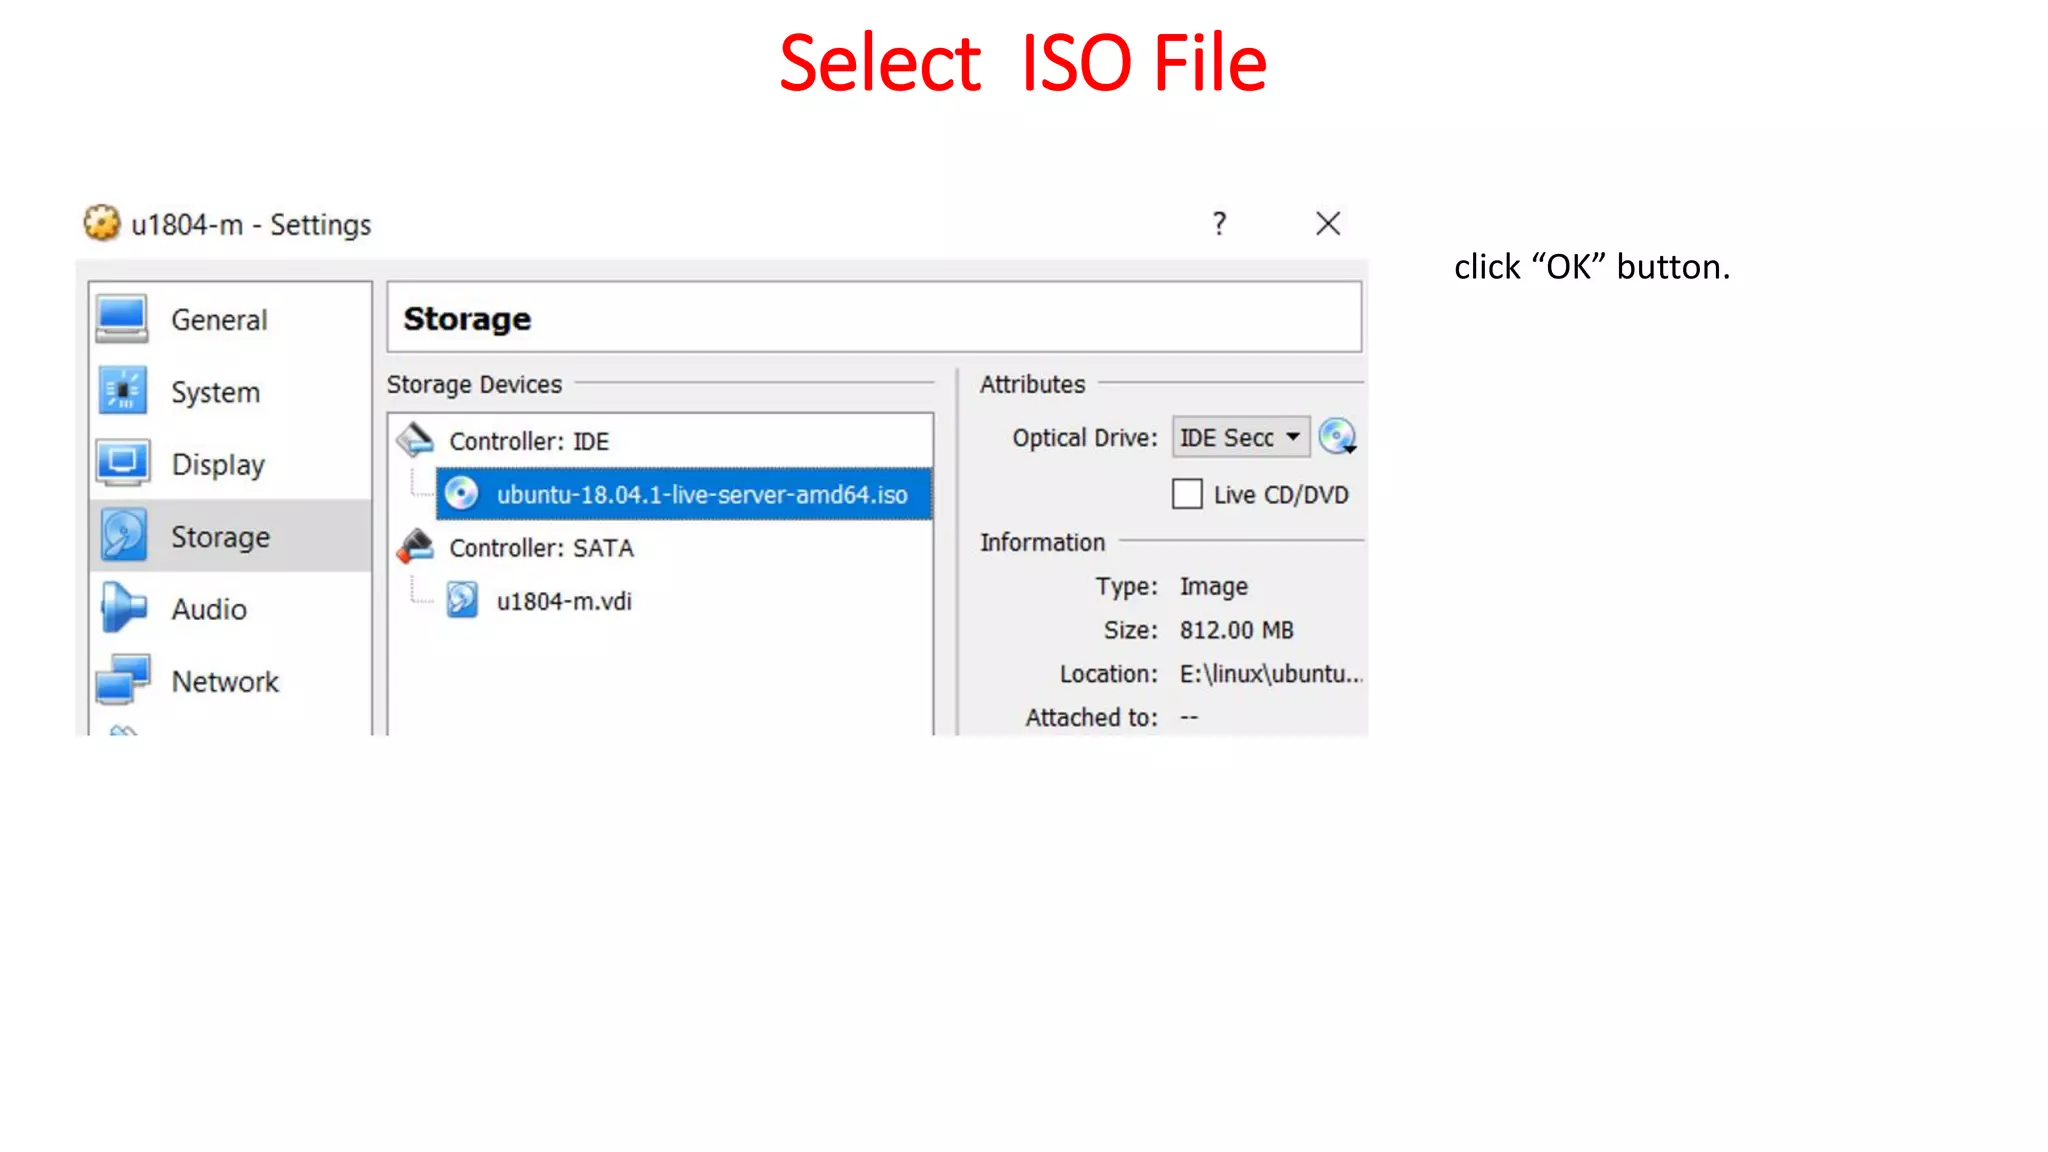
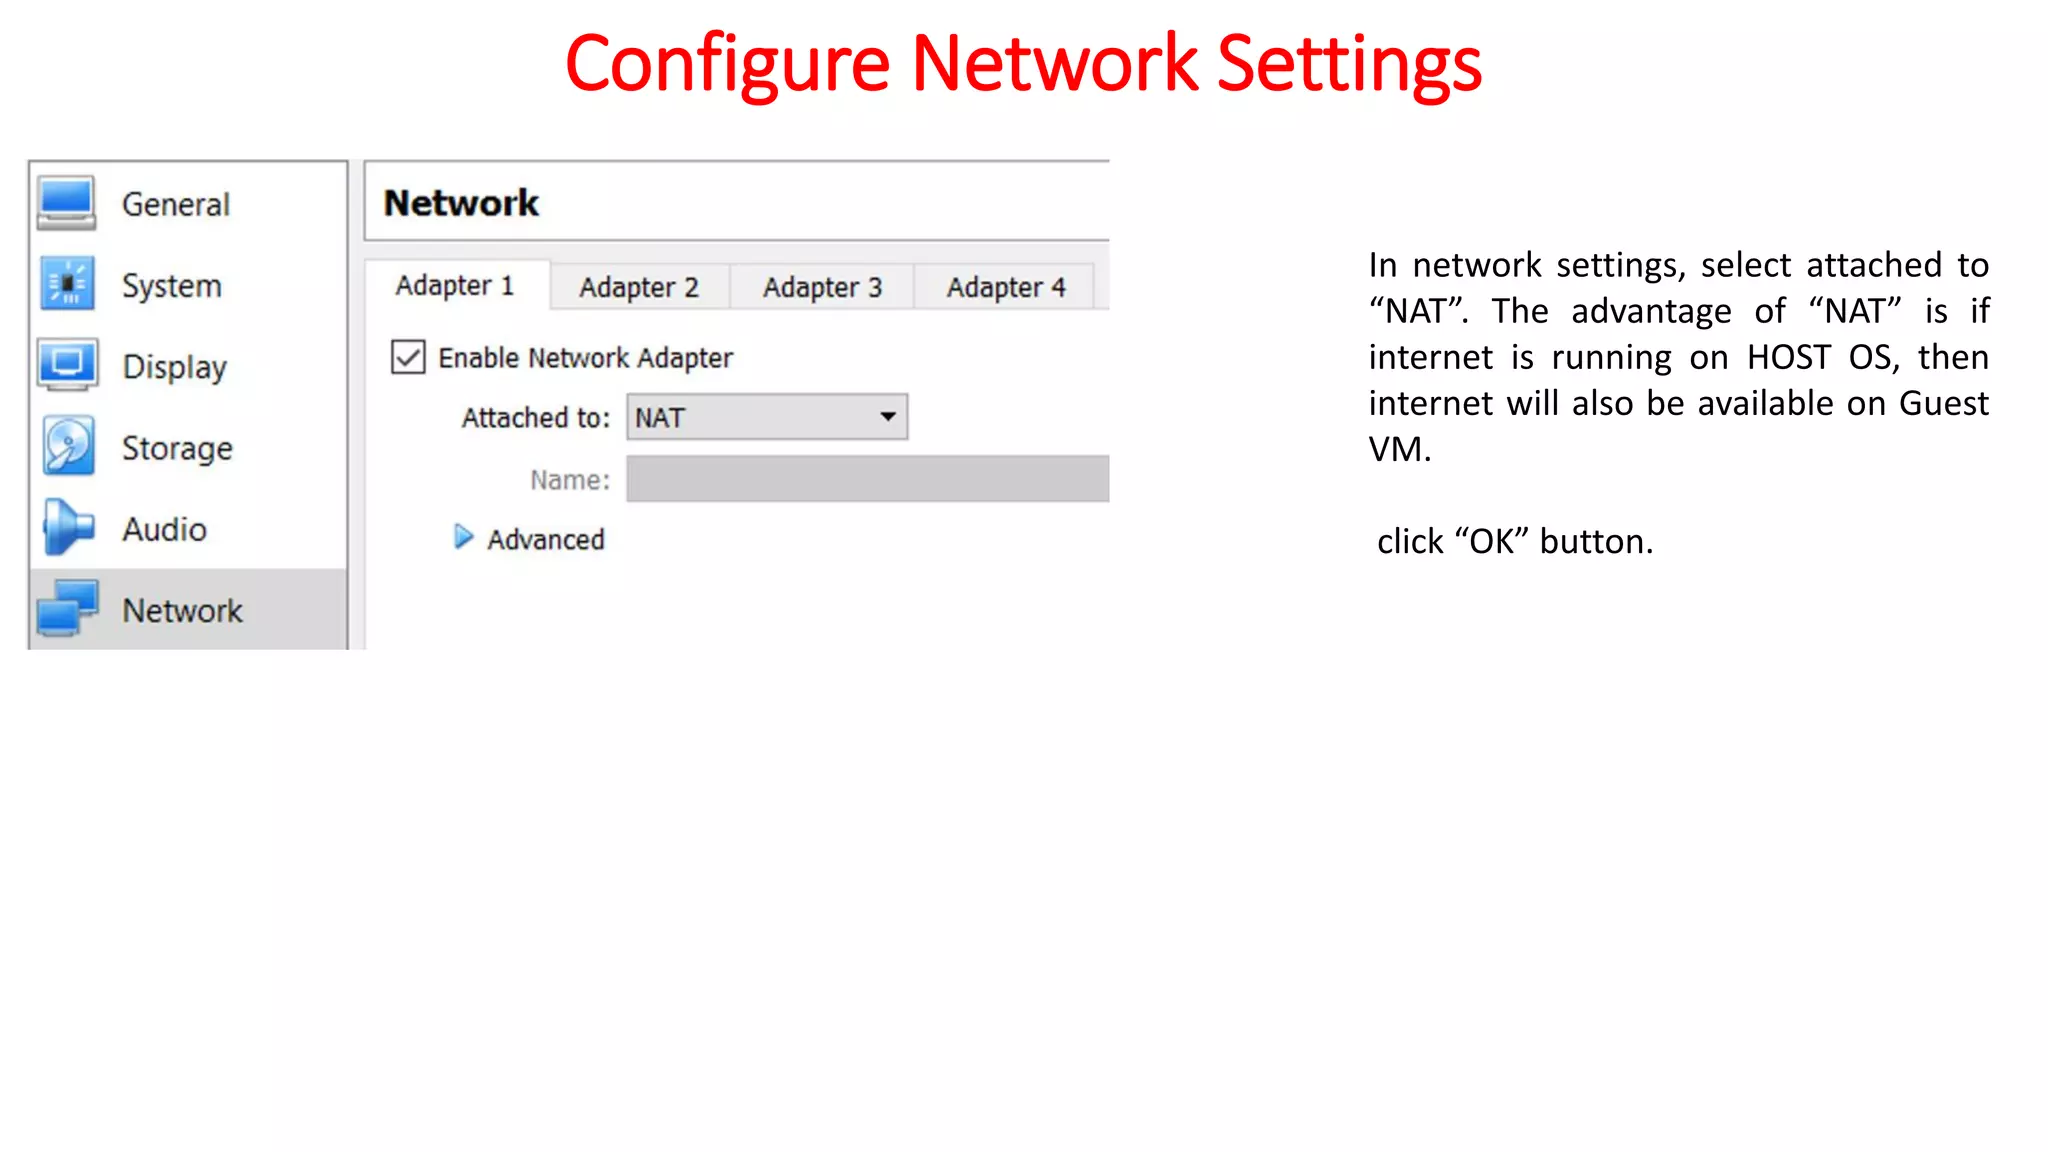
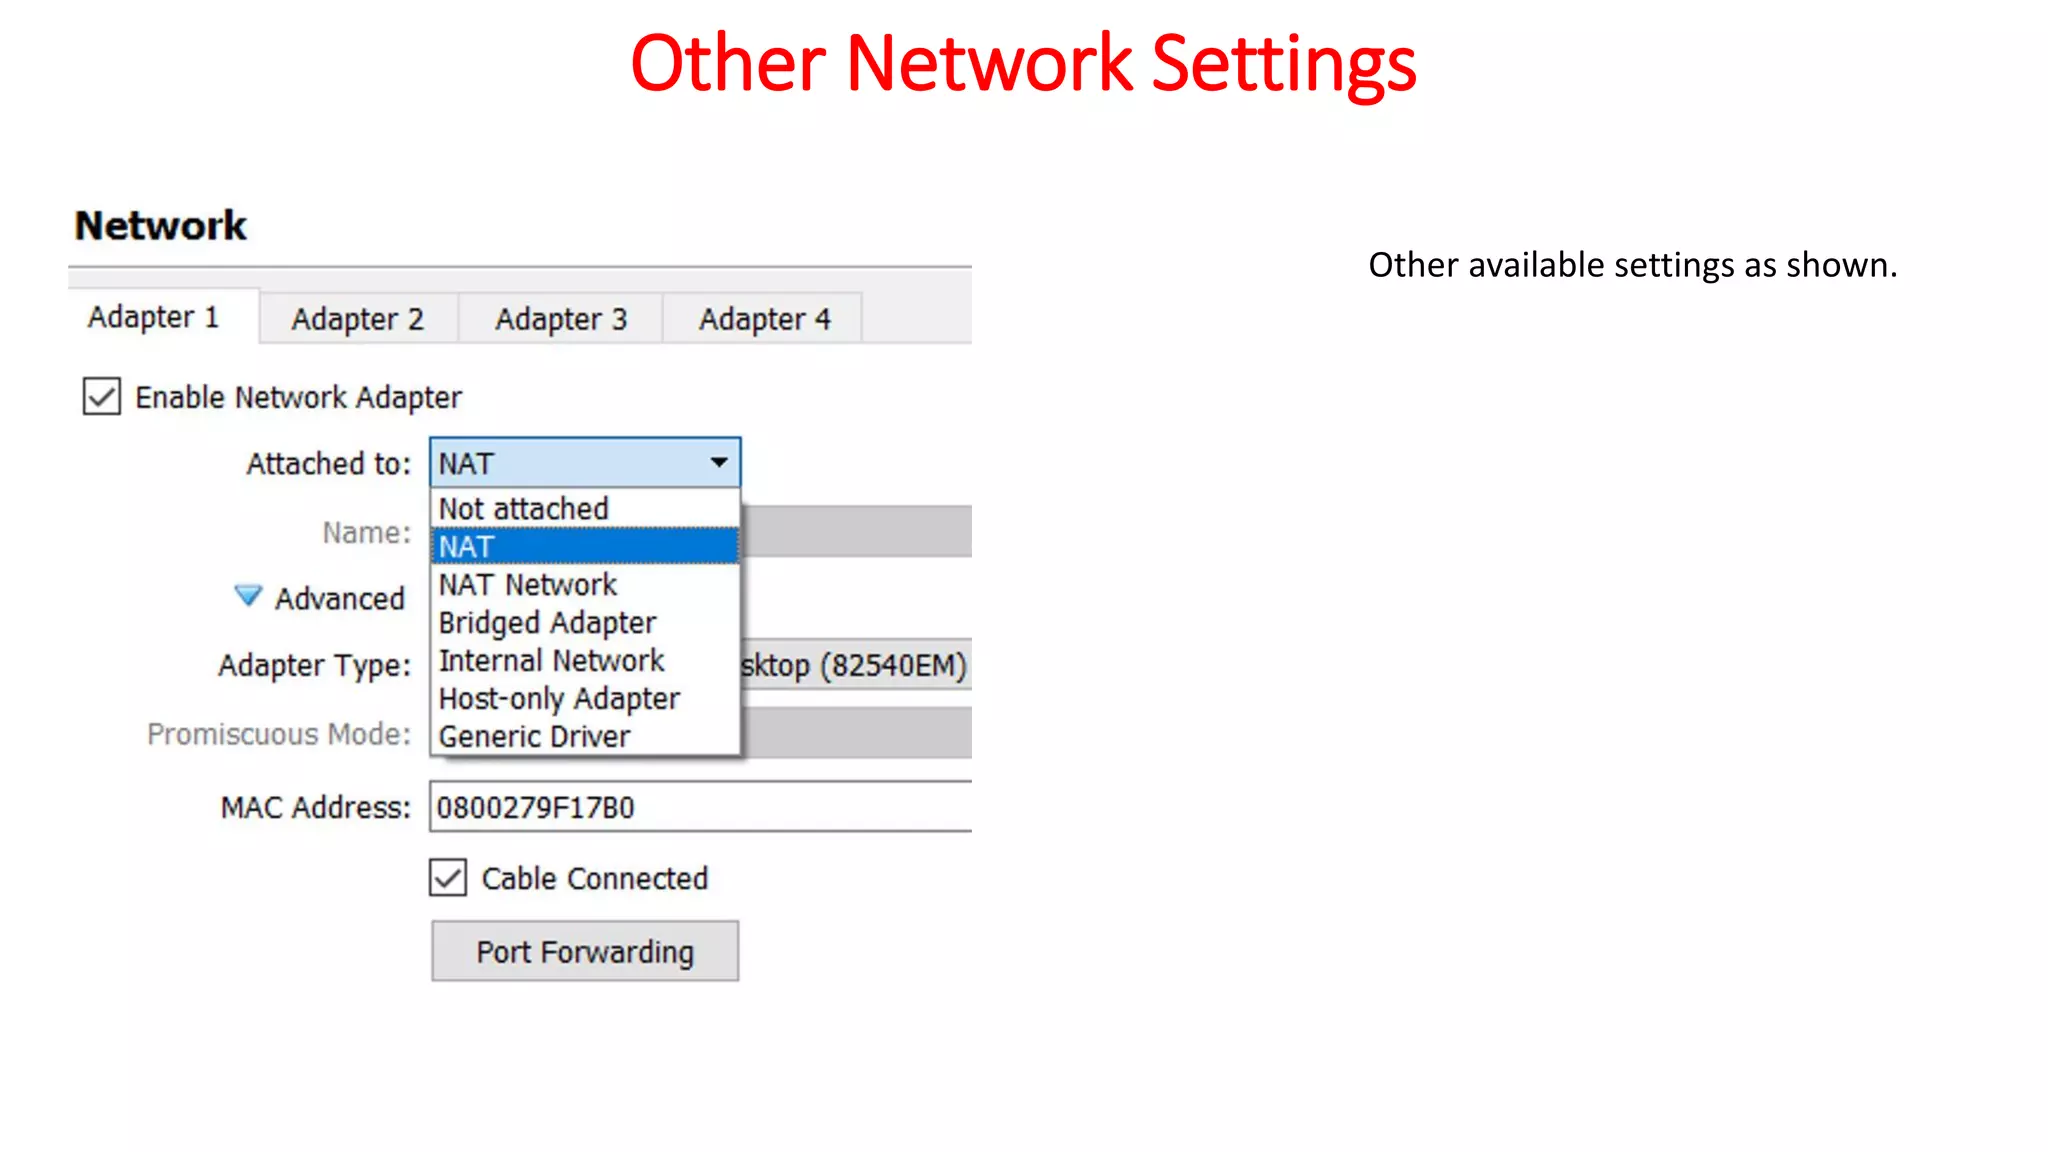
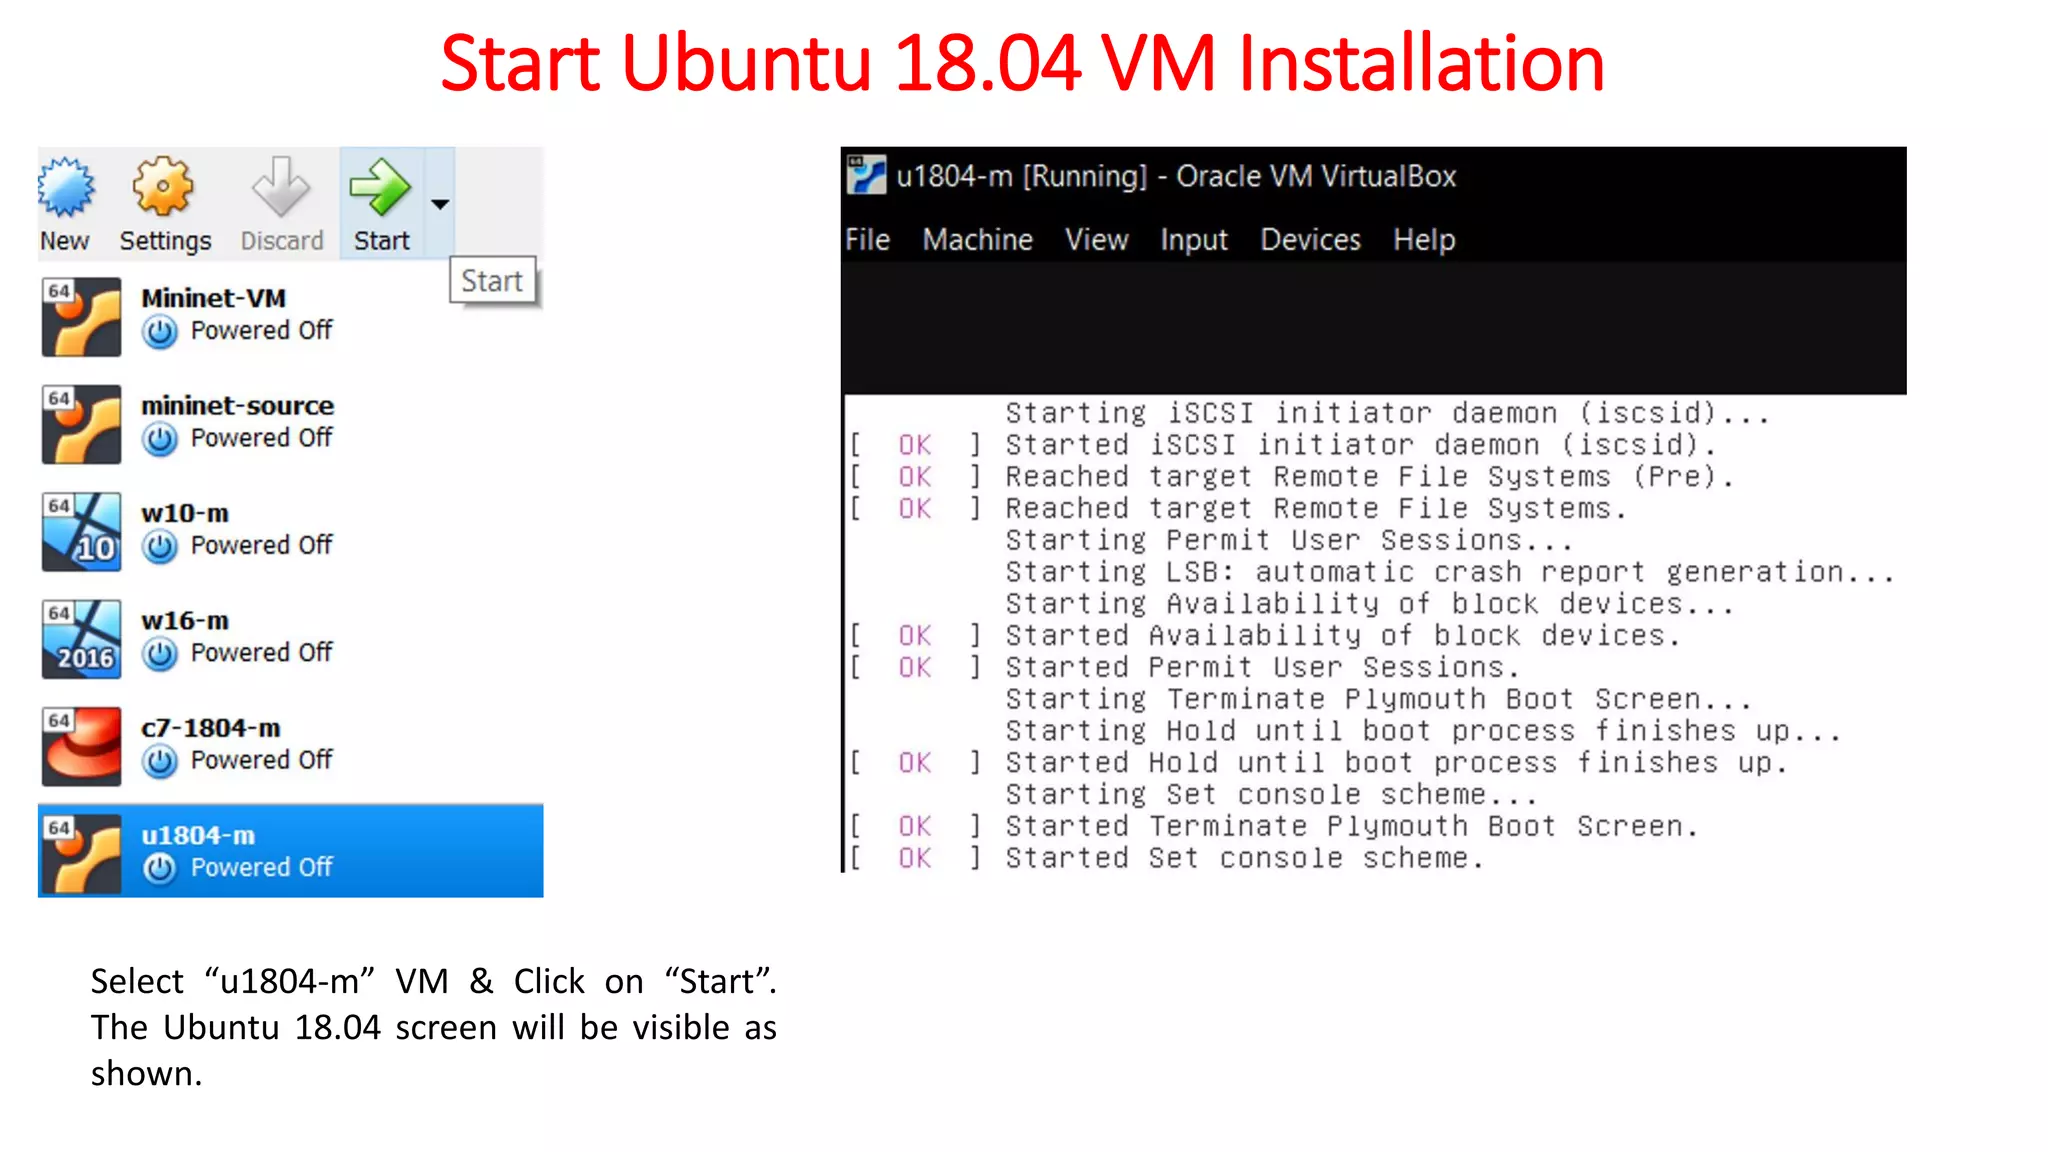
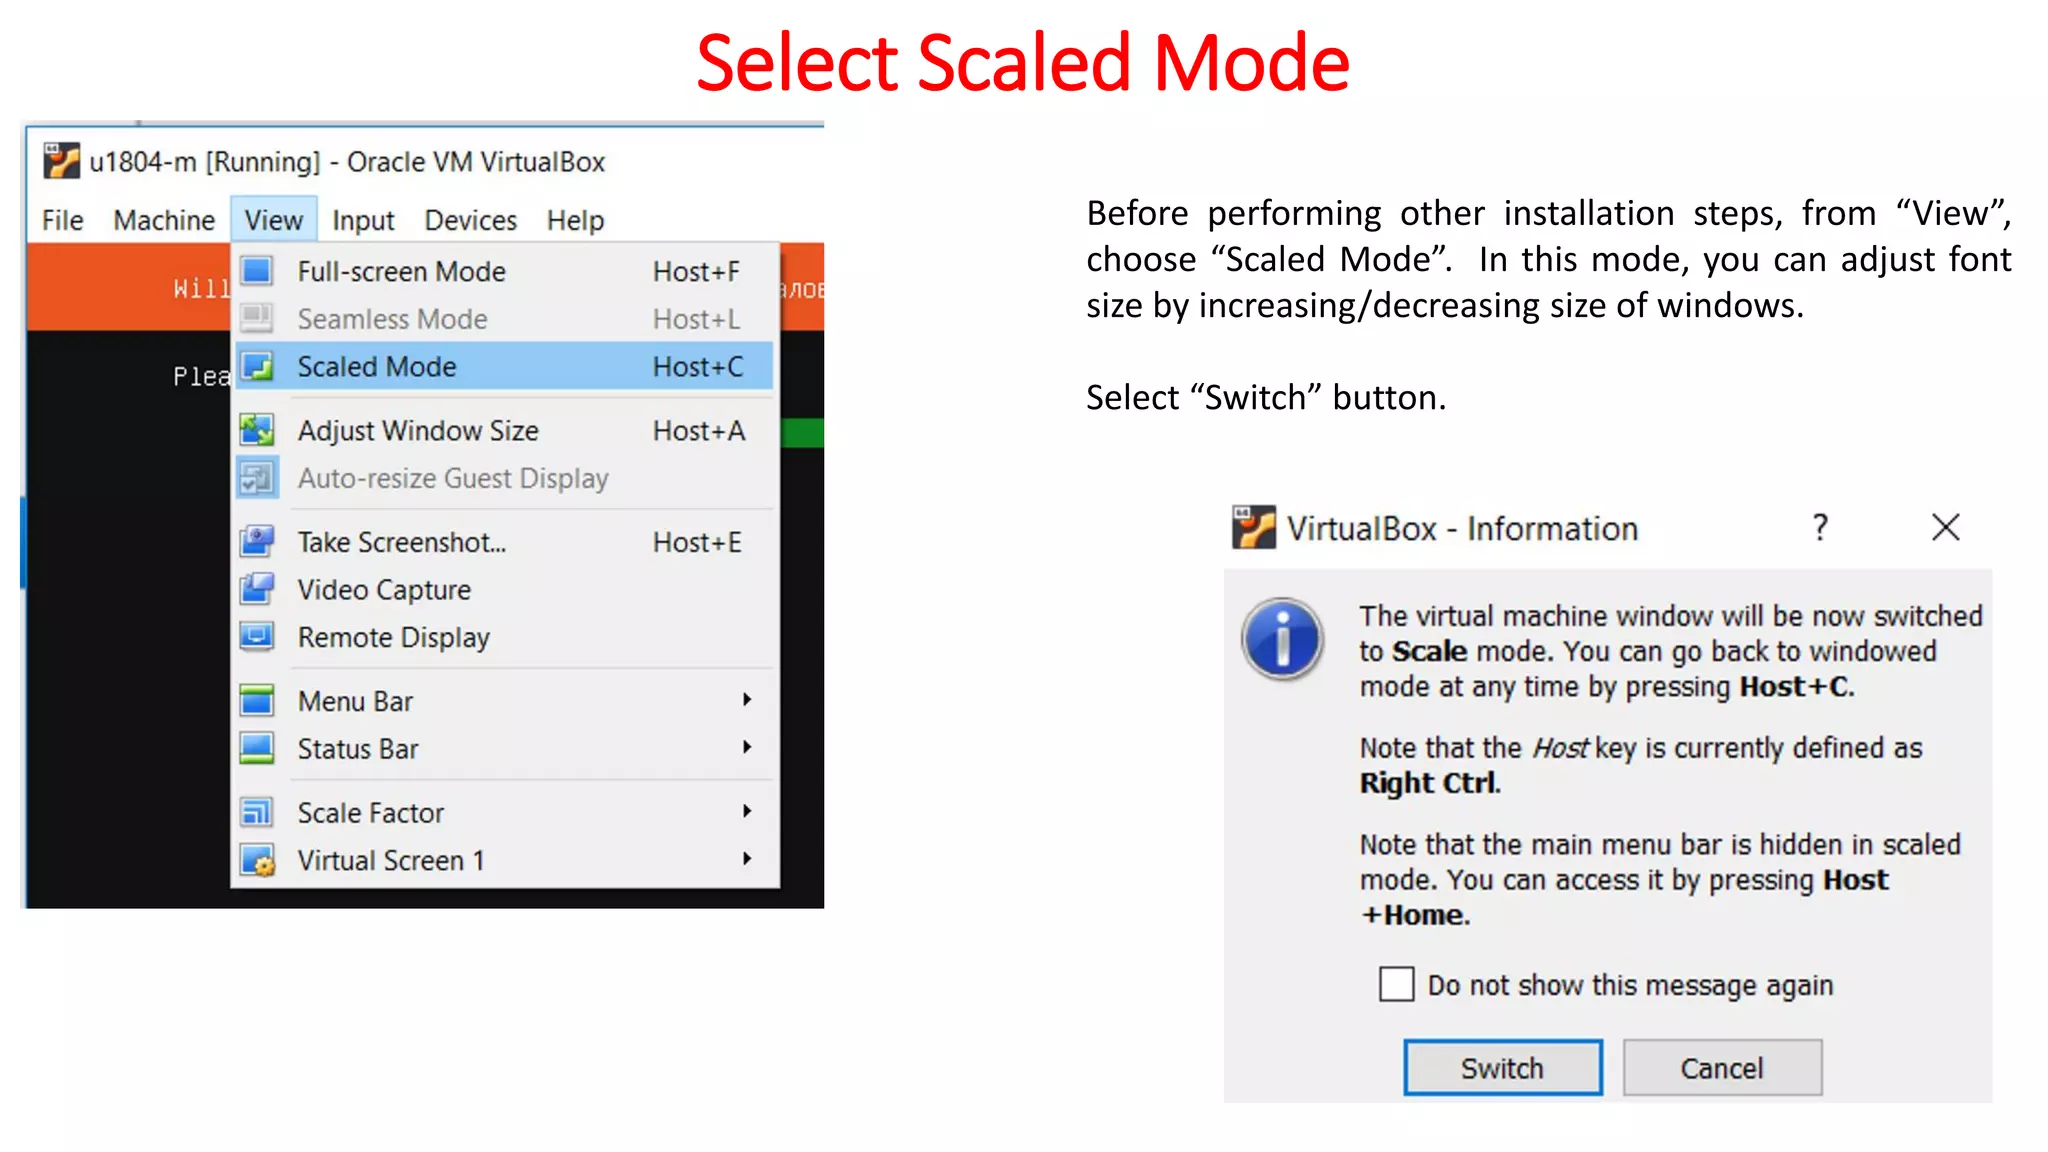
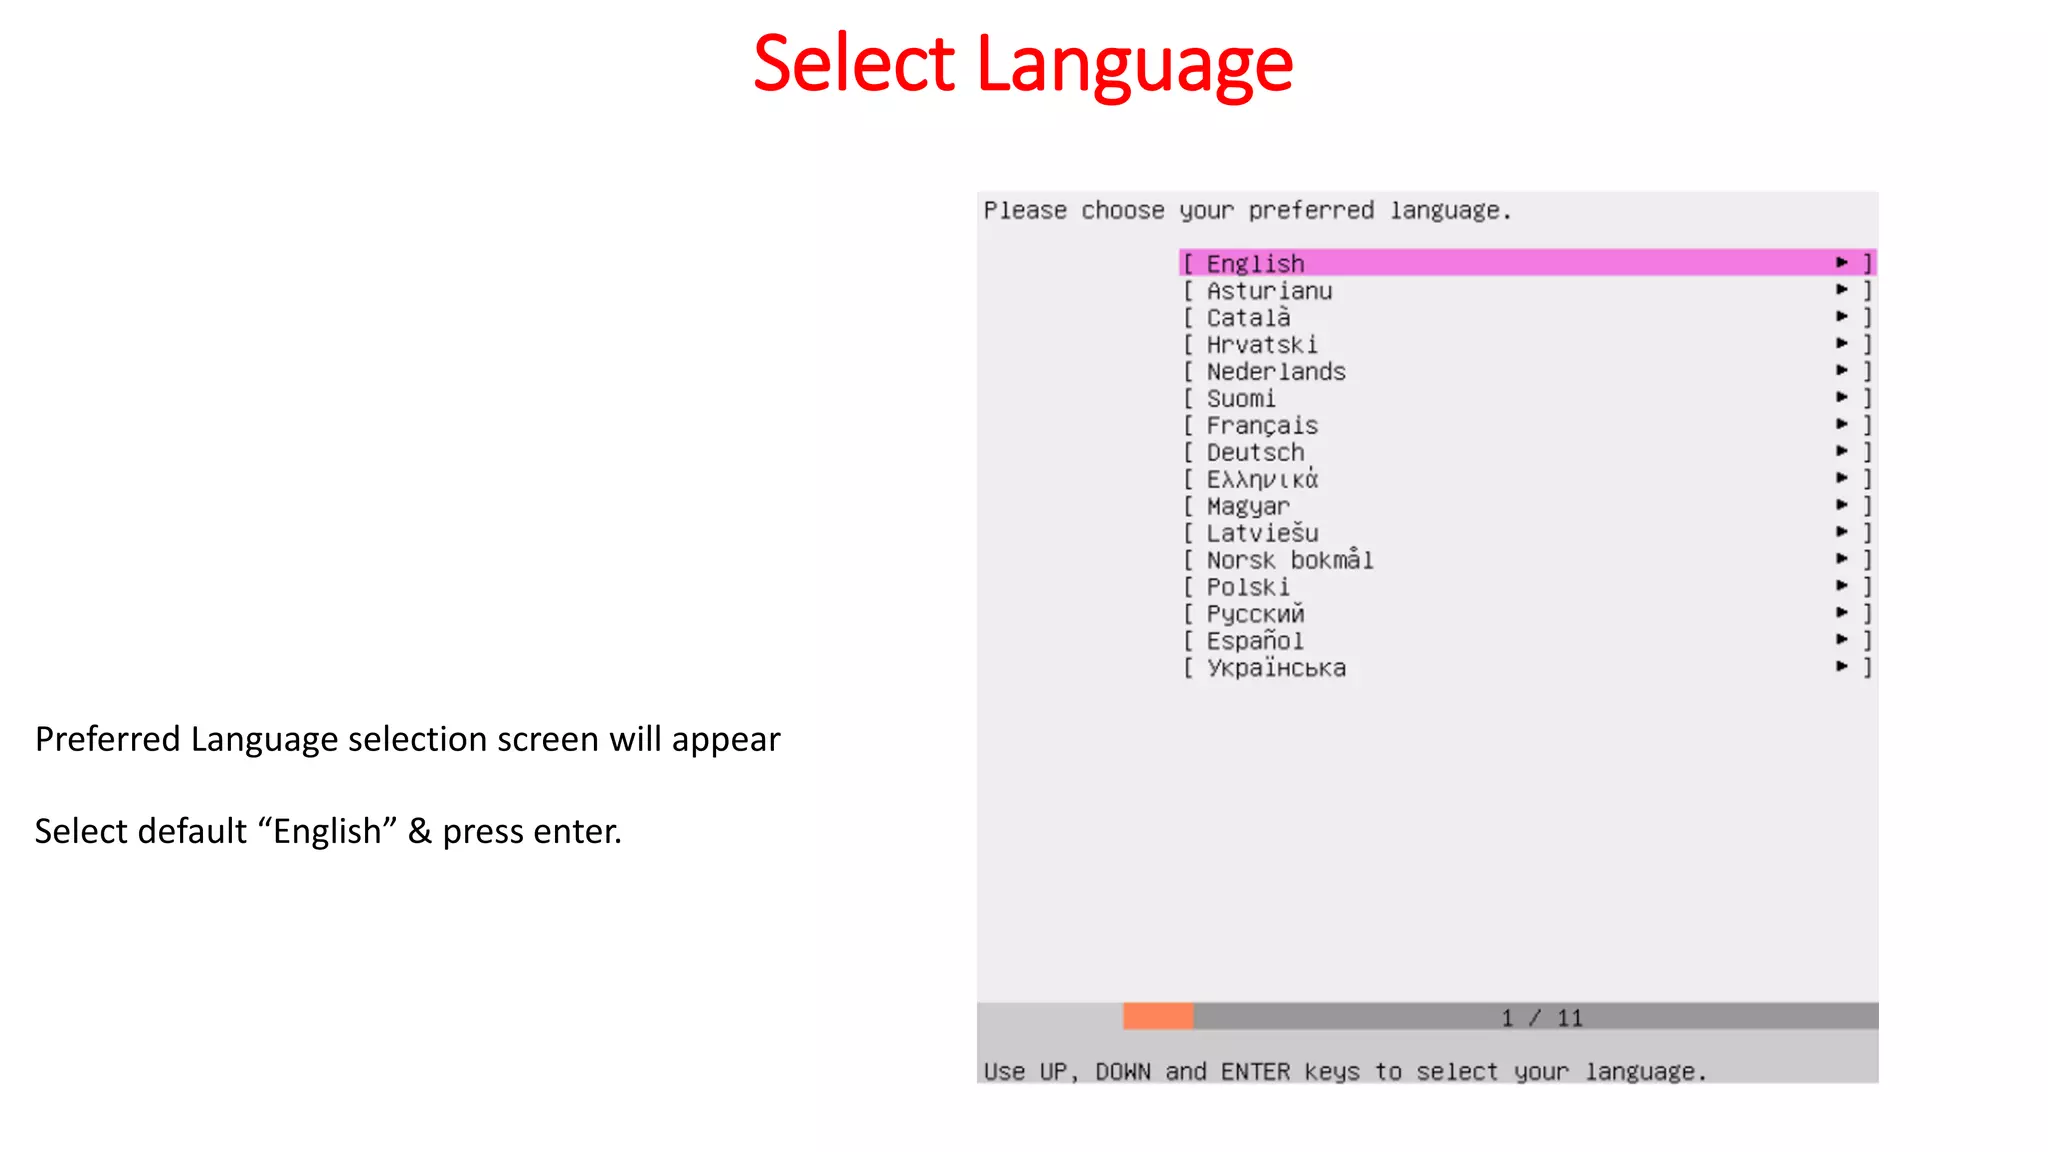
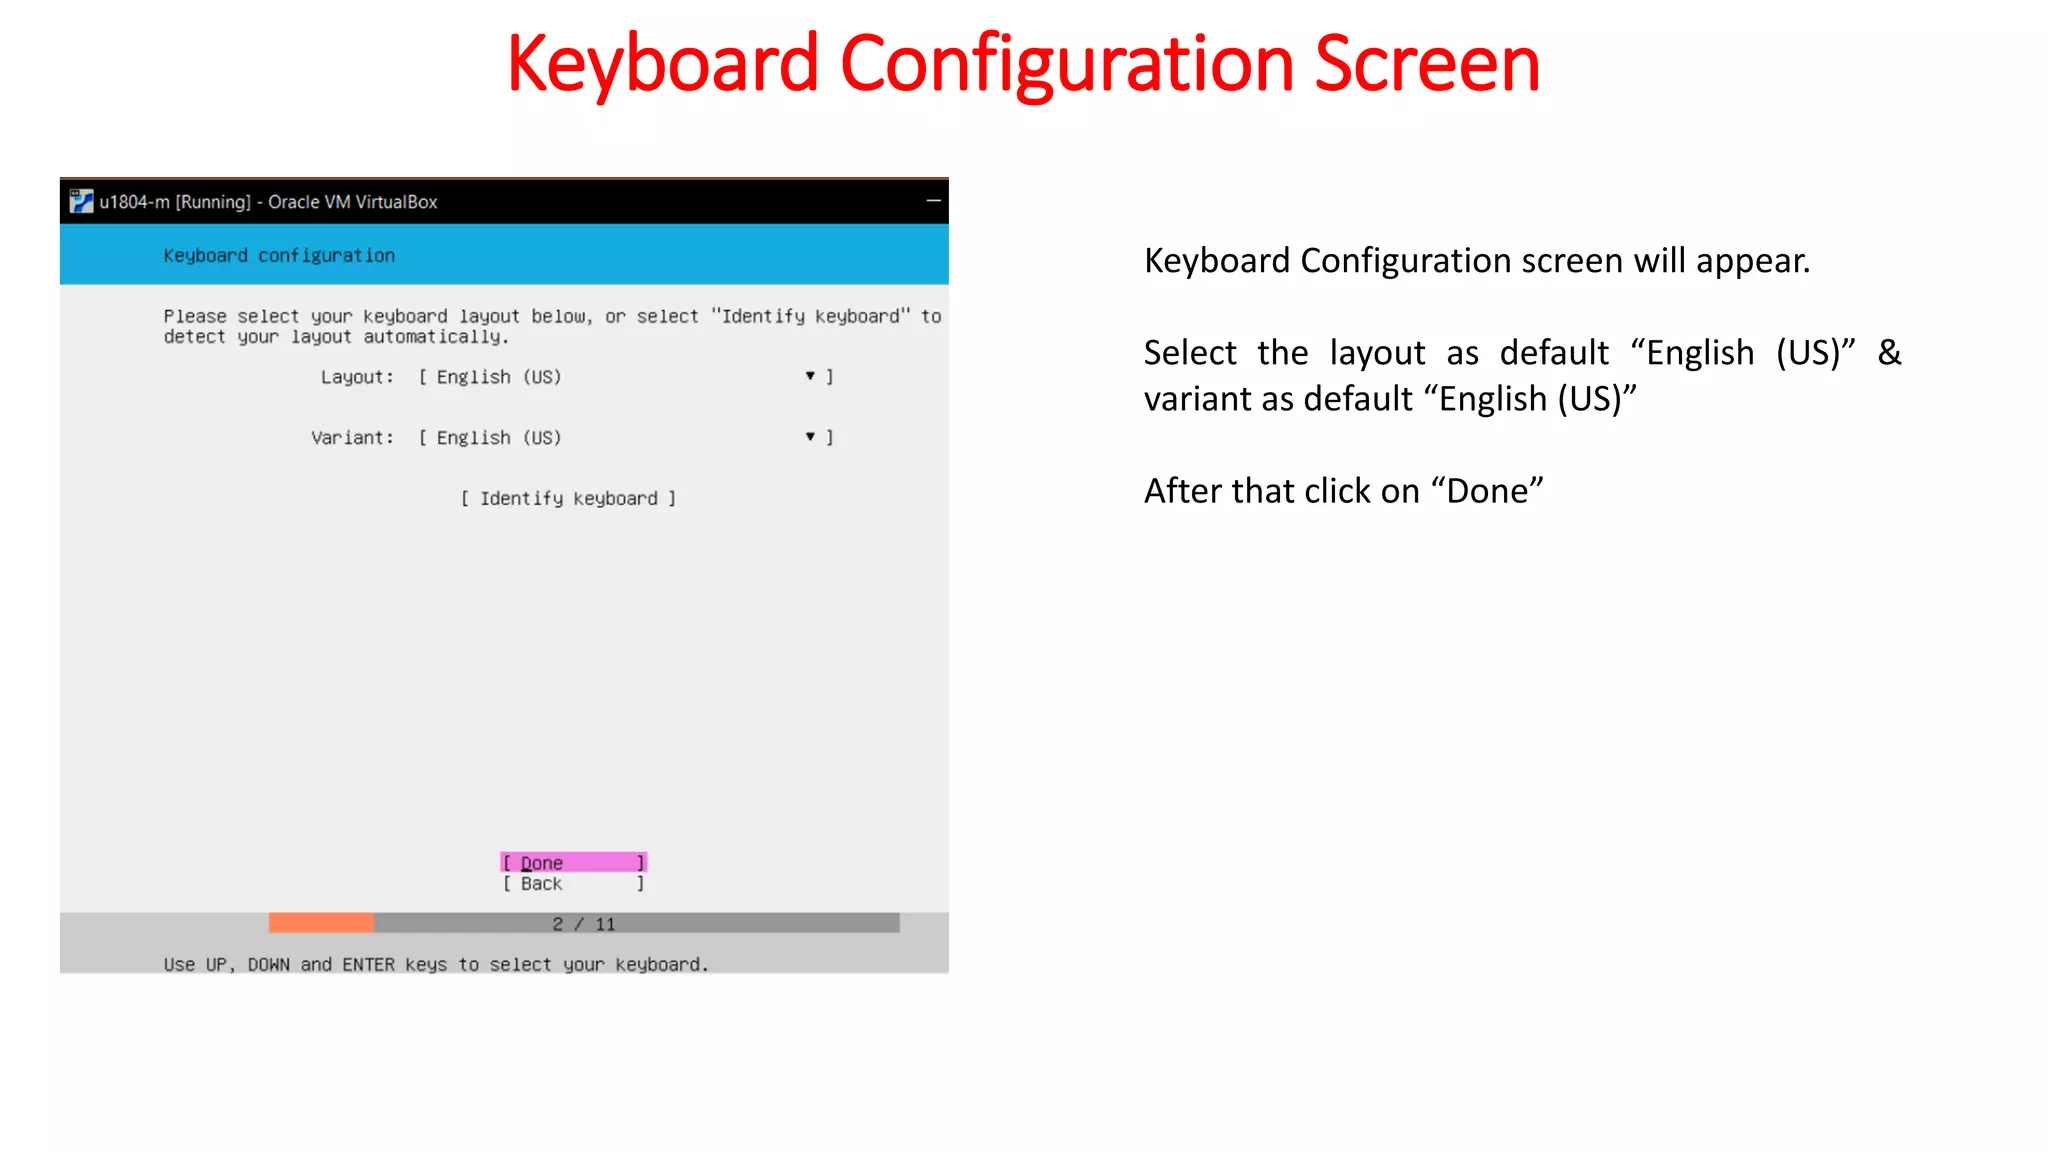
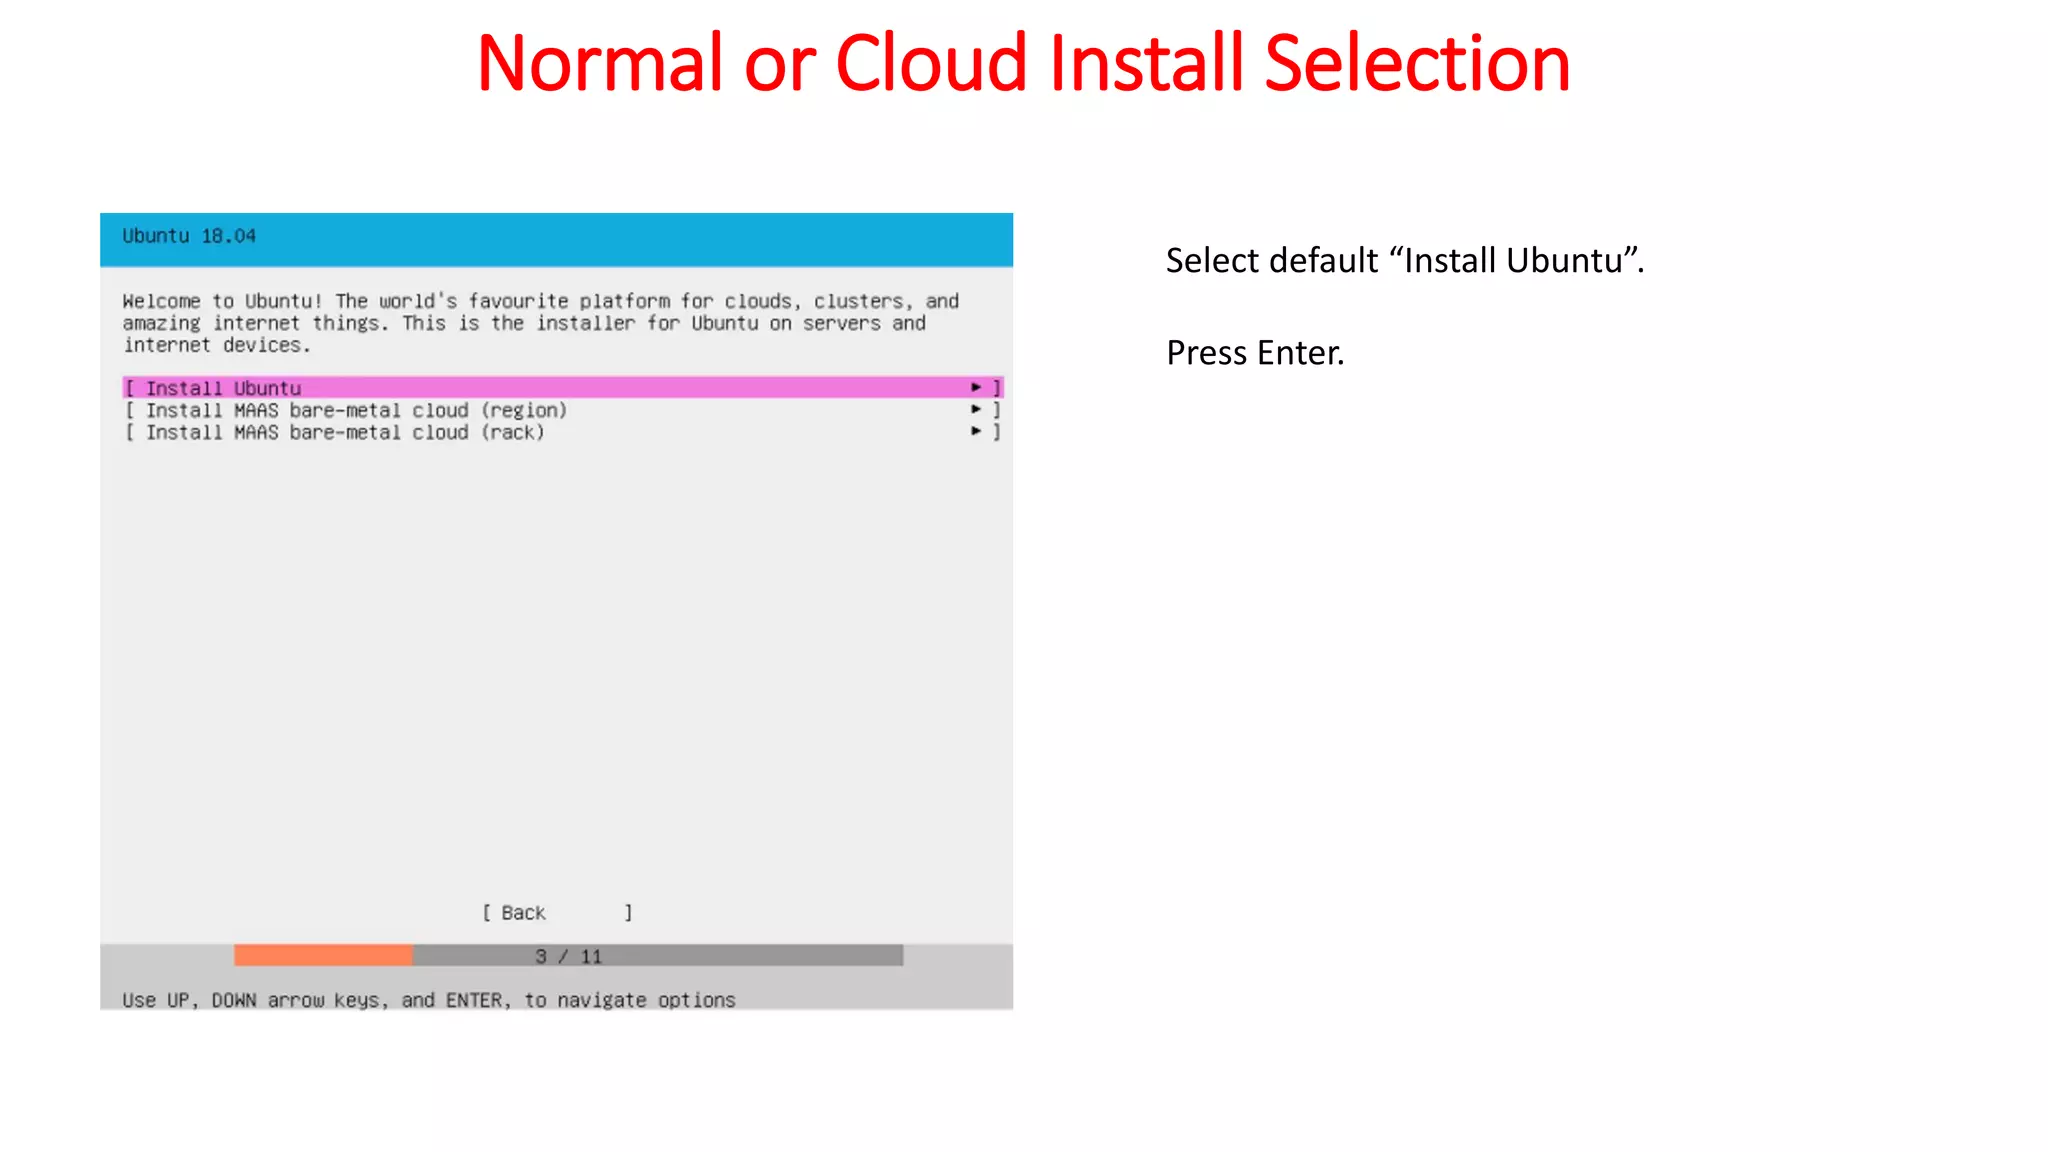
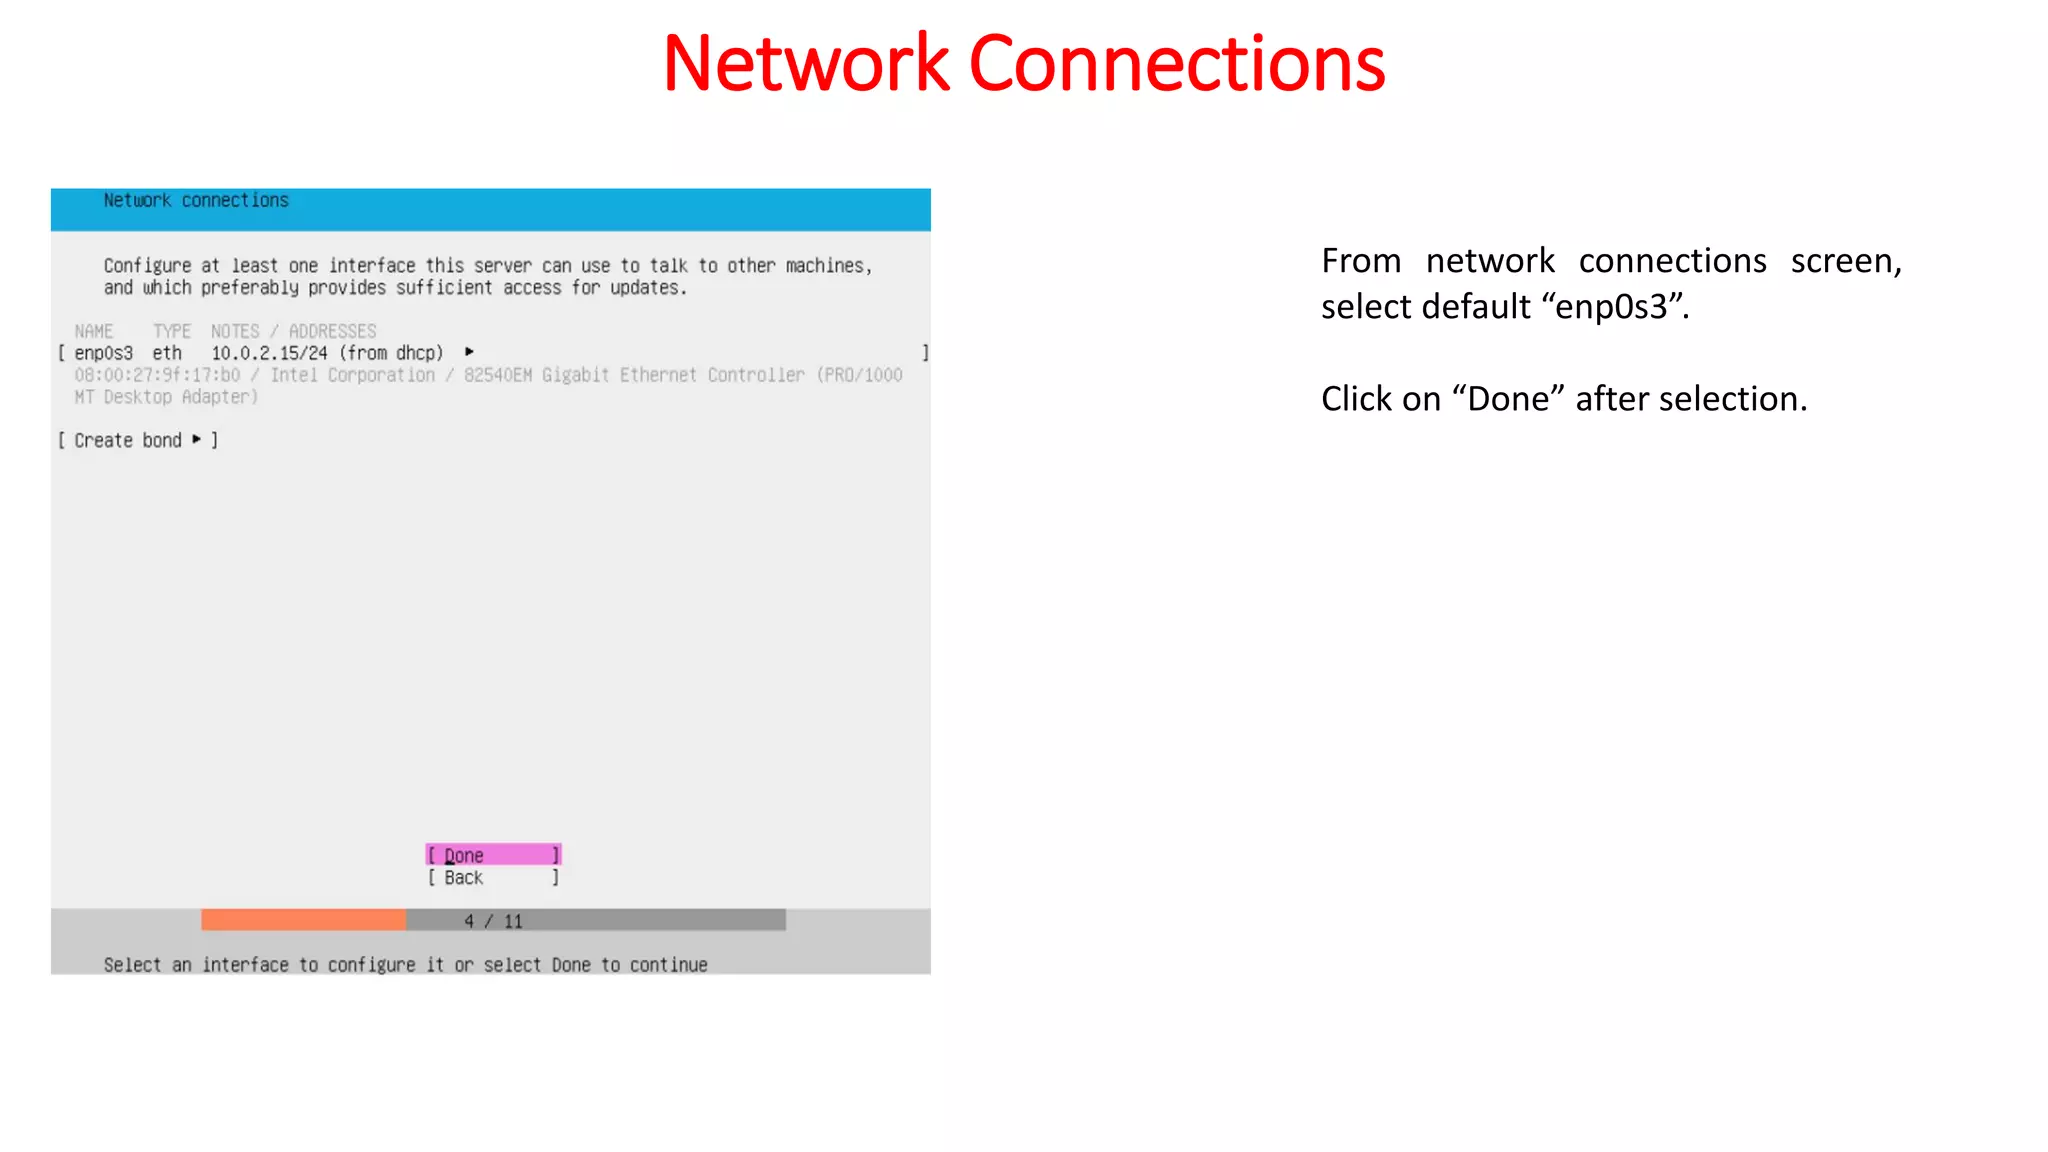
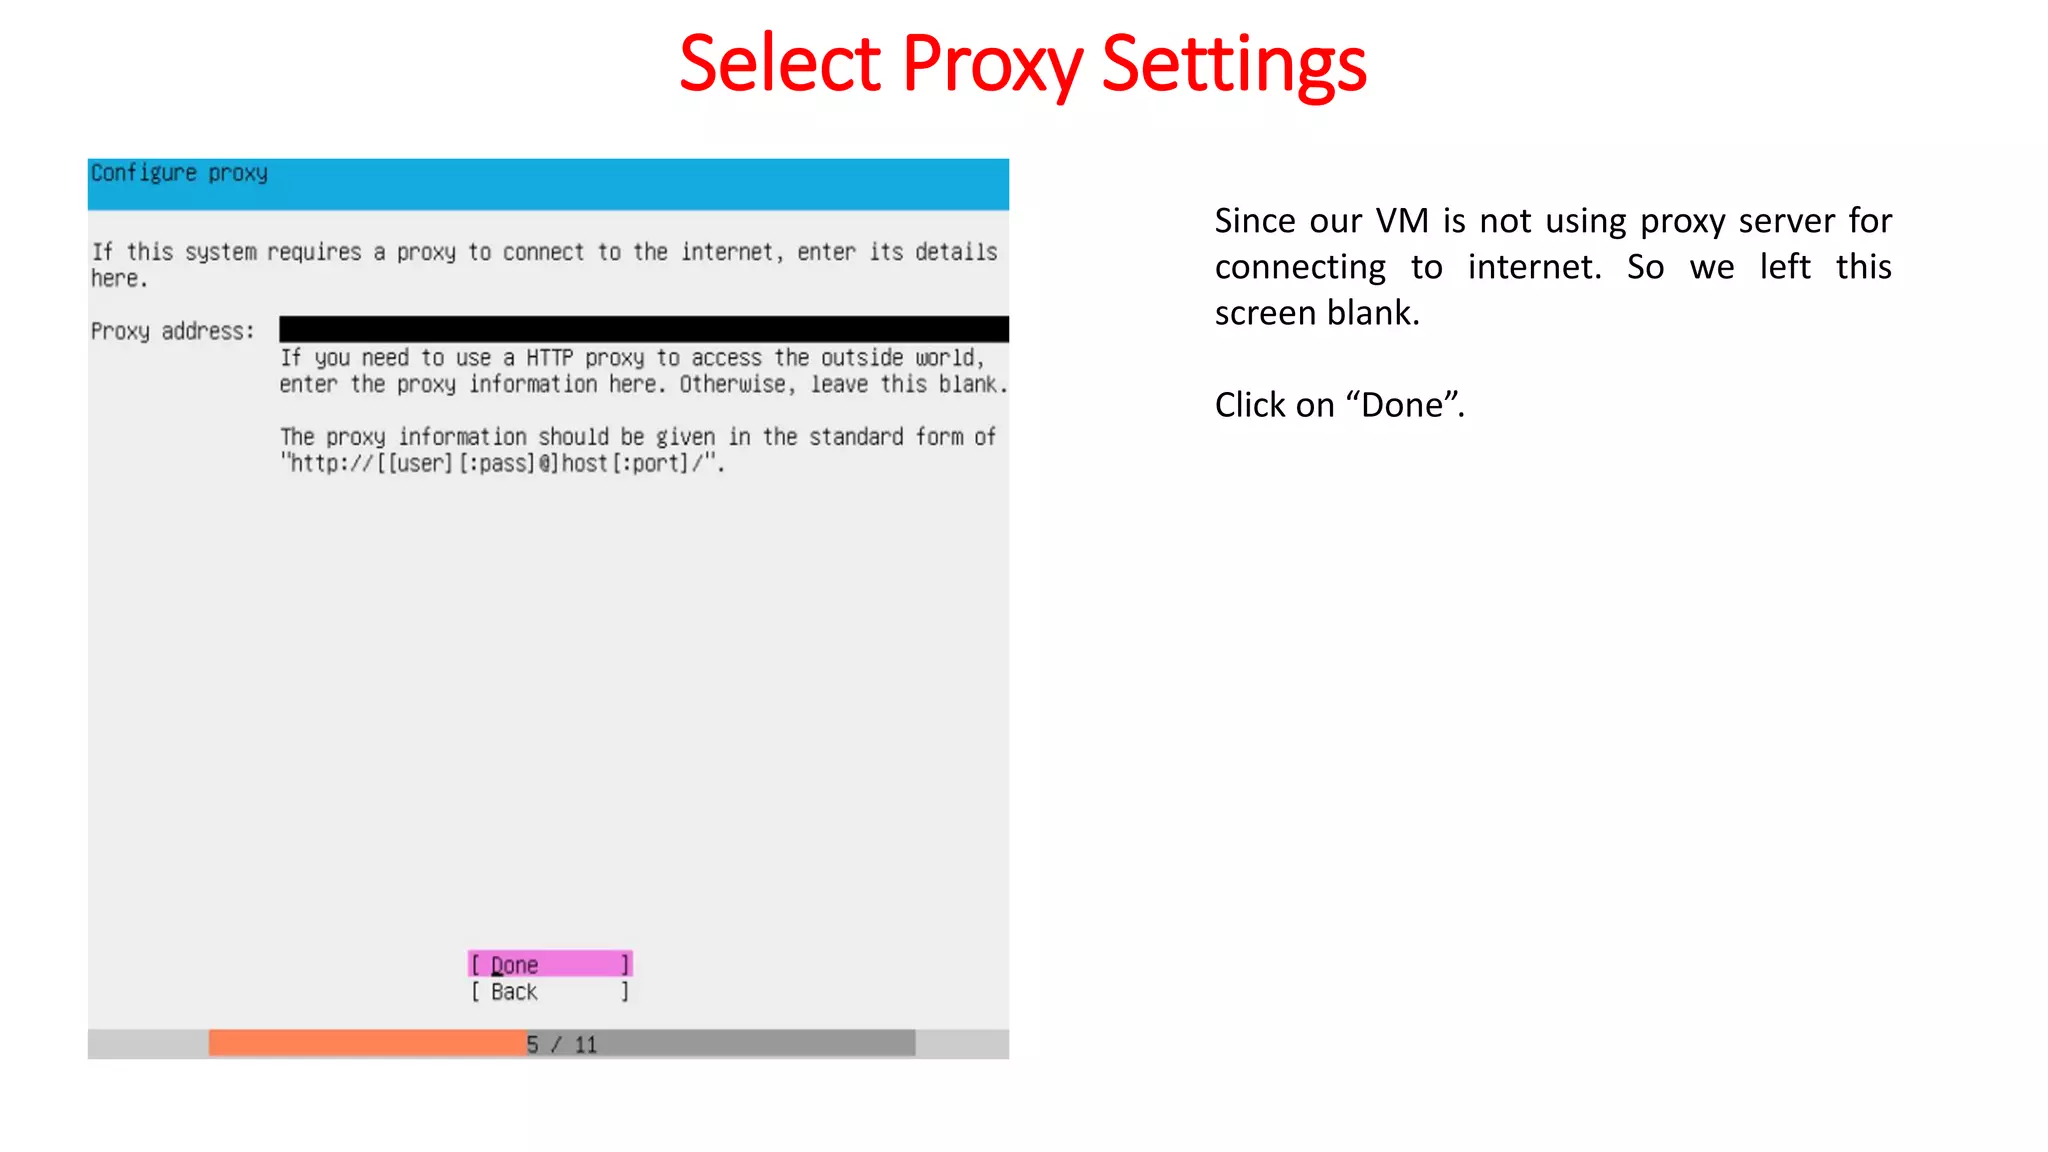
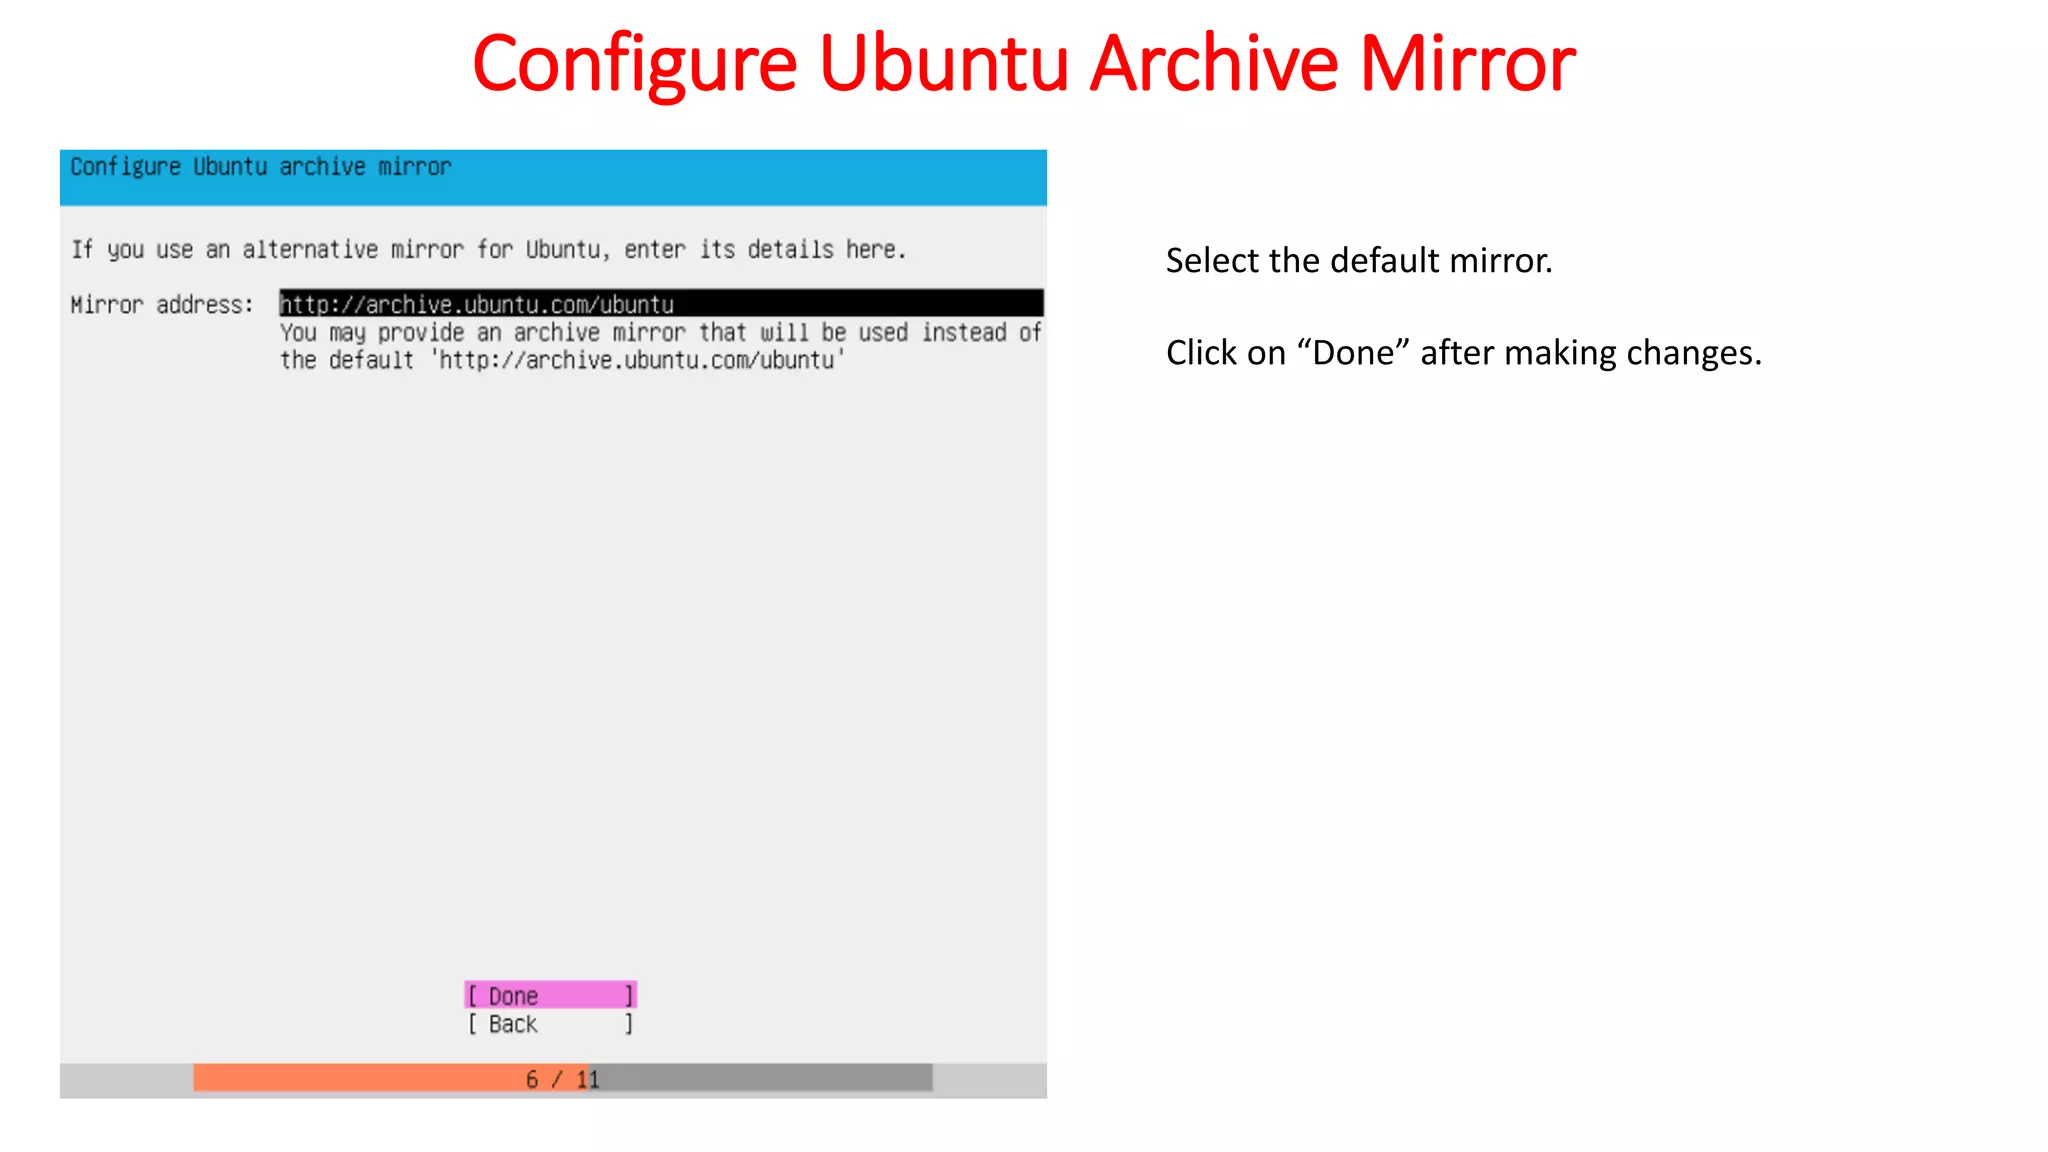
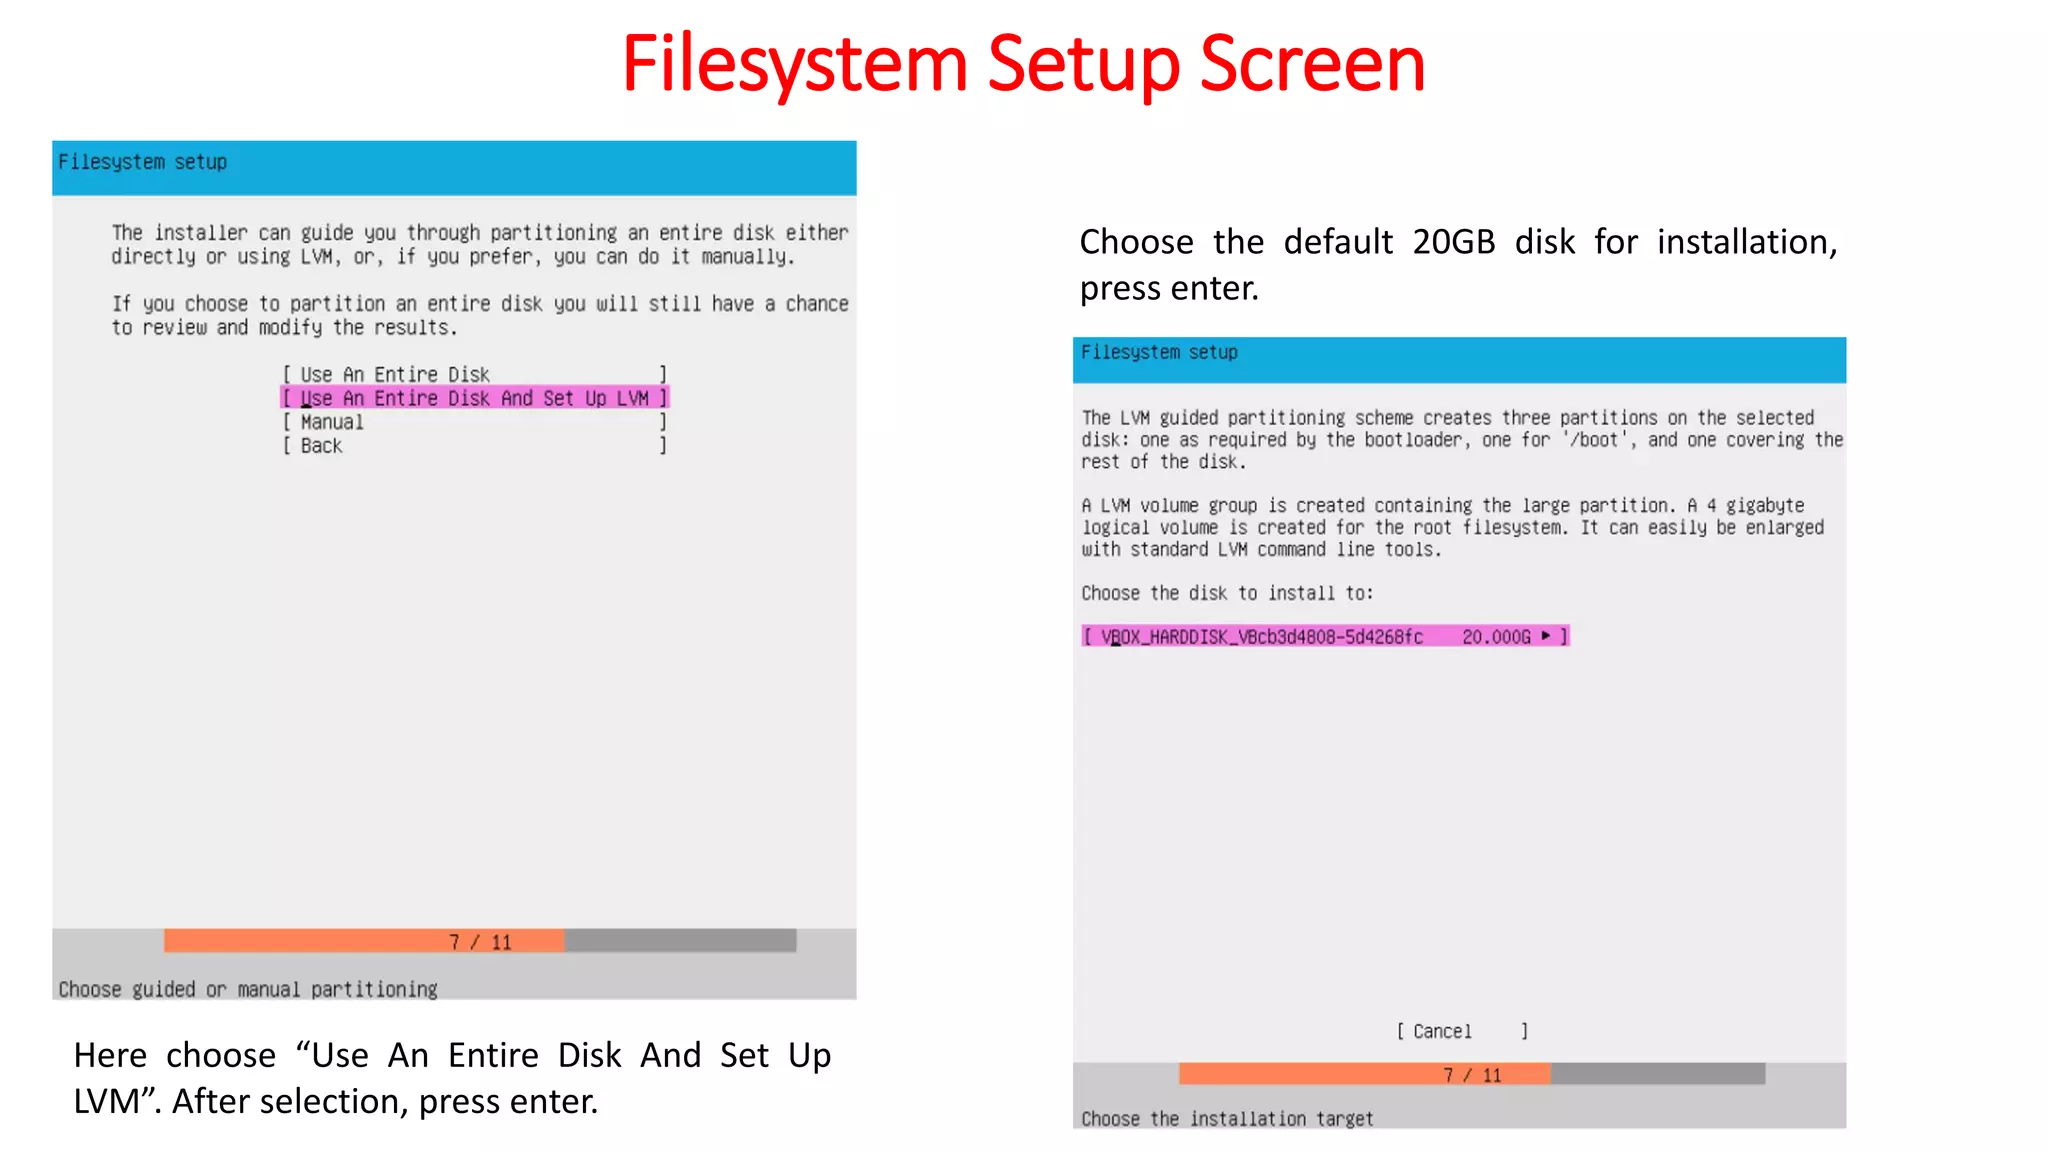
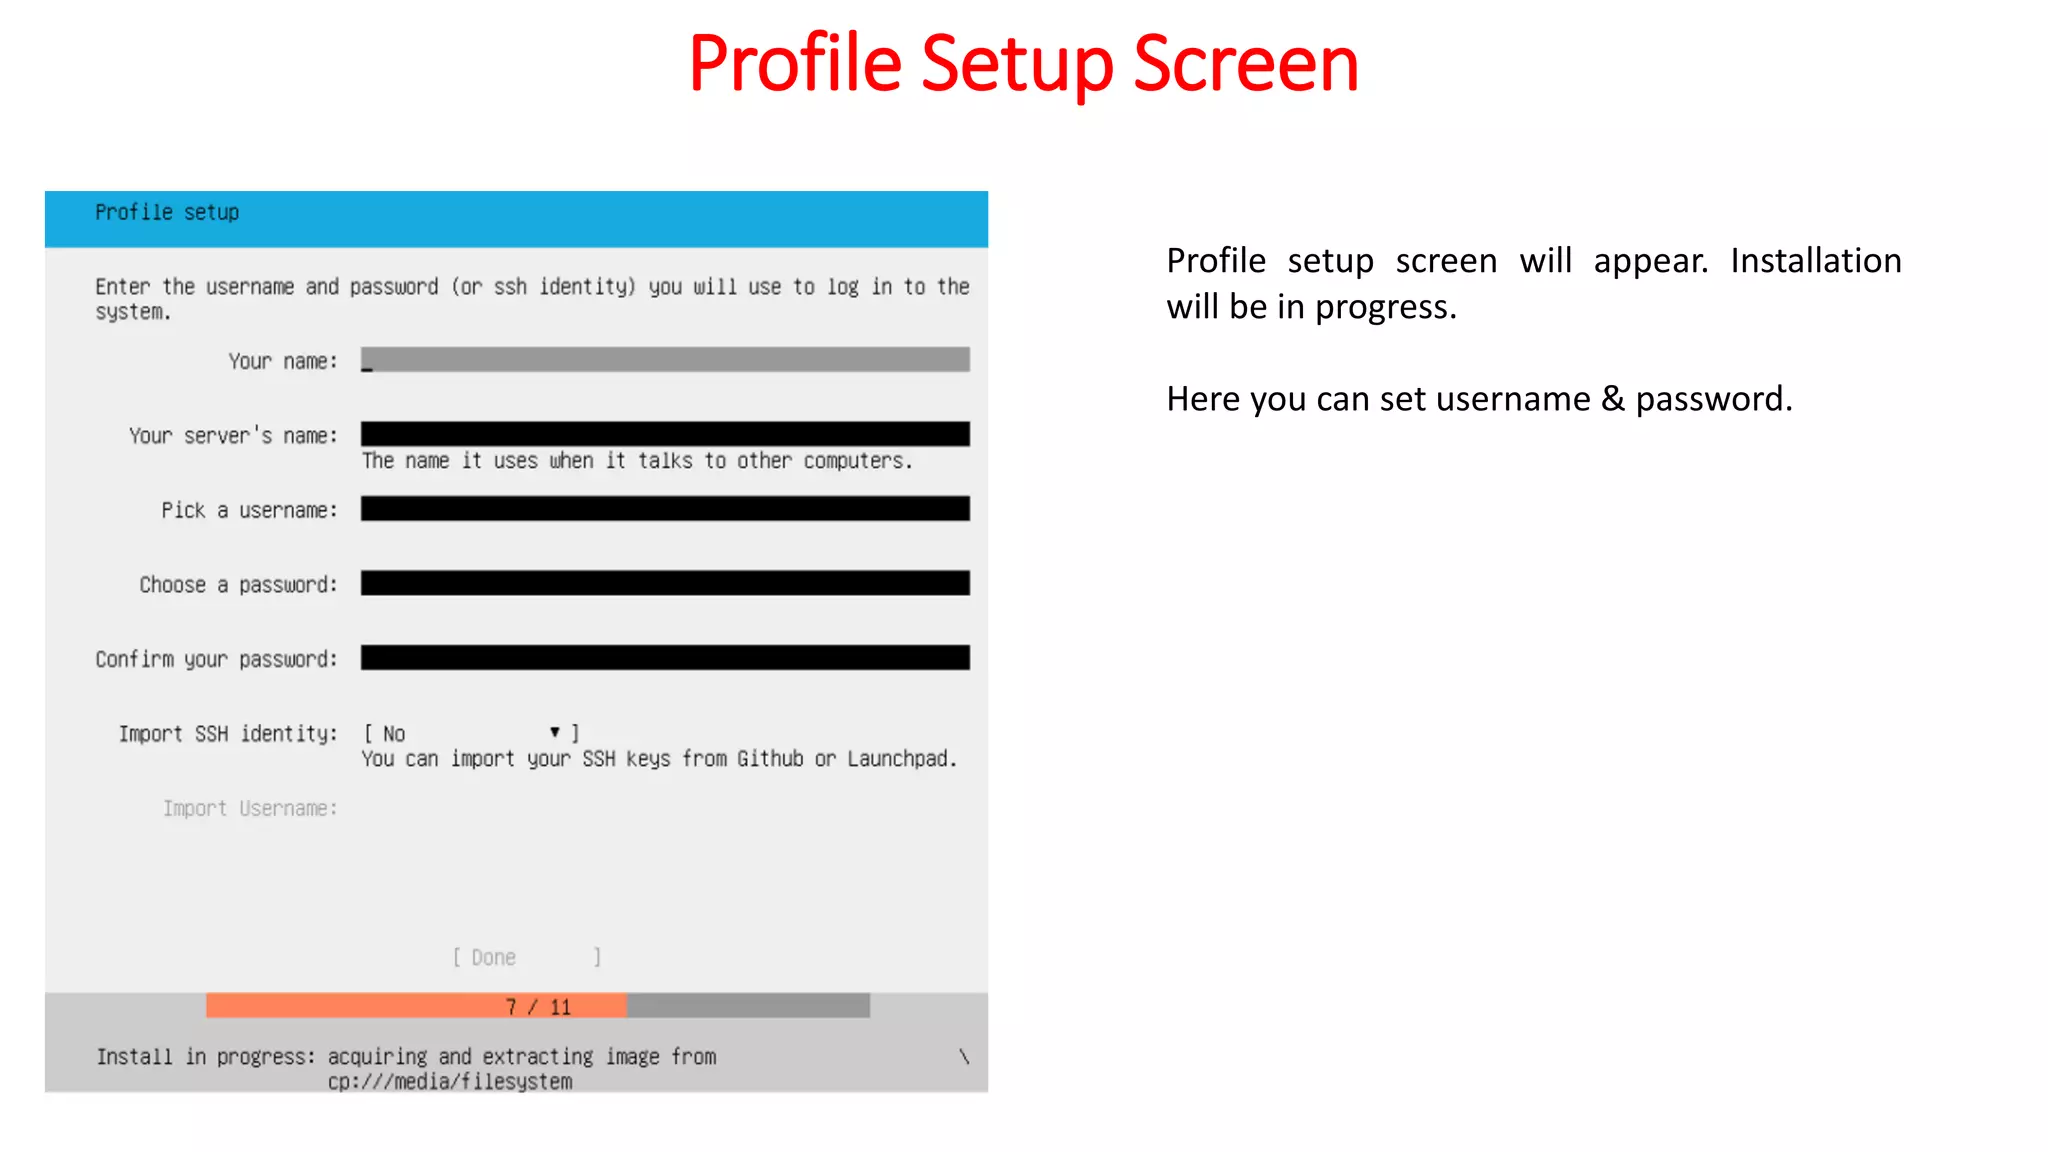
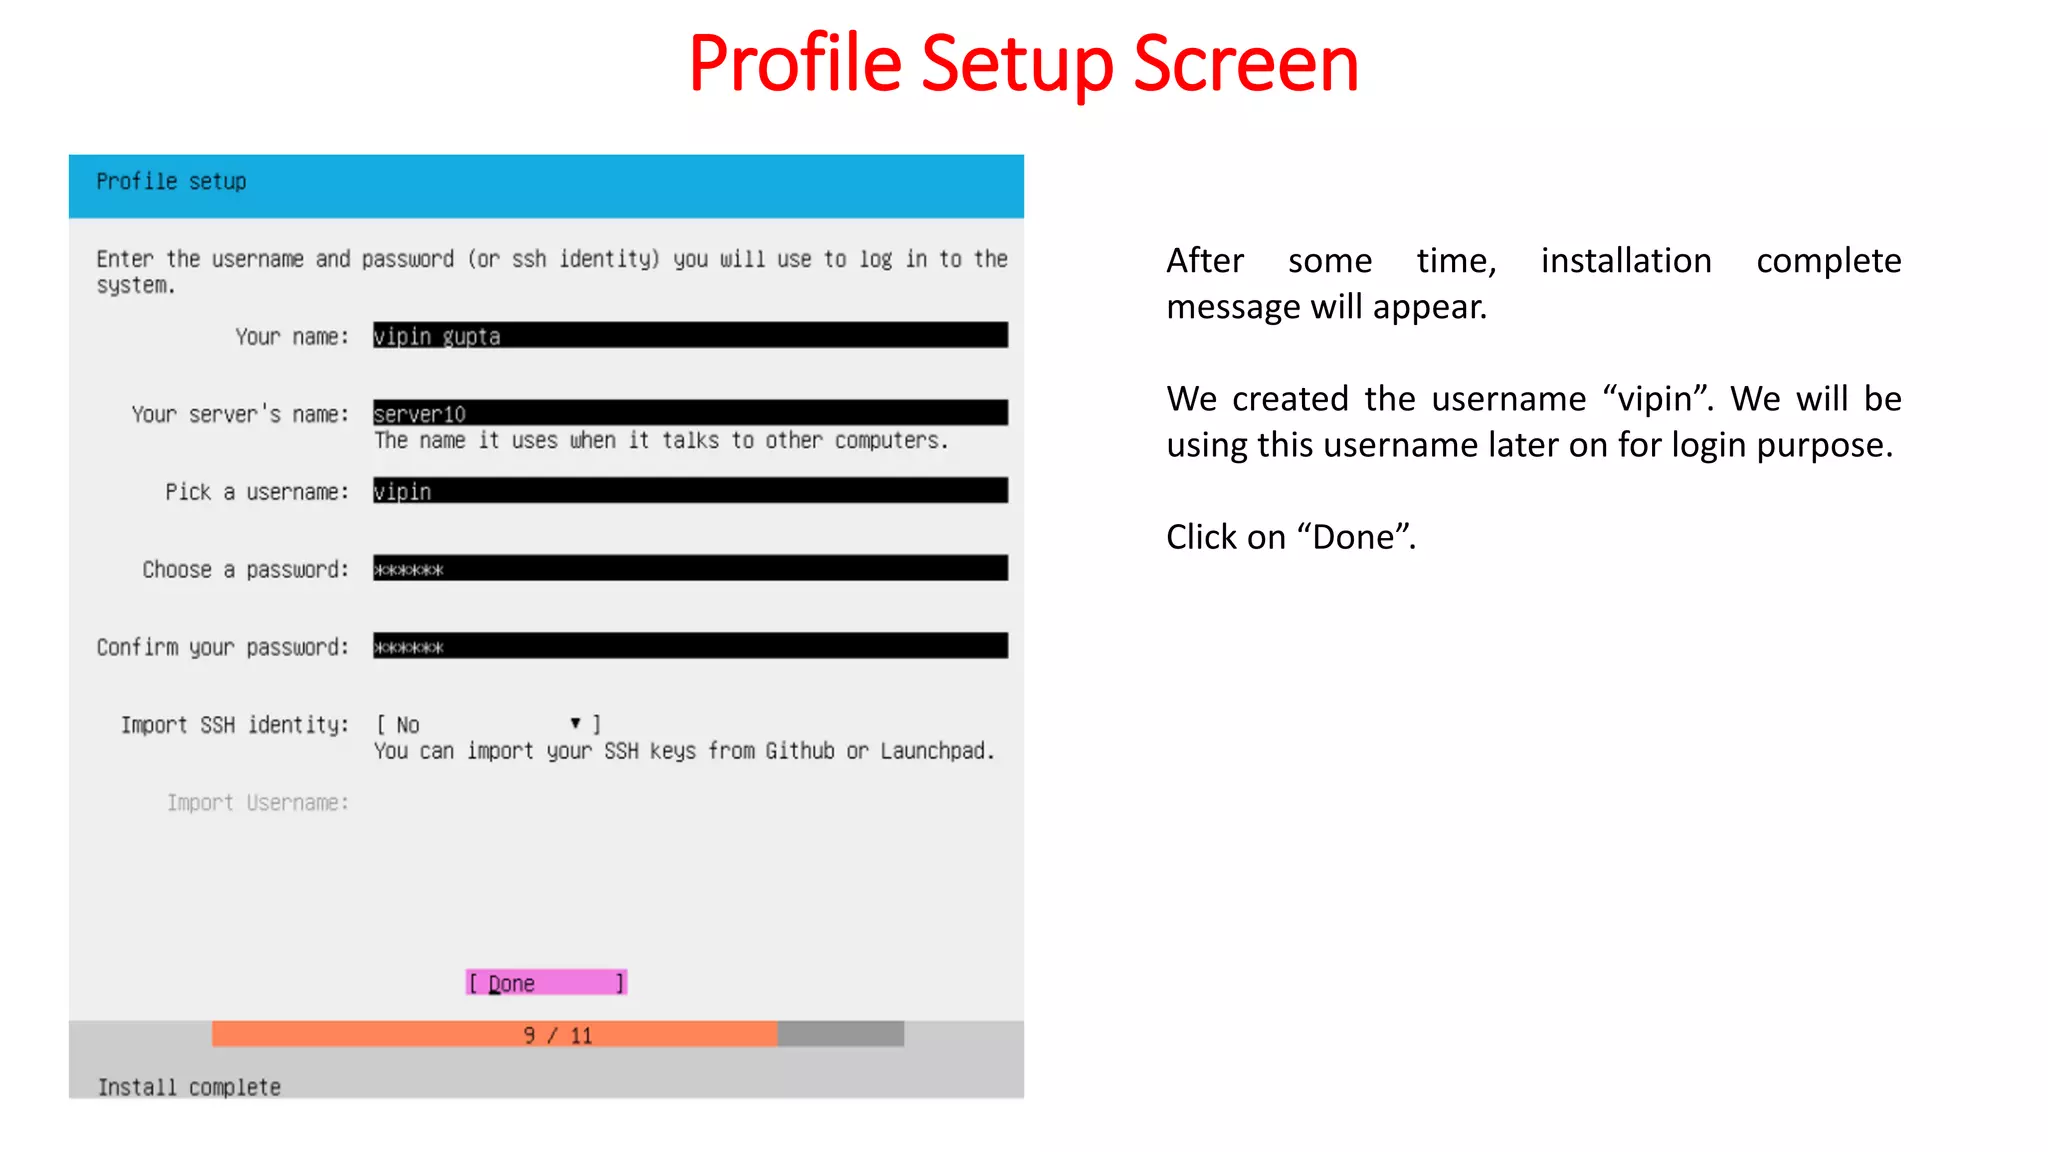
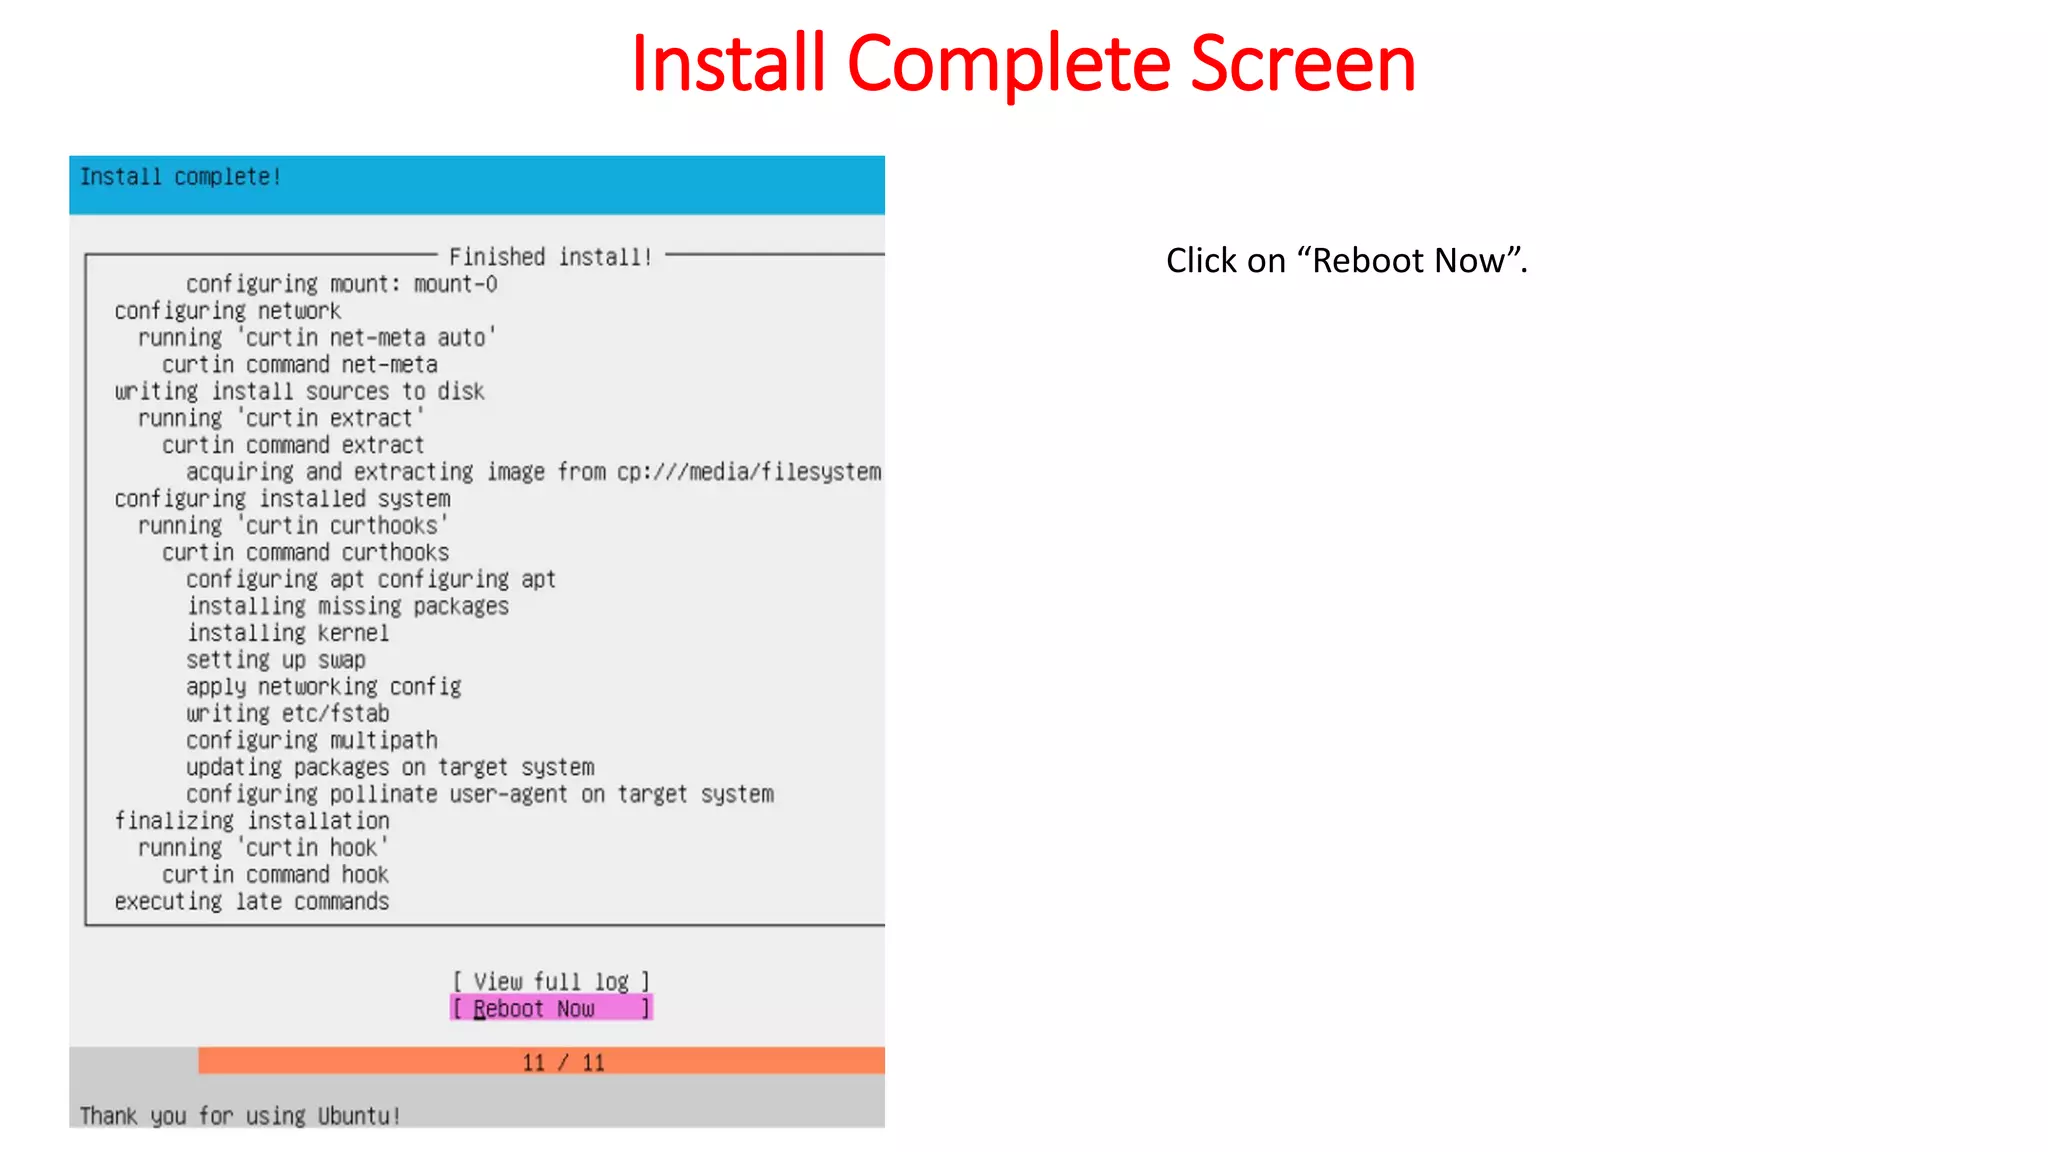
Ubuntu 18.04 Installation
(Server Edition)
Vipin Gupta
BE,RHCE,CEH,CCNA,MCSE,MCSA Mobile: 93563-10379
www.linuxexpert.invipin2411@gmail.com
The complete set of videos & other resources about
Docker Made Simple can be found at
https://www.udemy.com/docker-made-simple/?couponCode=UNET-DMS
Different Ubuntu Versions
It is always preferable to use
latest LTS version. We will be
installing ubuntu 18.04 server.
LTS means Long Term Support.
Download Ubuntu Server 18.04.1 LTS
Go to https://ubuntu.com & select server
download.
Click on “Download”
Download Ubuntu Server 18.04.1 LTS
“Save File” will appear. Save it in folder which
you can remember.
Creating Ubuntu 18.04 VM in Virtual Box
Click on “New” to create new Virtual Machine (VM).
Select some name, type as “Linux” and version as
“Ubuntu (64-bit)”.
After that click on “Next”
Creating Ubuntu 18.04 VM in Virtual Box
Select RAM size according to your needs & the
amount of total RAM available on HOST OS. In our
case, we have given 3 GB RAM since our HOST OS
RAM is 16 GB & later on we want to implement some
advance concepts on this VM.
Select Hard Disk
Select “Create a virtual hard disk now” & click
“Create” button.
Select Virtual Hard Disk File Type
Select “VDI (VirtualBox Disk Image)” & click “Next”
button.
Select Dynamically Allocated or Fixed Size
Select “Dynamically allocated” to make efficient use
of total hard disk space available on HOST OS. click
“Next” button.
Select Location & Size of Virtual Hard Disk
Select “20 GB” size instead of recommended 10 GB
size & keep the location default. Again this will
depend upon total available disk on HOST OS & the
amount of additional software we want to install on
VM.
click “Create” button.
Select Ubuntu ISO File
Go to “settings”, then choose “Storage” &
give path of iso.
Select ISO File
click “OK” button.
Configure Network Settings
In network settings, select attached to
“NAT”. The advantage of “NAT” is if
internet is running on HOST OS, then
internet will also be available on Guest
VM.
click “OK” button.
Other Network Settings
Other available settings as shown.
Start Ubuntu 18.04 VM Installation
Select “u1804-m” VM & Click on “Start”.
The Ubuntu 18.04 screen will be visible as
shown.
Select Scaled Mode
Before performing other installation steps, from “View”,
choose “Scaled Mode”. In this mode, you can adjust font
size by increasing/decreasing size of windows.
Select “Switch” button.
Select Language
Preferred Language selection screen will appear
Select default “English” & press enter.
Keyboard Configuration Screen
Keyboard Configuration screen will appear.
Select the layout as default “English (US)” &
variant as default “English (US)”
After that click on “Done”
Normal or Cloud Install Selection
Select default “Install Ubuntu”.
Press Enter.
Network Connections
From network connections screen,
select default “enp0s3”.
Click on “Done” after selection.
Select Proxy Settings
Since our VM is not using proxy server for
connecting to internet. So we left this
screen blank.
Click on “Done”.
Configure Ubuntu Archive Mirror
Select the default mirror.
Click on “Done” after making changes.
Filesystem Setup Screen
Here choose “Use An Entire Disk And Set Up
LVM”. After selection, press enter.
Choose the default 20GB disk for installation,
press enter.
Filesystem Setup Screen
It will show automatic partitioning details.
Click on “Done” with default settings.
When the “Confirm destructive action” screen
appears, click on “Continue”
Profile Setup Screen
Profile setup screen will appear. Installation
will be in progress.
Here you can set username & password.
Profile Setup Screen
After some time, installation complete
message will appear.
We created the username “vipin”. We will be
using this username later on for login purpose.
Click on “Done”.
Install Complete Screen
Click on “Reboot Now”.
Login Screen
After “Reboot Now”, Login screen will appear.
Enter login details. As can be seen, we can
successfully login.

Ubuntu 1804 Installation

  • 1.
    Ubuntu 18.04 Installation (ServerEdition) Vipin Gupta BE,RHCE,CEH,CCNA,MCSE,MCSA Mobile: 93563-10379 www.linuxexpert.invipin2411@gmail.com
  • 2.
    The complete setof videos & other resources about Docker Made Simple can be found at https://www.udemy.com/docker-made-simple/?couponCode=UNET-DMS
  • 3.
    Different Ubuntu Versions Itis always preferable to use latest LTS version. We will be installing ubuntu 18.04 server. LTS means Long Term Support.
  • 4.
    Download Ubuntu Server18.04.1 LTS Go to https://ubuntu.com & select server download. Click on “Download”
  • 5.
    Download Ubuntu Server18.04.1 LTS “Save File” will appear. Save it in folder which you can remember.
  • 6.
    Creating Ubuntu 18.04VM in Virtual Box Click on “New” to create new Virtual Machine (VM). Select some name, type as “Linux” and version as “Ubuntu (64-bit)”. After that click on “Next”
  • 7.
    Creating Ubuntu 18.04VM in Virtual Box Select RAM size according to your needs & the amount of total RAM available on HOST OS. In our case, we have given 3 GB RAM since our HOST OS RAM is 16 GB & later on we want to implement some advance concepts on this VM.
  • 8.
    Select Hard Disk Select“Create a virtual hard disk now” & click “Create” button.
  • 9.
    Select Virtual HardDisk File Type Select “VDI (VirtualBox Disk Image)” & click “Next” button.
  • 10.
    Select Dynamically Allocatedor Fixed Size Select “Dynamically allocated” to make efficient use of total hard disk space available on HOST OS. click “Next” button.
  • 11.
    Select Location &Size of Virtual Hard Disk Select “20 GB” size instead of recommended 10 GB size & keep the location default. Again this will depend upon total available disk on HOST OS & the amount of additional software we want to install on VM. click “Create” button.
  • 12.
    Select Ubuntu ISOFile Go to “settings”, then choose “Storage” & give path of iso.
  • 13.
    Select ISO File click“OK” button.
  • 14.
    Configure Network Settings Innetwork settings, select attached to “NAT”. The advantage of “NAT” is if internet is running on HOST OS, then internet will also be available on Guest VM. click “OK” button.
  • 15.
    Other Network Settings Otheravailable settings as shown.
  • 16.
    Start Ubuntu 18.04VM Installation Select “u1804-m” VM & Click on “Start”. The Ubuntu 18.04 screen will be visible as shown.
  • 17.
    Select Scaled Mode Beforeperforming other installation steps, from “View”, choose “Scaled Mode”. In this mode, you can adjust font size by increasing/decreasing size of windows. Select “Switch” button.
  • 18.
    Select Language Preferred Languageselection screen will appear Select default “English” & press enter.
  • 19.
    Keyboard Configuration Screen KeyboardConfiguration screen will appear. Select the layout as default “English (US)” & variant as default “English (US)” After that click on “Done”
  • 20.
    Normal or CloudInstall Selection Select default “Install Ubuntu”. Press Enter.
  • 21.
    Network Connections From networkconnections screen, select default “enp0s3”. Click on “Done” after selection.
  • 22.
    Select Proxy Settings Sinceour VM is not using proxy server for connecting to internet. So we left this screen blank. Click on “Done”.
  • 23.
    Configure Ubuntu ArchiveMirror Select the default mirror. Click on “Done” after making changes.
  • 24.
    Filesystem Setup Screen Herechoose “Use An Entire Disk And Set Up LVM”. After selection, press enter. Choose the default 20GB disk for installation, press enter.
  • 25.
    Filesystem Setup Screen Itwill show automatic partitioning details. Click on “Done” with default settings. When the “Confirm destructive action” screen appears, click on “Continue”
  • 26.
    Profile Setup Screen Profilesetup screen will appear. Installation will be in progress. Here you can set username & password.
  • 27.
    Profile Setup Screen Aftersome time, installation complete message will appear. We created the username “vipin”. We will be using this username later on for login purpose. Click on “Done”.
  • 28.
    Install Complete Screen Clickon “Reboot Now”.
  • 29.
    Login Screen After “RebootNow”, Login screen will appear. Enter login details. As can be seen, we can successfully login.