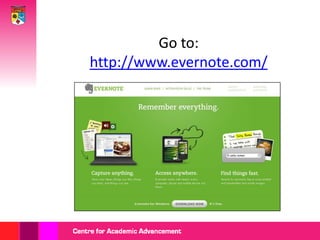
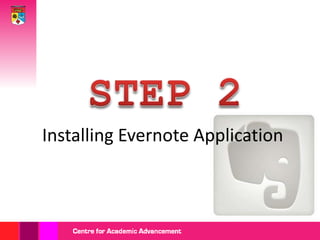
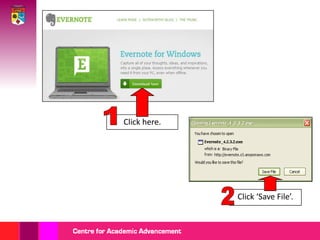
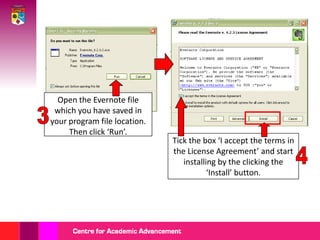
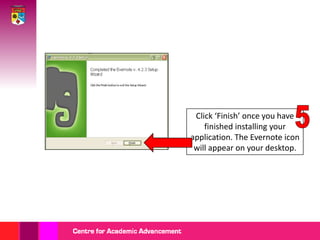
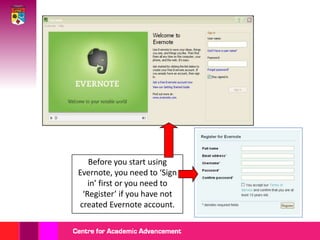
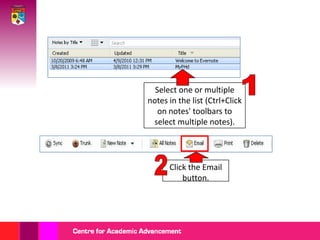
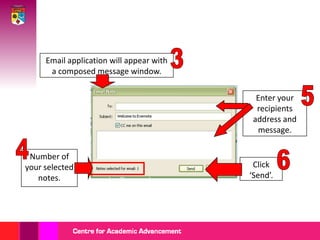
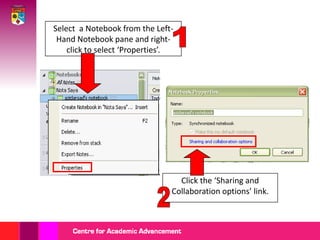
GETTING STARTED WITH EVERNOTEPROF. DR. MOHAMED AMIN EMBICENTRE FOR ACADEMIC ADVANCEMENT
STEP 1
Go to:http://www.evernote.com/
STEP 2Installing Evernote Application
1Click here.2Click ‘Save File’.
Open the Evernote file which you have saved in your program file location. Then click ‘Run’.3Tick the box ‘I accept the terms in the License Agreement’ and start installing by the clicking the ‘Install’ button. 4
5Click ‘Finish’ once you have finished installing your application. The Evernote icon will appear on your desktop.
STEP 3 Sign in/Register Evernote
Before you start using Evernote, you need to ‘Sign in’ first or you need to ‘Register’ if you have not created Evernote account.
STEP 4Creating Notebook
Evernote stores your notes in separate containers called “Notebooks.” Your account starts with one notebook, but you can make additional notebooks at any time.Two ways in creating notebook
31‘Create Notebook’ page will appear. Type your unique notebook name.24choose local notebook (the notebook stored on your computer and are never uploaded to the Evernote Web service)or Synchronized notebook (the notebook are uploaded to the Evernote Web service, and will be available via other forms of the Evernote Service (Evernote Web, Evernote for Mac, Evernote Mobile Web, Evernote for iPhone, etc) by logging into your Evernote account).
Click in the Left-Hand Notebook Pane  and hit the “Insert” key, or Right-Click in the Notebook Pane and select  “New Notebook”.ORNotebook Pane.
STEP 5 Exporting Notes
1Select the Note (or Notes) you would like to Export.23Export: (Or Ctrl+Shift+X). (This option can also be activated by Right-Clicking on one or more selected notes).
You can then choose what file type you would like, .enex (Evernote Backup), .html, .mht. If exporting to .enex, you can choose to export your note tags as well.4
STEP 6 Importing Notes
123You can choose to import the file/notes from evernote export file or OneNote.
STEP 7 Creating a Note/Ink Note/Webcam Note
Click the “New Note” button in the main toolbar.11OR2
New Note.New Webcam Note.New Ink Note.
STEP 8 Creating Multimedia Note
Add image and other file content to your notes Note: Only files of type PDF, JPG, WAV, PNG, MP3, GIF, AMR are supported for Free users. Premium members may attach files of any type, but Evernote can only preview files of supported file types. Drag and DropTake a file from anywhere on your Computer and drag it into a new or existing note.
STEP 9 Tagging
You can tag your notes for easier retrieval and memorizing. You can create your own tags, at any time and drag and-drop them to tagged notes.Right-Click on a Tag Section or on a Tag. You can create a tag or rename and delete the existing tag.
STEP 10 Emailing Notes
1Select one or multiple notes in the list (Ctrl+Click on notes' toolbars to select multiple notes).2Click the Email button.
3Email application will appear with a composed message window.5Enter your recipients address and message.4Number of your selected notes.6Click ‘Send’.
STEP 11  Sharing Notebooks
Select  a Notebook from the Left-Hand Notebook pane and right-click to select ‘Properties’.1Click the ‘Sharing and Collaboration options’ link.2
3You will be taken to the Evernote Web site, where you need to select Sharing from the left-hand pane, then ‘Sharing Setup’.4On the next page, click ‘Start Sharing’, or ‘Stop/Modify Sharing’ for the notebook you wish to Share.
5You will then have the option to Publish your notebook publicly, or to specific individuals.
If you choose ‘Share with the World’, you will be able to create a custom URL at which your notebook can be accessed, as well as modify the sort order and give it a custom description.If you choose ‘Share with Individuals’, you can select which individuals should receive a link to your notebook. Premium members also have the ability to allow other people to view, create, edit and delete notes within the shared notebook.once you click ‘Save’, your notebook will be published at the listed Public URL.Once you select ‘Send Invitations’, your guests will receive an email with a private link to your notebook that only they can access.
THE END

Getting started with evernote

  • 1.
    GETTING STARTED WITHEVERNOTEPROF. DR. MOHAMED AMIN EMBICENTRE FOR ACADEMIC ADVANCEMENT
  • 2.
  • 3.
  • 4.
  • 5.
  • 6.
    Open the Evernotefile which you have saved in your program file location. Then click ‘Run’.3Tick the box ‘I accept the terms in the License Agreement’ and start installing by the clicking the ‘Install’ button. 4
  • 7.
    5Click ‘Finish’ onceyou have finished installing your application. The Evernote icon will appear on your desktop.
  • 8.
  • 9.
    Before you startusing Evernote, you need to ‘Sign in’ first or you need to ‘Register’ if you have not created Evernote account.
  • 10.
  • 11.
    Evernote stores yournotes in separate containers called “Notebooks.” Your account starts with one notebook, but you can make additional notebooks at any time.Two ways in creating notebook
  • 12.
    31‘Create Notebook’ pagewill appear. Type your unique notebook name.24choose local notebook (the notebook stored on your computer and are never uploaded to the Evernote Web service)or Synchronized notebook (the notebook are uploaded to the Evernote Web service, and will be available via other forms of the Evernote Service (Evernote Web, Evernote for Mac, Evernote Mobile Web, Evernote for iPhone, etc) by logging into your Evernote account).
  • 13.
    Click in theLeft-Hand Notebook Pane and hit the “Insert” key, or Right-Click in the Notebook Pane and select “New Notebook”.ORNotebook Pane.
  • 14.
  • 15.
    1Select the Note(or Notes) you would like to Export.23Export: (Or Ctrl+Shift+X). (This option can also be activated by Right-Clicking on one or more selected notes).
  • 16.
    You can thenchoose what file type you would like, .enex (Evernote Backup), .html, .mht. If exporting to .enex, you can choose to export your note tags as well.4
  • 17.
  • 18.
    123You can chooseto import the file/notes from evernote export file or OneNote.
  • 19.
    STEP 7 Creating aNote/Ink Note/Webcam Note
  • 20.
    Click the “NewNote” button in the main toolbar.11OR2
  • 21.
    New Note.New WebcamNote.New Ink Note.
  • 22.
  • 23.
    Add image andother file content to your notes Note: Only files of type PDF, JPG, WAV, PNG, MP3, GIF, AMR are supported for Free users. Premium members may attach files of any type, but Evernote can only preview files of supported file types. Drag and DropTake a file from anywhere on your Computer and drag it into a new or existing note.
  • 24.
  • 25.
    You can tagyour notes for easier retrieval and memorizing. You can create your own tags, at any time and drag and-drop them to tagged notes.Right-Click on a Tag Section or on a Tag. You can create a tag or rename and delete the existing tag.
  • 26.
  • 27.
    1Select one ormultiple notes in the list (Ctrl+Click on notes' toolbars to select multiple notes).2Click the Email button.
  • 28.
    3Email application willappear with a composed message window.5Enter your recipients address and message.4Number of your selected notes.6Click ‘Send’.
  • 29.
  • 30.
    Select aNotebook from the Left-Hand Notebook pane and right-click to select ‘Properties’.1Click the ‘Sharing and Collaboration options’ link.2
  • 31.
    3You will betaken to the Evernote Web site, where you need to select Sharing from the left-hand pane, then ‘Sharing Setup’.4On the next page, click ‘Start Sharing’, or ‘Stop/Modify Sharing’ for the notebook you wish to Share.
  • 32.
    5You will thenhave the option to Publish your notebook publicly, or to specific individuals.
  • 33.
    If you choose‘Share with the World’, you will be able to create a custom URL at which your notebook can be accessed, as well as modify the sort order and give it a custom description.If you choose ‘Share with Individuals’, you can select which individuals should receive a link to your notebook. Premium members also have the ability to allow other people to view, create, edit and delete notes within the shared notebook.once you click ‘Save’, your notebook will be published at the listed Public URL.Once you select ‘Send Invitations’, your guests will receive an email with a private link to your notebook that only they can access.
  • 34.