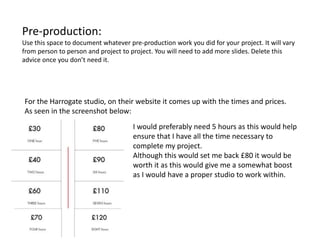
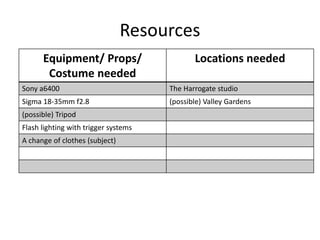
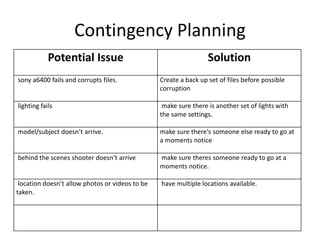
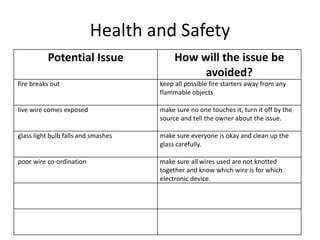
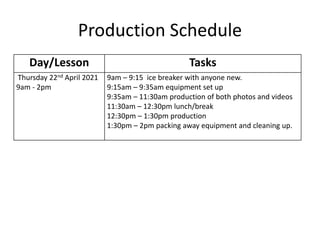
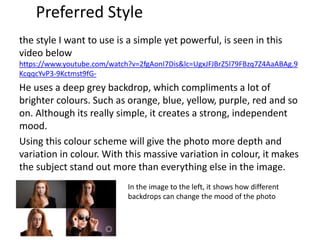
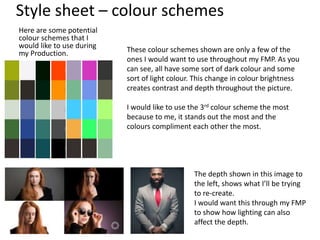
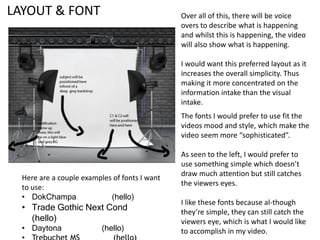
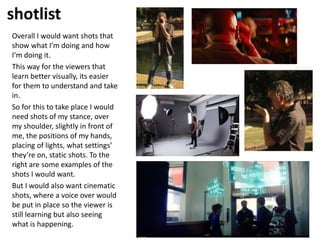
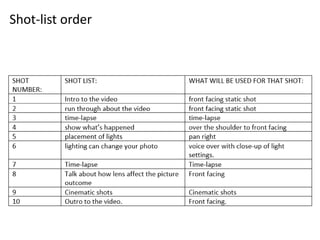
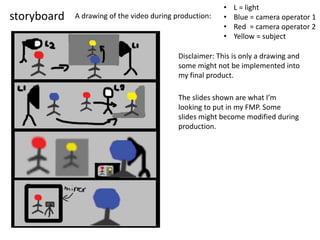
Pre-Production
Pre-production
• What are you making? (explain what you have been asked to
do) Im making a BTS photography shoot, to demonstrate how I
would normally work. And to give any advise to those looking
to learn.
• Why? (What is the purpose of making your Film)
• To help those either beginning to learn or looking for help.
• Who is it for? (Audience)
• Its for those looking to learn new things. Theres isn’t an age
range on creativity.
• Where will it appear/on what? (How will audience see it)
• It will mainly be displayed on youtube but it might be seen on
other platforms.
Reflection:
Pre-production:
Use this space to document whatever pre-production work you did for your project. It will vary
from person to person and project to project. You will need to add more slides. Delete this
advice once you don’t need it.
For the Harrogate studio, on their website it comes up with the times and prices.
As seen in the screenshot below:
I would preferably need 5 hours as this would help
ensure that I have all the time necessary to
complete my project.
Although this would set me back £80 it would be
worth it as this would give me a somewhat boost
as I would have a proper studio to work within.
Pre-production:
Use this space to document whatever pre-production work you did for your project. It will vary
from person to person and project to project. You will need to add more slides. Delete this
advice once you don’t need it.
I have got permission from the owner of Authentic productions to use his
equipment in my project. All it boils down to now is when the equipment
will be available for use.
I have got permission to use:
• Sony a6400
• sigma 18-35 f2.8
• A tripod
In the studio I am planning on booking, it comes with the mentioned below:
Resources
Equipment/ Props/
Costume needed
Locations needed
Sony a6400 The Harrogate studio
Sigma 18-35mm f2.8 (possible) Valley Gardens
(possible) Tripod
Flash lighting with trigger systems
A change of clothes (subject)
Contingency Planning
Potential Issue Solution
sony a6400 fails and corrupts files. Create a back up set of files before possible
corruption
lighting fails make sure there is another set of lights with
the same settings.
model/subject doesn’t arrive. make sure there's someone else ready to go at
a moments notice
behind the scenes shooter doesn’t arrive make sure theres someone ready to go at a
moments notice.
location doesn’t allow photos or videos to be
taken.
have multiple locations available.
Health and Safety
Potential Issue How will the issue be
avoided?
fire breaks out keep all possible fire starters away from any
flammable objects
live wire comes exposed make sure no one touches it, turn it off by the
source and tell the owner about the issue.
glass light bulb falls and smashes make sure everyone is okay and clean up the
glass carefully.
poor wire co-ordination make sure all wires used are not knotted
together and know which wire is for which
electronic device.
Production Schedule
Day/Lesson Tasks
Thursday 22nd April 2021
9am - 2pm
9am – 9:15 ice breaker with anyone new.
9:15am – 9:35am equipment set up
9:35am – 11:30am production of both photos and videos
11:30am – 12:30pm lunch/break
12:30pm – 1:30pm production
1:30pm – 2pm packing away equipment and cleaning up.
Preferred Style
the style I want to use is a simple yet powerful, is seen in this
video below
https://www.youtube.com/watch?v=2fgAonI7Dis&lc=UgxJFJBrZ5l79FBzq7Z4AaABAg.9
KcqqcYvP3-9Kctmst9fG-
He uses a deep grey backdrop, which compliments a lot of
brighter colours. Such as orange, blue, yellow, purple, red and so
on. Although its really simple, it creates a strong, independent
mood.
Using this colour scheme will give the photo more depth and
variation in colour. With this massive variation in colour, it makes
the subject stand out more than everything else in the image.
In the image to the left, it shows how different
backdrops can change the mood of the photo
Style sheet – colour schemes
Here are some potential
colour schemes that I
would like to use during
my Production. These colour schemes shown are only a few of the
ones I would want to use throughout my FMP. As you
can see, all have some sort of dark colour and some
sort of light colour. This change in colour brightness
creates contrast and depth throughout the picture.
I would like to use the 3rd colour scheme the most
because to me, it stands out the most and the
colours compliment each other the most.
The depth shown in this image to
the left, shows what I’ll be trying
to re-create.
I would want this through my FMP
to show how lighting can also
affect the depth.
LAYOUT & FONT Over all of this, there will be voice
overs to describe what is happening
and whilst this is happening, the video
will also show what is happening.
I would want this preferred layout as it
increases the overall simplicity. Thus
making it more concentrated on the
information intake than the visual
intake.
The fonts I would prefer to use fit the
videos mood and style, which make the
video seem more “sophisticated”.
As seen to the left, I would prefer to
use something simple which doesn’t
draw much attention but still catches
the viewers eyes.
I like these fonts because al-though
they’re simple, they can still catch the
viewers eye, which is what I would like
to accomplish in my video.
Here are a couple examples of fonts I want
to use:
• DokChampa (hello)
• Trade Gothic Next Cond
(hello)
• Daytona (hello)
shotlist
Overall I would want shots that
show what I’m doing and how
I’m doing it.
This way for the viewers that
learn better visually, its easier
for them to understand and take
in.
So for this to take place I would
need shots of my stance, over
my shoulder, slightly in front of
me, the positions of my hands,
placing of lights, what settings’
they’re on, static shots. To the
right are some examples of the
shots I would want.
But I would also want cinematic
shots, where a voice over would
be put in place so the viewer is
still learning but also seeing
what is happening.
Shot-list order
storyboard A drawing of the video during production:
Disclaimer: This is only a drawing and
some might not be implemented into
my final product.
• L = light
• Blue = camera operator 1
• Red = camera operator 2
• Yellow = subject
The slides shown are what I’m
looking to put in my FMP. Some
slides might become modified during
production.

FMP pre production

  • 1.
  • 2.
    Pre-production • What areyou making? (explain what you have been asked to do) Im making a BTS photography shoot, to demonstrate how I would normally work. And to give any advise to those looking to learn. • Why? (What is the purpose of making your Film) • To help those either beginning to learn or looking for help. • Who is it for? (Audience) • Its for those looking to learn new things. Theres isn’t an age range on creativity. • Where will it appear/on what? (How will audience see it) • It will mainly be displayed on youtube but it might be seen on other platforms. Reflection:
  • 3.
    Pre-production: Use this spaceto document whatever pre-production work you did for your project. It will vary from person to person and project to project. You will need to add more slides. Delete this advice once you don’t need it. For the Harrogate studio, on their website it comes up with the times and prices. As seen in the screenshot below: I would preferably need 5 hours as this would help ensure that I have all the time necessary to complete my project. Although this would set me back £80 it would be worth it as this would give me a somewhat boost as I would have a proper studio to work within.
  • 4.
    Pre-production: Use this spaceto document whatever pre-production work you did for your project. It will vary from person to person and project to project. You will need to add more slides. Delete this advice once you don’t need it. I have got permission from the owner of Authentic productions to use his equipment in my project. All it boils down to now is when the equipment will be available for use. I have got permission to use: • Sony a6400 • sigma 18-35 f2.8 • A tripod In the studio I am planning on booking, it comes with the mentioned below:
  • 5.
    Resources Equipment/ Props/ Costume needed Locationsneeded Sony a6400 The Harrogate studio Sigma 18-35mm f2.8 (possible) Valley Gardens (possible) Tripod Flash lighting with trigger systems A change of clothes (subject)
  • 6.
    Contingency Planning Potential IssueSolution sony a6400 fails and corrupts files. Create a back up set of files before possible corruption lighting fails make sure there is another set of lights with the same settings. model/subject doesn’t arrive. make sure there's someone else ready to go at a moments notice behind the scenes shooter doesn’t arrive make sure theres someone ready to go at a moments notice. location doesn’t allow photos or videos to be taken. have multiple locations available.
  • 7.
    Health and Safety PotentialIssue How will the issue be avoided? fire breaks out keep all possible fire starters away from any flammable objects live wire comes exposed make sure no one touches it, turn it off by the source and tell the owner about the issue. glass light bulb falls and smashes make sure everyone is okay and clean up the glass carefully. poor wire co-ordination make sure all wires used are not knotted together and know which wire is for which electronic device.
  • 8.
    Production Schedule Day/Lesson Tasks Thursday22nd April 2021 9am - 2pm 9am – 9:15 ice breaker with anyone new. 9:15am – 9:35am equipment set up 9:35am – 11:30am production of both photos and videos 11:30am – 12:30pm lunch/break 12:30pm – 1:30pm production 1:30pm – 2pm packing away equipment and cleaning up.
  • 9.
    Preferred Style the styleI want to use is a simple yet powerful, is seen in this video below https://www.youtube.com/watch?v=2fgAonI7Dis&lc=UgxJFJBrZ5l79FBzq7Z4AaABAg.9 KcqqcYvP3-9Kctmst9fG- He uses a deep grey backdrop, which compliments a lot of brighter colours. Such as orange, blue, yellow, purple, red and so on. Although its really simple, it creates a strong, independent mood. Using this colour scheme will give the photo more depth and variation in colour. With this massive variation in colour, it makes the subject stand out more than everything else in the image. In the image to the left, it shows how different backdrops can change the mood of the photo
  • 10.
    Style sheet –colour schemes Here are some potential colour schemes that I would like to use during my Production. These colour schemes shown are only a few of the ones I would want to use throughout my FMP. As you can see, all have some sort of dark colour and some sort of light colour. This change in colour brightness creates contrast and depth throughout the picture. I would like to use the 3rd colour scheme the most because to me, it stands out the most and the colours compliment each other the most. The depth shown in this image to the left, shows what I’ll be trying to re-create. I would want this through my FMP to show how lighting can also affect the depth.
  • 11.
    LAYOUT & FONTOver all of this, there will be voice overs to describe what is happening and whilst this is happening, the video will also show what is happening. I would want this preferred layout as it increases the overall simplicity. Thus making it more concentrated on the information intake than the visual intake. The fonts I would prefer to use fit the videos mood and style, which make the video seem more “sophisticated”. As seen to the left, I would prefer to use something simple which doesn’t draw much attention but still catches the viewers eyes. I like these fonts because al-though they’re simple, they can still catch the viewers eye, which is what I would like to accomplish in my video. Here are a couple examples of fonts I want to use: • DokChampa (hello) • Trade Gothic Next Cond (hello) • Daytona (hello)
  • 12.
    shotlist Overall I wouldwant shots that show what I’m doing and how I’m doing it. This way for the viewers that learn better visually, its easier for them to understand and take in. So for this to take place I would need shots of my stance, over my shoulder, slightly in front of me, the positions of my hands, placing of lights, what settings’ they’re on, static shots. To the right are some examples of the shots I would want. But I would also want cinematic shots, where a voice over would be put in place so the viewer is still learning but also seeing what is happening.
  • 13.
  • 14.
    storyboard A drawingof the video during production: Disclaimer: This is only a drawing and some might not be implemented into my final product. • L = light • Blue = camera operator 1 • Red = camera operator 2 • Yellow = subject The slides shown are what I’m looking to put in my FMP. Some slides might become modified during production.

Editor's Notes

  • #4 Use this space to document whatever pre-production work you did for your project. It will vary from person to person and project to project.
  • #5 Use this space to document whatever pre-production work you did for your project. It will vary from person to person and project to project.