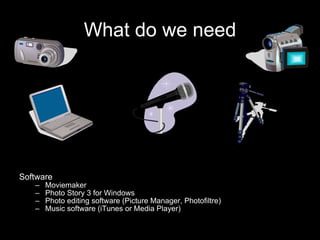
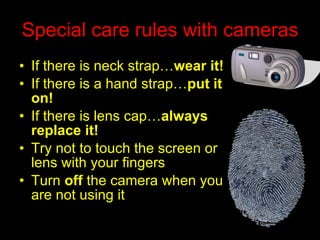
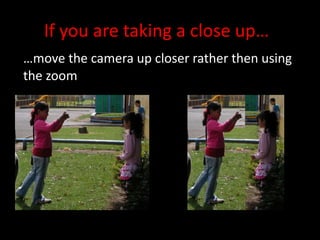
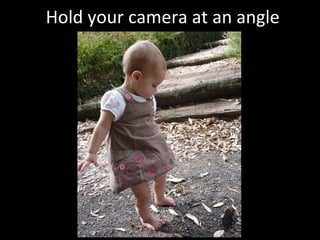
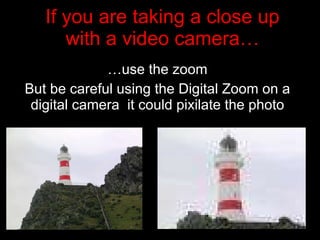
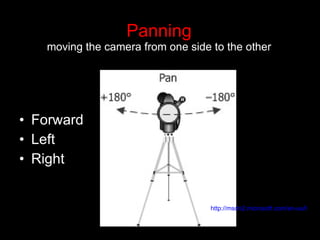
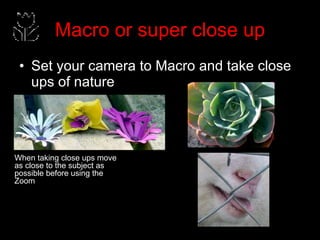
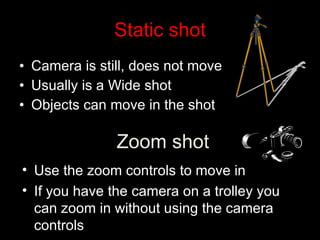
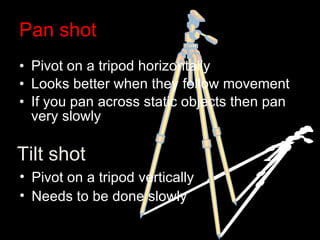
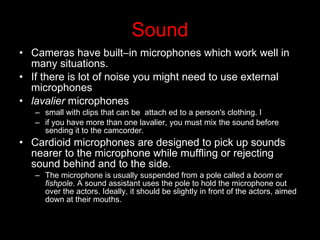
Basics of  Moviemaking
What do we need Software Moviemaker Photo Story 3 for Windows Photo editing software (Picture Manager, Photofiltre) Music software (iTunes or Media Player)
Special care rules with cameras If there is neck strap… wear   it! If there is a hand strap… put   it on! If there is lens cap… always   replace it! Try not to touch the screen or lens with your fingers Turn  off  the camera when you are not using it
Teach students how to look after the cameras Trust the children with the equipment Teach respect for the equipment by consistently modelling proper use Wear the neck strap Display confident use
If you are taking a close up… … move the camera up closer rather then using the zoom
Hold your camera at an angle
If you are taking a close up with a video camera… … use the zoom But be careful using the Digital Zoom on a digital camera  it could pixilate the photo
Background space with moving objects Take photos of objects moving Show the background space from where the object has come from
Have a range of shots in your movie
Series of shots
Wide Shot WS or Long Shot LS Establishes the setting Take a Wide shot that sets the scene for the viewer What is your Wide shot about? What scene is it setting? Set the scene then zoom to show detail.
3 main Levels What height are you at? Worms Eye or Low Angle Birds Eye or High Angle Eye level
The camera is down low looking up making your subject look more important or powerful.
High Angle or  Birds Eye  Your subject should look small and insignificant so the higher up looking down the better!
3 Main angles The way you tilt your camera Up Down Straight www.artsmia.org/.../abbott/images/camera_35.gif
3 types of Distance Close Far Medium
Horizon line Don’t cut your picture in half by setting the horizon line in the middle Set high to suggest closeness Set low to suggest spaciousness
Leading  lines Look for natural lines of the scene that leads the viewers eyes into the picture and to your main centre of interest Remember horizon lines Do a vertical and a horizontal photo
Close up Shot The subjects head will fill most of the shot from the chest or neck to just above the head. Use this shot to emphasise something.  Have them look away! Put space in front of them Do not put the head in the middle of the shot (unless it is a newsreader) give the head  space in front of it! Newsreader shot
Photos of children Get down low Take photos when they are busy Get in close Make it fun Try to capture the downtimes
 
Foreground Sometimes objects in the foreground can set a scene like branches or doorways
Extreme close up (ECU ) Only a part of the body or face is shown and generally is used to demonstrate deep emotion
Medium Shot MS shows a character from the waist to just above the head
Two shot Profile of two people communicating
Over the shoulder Face and shoulder shot of speaker, listener just part of head and one shoulder Reverse Shot Same as above but change speaker and listener
Focus Soft focus Sharp focus
Panning moving the camera from one side to the other Forward Left Right http://msdn2.microsoft.com/en-us/library/Aa510752.cam_pan_1(en-us,MSDN.10).png
When introducing cameras Talk about care and handling Talk about main parts of camera Look at different types of shots Send children out on a mission to take different shot angles  Have children analyse what they have done
Macro or super close up Set your camera to Macro and take close ups of nature When taking close ups move as close to the subject as possible before using the Zoom
Shooting  Techniques
Static shot Camera is still, does not move Usually is a Wide shot Objects can move in the shot Zoom shot Use the zoom controls to move in If you have the camera on a trolley you can zoom in without using the camera controls
Pan shot Pivot on a tripod horizontally Looks better when they follow movement If you pan across static objects then pan very slowly Tilt shot Pivot on a tripod vertically Needs to be done slowly
Sound Cameras have built–in microphones which work well in many situations.  If there is lot of noise you might need to use external microphones lavalier  microphones small with clips that can be  attach ed to a person's clothing. I if you have more than one lavalier, you must mix the sound before sending it to the camcorder.  Cardioid microphones are designed to pick up sounds nearer to the microphone while muffling or rejecting sound behind and to the side.  The microphone is usually suspended from a pole called a  boom  or  fishpole . A sound assistant uses the pole to hold the microphone out over the actors. Ideally, it should be slightly in front of the actors, aimed down at their mouths.

Filming Techniques

  • 1.
    Basics of Moviemaking
  • 2.
    What do weneed Software Moviemaker Photo Story 3 for Windows Photo editing software (Picture Manager, Photofiltre) Music software (iTunes or Media Player)
  • 3.
    Special care ruleswith cameras If there is neck strap… wear it! If there is a hand strap… put it on! If there is lens cap… always replace it! Try not to touch the screen or lens with your fingers Turn off the camera when you are not using it
  • 4.
    Teach students howto look after the cameras Trust the children with the equipment Teach respect for the equipment by consistently modelling proper use Wear the neck strap Display confident use
  • 5.
    If you aretaking a close up… … move the camera up closer rather then using the zoom
  • 6.
    Hold your cameraat an angle
  • 7.
    If you aretaking a close up with a video camera… … use the zoom But be careful using the Digital Zoom on a digital camera it could pixilate the photo
  • 8.
    Background space withmoving objects Take photos of objects moving Show the background space from where the object has come from
  • 9.
    Have a rangeof shots in your movie
  • 10.
  • 11.
    Wide Shot WSor Long Shot LS Establishes the setting Take a Wide shot that sets the scene for the viewer What is your Wide shot about? What scene is it setting? Set the scene then zoom to show detail.
  • 12.
    3 main LevelsWhat height are you at? Worms Eye or Low Angle Birds Eye or High Angle Eye level
  • 13.
    The camera isdown low looking up making your subject look more important or powerful.
  • 14.
    High Angle or Birds Eye Your subject should look small and insignificant so the higher up looking down the better!
  • 15.
    3 Main anglesThe way you tilt your camera Up Down Straight www.artsmia.org/.../abbott/images/camera_35.gif
  • 16.
    3 types ofDistance Close Far Medium
  • 17.
    Horizon line Don’tcut your picture in half by setting the horizon line in the middle Set high to suggest closeness Set low to suggest spaciousness
  • 18.
    Leading linesLook for natural lines of the scene that leads the viewers eyes into the picture and to your main centre of interest Remember horizon lines Do a vertical and a horizontal photo
  • 19.
    Close up ShotThe subjects head will fill most of the shot from the chest or neck to just above the head. Use this shot to emphasise something. Have them look away! Put space in front of them Do not put the head in the middle of the shot (unless it is a newsreader) give the head space in front of it! Newsreader shot
  • 20.
    Photos of childrenGet down low Take photos when they are busy Get in close Make it fun Try to capture the downtimes
  • 21.
  • 22.
    Foreground Sometimes objectsin the foreground can set a scene like branches or doorways
  • 23.
    Extreme close up(ECU ) Only a part of the body or face is shown and generally is used to demonstrate deep emotion
  • 24.
    Medium Shot MSshows a character from the waist to just above the head
  • 25.
    Two shot Profileof two people communicating
  • 26.
    Over the shoulderFace and shoulder shot of speaker, listener just part of head and one shoulder Reverse Shot Same as above but change speaker and listener
  • 27.
    Focus Soft focusSharp focus
  • 28.
    Panning moving thecamera from one side to the other Forward Left Right http://msdn2.microsoft.com/en-us/library/Aa510752.cam_pan_1(en-us,MSDN.10).png
  • 29.
    When introducing camerasTalk about care and handling Talk about main parts of camera Look at different types of shots Send children out on a mission to take different shot angles Have children analyse what they have done
  • 30.
    Macro or superclose up Set your camera to Macro and take close ups of nature When taking close ups move as close to the subject as possible before using the Zoom
  • 31.
  • 32.
    Static shot Camerais still, does not move Usually is a Wide shot Objects can move in the shot Zoom shot Use the zoom controls to move in If you have the camera on a trolley you can zoom in without using the camera controls
  • 33.
    Pan shot Pivoton a tripod horizontally Looks better when they follow movement If you pan across static objects then pan very slowly Tilt shot Pivot on a tripod vertically Needs to be done slowly
  • 34.
    Sound Cameras havebuilt–in microphones which work well in many situations. If there is lot of noise you might need to use external microphones lavalier microphones small with clips that can be attach ed to a person's clothing. I if you have more than one lavalier, you must mix the sound before sending it to the camcorder. Cardioid microphones are designed to pick up sounds nearer to the microphone while muffling or rejecting sound behind and to the side. The microphone is usually suspended from a pole called a boom or fishpole . A sound assistant uses the pole to hold the microphone out over the actors. Ideally, it should be slightly in front of the actors, aimed down at their mouths.