


![The $_FILES Array
• The $_FILES superglobal stores a variety of information pertinent to a file uploaded to the
server via a PHP script. In total, five items are available in this array, each of which is
introduced here:
• Note Each of the array elements introduced in this section makes reference to userfile.
This term is simply a placeholder for the name assigned to the file-upload form element. You
will probably change this name in accordance with your chosen name assignment.
• $_FILES['userfile']['error']: This array value offers important information pertinent to
the outcome of the upload attempt. In total, five return values are possible: one signifying a
successful outcome and four others denoting specific errors that arise from the attempt.
• $_FILES['userfile']['name']: This variable specifies the original name of the file,
including the extension, as declared on the client machine. Therefore, if you browse to a
file named vacation.png and upload it via the form, this variable will be assigned the value
vacation.png.
• $_FILES['userfile']['size']: This variable specifies the size, in bytes, of the file uploaded
from the client machine. For example, in the case of the vacation.png file, this variable
could plausibly be assigned a value such as 5253, or roughly 5KB.](https://image.slidesharecdn.com/fileuploadphp-170705133301/85/File-upload-php-8-320.jpg)
![PHP’s File-Upload Functions
• In addition to the number of file-handling functions made available via PHP’s file
system library PHP offers two functions specifically intended to aid in the
fileupload
• process, is_uploaded_file() and move_uploaded_file().
$_FILES['userfile']['tmp_name']: This variable specifies the temporary name assigned
to the file once it has been uploaded to the server. This is the name of the file assigned to
it while stored in the temporary directory (specified by the PHP directive
upload_tmp_dir).
$_FILES['userfile']['type']: This variable specifies the MIME type of the file uploaded
from the client machine. Therefore, in the case of the vacation.png image file, this
variable would be assigned the value image/png. If a PDF was uploaded, the value
application/pdf would be assigned. Because this variable sometimes produces unexpected
results, you should explicitly verify it yourself from within the script.](https://image.slidesharecdn.com/fileuploadphp-170705133301/85/File-upload-php-9-320.jpg)
![Determining Whether a File Was Uploaded
• The is_uploaded_file() function determines whether a file specified by the input parameter
filename is uploaded using the POST method. Its prototype follows:
• boolean is_uploaded_file(string filename)
• This function is intended to prevent a potential attacker from manipulating files not intended
for interaction via the script in question. For example, consider a scenario in which uploaded
files are made immediately available for viewing via a public site repository. Say an attacker
wants to make a file somewhat juicier than the boring old class notes available for his perusal,
say /etc/passwd. Rather than navigate to a class notes file as would be expected, the attacker
instead types /etc/passwd directly into the form’s file-upload field.
• Now consider the following script:
• <?php
• copy($_FILES['classnotes']['tmp_name'],
• "/www/htdocs/classnotes/".basename($classnotes));
• ?>
• The result of this poorly written example would be that the /etc/passwd file is copied to a
publicly accessible directory. (Go ahead, try it. Scary, isn’t it?) To avoid such a problem, use
the is_uploaded_file() function to ensure that the file denoted by the form field (in this case,
classnotes) is indeed a file that has been uploaded via the form.](https://image.slidesharecdn.com/fileuploadphp-170705133301/85/File-upload-php-10-320.jpg)
![• Here’s an improved and revised version of the previous example:
• <?php
• if (is_uploaded_file($_FILES['classnotes']['tmp_name'])) {
• copy($_FILES['classnotes']['tmp_name'],
• "/www/htdocs/classnotes/".$_FILES['classnotes']['name']);
• } else {
• echo "<p>Potential script abuse attempt detected.</p>";
• }
• ?>
• In the revised script, is_uploaded_file() checks whether the file denoted by
• $_FILES['classnotes']['tmp_name'] has indeed been uploaded. If the answer is yes,
the file is copied to
• the desired destination. Otherwise, an error message is displayed.](https://image.slidesharecdn.com/fileuploadphp-170705133301/85/File-upload-php-11-320.jpg)
![Moving an Uploaded File
• The move_uploaded_file() function provides a convenient means for moving an
uploaded file from the temporary directory to a final location. Its prototype follows:
• boolean move_uploaded_file(string filename, string destination)
• Although copy() works equally well, move_uploaded_file() offers one additional
feature: it will check to ensure that the file denoted by the filename input parameter
was in fact uploaded via PHP’s HTTP POST upload mechanism. If the file has not
been uploaded, the move will fail and a FALSE value will be returned. Because of
this, you can forgo using is_uploaded_file() as a precursor condition to using
move_uploaded_file().
• Using move_uploaded_file() is simple. Consider a scenario in which you want to
move the uploaded class notes file to the directory /www/htdocs/classnotes/ while
also preserving the file name as specified on the client:
• move_uploaded_file($_FILES['classnotes']['tmp_name'],"/www/htdocs/classnotes/"
.$_FILES['classnotes']['name']);
• Of course, you can rename the file to anything you wish after it’s been moved. It’s
important, however, that you properly reference the file’s temporary name within
the first parameter.](https://image.slidesharecdn.com/fileuploadphp-170705133301/85/File-upload-php-12-320.jpg)
![Upload Error Messages
• How do you know with certainty that the file-upload procedure was successful? And if
something goes awry during the upload process, how do you know what caused the error?
Happily, sufficient information for determining the outcome (and in the case of an error, the
reason for the error) is provided in $_FILES['userfile']['error']:
• UPLOAD_ERR_OK: A value of 0 is returned if the upload is successful.
• UPLOAD_ERR_INI_SIZE: A value of 1 is returned if there is an attempt to upload a file
whose size exceeds the value specified by the upload_max_filesize directive.
• UPLOAD_ERR_FORM_SIZE: A value of 2 is returned if there is an attempt to upload a
file whose size exceeds the value of the max_file_size directive, which can be embedded into
the HTML form
• UPLOAD_ERR_PARTIAL: A value of 3 is returned if a file is not completely uploaded.
• This might happen if a network error causes a disruption of the upload process.
• UPLOAD_ERR_NO_FILE: A value of 4 is returned if the user submits the form without
specifying a file for upload.
• UPLOAD_ERR_NO_TMP_DIR: A value of 6 is returned if the temporary directory does
not exist.
• UPLOAD_ERR_CANT_WRITE: Introduced in PHP 5.1.0, a value of 7 is returned if the
file can’t be written to the disk.
• UPLOAD_ERR_EXTENSION: Introduced in PHP 5.2.0, a value of 8 is returned if an issue
with PHP’s configuration caused the upload to fail.](https://image.slidesharecdn.com/fileuploadphp-170705133301/85/File-upload-php-13-320.jpg)


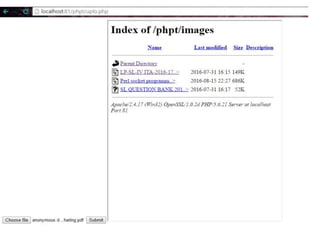
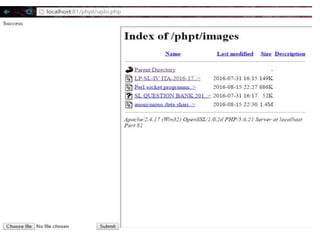
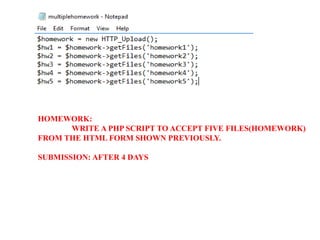

The PHP script uses the HTTP_Upload class to handle multiple file uploads from an HTML form. It creates 5 instances of the HTTP_Upload class, one for each file upload field. It checks that the files were uploaded successfully and moves them to the destination folder. Any errors are displayed to the user. <?php // Destination folder for uploaded files $destination_folder = '/homework_submissions'; // Loop through each file upload field for($i=1; $i<=5; $i++) { // Create HTTP_Upload instance $