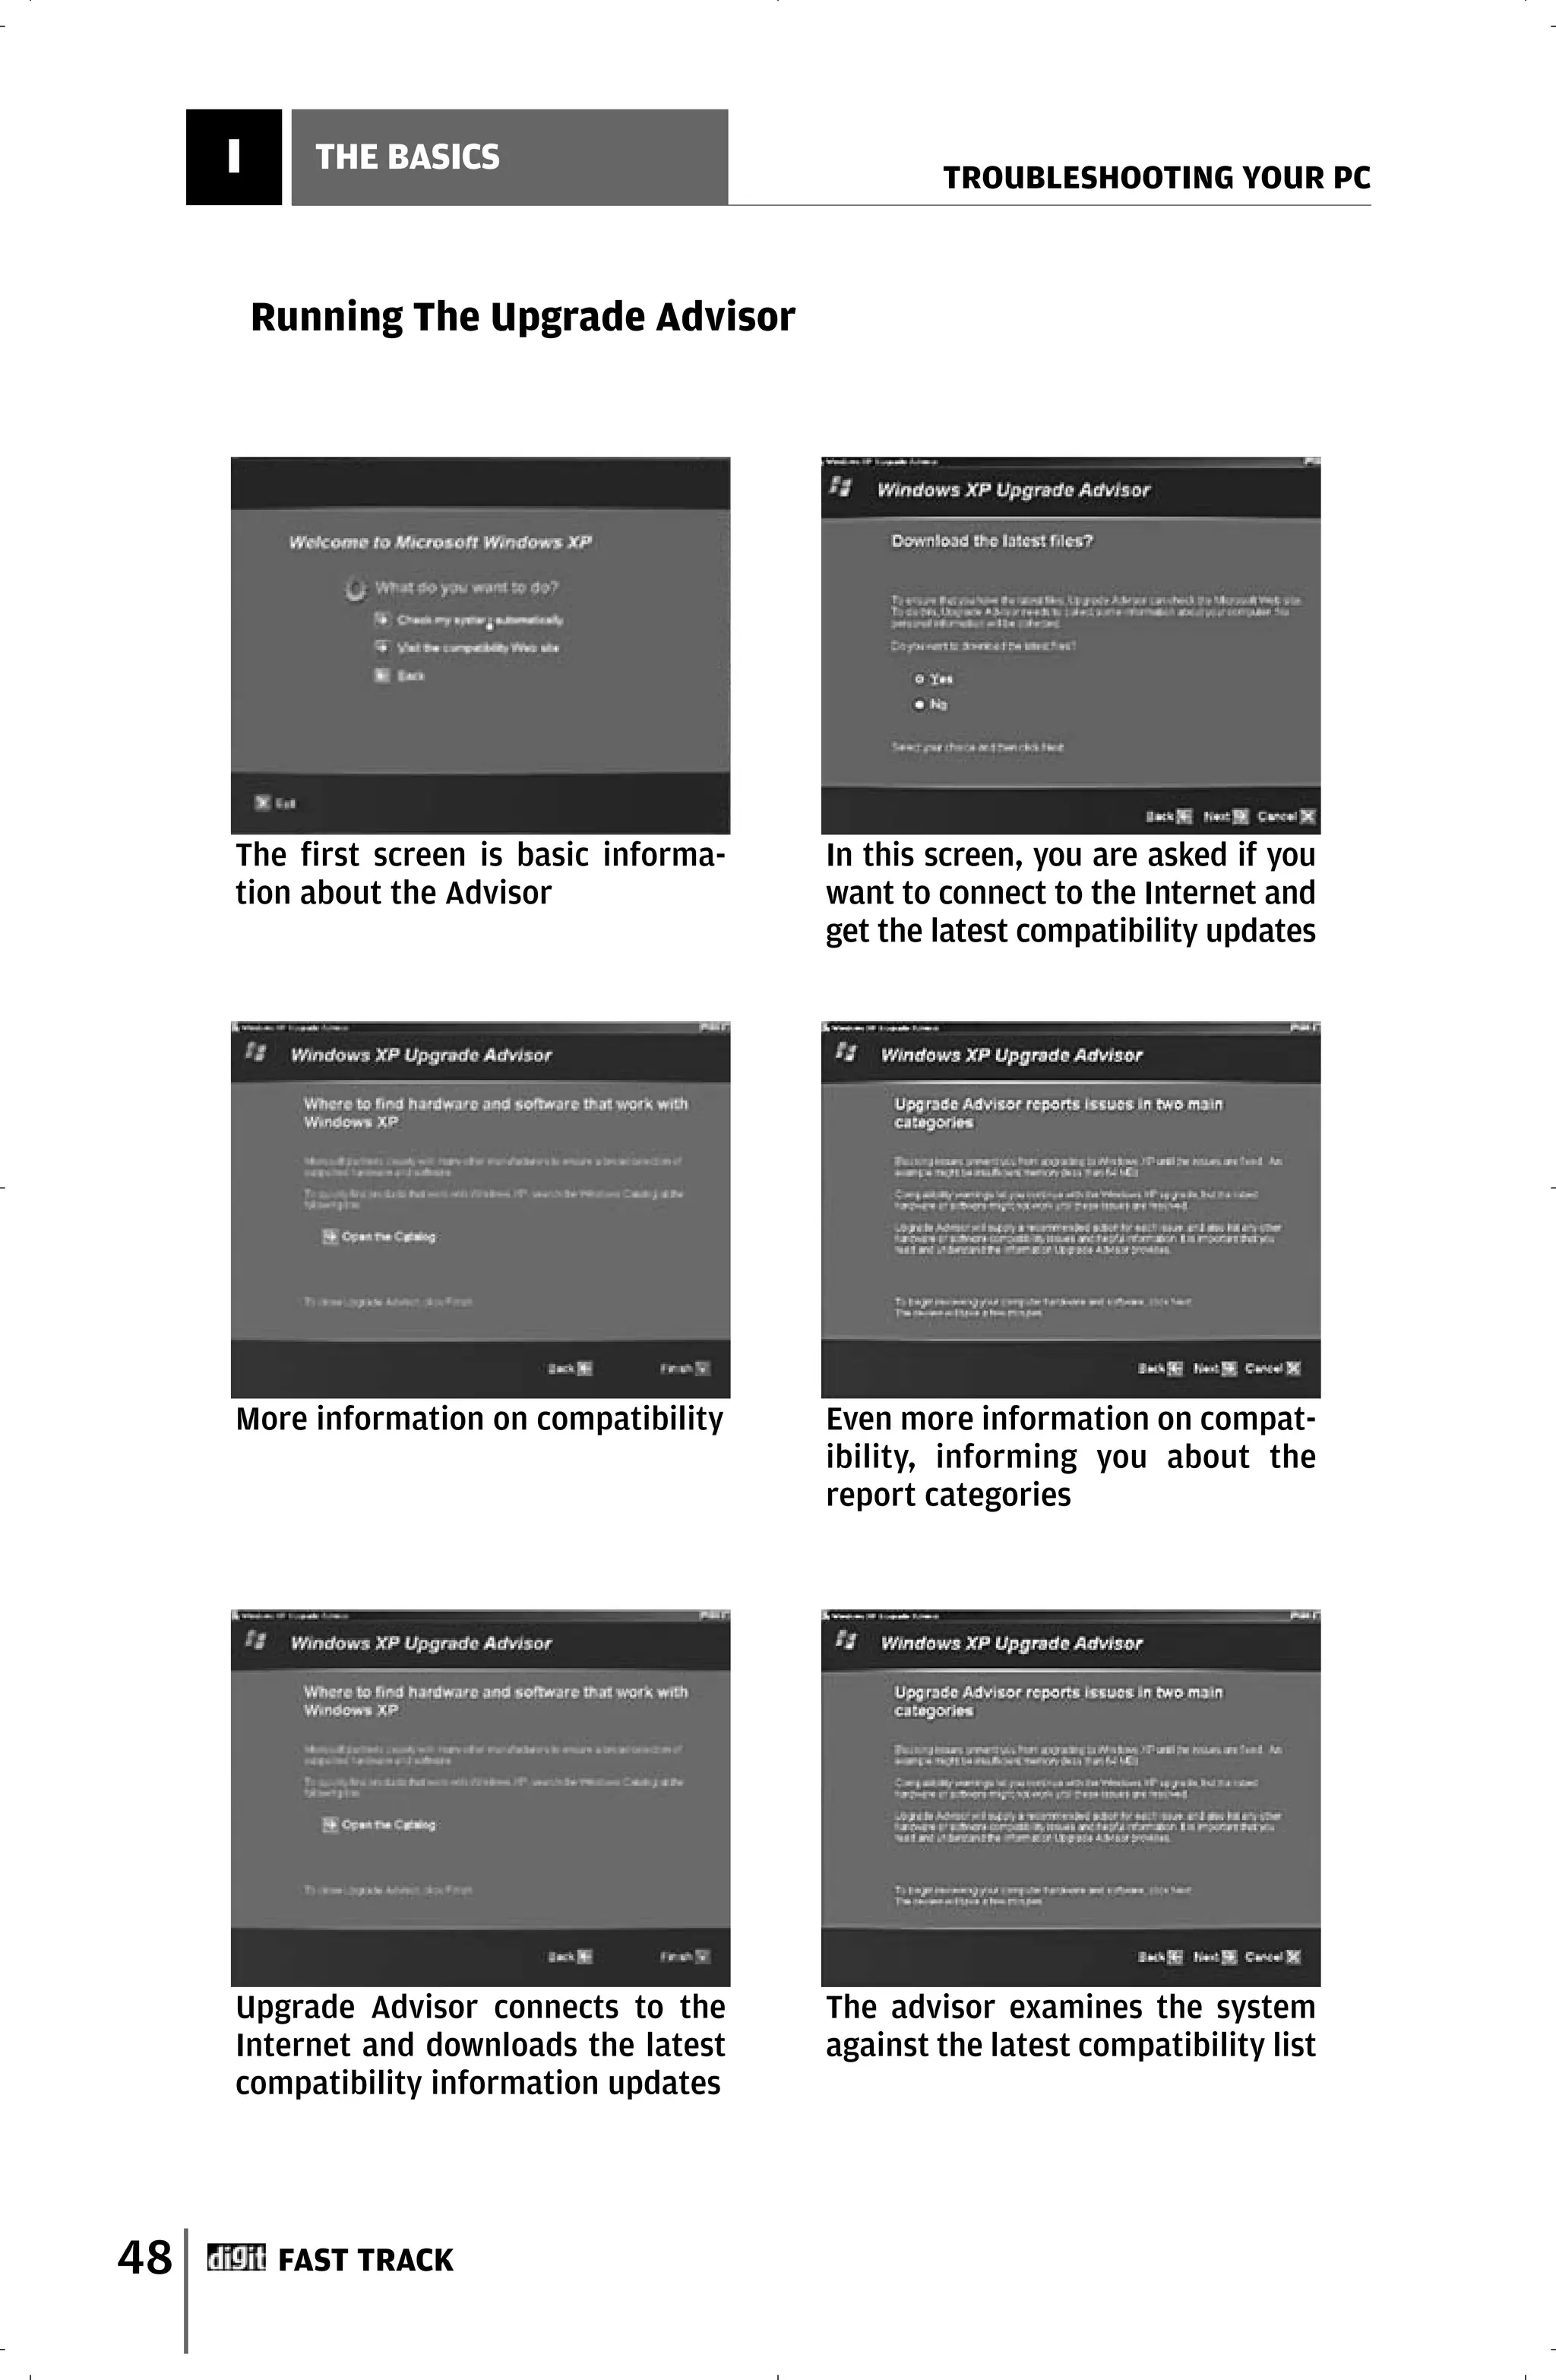
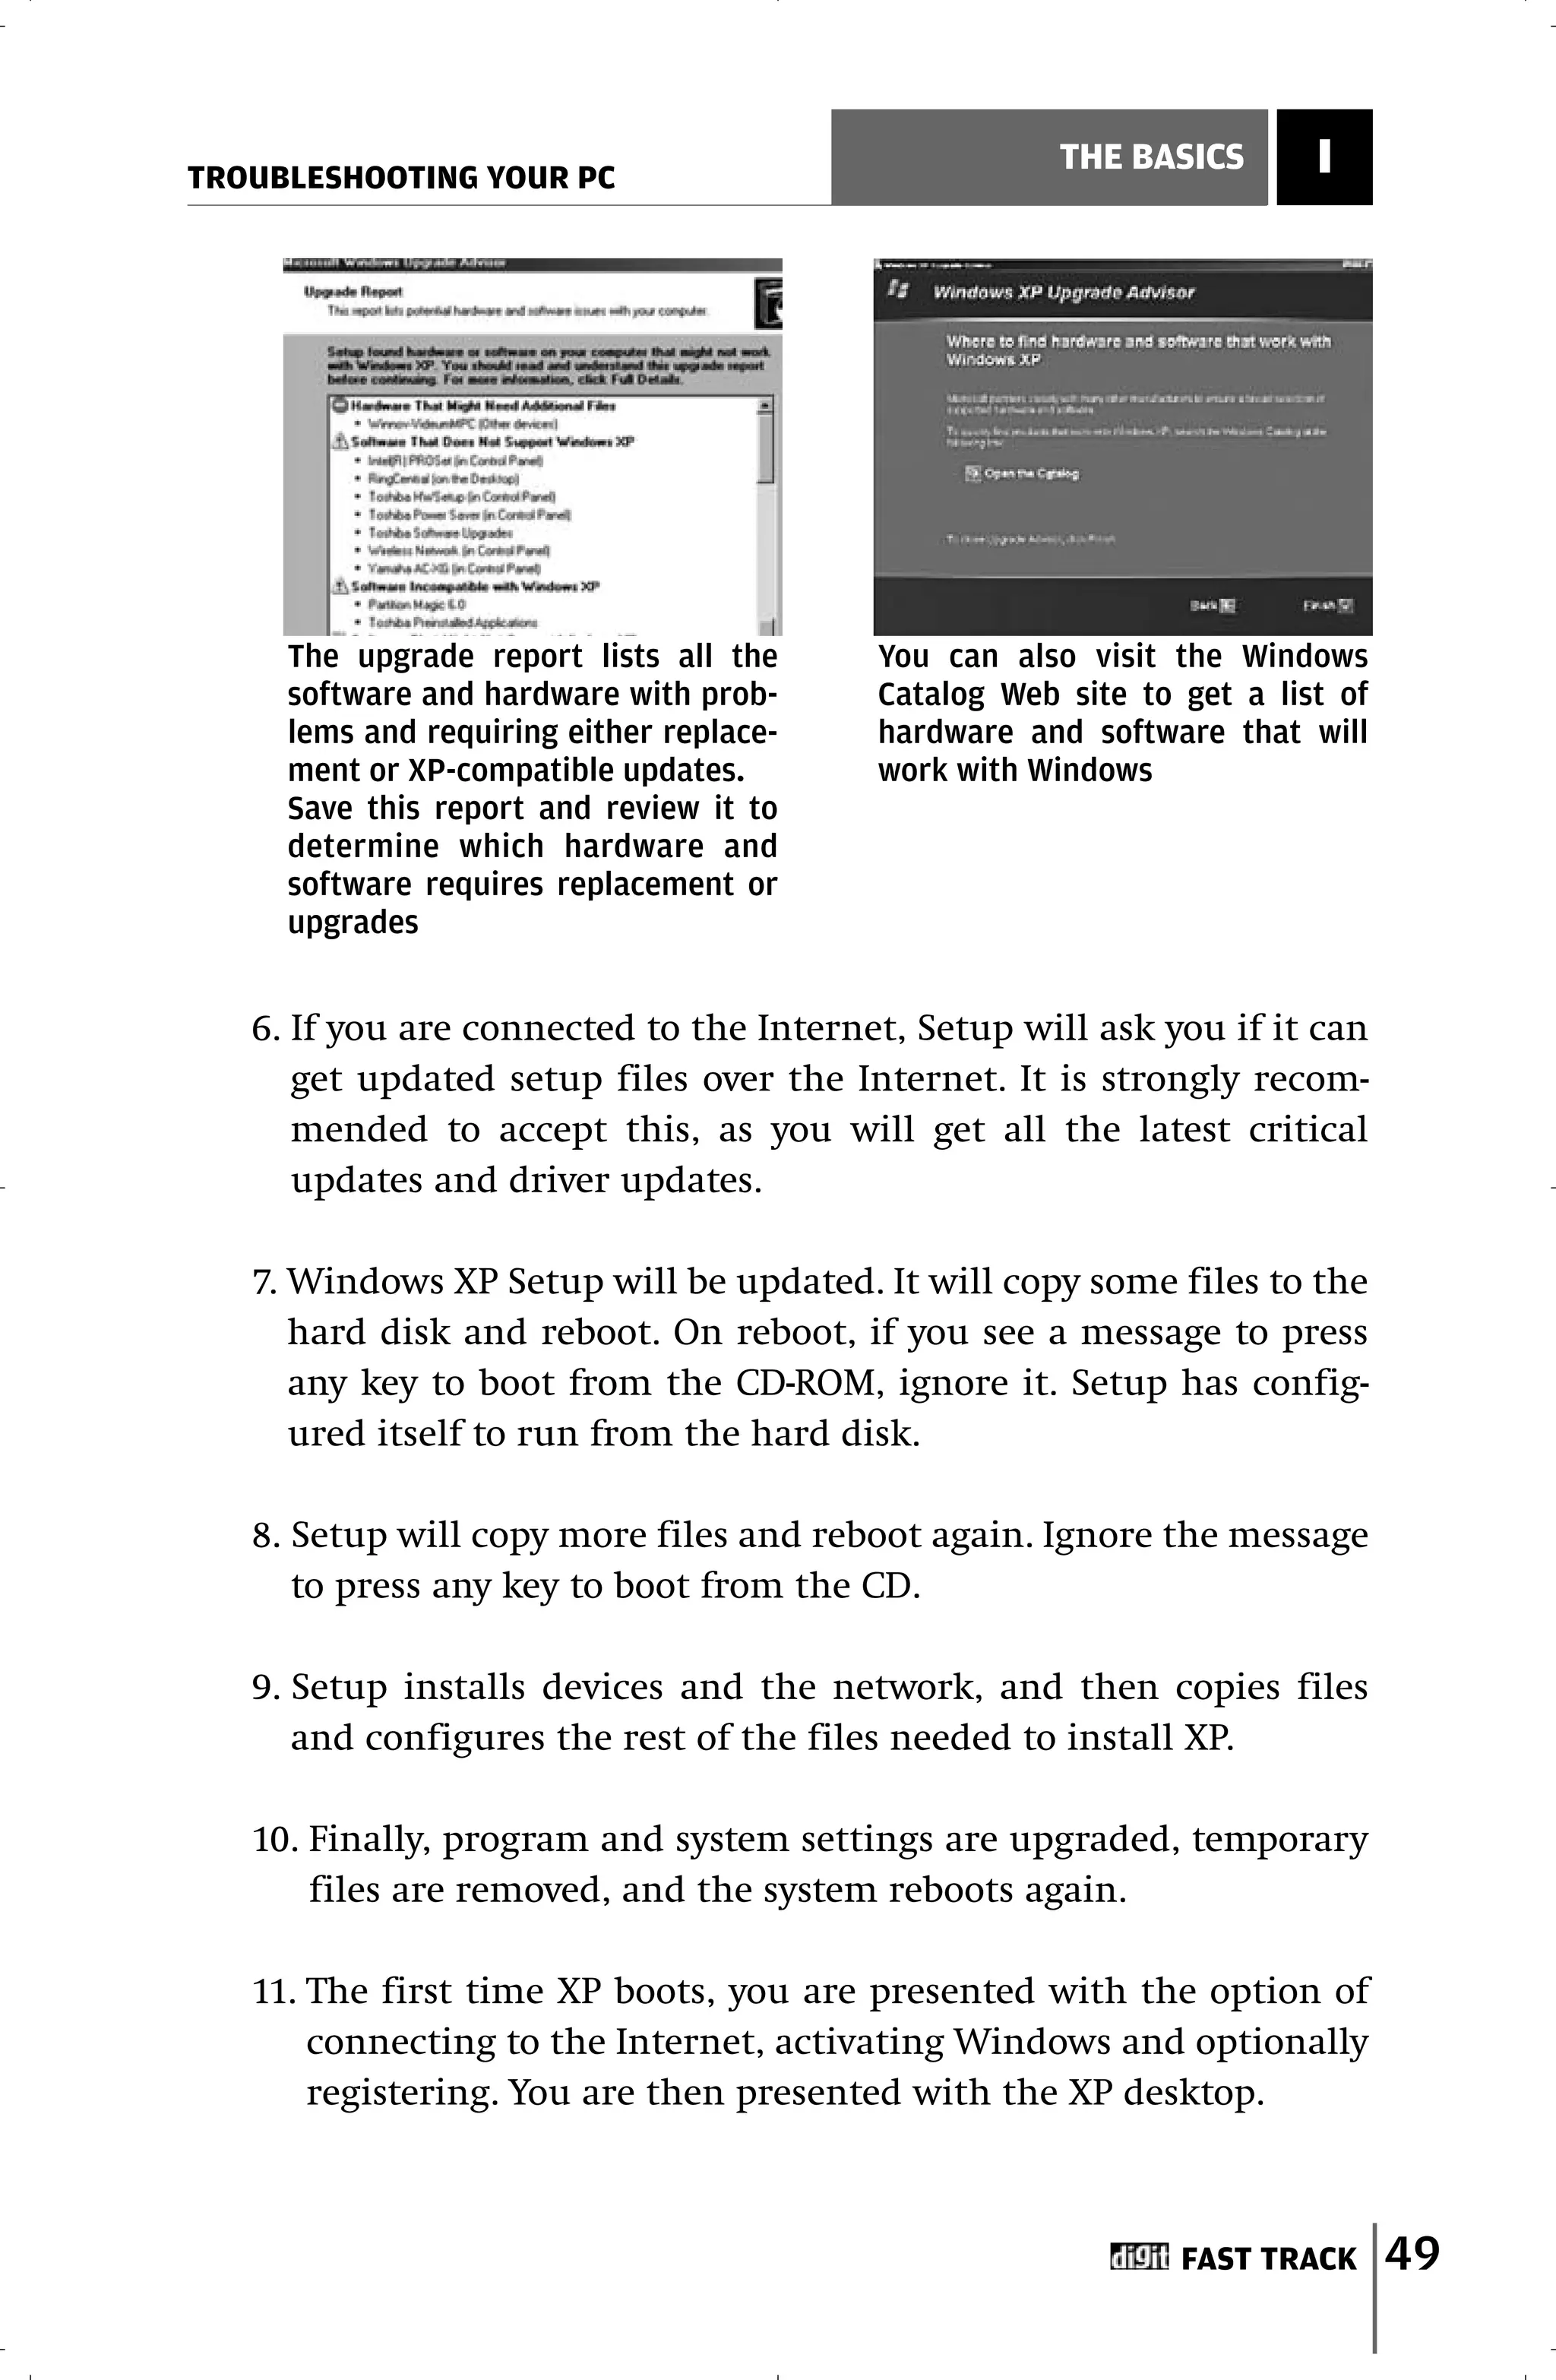
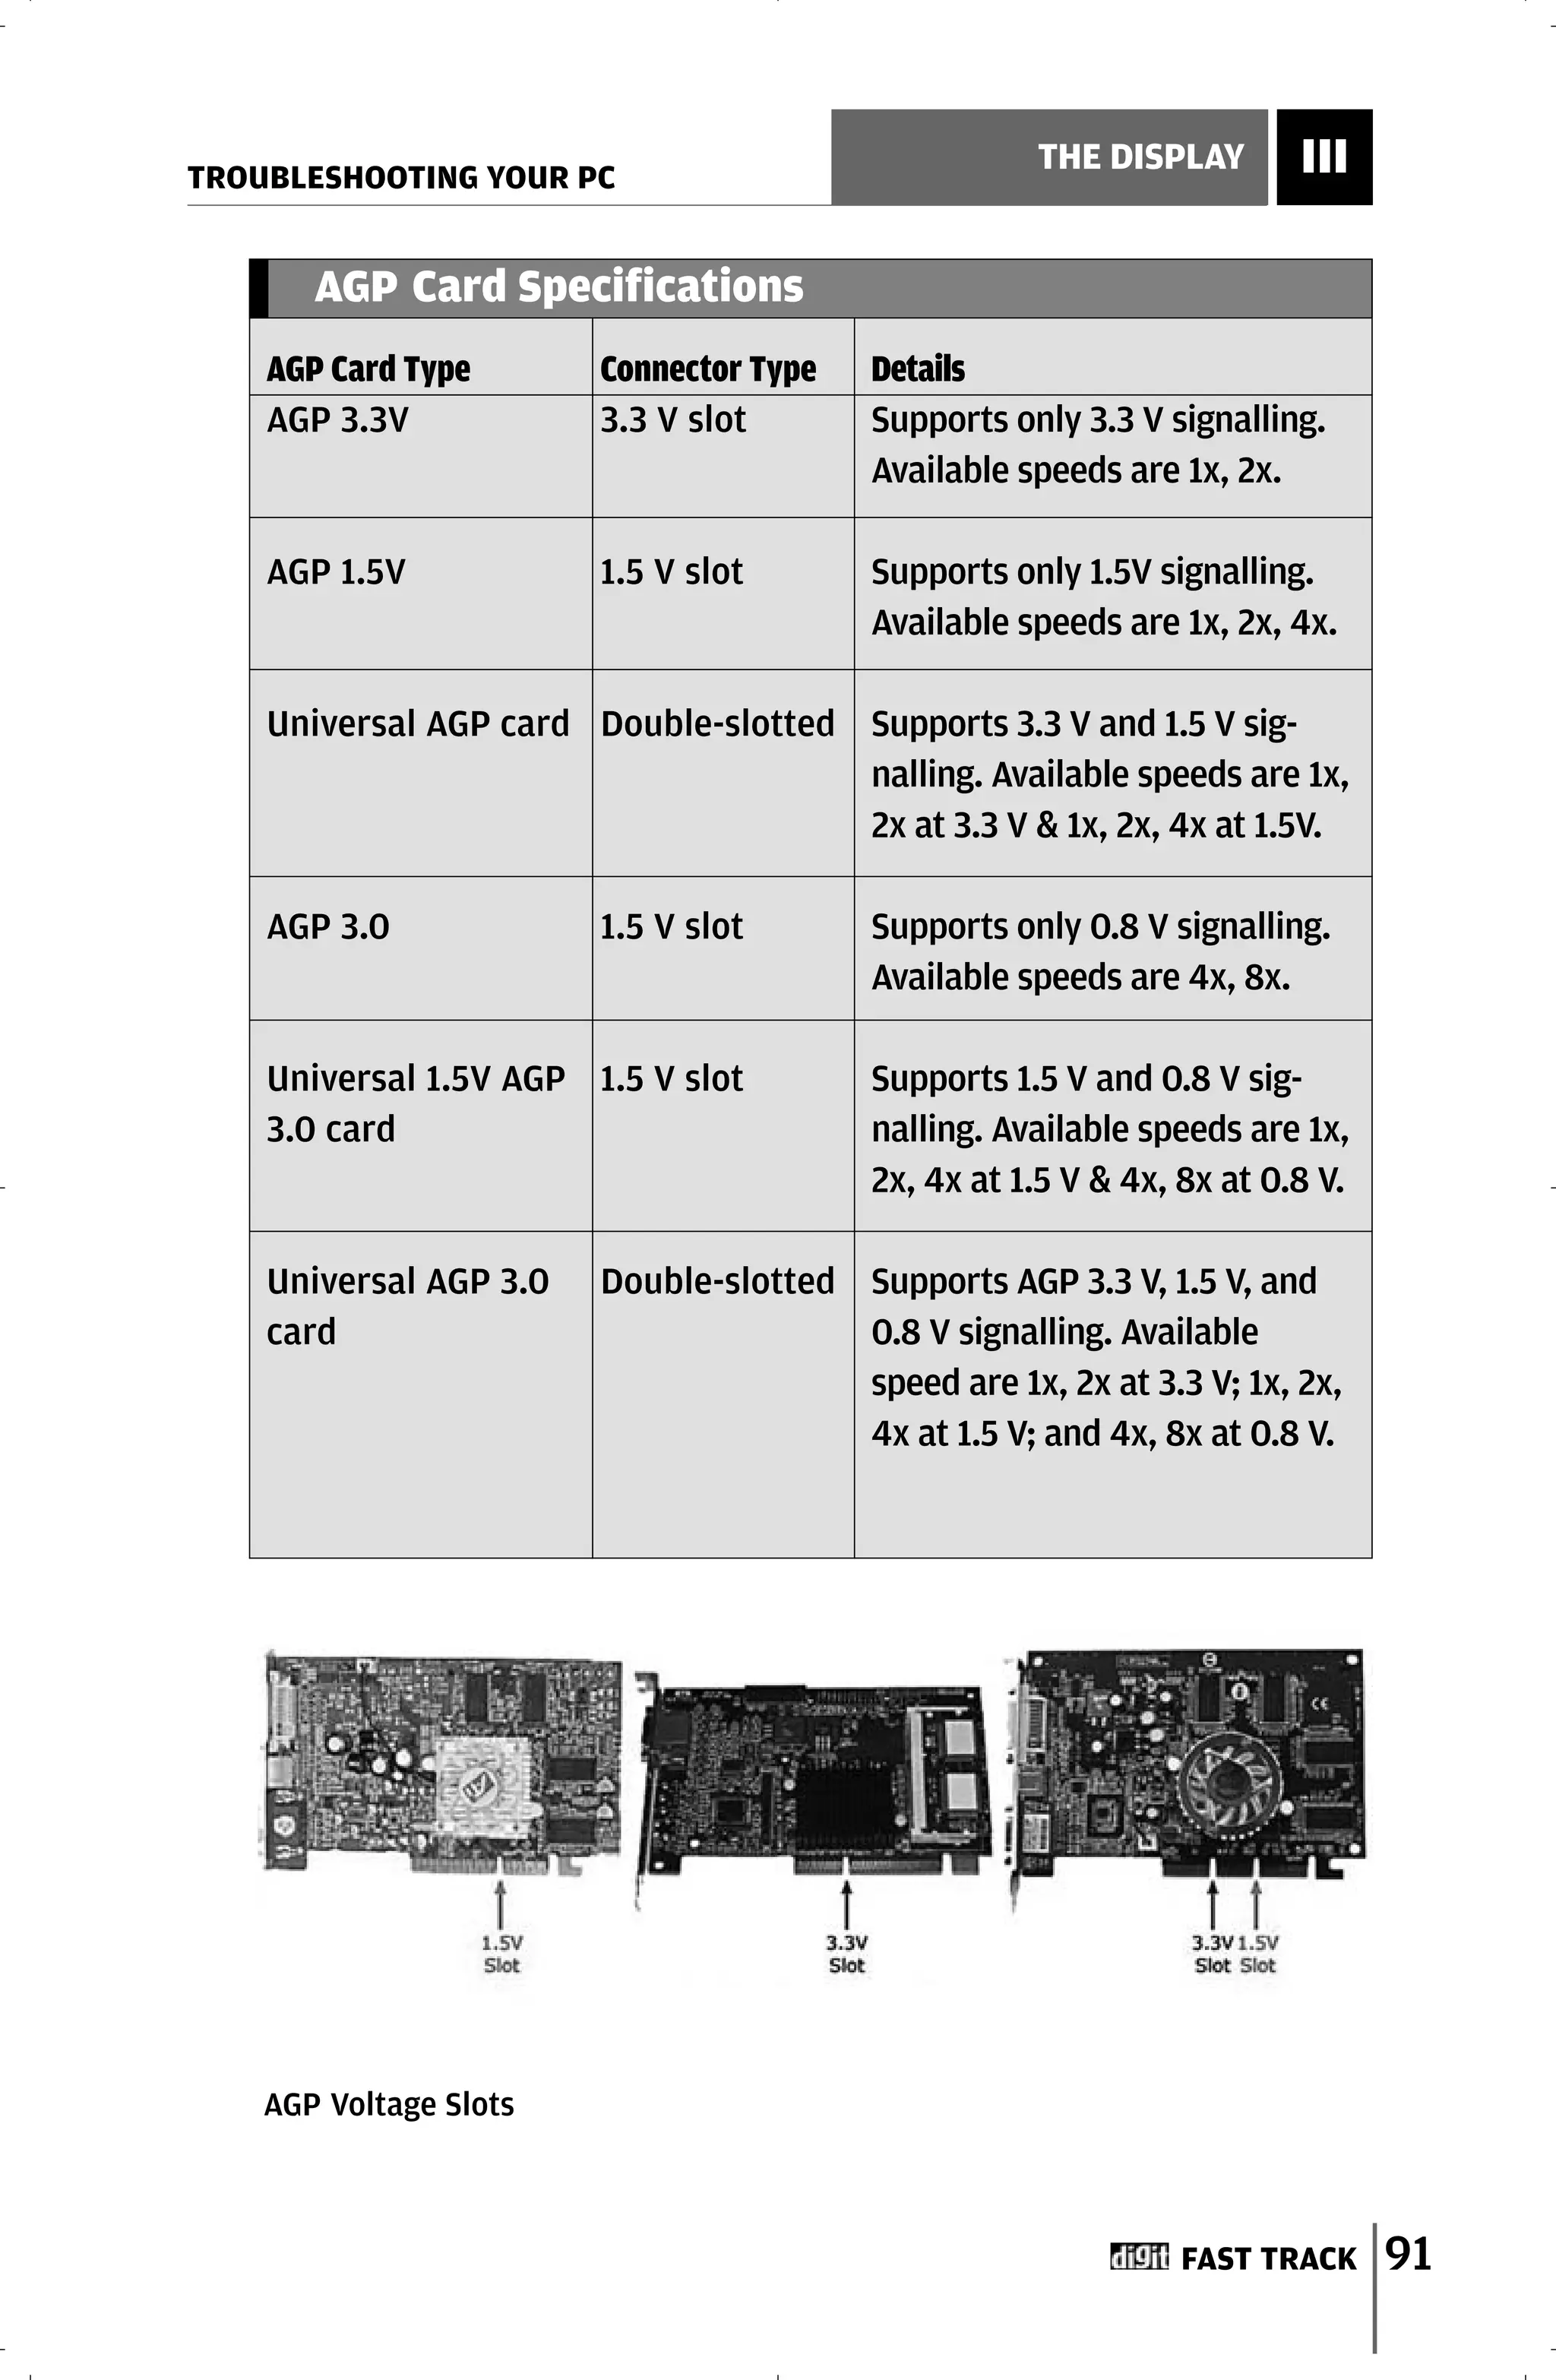
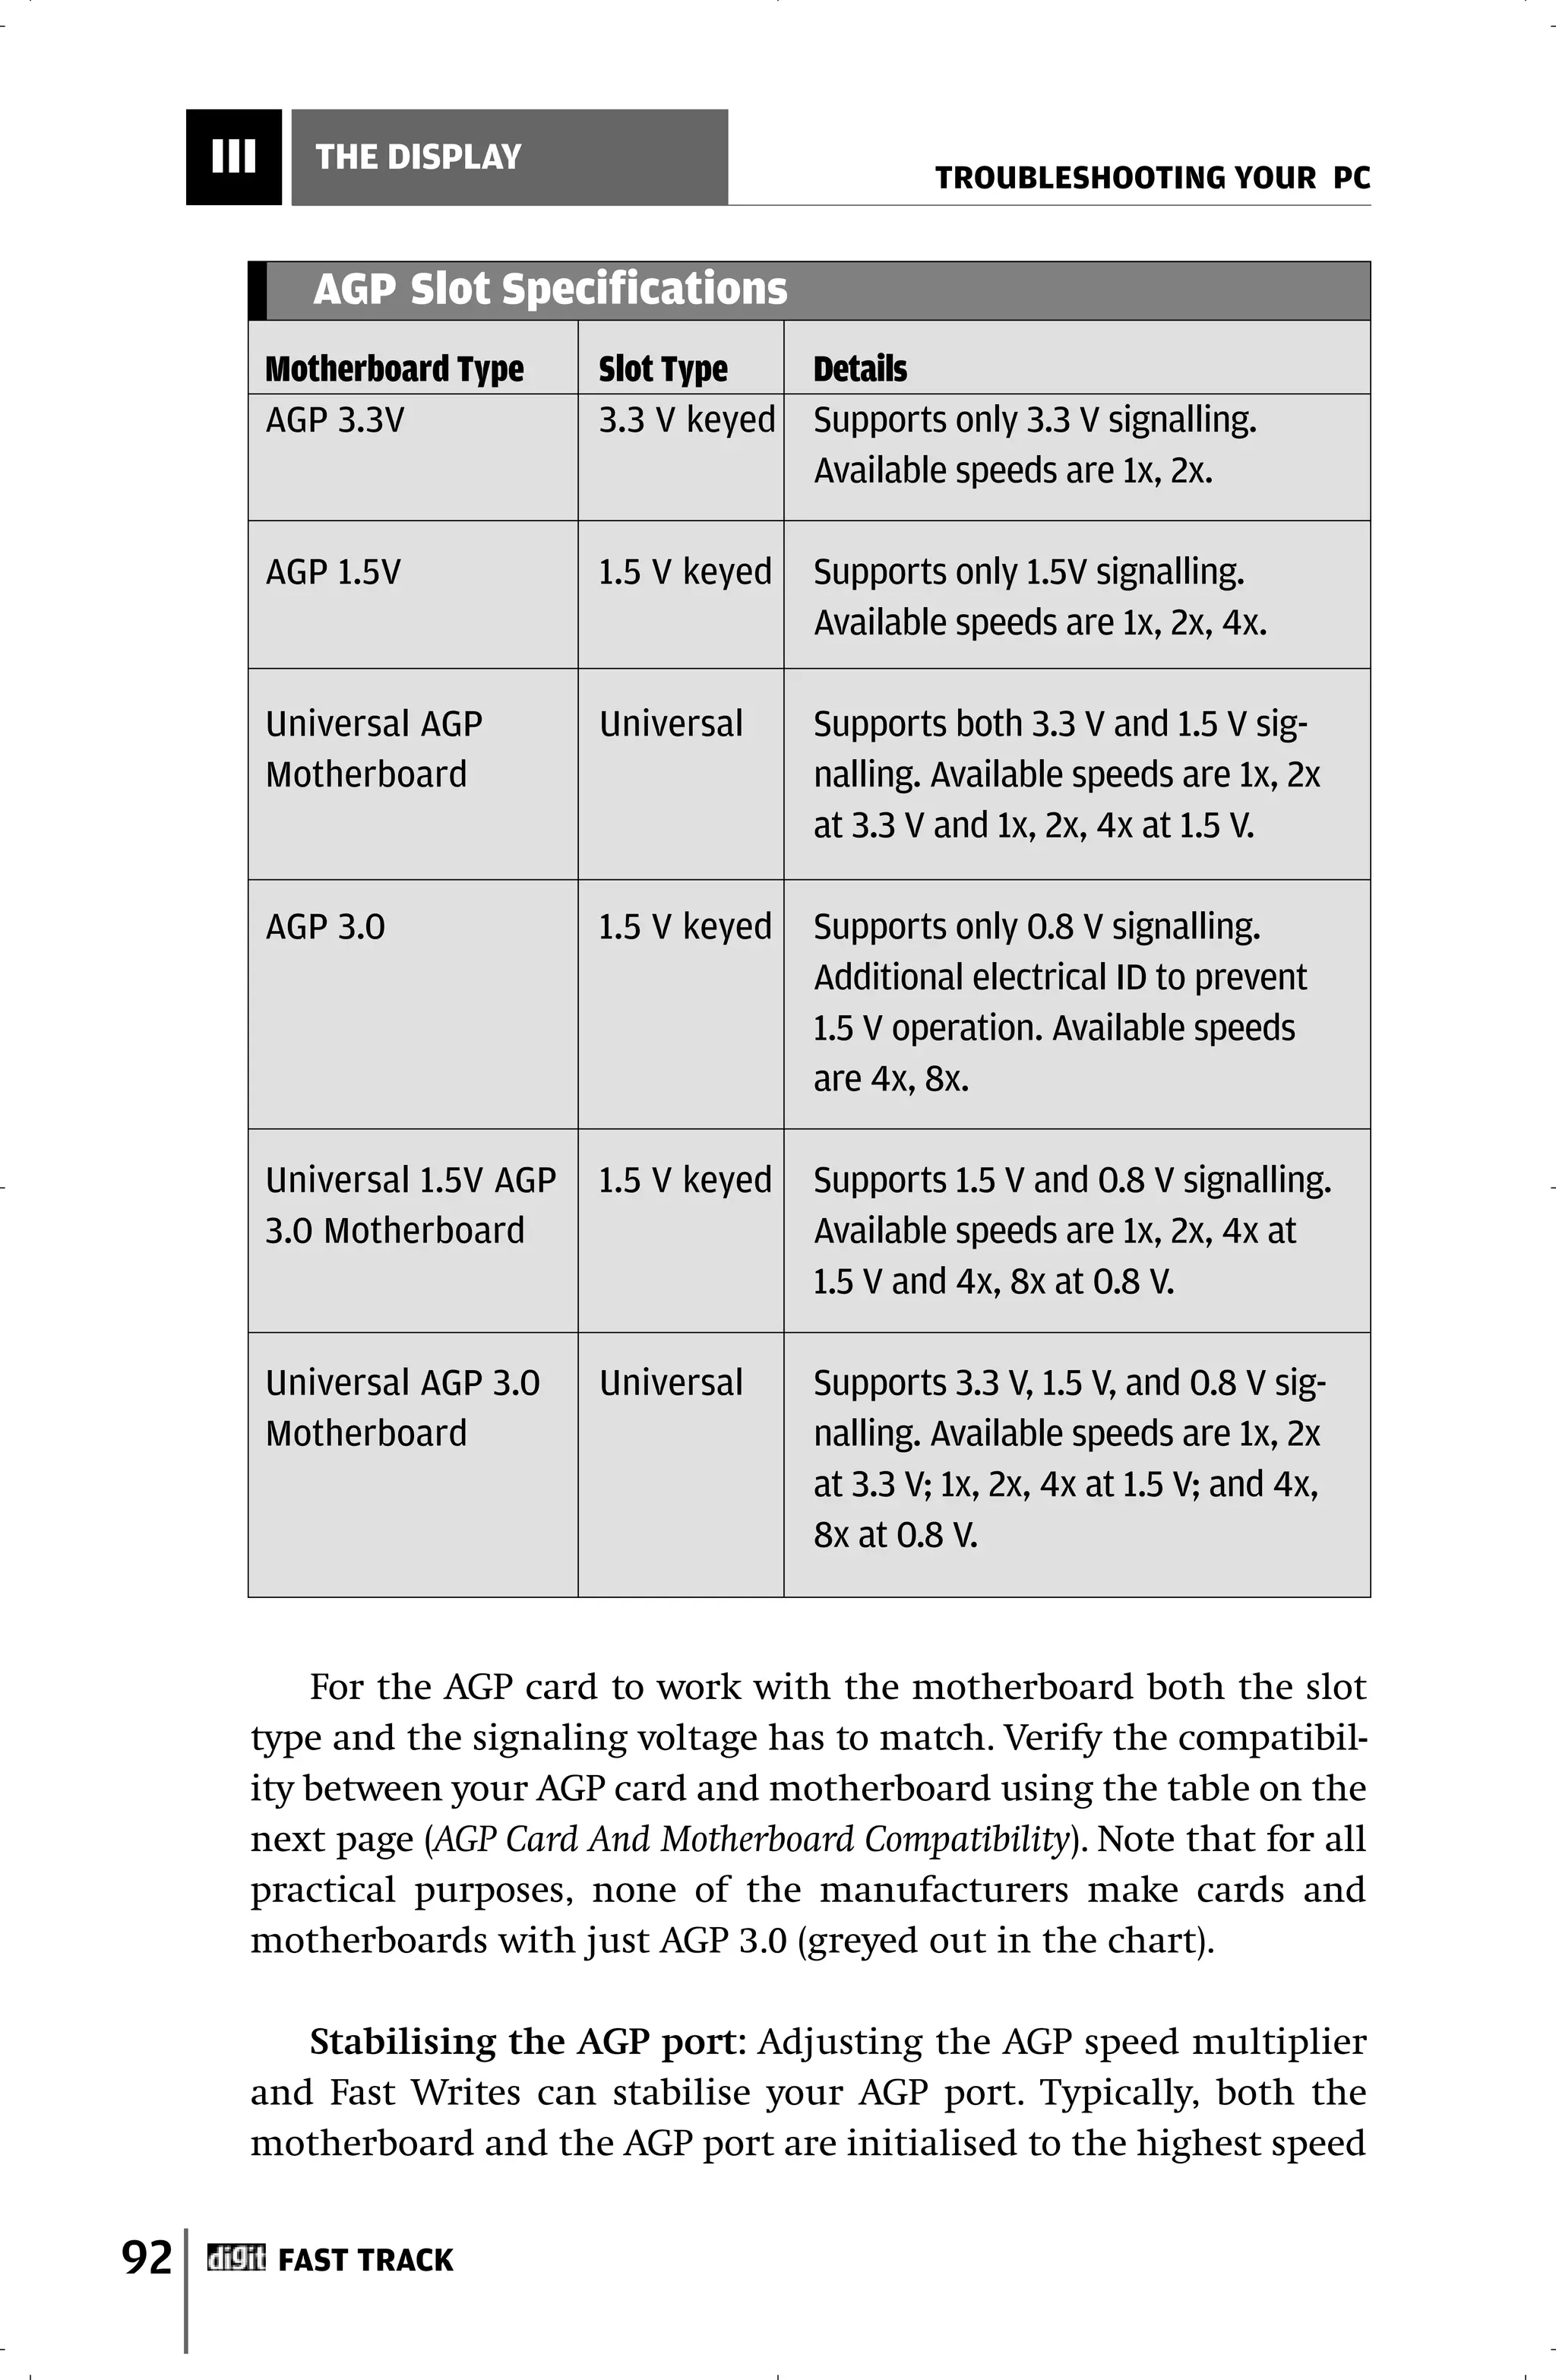
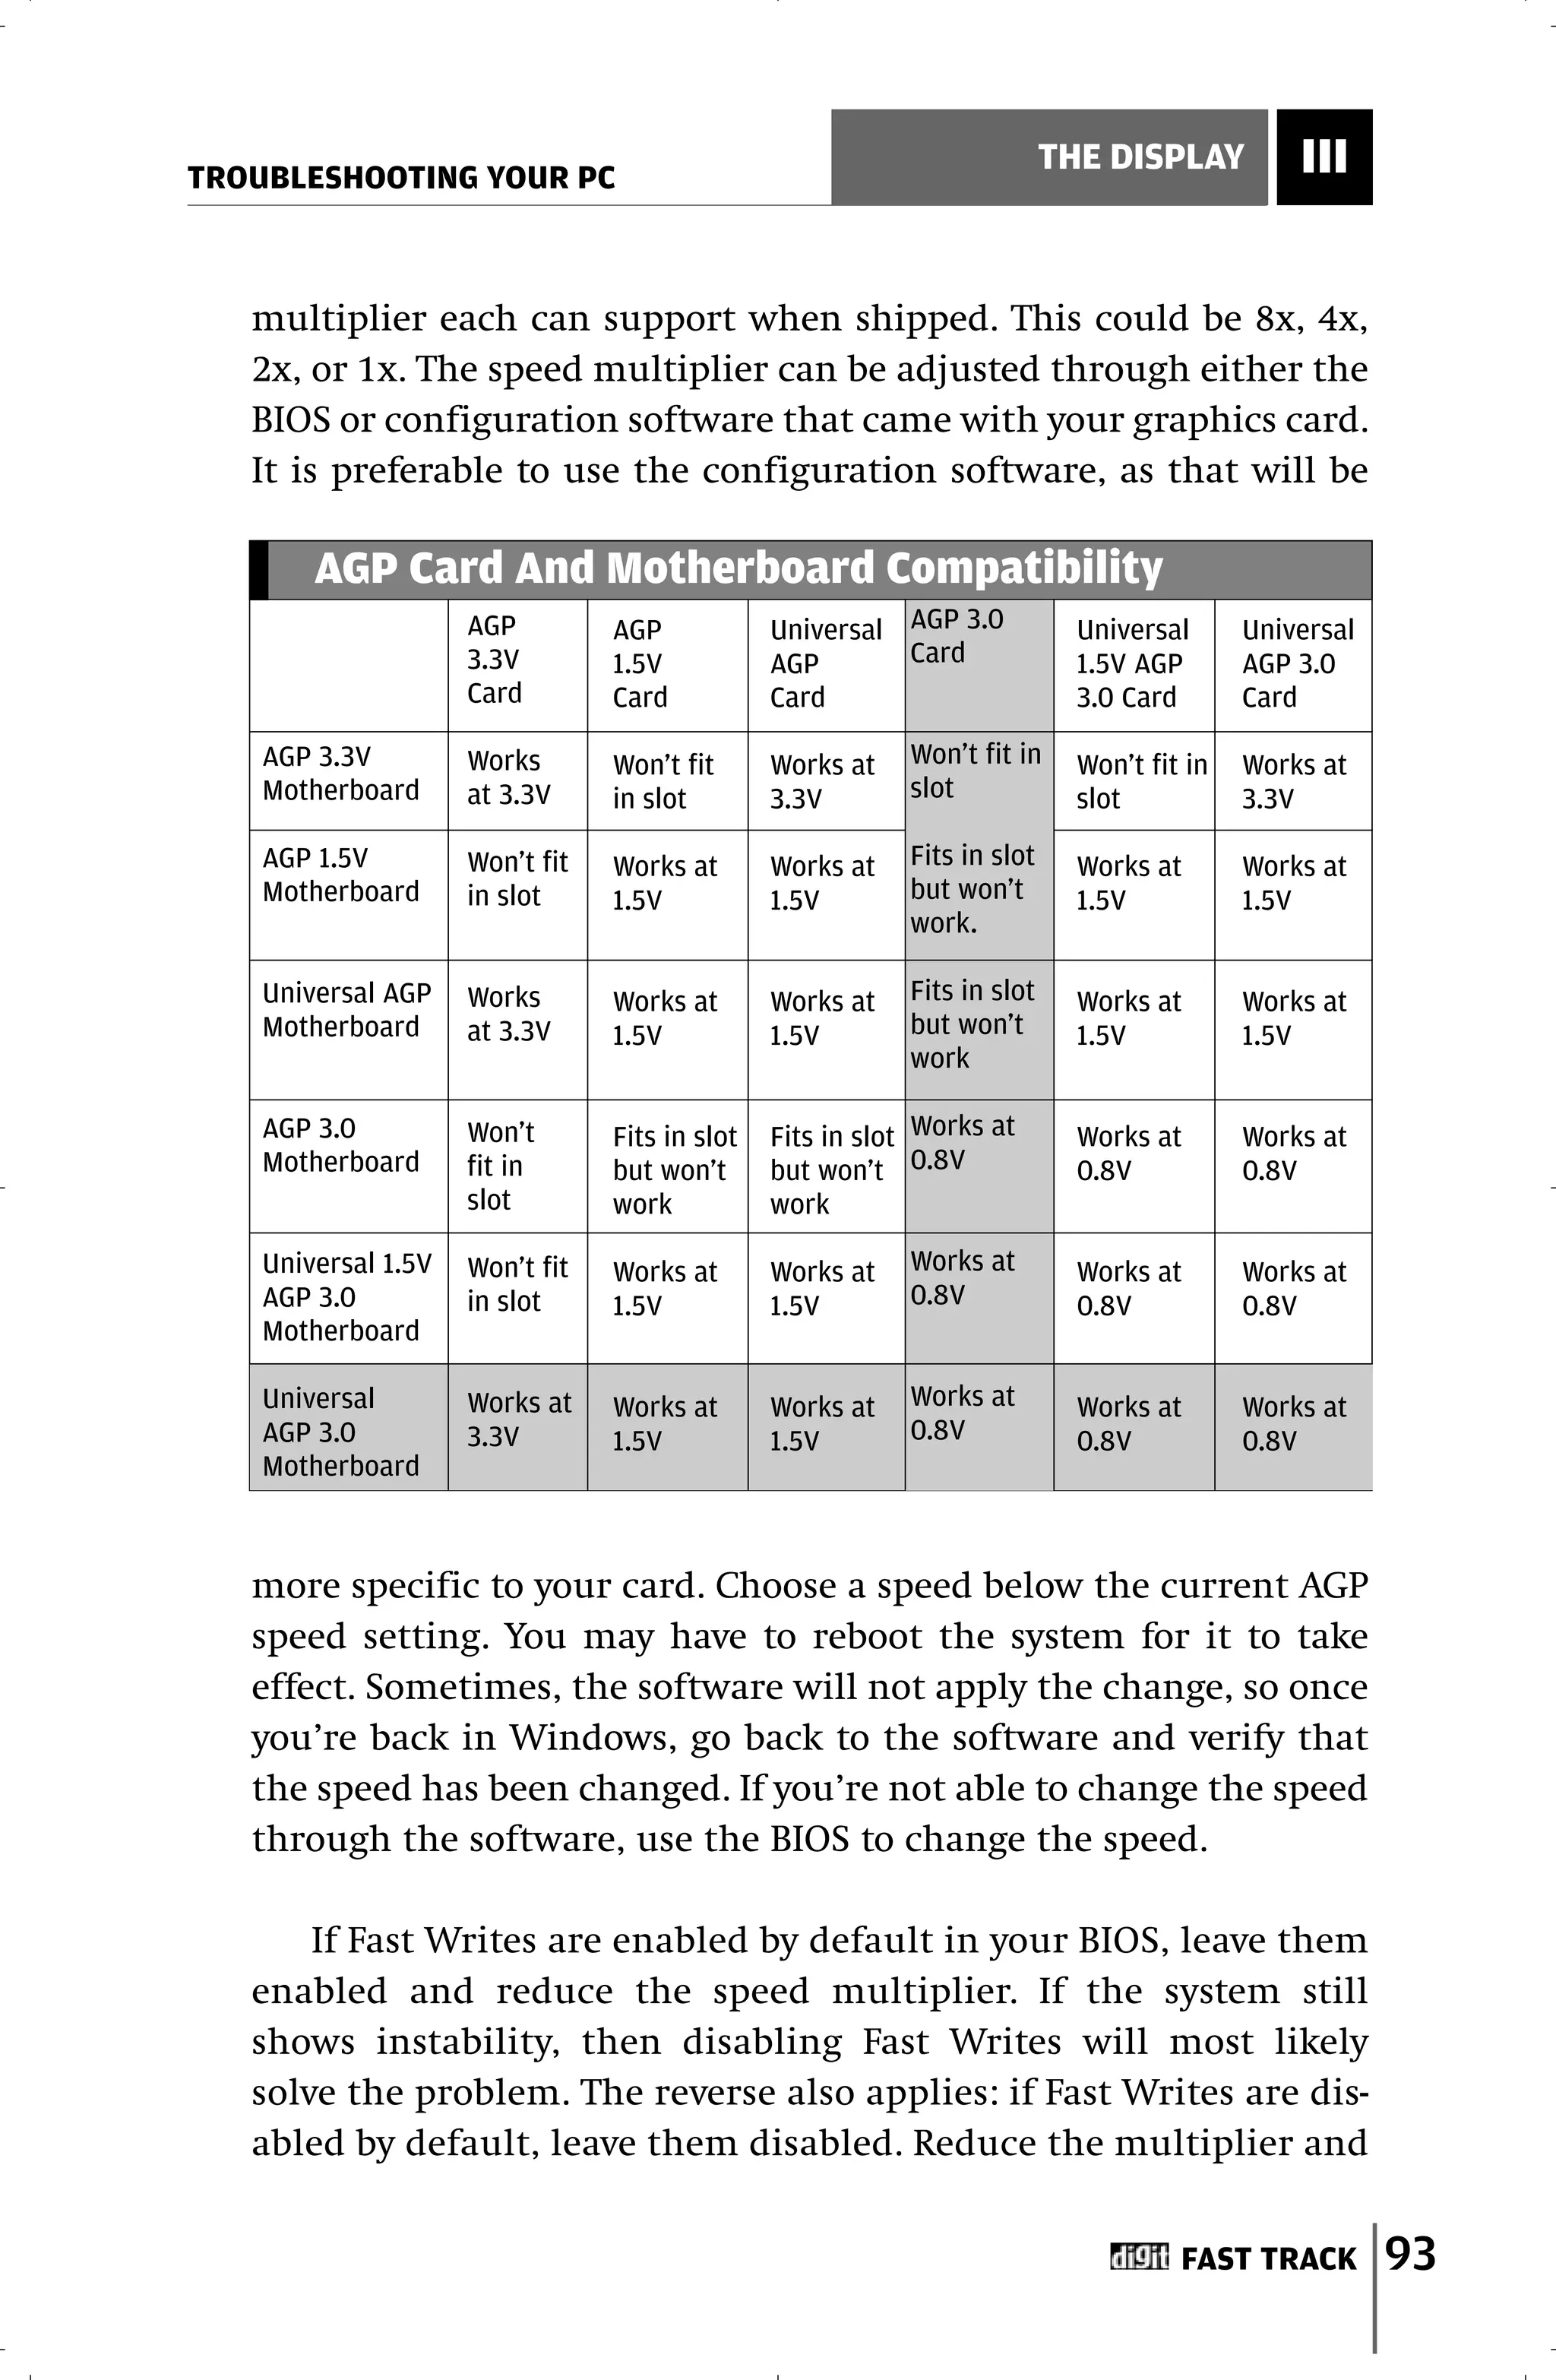
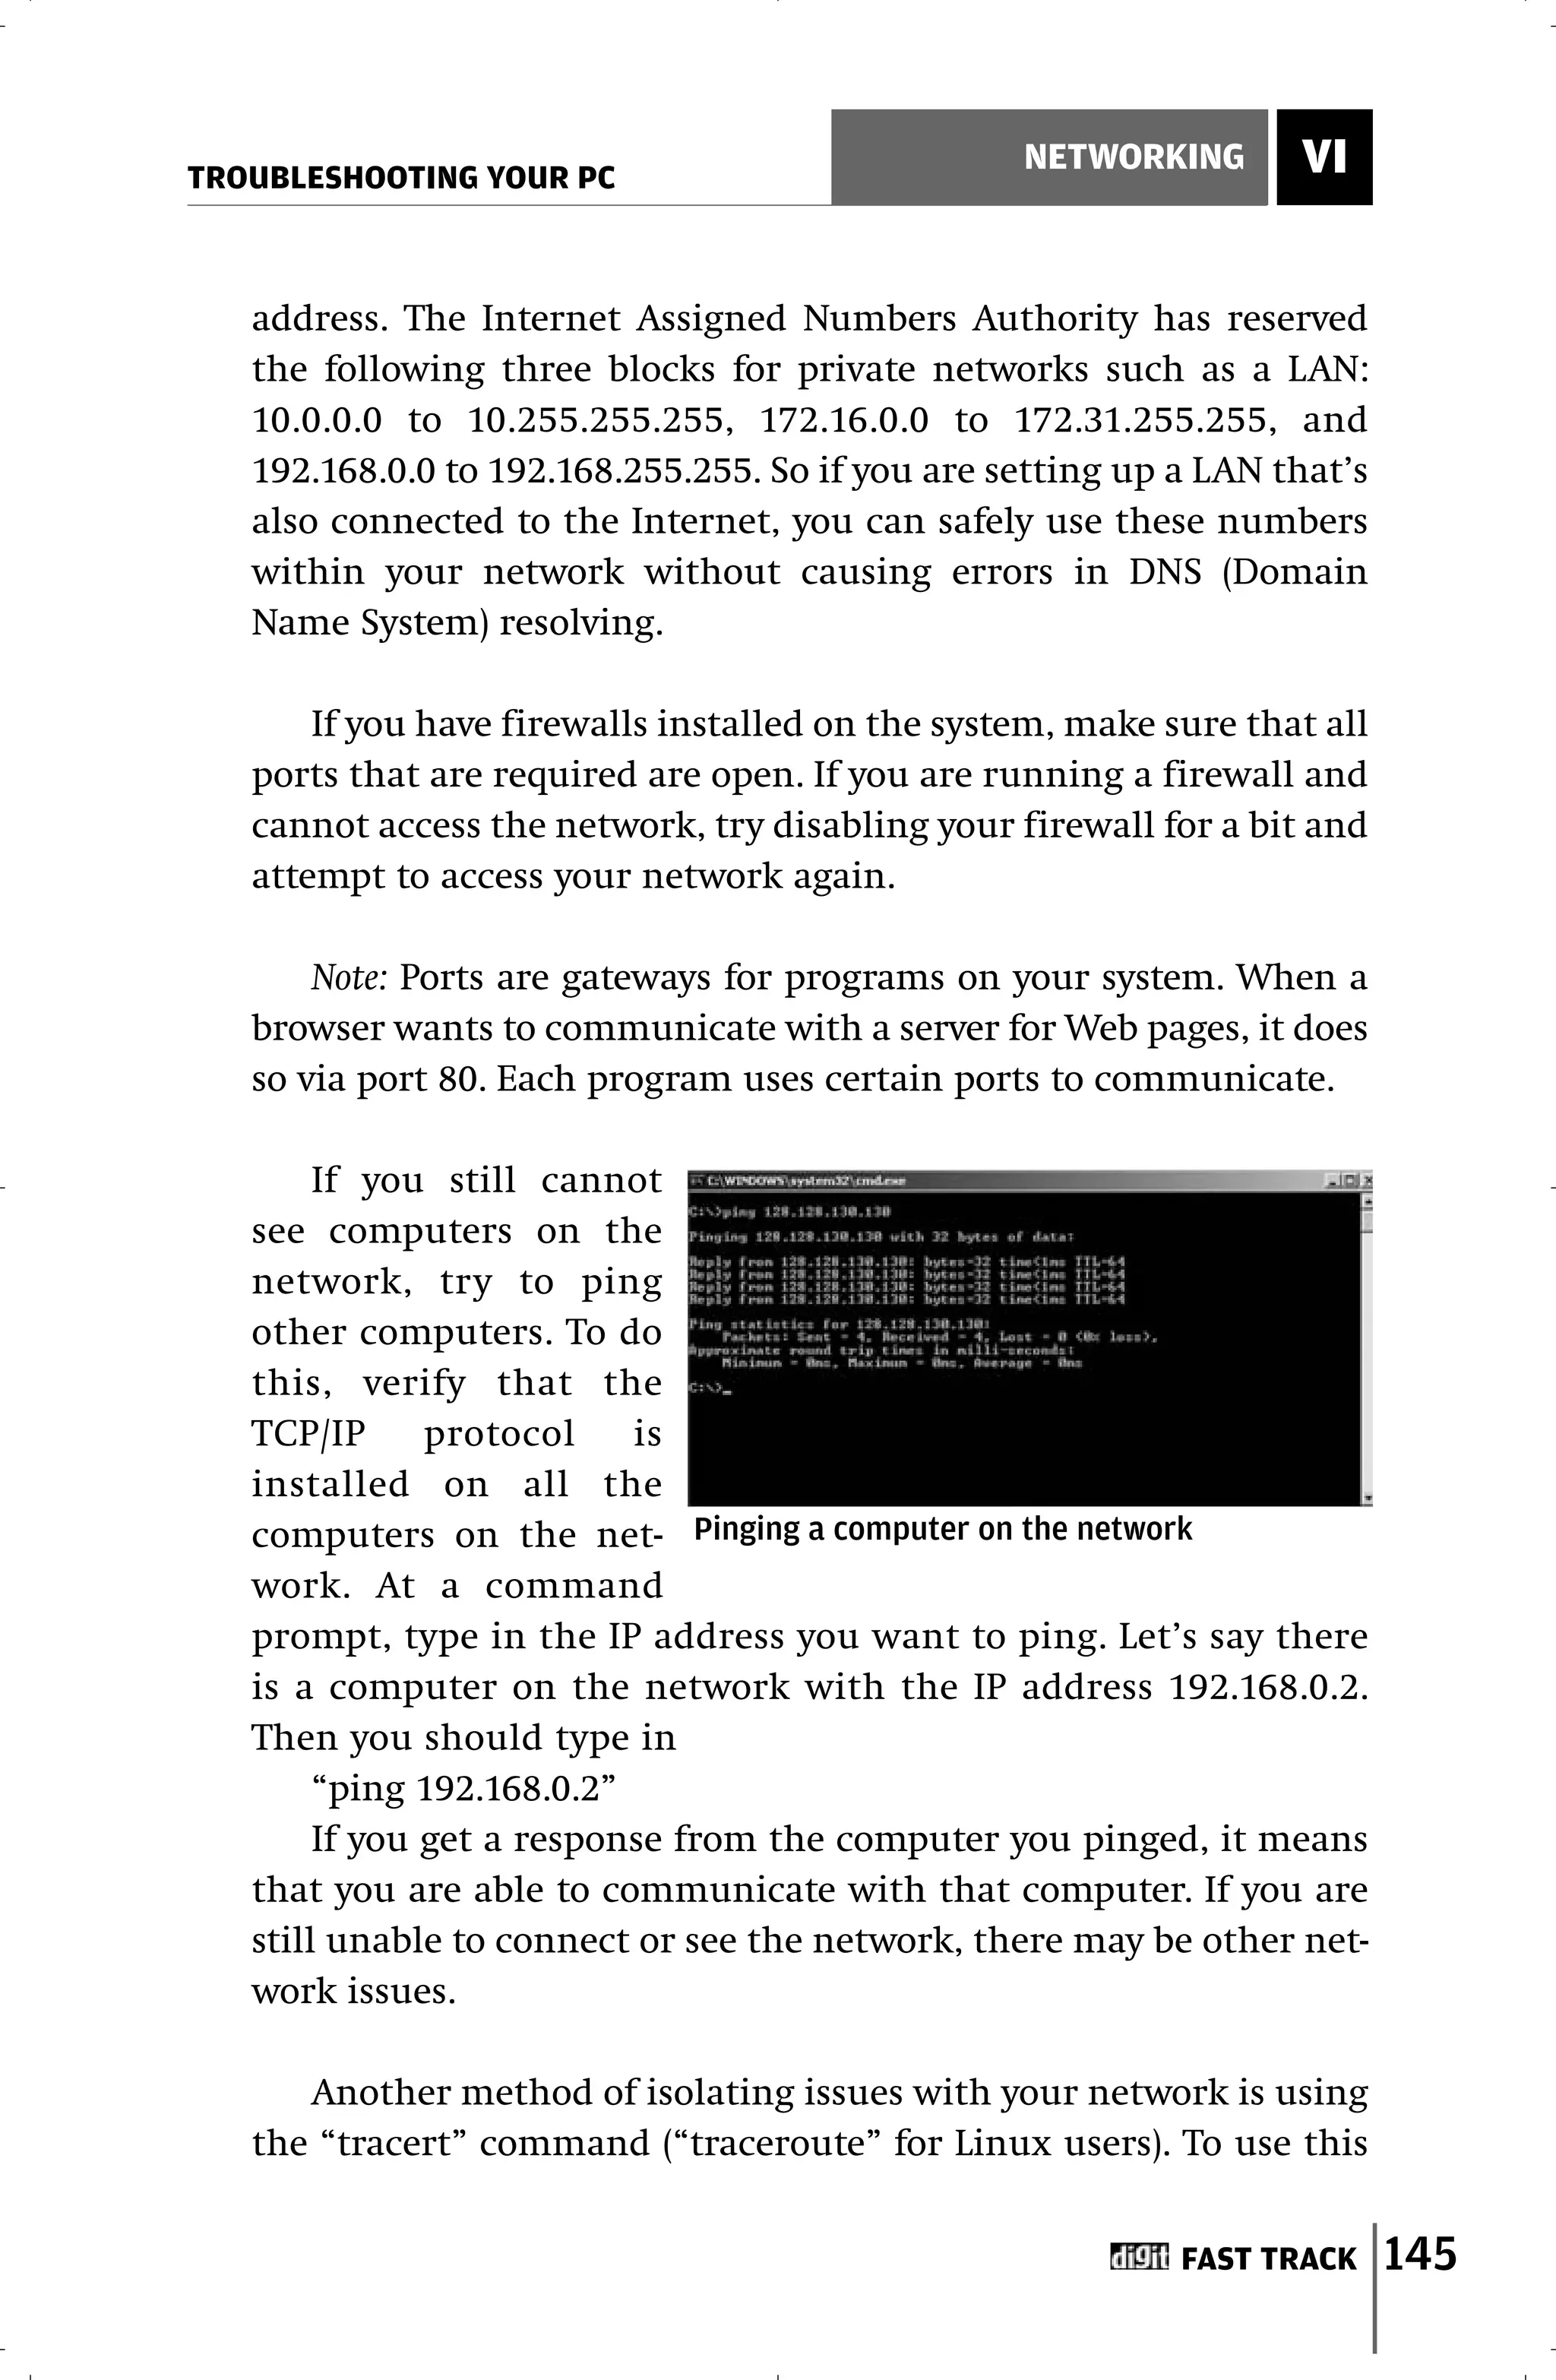
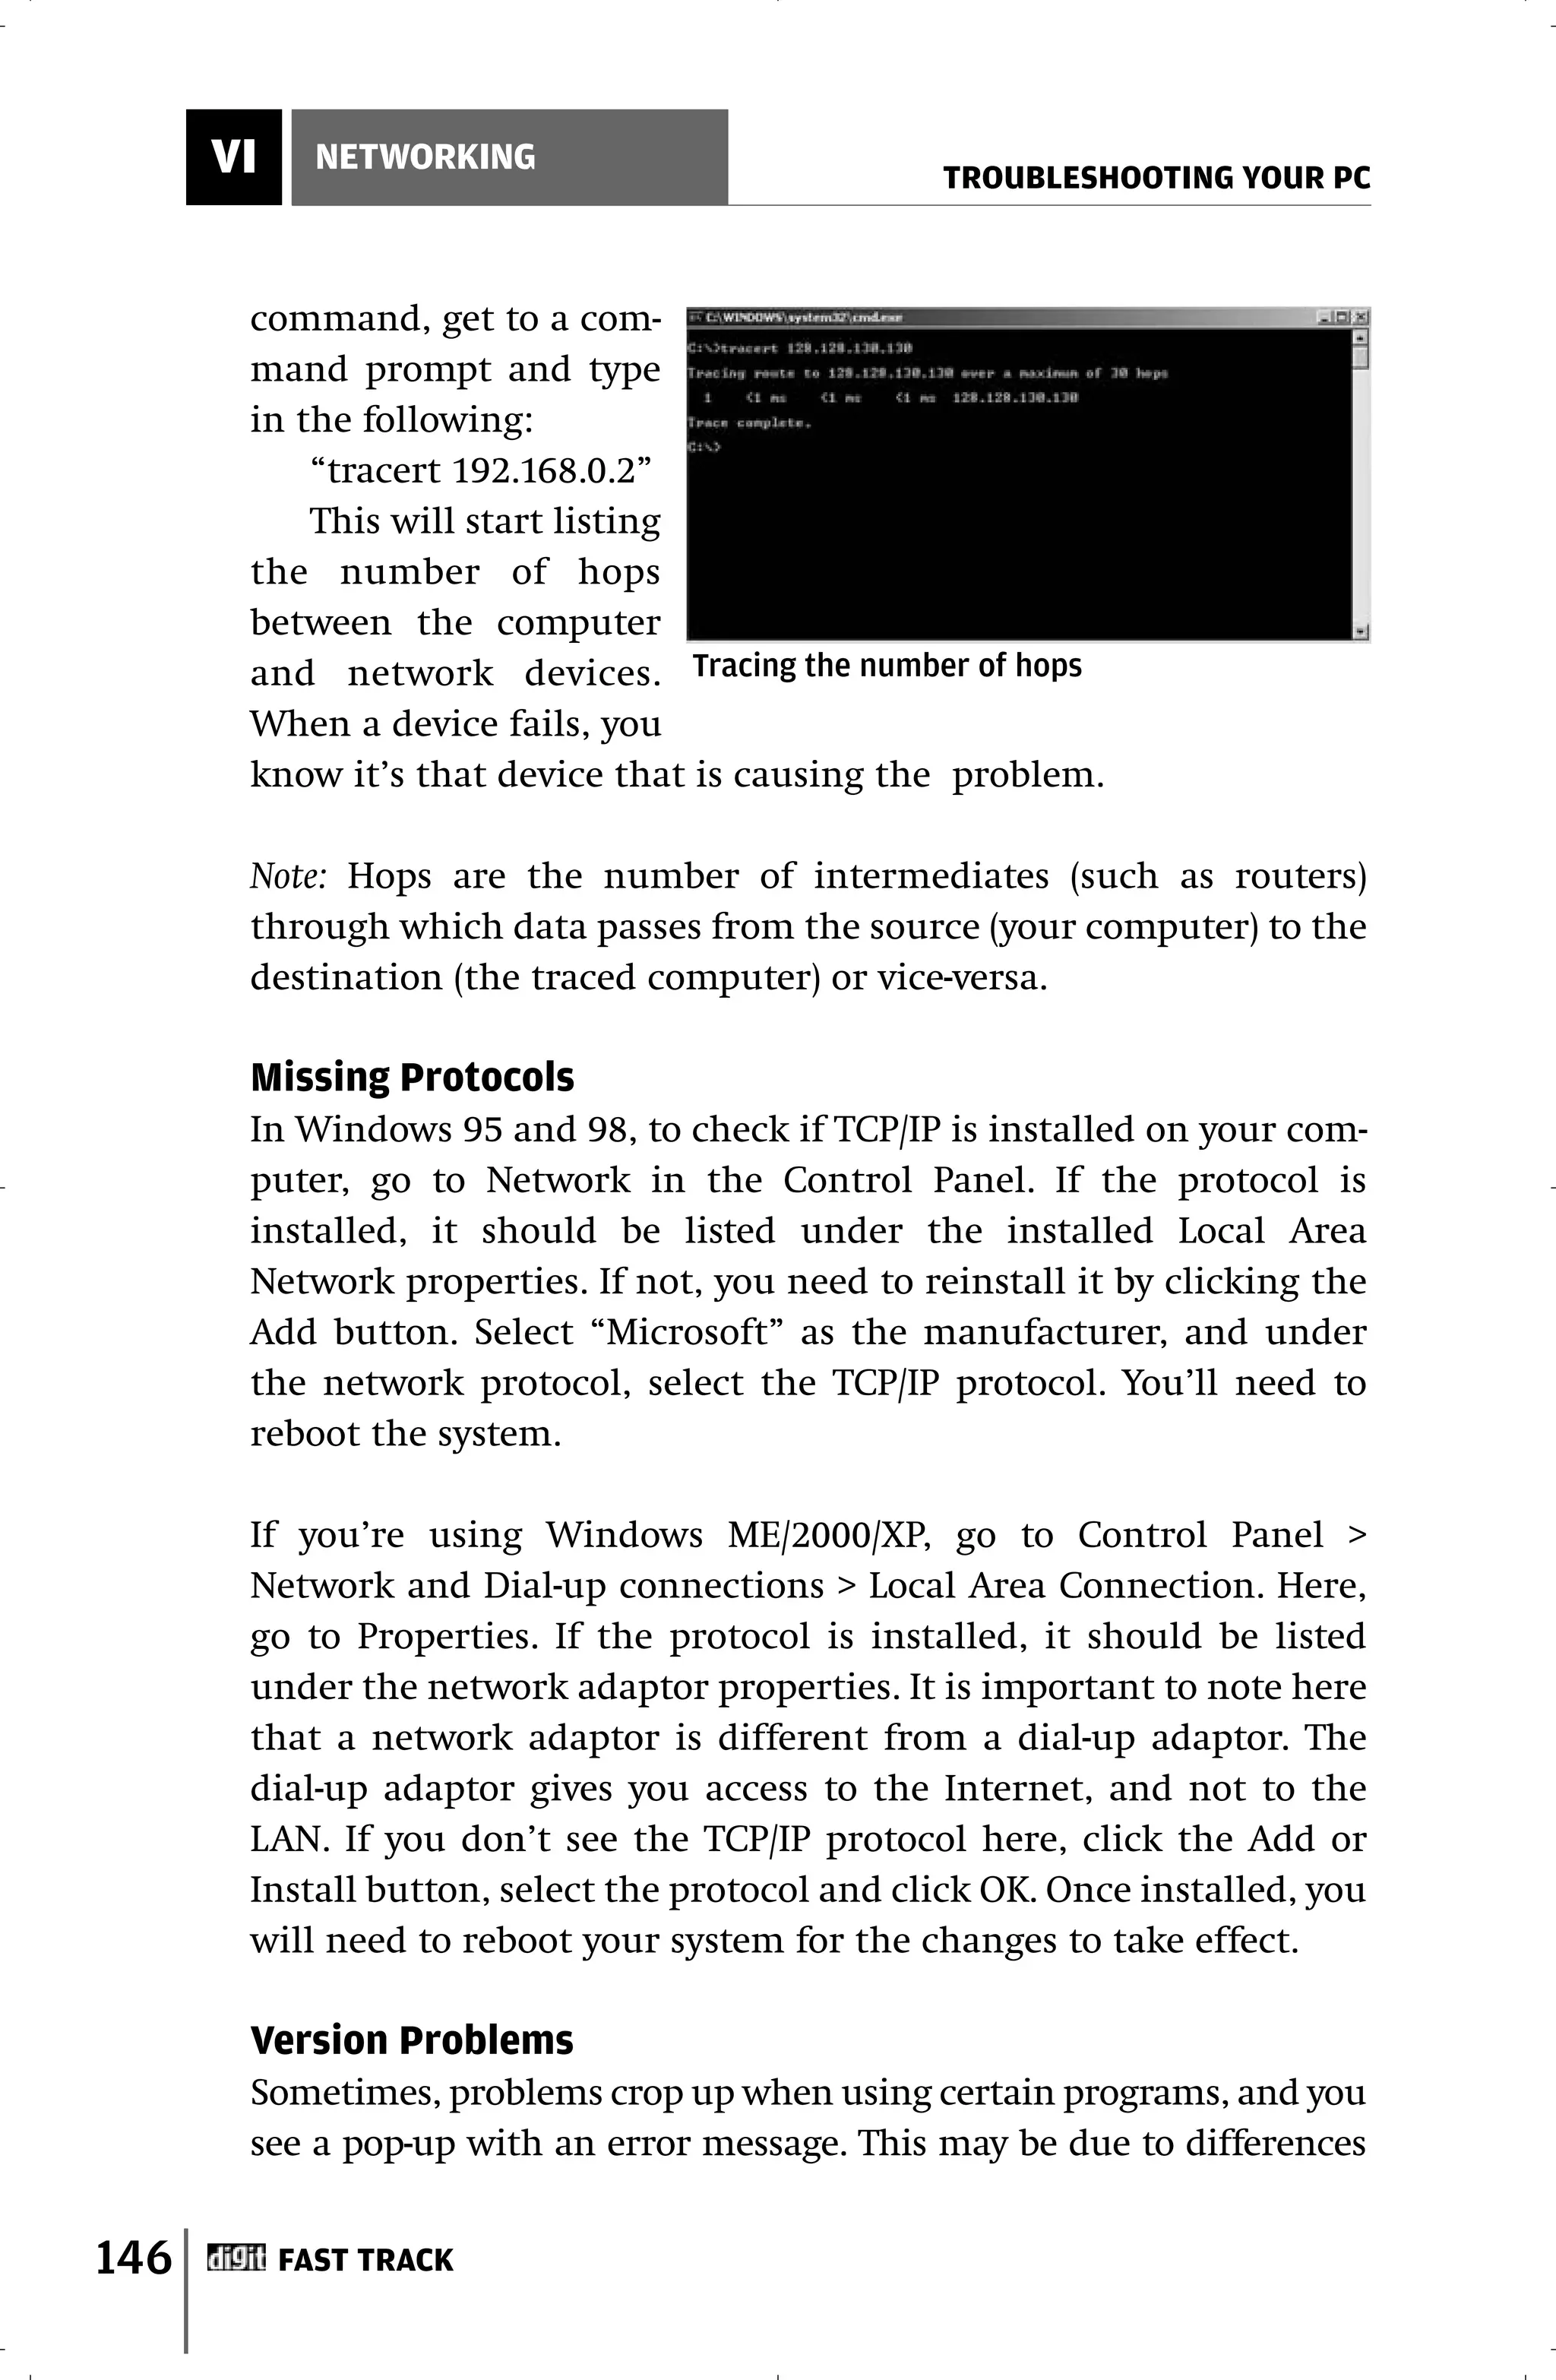
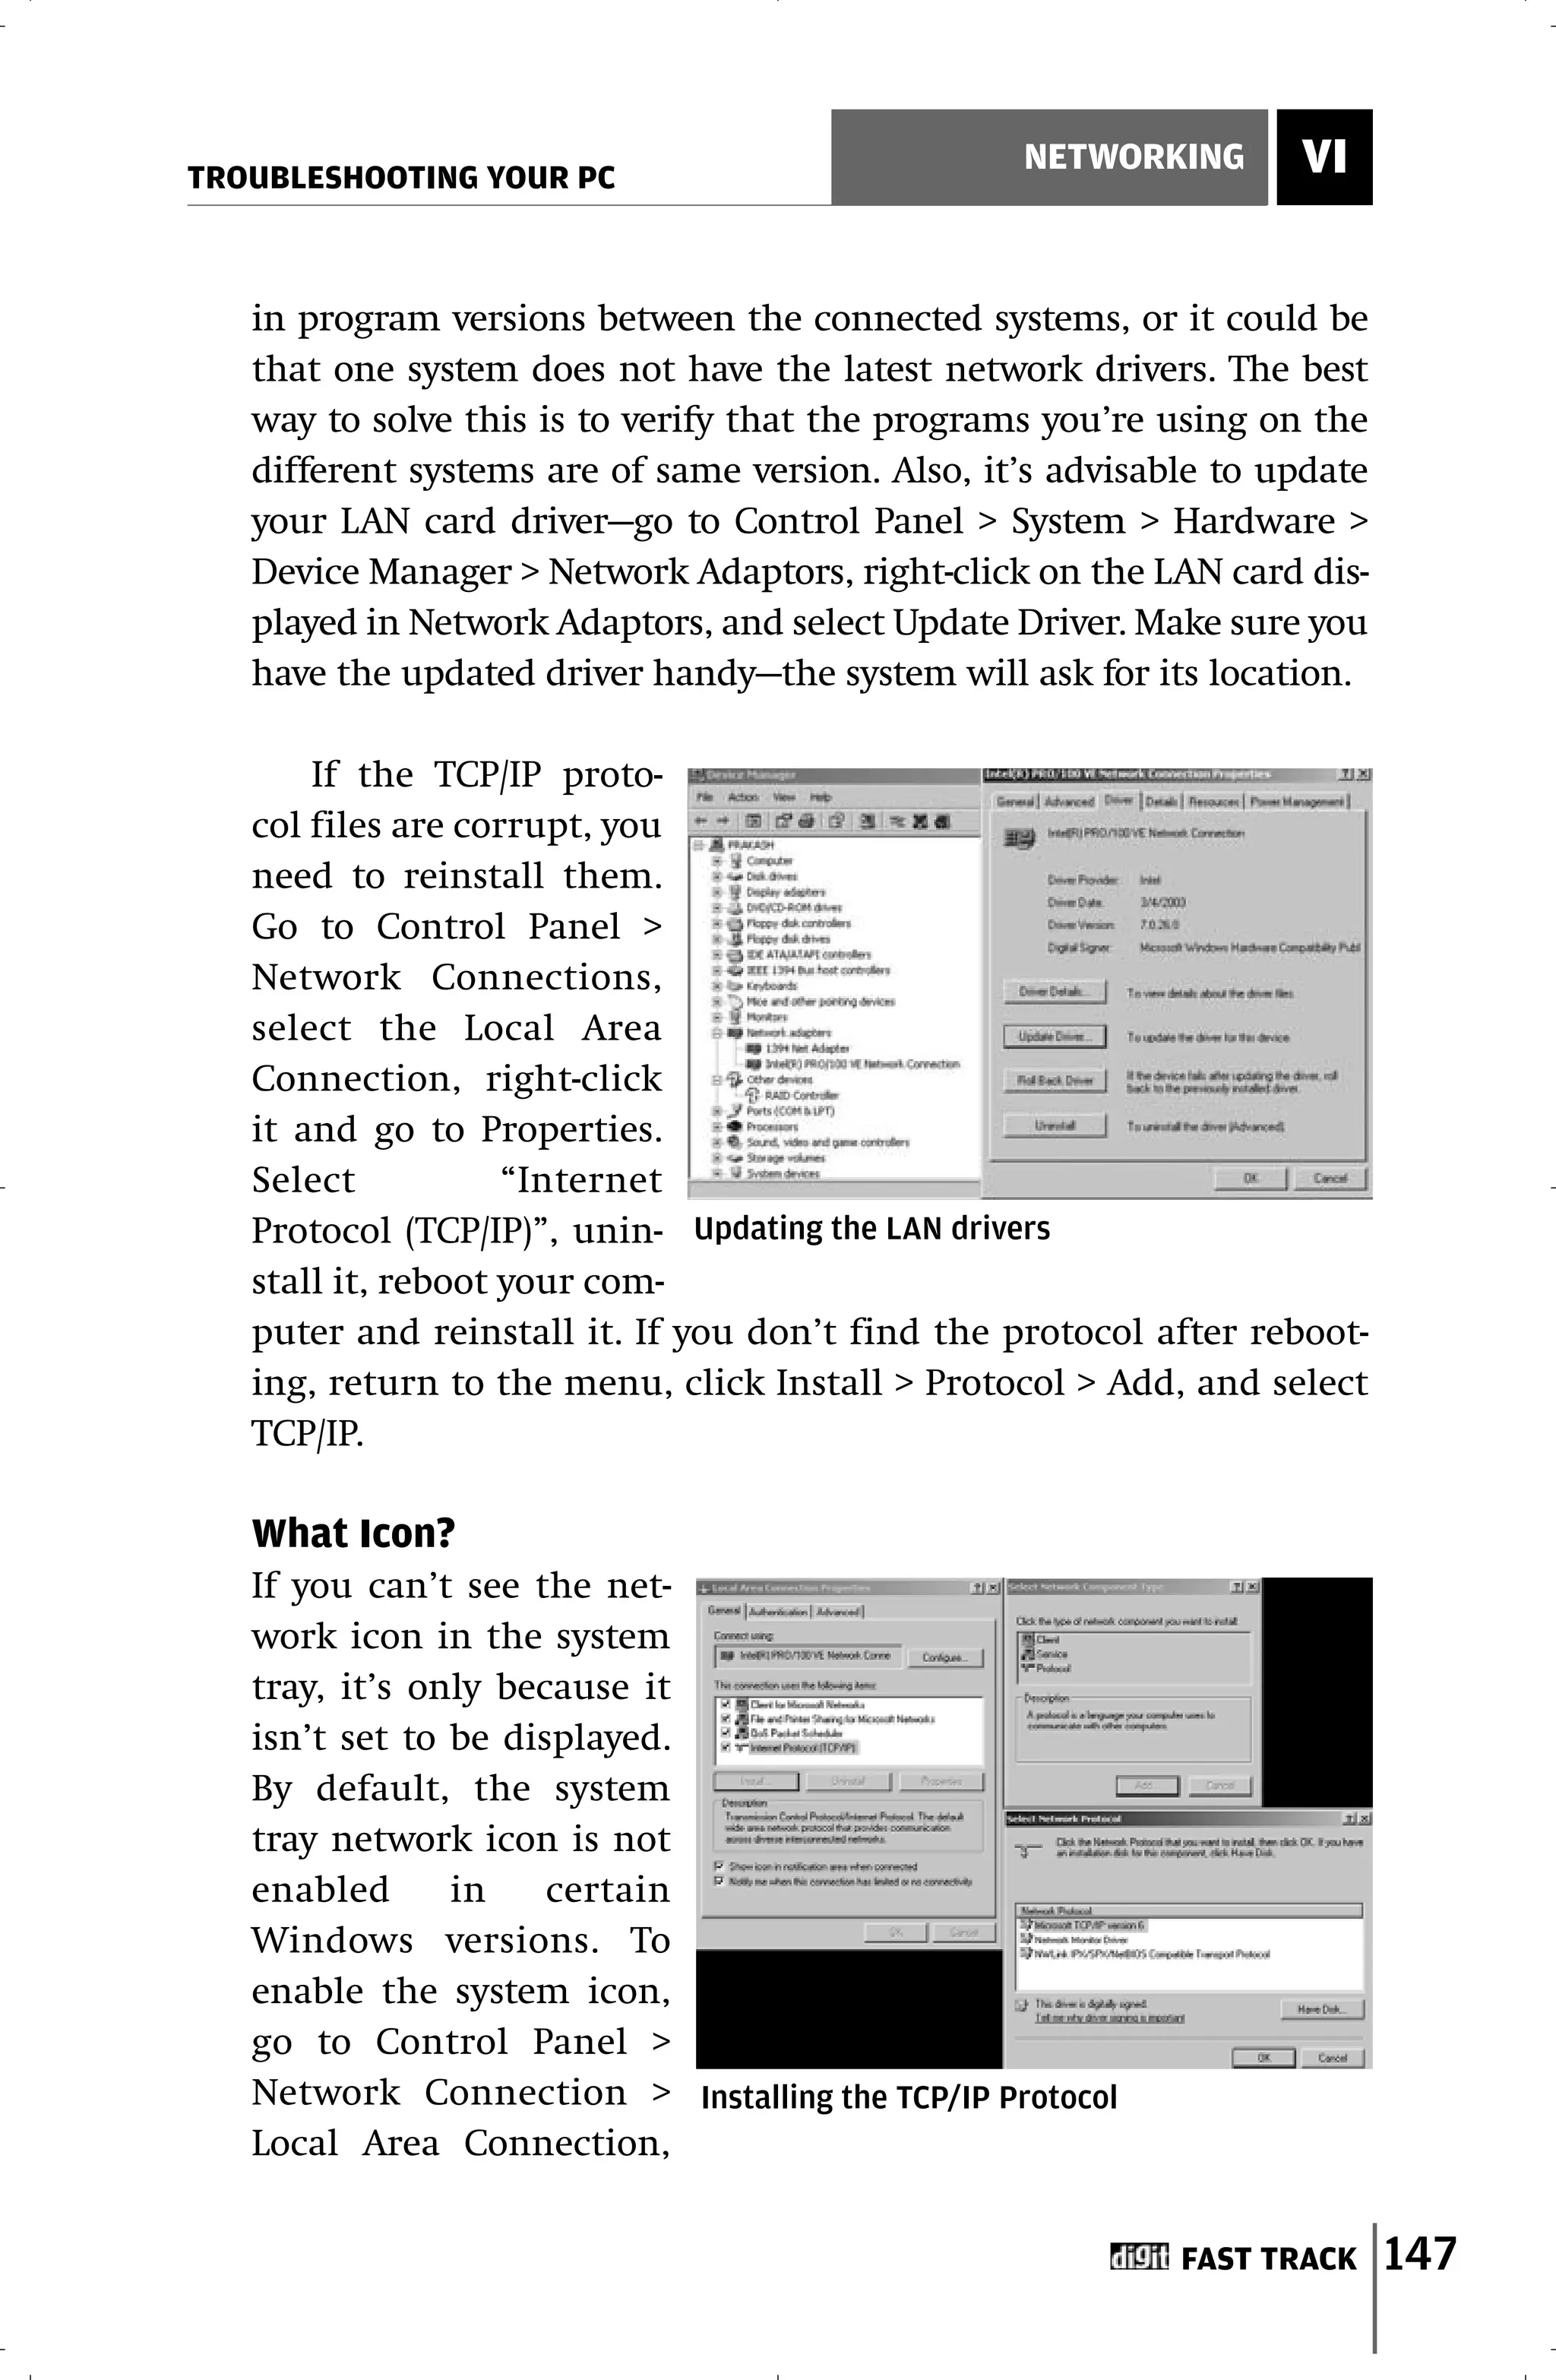
Downloaded 955 times

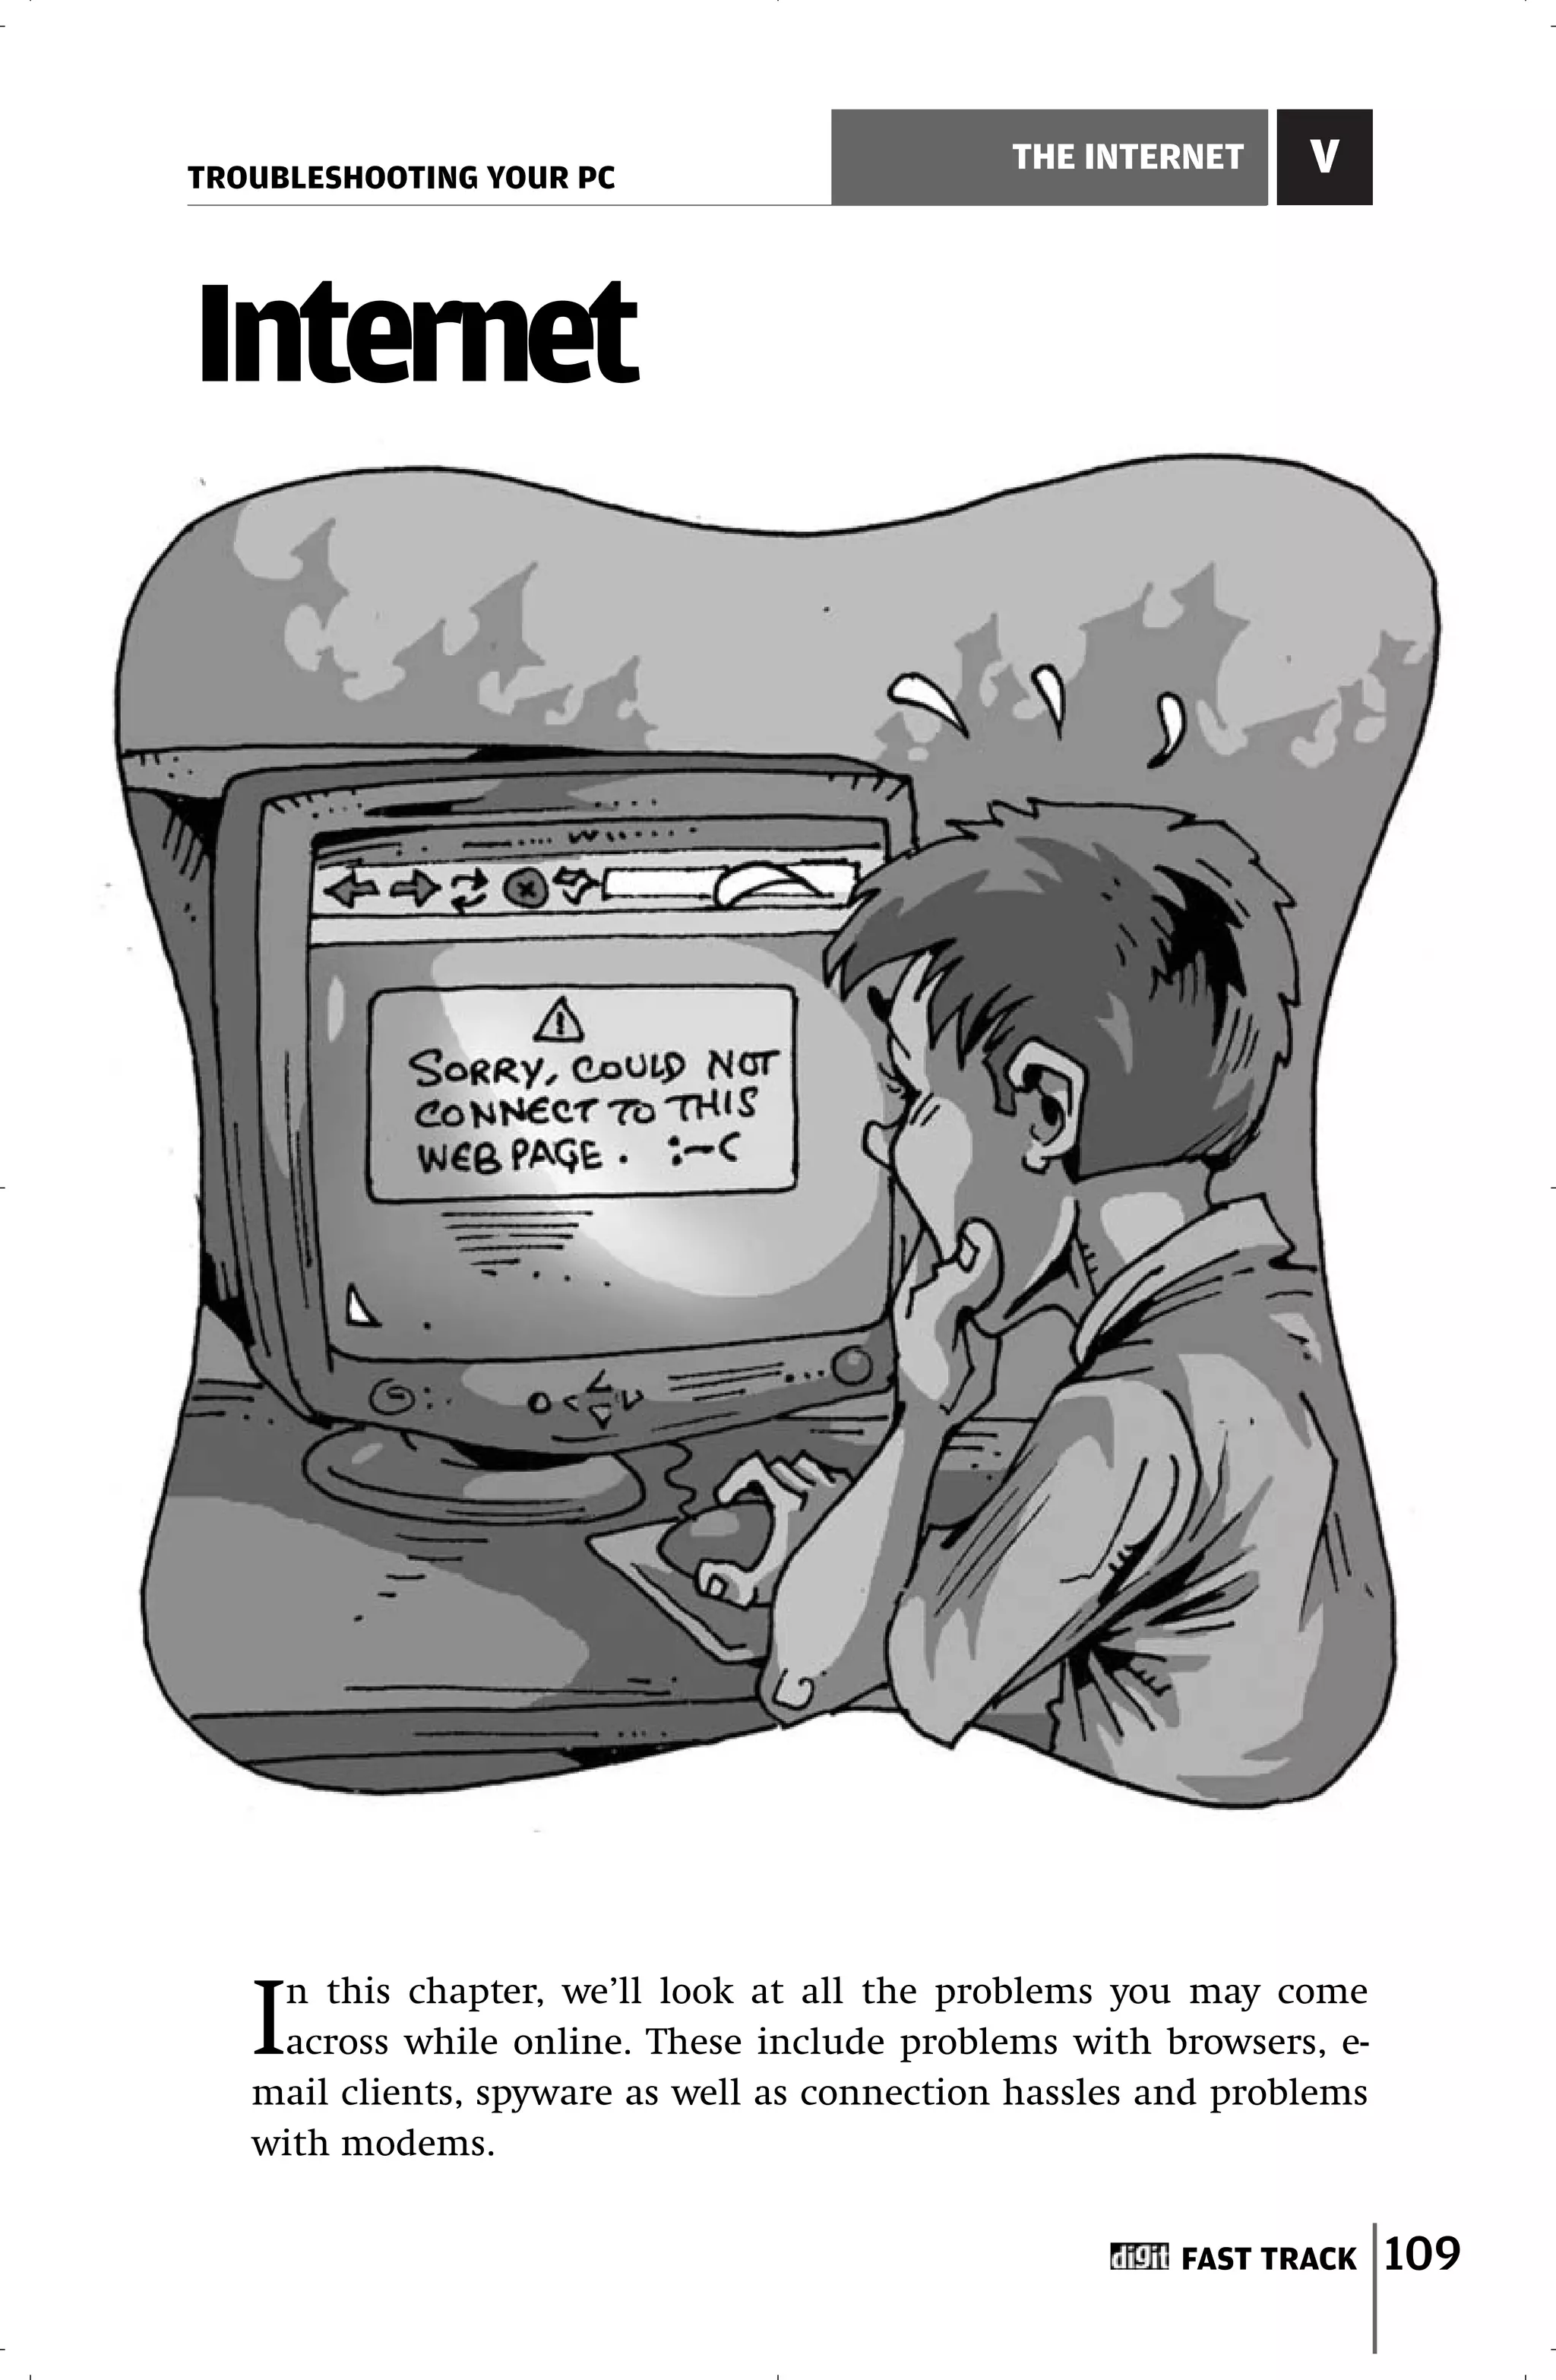
![TROUBLESHOOTING YOUR PC
THE BASICS I
Get an updated driver for the device from the manufacturer and
update the device software by clicking Update Driver on the Driver
tab.
AND/OR
Remove the device from Device Manager and reinstall it using the
Add Hardware Wizard.
Code 3
Code Meaning: The driver is corrupt or your system is running
low on memory and other resources.
Recommended Resolution: Run the Update Driver Wizard and rein-
stall the driver or get an updated driver from the manufacturer.
AND/OR
Close any applications using memory.
AND/OR
Add more RAM. See the chapter on Memory on how to do that.
AND/OR
Remove the device from Device Manager and reinstall it using the
Add Hardware Wizard.
Code 4
Code Meaning: (Not applicable to Windows XP) One of the drivers
for the device may have been corrupted, or its Windows Registry
entry may be damaged.
Recommended Resolution: Check the registry by running scan-
regw.exe. Click Start > Run. Type scanregw.exe and hit [Enter]. This
program will check the Registry for corruption and prompt you to
restore a previous good version of the Registry if it encounters any
damaged entries.
AND
Remove the device from Device Manager and reinstall it using Add
Hardware Wizard.
Code 5
Code Meaning: (Not applicable to Windows XP) The device has
requested a resource that Windows doesn’t know how to handle.
Recommended Resolution: Run the Update Driver Wizard and rein-
FAST TRACK 25](https://image.slidesharecdn.com/fasttracktotroubleshootingyourpc-120201111139-phpapp02/75/Fast-track-to-troubleshooting-your-pc-24-2048.jpg)
![TROUBLESHOOTING YOUR PC
THE BASICS I
er one at a time until Device Manager no longer lists the
unknown device. Or, if you know what hardware is causing the
error, verify that the hardware is working and that you have all
the correct and updated drivers for the OS. Install the drivers
through the Add Hardware Wizard.
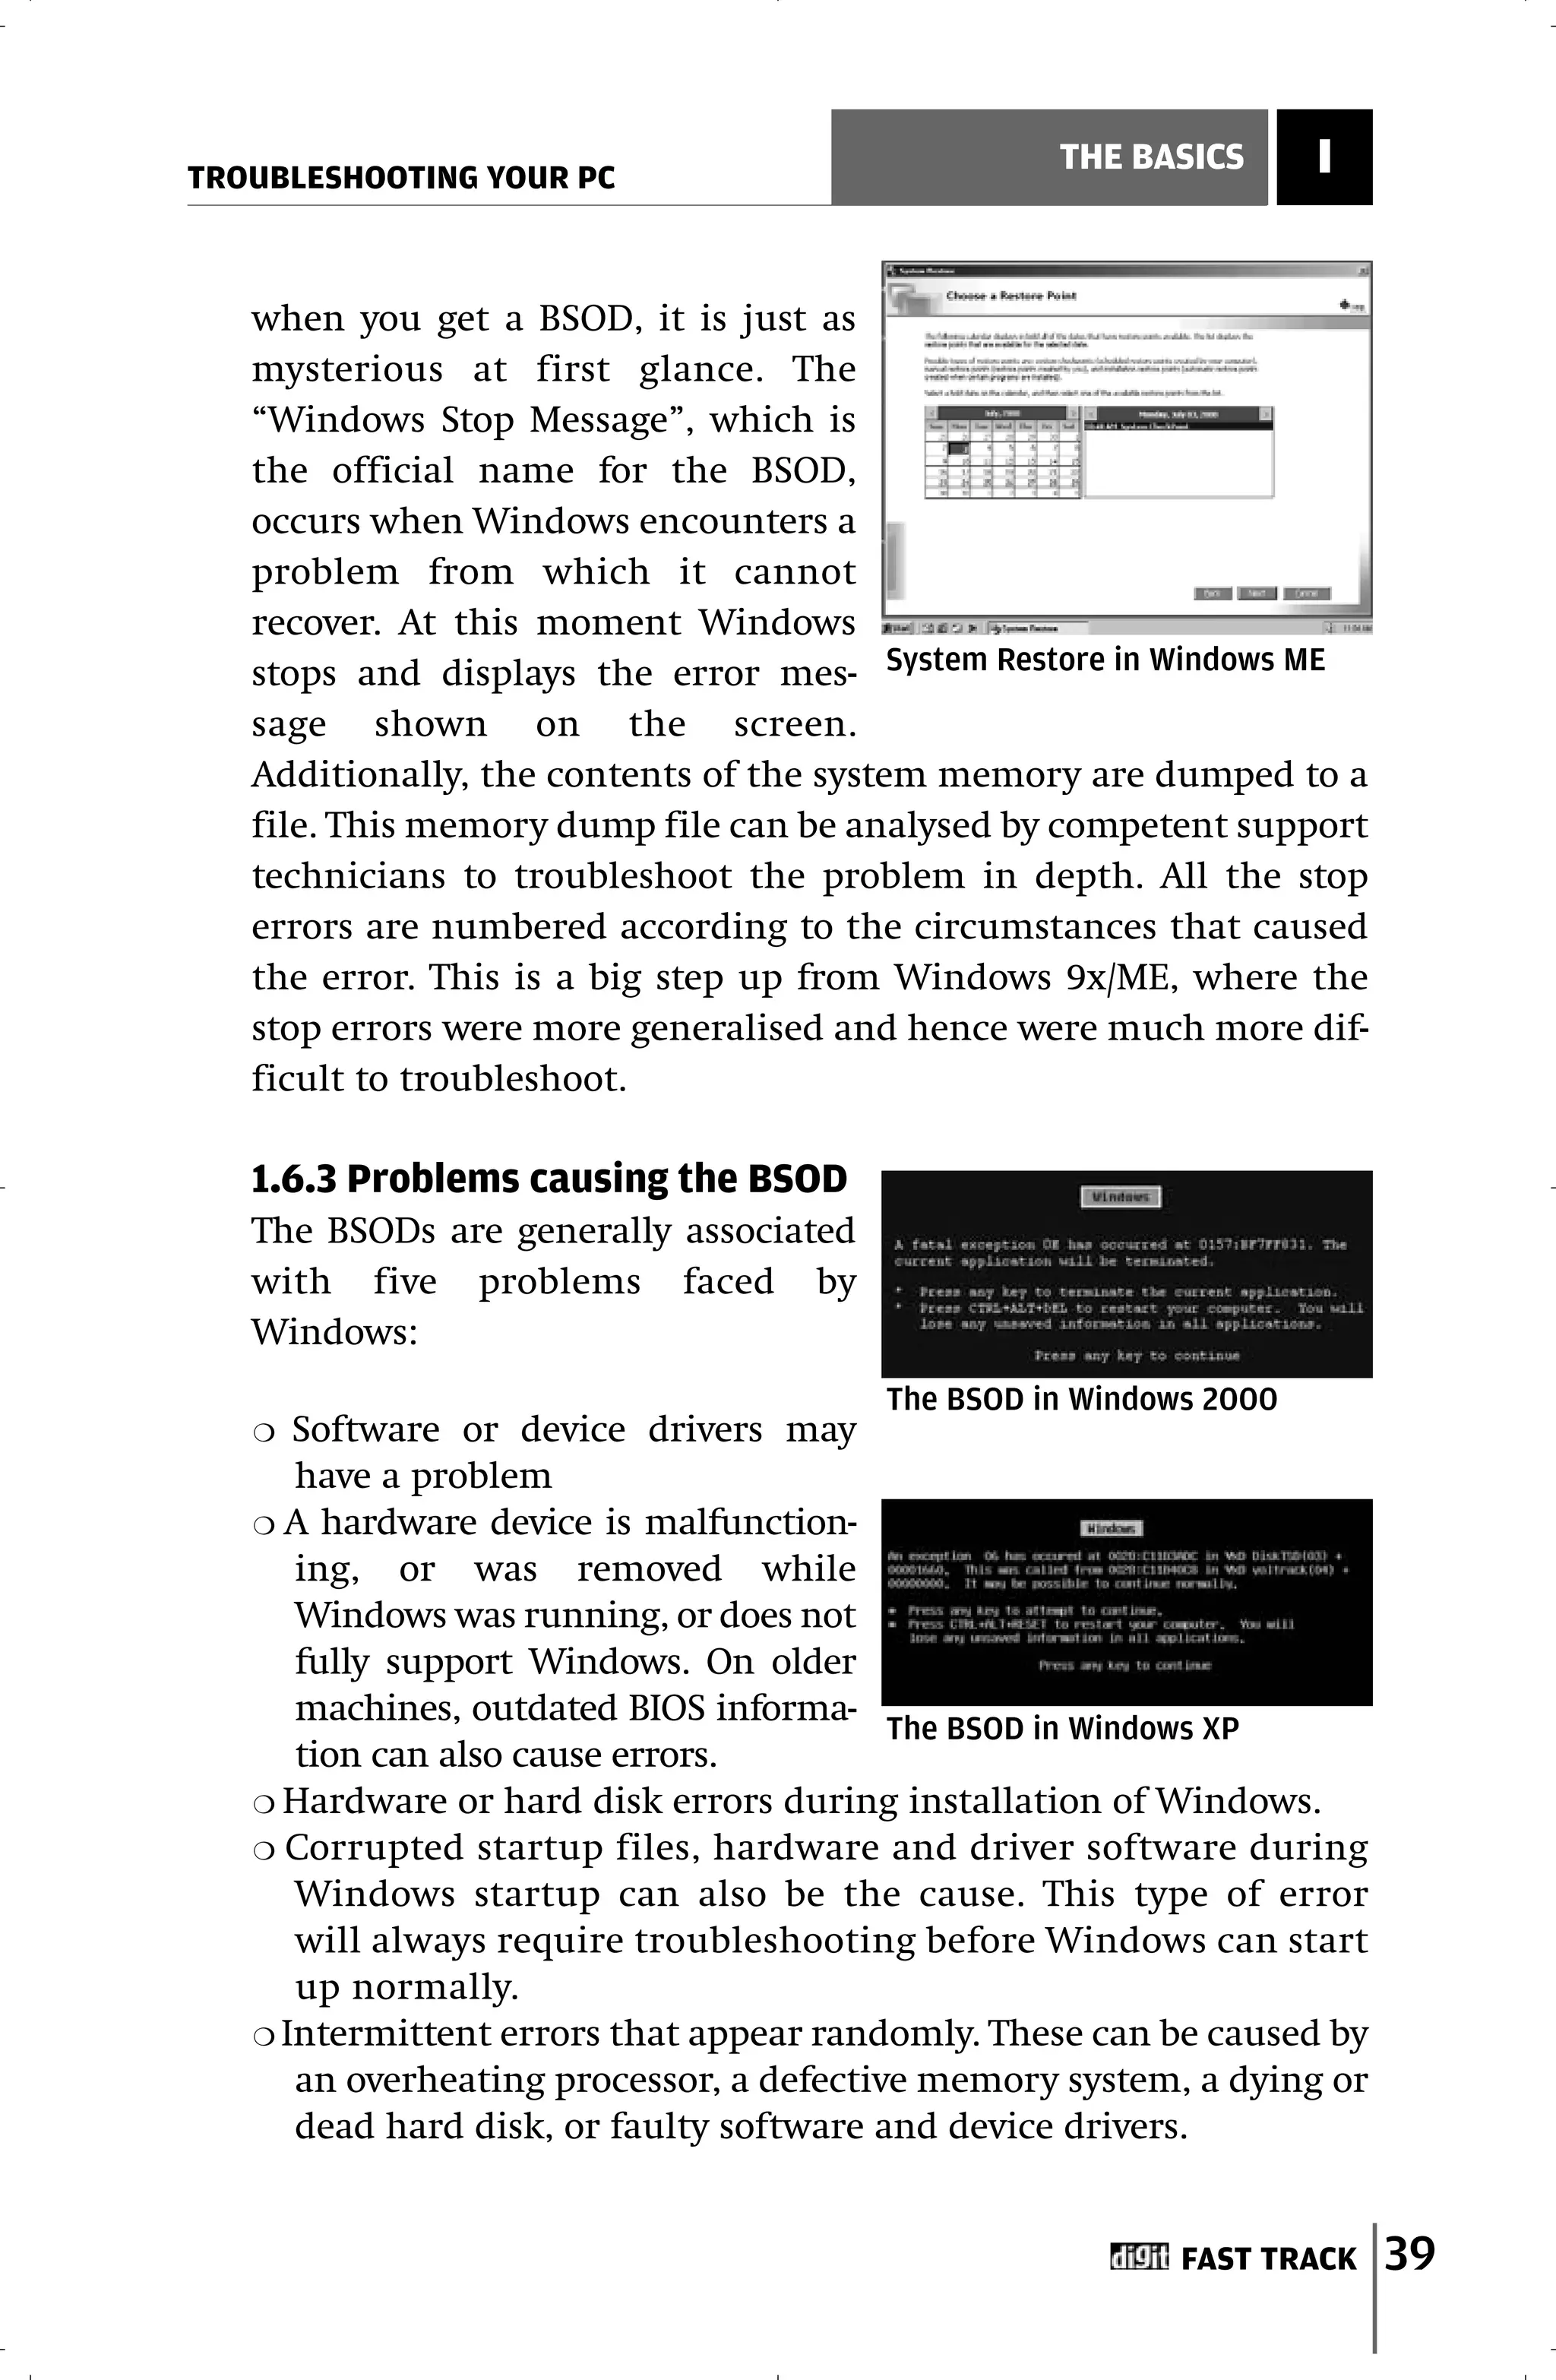
1.6 Troubleshooting the Blue Screen Of Death
One of the most dreaded error messages for a Windows user is
the blue screen, or the Blue Screen of Death (BSOD) as it is pop-
ularly known, which suddenly pops up informing you that
something is seriously wrong with Windows. What this screen
essentially means is that Windows has crashed and needs to
reboot to recover. Usually, you will be able to recover and con-
tinue without any problems, but it can sometimes be a hair-rais-
ing experience—like when you’re pressed for time and have to
get that PowerPoint presentation ready for your boss!
Windows 9x/ME
In Windows 9x/ME this error is less serious but more common. You
can usually recover from the error by simply pressing [Ctrl] + [Alt] +
[Del] and restarting the computer, or by switching off the PC and
switching it back on. However, the error message will contain very
little information that you can use in troubleshooting.
1.6.1 Problems causing the BSOD
The BSOD is the main way for virtual device drivers to report a
problem. The error description will state that Windows faced a
problem (exception) at a particular memory address (a portion of
the RAM) in a certain file, usually with the prefix VxD (virtual
device driver), or the file name may have the DLL extension. At the
minimum, it indicates that there was a problem with that particu-
lar file. Typically, this may have been caused by some action of the
user that Windows does not allow—like accessing a document from
a floppy and then removing the floppy before closing document. In
other cases it may indicate that there is a problem with a
FAST TRACK 37](https://image.slidesharecdn.com/fasttracktotroubleshootingyourpc-120201111139-phpapp02/75/Fast-track-to-troubleshooting-your-pc-36-2048.jpg)
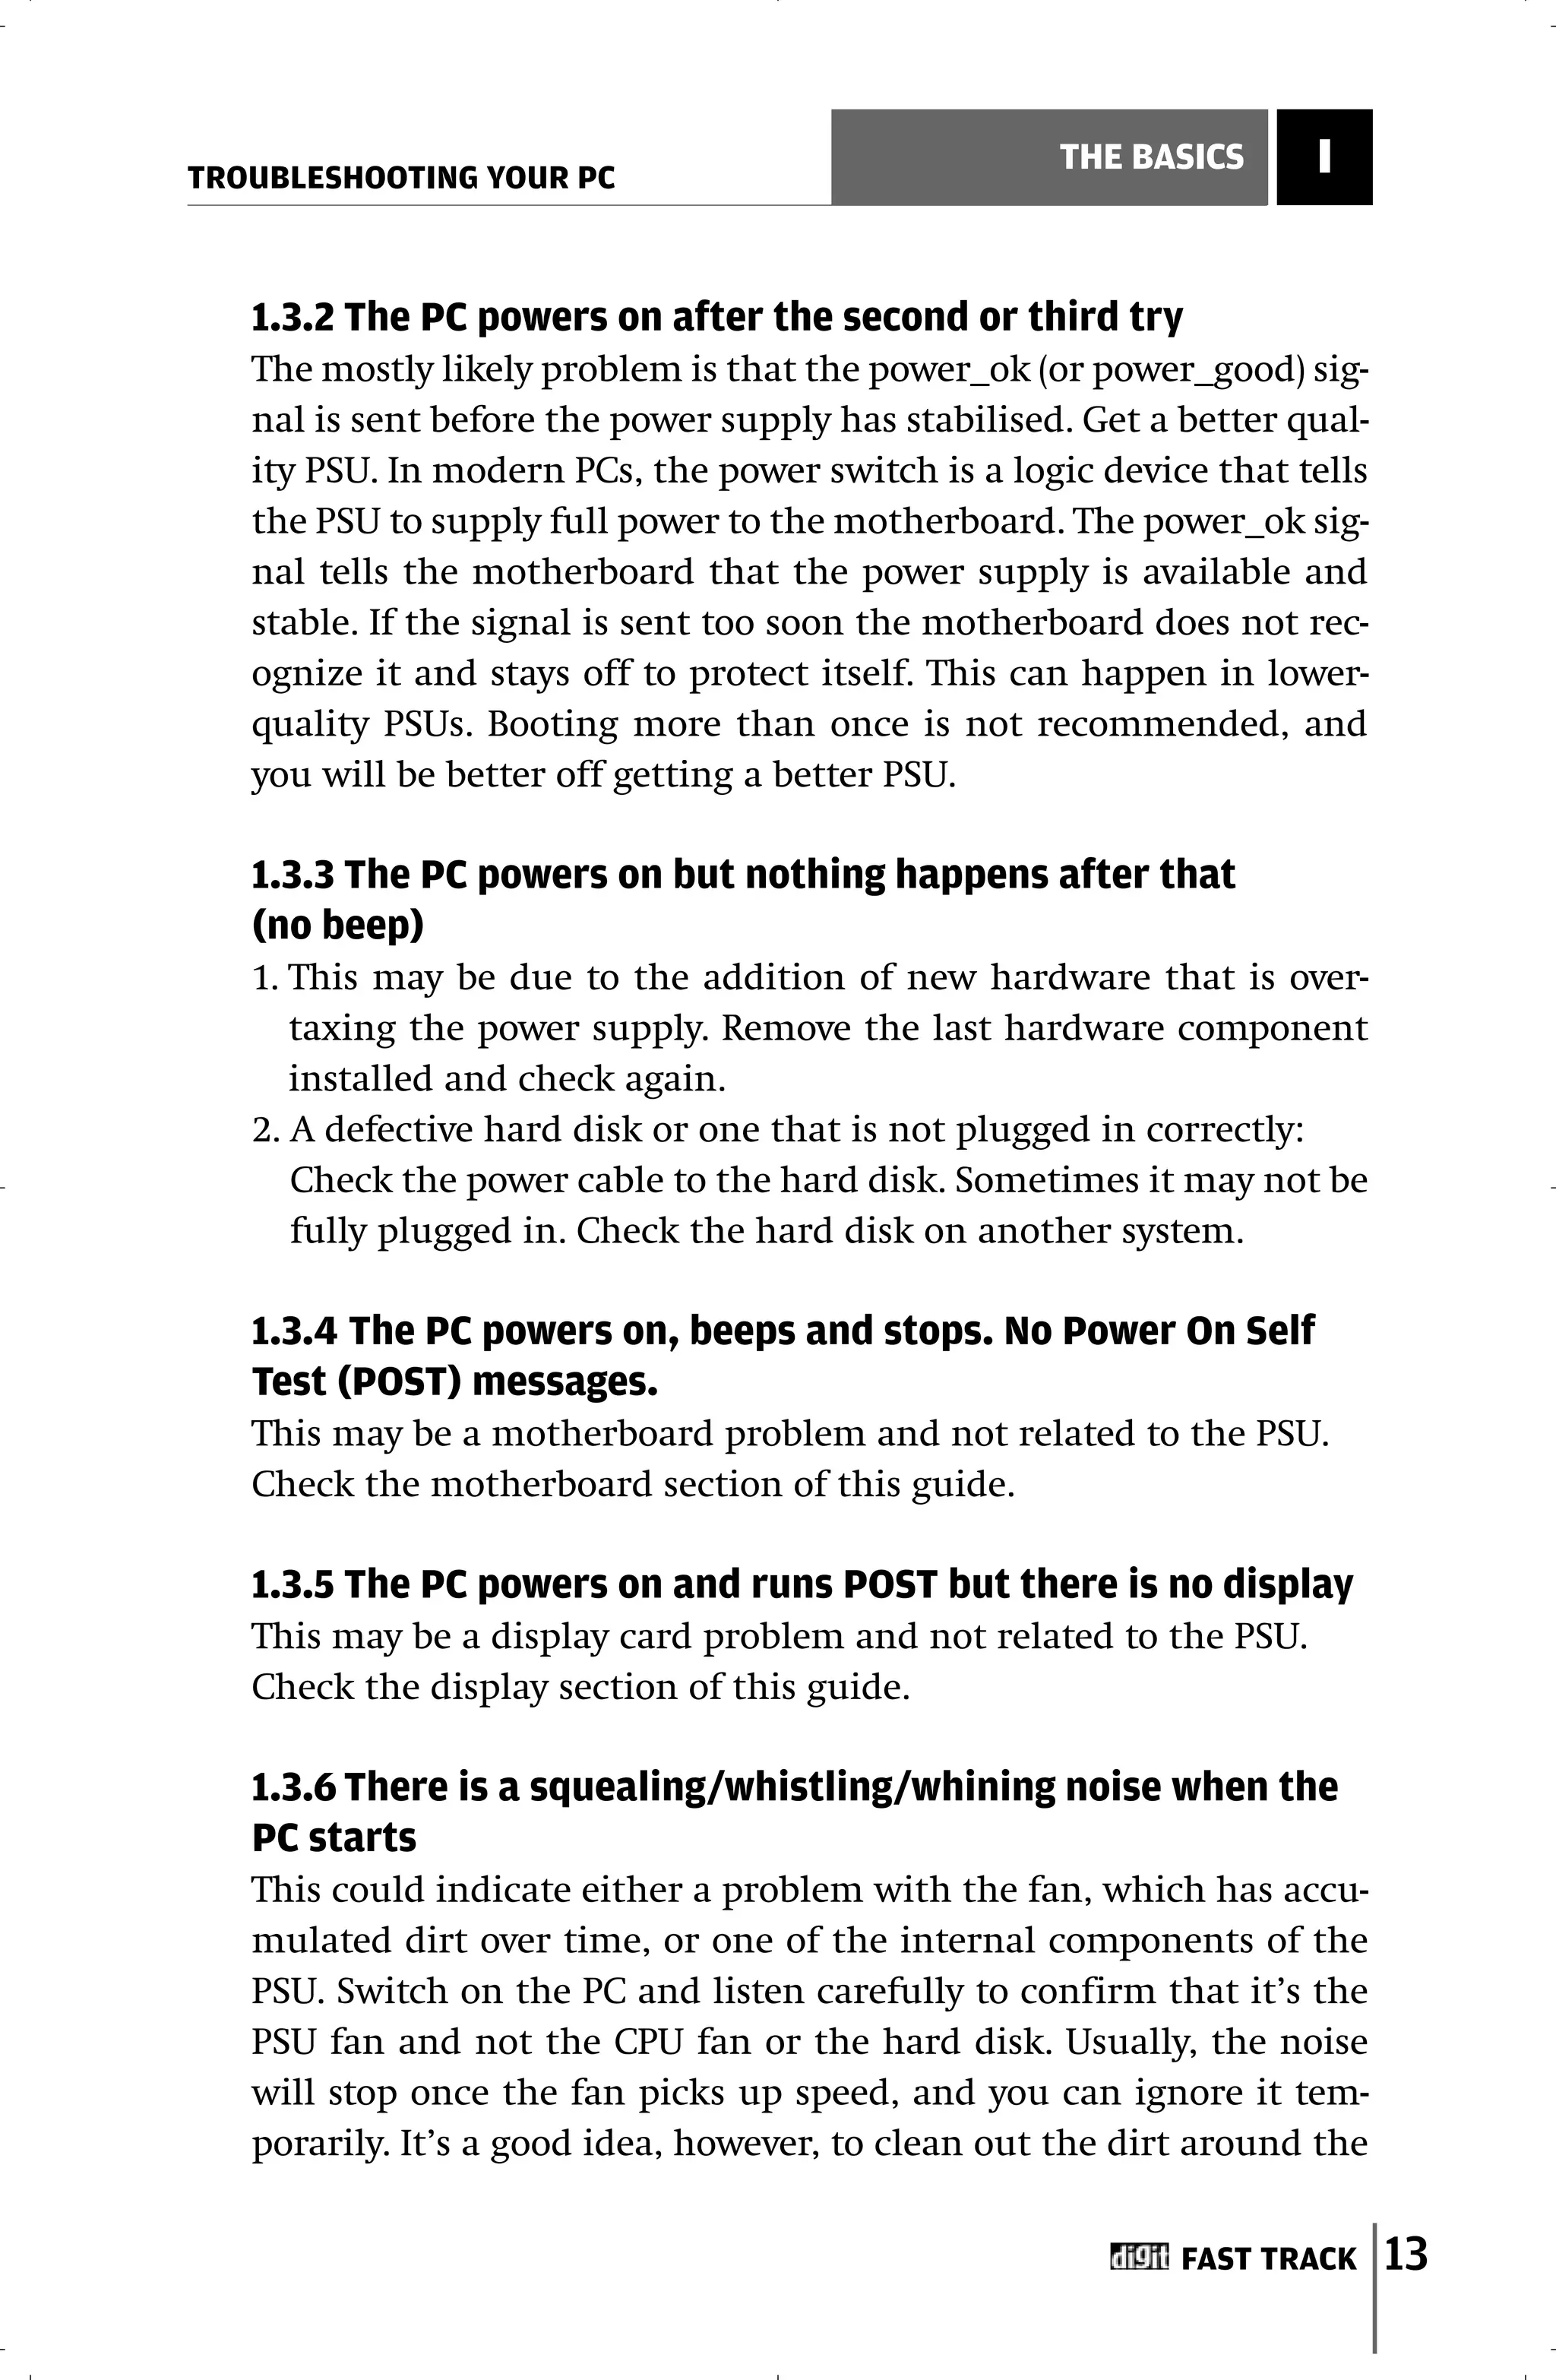
![I THE BASICS
TROUBLESHOOTING YOUR PC
1.6.4 Possible solutions to the BSOD
When a BSOD occurs, the first step is to note down the Stop num-
ber, the ‘friendly name’ of the error and also the name of the file
that is reported as the cause of the problem. The Stop number will
be in hexadecimal format—something like this:
STOP : 0x0000000A (0xDB000000, 0x00000001, 0x00000002,
0xB04FB0DB)
The friendly name will be something like this:
IRQL_NOT_LESS_OR_EQUAL
If the error comes up very briefly, before you can note it down,
and the system restarts, you will need to change a setting to tell
Windows not to automatically reboot. Right-click My Computer,
select the Advanced tab, and click “Startup and Recovery”, in
Windows 2000, clear the “Automatically Reboot” checkbox. In
Windows XP, click Settings and clear the “Automatic Restart”
checkbox. This, of course, assumes that Windows has rebooted
normally and you are able to change the setting.
If you are not able to boot normally, restart Windows and press
[F8] repeatedly during the POST cycle. This will take you to the
Advanced Options menu. Choose Safe Mode. Windows will attempt
to load with a minimum set of drivers. If Windows is able to boot
into Safe Mode, this most likely means that the problem is with a
particular software, and is not hardware-related. If Windows is not
able to boot into Safe Mode, restart the computer, bring up the
Advanced Options screen (by pressing [F8] during POST) and select
“Last Known Good Configuration”. Windows will then attempt to
load the last settings where everything worked normally. If that
doesn’t work, then it most likely means you have a serious hardware
or critical startup system file error. If this error has occurred after
any recent hardware additions, remove the hardware and try to
boot again.
40 FAST TRACK](https://image.slidesharecdn.com/fasttracktotroubleshootingyourpc-120201111139-phpapp02/75/Fast-track-to-troubleshooting-your-pc-39-2048.jpg)
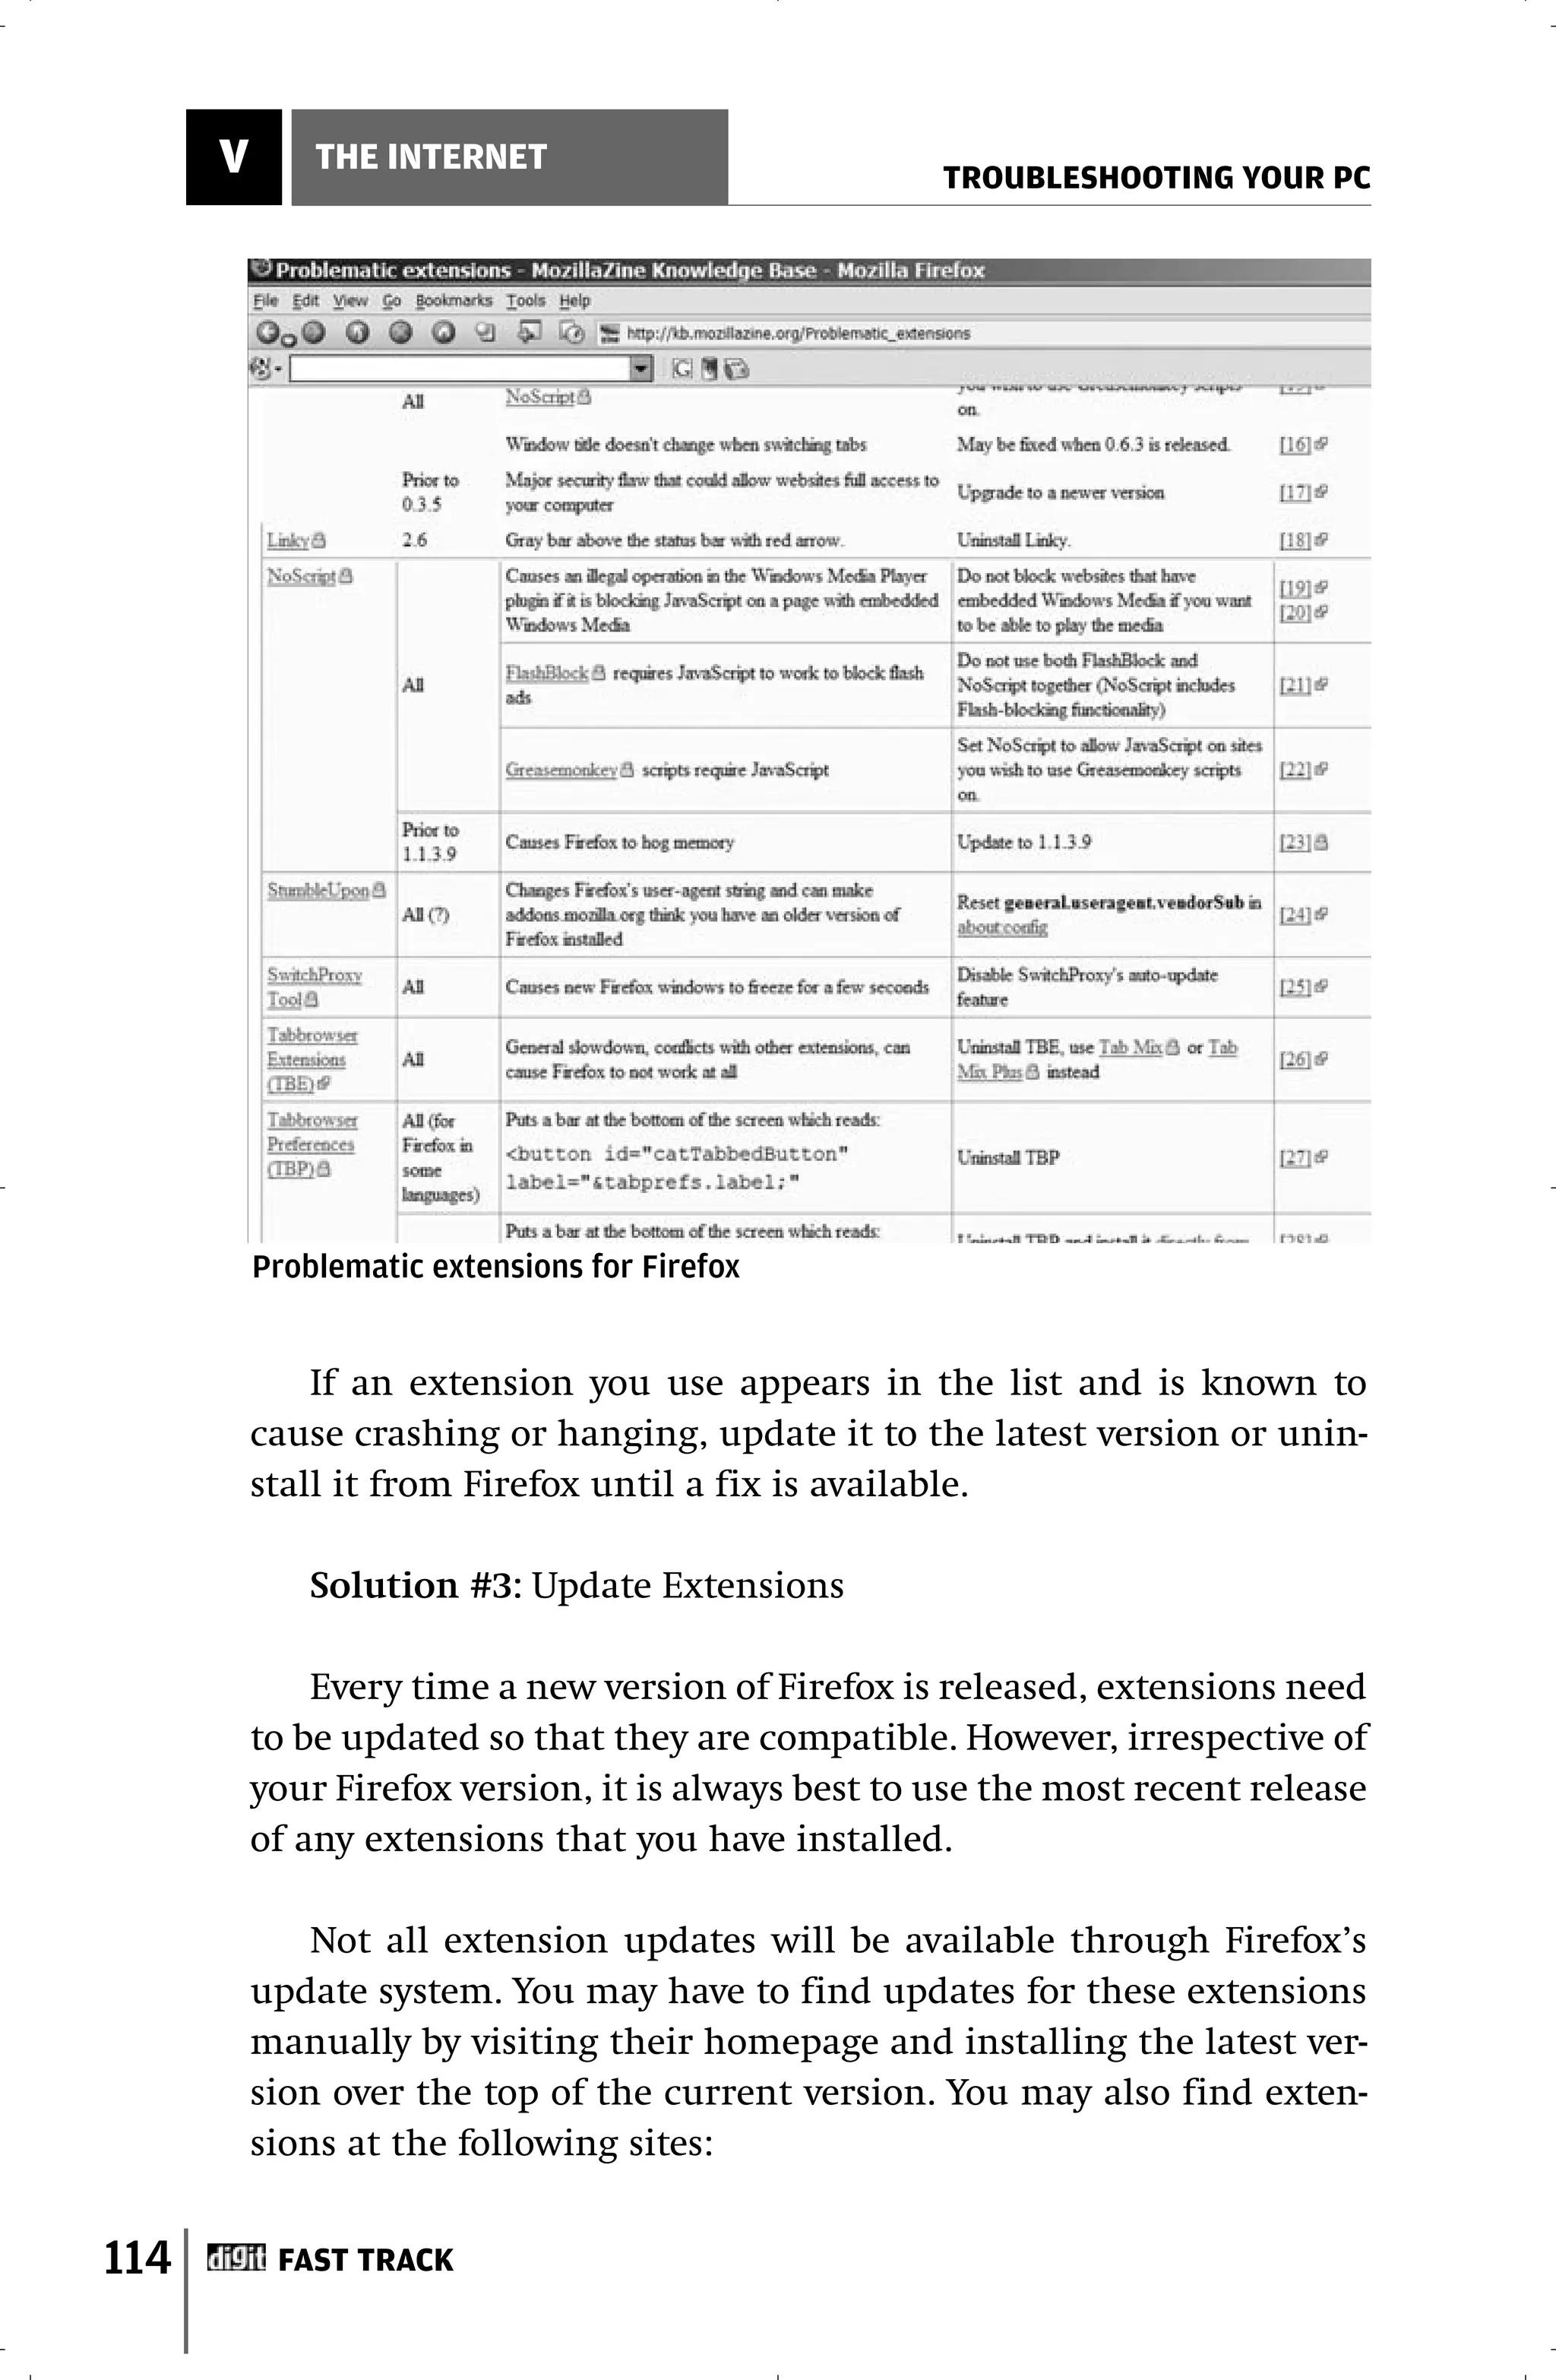
![TROUBLESHOOTING YOUR PC
THE BASICS I
If you are able to boot into Safe Mode, first perform a virus and spy-
ware scan using a tool such as Norton AntiVirus and Spybot S&D.
Uninstall any recently added software, and remove or roll back any
updated device drivers. (To roll back device drivers, go to the Properties
page of the device in Device Manager, select the Driver tab, and click
Roll Back Driver). In XP, you can perform one additional step—running
System Restore, as explained above for Windows ME.
Restart the computer normally and check if the problem recurs.
If it is an intermittent problem, and occurs at random, you can note
down the error number the next time it occurs, since you disabled
Automatic Restart after a crash. Boot into Safe Mode and see if you
get the same random error. If you do, then the problem is likely
hardware-related. Resolve the issue by following the hardware trou-
bleshooting steps explained below. If the error only occurs in nor-
mal mode, then it is likely a software problem. Follow the steps for
software and device driver troubleshooting described below.
Look in Device Manager and troubleshoot any hardware device
conflicts as explained in the Troubleshooting Hardware Device Conflicts
in Windows section. You can remove or disable the device, or roll
back its driver to a previous version.
If the BSOD is caused by a faulty program that crashes Windows
at system startup, you can disable the software from starting up by
using msconfig.exe. Type Start > Run, type in “msconfig” and press
[Enter]. Select the Startup tab and disable any or all software you
think may be the ones causing the problem. Better still, you could
disable all the software in the list, enable them one at a time, and
reboot the computer to identify the offending software.
If the BSOD is caused by faulty hardware, remove any recently
added hardware—after switching off the PC, of course! If the BSOD
still occurs, or there are no newly added hardware, test the RAM for
errors by using a memory diagnostic program such as Windows
Memory Diagnostic (http://oca.microsoft.com/en/windiag.asp). See
the Memory section of this guide for further information. If the
FAST TRACK 41](https://image.slidesharecdn.com/fasttracktotroubleshootingyourpc-120201111139-phpapp02/75/Fast-track-to-troubleshooting-your-pc-40-2048.jpg)
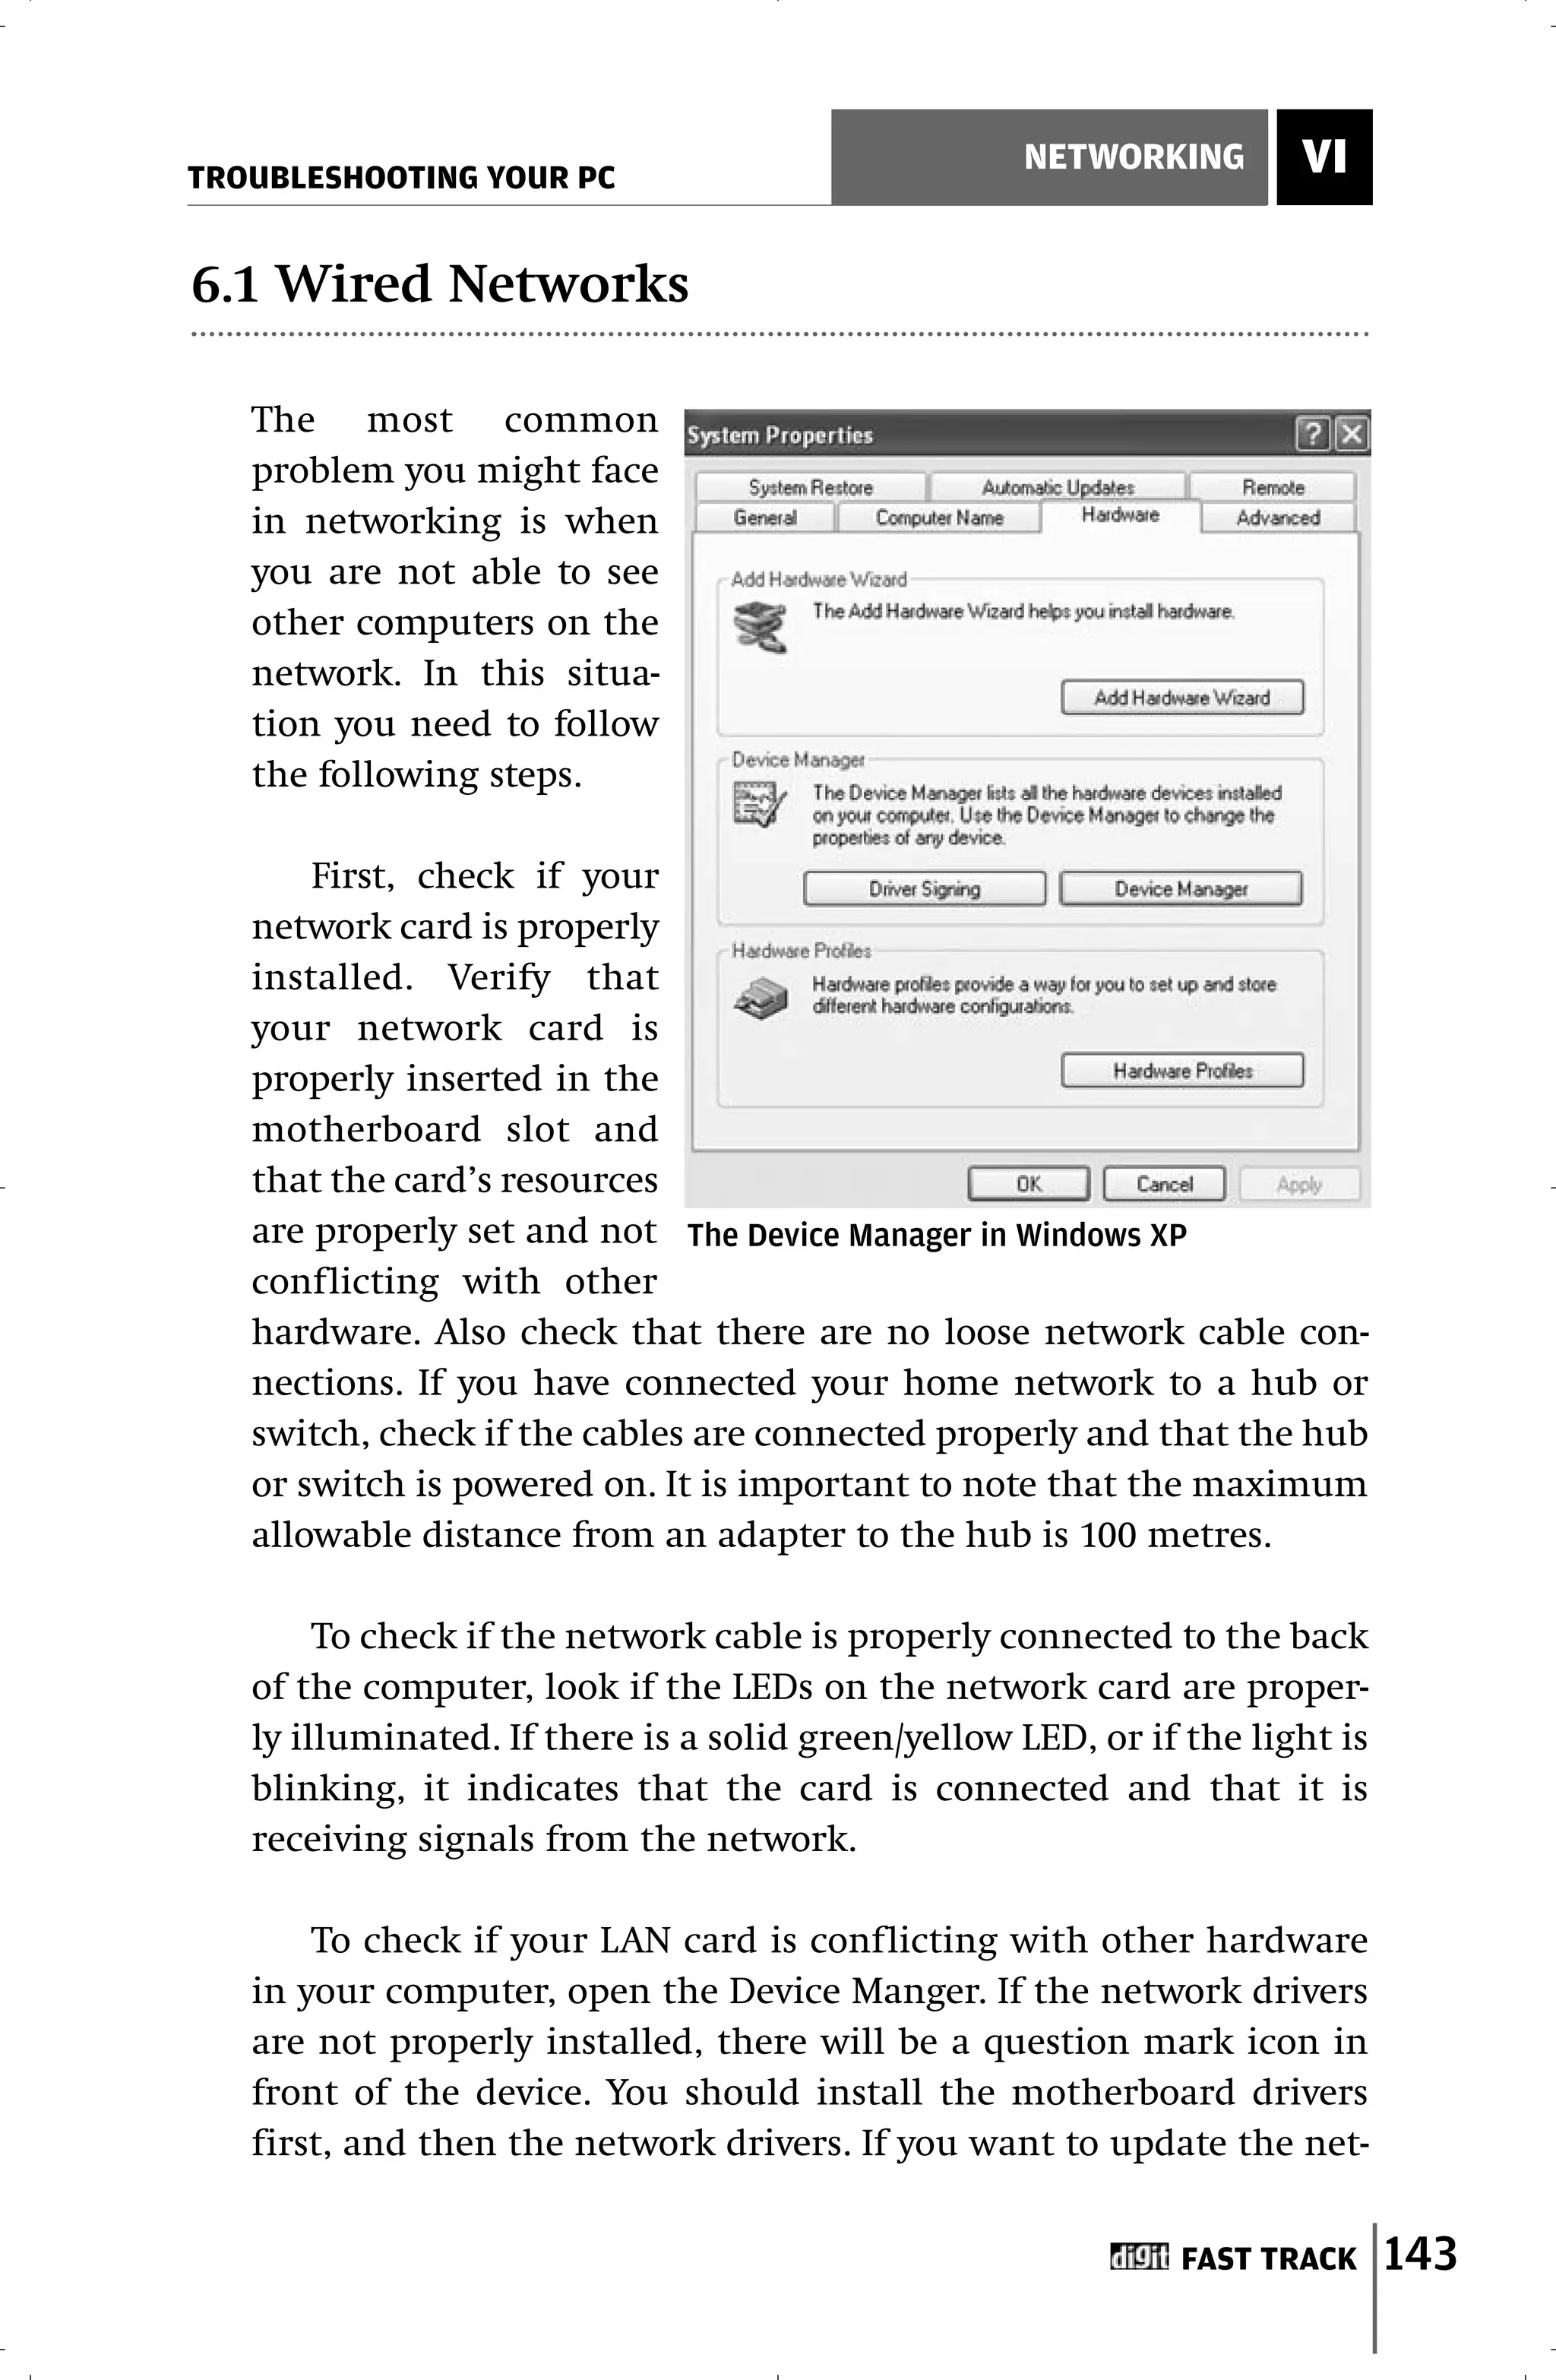
![I THE BASICS
TROUBLESHOOTING YOUR PC
diagnostic reports errors, then you’ve found the culprit. Replace
the defective RAM.
If the BSOD is due to corrupt system startup files, you can repair
Windows by performing a Repair Install. Boot the PC from the
Windows installation CD, press [Enter] to set up Windows XP, press
[F8] to accept the license agreement, and then press [R] to start the
Repair Installation. Windows will reinstall all the system files and
redetect all the hardware. Note: You will have to visit the Windows
Update site to reinstall any patches and Service Packs, since the
repair installation will remove them.
If you are still getting BSODs, switch off the PC, open the cabinet
and remove all but the essential hardware: the mouse, keyboard, hard
disk, CD-ROM, display card and RAM, along with the PSU and proces-
sor of course! Now, first attempt booting into Safe Mode, and if that
works, reboot normally. If you are successful, the problem is with one
of the peripheral devices. Add all the peripherals back one by one till
you get a BSOD again—the last added peripheral is the culprit.
If you are getting BSODs during installation, then the prob-
lem could be with the RAM, hard disk, processor, or one of the
peripherals. Test the RAM using a memory diagnostic tool as
described above, check the hard disk for errors (most hard disk
manufacturers provide software utilities that can diagnose
errors), verify that the CPU is not overheating by following the
instructions in the Motherboard section of this guide, and
remove all peripherals and run the installation with the mini-
mum configuration as described above. If the installation is suc-
cessful, you can troubleshoot the rest of the hardware devices
from within Windows.
1.6.5 Common Stop Message error codes and suggested
resolutions
These are some of the most common Stop Messages along with
their cause and suggested resolution:
42 FAST TRACK](https://image.slidesharecdn.com/fasttracktotroubleshootingyourpc-120201111139-phpapp02/75/Fast-track-to-troubleshooting-your-pc-41-2048.jpg)


![TROUBLESHOOTING YOUR PC
THE BASICS I
Cause 2: The BIOS settings are incorrect.
Solution 2: Restart the computer and enter the BIOS setup screen.
If you have changed any settings, restore them to the previous val-
ues. If you are not sure about the previous values or haven’t
changed the settings, select the Load Fail-safe Defaults (this could
also be “Factory Defaults”, “BIOS Setup Defaults”, etc.) option and
reboot.
Cause 3: There might be a hard disk failure or data corruption in
the boot records
Solution 3: Insert the Windows XP installation CD and restart the
computer. On the “Welcome to Setup” screen, press [R] to start the
Recovery Console. You will be prompted for the administrator
password. Type in the password, or if the password is blank, hit
[Enter]. At the command prompt, type in “chkdsk”. This will run
the Checkdisk utility that will scan the hard disk for any faults.
Checkdisk may report a hardware failure or errors on your disk. If
it does, it is best to take your PC to a repair professional.
Problem: You receive an error message when Windows XP starts.
Cause: A recently installed file or service or software program is
incompatible with Windows XP and is preventing it from starting.
Look carefully at the error message. If a file or service name is
referred to in the error message, then you can troubleshoot by
either clean booting or by stopping the service.
Solution 1a: To perform a clean boot in Windows XP, use the fol-
lowing steps:
1. Start the system configuration tool by going to Start > Run, typ-
ing in “msconfig”, and pressing [Enter]
2. Click Selective Startup and clear the following checkboxes:
“Process System.ini File”, “Process Win.ini File”, and “Load
Startup Items”.
3. Select the Services tab and click the “Hide All Microsoft
Services” checkbox, and then select “Disable All”.
4. Click OK and then “Restart” to restart your system.
5. When Windows restarts, if the error doesn’t occur, re-open
“msconfig” and check the “Process System.ini File” checkbox,
FAST TRACK 53](https://image.slidesharecdn.com/fasttracktotroubleshootingyourpc-120201111139-phpapp02/75/Fast-track-to-troubleshooting-your-pc-52-2048.jpg)
![I THE BASICS
TROUBLESHOOTING YOUR PC
click OK and restart your computer. If the error returns, you
know that the problem is with one of the System.ini entries. If
the error doesn’t occur, progressively enable the remaining
checkboxes (“Process Win.ini File”, “Load Startup Items”, and
“Load System Services”). Restart the computer after you enable
each checkbox till the error occurs again.
6. Once you have identified the area in which the error occurs, dis-
able the entry or stop/disable the service as the case may be.
Solution 1b: If you are unable to perform a clean boot to trou-
bleshoot the problem and you know the name of the service,
then start the Recovery Console as explained earlier. From the
command prompt, change to the System32 folder. Type in
“listsvc” at the command prompt in the System32 folder. A list of
all services on your computer will be displayed. Locate the serv-
ice name that is causing the error. Type “disable <servicename>”
and press [Enter].
The computer will print a message listing the “start type” that
is being shut down. Note it down in case you need to re-enable the
service. Type “exit” and allow the computer to restart normally.
Solution 1c: If you recently installed a program that is causing this
error, remove the program. If the program is not listed in the
Add/Remove list, you’ll have to visit the developer’s Web site for
instructions on how to remove the program.
Problem: After an upgrade, programs that loaded during start
up do not start.
Cause: This symptom is noticed when you log in for the first time
after upgrading from Windows 98 or ME. Windows XP will remove
all programs from the startup list, which it ‘feels’ are not compat-
ible.
Solution: Click Start > Run, type in “msconfig” and press [Enter].
Click the Startup tab. Select the “Restore Startup Programs” option
and click OK. Restart the computer. (This option won’t be available
if Windows XP Setup did not disable any startup programs.)
54 FAST TRACK](https://image.slidesharecdn.com/fasttracktotroubleshootingyourpc-120201111139-phpapp02/75/Fast-track-to-troubleshooting-your-pc-53-2048.jpg)
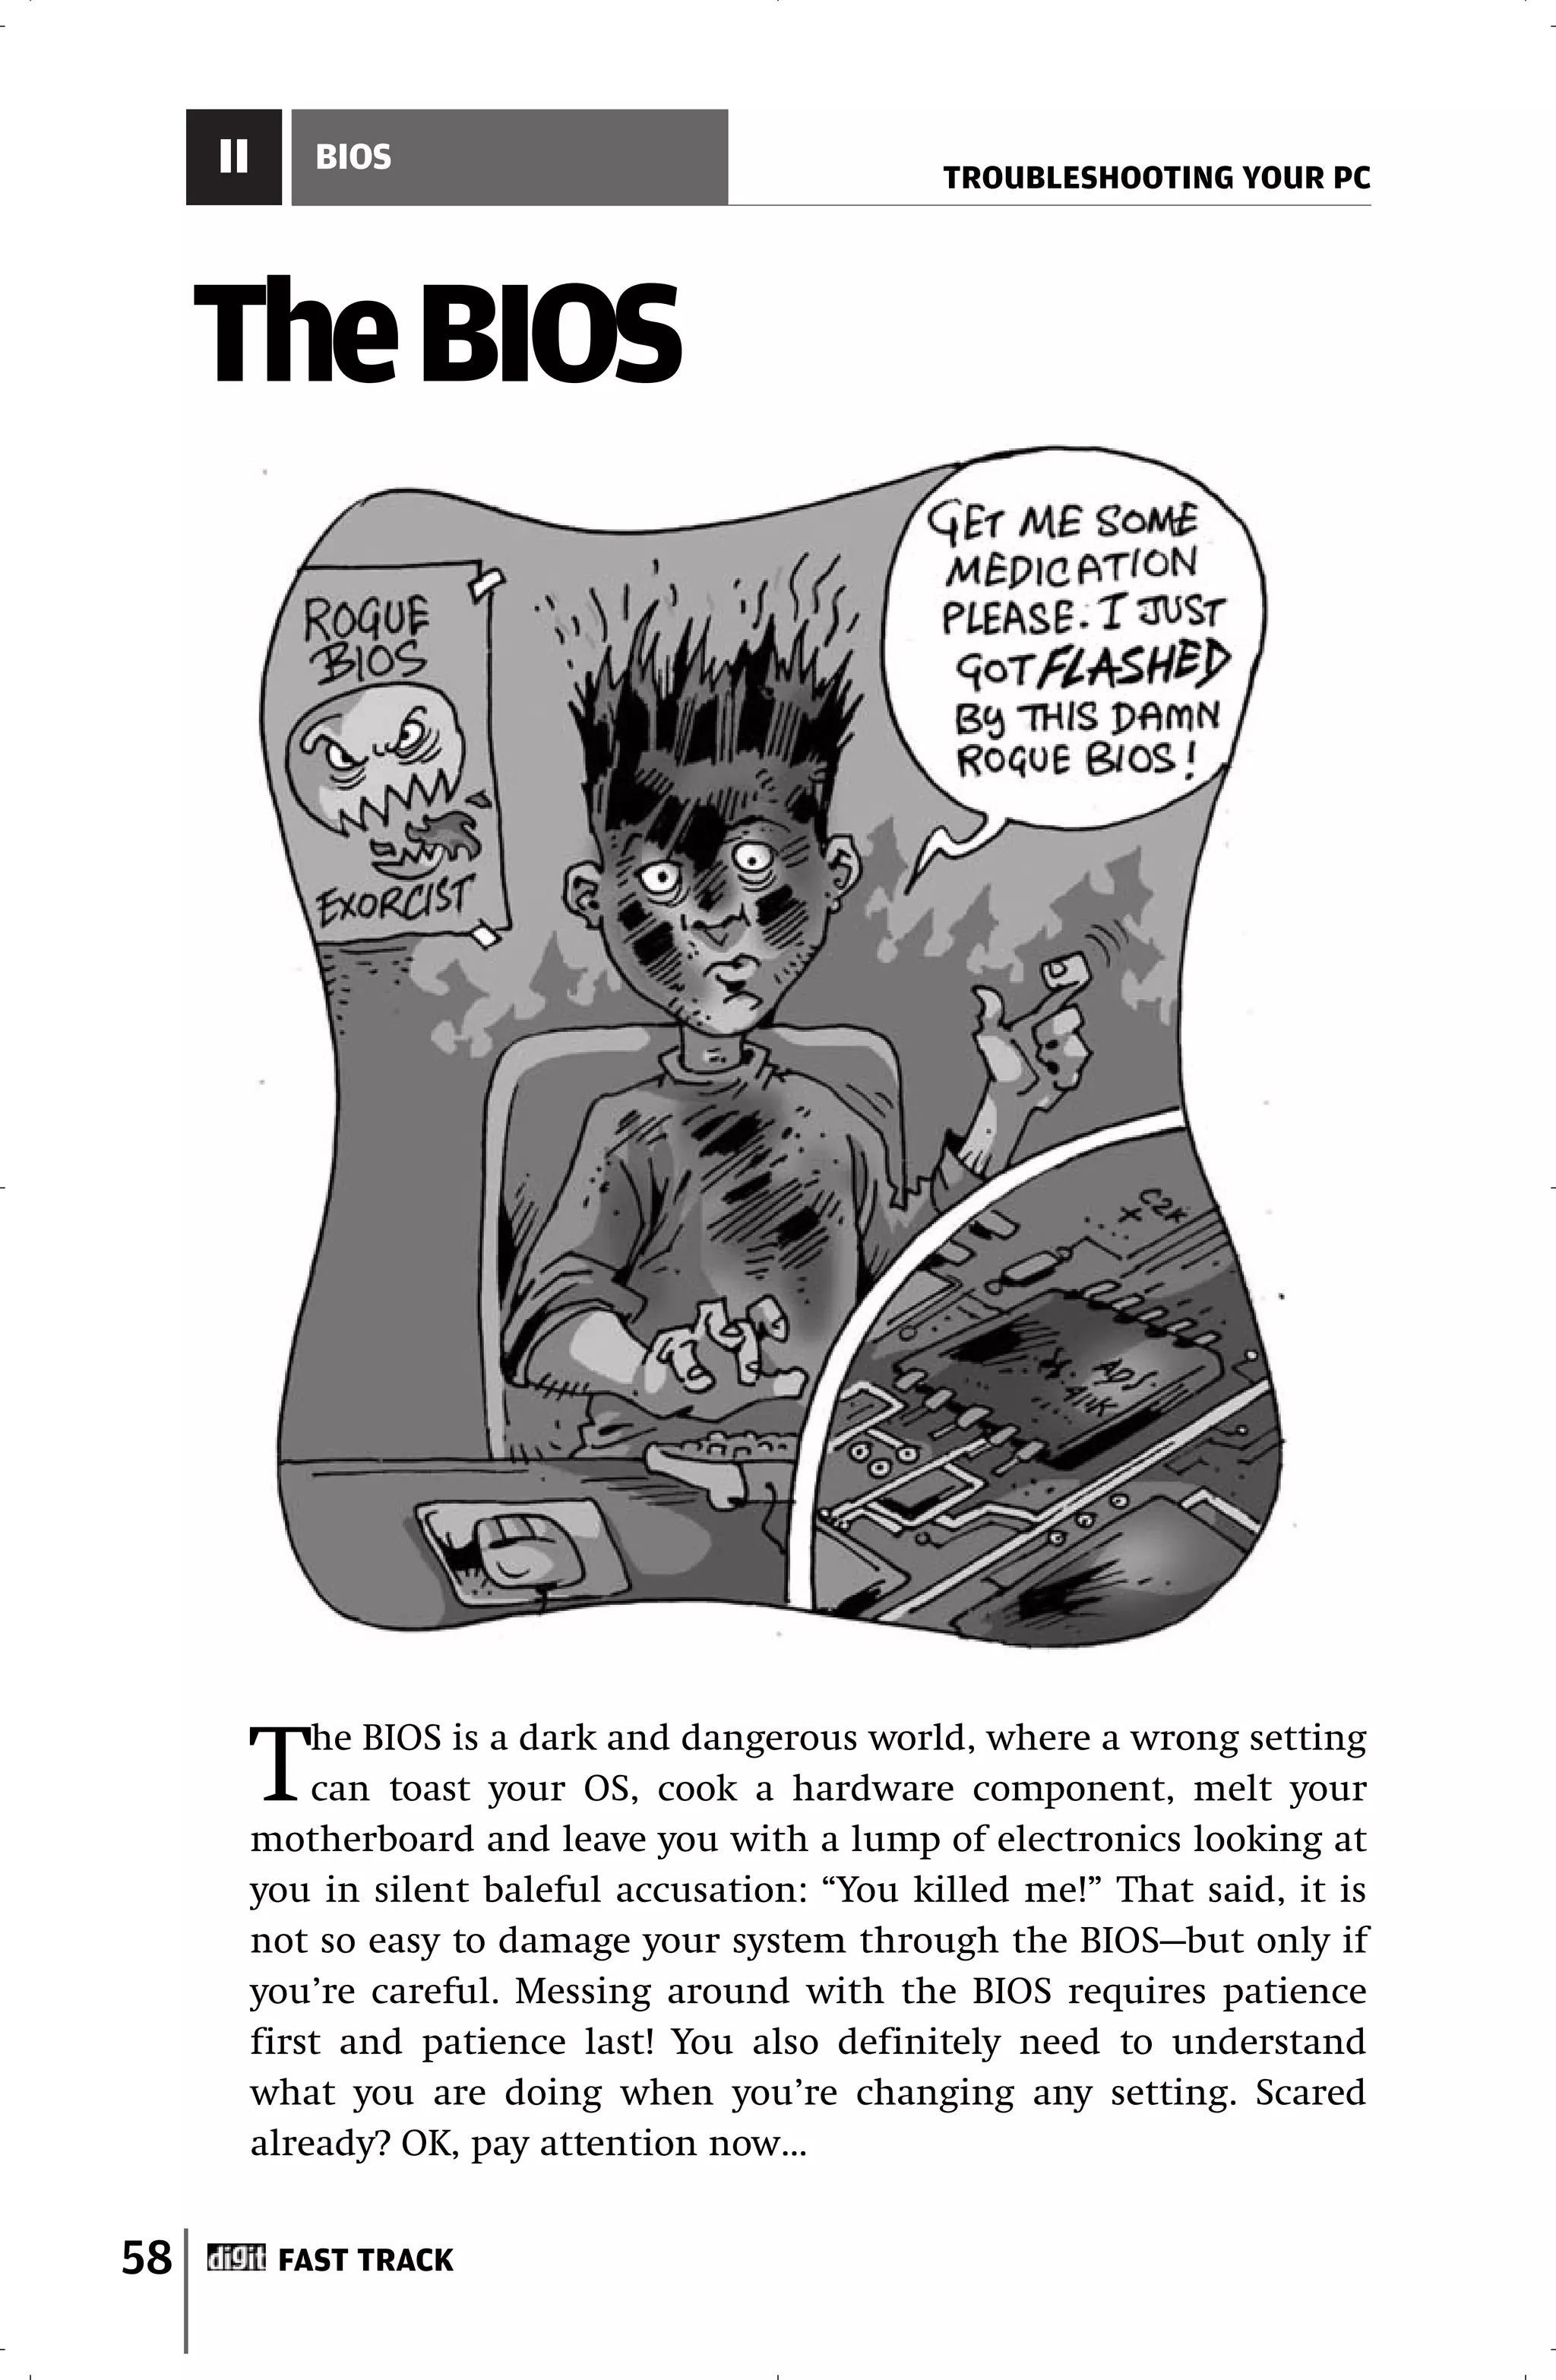
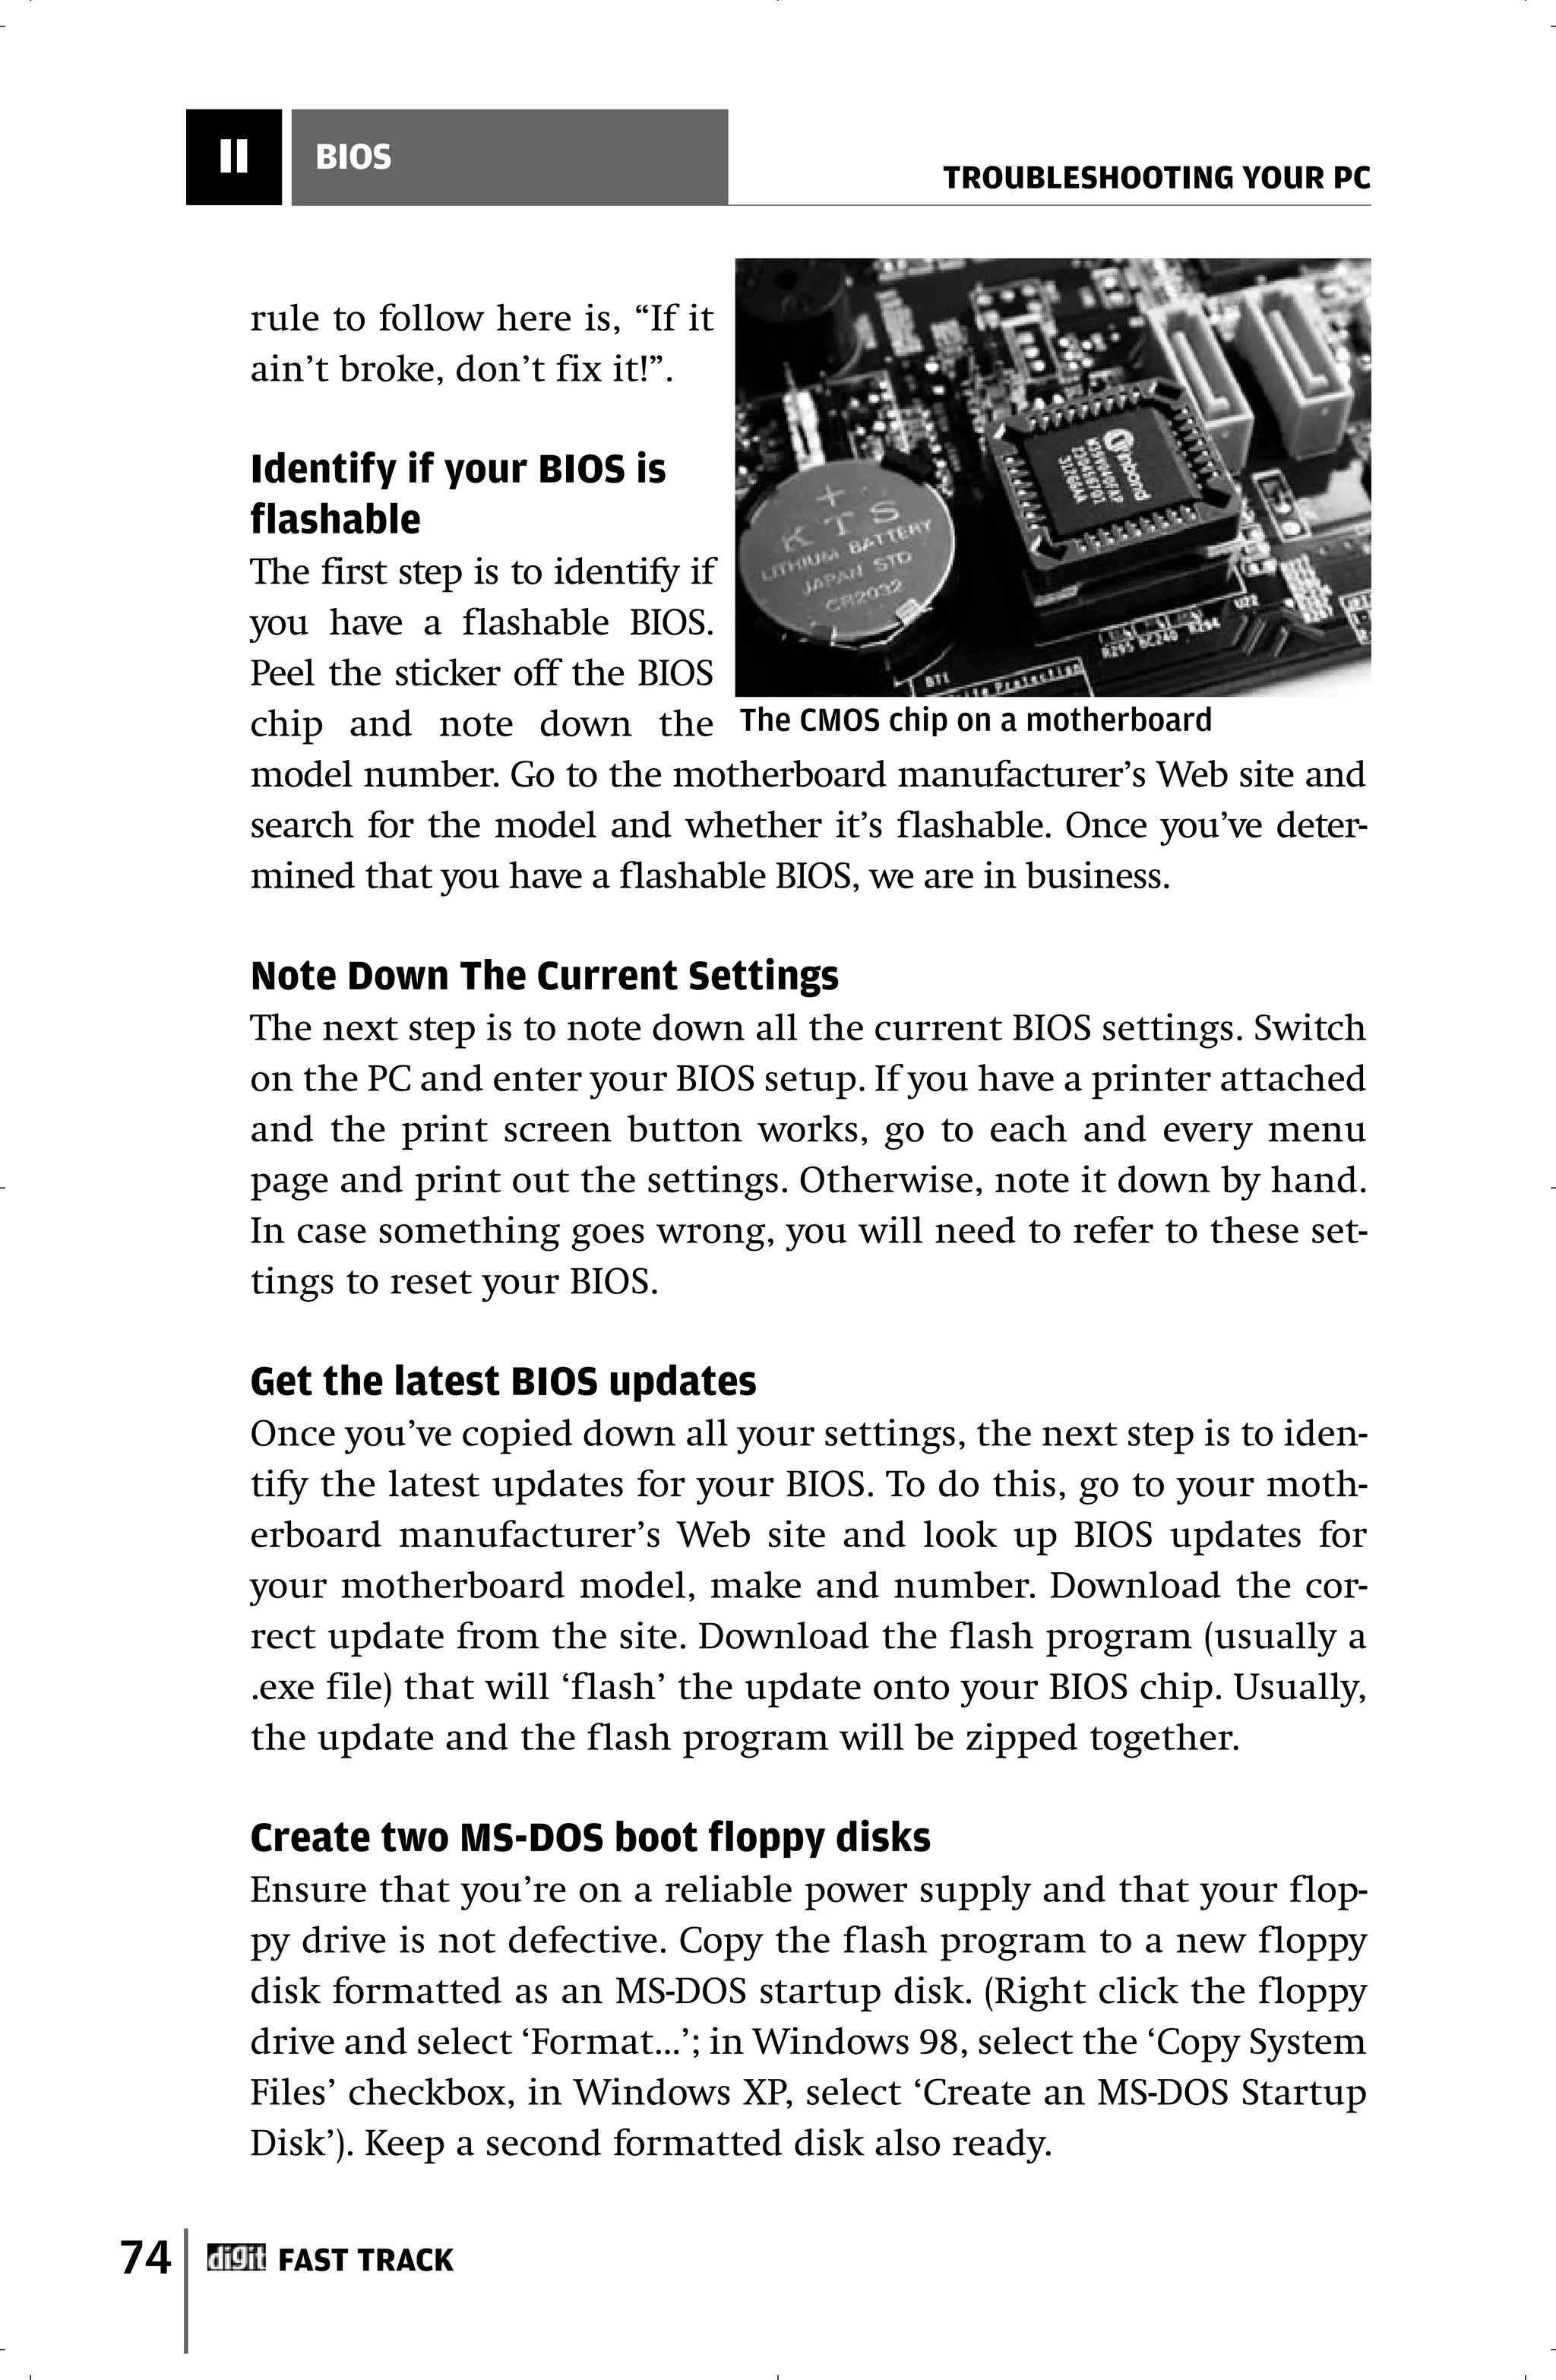
![II BIOS
TROUBLESHOOTING YOUR PC
The BIOS software code and all the settings for the PC are
stored on a memory chip that’s continuously supplied with power
by a battery. The battery also powers a real-time clock that keeps
accurate time. Hence, these settings (and time values) are retained
even when the power is switched off.
Motherboard manufacturers and BIOS vendors frequently
release updates, which can be “flashed” to the BIOS. In some trou-
bleshooting cases, your only option is to update the BIOS. Look
later in this section to learn how.
To enter the BIOS setup, you’ll need to press [Delete], or some-
thing similar, when your computer is booting up. Depending on
the PC, the key may be different—[Esc], [F1], [F10], etc.
2.2 BIOS Beep Codes
When your system has a problem that won’t let it start up proper-
ly, the first thing you will hear is warning beeps. These could be
because of hardware or even because of the BIOS itself.
Unfortunately, beep codes are not standardised across BIOS
vendors and motherboard manufacturers. Below are mentioned
the beep codes, along with the possible problem that could be
causing the beep, and some suggestions towards resolution. These
are for two popular BIOS vendors—AMI and Award. If your BIOS is
from any other vendor, you will need to refer to the motherboard
manufacturer’s or the BIOS vendor’s manual for details.
Also, motherboard manufacturers may modify the beep codes
to their convenience and not maintain consistency. Keep an open
mind when you decipher the beep, and don’t get into a tizzy if the
codes don’t match what is in here or in the BIOS vendor’s manual!
You should always try and contact the manufacturer to get the
correct beep codes.
60 FAST TRACK](https://image.slidesharecdn.com/fasttracktotroubleshootingyourpc-120201111139-phpapp02/75/Fast-track-to-troubleshooting-your-pc-59-2048.jpg)

![III THE DISPLAY
TROUBLESHOOTING YOUR PC
Solution: Adjust the display controls and see if you are able to get
back a stable picture. Reduce the refresh rate and/or the resolu-
tion. If you are not able to see the screen, reboot and press [F8].
Select Safe Mode from the list of options; Windows will start with
a simple driver at a low resolution and low refresh rate. Disable
any video drivers (through Device Manager) so that Windows is
forced to use its own driver to handle the display when you reboot
normally. After rebooting in normal mode, enable the driver and
run the Add New Hardware Wizard to redetect your video driver at
the basic resolution. Readjust your refresh rates and resolution to
below the values that caused the scrambling.
3.3.3 The display is too large or small, or the screen is
spilling out
Cause: It could be either that the horizontal, vertical, and other
image controls are not adjusted properly, or it could be a problem
with the video driver.
Solution: Adjust the image controls of the monitor. Check the
screen resolution and try lowering it. Ensure that you have the cor-
rect video driver for your video card. Check the options in the video
driver software to adjust the screen size.
3.3.4 You think the problem is with the video card, but
you’re not sure exactly what!
There are several possible problems that can’t be directly pin-
pointed. The most likely causes are resource conflicts or wrong
configuration settings. If you recently upgraded or added a com-
ponent to your system, check that first. Verify everything is
installed correctly; that jumpers, if any, are configured properly,
and then read on.
Cause 1: If the video card was recently added, it could be a prob-
lem with the fixing.
Solution 1: Ensure that the card is seated tightly, firmly and com-
pletely in its slot. Power off, remove the card, reseat it properly,
and then reboot.
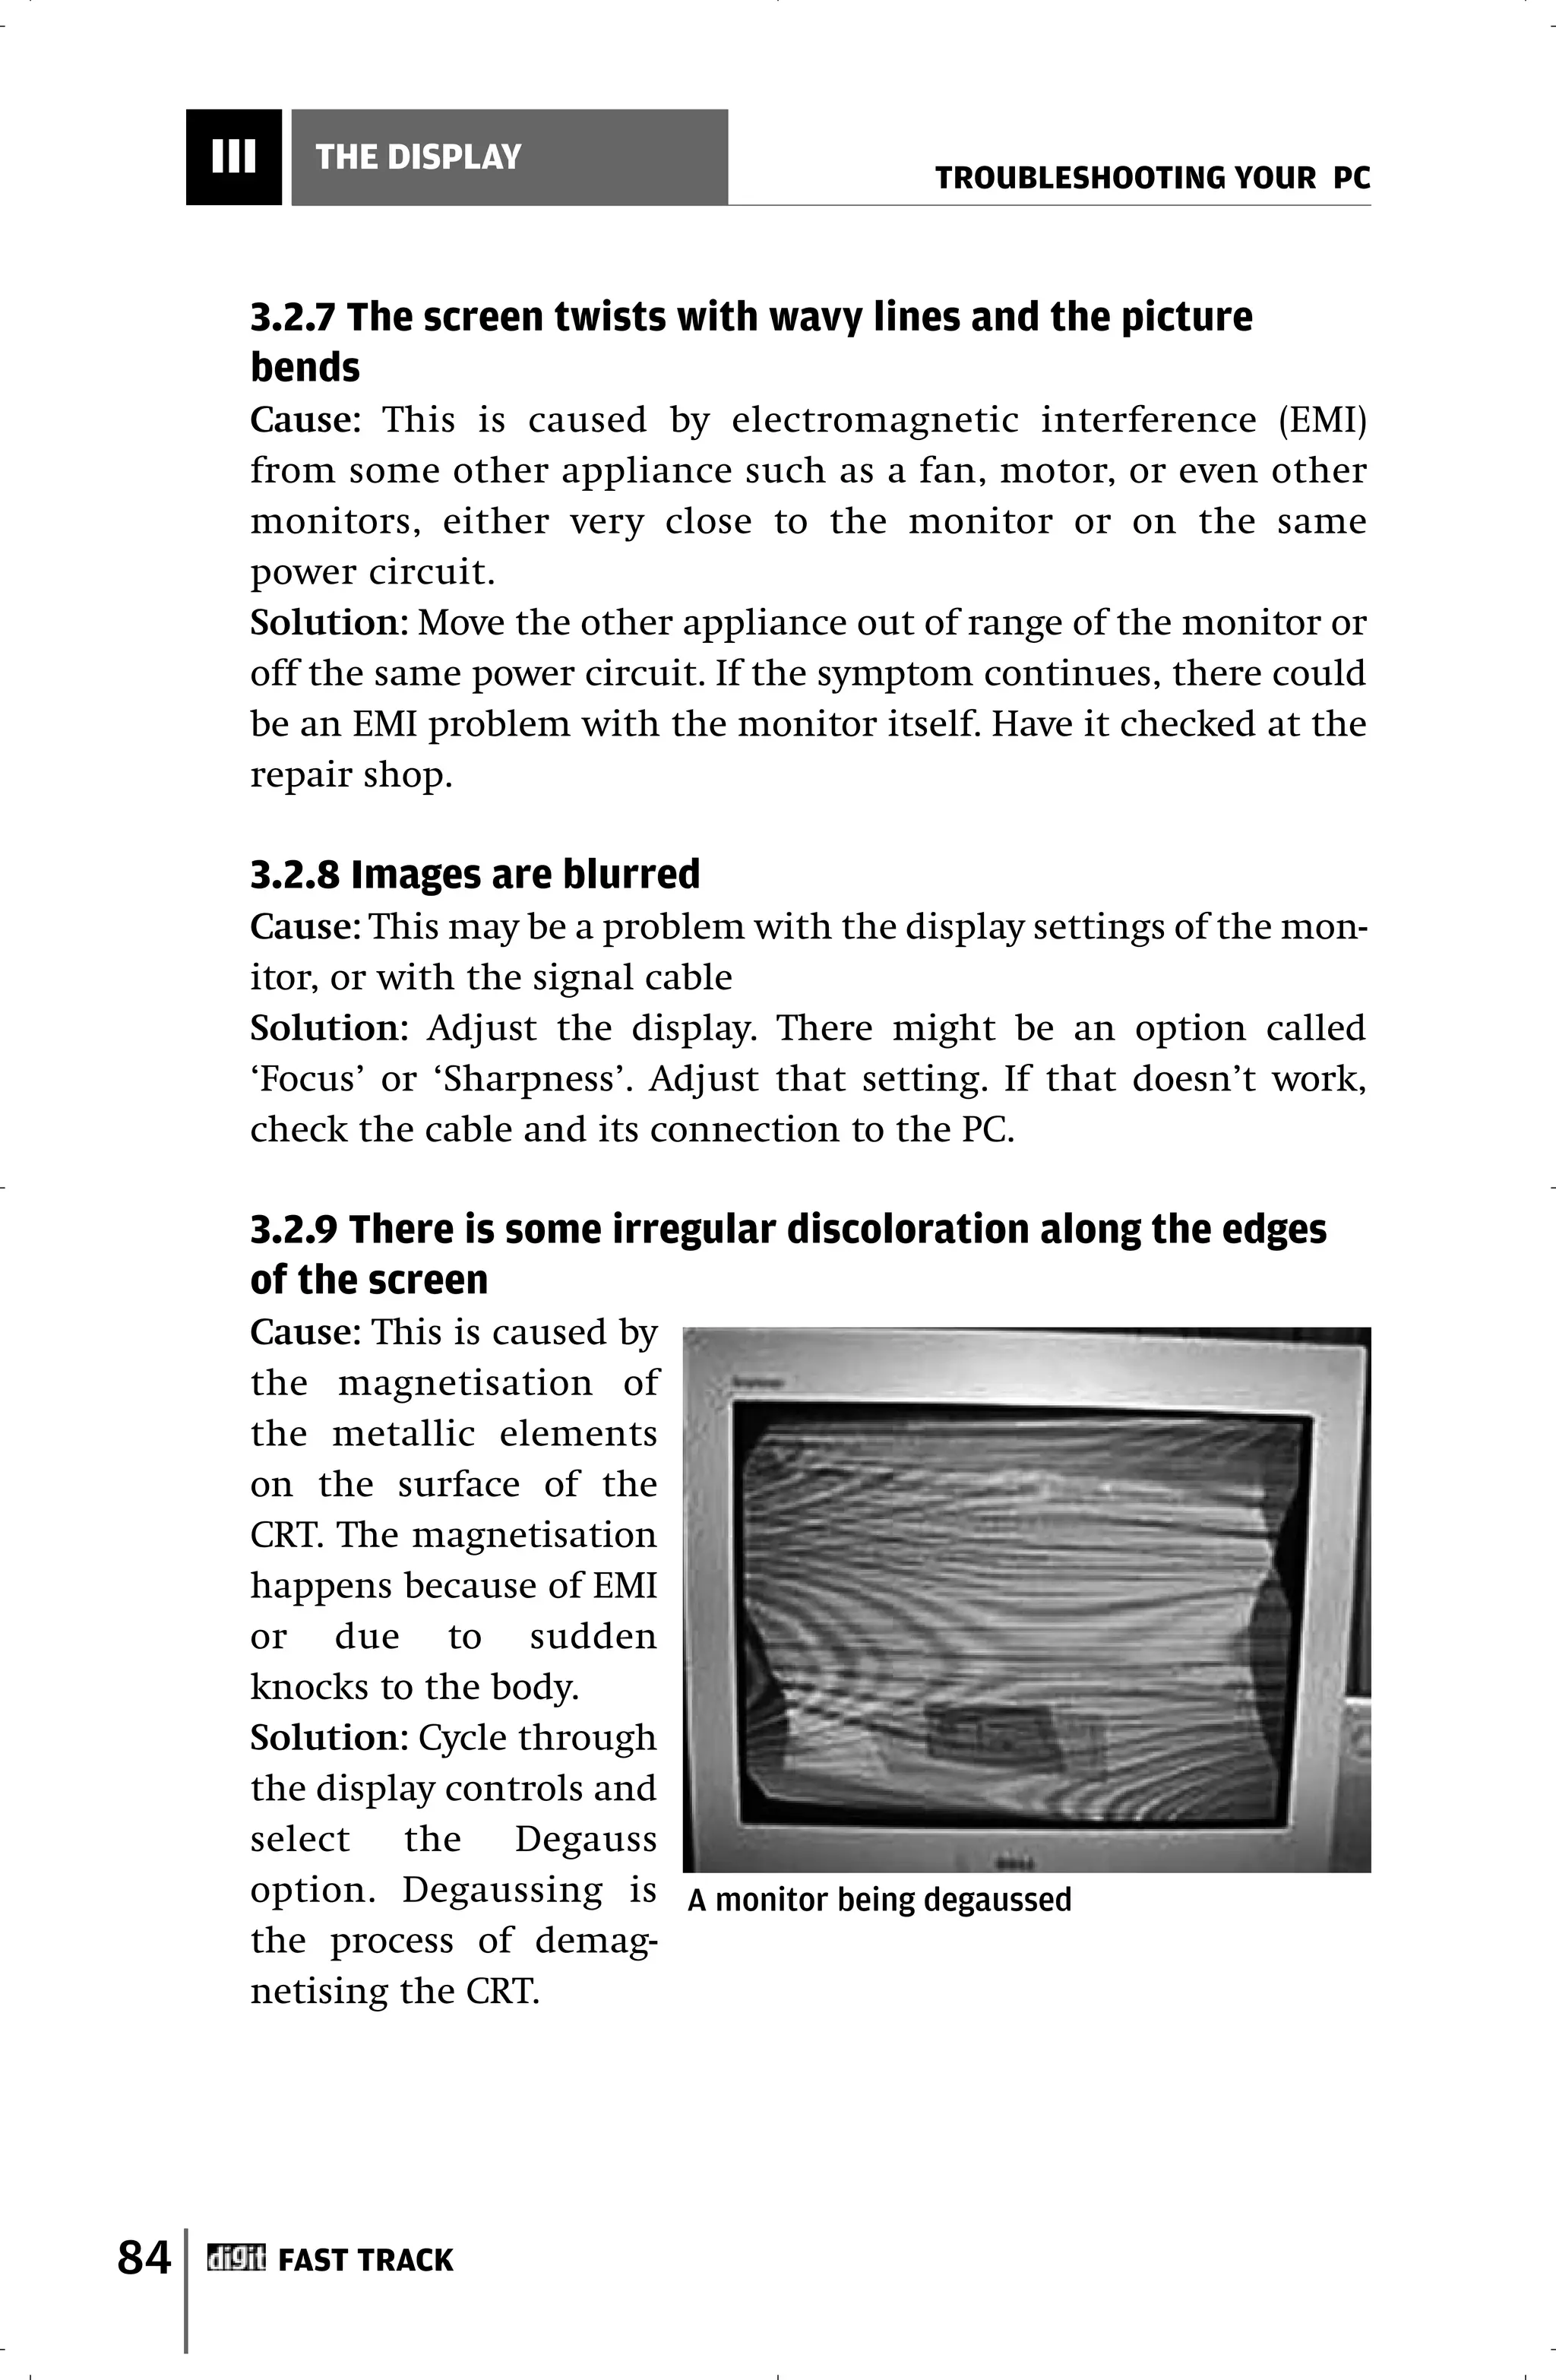
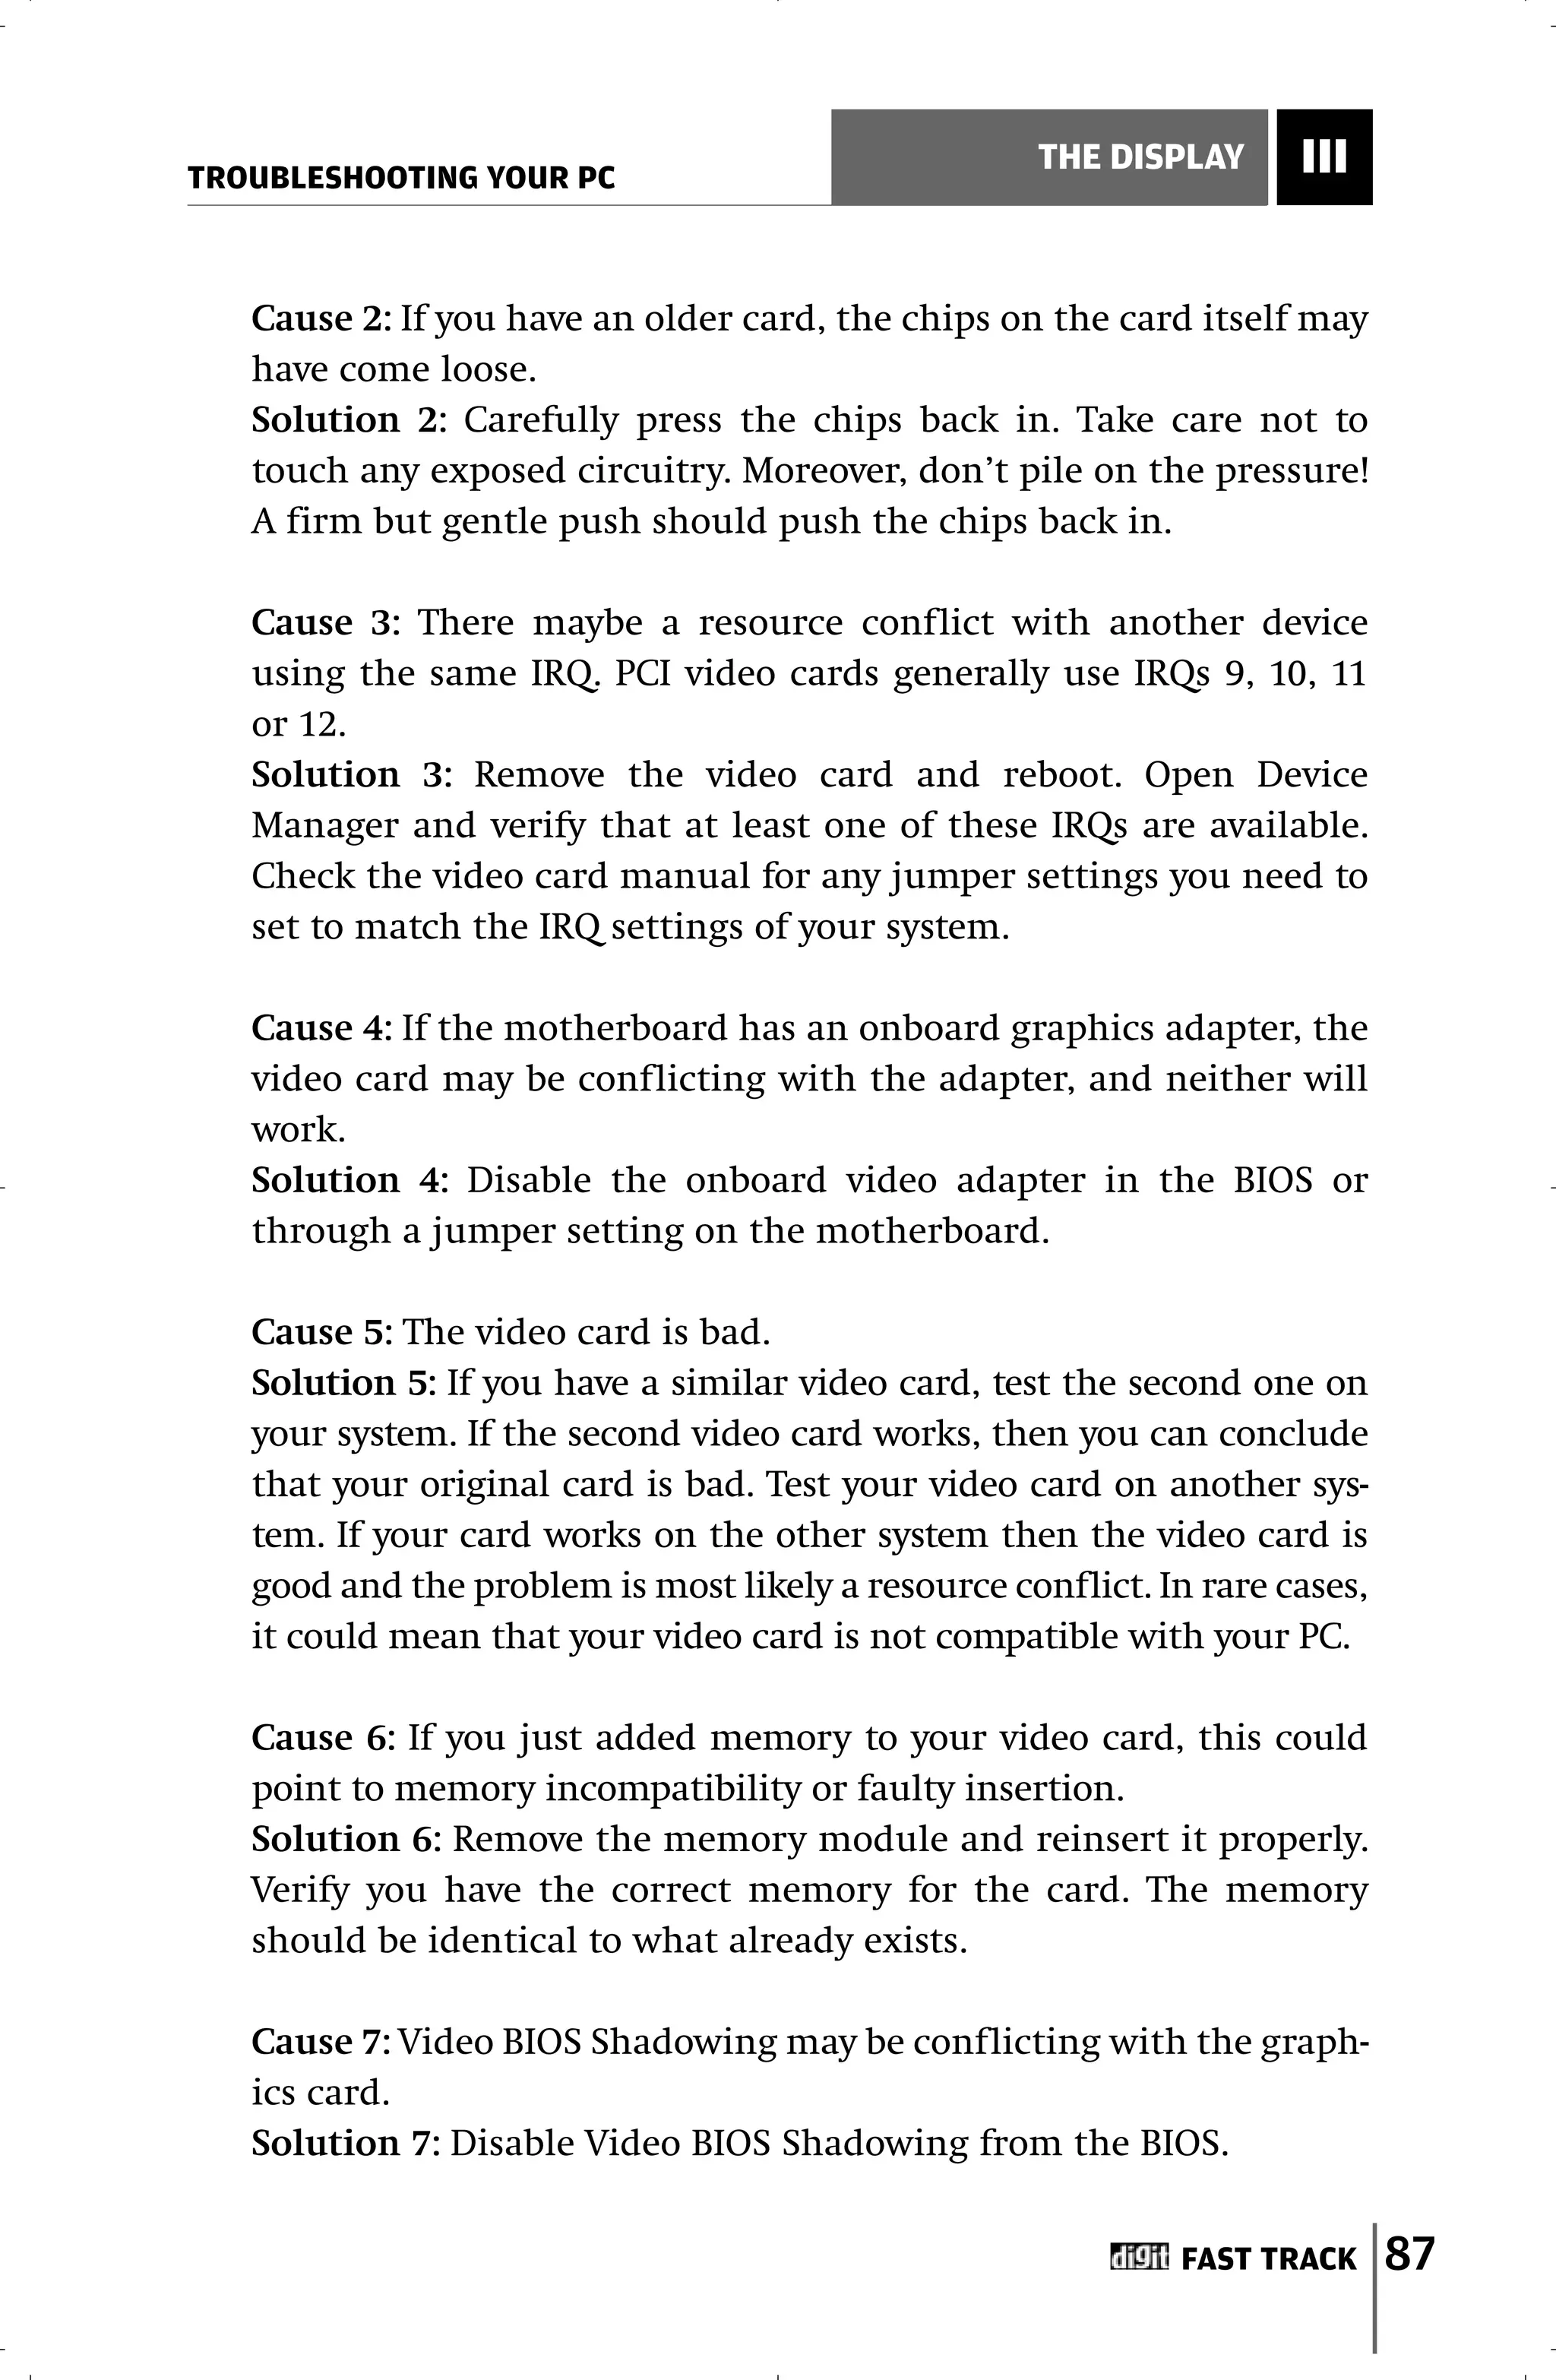
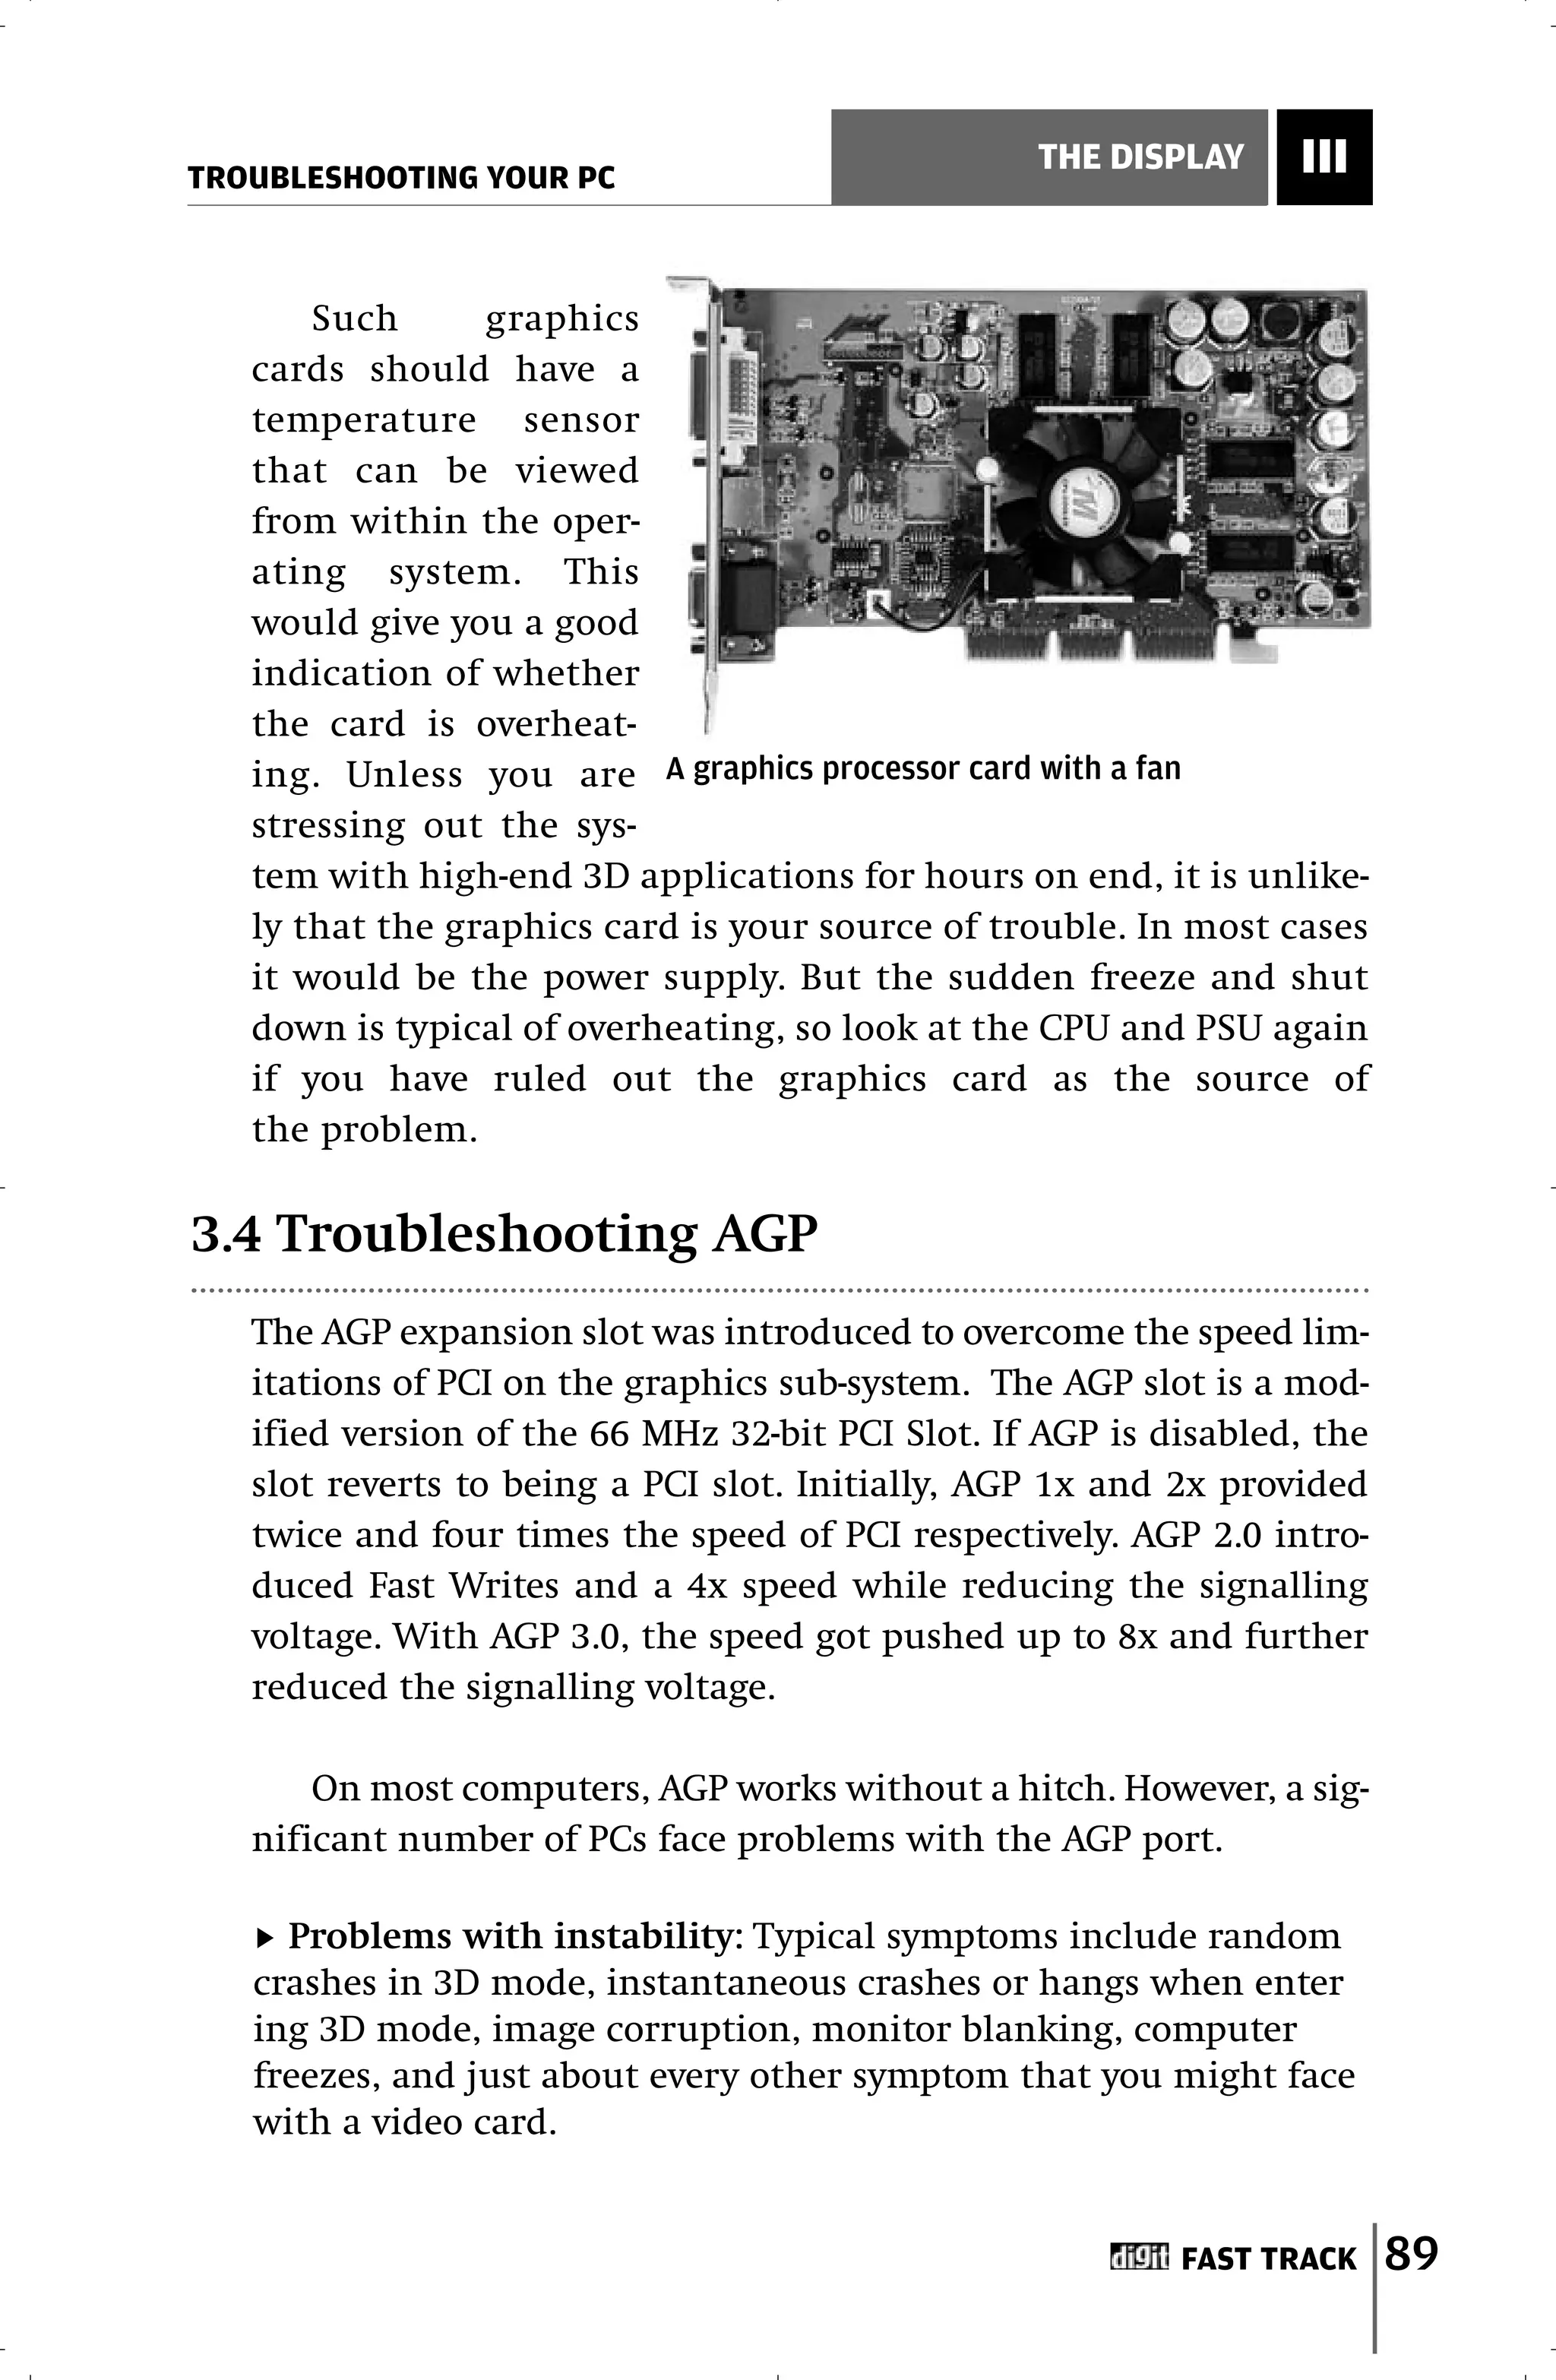
86 FAST TRACK](https://image.slidesharecdn.com/fasttracktotroubleshootingyourpc-120201111139-phpapp02/75/Fast-track-to-troubleshooting-your-pc-85-2048.jpg)
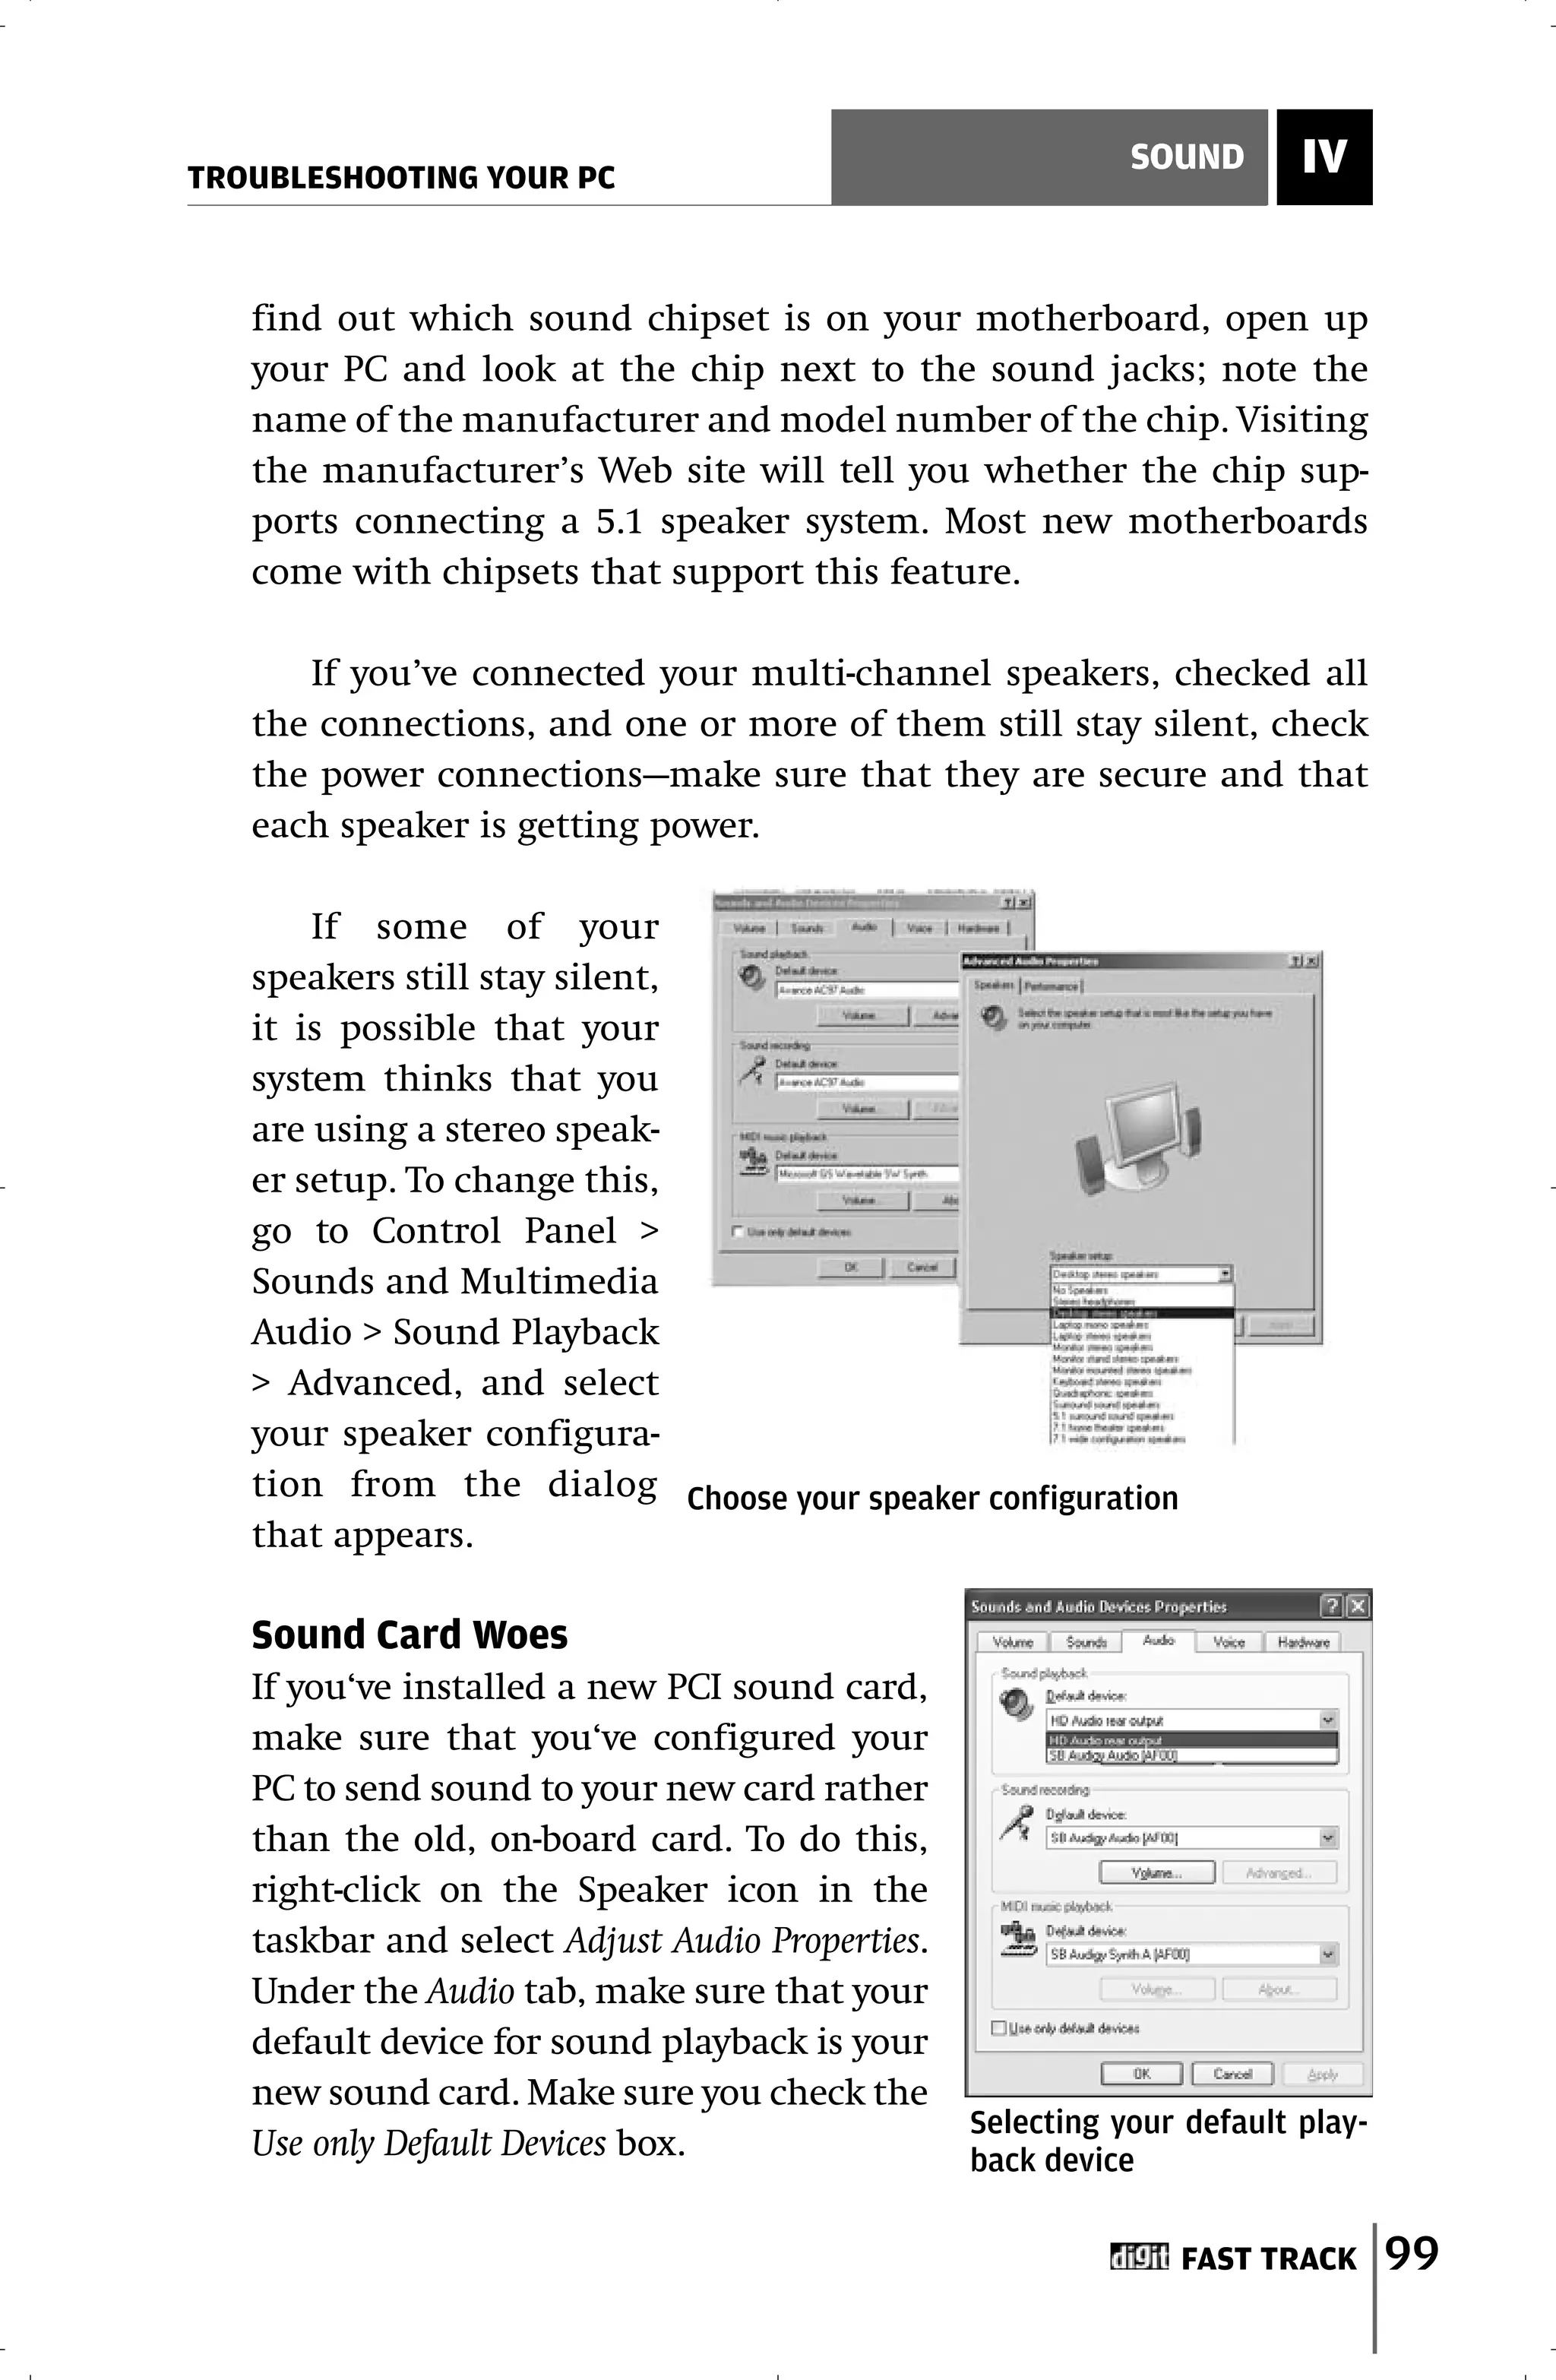
![IV SOUND
TROUBLESHOOTING YOUR PC
If you don’t see your
new card in the list for
Sound Playback, it
might not have been
properly installed. You
can check this in the
Device Manager. To get to
it, go to the Control
Panel and open the
System dialog. Under The Device Manager
the Hardware tab, click
on the Device Manager button.
Tip
In the Device Manager, look
under “Sound, Video and game If you’re going to use an
controllers”. If your card isn’t external sound card, disable
listed here, you will need to the on-board card through the
manually install it using the BIOS. Press the [Delete] button
Add Hardware utility in the as soon as your system boots
Control Panel. If the utility fails up to enter the BIOS. Go to the
to detect your soundcard, you Integrated Peripherals section
might need to open up your and change the setting for the
cabinet and make sure that (a) on-board audio card to
Both, the card and the PCI slot Disabled.
are clean, and (b) the card is
connected firmly.
If your card does show up in the Device Manager, but has a big,
yellow Exclamation Mark next to it, it means that the sound card’s
drivers weren’t properly installed. Make sure you get the latest
drivers from the manufacturer’s Web site and install them.
Codec Woes
If your PC falls silent when you try to play a particular file type, it
simply means the appropriate codec (Compressor-decompressor)
hasn’t been installed. Invariably, your media player will tell you so.
All you have to do then is install the codec, and everything should
be back to normal.
100 FAST TRACK](https://image.slidesharecdn.com/fasttracktotroubleshootingyourpc-120201111139-phpapp02/75/Fast-track-to-troubleshooting-your-pc-99-2048.jpg)
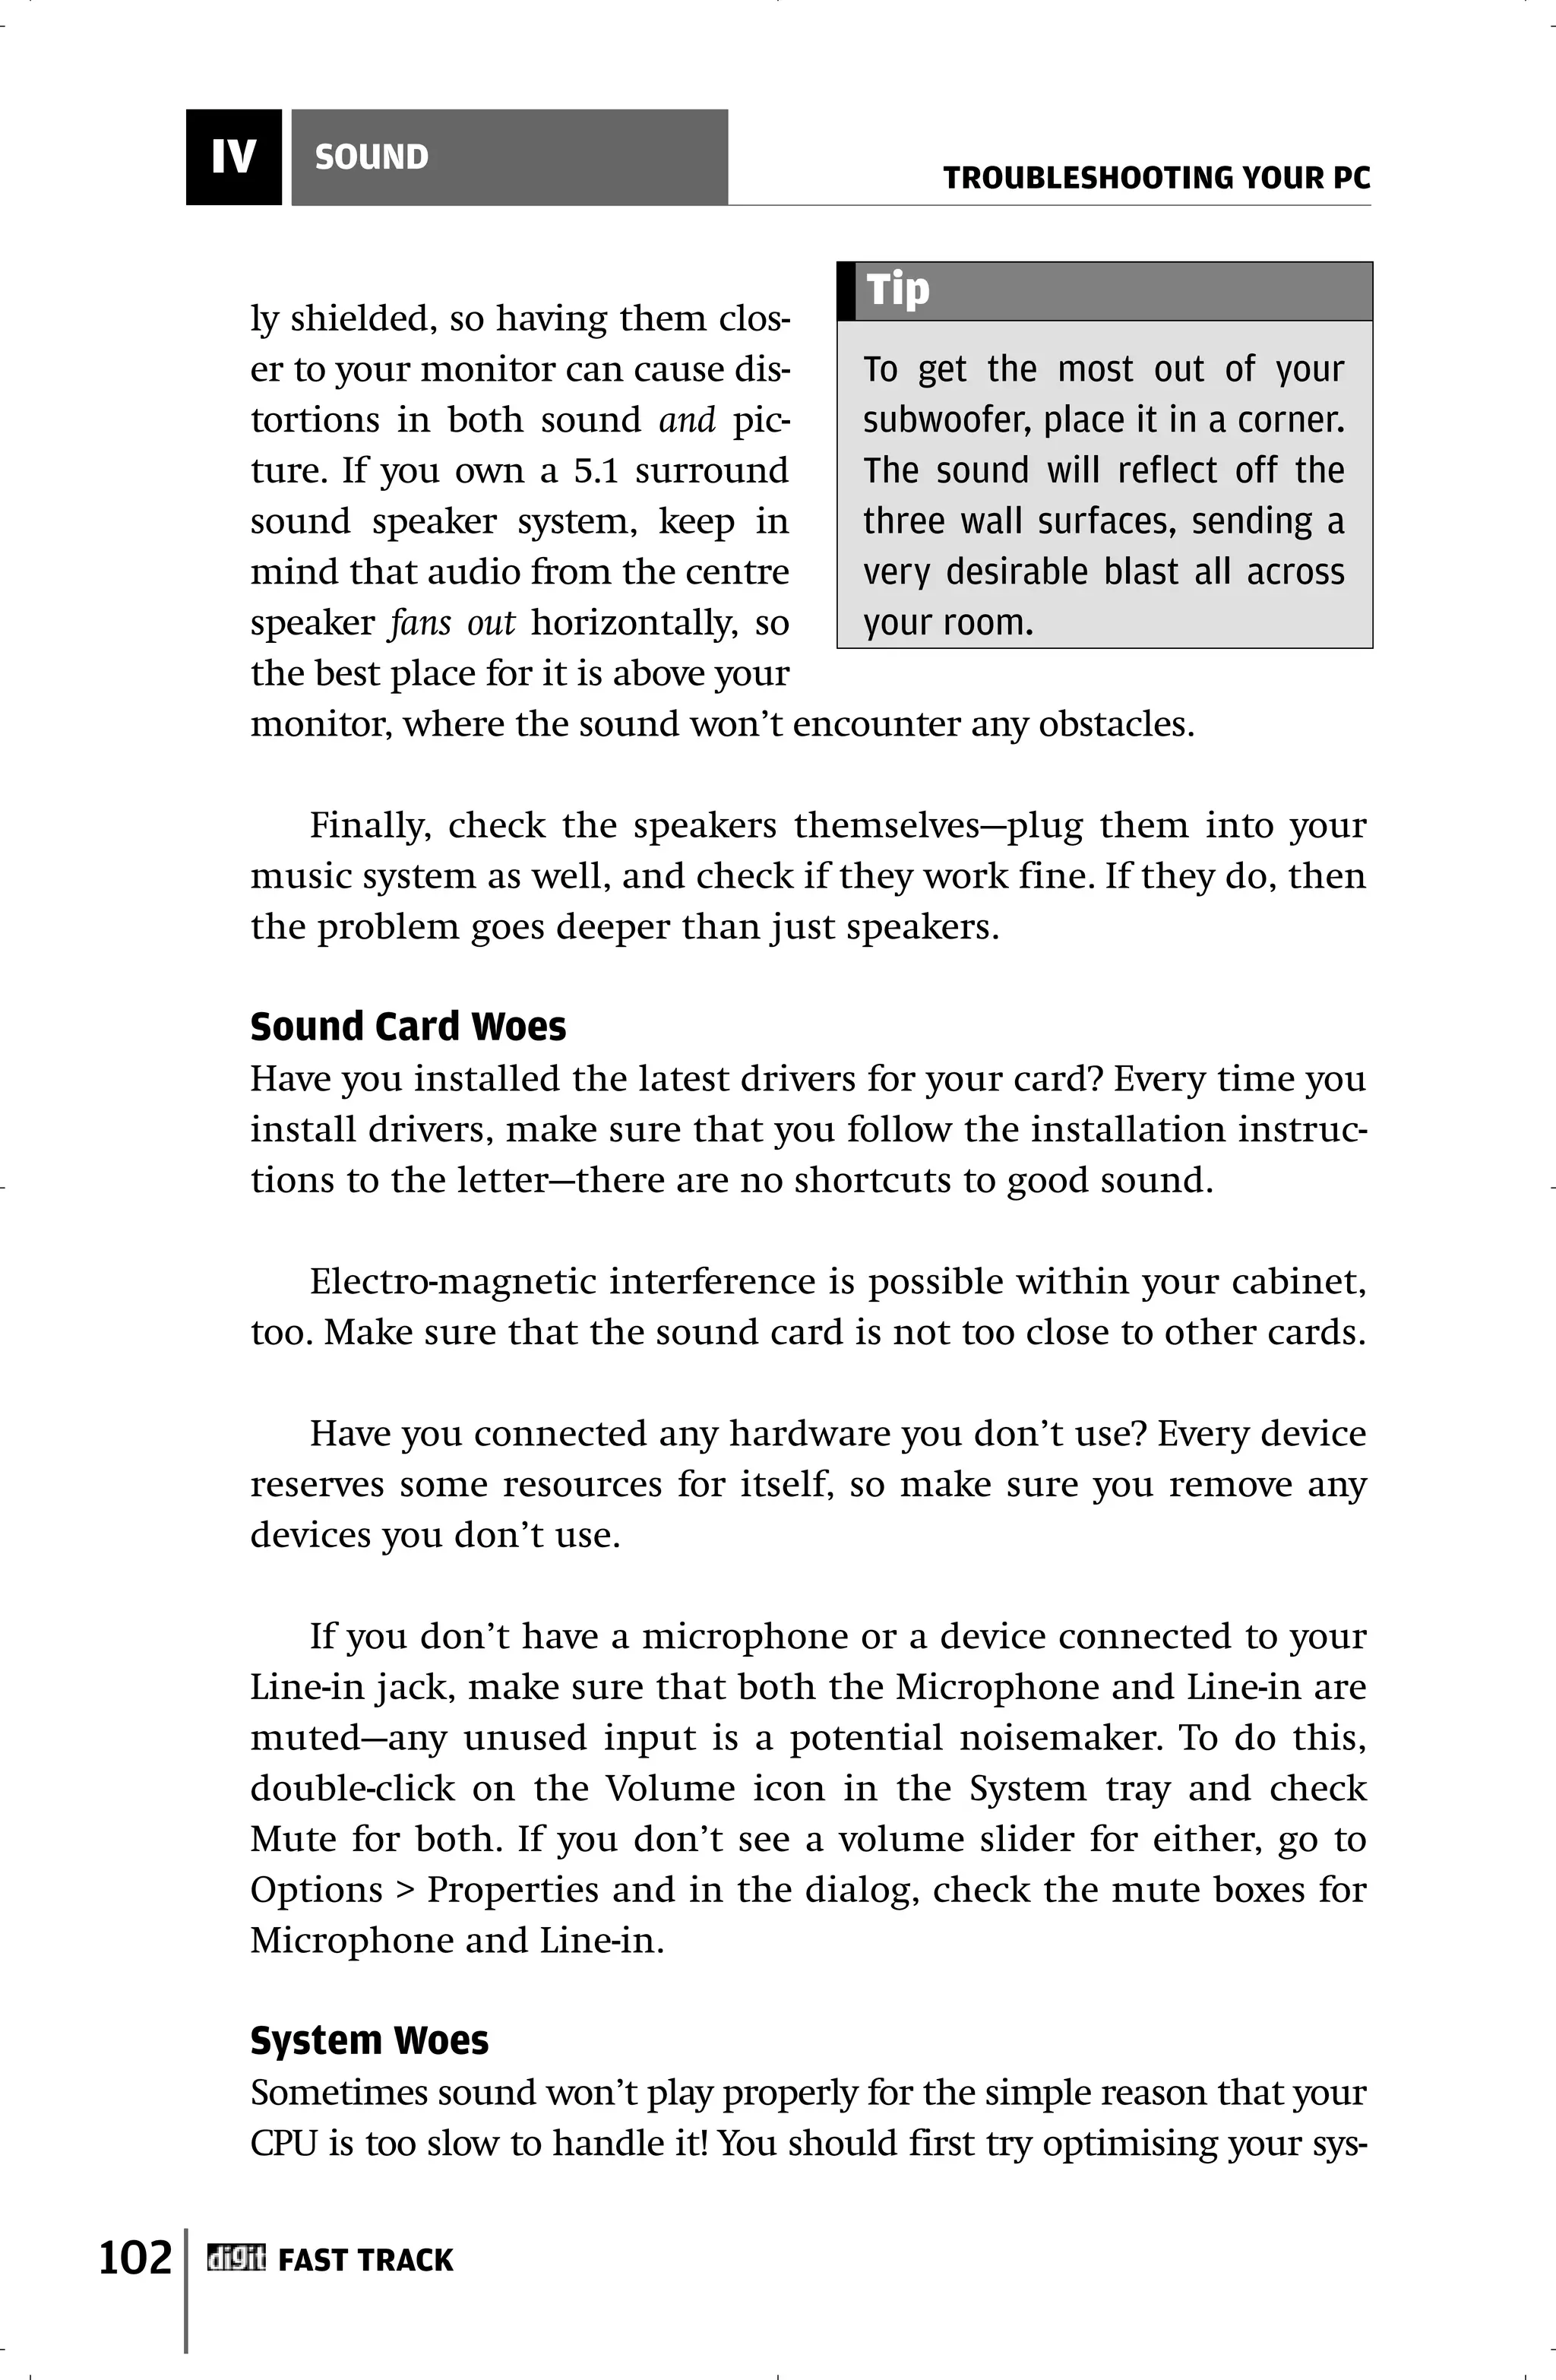
![TROUBLESHOOTING YOUR PC
SOUND IV
Game Woes
If sound works fine in
Windows, but you get
nothing from games, its
quite possible that game
has compatibility issues
with your sound card, or
simply that something’s
wrong with your DirectX
drivers (which you need
for playing DirectX-based
The DirectX diagnostic tool
games). Reinstall the lat-
est version of DirectX
and check again. If you still face problems, start the DirectX diag-
nostic tool by navigating to Start > Run, typing in “dxdiag” and
pressing [Enter]. The diagnostic tool will test the sound on your
system and will tell you exactly what’s wrong.
4.2 Snap, Crackle, Pop!
All systems go, but sound quality not as you expected? A badly
timed click here, a hiss there, some static somewhere, choppy
sound—the whole experience just ruined?
Speaker Woes
Check if there are any other electronic devices in the vicinity.
Speakers sometimes tend to pick up interference from the sur-
roundings, and having an appliance in the vicinity doesn’t help
much. Try moving your speakers and wires around and see if it
helps. A common culprit is the radio, and should be the first thing
to be removed from the immediate surroundings. Your speakers
shouldn’t be too close to your monitor, either.
Another cause of your problem could be because of how your
speakers are placed. Subwoofers are best under your table—for one
thing, they sound best from there; secondly, they aren’t magnetical-
FAST TRACK 101](https://image.slidesharecdn.com/fasttracktotroubleshootingyourpc-120201111139-phpapp02/75/Fast-track-to-troubleshooting-your-pc-100-2048.jpg)
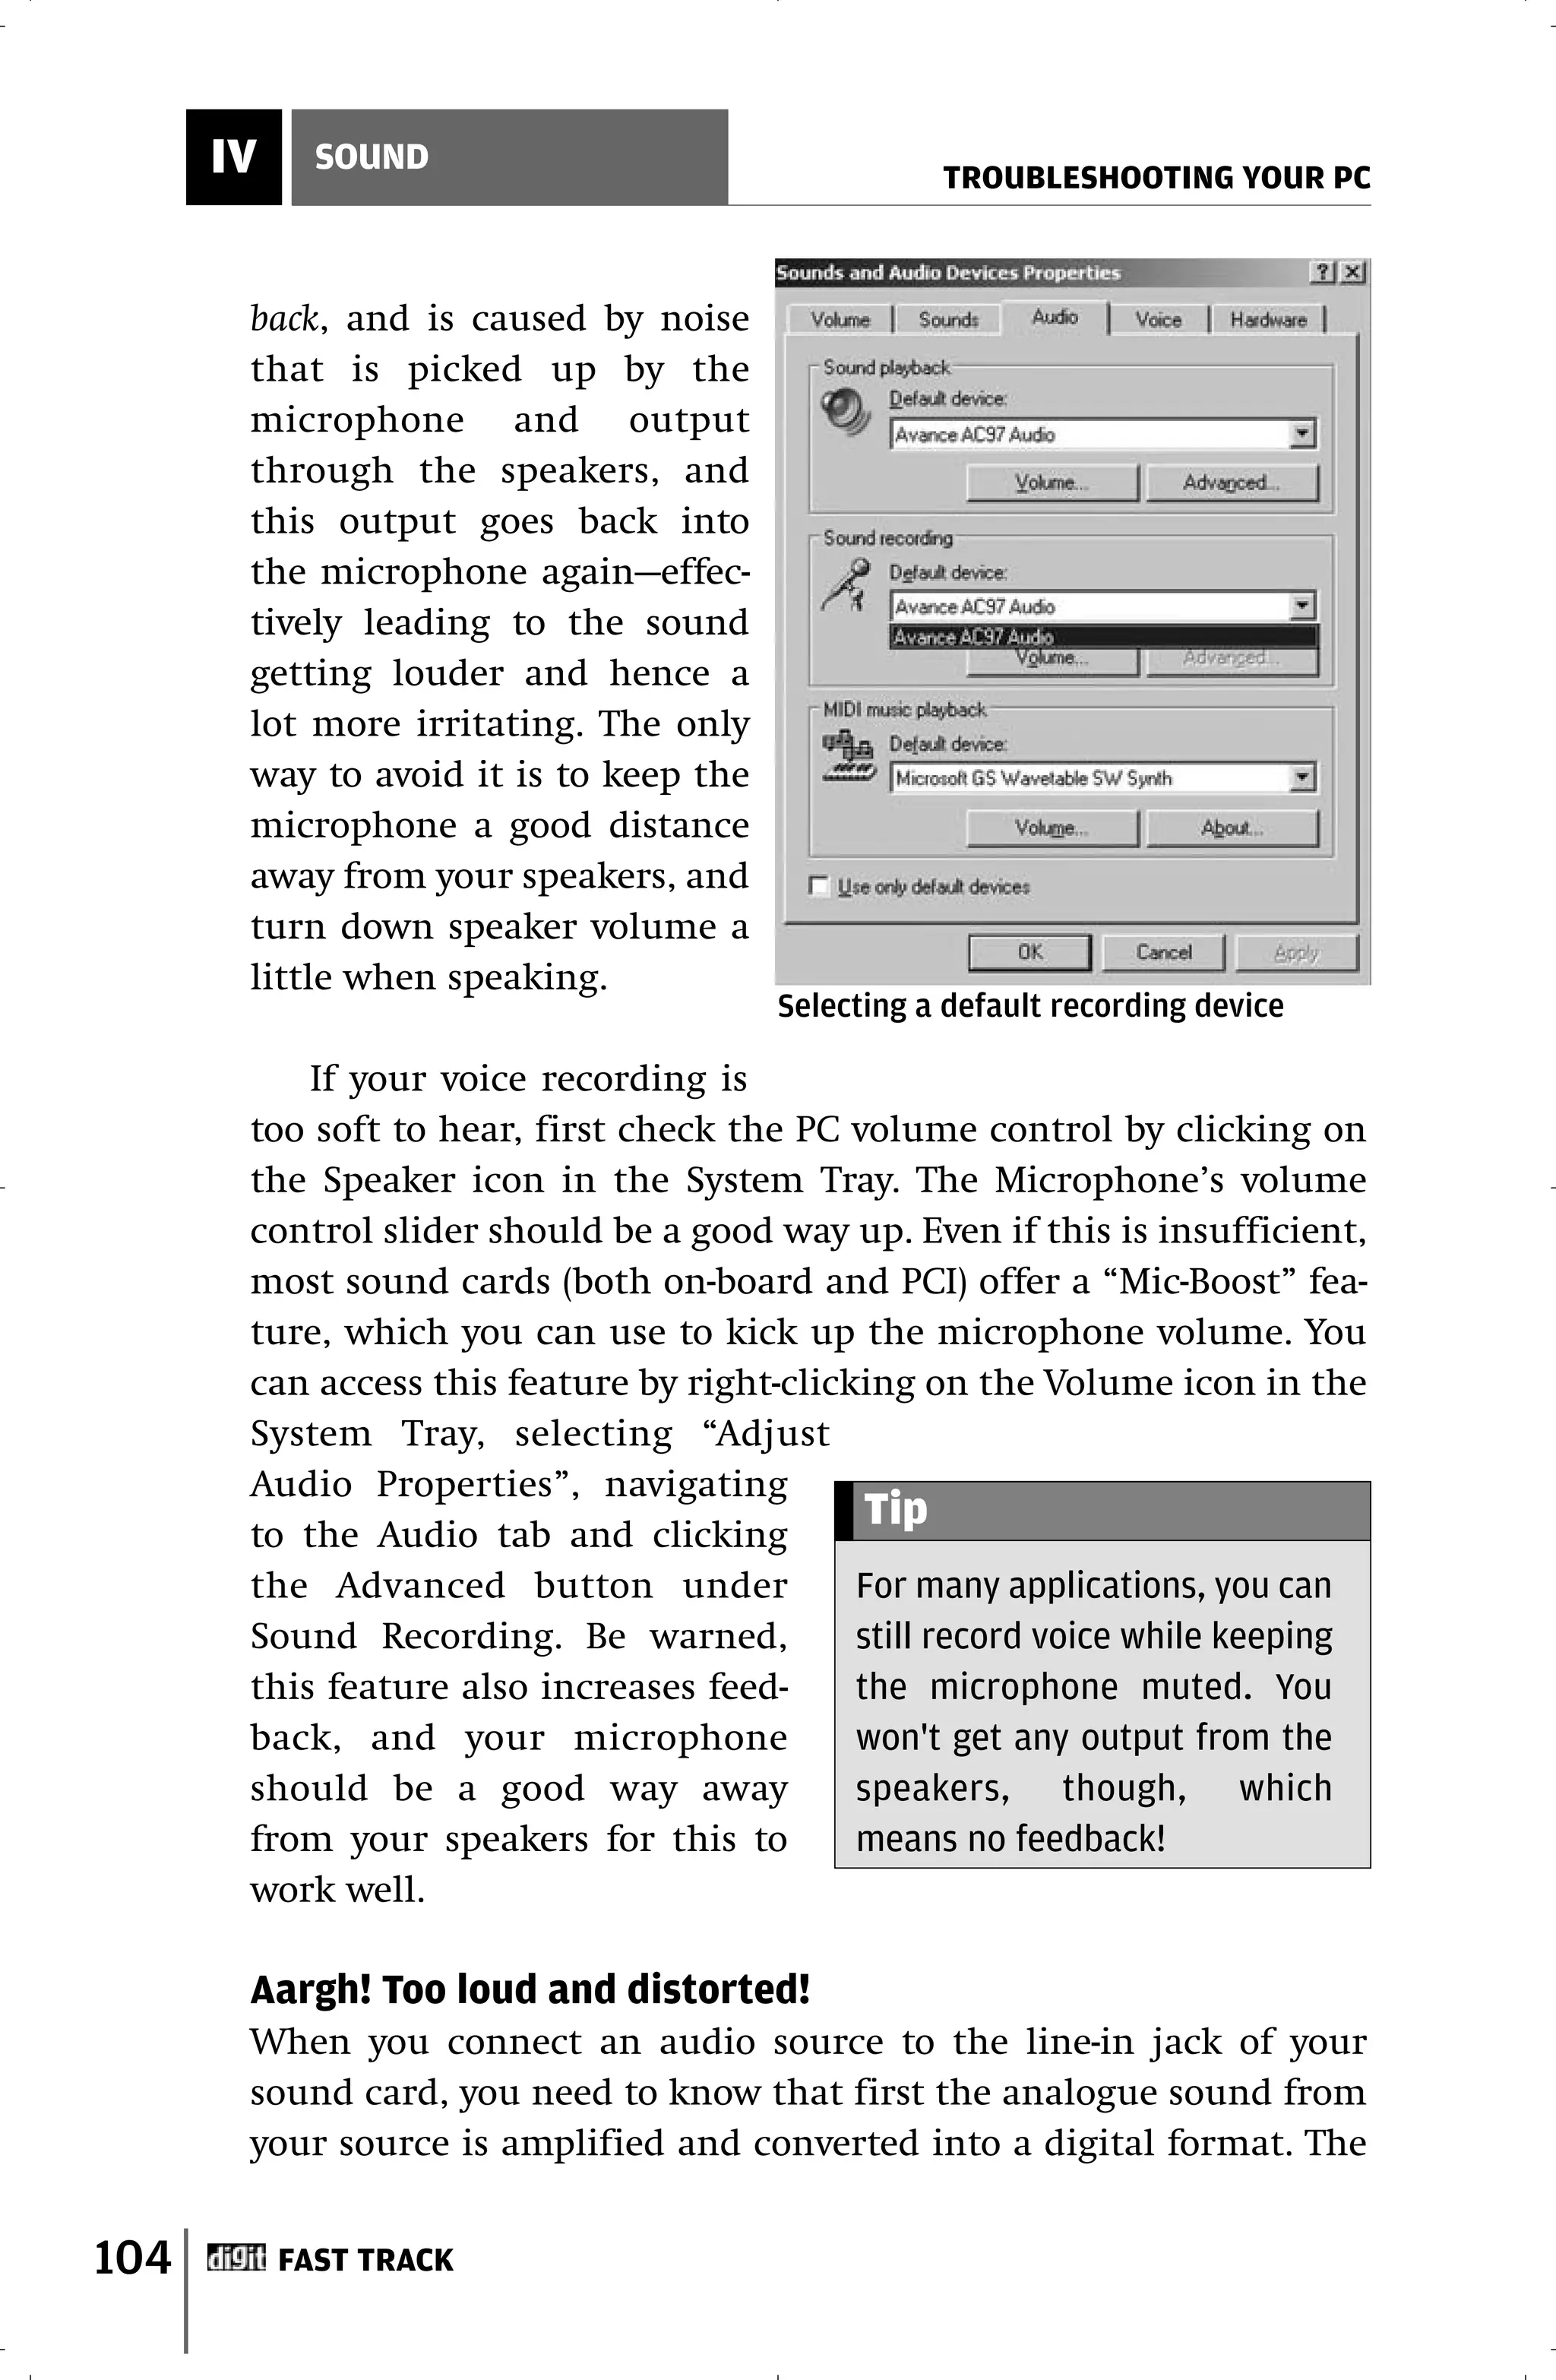
![TROUBLESHOOTING YOUR PC
THE INTERNET V
al ATi video adapters with the Rage chip set require a “DevBmp=1”
entry in the [Display] section of the WindowsSystem.ini file.
Problem: Internet Explorer is very slow at loading pages.
Cause: This could be a spyware issue.
Solution: Scan your computer for spyware using both Lavasoft's
Ad-Aware and Spybot Search&Destroy. If no spyware is detected, or
if you detected spyware and still have the same problem, try doing
a System Restore: go to Start > All Programs > Accessories > System
tools > System restore, and choose a Restore Point for a date before
the problem first cropped up.
Problem: Internet Explorer starts up with a weird, unknown
page, displays a lot of pop-ups, and you see sites in your Favorites
folder that you don’t recognise.
Cause: This happens when your browser has been “hijacked” by
spyware.
Solution: First off, clean your system of spyware by using both
Lavasoft’s Ad-Aware and Spybot Search&Destroy. If no spyware is
detected (which is unlikely), or if the problem persists, visit
http://hijack-this.net/ and do a free scan of your computer.
After the spyware scans, check for the spyware itself, and
delete them manually from your computer (including the folders).
Note down the names of the folders you deleted. Open the Registry
Editor. Find the keys with the names of these folders and then
delete the keys. Remember to always take a backup of your
Registry!
5.3 Microsoft Outlook
Problem: You get attachments in Outlook as “winmail.dat”.
Solution: Use AkeeSoft WMViewer, a free GUI utility for dealing
with the winmail.dat problem. It can extract winmail.dat files,
view the mail body and save any attachments. To use it, just open
FAST TRACK 121](https://image.slidesharecdn.com/fasttracktotroubleshootingyourpc-120201111139-phpapp02/75/Fast-track-to-troubleshooting-your-pc-120-2048.jpg)


![TROUBLESHOOTING YOUR PC
THE INTERNET V
Problem: You’re not able to use Internet-style quoting in replies.
Comments: Internet-style quoting consists of putting a “>” or
other character in front of the original message when you reply or
forward it. Recipients can easily distinguish the original message
from your comments. This method is preferred on many Internet
mailing lists that transmit in plain text only.
Solution: Choose Tools > Options. On the Preferences tab, click E-
mail Options. Under “When replying to a message” and “When for-
warding a message”, choose “Prefix each line of the original mes-
sage”. Set the prefix character(s) under “Prefix each line with”.
Click OK twice.
Problem: Within your own domain, you can’t send, using
Outlook, messages without the full domain name. For example,
within thinkdigit.com, you have to type in “digit@thinkdigit.com”
instead of just “digit”.
Workaround: Outlook, Exchange and Windows Messaging do not
support this feature directly. You’ll need to enter the address in
the ‘To’ box as [SMTP:accountname], being sure to include the
brackets. The “SMTP” tells Outlook that it’s an Internet address. It
will try to deliver it to the “accountname” account on your own
SMTP server.
Problem: You are not able to view full Internet headers.
Solution: The method depends on the version of Outlook. With
the exception of Outlook 2003, Outlook displays only the head-
ers, not the full message source. If viewing headers is something
you need to do often, use Pocketknife Peek (www.xintercept.com/
pkpeek.htm) to view and copy the headers.
Problem: You receive an error that says:
“Sending and Receiving reported error (0x800CCC0F) : ‘The connec-
tion to the server was interrupted. If this problem continues, con-
tact your server administrator or Internet service provider (ISP).’”
Cause: This error is generally caused by a spam mail sent to you
with a malformed header.
Solution: The easiest way to clear the problem is go to your Web mail
interface (if you have one) and delete the offending spam message.
FAST TRACK 129](https://image.slidesharecdn.com/fasttracktotroubleshootingyourpc-120201111139-phpapp02/75/Fast-track-to-troubleshooting-your-pc-128-2048.jpg)
![TROUBLESHOOTING YOUR PC
THE INTERNET V
Solution: If your computer often shuts down improperly, disable
background compacting. Now, to recover your mail, re-extract
them using a paid utility called DBXpress from www.oehelp.com/
DBXpress/Default.aspx
Problem: Outlook Express will not allow attachments
Cause: This is intentional. It’s meant to make your computer more
secure, but can be an annoyance.
Solution #1: Go to Tools > Options > Security tab and remove the
checkmark beside “Do not allow attachments to be saved or opened
that could potentially be a virus”. Press Apply and then OK. Exit
Outlook Express via the File menu, then re-launch the program. You
should now be able to view and save attachments to your hard disk,
but it is generally advised that you leave this turned on most of the
time to prevent accidentally opening infected attachments.
Solution #2: Here’s a quick work-around. Open the mail with the
attachment, then click Forward (just as if you were going to for-
ward the message to someone else). The attachment will now be
viewable below the Subject Line.
Problem: OE won’t switch identities.
Comments: There is a fix available for this: “An Overview of the
Cumulative Update for Outlook Express 6.0 SP-1”. This is available at
http://support.microsoft.com/default.aspx?scid=kb;EN-US;q3319 23
Workaround #1: You might find that the problem was caused by
installing SP1. The workaround is to uncheck the “use this identi-
ty as default” box under “Manage Identities”, and get prompted
for which identity to use every time you start.
Workaround #2: Hit the [F1] key before switching identities. This
will bring up the Outlook Express Help window. With this window
minimised, you can switch identities.
Problem: Outlook Express loads very slowly.
Cause: A possible cause for slow performance when starting
Microsoft Outlook Express in Windows XP is the integration of
Windows Messenger.
FAST TRACK 131](https://image.slidesharecdn.com/fasttracktotroubleshootingyourpc-120201111139-phpapp02/75/Fast-track-to-troubleshooting-your-pc-130-2048.jpg)
![TROUBLESHOOTING YOUR PC
THE INTERNET V
Problem: Links in mails do not work
Cause: This is a problem with your file type settings.
Solution: In Windows Explorer, go to Tools > Folder Options > File
Types and scroll down to “HTML” or “HTM”. Check the values
there. Click “Advanced” at the bottom right. Assuming you’re
using Internet Explorer, click “open”, then click “Edit”. Under
“Application used to perform action, the entry should be
“C:PROGRAM FILESINTERNET EXPLORERiexplore.exe” -
nohome
(Check the path to iexplore.exe to make sure it is correct.)
“DDE” should be checked. In the boxes below it you should
have, in order,
“%1”,,-1,0,,,,
IExplore
(blank)
WWW_OpenURL
If this is incorrect, change the values to the above. If it’s correct
and you still have problems, go to Start > Run and type in “regsvr32
urlmon.dll”. Next, open Internet Explorer and go to Tools >
Internet Options > Programs, and click “Reset Web Settings”.
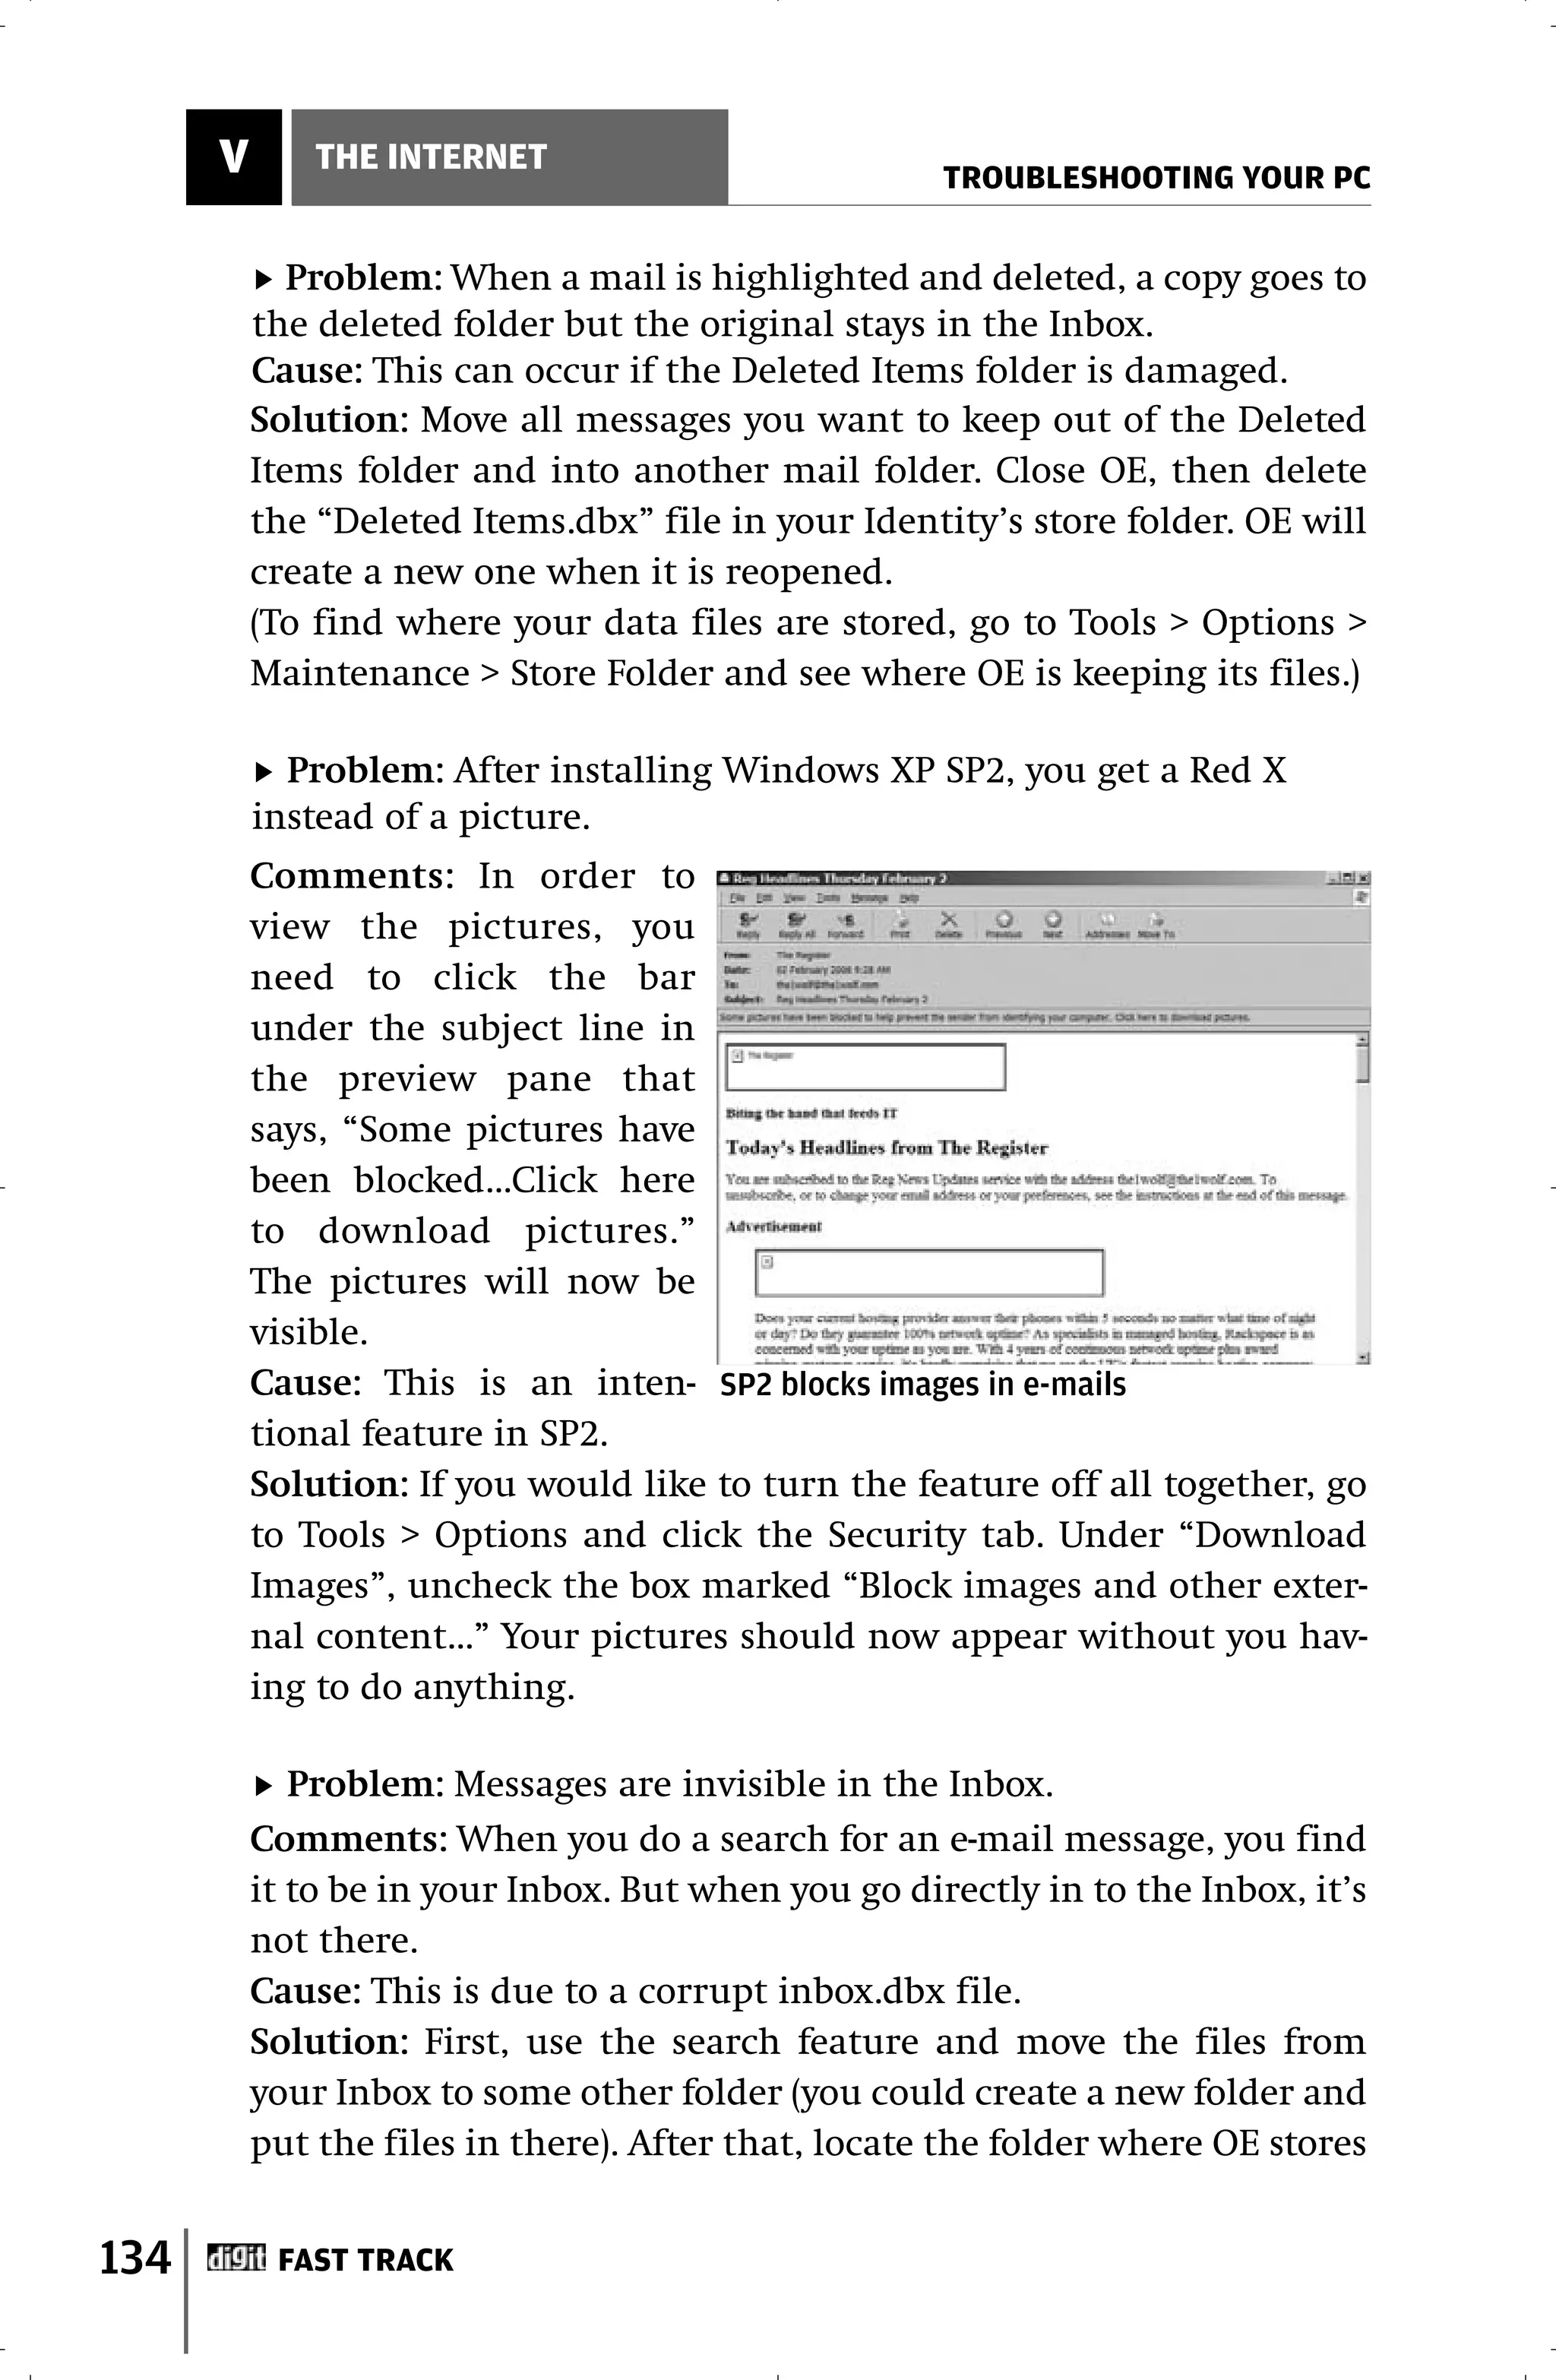
Problem: Messages do not appear in Outlook Express 6
Comments: When you try to access e-mails or newsgroup mes-
sages, the general header information appears, but when you
click on the message, you get an “hourglass” cursor, and the
body of the message does not appear. This happens to pre-down-
loaded email as well, not just new messages.
Cause: One of the causes of this could be a virus or spyware.
Solution #1: Do a thorough spyware and virus scan using the
latest definitions.
Solution #2: Go to: Start > Run and type in “regsvr32 inet-
comm.dll”, and press [Enter]. That might do the trick.
Solution #3: In Outlook Express, go to Tools > Options > Read >
Fonts, and change the default encoding setting to Western (ISO).
FAST TRACK 133](https://image.slidesharecdn.com/fasttracktotroubleshootingyourpc-120201111139-phpapp02/75/Fast-track-to-troubleshooting-your-pc-132-2048.jpg)
![VI NETWORKING
TROUBLESHOOTING YOUR PC
work driver, use only the latest drivers from the adapter manufac-
turer’s Web site.
If you are connecting two computers together without using a
hub or switch, make sure you’ve used a crossover cable. Crossover
cables can be easily confused with regular cables.
Let’s Play Ping-Pong
If you’ve followed the
above steps and still
have no luck, check if
the network card can
ping itself. “Ping” is a
diagnostic utility that Pinging your LAN card
helps you to find out if
the network connection is working properly, and the utility is
present in all versions of the Windows and Linux operating sys-
tems. In Windows, you can ping your network card by going to
Start > Run, typing in “command” and pressing [Enter]. At the
command prompt, type in “ping 127.0.0.1” or “ping localhost”. You
should see a set of replies from your network card. If you receive
an error message, or if transmission fails, then the network card is
not physically installed in the computer correctly, or is faulty. If
the network card is faulty, get it replaced instead of trying to get
it repaired. If you buy a new card, opt for a gigabit Ethernet card
instead of the older 10/100 cards.
If your card is properly installed and pings itself, but still can-
not see other computers on the network. It’s time to verify that the
protocols used are correct and installed on all the computers on
the network. Most computers today use TCP/IP as the default pro-
tocol, but some network administrators prefer IPX/SPX and
NetBEUI.
When specifying the IP values, it is important to make sure
that the Subnet Mask must be the same on all the systems con-
nected to the network, and that no two systems have the same IP
144 FAST TRACK](https://image.slidesharecdn.com/fasttracktotroubleshootingyourpc-120201111139-phpapp02/75/Fast-track-to-troubleshooting-your-pc-143-2048.jpg)

![TROUBLESHOOTING YOUR PC
STORAGE VII
floppy or CD-ROM and locate the FDISK command. Once located,
type in “FDISK /MBR” and hit [Enter]. Wait for the process to com-
plete, and your boot sector should be fixed.
For Windows NT/2000/XP, boot via the bootable CD-ROM and
enter the repair console. Here, type in “FIXMBR” and hit [Enter] to
restore the boot sector.
Problem: You get an error that says, “Immediately back up your
data and replace your hard disk drive. A failure may be imminent.”
Cause: A failure could indeed be imminent. The error is displayed
during the boot process only when you have a hard drive that is
SMART-enabled. “SMART” stands for “Self-Monitoring Analysis and
Reporting Technology,” and is an industry-wide standard for
increasing the reliability of hard drives to prevent loss of data.
Solution: When you get such an error, it is advisable to back up
the data on your hard drive. If your drive is in the warranty
period, it should be immediately sent to the service centre for
replacement or repair. As of now, the SMART tool can detect up
to 70 per cent of drive errors—the warning should therefore be
taken seriously.
Problem: The system refuses to boot after installing a new
hard drive.
Cause: The hard drive may not be connected properly, i.e., the data con-
nector and the power connector could be improperly connected.
Solution: When installing a new hard drive, always double-check
the connection of the data cable. Pin number one on the mother-
board should coincide with pin number one on the hard drive. One
edge of the data cable is marked red to indicate it as pin number one.
While connecting it to the drive, make sure the red line coincides
with pin number one of the drive and motherboard. Usually, the red line
on the cable and the red wire of the power connector will be side by side
when connected to the drive—this indicates a proper connection.
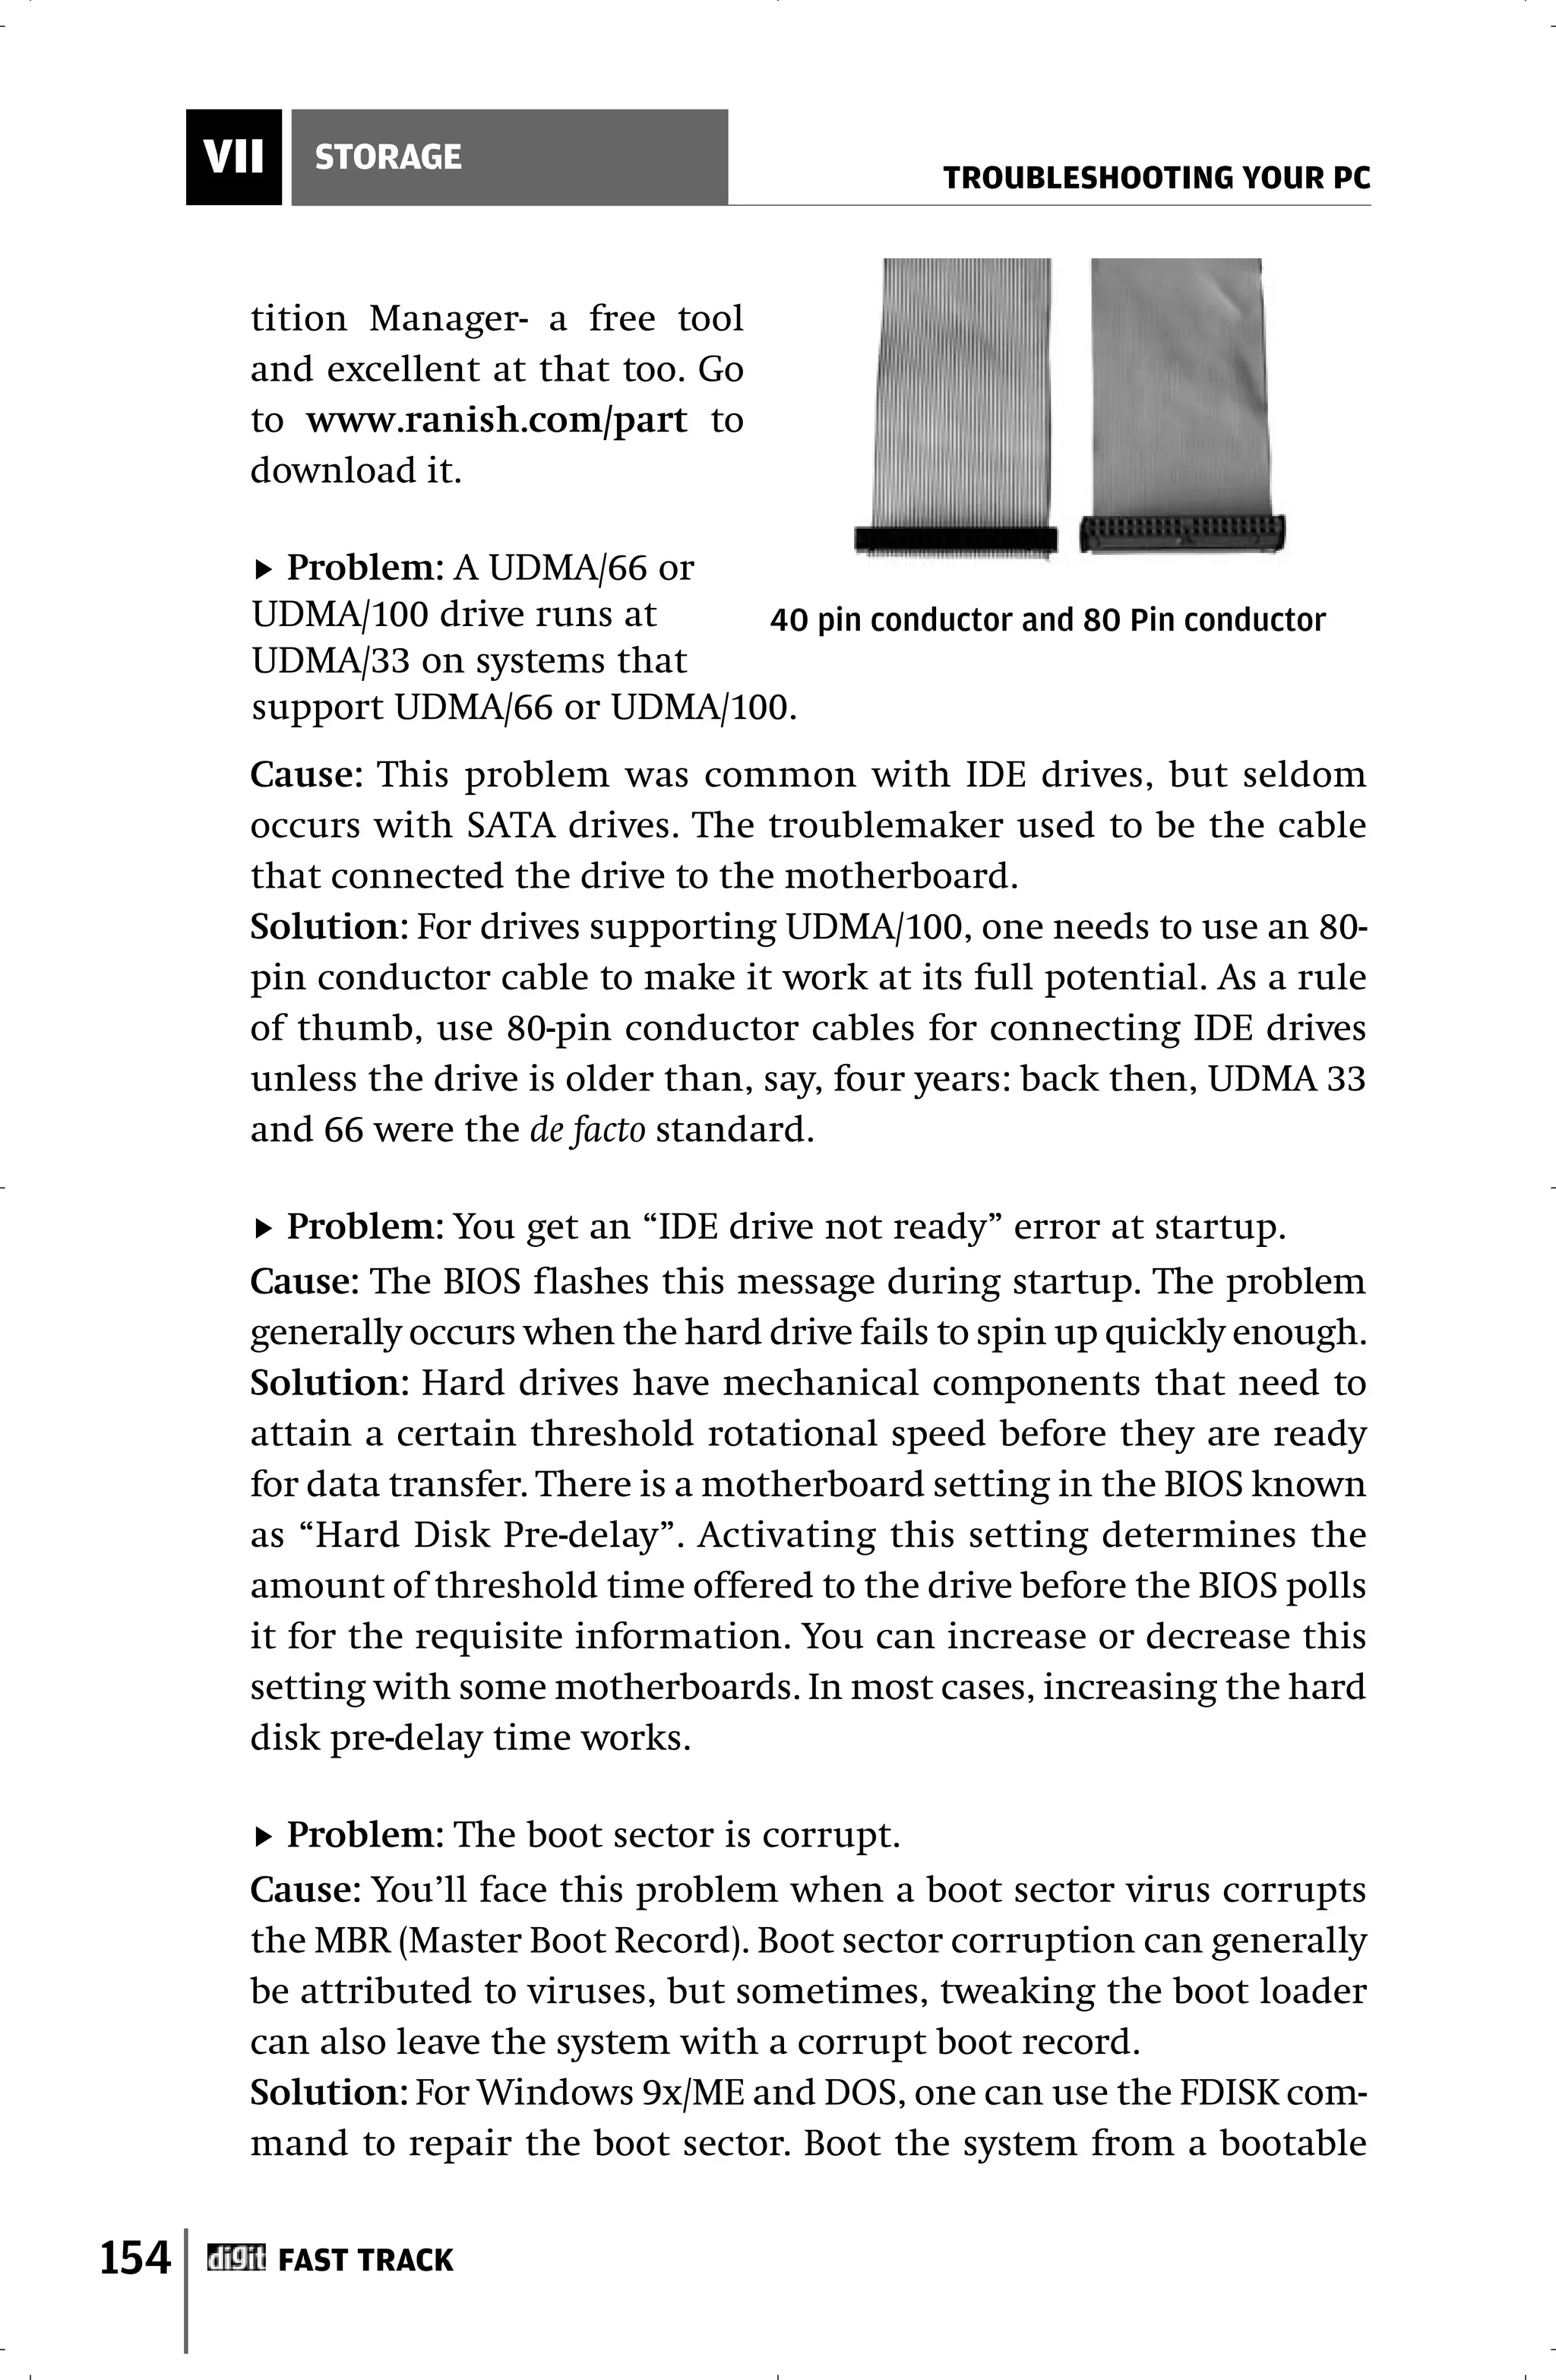
Problem: Hard drive letters after C: are pushed ahead when a
second drive is attached.
FAST TRACK 155](https://image.slidesharecdn.com/fasttracktotroubleshootingyourpc-120201111139-phpapp02/75/Fast-track-to-troubleshooting-your-pc-154-2048.jpg)
![TROUBLESHOOTING YOUR PC
STORAGE VII
Problem: The system can’t detect either of two drives connected
on the same channel.
Cause: This occurs when both drives are set to either Master or
Slave.
Solution: Check the jumper connection on both devices and set one
as the Master and the other as the Slave. In newer motherboards,
you can set both the devices to cable select—this takes care of the
problem in an efficient manner.
Problem: There is a large number of .CHK files in the root direc
tory of the drive.
Cause: .CHK files are created by the SCANDISK and CHKDSK utilities
when they scan the system for lost allocation units.
Solution: You can safely delete all .CHK files after searching for
them. It’s only when the PC is not shut down properly that these
.CHK files are created by the two scanning utilities. Hence, always
switch off the PC properly, i.e., don’t reboot the machine by pressing
the reset button on the front panel.
Problem: You’re unable to view a SATA hard drive during
Windows XP installation.
Cause: Windows XP loads the required drivers before it begins to
copy the files necessary for installation. Motherboard chipsets
lacking native support for SATA drives are not recognised during
the installation. You’ll have to manually load the drivers before the
file copying starts.
Solution: Such motherboards come bundled with a floppy drive
that contains the necessary SATA drivers. While loading Win-
dows XP, at a certain stage, i.e., before loading generic drivers
into memory, you’re prompted to press [F6] for installing addi-
tional device drivers. Press [F6] once the generic drivers are
loaded. The system will prompt for the floppy disk containing
the SATA drivers; insert the floppy disk and then load the appro-
priate driver for XP. Once this is done, Windows XP will recog-
nise SATA drives during setup.
FAST TRACK 157](https://image.slidesharecdn.com/fasttracktotroubleshootingyourpc-120201111139-phpapp02/75/Fast-track-to-troubleshooting-your-pc-156-2048.jpg)

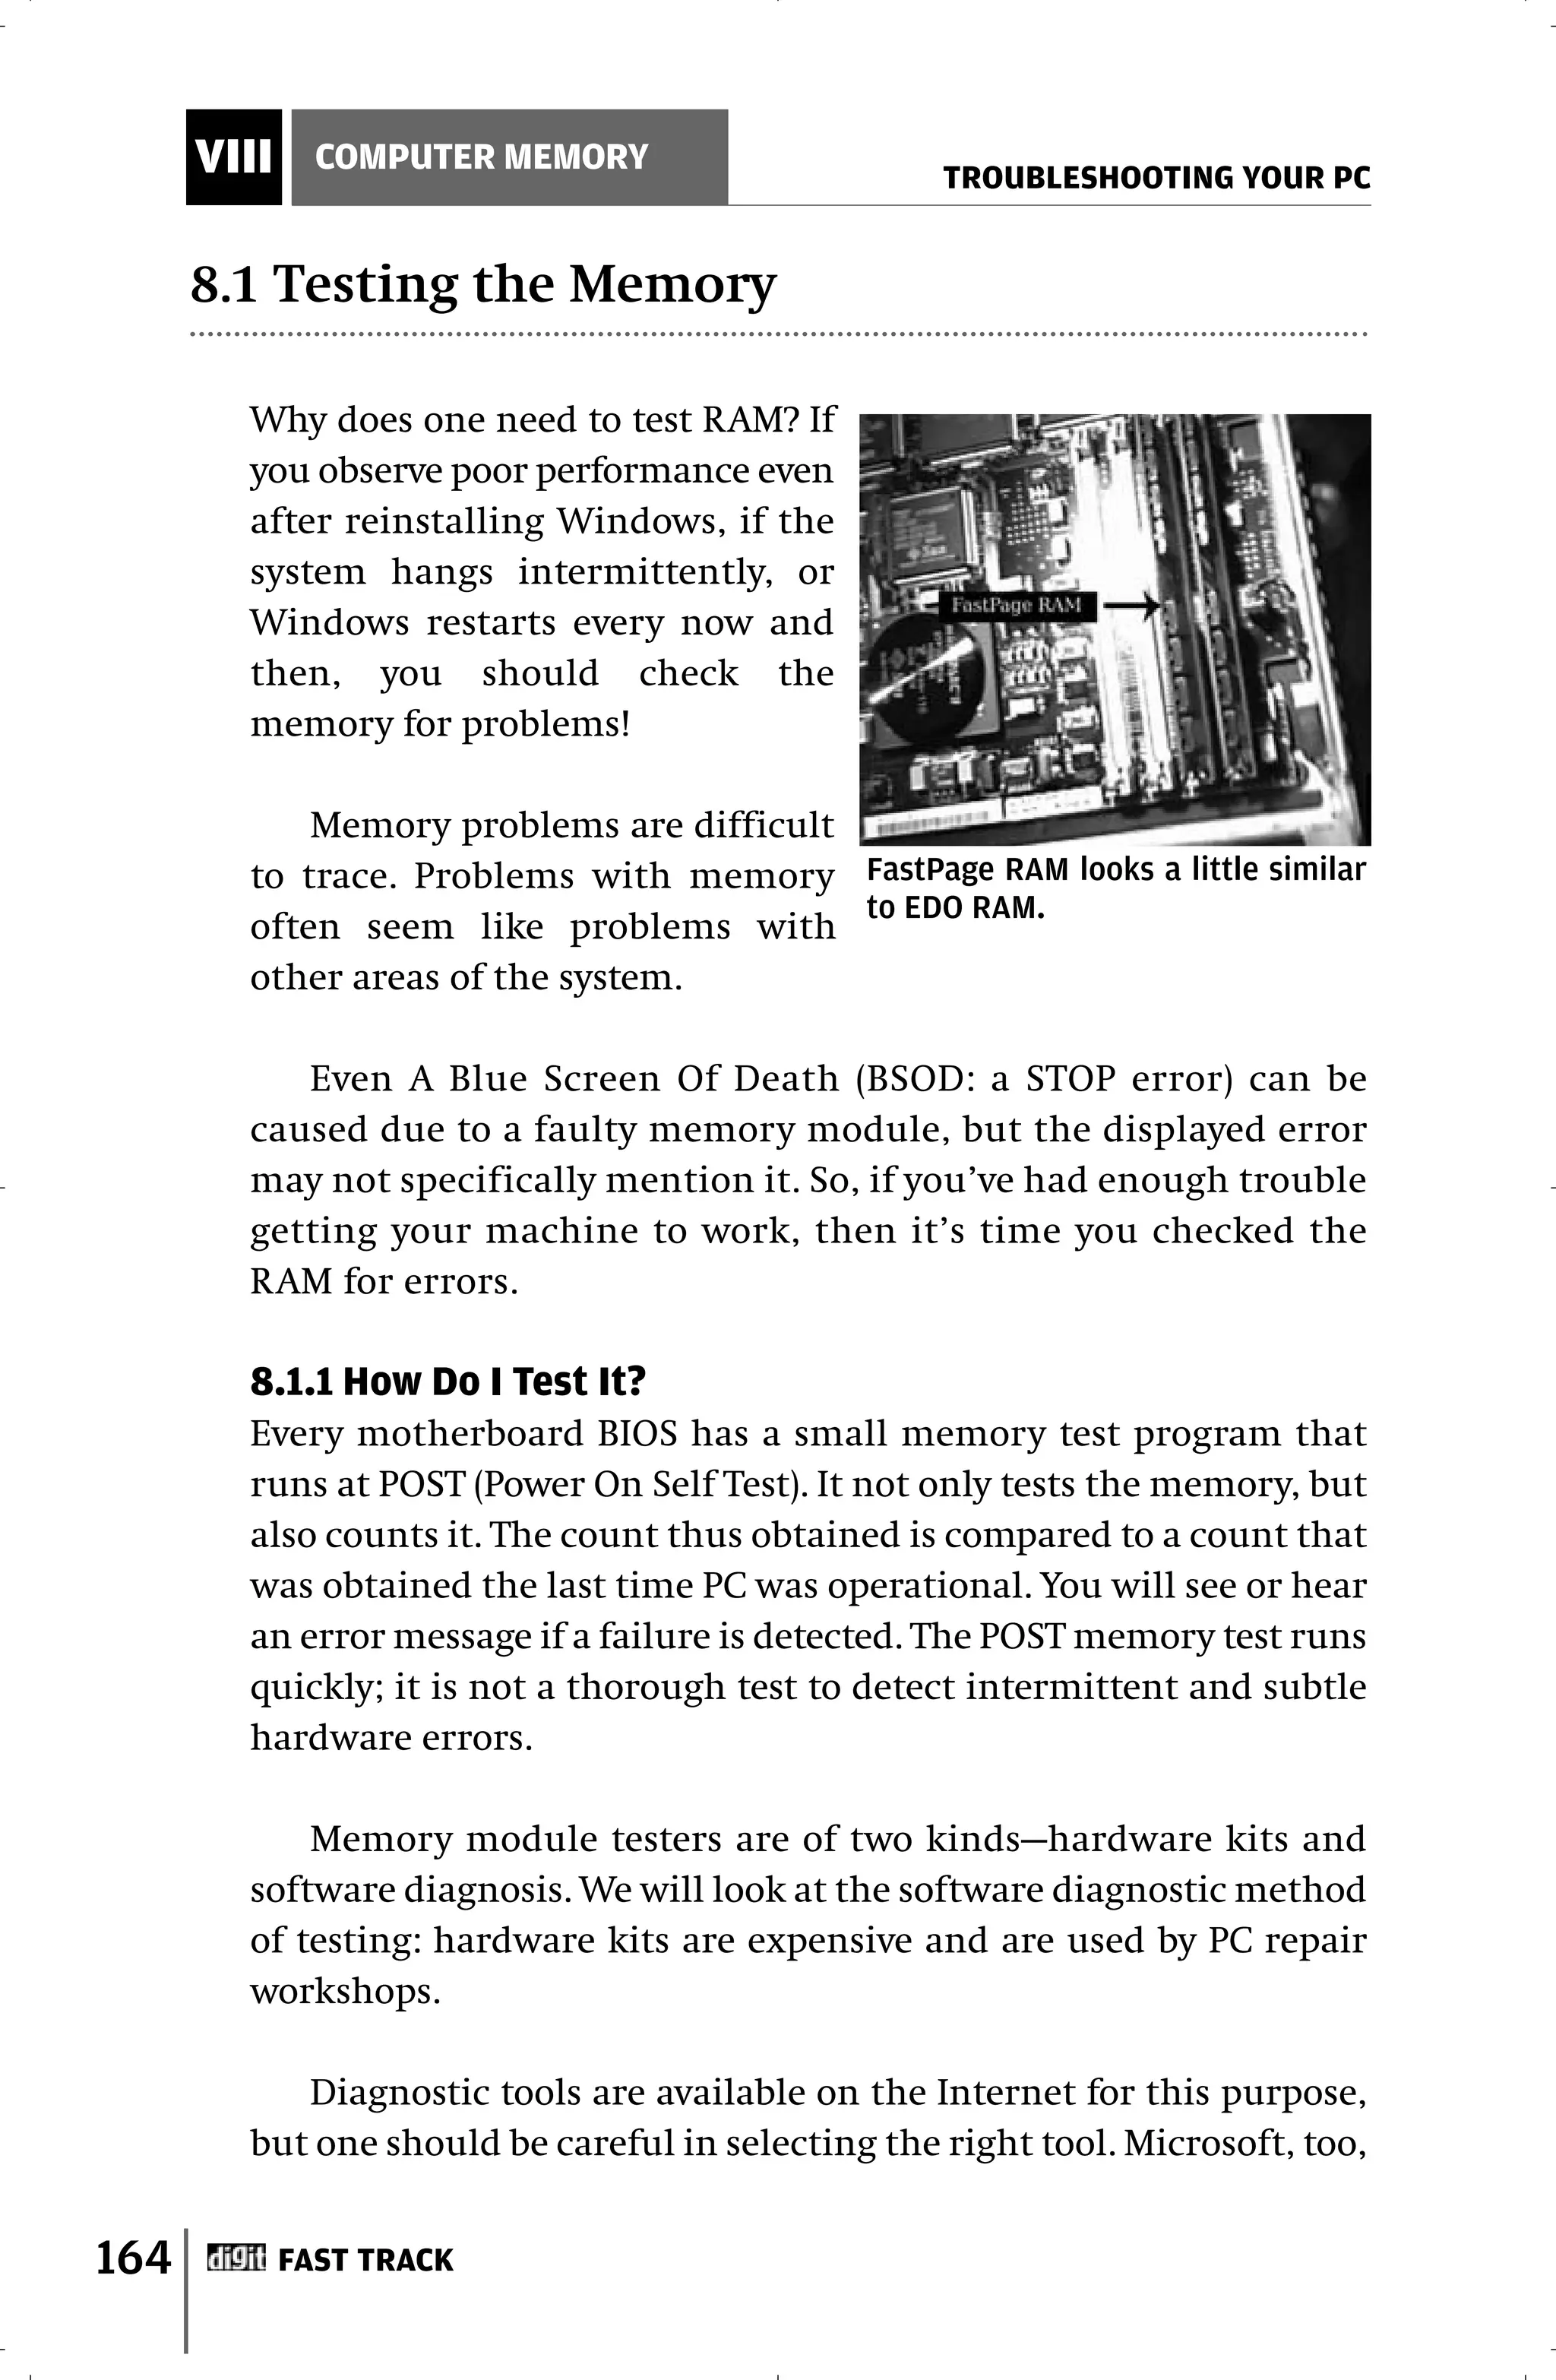
![TROUBLESHOOTING YOUR PC
COMPUTER MEMORY VIII
provides such a tool. Those who want to use a non-Microsoft product
can rely on Memtest86. It is reliable, powerful and free. It is a pre-
ferred tool because it is capable of detailed diagnosis, but it takes a
lot of time to do its testing.
The idea of memory testing revolves around throwing a pattern
of data to the memory and then testing whether the pattern is
intact in the module.
To use either tool mentioned above, you need to create a start-
up disk or a bootable CD containing the downloaded utility. Boot
the system from this disk and run the memory test program.
Memtest86
Download the precompiled, latest Windows version (Memtest86
v3.2) or the ISO image from www.memtest86.com to create a
bootable CD. Start your PC and go to the CMOS/BIOS setup by
pressing the appropriate key (most likely [Delete] or [F2]) and
change the boot priority to CD-ROM. Save the changes and exit
the CMOS/BIOS setup. Your PC will boot Memtest86, a tool that is
independent of the installed OS. The help bar, located at the
bottom of the screen, guides you through the process of memory
testing. All you have to do is press [C] to enter the main menu from
which you can choose ‘Test Selection’. Advanced options such as
Cache mode, ECC mode, Address range, etc. are also available from
the main menu.
Windows Memory Diagnostic
The file (mtinst.exe) that is available for download at Microsoft’s
Online Crash Analysis site (http://oca.microsoft.com/en/win-
diag.asp) can be used to create a start-up (floppy) disk or an ISO
image file (windiag.iso) on your hard disk. Once you have a
bootable CD/floppy ready, boot the machine using it. This will load
the Windows Memory Diagnostic with a DOS-like user interface.
The first test pass begins; you may choose to pause it or just exit
the memory test. If the first pass completes without any errors
then it is unlikely that second pass will find any, as the consequent
FAST TRACK 165](https://image.slidesharecdn.com/fasttracktotroubleshootingyourpc-120201111139-phpapp02/75/Fast-track-to-troubleshooting-your-pc-164-2048.jpg)
![VIII COMPUTER MEMORY
TROUBLESHOOTING YOUR PC
tests will use the same test set-
tings. Press [T] for a detailed inspec-
tion of the memory module. This
process consumes a lot of time,
and you may have to leave your
machine on through the night.
EDO RAM—Match the notches with
If you have more than one RAM those on the slots when fixing the
chip, then use one chip at a time RAM otherwise you may damage
the module
while testing. This way, you’ll know
which one is faulty. Moreover, the problem could also arise due to a
corroded interface on the motherboard. To counter this problem,
perform the test using different combinations of slots and memory.
Depending on the type of error and its gravity, you might need to call
a technician to rectify the problem—which is most likely replacing
the RAM chips or soldering new RAM slots to the motherboard.
8.1.2 Generic testing procedures
Keeping the system cache enabled when testing memory is the
biggest mistake you can make, as most systems have a ‘write-back
cache’, which invalidates the memory test. Data sent to main
memory is first written into cache. A memory test program first
writes data and then immediately reads it back. Eventually, the test
program mainly reads and writes from the cache, and does not test
all of the memory! The cache should therefore be disabled from the
BIOS/CMOS setup before memory test programs are run.
The generic test procedure is a method by which a user can iden-
tify whether there is a problem, and then isolate it.
Procedure A: Detecting a problem
i. Power on the system from an off state and observe the POST ses-
sion. If no errors were detected, go to step ii otherwise follow pro-
cedure B.
ii. Restart the system and enter the CMOS setup. Set all cache settings
to ‘Disabled’. Save and exit the CMOS setup and boot the system
from a start-up disk containing a memory diagnostic tool.
166 FAST TRACK](https://image.slidesharecdn.com/fasttracktotroubleshootingyourpc-120201111139-phpapp02/75/Fast-track-to-troubleshooting-your-pc-165-2048.jpg)
![VIII COMPUTER MEMORY
TROUBLESHOOTING YOUR PC
RAM, and it is supposed to load with CONFIG.SYS. The error is either
a result of a corrupt HIMEM.SYS file, or physical issues such as a
RAM module not
meeting the system
board specifications.
Solution: Assuming
that the file is actu-
ally corrupt, let’s
overwrite it with a
new file. Boot the DDR RAM has only one notch and it is not centrally
located
system with a Win 9x
startup disk. If the system boots properly, then it is likely that
Himem.sys is corrupt or missing, or it hasn’t been configured prop-
erly in CONFIG.SYS. At the prompt (A:>) type in “copy himem.sys
C:WINDOWS” and press [Enter]. If you encounter the problem on
rebooting the system, then edit CONFIG.SYS and make sure that it
contains the line
DEVICE=C:WINDOWSHIMEM.SYS
Save the edited file and reboot the system. You will have to con-
sult a technician or replace the module(s) if the problem persists.
Problem: New RAM Module Doesn’t Work On A Branded PC
You purchased a new RAM module and installed it in addition to an
existing module on a branded PC. The new module is not detected
by the computer.
Cause: Some branded PC manufacturers customise computer
peripherals to deliver better performance. Due to this customisa-
tion or proprietary peripherals, a user is unable to buy and install
peripherals available in the market. If you do, mismatch errors are
encountered.
Solution: Upgrading of the RAM must be done through the dealer
of your branded machine. Call their customer care centre for
assistance.
Problem: Problem Booting A RIMM-Based Machine
A RIMM-based machine fails to boot when a few RIMM slots are
left open.
170 FAST TRACK](https://image.slidesharecdn.com/fasttracktotroubleshootingyourpc-120201111139-phpapp02/75/Fast-track-to-troubleshooting-your-pc-169-2048.jpg)
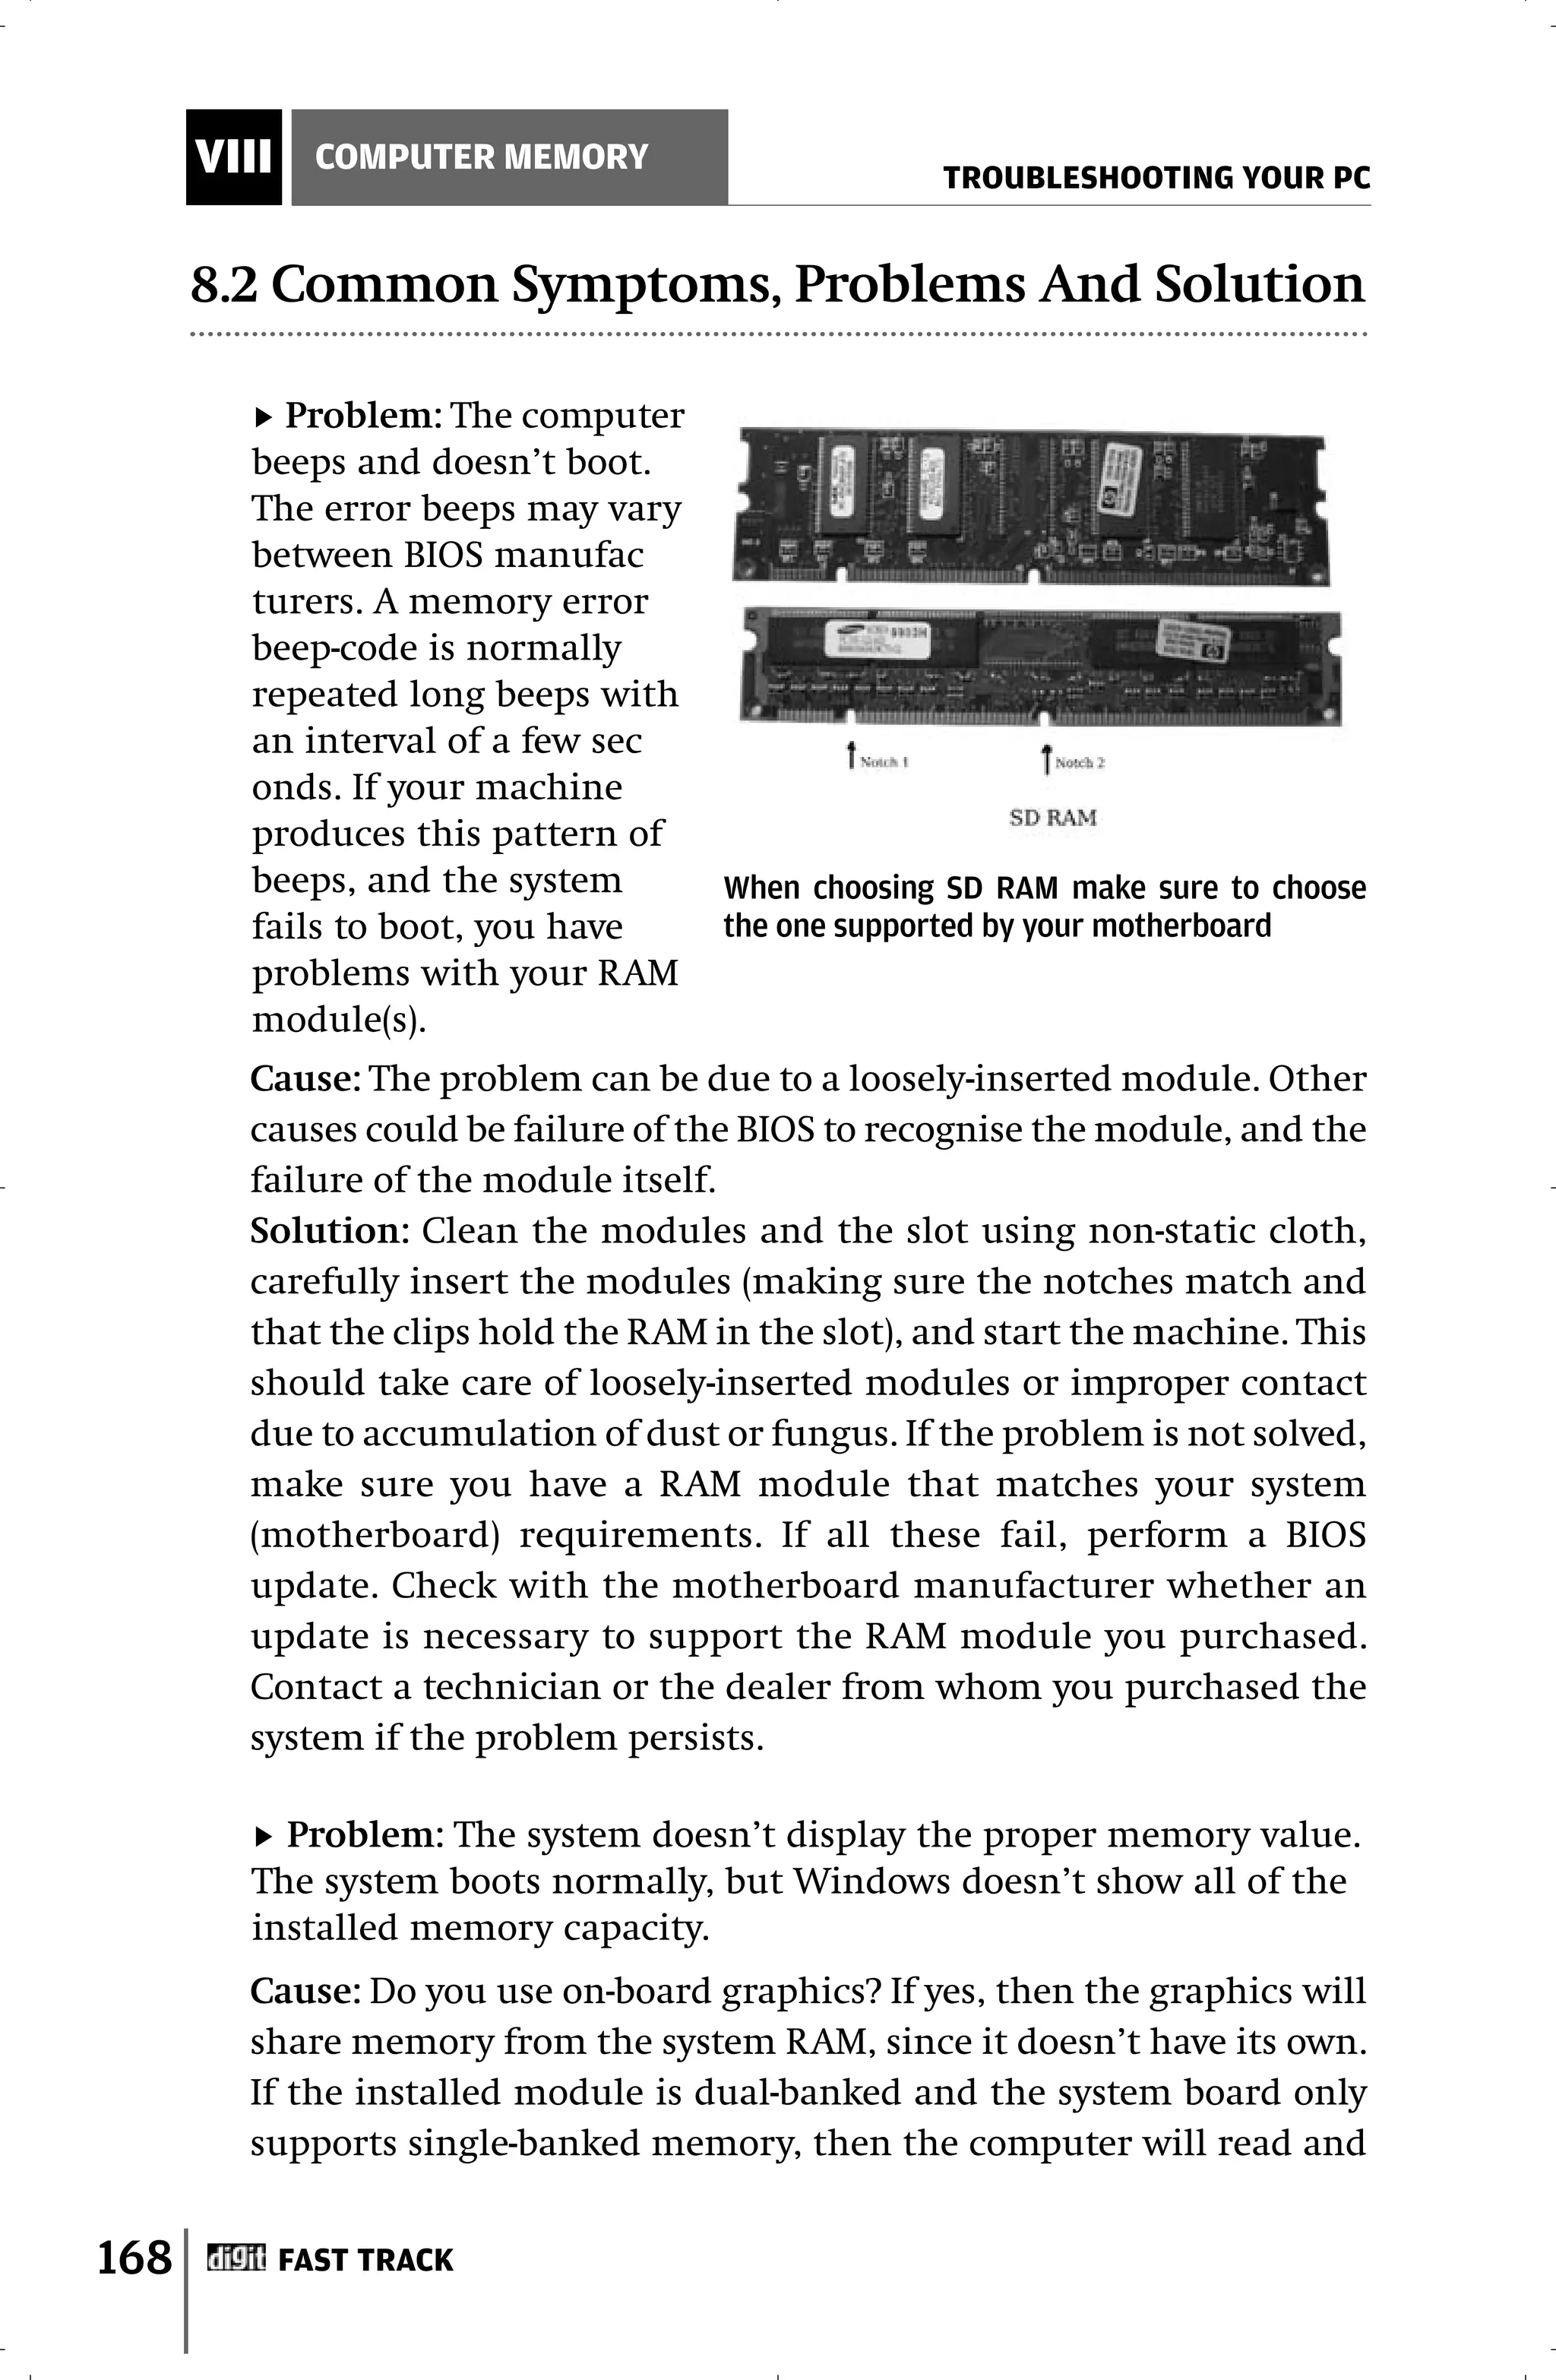
![VIII COMPUTER MEMORY
TROUBLESHOOTING YOUR PC
Problem: “Out of memory” Error In Win9x And Win ME
After upgrading the RAM to 512 MB, the system displays an error
message stating it’s “out of memory.”
Cause: This is due to a bug in Windows 9x and Windows ME systems
that have more than 512 MB of RAM. This is because the OS reserves
too much memory to be used as temporary cache. The reservation
is based on the amount of RAM. Therefore, when you use any Win-
dows application, or at Windows startup itself, this error message
pops up; the system is not actually out of memory.
Solution/Workaround: Go to Start > Run and type in “sysedit” and
hit [Enter]. The System Configuration Editor window opens; it opens
all the system configuration files within its window. Choose the
‘C:Windowssystem.ini’ box, and under ‘[vcache]’, enter the fol-
lowing parameter:
MaxFileCache=524288
The above value is in KB, and the amount should be less than or
equal to 512 MB. If you do not have [vcache] in your system.ini file,
then make the entry towards the end of the file:
[vcache]
MaxFileCache=524288
Save the file and reboot the machine.
Problem: Virtual Memory Error
There can be two types of error arising from virtual memory:
1. A STOP error stating “DRIVER_IRQL_NOT_LESS_OR_EQUAL”
2. System low on virtual memory
Cause: Let’s take the first case. Virtual memory is the swap space
used by Windows that creates an illusion of larger system memory.
This space is allocated by the OS under the primary partition (in
most cases). NT calculates this space as RAM + 12 MB, whereas Win-
dows 2000 and Windows XP counts it as 1.5 times the amount of
RAM. A STOP error occurs when the area on your hard disk that
contains pagefile.sys (the virtual memory) gets corrupted.
When the real system memory is low and the page file thus allotted
is also low, applications that use RAM extensively issue a ‘System low
on virtual memory’ error as the requirement shoots over the total
memory (RAM + virtual memory) available to the operating system.
172 FAST TRACK](https://image.slidesharecdn.com/fasttracktotroubleshootingyourpc-120201111139-phpapp02/75/Fast-track-to-troubleshooting-your-pc-171-2048.jpg)


![TROUBLESHOOTING YOUR PC
INPUT DEVICES IX
Problem: You get an error that says something about the device
driver for the Standard 101/102-Key or Microsoft Natural PS/2
Keyboard when you try to enter standby.
Cause: This issue may occur if Adobe Type Manager is installed on
your computer. Certain versions of Adobe Type Manager (version
4.0, for example) may not be compatible with the power manage-
ment features of Windows XP.
Exact Symptoms: When you try to put your computer into stand-
by, you receive the following error message:
“The device driver for the “Standard 101/102-Key or Microsoft
Natural PS/2 Keyboard” device is preventing the machine from
entering standby. Please close all applications and try again. If the
problem persists, you may need to update this driver.”
Solution: To resolve this issue, uninstall Adobe Type Manager.
Problem: You get an error message when using [Ctrl] + [Alt] +
[Delete] to shut down the computer with a USB keyboard.
Exact Symptoms: If you press [Ctrl] + [Alt] + [Delete] twice on a USB
keyboard in Windows, you may receive the following error mes-
sage on a blue screen:
“A fatal exception 06 has occurred at xxxx:xxxxxxxx. The current
application will be terminated.”
Cause: Restarting Windows by pressing [Ctrl] + [Alt] + [Delete] twice
is not recommended. This method causes Windows to suspend
most processes and should be used only when the normal shut-
down process is not possible.
Solution: Use the Shut Down command on the Start menu to
restart your computer.
Problem: Your wireless USB Mouse does not seem to get connected
to the system.
Cause: You haven’t synchronised the device properly.
Solution: There are three ways you can get the mouse to work.
First, press the Connect button on the mouse itself, located at the
bottom. You’ll need to use a pen for this. Second, press the
Connect button on the USB receiver. Third, go to the Mouse
FAST TRACK 181](https://image.slidesharecdn.com/fasttracktotroubleshootingyourpc-120201111139-phpapp02/75/Fast-track-to-troubleshooting-your-pc-180-2048.jpg)
![IX INPUT DEVICES
TROUBLESHOOTING YOUR PC
ports disabled. These systems must have their USB ports enabled
before a USB device will be detected and function properly. These
USB ports are generally enabled through the system BIOS.
Solution #5: In many cases, updating or reinstalling Microsoft
DirectX can resolve these issues.
Solution #6: Check to see that the USB port is correctly config-
ured. Go to System in the Control Panel. Click on the Device
Manger tab. Here, verify that you have an entry called “Universal
serial bus controller”. If this entry does not exist, you will need to
contact a technician for information on correctly configuring the
USB Controller. If the entry does exist, expand “Universal serial
bus controller”. Verify that there is a USB Root Hub icon and an
icon for the USB Port. If either of these icons are missing or have
an exclamation points or red crosses on them, contact a computer
engineer.
Solution #7: In many cases updating the driver for the USB port
resolves detection issues.
Solution #8: In some cases, corrupted system files can cause detec-
tion issues. System File Checker can check for corrupted files and
attempt to repair them. At a command prompt, type in “SFC/SCAN-
NOW” and hit [Enter]. Select “Scan for altered files”, and click
“Start”.
System File Checker will now scan for damaged and altered files.
If SFC finds such files, use the option to repair or restore the files.
Please note that if SFC finds that “USER.EXE” is damaged, do not
restore this file. “USER.EXE” is a core Windows component and
indicates a serious problem with Windows. If you decide to restore
“USER.EXE,” you should back up any important data, as Windows
may not restart if this file is restored.
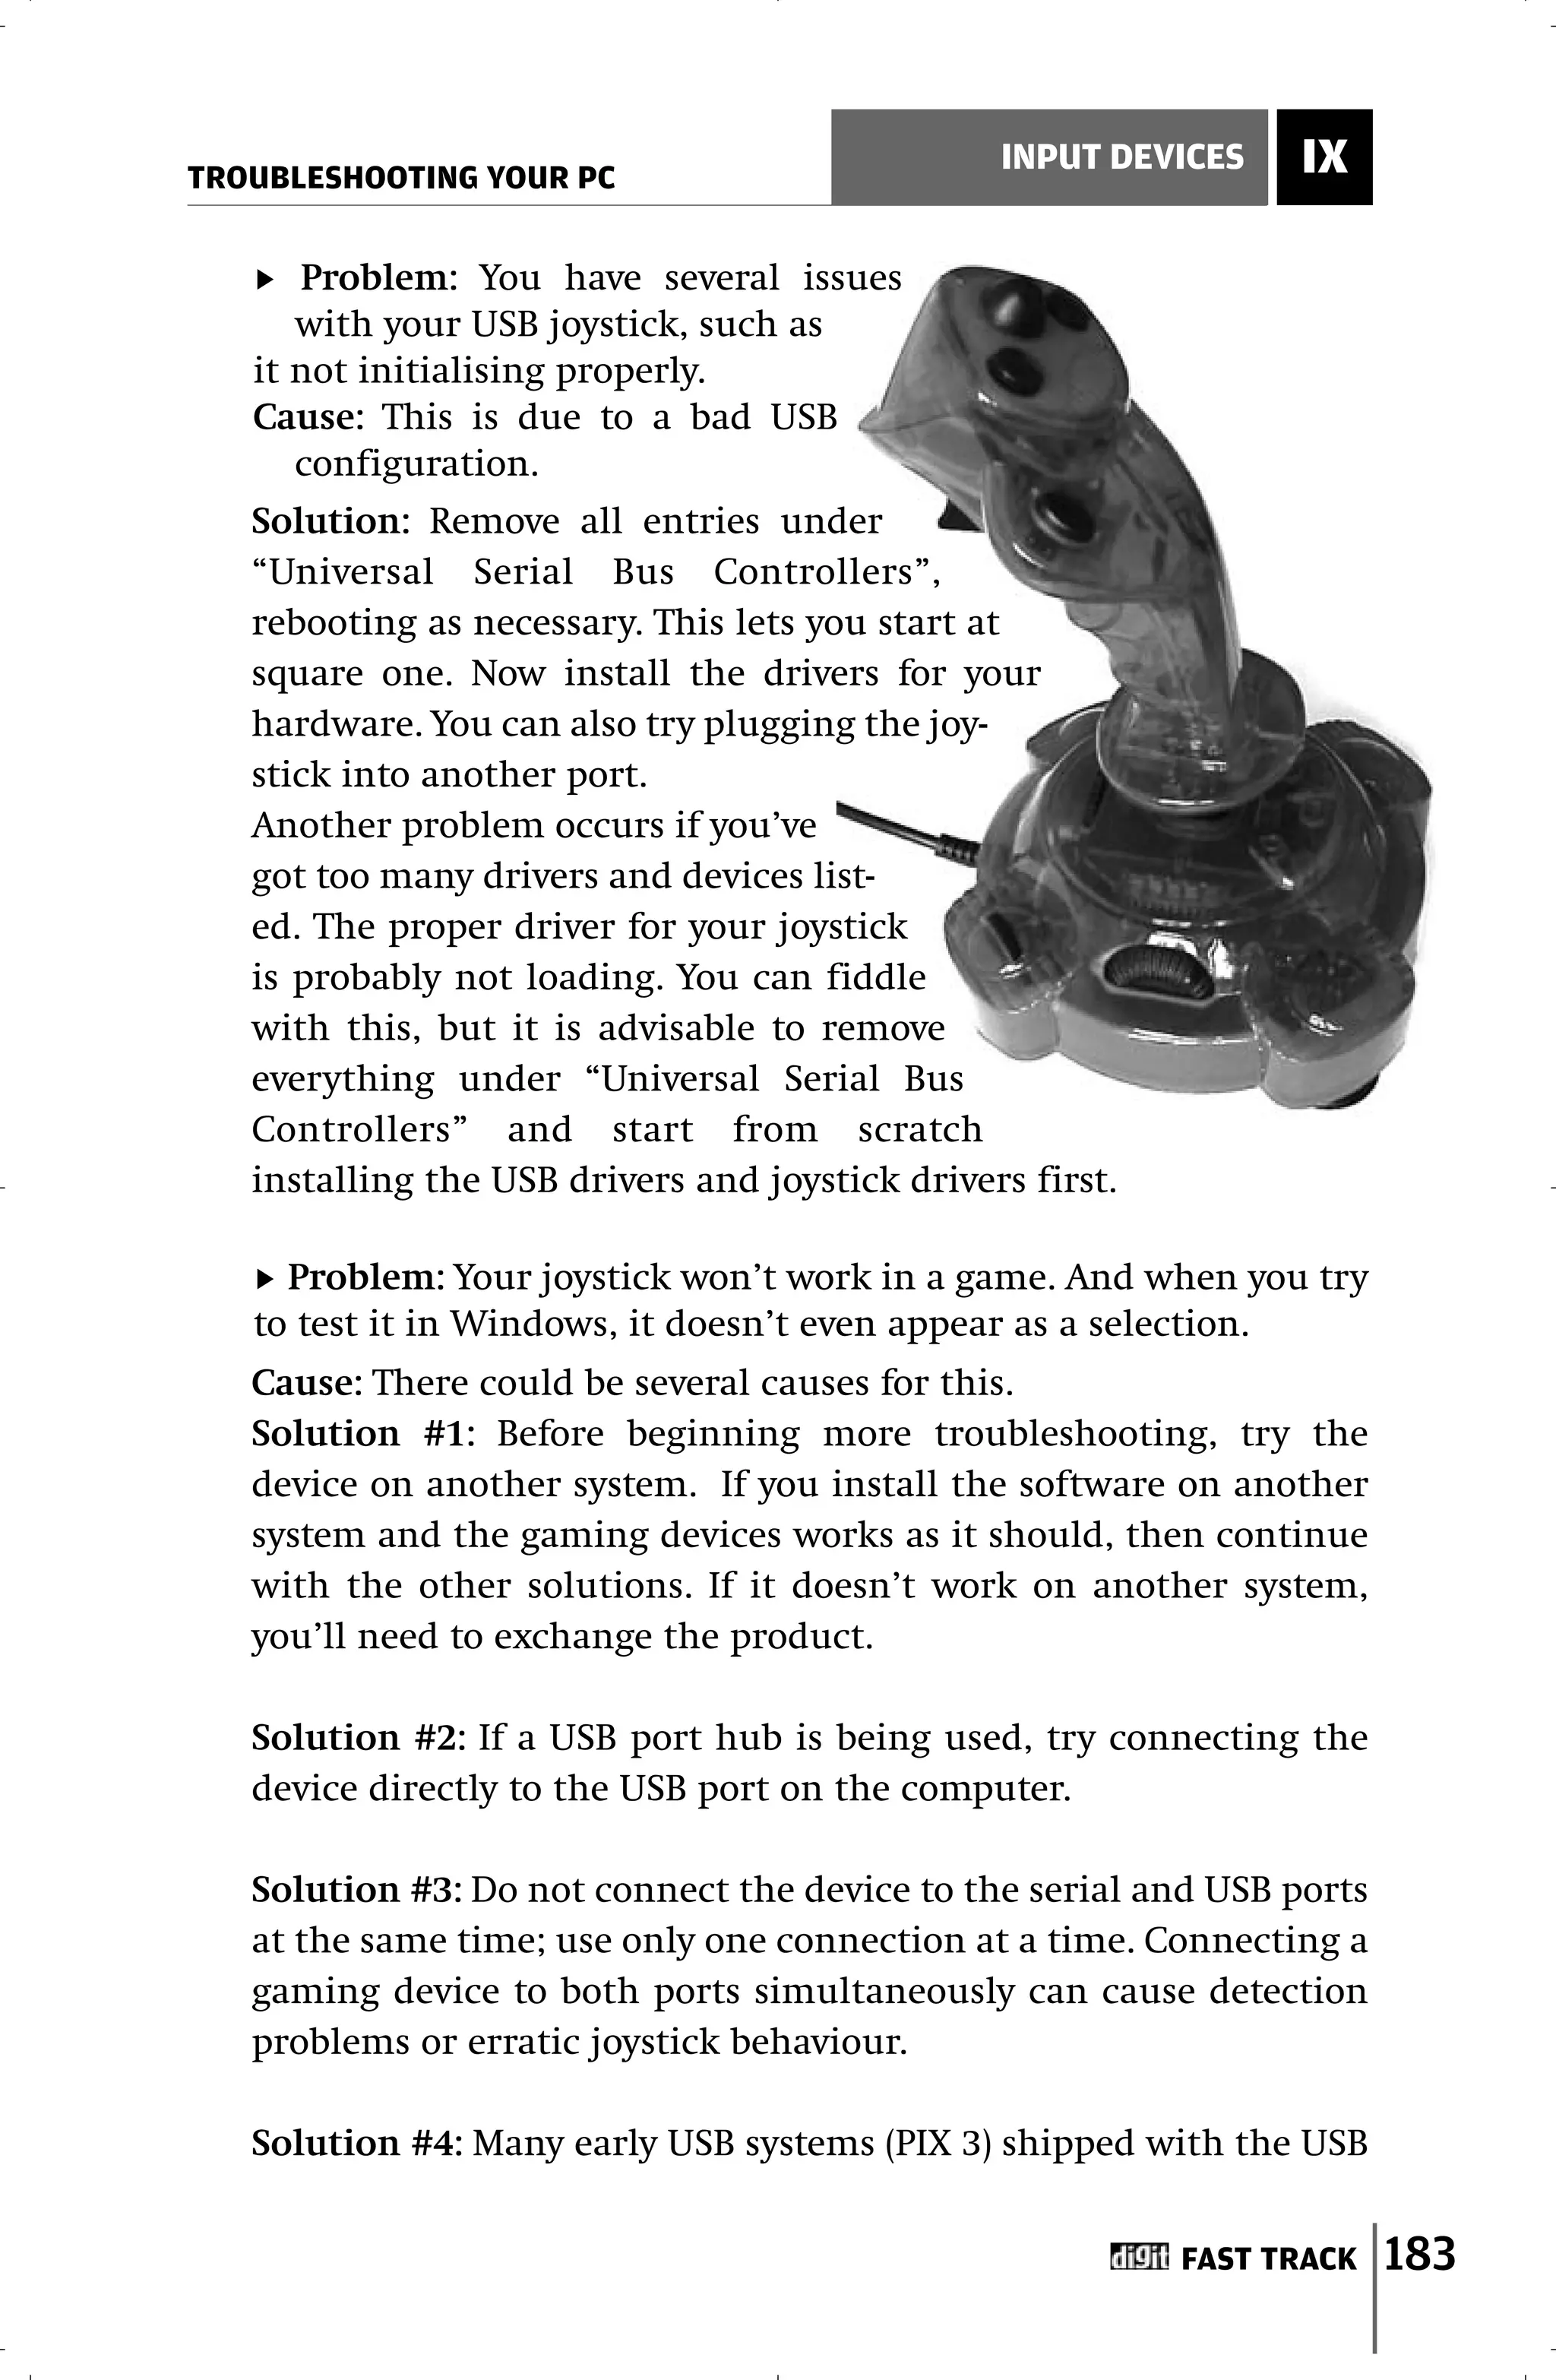
Problem: Your joystick appears to be uncalibrated.
Solution: Simply disconnect and reconnect the game controller to
184 FAST TRACK](https://image.slidesharecdn.com/fasttracktotroubleshootingyourpc-120201111139-phpapp02/75/Fast-track-to-troubleshooting-your-pc-183-2048.jpg)
![TROUBLESHOOTING YOUR PC
INPUT DEVICES IX
the USB port. It is very important that when you reconnect the joy-
stick, it remains centred. If that doesn’t work, try the manufac-
turer’s clear calibration utility. Most manufacturers offer this tiny
utility for download on their sites, and running it will clear all reg-
istry values that relate to device calibration. Note that all calibra-
tion information might be removed for all game controllers from
all manufacturers.
Problem: Your joystick is jumpy or erratic in a game.
Cause: Various things can cause a gaming device to act erratically.
These include problems with DirectX, calibration entries in the
Windows Registry, and game issues.
Solution: Make sure you are running the latest version of DirectX.
If you are unsure about what version of DirectX you are using, at
a command prompt, type in “dxdiag” and press [Enter]. The box
that comes up will tell you about what version of DirectX you have
installed on your system. Check the Microsoft Web site
(www.microsoft.com/directx) for the latest version.
You may also want to uninstall and reinstall the joystick software.
In some cases, if the calibration issue is within a game, you could
try uninstalling and reinstalling the game.
Problem: Your game says it supports force feedback, but you
don’t feel any forces on your force feedback device.
Solution: In order to feel forces, the game must support the
IFORCE-2 instruction set. In addition to using the IFORCE-2
instruction set, the option to feel forces must be turned on in the
game. For information on enabling forces within the game or find-
ing out if the game uses the IFORCE-2 instruction set, consult the
game’s documentation.
FAST TRACK 185](https://image.slidesharecdn.com/fasttracktotroubleshootingyourpc-120201111139-phpapp02/75/Fast-track-to-troubleshooting-your-pc-184-2048.jpg)
![X PERIPHERALS
TROUBLESHOOTING YOUR PC
10.3 Other Peripheral Devices
Problem: When your PC attempts to detect your Webcam, it
hangs and then restarts. After restarting, the following error
shows up: “[filename] is missing...”
Cause: The Web cam’s drivers are corrupt.
Solution: Download the latest drivers from the manufacturer’s
Web site.
Problem: When you connect your Webcam to a USB port,
Windows does not detect it. (You installed it on another computer
and it worked just fine.)
Cause: The onboard USB is not enabled in your motherboard.
Solution: To enable onboard USB, you need to access the BIOS
setup and select the ‘Integrated Peripherals’ option. Here, you will
find the options to enable/disable onboard USB. Enable it and
restart your machine with the device plugged in.
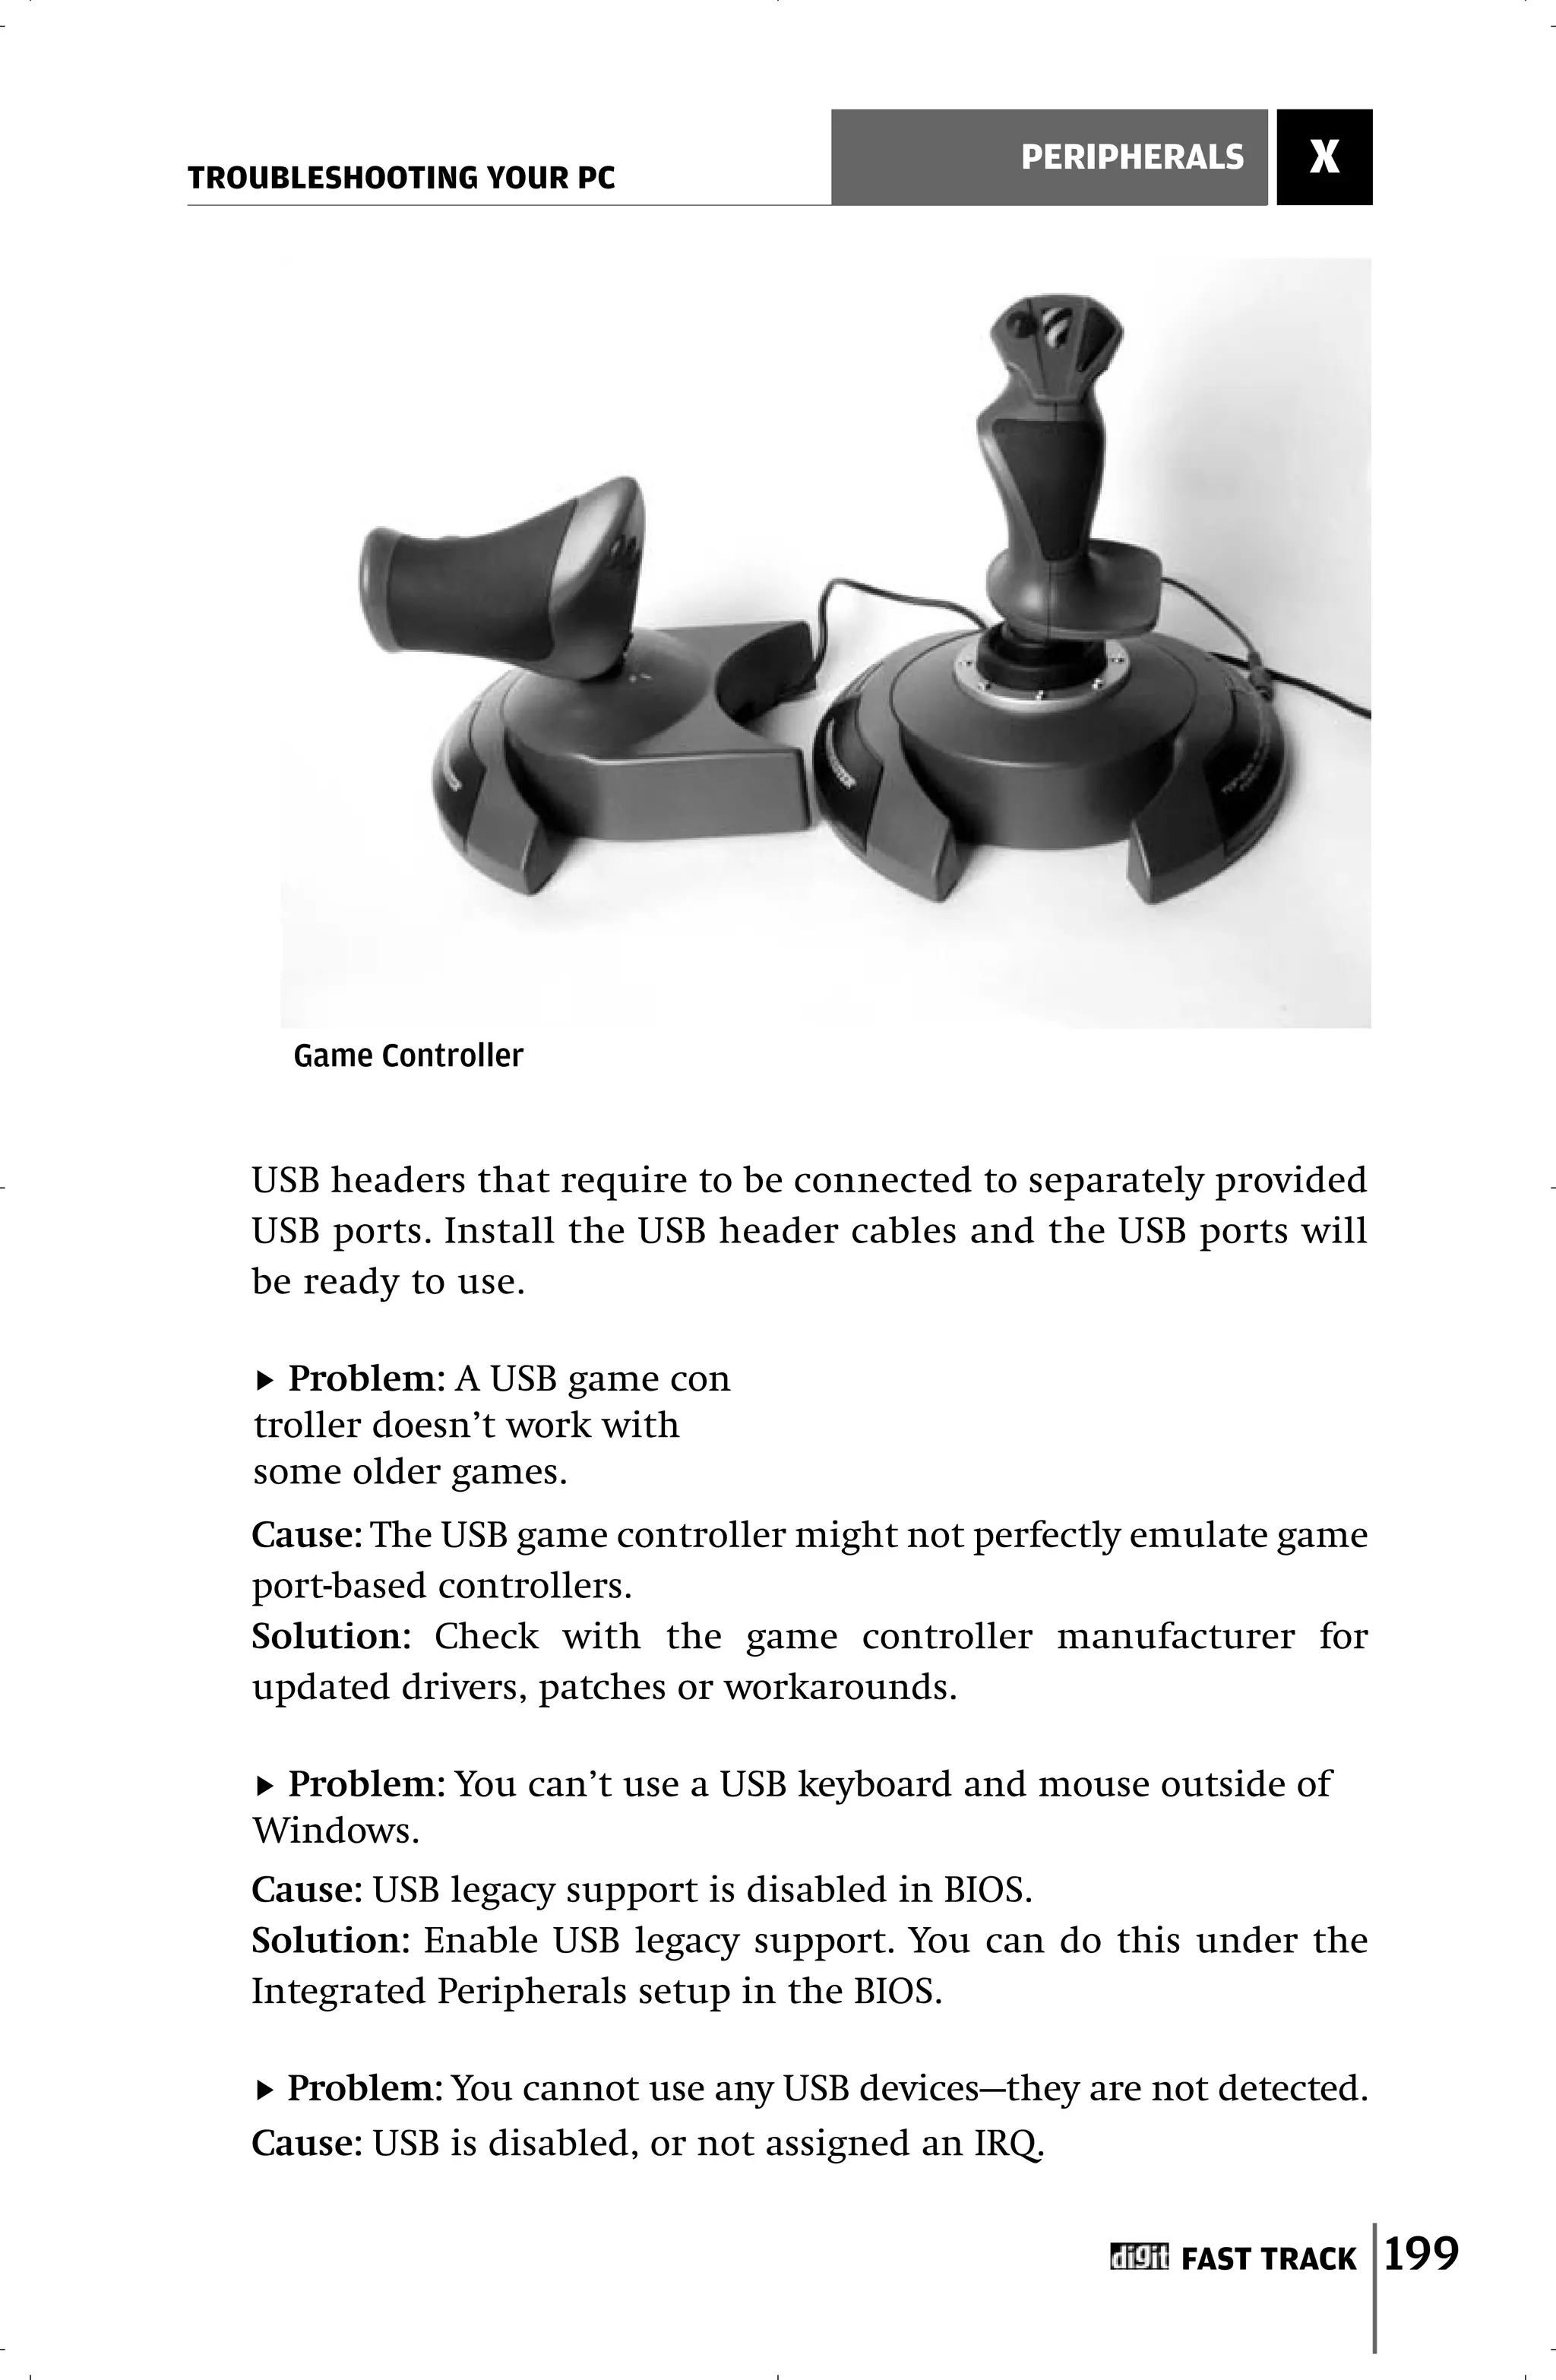
Problem: You are unable to use the
USB ports on your PC.
Cause: The USB ports might be dis-
abled, or there’s a problem with
Windows.
Solution: Enable the USB ports in BIOS.
This is usually under the Integrated
Peripherals option. If you have an older
version of Windows such as 95 or 98,
you will need to install the USB drivers
for your version of Windows either
from the motherboard driver CD or
from the motherboard manufacturer’s
Web site.
Problem: USB ports are available in
the BIOS but are not visible
under System in the Control Panel.
Cause: The USB header cables are not
connected to the motherboard.
Solution: Some motherboards have
198 FAST TRACK](https://image.slidesharecdn.com/fasttracktotroubleshootingyourpc-120201111139-phpapp02/75/Fast-track-to-troubleshooting-your-pc-197-2048.jpg)
![TROUBLESHOOTING YOUR PC
PERIPHERALS X
Problem: When you con
nect your USB camera to
your Windows 98 computer,
an error that says “STIMON
caused an invalid page fault”
is displayed. When you
access ‘Scanners’ from the
Control Panel and select the
camera in the window, an
error with Sticpl.cpl is
displayed.
Cause: The Stimon.exe file on your PC is damaged.
Solution: Press [Ctrl] + [Alt] + [Del] and check if Stimon is running. If
it is, end the task. Delete the file from C:WindowsSystem (where
C: is the drive Windows is loaded on). Run the Registry Editor and
navigate to HKEY_Local_MachineSoftwareMicrosoftWindows
CurrentVersion. Look for a value named “StillImageMonitor”
under either the “Run” or “RunServices” keys. Delete the value and
restart the PC. Now reinstall the drivers for the USB camera. If you
still get an error, replace the Sticpl.cpl file as well. To do this, run
“sfc” from Start > Run and insert the Windows 98 installation disk.
Select the option ‘Extract one file from installation disk’ and click
Browse. Locate Sticpl.cpl in the ..WindowsSystem folder and click
Start. Restart the machine after restoring the file.
Problem: Your Web camera just doesn’t activate in Windows 98.
You’ve tried reinstalling the drivers, but the installation failed.
The camera is not detected when you plug it in either. The USB
port is enabled in the BIOS. The Web cam works perfectly on
another system.
Cause: Since the possibilities have been narrowed down; the USB
port seems to be the culprit.
Solution: To be doubly sure that it is a problem with the USB port,
you can try installing a version of Windows with better USB sup
port, such as Windows XP. If the problem persists, your USB port is
definitely kaput! You are then left with two options—either buy
new USB ports with cables that connect to the USB header on your
motherboard (if your motherboard has such headers), or buy a
USB PCI card for new USB ports to connect your devices to.
FAST TRACK 201](https://image.slidesharecdn.com/fasttracktotroubleshootingyourpc-120201111139-phpapp02/75/Fast-track-to-troubleshooting-your-pc-200-2048.jpg)


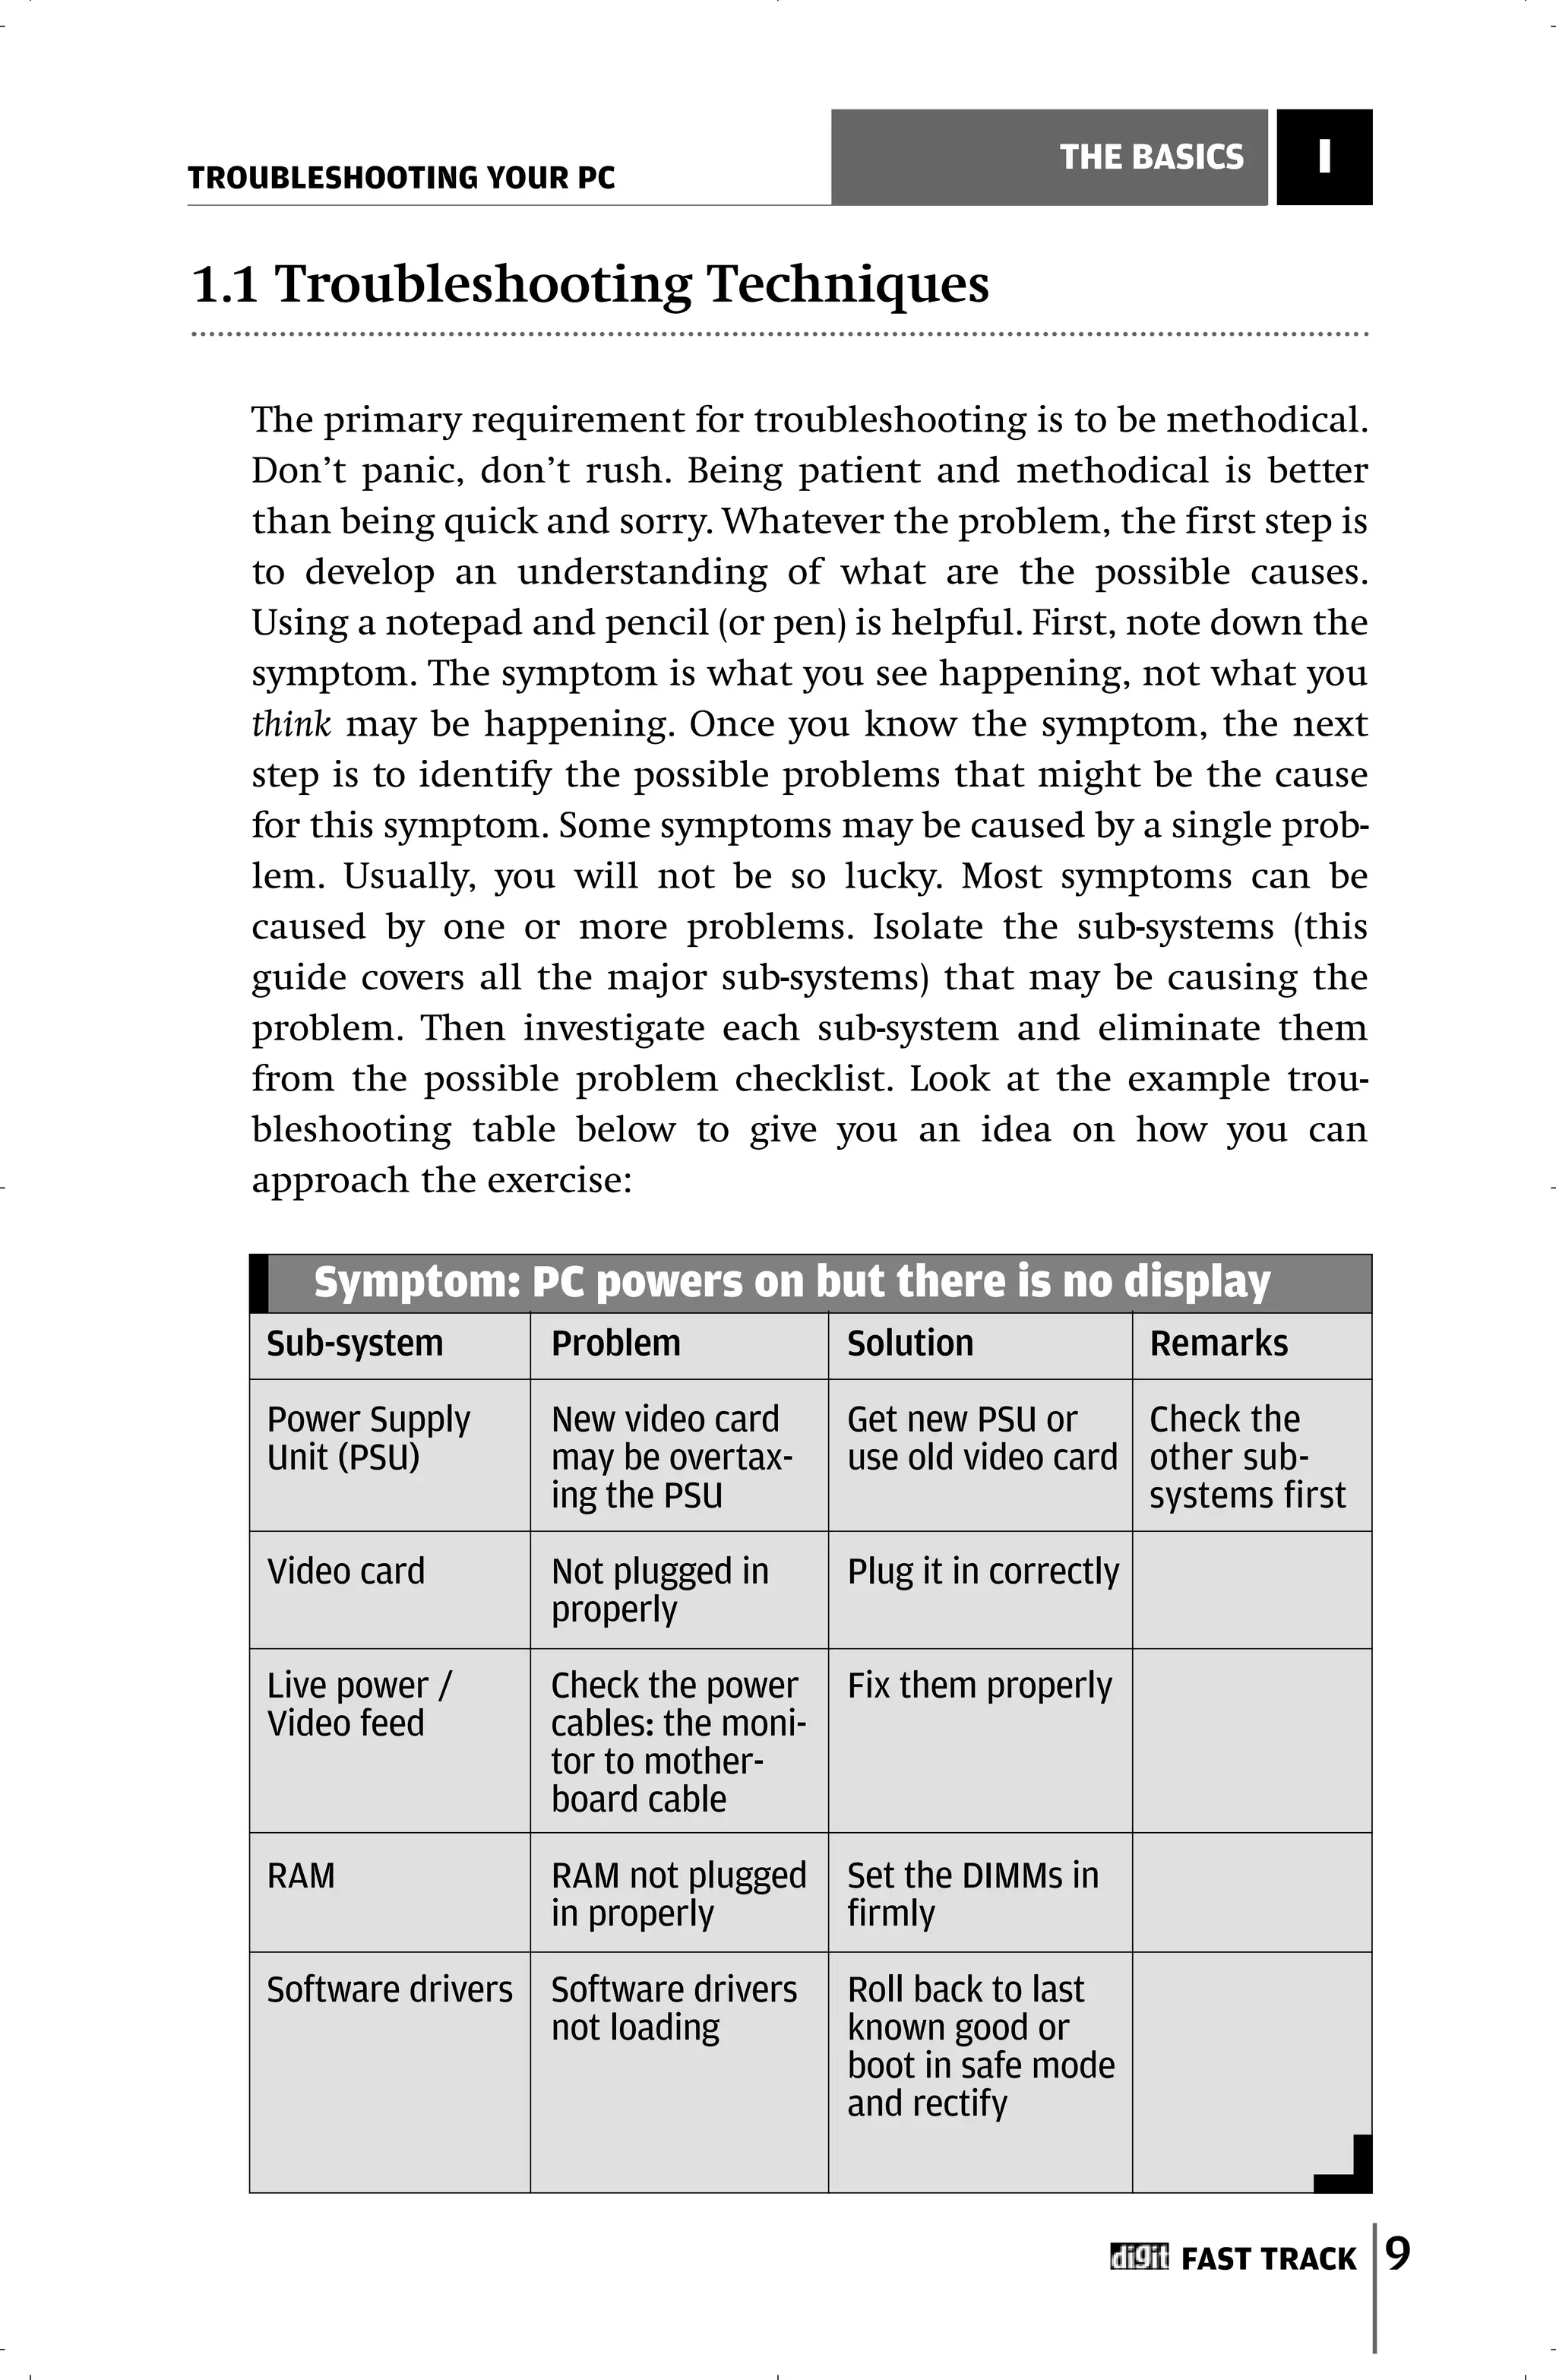
The document provides troubleshooting tips for common PC problems related to hardware components like the power supply unit (PSU), motherboard, and BIOS. It discusses symptoms of PSU issues like no power, intermittent power, power but no display, and noise. Troubleshooting techniques emphasized are being methodical, eliminating potential causes one by one, and seeking assistance from online communities if problems persist.