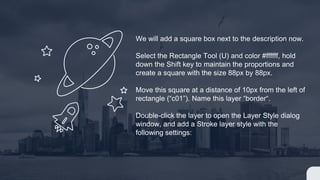
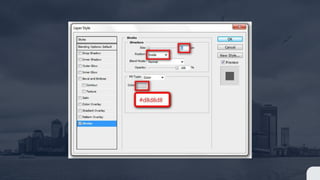
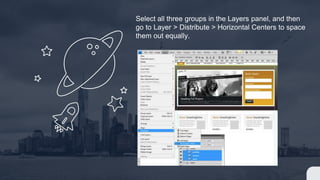
Creating The Main Content Area
6
Creating The
Main Content Area:
Create a new group and name it “content“. Select
the Rectangle Tool (U). Create a rectangle of 300px
by 175px and name it “c01“.
Place this layer 30px below the header and 0px
from the left guide. Double-click the layer and use
the settings as shown in the next slide.
We are going to add content to this box now. Select
the Horizontal Type Tool (T) and add the text, “About
SmashingDzine“. Make a selection of the “About”
word using the Horizontal Type Tool (T), and then
change its color to #b47825.
Then make a selection of the “Smashing” word, and
then change the color to #2f2f2f. Add a little
description and a link text beneath the title. The
following options were used for the title, description
and link text. (You can adjust these options as
needed).
For the Title:
Font: Trebuchet MS, style: Normal, size: 24pt, anti-
aliasing method: Sharp
For the Description:
Font: Arial, style: Normal, size: 12pt, anti-aliasing
method: None, color: #767676
For the Link text:
Font: Arial, style: Bold, size: 13pt, anti-aliasing
method: None, color: #252525, Underline
We will add a square box next to the description now.
Select the Rectangle Tool (U) and color #ffffff, hold
down the Shift key to maintain the proportions and
create a square with the size 88px by 88px.
Move this square at a distance of 10px from the left of
rectangle (“c01”). Name this layer “border“.
Double-click the layer to open the Layer Style dialog
window, and add a Stroke layer style with the
following settings:
Create another box with the size of 82px by 82px and
place it in the center of the “border” layer.
Name this layer “box” and change the color of this
square to #d5d5d5.
Select all layers in this group (“content” group), go to
Layer > New > Group from Layers (Ctrl/Cmd + G) and
rename this new group “about“.
The inside grey square box is a place holder for an
image and can be replaced with any image of your
choosing.
35 Duplicate the “about” group (Right-click on the
group and select Duplicate Group) and name it
“services“.
Right-click on the “services” group and select
Duplicate Group again and name it “portfolio“. We
have three groups now (“about”, “services”, and
“portfolio”).
Move the last group (“portfolio”) to the right guide as
shown in the next Slide.
Select all three groups in the Layers panel, and then
go to Layer > Distribute > Horizontal Centers to space
them out equally.
Change the titles for the “services” group (center) and
“portfolio” group (right) as shown below. (You can
change these titles according to your requirement.)

Creating The Main Content Area

  • 1.
    Creating The MainContent Area 6
  • 2.
    Creating The Main ContentArea: Create a new group and name it “content“. Select the Rectangle Tool (U). Create a rectangle of 300px by 175px and name it “c01“. Place this layer 30px below the header and 0px from the left guide. Double-click the layer and use the settings as shown in the next slide.
  • 4.
    We are goingto add content to this box now. Select the Horizontal Type Tool (T) and add the text, “About SmashingDzine“. Make a selection of the “About” word using the Horizontal Type Tool (T), and then change its color to #b47825. Then make a selection of the “Smashing” word, and then change the color to #2f2f2f. Add a little description and a link text beneath the title. The following options were used for the title, description and link text. (You can adjust these options as needed).
  • 6.
    For the Title: Font:Trebuchet MS, style: Normal, size: 24pt, anti- aliasing method: Sharp For the Description: Font: Arial, style: Normal, size: 12pt, anti-aliasing method: None, color: #767676 For the Link text: Font: Arial, style: Bold, size: 13pt, anti-aliasing method: None, color: #252525, Underline
  • 7.
    We will adda square box next to the description now. Select the Rectangle Tool (U) and color #ffffff, hold down the Shift key to maintain the proportions and create a square with the size 88px by 88px. Move this square at a distance of 10px from the left of rectangle (“c01”). Name this layer “border“. Double-click the layer to open the Layer Style dialog window, and add a Stroke layer style with the following settings:
  • 9.
    Create another boxwith the size of 82px by 82px and place it in the center of the “border” layer. Name this layer “box” and change the color of this square to #d5d5d5. Select all layers in this group (“content” group), go to Layer > New > Group from Layers (Ctrl/Cmd + G) and rename this new group “about“.
  • 11.
    The inside greysquare box is a place holder for an image and can be replaced with any image of your choosing. 35 Duplicate the “about” group (Right-click on the group and select Duplicate Group) and name it “services“. Right-click on the “services” group and select Duplicate Group again and name it “portfolio“. We have three groups now (“about”, “services”, and “portfolio”). Move the last group (“portfolio”) to the right guide as shown in the next Slide.
  • 13.
    Select all threegroups in the Layers panel, and then go to Layer > Distribute > Horizontal Centers to space them out equally.
  • 14.
    Change the titlesfor the “services” group (center) and “portfolio” group (right) as shown below. (You can change these titles according to your requirement.)