Creating The Logo:
2
Creating The Logo:
Now we are going to create the logo for our website.
The logo is going to be very simple and it will have a
color gradient effect. Create a new group (Layer >
New > Group) and name it “logo“.
Select the Horizontal Type Tool (T) and type
“SMASHING” (or the name of your website) in capital
letters.
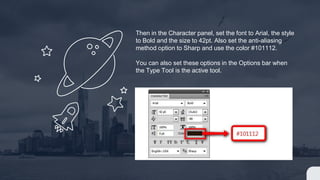
Then in the Character panel, set the font to Arial, the style
to Bold and the size to 42pt. Also set the anti-aliasing
method option to Sharp and use the color #101112.
You can also set these options in the Options bar when
the Type Tool is the active tool.
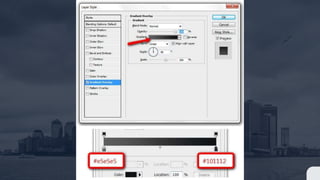
Double-click to open the Layer Style dialog
box. Select Gradient Overlay, click the
Gradient Editor and use the settings as
shown in the next slide..
Put the “SMASHING” type layer at the distance of
35px from top and 0px from left guide. You can do
this accurately using the Move Tool (V) and your
arrow keys. Duplicate this type layer (Layer >
Duplicate Layer).
Move the duplicated layer right next to the
“SMASHING” word and edit the text to “Dzine“.
Repeat Steps 6, 7, 8 but use different gradient
colors (Left color stop: #b27625, Right color stop:
#e5ad27) for the word “Dzine”.
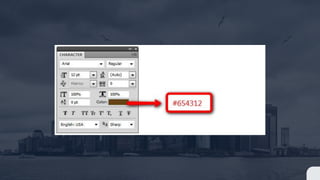
10 Select the Horizontal Type Tool (T) and add a
tag line under the logo with following settings.
The final logo should look like the image below.
To activate/deactivate the guides, go to View >
Show > Grid or use the shortcut Ctrl/Cmd + ;

Creating The Logo:

  • 1.
  • 2.
    Creating The Logo: Nowwe are going to create the logo for our website. The logo is going to be very simple and it will have a color gradient effect. Create a new group (Layer > New > Group) and name it “logo“. Select the Horizontal Type Tool (T) and type “SMASHING” (or the name of your website) in capital letters.
  • 3.
    Then in theCharacter panel, set the font to Arial, the style to Bold and the size to 42pt. Also set the anti-aliasing method option to Sharp and use the color #101112. You can also set these options in the Options bar when the Type Tool is the active tool.
  • 4.
    Double-click to openthe Layer Style dialog box. Select Gradient Overlay, click the Gradient Editor and use the settings as shown in the next slide..
  • 6.
    Put the “SMASHING”type layer at the distance of 35px from top and 0px from left guide. You can do this accurately using the Move Tool (V) and your arrow keys. Duplicate this type layer (Layer > Duplicate Layer). Move the duplicated layer right next to the “SMASHING” word and edit the text to “Dzine“. Repeat Steps 6, 7, 8 but use different gradient colors (Left color stop: #b27625, Right color stop: #e5ad27) for the word “Dzine”. 10 Select the Horizontal Type Tool (T) and add a tag line under the logo with following settings.
  • 8.
    The final logoshould look like the image below. To activate/deactivate the guides, go to View > Show > Grid or use the shortcut Ctrl/Cmd + ;