Microsoft access 2007_tutorial
•
2 likes•1,202 views

This document provides instructions for creating a database in Microsoft Access 2007. It begins by explaining how to start Access 2007 and open a blank database. It then guides the user through creating a table called "personnel" with fields like "Last Name" and setting properties like the field size. The instructions demonstrate the new interface in Access 2007 with tabs and ribbons and provide tips for designing database fields and tables.

More Related Content
What's hot
What's hot (20)
Similar to Microsoft access 2007_tutorial
Similar to Microsoft access 2007_tutorial (20)
Recently uploaded
Recently uploaded (20)
Microsoft access 2007_tutorial
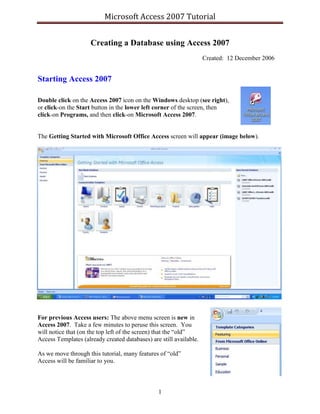
- 1. Microsoft Access 2007 Tutorial Creating a Database using Access 2007 Created: 12 December 2006 Starting Access 2007 Double click on the Access 2007 icon on the Windows desktop (see right), or click-on the Start button in the lower left corner of the screen, then click-on Programs, and then click-on Microsoft Access 2007. The Getting Started with Microsoft Office Access screen will appear (image below). For previous Access users: The above menu screen is new in Access 2007. Take a few minutes to peruse this screen. You will notice that (on the top left of the screen) that the “old” Access Templates (already created databases) are still available. As we move through this tutorial, many features of “old” Access will be familiar to you. 1
- 2. Microsoft Access 2007 Tutorial Left Mouse Button In this tutorial, whenever we indicate that you need to click the mouse, it will mean to click the left mouse button – unless we indicate that you should click the RIGHT mouse button. So, always “click left” unless we tell you otherwise. Creating an Access 2007 Database This tutorial will assist you in creating a database that includes the features most often used in databases. Once you gain skill with the database you create, you will be able to use and understand the already created Microsoft Access databases mentioned on the last page. We’ll begin with a Blank Database and increase our database knowledge with each step. Look at the center of your Access screen. You will see – Getting Started with Microsoft Office Access. Below the title you will see a Blank Database button. Click the Blank Database button. As soon as you click the Blank Database button, the right side of your Access screen will change and look like the image on the left. Saving your work One of the unique things about Access database is that it requires you to save your database as soon as you enter the program. You can save your work on a floppy diskette in the A: Drive, on a USB key/Flash Drive or on your C: Hard Disk, or in some other drive. Please save to one of these areas and substitute your Drive in the instructions. To choose the Drive, on which you will save your Access database, click the small folder to the right of File Name: 2
- 3. Microsoft Access 2007 Tutorial A New File Database menu screen similar to the one below will appear when you click the folder. In the upper left corner of the File New Database menu screen that appears, you will see a Save in: area (see upper left arrow above). Click-on the small down arrow on the right and it will show you the various disk drives available on which you can save (see right upper arrow above). Point to the drive on which you want to save your database, and click-on it. If you choose the 3½ Floppy (A:), make sure you have a formatted disk in the A drive. If you choose the C: drive, choose the folder in which you want to save by double clicking on the folder. Your selection should now appear in the Save in: area Next click-in the area to the right of File Name:. Delete any text that is entered in the area and then type-in the word PERSON as shown at the bottom of the above image (see lower left arrow). Now click-on the OK button or tap the Enter key (see lower right arrow on last page). You will now return to the Getting Started with Microsoft Office Access screen. On the right side of the screen you will see your database File Name and below it, the Drive on which you will create your database. Click the Create button. 3
- 4. Microsoft Access 2007 Tutorial Creating a Table When you click the Create button your Access 2007 screen will change to the image below. This is the “new look” in 2007 Office. You will now see Tabs and Ribbons that automatically appear for the area in Access on which you’re working. Instead of a Menu Bar and drop down selections, you’ll now see these new features. Tabs Ribbon Groups When we clicked the Create button Access assumed we desired to create – within our Person database – another database – which is called a Table. You’ll notice that at the top of the above image that the Table Tools and Datasheet Tabs appeared to assist you. The Ribbon below these Tabs is composed of Groups of selections you’ll use to assist you as you create your Table. We’ll be working with these Tabs/Ribbons throughout this tutorial. In the lower portion of the above image you’ll see selections that indicate we are creating a new Table. On the left of the Table Tools-Datasheet Tab/Ribbon you’ll see a View button. Click the View button. When you click the View button the image on the left will appear. Since we want to create or design a new Table, we’ll click the Design View selection. A Save As menu screen will appear similar to the image on the right. Type personnel in the Table Name: area and then click the OK button. 4
- 5. Microsoft Access 2007 Tutorial Your Access 2007 screen will now change again – to the image below. We’ve enlarged the upper left corner of this image below. Notice (in the image above) that our Table Tools Tab still appears. However, because we are now in the Design process, the lower Tab/Ribbon has changed to Design – to assist us with designing our Table. 5
- 6. Microsoft Access 2007 Tutorial In the image on the last page you will notice that the Primary Key button is “orange” and, in our Personnel Table, that it is also “orange” – with a little key to the left of ID. In database language this is called “keying.” Keying, or indexing, is somewhat advanced. You can get a good description by searching in Help for Keying or Primary Key. To “turn off” the Primary Key, click the Primary Key button. You’ll notice that they Primary Key button is no longer “orange” and the little key is gone from the left of ID. If the Personnel Table image does not “fill” the screen, click-on the small square between the “minus and the X” in the upper right hand corner of the screen (see arrow and image on right). This will Maximize the screen. Notice, under the Blue Bar at the top of the Design screen there are (3) things: Field name, Data Type, and Description And, in the lower half of the window; Field Properties. We’ll be creating the Field Names that make up a database. This is similar to creating a blank personnel form (on paper) that will be "filled-in" for each employee (Name, Address, Phone Number, etc.). The areas that will be filled in are called Fields in a database. When you fill in all of the fields for a person, the individual "forms" are called records in a database. There will be a record, or form, for each employee. All the forms, together, make up a Table (database). 6
- 7. Microsoft Access 2007 Tutorial So let’s create a personnel database. Significant Note: When creating a database it is always best to “break down” a field into its “smallest parts.” For example – Name would break down into First Name, and Last Name (you could also have Middle Initial, Title, etc.) Address would break down into Street Address, City, State, and Zip (you could also have Apartment Number, etc). Because we are working in Access 2007 it will be very simple to “put the fields back together” with a few mouse clicks when we need to do this. Trust us. This will save you a lot of time later on. Look at the image on the right. Clickin the area or space under Field Name and type-in Last Name (to replace ID). Tap Enter or click-in the area to the right under Data Type. The cursor now moves to the right under Data Type. Click the down arrow under Data Type on right (see arrow on right). Your design screen should look like the one on the right. Now we’ll talk about Data Types. Data Type Text You may type in any alphabetical/numerical data that you desire - up to a maximum of 255 characters. As indicated, this is a text field, so you can't do mathematical calculations. Examples of Text data are: names, addresses, stock numbers, room numbers, zip codes, etc. Memo This field is for lots of text. You can have up to 32,000 characters. Number This field is for numbers where you want to add, subtract, multiply, divide, average, and do numerical calculations. This field can be a very large size, so when we get to Field Properties, we'll talk about "sizing" this field so it doesn't take up to much "space" in storage. Date/Time Dates and Times. You may format these later, as you may desire. Currency Dollars ($). You may format these later, as you may desire. AutoNumber Yes/No This field is an "automatic" counter that assigns a number each time you put data into a new field. This is a "True/False" or "Yes/No" type of field. 7
- 8. Microsoft Access 2007 Tutorial OLE Object This means "Object Link Embedding" which indicates you can insert a graphic, picture, sound, etc. Pretty neat to put a photograph in a personnel record or a picture of an inventory item in the stock record (advanced stuff). Since this is a simple, introductory Access tutorial, we won’t work with Hyperlinks, Attachments, or Lookup Wizards. We'll leave Last Name as a Text Data Type. To the right under Description you may make any remarks you feel are appropriate to someone who may want to know how/why you designed the field as you did. Now notice in the lower part of the screen, under Field Properties, that a box appeared when you selected the Text Data Type. This box is "tailored" to the Text Data Type that you selected above. Your Field Properties should look like the one below when you finish doing the steps indicated below. Field Properties Click-in each area (to the right of the words) as you read about it below Field Size Is currently set to 255 characters. That's pretty large for a name. So, clickin this area and change the number to 25 (you can make this larger or smaller later if you have to). Format Now click-in the Format Area. Next tap the F1 function key to activate Help. Since you are in the Format area, Help will be "tailored to" this area. When the Help Window appears, click Format Property. Now click Text and Memo Data Types. Notice that there are several choices to make your characters upper or lower case. This gives you an idea of some formats. We'll use one later. Now click-on the “X” in the upper right corner of the Microsoft Access Help – Format Property Window to close it. 8
- 9. Microsoft Access 2007 Tutorial Input Mask We'll come back to this feature later. Caption Look at the Light Blue Help area to the right. It explains about Caption. Default Value We'll come back to this feature later. Validation Rule We'll come back to this feature later. Validation Text We'll come back to this feature later. Required Look at the Light Blue Help area to the right. Allow Zero Length Look at the Light Blue Help area to the right. Indexed Look at the Light Blue Help area to the right. Unicode Compression Look at the Light Blue Help area to the right. IME Mode Look at the Light Blue Help area to the right. IME Sentence Mode Look at the Light Blue Help area to the right. Smart Tags Look at the Light Blue Help area to the right. Now we’ll repeat this process and create different Field Names and Data Types. Type-in the Field Names as indicated below and set them to the Data Types and Sizes indicated. Start each new Field Name and Data Type - below the previous field (see example below) Field Name Last name First name Social Security # Data Type Size Text Text Text 25 20 15 9 (Already Completed)
- 10. Microsoft Access 2007 Tutorial We'll use an Input Mask for our Social Security Number. Click-in the Input Mask area in the Field Properties area at the bottom of the screen (see left arrow below). Notice the three "dots" (...) in a box on the right. Click-on the three dots (see right arrow above). An Input Mask Wizard will appear: "Must Save Table First. Save Now?". Click-on Yes. A Save As Window may now appear. If it does, type-in Personnel in the area under Table Name:, and click-on OK. The Input Mask Wizard will show you some Sample Masks (you may scroll up/down to view them). We'll use Social Security Number, so click-on it. Your screen should look like the one below. Now click-on Next at the bottom of the Input Mask Wizard screen. You will now see a default number of 000-00-0000 using dashes (-) between the numbers. You can use anything you want. 10
- 11. Microsoft Access 2007 Tutorial We'll leave it as is, so click-on Next> again (at the bottom of the Input Mask Wizard screen). On this Input Mask Wizard screen you’ll see two choices. Click-in the little circle to the left of With symbols in the mask, like this:. Sometimes, when we use Access data as a part of mail merges or in labels, if we don’t save the dashes, they won’t appear in our document. So, it always a good idea to save dashes. Click-on Next> again. Now click-on Finish. You will see some “special” numbers written in the Input Mask area for Social Security #. When you begin to enter data in this field, you’ll see how this works. Your Field Properties area should look like the image below. 11
- 12. Microsoft Access 2007 Tutorial Now continue entering the following information in the Field Name and Data Type areas as we did above. Street address City State Text Text Text 25 20 2 Here we'll use a Format. First make the Field Size 2 then click-in the area to the right of Format. A down pointing arrow, like the one above (see arrow), will appear on the right side of the Format area. If you click-on the arrow, the area will appear blank (that's because we haven't entered a Format). Tap the F1 key in the row of Function Keys at the top of the keyboard. A Help menu screen “tailored” to Format will appear )like the one below). Since you are in the Format area, Help will be "tailored to" this area. When the Help Window appears, click Format Property. Since we are working with a Text Data Type, click-on Text and Memo Data Types (see arrow below). 12
- 13. Microsoft Access 2007 Tutorial Notice that a > will change any alphabetic character you type into all upper case letters. Now point and click the “X” in the upper right hand corner of the Format Help Screen (notice that the Help Window closes "automatically"). Now type a > in the Format area. Your Field Properties area should look like the one below. Continue entering the following information in the Field Name and Data Type areas as we did above. Zip Gender Text Text 5 1 Insert a > in the Format area to make all gender entries become upper case (capitals - like you just did for State). Favorite Number Number (Note: this is the first Number field) Here we'll learn about Numbers, the Validation Rule and Validation Text. We'll limit the person's favorite number to a number between 1 and 999. Leave the Field Size set to Long Integer. Now click-in the area to the right of Decimal Places. It currently indicates Auto. When you click, you will see a little down arrow on the right side of the area. Click-on the little arrow. Select “0.” This indicates that decimal places are not allowed in the Favorite Number. 13
- 14. Microsoft Access 2007 Tutorial Next, click-in the Validation Rule area. We'll "build" a mathematical expression that will only allow numbers from 1 to 999. Type in the following expression (in the area to the right of Validation Rule): > 0 and < 1000 This tells Access that the number entered must be between 1 and 999. You’ll notice that when you click-in the Validation Rule area that three periods (…) appear just like they did in Input Mask. If you want to click-on the three periods they will bring up an Expression Builder which you can use to create the mathematical formula above. Please note that frequently, if you are really not great at math, the Expression Builder can cause problems. Sometimes, the Expression Builder will “insert” an <<expr>> in the formula. If it does this, delete the <<expr>>. This will confuse Access, and will frequently cause the program to “stop” until you remove <<expr>>. So, if you want to look at Expression Builder, please do so. But – be careful. If someone does not enter a number correctly, an error message will appear. Now we'll create an appropriate error message. Click-in the Validation Text area and type-in: Favorite Number must be between 1 and 999. 14
- 15. Microsoft Access 2007 Tutorial When you finish all of the above, your Field Properties should look like the one below. Continue entering the following information in the Field Name and Data Type areas as we did above. Date hired Date/Time In Format area click the small down arrow on the right side of the Format area and choose Short Date. In the Input Mask area click the three dots (...), Save the table, and choose Short Date again, click Next>, click Next> again, then click Finish. (This will insert a / between the day, month, year). Your Field Properties should look like the image below. Salary Currency In the Decimal Places Field Properties area click-on the small down arrow on the right side and select 0 – this indicates “no cents.” Type a 0 (zero) in the area to the right of Default Value. This will indicate 0 income if no Salary figure is entered. Your Field Properties screen should look like the image below. 15
- 16. Microsoft Access 2007 Tutorial Application Received Yes/No We’ll make this a “Yes/No” or “check box” field. When we begin entering data in the database, you’ll see how this “box” works. Now that we have created our Person Database and Personnel Table it would be a good time to Save the last few changes. Microsoft Office Button The Microsoft Office Button has replaced File in the Menu Bar. In the upper left corner of your Access 2007 screen you will see a button similar to the image on the right. This is the Microsoft Office Button. Click the Microsoft Office Button. You will now see the Access 2007 Microsoft Office Button selections. First, notice that many of the “old” FileMenu Bar choices are included in this menu (they are all here – we’ll show you). Since we Saved our database at the beginning of the tutorial, we only have to click the Save choice. 16
- 17. Microsoft Access 2007 Tutorial Quick Access Toolbar You could also click the small diskette in the Quick Access Toolbar in the upper left corner of your Access screen. Entering data in the database At this point you will still be in the Design view. To enter data into your Table you will need to be in a Datasheet View. In the upper left corner of your screen (under the Home Tab) you will see that the first button on the left that has a small sheet of paper (see arrow on the right) – the View button. Point to this button with the mouse and pause, you will see a "Tool Tip" that indicates that this button is the View Button. This is logical because you have been designing your table and now want to view the data that you will enter in your Table (database). If you are familiar with spreadsheets it looks like a tiny version spreadsheet. Click the View button. When you click the View button, the top of your Access screen will look like the image below. Notice that all of the Fields you created are – in the order you created them – along the top of the Table. Some of the Field Names may be “cut off” a bit. We’ll widen our fields in a moment. You can enter data in each Field. But let’s widen some of our columns a bit so we can see the titles. Widening Columns in Datasheet View To widen columns so you can see the Field Names in the Datasheet View you will need to move your cursor over the “line” between two Field Names (like we did in the image above). When our cursor was over the line between Street Address and City, it turned to a line with two arrows pointing left and right. When you see this line with the arrows, click and hold down the left mouse button and move your cursor to the right a bit. You will see the column get larger as you move your cursor. When you have the column as wide as you desire, take your finger off the mouse button. You may desire to widen other columns so you can see all of your data – like First Name, Last Name, Street Address, etc. You widen as you desire. 17
- 18. Microsoft Access 2007 Tutorial One note – since we have a Validation Rule in one of our Fields, if we try to widen a column we will get the Validation Rule error message. So, it’s best to only widen columns when you are not entering data. Entering Data Under Last Name you will see a flashing cursor; this means that you are ready to begin entering data. You may type the data and tap Enter, or click with the mouse in each field. If you make a mistake you may retype the data. If you see a mistake later you can come back at any time and correct it. Under each field, type the following in the area below the Field Name: Field Name 1. Last Name 2. First Name 3. Social Security # 4. Street address 5. City 6. State 7. Zip 8. Gender 9. Favorite Number 10. Date Hired 11. Salary 12. Application Received To be typed Smith Fred 123-45-6789 100 Main Street Lynchburg va 24501 m or f (your choice) 2007 07/01/1993 40000 Point the mouse to the little square and click the left mouse button. You will see a check mark appear in the square. A click in the square indicates that the application has been received. If you do not click, then that will mean the application has not been received. As you are entering this data you will notice several things. Social Security Number and Date Hired – You’ll “see” your Input Mask work. State and Gender – you typed in small letters – notice how the Format ( > ) forced the letter(s) to be capitals. Favorite Number – since the Favorite Number is “too big” you will see your error message appear. Click-on OK in the message screen and then create a Favorite number that will work. Salary - notice how your Currency formatting created a $, commas and periods. 18
- 19. Microsoft Access 2007 Tutorial When you have completed typing the information, tap Enter so the cursor will move down to the next record. You are now ready to insert your second entry. Note: When you tapped Enter, Access automatically saved your first record. This can be confirmed by the display of the hourglass. Also note: As you began typing your first record a small pencil appeared in the left margin. This indicates that you are "writing to" this record (editing). Below the pencil an * (asterisk) also appeared. This indicates that your next record will go below the first. There are (2) methods for entering data into the database: 1. The method you just used is called Datasheet View method. or 2. You can use the Form View method (we’ll create a Form in a bit later in the tutorial). Exiting and Saving Anytime you need to leave your database, click the Microsoft Office Button in the upper left corner of your Access screen, then click Exit Access – in the lower right corner of the menu screen. If you have not saved your spreadsheet, a reminder box will appear asking you to do so. Notice the Access Options button to the left of Exit Access. Earlier, we indicated that all of the choices under File in the Menu Bar are still available using the Microsoft Office Button. Click the Access Options button. The Access Options menu screen (top of next page) will appear. As you can see, all of the choices available under File in the menu bar are here – as well as many more. 19
- 20. Microsoft Access 2007 Tutorial If you click the Resources selection in the Access Options menu, you will see some great online resources available to assist you with Access. After you have reviewed the Access Microsoft Office button choices, click the Exit Access button. 20
- 21. Microsoft Access 2007 Tutorial If Access asks: “Do you want to save?,” click. If Access shows you a Save file screen, give it a name of your choice and click on OK. You should then exit to the Windows Screen with no problems. Since you have already named everything for this exercise, you should not have to name any files as you exit. Opening Access Database - again If you decide to Exit Access 2007, and then return to continue the tutorial, refer to the instructions at the beginning of this tutorial (Page 1) to open Access again. A neat thing about Access 2007 is the Open Recent Database area on the right side of the screen. Once you have created a database, you will see your database in the Open portion of the area (see arrow and image to the right). You can simply click-on the file, in this tutorial Person, and it will open. When Access 2007 opens, you will see that the bottom portion of your screen is blue and that the below message appears above the blue area. Access has long been a source for worms and viruses when e-mailed to other people, so Access 2007 has this additional feature to protect you. Click the Options button to the right of the Security Warning. When you Click the Options button to the right of the Security Warning, the Microsoft Office Security Options menu screen will appear. Take a few minutes to read this information. If you receive an Access database from someone who you do not know, you can use the features in this screen to assist in protecting you. Since you are opening your own database, click the small circle to the left of Enable this content (see arrow below). Then click the OK button. 21
- 22. Microsoft Access 2007 Tutorial When you click the OK button you will see, on the left side of your screen, that your Personnel:Table turns orange. This means that it is OK and that you now can open it again to enter more data. You have two choices to open your Table. 1. You can move your cursor over the orange area and click the LEFT mouse button twice quickly – and your Table will open in the Datasheet View. 2. You can move your cursor over the orange area and click the RIGHT mouse button. You will see a drop down menu appear. You can click on Open You are now ready to continue entering the data in the Datasheet View. 22
- 23. Microsoft Access 2007 Tutorial Form View and Datasheet View As indicated previously, you have a choice to enter your data. You can use the Datasheet View, like we have done so far, or you can use a Form. Both methods work well. Creating a Form in Access 2007 is really different than in previous versions of Access. We’ll now use the new Tabs and Ribbons to Create a Form for our Personnel Table. First, look at the top of your Access screen and click the Create Tab (we want to Create a Form). Look in the Create Ribbon in the forms Group and you’ll see the Form button. Click the Form button. You’ll see your screen change significantly in many ways. The first thing you’ll notice is that Access 2007 – knowing you were entering data from the Personnel Table – created a Form with all of the Fields in your Table! You’re all ready to enter data in this form. Your Personnel Form should look something like the image below. 23
- 24. Microsoft Access 2007 Tutorial Another new feature of Access 2007 is the Tab layout for what you’re working with. Look just above the Form and you will see two Tabs. Notice the small image on the left of each Tab. The left Tab is your Personnel Datasheet and the right Tab is your Personnel Form. You can click on whichever Tab you want to enter Data in your Table. You may enter data in Form View the same as in Datasheet View. To Save your new Form you can click on the Small Save Diskette in the Quick Access Toolbar. Since your form will be a part of your Person Database, it will automatically save as the Tab Name. Or, you can move your cursor over the Personnel Form Tab and click the RIGHT mouse button. When the drop down menu appears, click the Save selection. The data entry form is now saved as Personnel, just like the Table. Notice, at the bottom of the Form screen, that there is a status area (see below) that tells you what record you are on. You can use the arrows to “move” from one record to another, or select a new record in which to enter data. Click-on each of the arrows to see how they work. Some will take you forward or back to the next or previous record, and some will take you to the beginning or end of your records. The arrow with an asterisk will take you to a new blank record. Enter a few records to see how the Form View works. When you first “open” your Person Database, you may choose your favorite method to enter data: The data Form or Datasheet. Look on the left side of your screen and you will see All Tables. Under All Tables, you will see your Personnel Table with two selections below it: Personnel: Table and Personnel. Notice the image on the left of each selection (like at the bottom of Page 23). You can switch back and forth from the Datasheet entry to the Form entry by clicking on your choice (as outlined on Page 22). 24
- 25. Microsoft Access 2007 Tutorial At the lower left corner of the menu screen, you will see some text that indicates that you are either using Form or Datasheet View to enter your data. When you have opened your Datasheet View and Form View you can switch back and forth by clicking on the Tabs. The View buttons on the upper left indicate what “view” you are using: Design View, Form View, or Datasheet View. You can move back-and-forth between views by clicking-on the down triangle (see arrows and images) and then choose the View you desire. Note: When you are finished entering data and preparing to exit Microsoft Access, or Close the form, if you did not save before exiting, the program will ask if you want to Save the Form. This is up to you. You may save it with your choice of names and it will then show-up as a form when the Person Database Main Window appears. Or, you can indicate No, and re-create the form again with the Wizard. Important To record enough information so that you can see the power of Access database does enter 24 or more records now. You may use either Form View or Datasheet View. Querying the Database This is what a database is designed for: finding specific information about some of the data in the table(s) very quickly. A query is a search for general or specific data in a field or fields in your database (e.g. the first and last names and birth dates of all employees, just the Jones’s, the people from CA, salaries > $10,000, etc.). In order to do this, we need to click on the fields we want to query. So, let’s start by finding just Last Names in our table. 25
- 26. Microsoft Access 2007 Tutorial If you are not in the Database: PERSON screen which shows the Tables, Queries, etc., go there by following the instructions on Pages 21-24 . If you have the Personnel Datasheet or Personnel Form open (to add data), close them before you begin your queries. The Access program sometimes becomes logically confused when you try to do queries when it “thinks” you also want to add data. You may see “error” messages if you leave the Form or Datasheet open. You can RIGHT click on the Datasheet and Form Tabs and then select Close – if you have them open. Your Access screen should look similar to the image below. Click the Create Tab at the top of the Access screen (left arrow above). Then move your cursor over the Query Design Button in the Create Tab/Ribbon (right arrow above). When you move your cursor over Query Design in the Other Group you will see an image similar to the one on the right. Click the Query Design button. Two new windows will appear: Query 1: Tab and Show Table. You will first have to select the table(s) you desire to query. The Show Table screen should look like the one below. Click Add First Then click Close 26
- 27. Microsoft Access 2007 Tutorial The Show Table window will disappear, and the Query 1: Query window, will appear. Click-on the expansion square in the upper right corner to enlarge the Query 1: Select Query window. Your screen should now look similar to the one below. These areas are magnified below Notice, in the upper half of the window, a small box on the left indicates: Personnel. At the top is an asterisk ( * ) and below, in an elevator box, are the fields from the Personnel Table (you can move up-and-down the list as you desire). What we need to do next is place the Fields we want to query in the lower area of the screen. Notice the lower area on the left border. The first row indicates Field:, followed by Table, Sort:, Show:, Criteria:, and or:. In the lower half of the screen click-in the first cell to the right of Field:. We'll start with a query on Last Name, State, Favorite Number and Salary. Now click-on the down arrow and then click-on Last Name. Notice how Last Name now appears to the right of Field: and a (check) is seen in the Show: cell (The means that you will see Last Names in your query.). Notice, also, to the right of Table:, that Personnel (the Table from which we queried) is showing. Your query screen should now look like the one on the right. 27
- 28. Microsoft Access 2007 Tutorial Now move to the next Field cell on the right and, using the down arrow click-on State. In the next two fields to the right, insert Favorite Number and Salary. Your Query1: Select Query screen should look like this: Now, look in the Button Bar at the top left of the screen. In the middle of the bar you will see an exclamation mark ( ! ) like the one on the right. If you move the cursor over it, the help text box will indicate "Run." Click-on the ( ! ). This click executes your query. Your query screen should look similar to the one on the left. Notice, the screen ONLY shows the four fields that you queried. You can add or remove fields, as you desire. To do this we need to return to the Design View where we created this query. To return to Design View click-on the small button in the upper left corner of the screen that has the blue triangle, pencil, and ruler (like the one on the right). Then, simply click-in the Field area and select a new field and it will replace the old one. Or, click-on the field you want to remove and tap the Delete key. Sometimes you may have a lot of fields and it will be too large for a single sheet of paper. 28
- 29. Microsoft Access 2007 Tutorial To see how your query will look, if you print it, we’ll show you how to open a Print Preview First, click the Microsoft Office Button on the upper left of your Access Screen. Then move your cursor over the Print selection. A Preview and print the view area will appear on the right. Move your cursor over Print Preview and click on this selection. While you’re in the Print Preview you’ll see a little magnifying glass that you can move over your query. If you click the left mouse button once the magnifying glass will “zoom” in and enlarge the view. If you click the left mouse button again it will zoom out. To return to your query, click-on the Close Print Preview button on the right side of the Print Preview Tab/Ribbon. This will take you back to the Normal View of your query. Adding a Print Preview Button to the Quick Access Toolbar. It took a lot of “clicks” to get to Print Preview. So, let’s add the Print Preview button to our Quick Access Toolbar at the top of the screen. Then all we’ll have to do is click this button for a Print Preview! Repeat the steps at the top of this page to “get to” the Print Preview selection. When you “see” the Print Preview selection – click the RIGHT mouse button. When the drop down menu appears, click the Add to Quick Access Toolbar selection. 29
- 30. Microsoft Access 2007 Tutorial After you add the Print Preview button to your Quick Access Toolbar, the toolbar will look like the image on the right. Notice that Print Preview may now be accessed by clicking this button. You can use this “method” to add any button you desire to your Quick Access Toolbar. There is a small arrow on the right side of the Quick Access Toolbar (image on right). If you move your cursor over the arrow, you will see that it indicates Customize Quick Access Toolbar. You can work with this as you desire. You can customize the Quick Access Toolbar in each 2007 Office application as you wish. Sorting the Database If you are not in the Query Design Screen, you’ll need to be in that view. So, go to the Design Screen (bottom Page 28). Notice that the third row, in the lower half of the screen, indicates Sort: (like the image at the right). Click-in the Sort: area under Last Name. A down arrow box appears; click-on the down arrow. Let's sort the Last Names in Ascending order. Click-on Ascending. Notice that Ascending now appears in the Sort: area. Click-on the ( ! ) to see the new query. Notice that the names you entered are alphabetized. Click-on the Design View button (triangle-rulerpencil). Now change the Ascending under Last Name to (not sorted). On your own, try sorting some of the other fields. When you are finished remember to set the fields to (not sorted) unless you do want to sort on those fields. You may also sort various fields in your database whenever you are in the Datasheet View, whether you are viewing the entire Table, or a Query from the Table. Notice that the Field Names are shown at the top of each column in gray cells. If you click-on one of the blue area field names (like State), the entire column (Field) turns “blue” (like the image on the right). This indicates that you have “marked” the entire column (Field). 30
- 31. Microsoft Access 2007 Tutorial On the Home Tab/Ribbon, on the right side, in the Sort & Filter Group, you will see two buttons with “down” arrows (like the image on the right). When you move the cursor over these two buttons a text help box will indicate: Sort Ascending or Sort Descending. If you click-on one of the buttons, the Field which you selected (highlighted) will be sorted in the order selected. Give this a try and see how it works. You can always click the Undo Arrow in your Quick Access Toolbar if you desire to go back to the original order. New to Access 2007 – A Filter/Sort Arrow for each Field! In the image on the right we clicked the small down arrow to the right of State. A drop down Filter/Sort menu appeared! This is new in Access 2007. You also use this menu to enhance your sorts. Notice that the A to Z and Z to A are in this menu, as well as text Filters. You can experiment with these filters as you desire. This is a neat new feature that will assist you greatly in doing your queries. So, there are several “ways” you can sort your Tables and Queries. Specific Queries So far we have listed everything under each Field Name that we selected. However, many times you will probably want to find something specific in your Table (database - e.g. people from a certain state or city, people whose favorite number is 7 or salaries between $ 20,000 and $ 50,000). This is fairly common sense, but it can get tricky. To get an idea of various criteria (you might want to use), click-on the Help Question Mark in the upper right corner of the Access Screen. 31
- 32. Microsoft Access 2007 Tutorial The Access Help Task Pane will appear on the right side of your screen. Notice that there are already a number of Help topics already included in this Task Pane. When your screen appears, click-in the Search area in the Task Pane. Typein “query criteria” and then tap the Enter key. A Search for: Task Pane will now appear (like the one on the right). Click-on the Examples of query criteria selection. Another Access Help Screen will appear similar to the one on the right. Click the Maximize square in the upper right corner of this screen so that you can see all of the criteria examples more easily. 32
- 33. Microsoft Access 2007 Tutorial Use the Elevator Bar on the right side of this Help screen to view all of the various criteria for queries. This is a wonderfully updated feature in Access 2007 that really gives you an Access Manual for criteria. When you are finished, click-on the “X” in the upper right corner of the Microsoft Access Help Topics menu screen to close the screen. You may return and explore additional help screens as you become more accomplished with Access 2007 database. These help screens are like having a complete Access 2007 manual on your computer. Now we'll try a few specific queries. First let's find a specific state. You should be back in the Query1: Select Query menu Design window. It should look like the image below. If you’re not then click the Design button in the upper left corner of the screen (like the one on the right). Click-in the cell to the right of Criteria: in the State column. You will see a flashing cursor (Make sure you are in the State column.). Type-in the abbreviation for one of the states you entered in your Personnel Table. Your Query should look like the image below. Now click-on ( ! ). A new Query1 window will appear. Only persons from the state you selected should show. This is a SPECIFIC query for that state. 33
- 34. Microsoft Access 2007 Tutorial Click-on Design View Button (triangle-ruler-pencil) to return to Design View. Delete the state you entered. Now we'll look for Favorite Numbers larger than 600. Type-in >600 in the Criteria cell under the Favorite Number Column. Click-on ( ! ). Everyone with a favorite number larger than 600 should show. If no one is indicated you don't have a person with a number larger than 600, or you might have typed the >600 incorrectly. Return to the Design View. Delete the >600 and run the query with no criteria. You should “see” all the fields again. Return to the Design View again. Make sure all the Criteria: cells are empty. Next we'll look for persons with salaries equal to or larger than $ 20,000 and equal to or less than $ 50,000. In the Salary field column, in the Criteria: cell type-in: >= 30000 and <= 40000 Click-on the ( ! ). 34
- 35. Microsoft Access 2007 Tutorial You should now see a specific query that indicates those persons in the range you chose. Go back to Design View. Delete the criteria you entered under Salary. Now, on your own, if you desire, add or delete some fields to your query and experiment with some combinations. Don't get frustrated if no specific items appear. Frequently you might query for something that can't exist (e.g. states of VA and CA – a person can't be from both states at the same time) or there just isn't anything that matches. For fun, notice the or: just below Criteria to the left of the Design View. Try one state in the Criteria: cell under State and another in the or: cell. Go back to your Query Help (Page 32) and try some of the criteria you see. When you have a good feel for queries you’re ready to end your query session. Make sure that your query is completely clear of criteria – we’ll use this query later for a report! RIGHT click on the Query1 Tab. A Drop down menu will appear. Move your cursor over Save and click on Save. A Save As window will appear. Name the Query anything you like, we’re going to name our query “Test Query 2007.” Click-on OK. When you click the OK button you will notice several things - the Query1 Tab changes to the name you chose, and on the left side of your screen you now see you new query is available to use again, as you desire. You can activate this query and change things just like you did above. 35
- 36. Microsoft Access 2007 Tutorial You can close your Query by RIGHT clicking on the Tab and then clicking Close. Any time you desire to open this query again, you simply click twice quickly on the query selection on the left side of your Access screen. Or, you can RIGHT click the query and choose Open. Reports Reports can be very complex. In this tutorial we'll cover the very basic steps of creating Reports. A good manual or some knowledgeable assistance will be essential to mastering reports. There are several types of reports. We'll use Access Wizards and Tabs/Ribbons to design several simple reports. For those who are accomplished with Access reports – from earlier versions of Access – this will be a whole new adventure with the Tab/Ribbons of 2007 Office. First, make sure that you have closed any Tables, Forms, or Queries on which you are open. Your Access screen should look similar to the image below. Click the Create Tab and the Create Ribbon will appear. Look at the Ribbon on the right side. You will see the Create Reports Group 36
- 37. Microsoft Access 2007 Tutorial The Create Reports Group is enlarged on the right. We’ll begin our Report lesson using the Report Wizard. Once you’ve created a Report with the Wizard, you’ll be somewhat familiar with Reports. We’ll then use some of the other selections in this Group to create Reports. Click the Report Wizard selection in the Reports Group. The Report Wizard Menu screen will appear: Read all the information in the Report Wizard menu screen. Only the fields you select from your table will show-in the report. To bring fields into the report individually you click-on the name of the field (in the list of fields in the area under Available Fields:) and then click-on the >. The order which you click-on the fields will be their order in the report. The >> brings over all of the fields. The < brings back one of the fields which you have selected and << brings back all of the fields. If you make a mistake, or want to start over, click the << selection to bring back all of the fields and try again. Look at the image above. Notice the arrow pointing to the down arrow on the right side of the Tables/Queries area. Click this arrow and select your Table:Personnel. Your Report Wizard menu screen should look like the large image in the middle of this page. 37
- 38. Microsoft Access 2007 Tutorial Let's begin. Click-on First Name, then click-on > (notice how the First Name field went from the Available Fields: to Selected Fields:). Now do the same with the Last Name, State, Gender and Salary fields. These are the fields that will appear in our first report. Your Report Wizard menu screen should look like the one below. If it does, click-on the Next> Button. If not, use the << to bring all the fields back and try again. 38
- 39. Microsoft Access 2007 Tutorial Grouping in Reports This Report Wizard menu screen asks if you want to add Grouping. Grouping simply “groups” records by an item in the report you are designing. We’ll group by state. This means that “records” from a state will be in a “group” (e.g. people from Virginia will be in one group, the folks from Washington in another, and so on). This will be easy to see when we look at the report. So, click-on State, then click-on >. If you make a mistake, no problem, just use the <. Your screen should now look like the one below. Click-on Next> again. Another Report Wizard menu screen will follow. 39
- 40. Microsoft Access 2007 Tutorial First, the above screen requests that you indicate a Sort Order. This simply means that within each “group, the alphabetic order in which you want the fields sorted. We’ll sort by Last Name and then First Name. This way you’ll have the names, grouped by state, in Last Name order and, where you have several people with the same Last Name, they’ll be sub-sorted in First Name order. Notice the Ascending button to the right of the Sort boxes. This indicates that the Field that you select is in A to Z or ascending order. If you click-on this button, it will reverse the order from Z to A, or descending order. Click-on the small down arrow to the right of the first box and select Last Name. Leave the order as Ascending. Now, select First Name in the second box. When you are finished, your Report Wizard menu screen should look like the one above. Notice a Summary Options button below the sort fields you have selected. Access 2007 is “really smart.” Whenever you see the Summary Options box it is because Access 2007 knows that you selected a number field for your report. The Summary Options box ONLY appears when a number field is selected! Click-on the Summary Options… button. 40
- 41. Microsoft Access 2007 Tutorial The Summary Options menu box allows you to enter calculations for numerical and currency fields if you have selected any. It will summarize these calculations by each group, and in total. So, since Salary is a currency field, we can obtain calculations. Click-in the boxes under Sum and Avg; this will furnish these calculations (as you will see in the report). If you want percentages as well, click-in the box next to Calculate percent of total for sums. Click-on OK. This will return you to the previous Wizard screen. Click-on Next> again. This Report Wizard screen allows you to select a layout for your report. Click-in the small circles to the left of each choice in the Layout area and observe the results. For the moment, we’ll stay with the default: Stepped. So click-again it that circle. Leave the report in Portrait Orientation. 41
- 42. Microsoft Access 2007 Tutorial Note: At the bottom of the last Report Wizard menu screen (on the last page) there is a check in the small box to the left of Adjust the field width so all fields fit on a page. This is a very important check. This means that no matter how many fields you place in your report, they will all fit on one page. With a few fields in the report, this is no big deal. However, if you have a lot of fields, they will be all “scrunched” up and you’ll notice that sometimes the Field Names and data for these fields are “cut-off” a bit. As mentioned at the beginning of the Reports section of the tutorial, this is where an advanced course or manual are almost essential. Click-on Next> again. The next Report Wizard will appear. This menu screen allows you to select the Style that you would like for your report. Click-on the choices (Apex, Aspect, etc.) and see what each “looks like”. Choose whichever style you desire and click-on Next> again. 42
- 43. Microsoft Access 2007 Tutorial The next Report Wizard screen is the last screen in the sequence. It allows you to select a title different from the name of your database - if you so choose. Note that the small circle in front of Preview the Report is “dotted”. When we click the Finish button Access 2007 will go to a preview copy of your report. We’ll title this report State Report. Use this name, or any name you desire, and click-on Finish. This is a report in Tabular (Columnar) format. Your screen should look something like the one below. Notice the #### symbols under Salary and on the right of Sum and Avg. The fields are not wide enough to display these numbers. We’ll show you how to adjust column widths in a moment. 43
- 44. Microsoft Access 2007 Tutorial Notice in the upper left Corner of the Access screen that you are currently in Layout View. If you click the small down arrow under View, the drop down menu on the right will appear. To “really see” what the State Report will look like, you’ll need to go to a Print Preview. You can either click on the Print Preview selection in the menu on the right, or click the Print Preview button you placed in the Quick Access Toolbar at the top left of your screen. In the Print Preview image below you can see that the Salary, Sum and Average amounts are “cut off.” We’ll need to go to the Design View to enlarge these “boxes” so that we can see all the numbers. Notice in the lower left corner of the State Report screen that you are on Page 1 of the report. Notice the “triangle arrow” buttons to the left and right of Page 1. These take you to the first page of the report, the previous page, the next page, and the last page. Try clicking-on them. 44
- 45. Microsoft Access 2007 Tutorial Notice that your cursor – in this Preview Report screen is a magnifying glass. This shows you how a page of your report will appear when you print it. Each time you click the magnifying glass you will “zoom in” or “zoom out” making your report appear larger or smaller. You will zoom to the “place” where you place your magnifying glass – just like if you were using a real magnifying glass and a real piece of paper. You’ll magnify the place where you are “holding” the magnifying glass. So, give this a try. To return to your State Report, click-on the Close Print Preview button on the right side of the Print Preview Tab/Ribbon. This will take you back to the Layout View of your Report. You will see your State Report with all of the #### symbols. Click the down arrow below the View button in the upper left corner of your Access screen and then click the Design View selection. We’ll explain about what you see in the image above on the next page. 45
- 46. Microsoft Access 2007 Tutorial New Report Design Tools Tab/Ribbon in Access 2007 In addition to the change to the Design View, you will see that the Home Tab/Ribbon is replaced by a Report Design View Tab/Ribbon. In previous versions of Access, small menu windows would open for Design View. These have now been placed in the Tab/Ribbon you see below. We enlarged a part of this Tab/Ribbon so you can see that the Tab/Ribbon Groups – Grouping & Totals, Gridlines and Controls have replaced the “old” menu boxes. When you become more comfortable with Access Reports, you’ll find that these tools come in quite handy. Now, about the areas you saw in the Design View on the last page…… First: Notice, to the left, in the light blue part of the screen, it indicates: Report Header, Page Header, State Header, Detail, State Footer, Page Footer and Report Footer (see arrows on the last page). Report Header: If something shows here, it will only be shown on the first page of the report. Page Header: If something shows here, it will show on each page of the report at the top of each column. 46
- 47. Microsoft Access 2007 Tutorial State Header This “sets-off” the State Grouping. State Footer This “ends” the State Grouping. Detail: These are the field names from our database. Access will “pull” the data for the individual fields from our database records. These are the database fields themselves. The fields print each time there is a person in the database. This field information is drawn from the database. As you enter more people in the database and run the report again, more people will be shown. The "size" of the box you see on the screen was created when we created the field sizes. Page Footer: This is what shows at the bottom of each page. Report Footer: This is what shows only on the last page of the report. Also note, the lower right corners of the State and Report Footer area boxes indicate: = SUM([Salary]). This is a calculation box the Wizard created. This is what gave you the calculations for your average and the sum of the salaries in the State area and the grand total of all salaries in the Footer area. 47
- 48. Microsoft Access 2007 Tutorial Enlarging the Salary, Sum and Average “boxes” On Pages 43 and 44 we saw that the Salary, Sum and Average numbers were “cut off.” We’ll now show you how to widen the boxes so you can see “all the numbers.” In Design View, click on the Salary box in the Detail area. The border around the box will turn orange. Carefully move your cursor over the right side of the box – you will see a twoheaded arrow – your Detail area should now look like the image below. When you see the two-headed arrow, click and HOLD DOWN the LEFT mouse button and move your cursor slowly to the right. You will see the Salary box get larger – as well as the Salary area in the Report Header. Take your finger off the left mouse button. Your Salary box and Salary Header should now look similar to the image on the right. If you have not made the area large enough, or too large, you can return to the Design View and adjust as need be. Now move to the State Footer area and do the same for the Sum box. And, then the Average box. Click a Print Preview button (like you did at the top of Page 44). You should now see “all” of your numbers. 48
- 49. Microsoft Access 2007 Tutorial Saving Reports Since you have already “named” your Report (State Report), move your cursor over the State Report Tab and click the RIGHT mouse button. When the drop down menu appears, click Save. You will see your State Report in the area on the left of your screens with you Table, Form and Query. Close this report again as you did previously (by RIGHT clicking on the State Report Tab and selecting Close). Quick Reports On Pages 36 and 37 we showed you how to create a report using a Report Wizard – to give you a “feel” for how Reports are produced. A really neat new feature of Access 2007 is what we’ll call “Quick Reports.” Now that you know how to use the Wizard and understand basic reports, you can create similar – simple reports – with a couple of “clicks.” Click the Create Tab. Then, click your Personnel selection under All Tables. Move your cursor over the Report selection in the Reports group. Read the pop-up Help box and then click Report. You will see several things occur at the same time. On the lower right side of your Access screen you will see the Quick Report (image at the top of the next page). 49
- 50. Microsoft Access 2007 Tutorial Notice that Access has chosen a name for the Report based on the name of your Table. Also notice that a new Report Layout Tools Tab – with a Formatting Tab/Ribbon – appears to assist you. You can experiment with this Report and the Formatting Tab/Ribbon as you desire. Don’t worry if you really create a Report that you don’t want. You can use the Undo Arrow to go back a step or two or you can RIGHT click on the new Report Tab and select Delete. As you create reports you may save or not save, as you desire. Reports can become very complex, very quickly. This is only an introductory tutorial, which furnishes a simple guide to report design. You might want to purchase a book on Access or try a separate tutorial on reports. Our favorite book is Microsoft Press Access 2007 – Inside Out from Microsoft Press When you are finished simply exit Access as you did on Page 19. Now that you have the basics, you might want to try some things on your own. Try using the Wizards in Table, Query and Reports. We'll, that about does it for now. If you have comments on this tutorial, simply send e-mail to the Internet address below. 50