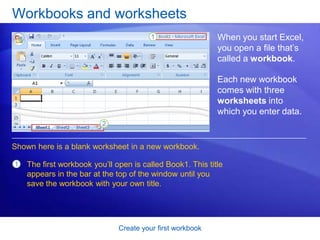
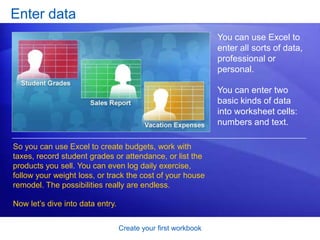
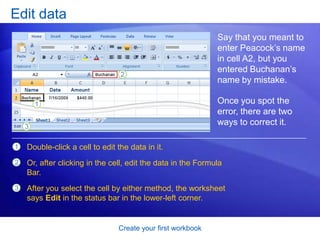
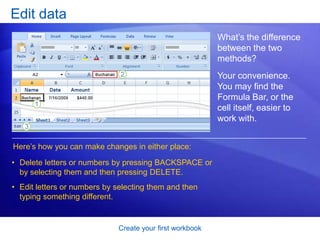
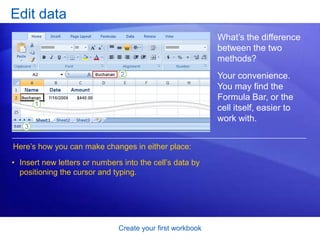
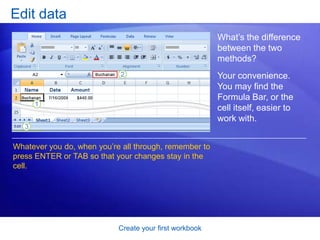
NOTE IT ACADEMY presents:Microsoft® Office Excel®2007 TrainingCreate your first workbook
Create your first workbookCourse contentsOverview: Where to begin?
Lesson 1: Meet the workbook
Lesson 2: Enter data
Lesson 3: Edit data and revise worksheetsEach lesson includes a list of suggested tasks and a set of test questions.
Create your first workbookOverview: Where to begin?You’ve been asked to enter data in Excel 2007, but you’ve never worked with Excel. Where do you begin?Or perhaps you have worked in Excel but still wonder how to do some of the basics like entering and editing text and numbers, or adding and deleting columns and rows. Here you’ll learn the skills you need to work in Excel, quickly and with little fuss.
Create your first workbookCourse goals			Create a new workbook.
Enter text and numbers.
Edit text and numbers.
Insert and delete columns and rows.Lesson 1Meet the workbook
Create your first workbookMeet the workbookWhen you start Excel, you’re faced with a big empty grid made up of columns, rows, and cells.If you’re new to Excel, you may wonder what to do next. So this course will start by helping you get comfortable with some Excel basics that will guide you when you enter data in Excel.
Create your first workbookThe RibbonThe band at the top of the Excel 2007 window is called the Ribbon. The Ribbon is made up of different tabs, each of which is related to specific kinds of work that people do in Excel. You click the tabs at the top of the Ribbon to see the different commands on each tab.
Create your first workbookThe RibbonThe Home tab, first on the left, contains the everyday commands that people use most. The picture illustrates Home tab commands on the Ribbon.The Ribbon spans the top of the Excel window.Commands on the Ribbon are organized in small related groups. For example, commands to work with the contents of cells are grouped together in the Editing group, and commands to work with cells themselves are in the Cells group.
Create your first workbookWorkbooks and worksheetsWhen you start Excel, you open a file that’s called a workbook. Each new workbook comes with three worksheets into which you enter data. Shown here is a blank worksheet in a new workbook.The first workbook you’ll open is called Book1. This title appears in the bar at the top of the window until you save the workbook with your own title.
Create your first workbookWorkbooks and worksheetsWhen you start Excel, you open a file that’s called a workbook. Each new workbook comes with three worksheets into which you enter data. Shown here is a blank worksheet in a new workbook.Sheet tabs appear at the bottom of the window. It’s a good idea to rename the sheet tabs to make the information on each sheet easier to identify.
Create your first workbookWorkbooks and worksheetsYou may also be wondering how to create a new workbook.Here’s how.Click the Microsoft Office Button       in the upper-left portion of the window.Click New.In the New Workbook window, click Blank Workbook.
Create your first workbookColumns, rows, and cellsWorksheets are divided into columns, rows, and cells. That’s the grid you see when you open up a workbook. Columns go from top to bottom on the worksheet, vertically. Each column has an alphabetical heading at the top.Rows go across the worksheet, horizontally. Each row also has a heading. Row headings are numbers, from 1 through 1,048,576.
Create your first workbookColumns, rows, and cellsWorksheets are divided into columns, rows, and cells. That’s the grid you see when you open up a workbook.The alphabetical headings on the columns and the numerical headings on the rows tell you where you are in a worksheet when you click a cell. The headings combine to form the cell address. For example, the cell at the intersection of column A and row 3 is called cell A3. This is also called the cell reference.
Create your first workbookCells are where the data goesCells are where you get down to business and enter data in a worksheet. The picture on the left shows what you see when you open a new workbook. The first cell in the upper-left corner of the worksheet is the active cell. It’s outlined in black, indicating that any data you enter will go there.
Create your first workbookCells are where the data goesYou can enter data wherever you like by clicking any cell in the worksheet to select the cell. When you select any cell, it becomes the active cell. As described earlier, it becomes outlined in black. The headings for the column and row in which the cell is located are also highlighted.
Create your first workbookCells are where the data goesYou can enter data wherever you like by clicking any cell in the worksheet to select the cell. For example, if you select a cell in column C on row 5, as shown in the picture on the right: Column C is highlighted.Row 5 is highlighted.
Create your first workbookCells are where the data goesYou can enter data wherever you like by clicking any cell in the worksheet to select the cell. For example, if you select a cell in column C on row 5, as shown in the picture on the right:The active cell, C5 in this case, is outlined. And its name—also known as the cell reference—is shown in the Name Box in the upper-left corner of the worksheet.
Create your first workbookCells are where the data goesThe outlined cell, highlighted column and row headings, and appearance of the cell reference in the Name Boxmake it easy for you to see that C5 is the active cell.These indicators aren’t too important when you’re right at the top of the worksheet in the very first few cells.But when you work farther and farther down or across the worksheet, they can really help you out.
Create your first workbookSuggestions for practiceRename a worksheet tab.Move from one worksheet to another. Add color to worksheet tabs.Add and delete worksheets.Review column headings and use the Name Box. Online practice (requires Excel 2007)
Create your first workbookTest 1, question 1You need a new workbook. How do you create one? (Pick one answer.)In the Cells group, click Insert, and then click Insert Sheet. Click the Microsoft Office Button, and then click New. In the New Workbook window, click Blank workbook. In the Cells group, click Insert, and then click Workbook.
Create your first workbookTest 1, question 1: AnswerClick the Microsoft Office Button, and then click New. In the New Workbook window, click Blank workbook.
Create your first workbookTest 1, question 2The Name Box shows the contents of the active cell. (Pick one answer.)True.False.
Create your first workbookTest 1, question 2: AnswerFalse. The Name Box gives you the cell reference of the active cell. You can also use the Name Box to select a cell, by typing that cell reference in the box.
Create your first workbookTest 1, question 3In a new worksheet, you must start by typing in cell A1. (Pick one answer.)True.False.
Create your first workbookTest 1, question 3: AnswerFalse. You’re free to roam and type wherever you want. Click in any cell and start to type. But don’t make readers scroll to see data that could just as well start in cell A1 or A2.
Lesson 2Enter data
Create your first workbookEnter dataYou can use Excel to enter all sorts of data, professional or personal. You can enter two basic kinds of data into worksheet cells: numbers and text. So you can use Excel to create budgets, work with taxes, record student grades or attendance, or list the products you sell. You can even log daily exercise, follow your weight loss, or track the cost of your house remodel. The possibilities really are endless. Now let’s dive into data entry.
Create your first workbookBe kind to your readers: start with column titlesWhen you enter data, it’s a good idea to start by entering titles at the top of each column. This way, anyone who shares your worksheet can understand what the data means (and you can understand it yourself, later on). You’ll often want to enter row titles too.
Create your first workbookBe kind to your readers: start with column titlesThe worksheet in the picture shows whether or not representatives from particular companies attended a series of monthly business lunches. It uses column and row titles: The column titles are the months of the year, across the top of the worksheet.The row titles down the left side are company names.
Create your first workbookStart typingSay you’re creating a list of salespeople names. The list will also have the dates of sales, with their amounts. So you’ll need these column titles: Name, Date, and Amount.
Create your first workbookStart typingSay you’re creating a list of salespeople names. The list will also have the dates of sales, with their amounts.The picture illustrates the process of typing the information and moving from cell to cell: Type Name in cell A1 and press TAB. Then type Date in cell B1, press TAB, and type Amount in cell C1.
Create your first workbookStart typingSay you’re creating a list of salespeople names. The list will also have the dates of sales, with their amounts.The picture illustrates the process of typing the information and moving from cell to cell: After typing the column titles, click in cell A2 to begin typing the salespeople’s names. Type the first name, and then press ENTER to move the selection down the column by one cell to cell A3. Then type the next name, and so on.
Create your first workbookEnter dates and timesExcel aligns text on the left side of cells, but it aligns dates on the right side of cells. To enter a date in column B, the Date column, you should use a slash or a hyphen to separate the parts: 7/16/2009 or 16-July-2009. Excel will recognize either as a date.
Create your first workbookEnter dates and timesExcel aligns text on the left side of cells, but it aligns dates on the right side of cells. If you need to enter a time, type the numbers, a space, and then a or p—for example, 9:00 p. If you put in just the number, Excel recognizes a time and enters it as AM.
Create your first workbookEnter numbersExcel aligns numbers on the right side of cells. To enter the sales amounts in column C, the Amount column, you would type the dollar sign ($), followed by the amount.
Create your first workbookEnter numbers Other numbers and how to enter themTo enter fractions, leave a space between the whole number and the fraction. For example, 1 1/8.
To enter a fraction only, enter a zero first, for example, 0 1/4. If you enter 1/4 without the zero, Excel will interpret the number as a date, January 4.
If you type (100) to indicate a negative number by parentheses, Excel will display the number as -100. Create your first workbookQuick ways to enter dataHere are two time-savers you can use to enter data in Excel: AutoComplete and AutoFill.Animation: Right-click, and click Play.AutoComplete: Type a few letters in a cell, and Excel can fill in the remaining characters for you. AutoFill: Type one or more entries in an intended series, and then extend the series. Play the animation to see AutoFill in action.
Create your first workbookQuick ways to enter dataHere are two time-savers you can use to enter data in Excel: AutoComplete and AutoFill.AutoComplete: Type a few letters in a cell, and Excel can fill in the remaining characters for you. Just press ENTER when you see them added. AutoFill: Type one or more entries in an intended series, and then extend the series.
Create your first workbookSuggestions for practiceEnter data using TAB and ENTER.Fix mistakes as you type.Enter dates and times.Enter numbers.Use AutoFill.Use AutoComplete. Online practice (requires Excel 2007)
Create your first workbookTest 2, question 1Pressing ENTER moves the selection one cell to the right. (Pick one answer.)True.False.
Create your first workbookTest 2, question 1: AnswerFalse. Pressing ENTER moves the selection down. Pressing TAB moves the selection to the right.
Create your first workbookTest 2, question 2To enter the months of the year without typing each month yourself, you’d use which of the following? (Pick one answer.)AutoComplete.AutoFill.CTRL+ENTER.
Create your first workbookTest 2, question 2: AnswerAutoFill.Use AutoFill to complete lists that you’ve begun, such as days, weeks, or times tables.
Create your first workbookTest 2, question 3Which of these will Excel recognize as a date? (Pick one answer.)February 6 1947. 2,6,47.2-Feb-47.
Create your first workbookTest 2, question 3: Answer2-Feb-47.You use a slash or a hyphen to separate the parts of a date.
Lesson 3Edit data and revise worksheets
Create your first workbookEdit data and revise worksheetsEveryone makes mistakes. Even data that you entered correctly can need updates later on.Sometimes, the whole worksheet needs a change. Suppose you need to add another column of data, right in the middle of your worksheet. Or suppose you list employees one per row, in alphabetical order—what do you do when you hire somebody new?This lesson shows you how easy it is to edit data and add and delete worksheet columns and rows.
Create your first workbookEdit dataSay that you meant to enter Peacock’s name in cell A2, but you entered Buchanan’s name by mistake. Once you spot the error, there are two ways to correct it. Double-click a cell to edit the data in it.Or, after clicking in the cell, edit the data in the Formula Bar.After you select the cell by either method, the worksheet says Edit in the status bar in the lower-left corner.
Create your first workbookEdit dataWhat’s the difference between the two methods? Your convenience. You may find the Formula Bar, or the cell itself, easier to work with.  Here’s how you can make changes in either place:Delete letters or numbers by pressing BACKSPACE or by selecting them and then pressing DELETE.
Edit letters or numbers by selecting them and then typing something different.Create your first workbookEdit dataWhat’s the difference between the two methods? Your convenience. You may find the Formula Bar, or the cell itself, easier to work with.  Here’s how you can make changes in either place:Insert new letters or numbers into the cell’s data by positioning the cursor and typing.Create your first workbookEdit dataWhat’s the difference between the two methods? Your convenience. You may find the Formula Bar, or the cell itself, easier to work with.  Whatever you do, when you’re all through, remember to press ENTER or TAB so that your changes stay in the cell.
Create your first workbookRemove data formattingSurprise! Someone else has used your worksheet, filled in some data, and made the number in cell C6 bold and red to highlight that Peacock made the highest sale. But Peacock’s customer has changed her number, so the final sale was much smaller. You want to remedy the situation.
Create your first workbookRemove data formattingSurprise! Someone else has used your worksheet, filled in some data, and made the number in cell C6 bold and red to highlight that Peacock made the highest sale. As the picture shows:The original number was formatted bold and red.So you delete the number. You enter a new number. But it’s still bold and red! What gives?
Create your first workbookRemove data formattingWhat’s going on is that the cell itself is formatted, not data in the cell.So when you delete data that has special formatting, you also need to delete the formatting from the cell. Until you do, any data you enter in that cell will have special formatting.
Create your first workbookRemove data formattingHere’s how to remove formatting. Click in the cell, and then on the Home tab, in the Editing group, click the arrow on Clear     .Click Clear Formats, which removes the format from the cell. Or you can click Clear All to remove both the data and the formatting at the same time.
Create your first workbookInsert a column or rowAfter entering data, you may find that you need to add columns or rows to hold additional information. Do you need to start over? Of course not. To insert a single column:Click any cell in the column immediately to the right of where you want the new column to go. On the Home tab, in the Cells group, click the arrow on Insert. On the drop-down menu, click Insert Sheet Columns. A new blank column is inserted.
Create your first workbookInsert a column or rowAfter entering data, you may find that you need to add columns or rows to hold additional information. Do you need to start over? Of course not. To insert a single row:Click any cell in the row immediately below where you want the new row. In the Cells group, click the arrow on Insert. On the drop-down menu, click Insert Sheet Rows. A new blank row is inserted.
Create your first workbookInsert a column or rowExcel gives a new column or row the heading its place requires, and changes the headings of later columns and rows. Animation: Right-click, and click Play.Play the animation to see the process of inserting a column and a row in a worksheet.
Create your first workbookInsert a column or rowAfter entering data, you may find that you need to add columns or rows to hold additional information. Do you need to start over? Of course not.Excel gives a new column or row the heading its place requires, and changes the headings of later columns and rows.
Create your first workbookSuggestions for practiceEdit data.Delete formatting from a cell.Work in Edit mode.Insert and delete columns and rows.Online practice (requires Excel 2007)
Create your first workbookTest 3, question 1What do you first do to delete the formatting in a cell? (Pick one answer.)Delete the cell contents. Click Format in the Cells group on the Home tab. Click Clear in the Editing group on the Home tab.
Create your first workbookTest 3, question 1: AnswerClick Clear in the Editing group on the Home tab. Then click Clear Formats.

Microsoft Excel 2007: Create Your First Workbook

  • 1.
    NOTE IT ACADEMYpresents:Microsoft® Office Excel®2007 TrainingCreate your first workbook
  • 2.
    Create your firstworkbookCourse contentsOverview: Where to begin?
  • 3.
    Lesson 1: Meetthe workbook
  • 4.
  • 5.
    Lesson 3: Editdata and revise worksheetsEach lesson includes a list of suggested tasks and a set of test questions.
  • 6.
    Create your firstworkbookOverview: Where to begin?You’ve been asked to enter data in Excel 2007, but you’ve never worked with Excel. Where do you begin?Or perhaps you have worked in Excel but still wonder how to do some of the basics like entering and editing text and numbers, or adding and deleting columns and rows. Here you’ll learn the skills you need to work in Excel, quickly and with little fuss.
  • 7.
    Create your firstworkbookCourse goals Create a new workbook.
  • 8.
  • 9.
  • 10.
    Insert and deletecolumns and rows.Lesson 1Meet the workbook
  • 11.
    Create your firstworkbookMeet the workbookWhen you start Excel, you’re faced with a big empty grid made up of columns, rows, and cells.If you’re new to Excel, you may wonder what to do next. So this course will start by helping you get comfortable with some Excel basics that will guide you when you enter data in Excel.
  • 12.
    Create your firstworkbookThe RibbonThe band at the top of the Excel 2007 window is called the Ribbon. The Ribbon is made up of different tabs, each of which is related to specific kinds of work that people do in Excel. You click the tabs at the top of the Ribbon to see the different commands on each tab.
  • 13.
    Create your firstworkbookThe RibbonThe Home tab, first on the left, contains the everyday commands that people use most. The picture illustrates Home tab commands on the Ribbon.The Ribbon spans the top of the Excel window.Commands on the Ribbon are organized in small related groups. For example, commands to work with the contents of cells are grouped together in the Editing group, and commands to work with cells themselves are in the Cells group.
  • 14.
    Create your firstworkbookWorkbooks and worksheetsWhen you start Excel, you open a file that’s called a workbook. Each new workbook comes with three worksheets into which you enter data. Shown here is a blank worksheet in a new workbook.The first workbook you’ll open is called Book1. This title appears in the bar at the top of the window until you save the workbook with your own title.
  • 15.
    Create your firstworkbookWorkbooks and worksheetsWhen you start Excel, you open a file that’s called a workbook. Each new workbook comes with three worksheets into which you enter data. Shown here is a blank worksheet in a new workbook.Sheet tabs appear at the bottom of the window. It’s a good idea to rename the sheet tabs to make the information on each sheet easier to identify.
  • 16.
    Create your firstworkbookWorkbooks and worksheetsYou may also be wondering how to create a new workbook.Here’s how.Click the Microsoft Office Button in the upper-left portion of the window.Click New.In the New Workbook window, click Blank Workbook.
  • 17.
    Create your firstworkbookColumns, rows, and cellsWorksheets are divided into columns, rows, and cells. That’s the grid you see when you open up a workbook. Columns go from top to bottom on the worksheet, vertically. Each column has an alphabetical heading at the top.Rows go across the worksheet, horizontally. Each row also has a heading. Row headings are numbers, from 1 through 1,048,576.
  • 18.
    Create your firstworkbookColumns, rows, and cellsWorksheets are divided into columns, rows, and cells. That’s the grid you see when you open up a workbook.The alphabetical headings on the columns and the numerical headings on the rows tell you where you are in a worksheet when you click a cell. The headings combine to form the cell address. For example, the cell at the intersection of column A and row 3 is called cell A3. This is also called the cell reference.
  • 19.
    Create your firstworkbookCells are where the data goesCells are where you get down to business and enter data in a worksheet. The picture on the left shows what you see when you open a new workbook. The first cell in the upper-left corner of the worksheet is the active cell. It’s outlined in black, indicating that any data you enter will go there.
  • 20.
    Create your firstworkbookCells are where the data goesYou can enter data wherever you like by clicking any cell in the worksheet to select the cell. When you select any cell, it becomes the active cell. As described earlier, it becomes outlined in black. The headings for the column and row in which the cell is located are also highlighted.
  • 21.
    Create your firstworkbookCells are where the data goesYou can enter data wherever you like by clicking any cell in the worksheet to select the cell. For example, if you select a cell in column C on row 5, as shown in the picture on the right: Column C is highlighted.Row 5 is highlighted.
  • 22.
    Create your firstworkbookCells are where the data goesYou can enter data wherever you like by clicking any cell in the worksheet to select the cell. For example, if you select a cell in column C on row 5, as shown in the picture on the right:The active cell, C5 in this case, is outlined. And its name—also known as the cell reference—is shown in the Name Box in the upper-left corner of the worksheet.
  • 23.
    Create your firstworkbookCells are where the data goesThe outlined cell, highlighted column and row headings, and appearance of the cell reference in the Name Boxmake it easy for you to see that C5 is the active cell.These indicators aren’t too important when you’re right at the top of the worksheet in the very first few cells.But when you work farther and farther down or across the worksheet, they can really help you out.
  • 24.
    Create your firstworkbookSuggestions for practiceRename a worksheet tab.Move from one worksheet to another. Add color to worksheet tabs.Add and delete worksheets.Review column headings and use the Name Box. Online practice (requires Excel 2007)
  • 25.
    Create your firstworkbookTest 1, question 1You need a new workbook. How do you create one? (Pick one answer.)In the Cells group, click Insert, and then click Insert Sheet. Click the Microsoft Office Button, and then click New. In the New Workbook window, click Blank workbook. In the Cells group, click Insert, and then click Workbook.
  • 26.
    Create your firstworkbookTest 1, question 1: AnswerClick the Microsoft Office Button, and then click New. In the New Workbook window, click Blank workbook.
  • 27.
    Create your firstworkbookTest 1, question 2The Name Box shows the contents of the active cell. (Pick one answer.)True.False.
  • 28.
    Create your firstworkbookTest 1, question 2: AnswerFalse. The Name Box gives you the cell reference of the active cell. You can also use the Name Box to select a cell, by typing that cell reference in the box.
  • 29.
    Create your firstworkbookTest 1, question 3In a new worksheet, you must start by typing in cell A1. (Pick one answer.)True.False.
  • 30.
    Create your firstworkbookTest 1, question 3: AnswerFalse. You’re free to roam and type wherever you want. Click in any cell and start to type. But don’t make readers scroll to see data that could just as well start in cell A1 or A2.
  • 31.
  • 32.
    Create your firstworkbookEnter dataYou can use Excel to enter all sorts of data, professional or personal. You can enter two basic kinds of data into worksheet cells: numbers and text. So you can use Excel to create budgets, work with taxes, record student grades or attendance, or list the products you sell. You can even log daily exercise, follow your weight loss, or track the cost of your house remodel. The possibilities really are endless. Now let’s dive into data entry.
  • 33.
    Create your firstworkbookBe kind to your readers: start with column titlesWhen you enter data, it’s a good idea to start by entering titles at the top of each column. This way, anyone who shares your worksheet can understand what the data means (and you can understand it yourself, later on). You’ll often want to enter row titles too.
  • 34.
    Create your firstworkbookBe kind to your readers: start with column titlesThe worksheet in the picture shows whether or not representatives from particular companies attended a series of monthly business lunches. It uses column and row titles: The column titles are the months of the year, across the top of the worksheet.The row titles down the left side are company names.
  • 35.
    Create your firstworkbookStart typingSay you’re creating a list of salespeople names. The list will also have the dates of sales, with their amounts. So you’ll need these column titles: Name, Date, and Amount.
  • 36.
    Create your firstworkbookStart typingSay you’re creating a list of salespeople names. The list will also have the dates of sales, with their amounts.The picture illustrates the process of typing the information and moving from cell to cell: Type Name in cell A1 and press TAB. Then type Date in cell B1, press TAB, and type Amount in cell C1.
  • 37.
    Create your firstworkbookStart typingSay you’re creating a list of salespeople names. The list will also have the dates of sales, with their amounts.The picture illustrates the process of typing the information and moving from cell to cell: After typing the column titles, click in cell A2 to begin typing the salespeople’s names. Type the first name, and then press ENTER to move the selection down the column by one cell to cell A3. Then type the next name, and so on.
  • 38.
    Create your firstworkbookEnter dates and timesExcel aligns text on the left side of cells, but it aligns dates on the right side of cells. To enter a date in column B, the Date column, you should use a slash or a hyphen to separate the parts: 7/16/2009 or 16-July-2009. Excel will recognize either as a date.
  • 39.
    Create your firstworkbookEnter dates and timesExcel aligns text on the left side of cells, but it aligns dates on the right side of cells. If you need to enter a time, type the numbers, a space, and then a or p—for example, 9:00 p. If you put in just the number, Excel recognizes a time and enters it as AM.
  • 40.
    Create your firstworkbookEnter numbersExcel aligns numbers on the right side of cells. To enter the sales amounts in column C, the Amount column, you would type the dollar sign ($), followed by the amount.
  • 41.
    Create your firstworkbookEnter numbers Other numbers and how to enter themTo enter fractions, leave a space between the whole number and the fraction. For example, 1 1/8.
  • 42.
    To enter afraction only, enter a zero first, for example, 0 1/4. If you enter 1/4 without the zero, Excel will interpret the number as a date, January 4.
  • 43.
    If you type(100) to indicate a negative number by parentheses, Excel will display the number as -100. Create your first workbookQuick ways to enter dataHere are two time-savers you can use to enter data in Excel: AutoComplete and AutoFill.Animation: Right-click, and click Play.AutoComplete: Type a few letters in a cell, and Excel can fill in the remaining characters for you. AutoFill: Type one or more entries in an intended series, and then extend the series. Play the animation to see AutoFill in action.
  • 44.
    Create your firstworkbookQuick ways to enter dataHere are two time-savers you can use to enter data in Excel: AutoComplete and AutoFill.AutoComplete: Type a few letters in a cell, and Excel can fill in the remaining characters for you. Just press ENTER when you see them added. AutoFill: Type one or more entries in an intended series, and then extend the series.
  • 45.
    Create your firstworkbookSuggestions for practiceEnter data using TAB and ENTER.Fix mistakes as you type.Enter dates and times.Enter numbers.Use AutoFill.Use AutoComplete. Online practice (requires Excel 2007)
  • 46.
    Create your firstworkbookTest 2, question 1Pressing ENTER moves the selection one cell to the right. (Pick one answer.)True.False.
  • 47.
    Create your firstworkbookTest 2, question 1: AnswerFalse. Pressing ENTER moves the selection down. Pressing TAB moves the selection to the right.
  • 48.
    Create your firstworkbookTest 2, question 2To enter the months of the year without typing each month yourself, you’d use which of the following? (Pick one answer.)AutoComplete.AutoFill.CTRL+ENTER.
  • 49.
    Create your firstworkbookTest 2, question 2: AnswerAutoFill.Use AutoFill to complete lists that you’ve begun, such as days, weeks, or times tables.
  • 50.
    Create your firstworkbookTest 2, question 3Which of these will Excel recognize as a date? (Pick one answer.)February 6 1947. 2,6,47.2-Feb-47.
  • 51.
    Create your firstworkbookTest 2, question 3: Answer2-Feb-47.You use a slash or a hyphen to separate the parts of a date.
  • 52.
    Lesson 3Edit dataand revise worksheets
  • 53.
    Create your firstworkbookEdit data and revise worksheetsEveryone makes mistakes. Even data that you entered correctly can need updates later on.Sometimes, the whole worksheet needs a change. Suppose you need to add another column of data, right in the middle of your worksheet. Or suppose you list employees one per row, in alphabetical order—what do you do when you hire somebody new?This lesson shows you how easy it is to edit data and add and delete worksheet columns and rows.
  • 54.
    Create your firstworkbookEdit dataSay that you meant to enter Peacock’s name in cell A2, but you entered Buchanan’s name by mistake. Once you spot the error, there are two ways to correct it. Double-click a cell to edit the data in it.Or, after clicking in the cell, edit the data in the Formula Bar.After you select the cell by either method, the worksheet says Edit in the status bar in the lower-left corner.
  • 55.
    Create your firstworkbookEdit dataWhat’s the difference between the two methods? Your convenience. You may find the Formula Bar, or the cell itself, easier to work with. Here’s how you can make changes in either place:Delete letters or numbers by pressing BACKSPACE or by selecting them and then pressing DELETE.
  • 56.
    Edit letters ornumbers by selecting them and then typing something different.Create your first workbookEdit dataWhat’s the difference between the two methods? Your convenience. You may find the Formula Bar, or the cell itself, easier to work with. Here’s how you can make changes in either place:Insert new letters or numbers into the cell’s data by positioning the cursor and typing.Create your first workbookEdit dataWhat’s the difference between the two methods? Your convenience. You may find the Formula Bar, or the cell itself, easier to work with. Whatever you do, when you’re all through, remember to press ENTER or TAB so that your changes stay in the cell.
  • 57.
    Create your firstworkbookRemove data formattingSurprise! Someone else has used your worksheet, filled in some data, and made the number in cell C6 bold and red to highlight that Peacock made the highest sale. But Peacock’s customer has changed her number, so the final sale was much smaller. You want to remedy the situation.
  • 58.
    Create your firstworkbookRemove data formattingSurprise! Someone else has used your worksheet, filled in some data, and made the number in cell C6 bold and red to highlight that Peacock made the highest sale. As the picture shows:The original number was formatted bold and red.So you delete the number. You enter a new number. But it’s still bold and red! What gives?
  • 59.
    Create your firstworkbookRemove data formattingWhat’s going on is that the cell itself is formatted, not data in the cell.So when you delete data that has special formatting, you also need to delete the formatting from the cell. Until you do, any data you enter in that cell will have special formatting.
  • 60.
    Create your firstworkbookRemove data formattingHere’s how to remove formatting. Click in the cell, and then on the Home tab, in the Editing group, click the arrow on Clear .Click Clear Formats, which removes the format from the cell. Or you can click Clear All to remove both the data and the formatting at the same time.
  • 61.
    Create your firstworkbookInsert a column or rowAfter entering data, you may find that you need to add columns or rows to hold additional information. Do you need to start over? Of course not. To insert a single column:Click any cell in the column immediately to the right of where you want the new column to go. On the Home tab, in the Cells group, click the arrow on Insert. On the drop-down menu, click Insert Sheet Columns. A new blank column is inserted.
  • 62.
    Create your firstworkbookInsert a column or rowAfter entering data, you may find that you need to add columns or rows to hold additional information. Do you need to start over? Of course not. To insert a single row:Click any cell in the row immediately below where you want the new row. In the Cells group, click the arrow on Insert. On the drop-down menu, click Insert Sheet Rows. A new blank row is inserted.
  • 63.
    Create your firstworkbookInsert a column or rowExcel gives a new column or row the heading its place requires, and changes the headings of later columns and rows. Animation: Right-click, and click Play.Play the animation to see the process of inserting a column and a row in a worksheet.
  • 64.
    Create your firstworkbookInsert a column or rowAfter entering data, you may find that you need to add columns or rows to hold additional information. Do you need to start over? Of course not.Excel gives a new column or row the heading its place requires, and changes the headings of later columns and rows.
  • 65.
    Create your firstworkbookSuggestions for practiceEdit data.Delete formatting from a cell.Work in Edit mode.Insert and delete columns and rows.Online practice (requires Excel 2007)
  • 66.
    Create your firstworkbookTest 3, question 1What do you first do to delete the formatting in a cell? (Pick one answer.)Delete the cell contents. Click Format in the Cells group on the Home tab. Click Clear in the Editing group on the Home tab.
  • 67.
    Create your firstworkbookTest 3, question 1: AnswerClick Clear in the Editing group on the Home tab. Then click Clear Formats.